SIMS SOLUS 2.0 - Education ICT Service
SIMS SOLUS 2.0 - Education ICT Service
SIMS SOLUS 2.0 - Education ICT Service

Create successful ePaper yourself
Turn your PDF publications into a flip-book with our unique Google optimized e-Paper software.
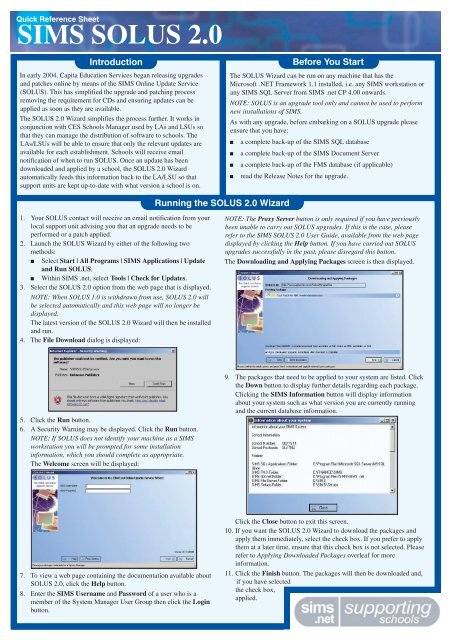
Quick Reference Sheet<br />
<strong>SIMS</strong> <strong>SOLUS</strong> <strong>2.0</strong><br />
Introduction<br />
In early 2004, Capita <strong>Education</strong> <strong>Service</strong>s began releasing upgrades<br />
and patches online by means of the <strong>SIMS</strong> Online Update <strong>Service</strong><br />
(<strong>SOLUS</strong>). This has simplified the upgrade and patching process<br />
removing the requirement for CDs and ensuring updates can be<br />
applied as soon as they are available.<br />
The <strong>SOLUS</strong> <strong>2.0</strong> Wizard simplifies the process further. It works in<br />
conjunction with CES Schools Manager used by LAs and LSUs so<br />
that they can manage the distribution of software to schools. The<br />
LAs/LSUs will be able to ensure that only the relevant updates are<br />
available for each establishment. Schools will receive email<br />
notification of when to run <strong>SOLUS</strong>. Once an update has been<br />
downloaded and applied by a school, the <strong>SOLUS</strong> <strong>2.0</strong> Wizard<br />
automatically feeds this information back to the LA/LSU so that<br />
support units are kept up-to-date with what version a school is on.<br />
Before You Start<br />
The <strong>SOLUS</strong> Wizard can be run on any machine that has the<br />
Microsoft .NET Framework 1.1 installed, i.e. any <strong>SIMS</strong> workstation or<br />
any <strong>SIMS</strong> SQL Server from <strong>SIMS</strong> .net CP 4.00 onwards.<br />
NOTE: <strong>SOLUS</strong> is an upgrade tool only and cannot be used to perform<br />
new installations of <strong>SIMS</strong>.<br />
As with any upgrade, before embarking on a <strong>SOLUS</strong> upgrade please<br />
ensure that you have:<br />
■ a complete back-up of the <strong>SIMS</strong> SQL database<br />
■ a complete back-up of the <strong>SIMS</strong> Document Server<br />
■ a complete back-up of the FMS database (if applicable)<br />
■ read the Release Notes for the upgrade.<br />
Running the <strong>SOLUS</strong> <strong>2.0</strong> Wizard<br />
1. Your <strong>SOLUS</strong> contact will receive an email notification from your<br />
local support unit advising you that an upgrade needs to be<br />
performed or a patch applied.<br />
2. Launch the <strong>SOLUS</strong> Wizard by either of the following two<br />
methods:<br />
■ Select Start | All Programs | <strong>SIMS</strong> Applications | Update<br />
and Run <strong>SOLUS</strong>.<br />
■ Within <strong>SIMS</strong> .net, select Tools | Check for Updates.<br />
3. Select the <strong>SOLUS</strong> <strong>2.0</strong> option from the web page that is displayed.<br />
NOTE: When <strong>SOLUS</strong> 1.0 is withdrawn from use, <strong>SOLUS</strong> <strong>2.0</strong> will<br />
be selected automatically and this web page will no longer be<br />
displayed.<br />
The latest version of the <strong>SOLUS</strong> <strong>2.0</strong> Wizard will then be installed<br />
and run.<br />
4. The File Download dialog is displayed:<br />
NOTE: The Proxy Server button is only required if you have previously<br />
been unable to carry out <strong>SOLUS</strong> upgrades. If this is the case, please<br />
refer to the <strong>SIMS</strong> <strong>SOLUS</strong> <strong>2.0</strong> User Guide, available from the web page<br />
displayed by clicking the Help button. If you have carried out <strong>SOLUS</strong><br />
upgrades successfully in the past, please disregard this button.<br />
The Downloading and Applying Packages screen is then displayed.<br />
5. Click the Run button.<br />
6. A Security Warning may be displayed. Click the Run button.<br />
NOTE: If <strong>SOLUS</strong> does not identify your machine as a <strong>SIMS</strong><br />
workstation you will be prompted for some installation<br />
information, which you should complete as appropriate.<br />
The Welcome screen will be displayed:<br />
9. The packages that need to be applied to your system are listed. Click<br />
the Down button to display further details regarding each package.<br />
Clicking the <strong>SIMS</strong> Information button will display information<br />
about your system such as what version you are currently running<br />
and the current database information.<br />
7. To view a web page containing the documentation available about<br />
<strong>SOLUS</strong> <strong>2.0</strong>, click the Help button.<br />
8. Enter the <strong>SIMS</strong> Username and Password of a user who is a<br />
member of the System Manager User Group then click the Login<br />
button.<br />
Click the Close button to exit this screen.<br />
10. If you want the <strong>SOLUS</strong> <strong>2.0</strong> Wizard to download the packages and<br />
apply them immediately, select the check box. If you prefer to apply<br />
them at a later time, ensure that this check box is not selected. Please<br />
refer to Applying Downloaded Packages overleaf for more<br />
information.<br />
11. Click the Finish button. The packages will then be downloaded and,<br />
if you have selected<br />
the check box,<br />
applied.
Quick Reference Sheet<br />
<strong>SIMS</strong> <strong>SOLUS</strong> <strong>2.0</strong><br />
If you have downloaded an upgrade or a patch using <strong>SOLUS</strong> <strong>2.0</strong> and you now wish to apply the package, this is also carried out using <strong>SOLUS</strong> <strong>2.0</strong><br />
Wizard. To apply the package:<br />
1. Launch the <strong>SOLUS</strong> Wizard by either of the following two methods:<br />
■<br />
■<br />
Select Start | All Programs | <strong>SIMS</strong> Applications | Update and Run <strong>SOLUS</strong>.<br />
Within <strong>SIMS</strong> .net, select Tools | Check for Updates.<br />
2. Follow any on-screen instructions until the Welcome page of the <strong>SOLUS</strong> 2 Wizard is displayed.<br />
3. Enter the <strong>SIMS</strong> User Name and <strong>SIMS</strong> Password of a user who is a member of the System Manager’s Group.<br />
4. Ensure the I agree to the Terms and Conditions above check box is selected below the Terms and Conditions of Use panel and click the<br />
Login button.<br />
The system logs you in and displays the packages that need to be applied to your system.<br />
5. Click the Apply Packages Now button to apply the package.<br />
6. Click the Finish button at the end of the process.<br />
The download and applications status is then automatically fed back to your LSU.<br />
NOTE: You must run <strong>SIMS</strong> .net on any workstation new to <strong>SIMS</strong> .net before attempting to use Lesson Monitor or Web Integrator on that<br />
workstation.<br />
When you have upgraded your <strong>SIMS</strong> system, the modules will update the first time you log into one of them following your database upgrade.<br />
IMPORTANT NOTES:<br />
■ This process must be carried out on ALL workstations.<br />
■ This process must be carried out BEFORE running the <strong>SIMS</strong> .net Data Conversion Utility.<br />
■ It does not require an administrative visit as long as the user has been given adequate permissions for the update to occur.<br />
1. Select Start | Programs | <strong>SIMS</strong> Applications | <strong>SIMS</strong> .net (or access an SQL module through Launcher) to open the module.<br />
NOTE: It is recommended that you open <strong>SIMS</strong> .net via Start | Programs | <strong>SIMS</strong> Applications | <strong>SIMS</strong> .net. Accessing <strong>SIMS</strong> .net via shortcuts<br />
through Windows Explorer or desktop shortcuts will only trigger the upgrade if they have been set up correctly. For more information on<br />
shortcuts, please refer to the Adding a New <strong>SIMS</strong> .net Shortcut section that follows.<br />
2. The update will then be performed automatically. Once the update has completed, you can use the module as usual.<br />
For technical information regarding updating your workstations, please refer to the <strong>SIMS</strong> <strong>SOLUS</strong> Technical Guide which is available from the<br />
<strong>SOLUS</strong> website.<br />
Adding a New <strong>SIMS</strong> .net Shortcut<br />
Shortcuts can be created in various ways. <strong>SIMS</strong> .net shortcuts will only trigger the upgrade if they have been created in a certain way. To check<br />
if your <strong>SIMS</strong> .net shortcut on the desktop will trigger an upgrade:<br />
1. Right-click on the shortcut and select Properties.<br />
2. On the Shortcut page, check that the following text is entered in the Target field:<br />
"C:\Program Files\<strong>SIMS</strong>\<strong>SIMS</strong> .net\<strong>SIMS</strong>Load.exe" "C:\Program Files\<strong>SIMS</strong>\<strong>SIMS</strong> .net\Pulsar.exe"<br />
If all of this text is present, the shortcut will trigger the upgrade. If all of the text is not present, you will need to delete the shortcut and create a new<br />
one:<br />
1. Highlight the shortcut and press the delete key. Confirm that you want to delete<br />
the shortcut.<br />
2. Select Start | Programs | <strong>SIMS</strong> Applications.<br />
3. Right-click and drag <strong>SIMS</strong> .net to the desktop.<br />
4. Select Copy Here from the pop-up menu.<br />
Additional Information<br />
Applying Downloaded Packages<br />
Updating the Workstations<br />
The process of running the Wizard directly from the <strong>SOLUS</strong>Choice website ensure that the<br />
latest version of the Wizard is always deployed. For information detailing any changes or<br />
enhancements that have been made to the Wizard, please visit:<br />
www.capitasolus.co.uk/updates.asp<br />
Troubleshooting<br />
If you encounter any problems or issues whilst using the Wizard, please contact your Local<br />
Support Unit. Information pertaining to any known issues about the Wizard and the latest<br />
documentation can be found at:<br />
www.capitasolus.co.uk/moreinfo.asp<br />
This guide is based on the version of the software (<strong>2.0</strong>) in use at<br />
the time of publication. For details of changes to the software,<br />
please refer to the associated handbook and online help file.<br />
For further copies of this, or other laminates, please email<br />
publications@capita.co.uk.<br />
For information on available training courses, please contact<br />
Capita Professional <strong>Service</strong>s on 01234 763672<br />
or email profserv@capita.co.uk.<br />
© Capita Business <strong>Service</strong>s Ltd 2006. All rights reserved.<br />
No part of this publication may be reproduced, photocopied,<br />
stored on a retrieval system, translated or transmitted without the<br />
express written consent of the publisher.<br />
Capita <strong>Education</strong> <strong>Service</strong>s, 5 Franklin Court,<br />
Priory Business Park, Stannard Way, Bedford, MK44 3JZ<br />
Tel: 01234 838080 http://sims.capitaes.co.uk