

COMPAT DualFlo - Nestle-Nutrition.com
COMPAT DualFlo - Nestle-Nutrition.com
COMPAT DualFlo - Nestle-Nutrition.com

You also want an ePaper? Increase the reach of your titles
YUMPU automatically turns print PDFs into web optimized ePapers that Google loves.
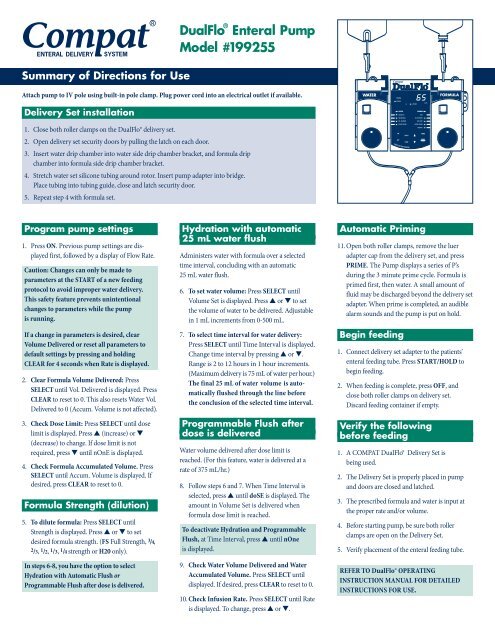
Summary of Directions for Use<br />
<strong>DualFlo</strong> ® Enteral Pump<br />
Model #199255<br />
Attach pump to IV pole using built-in pole clamp. Plug power cord into an electrical outlet if available.<br />
Delivery Set installation<br />
1. Close both roller clamps on the <strong>DualFlo</strong>® delivery set.<br />
2. Open delivery set security doors by pulling the latch on each door.<br />
3. Insert water drip chamber into water side drip chamber bracket, and formula drip<br />
chamber into formula side drip chamber bracket.<br />
4. Stretch water set silicone tubing around rotor. Insert pump adapter into bridge.<br />
Place tubing into tubing guide, close and latch security door.<br />
5. Repeat step 4 with formula set.<br />
RUNNING<br />
STOPPED<br />
mL/hr<br />
AC LOW BAT<br />
WATER<br />
FORMULA<br />
VOLUME SET<br />
RATE<br />
TIME INTERVAL<br />
VOL. DELIVERED<br />
VOL. DELIVERED<br />
DOSE LIMIT<br />
ACCUM. VOLUME<br />
ACCUM. VOLUME<br />
STRENGTH<br />
ON<br />
PRIME<br />
SELECT<br />
OFF*<br />
START<br />
HOLD<br />
CLEAR<br />
*EXCEPT BATTERY CHARGER<br />
Program pump settings<br />
1. Press ON. Previous pump settings are displayed<br />
first, followed by a display of Flow Rate.<br />
Caution: Changes can only be made to<br />
parameters at the START of a new feeding<br />
protocol to avoid improper water delivery.<br />
This safety feature prevents unintentional<br />
changes to parameters while the pump<br />
is running.<br />
If a change in parameters is desired, clear<br />
Volume Delivered or reset all parameters to<br />
default settings by pressing and holding<br />
CLEAR for 4 seconds when Rate is displayed.<br />
2. Clear Formula Volume Delivered: Press<br />
SELECT until Vol. Delivered is displayed. Press<br />
CLEAR to reset to 0. This also resets Water Vol.<br />
Delivered to 0 (Accum. Volume is not affected).<br />
3. Check Dose Limit: Press SELECT until dose<br />
limit is displayed. Press ▲ (increase) or ▼<br />
(decrease) to change. If dose limit is not<br />
required, press ▼ until nOnE is displayed.<br />
4. Check Formula Accumulated Volume. Press<br />
SELECT until Accum. Volume is displayed. If<br />
desired, press CLEAR to reset to 0.<br />
Formula Strength (dilution)<br />
5. To dilute formula: Press SELECT until<br />
Strength is displayed. Press ▲ or ▼ to set<br />
desired formula strength. (FS Full Strength, 3 /4,<br />
2/3, 1 /2, 1 /3, 1 /4 strength or H20 only).<br />
In steps 6-8, you have the option to select<br />
Hydration with Automatic Flush or<br />
Programmable Flush after dose is delivered.<br />
Hydration with automatic<br />
25 mL water flush<br />
Administers water with formula over a selected<br />
time interval, concluding with an automatic<br />
25 mL water flush.<br />
6. To set water volume: Press SELECT until<br />
Volume Set is displayed. Press ▲ or ▼ to set<br />
the volume of water to be delivered. Adjustable<br />
in 1 mL increments from 0-500 mL.<br />
7. To select time interval for water delivery:<br />
Press SELECT until Time Interval is displayed.<br />
Change time interval by pressing ▲ or ▼.<br />
Range is 2 to 12 hours in 1 hour increments.<br />
(Maximum delivery is 75 mL of water per hour.)<br />
The final 25 mL of water volume is automatically<br />
flushed through the line before<br />
the conclusion of the selected time interval.<br />
Programmable Flush after<br />
dose is delivered<br />
Water volume delivered after dose limit is<br />
reached. (For this feature, water is delivered at a<br />
rate of 375 mL/hr.)<br />
8. Follow steps 6 and 7. When Time Interval is<br />
selected, press ▲ until doSE is displayed. The<br />
amount in Volume Set is delivered when<br />
formula dose limit is reached.<br />
To deactivate Hydration and Programmable<br />
Flush, at Time Interval, press ▲ until nOne<br />
is displayed.<br />
9. Check Water Volume Delivered and Water<br />
Accumulated Volume. Press SELECT until<br />
displayed. If desired, press CLEAR to reset to 0.<br />
10. Check Infusion Rate. Press SELECT until Rate<br />
is displayed. To change, press ▲ or ▼.<br />
Automatic Priming<br />
11.Open both roller clamps, remove the luer<br />
adapter cap from the delivery set, and press<br />
PRIME. The Pump displays a series of P’s<br />
during the 3 minute prime cycle. Formula is<br />
primed first, then water. A small amount of<br />
fluid may be discharged beyond the delivery set<br />
adapter. When prime is <strong>com</strong>pleted, an audible<br />
alarm sounds and the pump is put on hold.<br />
Begin feeding<br />
1. Connect delivery set adapter to the patients’<br />
enteral feeding tube. Press START/HOLD to<br />
begin feeding.<br />
2. When feeding is <strong>com</strong>plete, press OFF, and<br />
close both roller clamps on delivery set.<br />
Discard feeding container if empty.<br />
Verify the following<br />
before feeding<br />
1. A <strong>COMPAT</strong> <strong>DualFlo</strong>® Delivery Set is<br />
being used.<br />
2. The Delivery Set is properly placed in pump<br />
and doors are closed and latched.<br />
3. The prescribed formula and water is input at<br />
the proper rate and/or volume.<br />
4. Before starting pump, be sure both roller<br />
clamps are open on the Delivery Set.<br />
5. Verify placement of the enteral feeding tube.<br />
REFER TO <strong>DualFlo</strong>® OPERATING<br />
INSTRUCTION MANUAL FOR DETAILED<br />
INSTRUCTIONS FOR USE.
<strong>DualFlo</strong> ®<br />
Enteral Pump<br />
Model #199255<br />
RUNNING<br />
Troubleshooting<br />
When turned on, the <strong>COMPAT</strong> <strong>DualFlo</strong>® Enteral Feeding Pump is designed to provide audible and visible<br />
alarms under several conditions where desired performance cannot be maintained. Pressing START/HOLD<br />
after the alarm condition is identified silences the alarm and returns the pump to hold mode. Perform the<br />
necessary procedures to correct the alarm condition. Press START/HOLD again to resume normal operation.<br />
STOPPED<br />
AC<br />
WATER<br />
VOLUME SET<br />
TIME INTERVAL<br />
VOL. DELIVERED<br />
ACCUM. VOLUME<br />
ON<br />
SELECT<br />
OFF*<br />
CLEAR<br />
*EXCEPT BATTERY<br />
CHARGER<br />
mL/hr<br />
LOW BAT<br />
FORMULA<br />
RATE<br />
VOL. DELIVERED<br />
DOSE LIMIT<br />
ACCUM. VOLUME<br />
STRENGTH<br />
PRIME<br />
START<br />
HOLD<br />
SITUATION<br />
•Low battery<br />
alarm activated<br />
•FEEd Err<br />
(alarm activated)<br />
•HoLd Err (Pump<br />
is left on hold)<br />
•doSE dEL<br />
(Dose Complete)<br />
•no SEt (alarm<br />
activated)<br />
TROUBLESHOOTING GUIDE<br />
POSSIBLE CAUSE<br />
SOLUTION<br />
•Plug cord into AC outlet<br />
•Battery charge is below<br />
performance level<br />
•Formula or water container<br />
is empty<br />
•Occlusion is restricting flow<br />
•Drip chamber not properly<br />
placed in pump<br />
•Drip chamber walls coated with<br />
formula drops or<br />
condensation in sensor path<br />
•Flow sensors housing need<br />
cleaning<br />
•Pump is on hold for more<br />
than 2 1/2 minutes<br />
•Pump has delivered<br />
preset volume<br />
•Door not closed and latched<br />
•No set or improper set loaded<br />
•Replace or refill formula or<br />
water container<br />
•Identify point of occlusion and<br />
free up<br />
- Pump Set<br />
• kinked tubing<br />
• blocked tubing<br />
• closed roller clamp<br />
- Feeding tube<br />
- Feeding container<br />
•Assemble properly<br />
•Manipulate chamber to clear<br />
drops or condensation in<br />
sensor path<br />
•Clean with cotton swab dampened<br />
with isopropyl alcohol<br />
•Press START/HOLD button<br />
•Clear Volume Delivered and start<br />
a new dose.<br />
•Examine tubing for proper<br />
placement, close door<br />
•Load an appropriate set<br />
•Assemble tubing properly<br />
around pump rotor. Close and<br />
latch door.<br />
Cleaning<br />
Routine cleaning of the <strong>COMPAT</strong> <strong>DualFlo</strong>® pump<br />
should be an ongoing process to ensure maximum<br />
performance.<br />
Caution: Always disconnect the pump from<br />
an electrical outlet before cleaning to avoid<br />
electric shock hazard.<br />
Clean the pump housing and rotor regularly<br />
using a cloth or sponge with warm soapy water.<br />
(Prolonged exposure to alcohol, household<br />
detergents or strong cleansers can result in<br />
damage to pump housing).<br />
Clean drip sensors with a cotton swab and<br />
isopropyl alcohol.<br />
Do not autoclave. Do not immerse pump in<br />
cleaning solutions.<br />
Disinfecting<br />
If it is necessary to disinfect the entire pump,<br />
the following is re<strong>com</strong>mended:<br />
General Disinfectants<br />
Cidex® (Arbrook Manufacturing)<br />
pHisohex® (Winthrop-Stearns, Inc. Corp.)<br />
Hibiclens® (Imperial Chemical Industries PLC)<br />
Isopropyl alcohol<br />
AIDS and Hepatitis Disinfectants<br />
10% concentration of 5.25% sodium hypochlorite<br />
(household bleach)<br />
Tuberculosis Disinfectants<br />
70% concentration of isopropyl alcohol<br />
After application of these disinfecting agents,<br />
allow to air dry. These re<strong>com</strong>mendations should<br />
not be substituted for official procedures that<br />
may differ among institutions. To determine the<br />
proper procedure in a particular institution,<br />
contact the Infection Control Department.<br />
www.nestlenutrition.<strong>com</strong>/us • 1-800-DEVICE8<br />
Except as noted, all trademarks are owned by Société des Produits Nestlé S.A., Vevey, Switzerland.<br />
NEST-10473-0908


