
Create successful ePaper yourself
Turn your PDF publications into a flip-book with our unique Google optimized e-Paper software.
HP-535 Nov. 1998<br />
STAND ASSEMBLY (KS-505)<br />
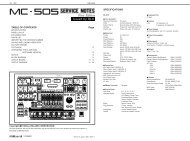
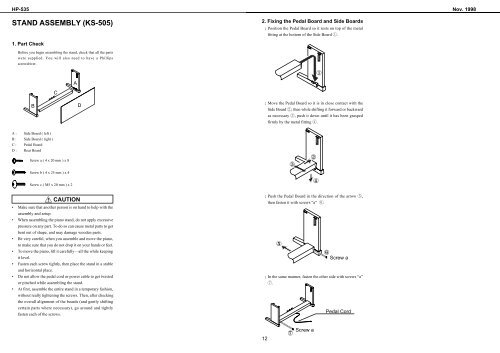
2. Fixing the Pedal Board and Side Boards<br />
¡ Position the Pedal Board so it rests on top of the metal<br />
fitting at the bottom of the Side Board q.<br />
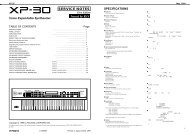
1. Part Check<br />
Before you begin assembling the stand, check that all the parts<br />
were supplied. You will also need to have a Phillips<br />
screwdriver.<br />
C<br />
A<br />
B<br />
D<br />
¡ Move the Pedal Board so it is in close contact with the<br />
Side Board w, then while shifting it forward or backward<br />
as necessary e, push it down until it has been grasped<br />
firmly by the metal fitting r.<br />
A : Side Board ( left )<br />
B : Side Board ( right )<br />
C : Pedal Board<br />
D : Rear Board<br />
Screw a ( 4 x 20 mm ) x 8<br />
Screw b ( 4 x 25 mm ) x 4<br />
Screw c ( M5 x 20 mm ) x 2<br />
CAUTION<br />
• Make sure that another person is on hand to help with the<br />
assembly and setup.<br />
• When assembling the piano stand, do not apply excessive<br />
pressure on any part. To do so can cause metal parts to get<br />
bent out of shape, and may damage wooden parts.<br />
• Be very careful, when you assemble and move the piano,<br />
to make sure that you do not drop it on your hands or feet.<br />
• To move the piano, lift it carefully—all the while keeping<br />
it level.<br />
• Fasten each screw tightly, then place the stand in a stable<br />
and horizontal place.<br />
• Do not allow the pedal cord or power cable to get twisted<br />
or pinched while assembling the stand.<br />
• At first, assemble the entire stand in a temporary fashion,<br />
without really tightening the screws. Then, after checking<br />
the overall alignment of the boards (and gently shifting<br />
certain parts where necessary), go around and tightly<br />
fasten each of the screws.<br />
¡ Push the Pedal Board in the direction of the arrow t,<br />
then fasten it with screws “a” y.<br />
Screw a<br />
¡ In the same manner, fasten the other side with screws “a”<br />
u.<br />
Pedal Cord<br />
Screw a<br />
12