
You also want an ePaper? Increase the reach of your titles
YUMPU automatically turns print PDFs into web optimized ePapers that Google loves.
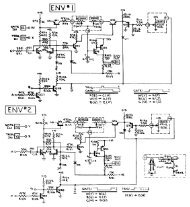
HP-535 Nov. 1998<br />
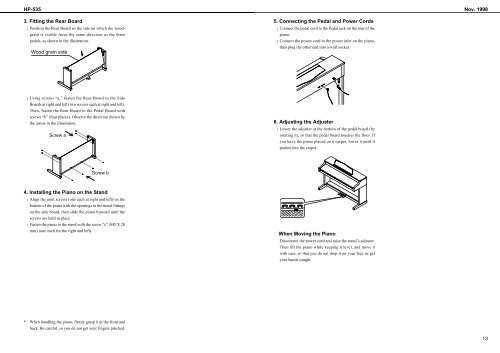
3. Fitting the Rear Board<br />
¡ Position the Rear Board so the side on which the woodgrain<br />
is visible faces the same direction as the three<br />
pedals, as shown in the illustration.<br />
Wood grain side<br />
5. Connecting the Pedal and Power Cords<br />
¡ Connect the pedal cord to the Pedal jack on the rear of the<br />
piano.<br />
¡ Connect the power cord to the power inlet on the piano,<br />
then plug the other end into a wall socket.<br />
¡ Using screws “a,” fasten the Rear Board to the Side<br />
Boards at right and left (two screws each at right and left).<br />
Then, fasten the Rear Board to the Pedal Board with<br />
screws “b” (four places). Observe the direction shown by<br />
the arrow in the illustration.<br />
Screw a<br />
6. Adjusting the Adjuster<br />
¡ Lower the adjuster at the bottom of the pedal board (by<br />
rotating it), so that the pedal board touches the floor. If<br />
you have the piano placed on a carpet, lower it until it<br />
pushes into the carpet.<br />
Screw b<br />
4. Installing the Piano on the Stand<br />
¡ Align the joint screws (one each at right and left) on the<br />
bottom of the piano with the openings in the metal fittings<br />
on the side board, then slide the piano forward until the<br />
screws are held in place.<br />
¡ Fasten the piano to the stand with the screw “c” (M5 X 20<br />
mm) (one each for the right and left).<br />
When Moving the Piano<br />
Disconnect the power cord and raise the stand’s adjuster.<br />
Then lift the piano while keeping it level, and move it<br />
with care, so that you do not drop it on your feet, or get<br />
your hands caught.<br />
* When handling the piano, firmly grasp it at the front and<br />
back. Be careful, so you do not get your fingers pinched.<br />
13