7. operating the zpm - Grass
7. operating the zpm - Grass
7. operating the zpm - Grass

You also want an ePaper? Increase the reach of your titles
YUMPU automatically turns print PDFs into web optimized ePapers that Google loves.
<strong>7.</strong> OPERATING THE ZPM<br />
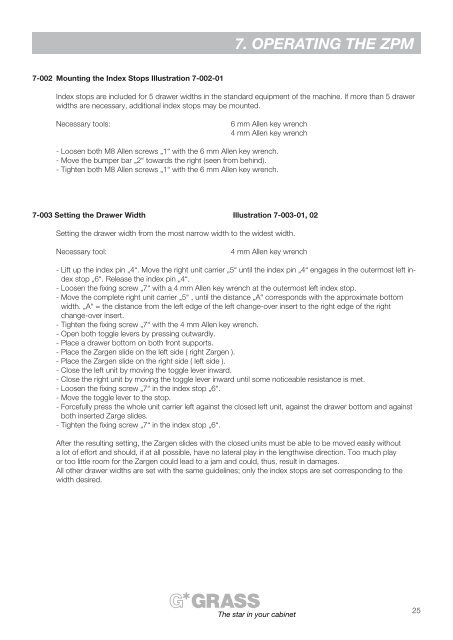
7-002 Mounting <strong>the</strong> Index Stops Illustration 7-002-01<br />
Index stops are included for 5 drawer widths in <strong>the</strong> standard equipment of <strong>the</strong> machine. If more than 5 drawer<br />
widths are necessary, additional index stops may be mounted.<br />
Necessary tools:<br />
6 mm Allen key wrench<br />
4 mm Allen key wrench<br />
- Loosen both M8 Allen screws „1“ with <strong>the</strong> 6 mm Allen key wrench.<br />
- Move <strong>the</strong> bumper bar „2“ towards <strong>the</strong> right (seen from behind).<br />
- Tighten both M8 Allen screws „1“ with <strong>the</strong> 6 mm Allen key wrench.<br />
7-003 Setting <strong>the</strong> Drawer Width Illustration 7-003-01, 02<br />
Setting <strong>the</strong> drawer width from <strong>the</strong> most narrow width to <strong>the</strong> widest width.<br />
Necessary tool:<br />
4 mm Allen key wrench<br />
- Lift up <strong>the</strong> index pin „4“. Move <strong>the</strong> right unit carrier „5“ until <strong>the</strong> index pin „4“ engages in <strong>the</strong> outermost left index<br />
stop „6“. Release <strong>the</strong> index pin „4“.<br />
- Loosen <strong>the</strong> fixing screw „7“ with a 4 mm Allen key wrench at <strong>the</strong> outermost left index stop.<br />
- Move <strong>the</strong> complete right unit carrier „5“ , until <strong>the</strong> distance „A“ corresponds with <strong>the</strong> approximate bottom<br />
width. „A“ = <strong>the</strong> distance from <strong>the</strong> left edge of <strong>the</strong> left change-over insert to <strong>the</strong> right edge of <strong>the</strong> right<br />
change-over insert.<br />
- Tighten <strong>the</strong> fixing screw „7“ with <strong>the</strong> 4 mm Allen key wrench.<br />
- Open both toggle levers by pressing outwardly.<br />
- Place a drawer bottom on both front supports.<br />
- Place <strong>the</strong> Zargen slide on <strong>the</strong> left side ( right Zargen ).<br />
- Place <strong>the</strong> Zargen slide on <strong>the</strong> right side ( left side ).<br />
- Close <strong>the</strong> left unit by moving <strong>the</strong> toggle lever inward.<br />
- Close <strong>the</strong> right unit by moving <strong>the</strong> toggle lever inward until some noticeable resistance is met.<br />
- Loosen <strong>the</strong> fixing screw „7“ in <strong>the</strong> index stop „6“.<br />
- Move <strong>the</strong> toggle lever to <strong>the</strong> stop.<br />
- Forcefully press <strong>the</strong> whole unit carrier left against <strong>the</strong> closed left unit, against <strong>the</strong> drawer bottom and against<br />
both inserted Zarge slides.<br />
- Tighten <strong>the</strong> fixing screw „7“ in <strong>the</strong> index stop „6“.<br />
After <strong>the</strong> resulting setting, <strong>the</strong> Zargen slides with <strong>the</strong> closed units must be able to be moved easily without<br />
a lot of effort and should, if at all possible, have no lateral play in <strong>the</strong> lengthwise direction. Too much play<br />
or too little room for <strong>the</strong> Zargen could lead to a jam and could, thus, result in damages.<br />
All o<strong>the</strong>r drawer widths are set with <strong>the</strong> same guidelines; only <strong>the</strong> index stops are set corresponding to <strong>the</strong><br />
width desired.<br />
The star in your cabinet<br />
25