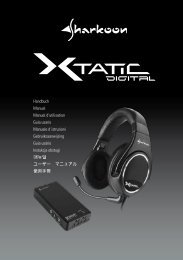
X-Tatic Digital - Sharkoon
X-Tatic Digital - Sharkoon
X-Tatic Digital - Sharkoon

You also want an ePaper? Increase the reach of your titles
YUMPU automatically turns print PDFs into web optimized ePapers that Google loves.
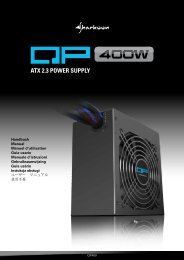
Handbuch<br />
Manual<br />
Manuel d‘utilisation<br />
Guia usario<br />
Manuale d´istruzioni<br />
Gebruiksaanwijzing<br />
Guia usário<br />
Instukcja obstugi<br />
매뉴얼<br />
ユーザー マニュアル<br />
使 用 手 冊
Content<br />
1. Features<br />
1.1 X-<strong>Tatic</strong> <strong>Digital</strong><br />
1.2 X-<strong>Tatic</strong> Sound Control Unit (SCU)<br />
2. Specifications<br />
2.1 X-<strong>Tatic</strong> <strong>Digital</strong><br />
2.2 X-<strong>Tatic</strong> SCU<br />
3. Compatibility<br />
3.1 X-<strong>Tatic</strong> <strong>Digital</strong><br />
3.2 X-<strong>Tatic</strong> SCU<br />
4. Parts and accessories<br />
4.1 X-<strong>Tatic</strong> <strong>Digital</strong><br />
4.2 X-<strong>Tatic</strong> SCU<br />
5. The headset at a glance<br />
5.1 The volume controller<br />
5.2 The connectors<br />
5.3 Connecting the microphone to the headset<br />
6. The SCU at a glance<br />
6.1 Sound settings / sound technologies<br />
6.1.1 Volume / Dolby Pro Logic (VOL / PL)<br />
6.1.2 TD (Time-Delay)<br />
6.1.3 DRC (Dynamic Range Control)<br />
6.1.4 Activating TD / DRC<br />
6.2 Restore the factory default / reset<br />
7. Using the X-<strong>Tatic</strong> <strong>Digital</strong> with a PC (optical output)<br />
8. Using the X-<strong>Tatic</strong> <strong>Digital</strong> with the Xbox / Xbox 360<br />
9. Using the X-<strong>Tatic</strong> <strong>Digital</strong> with the PS2 / PS3<br />
10. Using the X-<strong>Tatic</strong> <strong>Digital</strong> with a PC or any other source (analogue output)<br />
11. The power supply<br />
12. Important notes<br />
X-TATIC DIGITAL
Dear customer!<br />
Congratulations for purchasing one premium quality SHARKOON product.<br />
For a long life time and to take full advantage of this product we recommend that<br />
you read this manual completely.<br />
Have a good time with our product!<br />
SHARKOON Technologies GmbH<br />
1. Features<br />
1.1 X-<strong>Tatic</strong> <strong>Digital</strong><br />
• 5.1 channel headset<br />
• 8 speakers (4 in each earpiece)<br />
• <strong>Digital</strong>, in-line volume control<br />
• High end amplifier<br />
• Independent, illuminated volume adjustment for each channel and master volume<br />
• Detachable microphone with QuickOn connection<br />
1.2 X-<strong>Tatic</strong> Sound Control Unit (SCU)<br />
• Supports Dolby <strong>Digital</strong> 2.0, Dolby <strong>Digital</strong> 5.1 and Dolby Pro Logic<br />
• Supports the chat function of PS3, X-Box and X-Box 360<br />
• Dynamic Range Control<br />
2. Specifications<br />
2.1 X-<strong>Tatic</strong> <strong>Digital</strong><br />
• Center speaker: 2 x 27 mm<br />
• Front speaker: 2 x 30 mm<br />
• Rear speaker: 2 x 30 mm<br />
• Subwoofer: 2 x 40 mm<br />
• Impedance: 32 Ohm<br />
• Microphone: 6 x 5 mm (L x W) / unidirectional<br />
• Cable Length: 360 cm<br />
• Connection: 1 x 9-pin analogue plug<br />
2.2 X-<strong>Tatic</strong> SCU<br />
• <strong>Digital</strong> optical input (S/PDIF)<br />
• 2 analogue audio outputs for the X-<strong>Tatic</strong> headset<br />
• 3 analogue 3.5 mm audio outputs (front, rear, center / subwoofer)<br />
• 1 microphone connector for PS3 (USB A > USB B)<br />
• 1 power connector<br />
• Dimensions: 15 x 122 x 56 mm (H x L x W)<br />
• Weight: 110 g<br />
X-TATIC DIGITAL
3. Compatibility<br />
3.1 X-<strong>Tatic</strong> <strong>Digital</strong><br />
• PC / MAC / other sources: analogue input (via cable adapter)<br />
3.2 X-<strong>Tatic</strong> SCU<br />
• Xbox / Xbox 360: optical input<br />
• PS2 / PS3: optical input / USB microphone connection<br />
• PC / MAC: optical input / analogue or USB microphone input<br />
• DVD / other sources: optical input<br />
4. Parts and accessories<br />
4.1 X-<strong>Tatic</strong> <strong>Digital</strong><br />
A<br />
B<br />
D<br />
C<br />
• X-<strong>Tatic</strong> <strong>Digital</strong> 5.1 headset (A)<br />
• Microphone (B)<br />
• Cable adapter (9-pin analogue plug > 4 x 3.5 mm / C)<br />
• Power supply incl. travel adapter (D)<br />
• Manual<br />
X-TATIC DIGITAL
4.2 X-<strong>Tatic</strong> SCU<br />
A<br />
B<br />
C<br />
D<br />
• X-<strong>Tatic</strong> Sound Control Unit (A)<br />
• USB microphone cable for PS3 and PC (B)<br />
• Microphone connection cable for Xbox 360 (3.5 mm jack > 2.5 mm jack / C)<br />
• Optical connection cable (S/PDIF / D)<br />
Note:<br />
If you are missing any of the items listed above, please contact customer service via<br />
e-mail at support@sharkoon.com or call: + 49 (0) 6403 – 775 6100<br />
In case you have purchased the X-<strong>Tatic</strong> <strong>Digital</strong> outside of Europe/USA you will find<br />
two separate power supplies included with the headset: one to power the SCU, the<br />
second to power the headset.<br />
X-TATIC DIGITAL
5. The headset at a glance<br />
A<br />
B<br />
A –<br />
B –<br />
C –<br />
Headband<br />
Headphones<br />
Detachable, adjustable<br />
microphone<br />
C<br />
D<br />
D –<br />
Microphone connector<br />
X-TATIC DIGITAL
5.1 The volume controller<br />
C<br />
A<br />
A<br />
C<br />
B<br />
D<br />
C<br />
D<br />
B<br />
E<br />
A – Volume adjustment for each channel after pressing the according button (button<br />
illuminated) or main volume adjustment respectively (all buttons illuminated) as<br />
well as volume on/off (by pressing this controller)<br />
B – Microphone volume (only Xbox 360)<br />
C – Control button for the front, rear and center speaker as well as for the subwoofer<br />
(Sub). The volume level is displayed by different colors.<br />
D – Microphone on/off<br />
(E – Connection for Xbox 360 microphone – see below 8.)<br />
Note:<br />
To switch on/off the headset press the button for volume adjustment (see above A)<br />
and the control button for the front speaker (Front, see above C) simultaneously for<br />
~5 seconds.<br />
X-TATIC DIGITAL
5.2 The connectors<br />
A<br />
a<br />
A – Headset connectors<br />
a – 9-pin analog connector<br />
b – ISO power connector<br />
b<br />
B<br />
a<br />
b<br />
1 2 3 4<br />
B – Cable adapter<br />
a – 9-pin analog jack<br />
b – 3.5 mm stereo plug for each<br />
channel:<br />
1 – Microphone connector<br />
(pink)<br />
2 – Subwoofer connector<br />
(orange)<br />
3 – Connector for rear speakers<br />
(black)<br />
4 – Connector for front<br />
speakers (green)<br />
5.3 Connecting the microphone to the headset<br />
1. Insert the microphone’s 3.5 mm stereo plug (fig. 1) loosely into the headset’s microphone<br />
connector (fig. 2).<br />
fig. 1<br />
fig. 2<br />
X-TATIC DIGITAL
2. Turn the microphone until the indications on the microphone and on the headset are<br />
opposite to each other (fig. 3).<br />
fig. 3<br />
3. Press the microphone’s plug into the headset’s jack completely and turn the microphone<br />
to the front and into the desired position.<br />
6. The SCU at a glance<br />
A<br />
A<br />
B<br />
C<br />
a<br />
c<br />
b<br />
d<br />
C<br />
A – Analogue audio outputs (3x 3.5 mm jack for front, surround and center speaker)<br />
B – LEDs for:<br />
a – Power on / off<br />
b – Dolby <strong>Digital</strong> on / off<br />
c – Dolby ProLogic on / off<br />
d – DRC on / off<br />
C – Analogue audio outputs for the X-<strong>Tatic</strong> headset (2x 9-pin analogue plug)<br />
X-TATIC DIGITAL
B<br />
A<br />
B<br />
A<br />
C D E<br />
F<br />
G<br />
H<br />
A – Optical audio input (S/PDIF)<br />
B – USB connector (for PS3 microphone)<br />
C – Buttons for volume (- / +) resp. Time-Delay (- / +)<br />
D – On / off button for Pro Logic resp. Dynamic Range Control (DRC)<br />
E – SCU power on / off button<br />
F – Switch between Time-Delay for surround and center speaker<br />
G – Switch between volume / Pro Logic (VOL / PL) and Time-Delay / Range<br />
Control (TD / DRC)<br />
H – ISO power connector<br />
6.1 Sound settings / sound technologies<br />
Source<br />
Output / Function<br />
Stereo Dolby Pro Logic Dolby <strong>Digital</strong> 5.1 DRC<br />
Stereo yes yes no no<br />
Dolby <strong>Digital</strong> 2.0 no yes no no<br />
Dolby Pro Logic no yes no no<br />
Dolby <strong>Digital</strong> 5.1 no no yes yes<br />
Note:<br />
It may take several seconds to recognize the signal and to display the current sound<br />
mode via LED.<br />
X-TATIC DIGITAL
6.1.1 Volume / Dolby Pro Logic (VOL / PL)<br />
Dolby Pro Logic is a Dolby technology which enables the transformation of a<br />
2-channel signal into a 5.1-channel signal.<br />
1. Toggle the switch (fig. 1 / A) into the “VOL / PL” position.<br />
2. Activate / deactivate the Dolby Pro Logic function with the respective button (fig. 1 / B).<br />
3. Adjust the volume using the buttons “Vol -” and “Vol +” (fig. 1 / C).<br />
C<br />
B<br />
A<br />
fig. 1<br />
6.1.2 TD (Time-Delay)<br />
The Time-Delay function allows to define a time delay for the sound reproduction of<br />
each speaker. Thus a spacious playback of the audio signal can be achieved. Note that<br />
increasing the delay too much may cause unnatural results.<br />
6.1.3 DRC (Dynamic Range Control)<br />
Dynamic Range control limits the dynamic, decreasing the level difference between<br />
loud and quiet passages in a Dolby <strong>Digital</strong> 5.1 signal thus balancing the effect loudness.<br />
6.1.4 Activating TD / DRC<br />
1. Toggle the switch (fig. 2 / A) to the “TD / DRC” position.<br />
2. Select the desired channel (center / surround) you wish to adjust using the TD function<br />
switch (fig. 2 / B). Pressing the buttons “TD -” or “TD +” (fig. 2 / C) will set the<br />
Time-Delay with “TD +” increasing its value and “TD -” decreasing it. A bigger delay<br />
produces a more spacious feeling.<br />
3. You may additionally activate / deactivate the DRC function by pressing the button<br />
“Pro Logic / DRC” (fig. 2 /D).<br />
C<br />
D<br />
B<br />
A<br />
fig. 2<br />
The Sound Control Unit will keep all settings after shutdown. Changes to the<br />
Time-Delay settings in Dolby <strong>Digital</strong> 5.1 mode will affect the settings in Dolby Pro<br />
Logic mode and vice versa.<br />
X-TATIC DIGITAL
6.2 Restore the factory default / reset<br />
To restore the factory settings press and hold the buttons “Vol -” and “Vol +”<br />
(fig. 3 / A) simultaneously while the SCU is switched off then press the power button<br />
(fig.3 / B). The LED display (fig. 4) will flash 3 times to confirm the successful reset.<br />
A<br />
B<br />
fig. 3<br />
fig. 4<br />
7. Using the X-<strong>Tatic</strong> <strong>Digital</strong> with a PC (optical output)<br />
1. Connect the optical cable (remove protective caps!) to the optical audio output of your<br />
PC’s soundcard and the SCU’s optical audio input.<br />
2. Connect the X-<strong>Tatic</strong> to the SCU by plugging the headset cable’s 9-pin connector to<br />
the SCU’s 9-pin plug.<br />
3. Connect the USB microphone cable to the respective plugs of the SCU and your PC.<br />
4. Connect the power supply delivered with the X-<strong>Tatic</strong> to a wall outlet, the adapter‘s<br />
angled power plug to the SCU‘s ISO power jack and the straight power plug to the<br />
respective headset cable’s power connector.<br />
Note:<br />
In case you are using the version with two separate power adapters, proceed as<br />
follows:<br />
4. a) Connect one of the included power supplies to a wall outlet and the angled<br />
power plug to the SCU’s ISO power connector.<br />
4. b) Connect the second power supply delivered with the X-<strong>Tatic</strong> to a wall outlet<br />
and the straight power plug to the headset cable’s ISO power connector.<br />
5. Alternatively connect the single 3.5 mm jacks of any 5.1 headset to the SCU’s<br />
according analog plugs (instead of the USB microphone cable the microphone is directly<br />
connected to the soundcard). For a better distinction the connectors are color coded.<br />
6. Switch on the SCU and boot up your PC.<br />
Note:<br />
If you are facing any failures using the microphone function via USB we recommend<br />
to check your operating system’s audio settings and to define the soundcard as output<br />
device and the USB microphone as input device.<br />
X-TATIC DIGITAL
8. Using the X-<strong>Tatic</strong> <strong>Digital</strong> with the Xbox / Xbox 360<br />
1. Connect the optical cable (remove protective caps!) to the optical audio output of your<br />
Xbox / Xbox 360 and the SCU’s optical audio input.<br />
2. Connect the X-<strong>Tatic</strong> to the SCU by plugging the headset cable’s 9-pin connector to<br />
the SCU’s 9-pin plug.<br />
3. Connect the microphone cable for Xbox 360 to the respective<br />
microphone input on the X-<strong>Tatic</strong>’s volume controller and the controller of the game<br />
pad.<br />
4. Connect the power supply delivered with the X-<strong>Tatic</strong> to a wall outlet, the adapter‘s<br />
angled power plug to the SCU‘s ISO power jack and the straight power plug to the<br />
respective headset cable’s power connector.<br />
Note:<br />
In case you are using the version with two separate power adapters, proceed as<br />
follows:<br />
4. a) Connect one of the included power supplies to a wall outlet and the angled<br />
power plug to the SCU’s ISO power connector.<br />
4. b) Connect the second power supply delivered with the X-<strong>Tatic</strong> to a wall outlet<br />
and the straight power plug to the headset cable’s ISO power connector.<br />
5. Switch on the SCU and the game pad.<br />
6. From the Xbox 360’s settings menu (“System” > “Console Settings” > “Audio” ><br />
“<strong>Digital</strong> Output”) select Dolby <strong>Digital</strong> 5.1 as output format.<br />
Note:<br />
From the Xbox’s settings menu select Dolby <strong>Digital</strong> 5.1 as output format.<br />
9. Using the X-<strong>Tatic</strong> <strong>Digital</strong> with the PS2 / PS3<br />
1. Connect the optical cable (remove protective caps!) to the optical audio output of your<br />
PS2 / PS3 and the SCU’s optical audio input.<br />
2. Connect the X-<strong>Tatic</strong> to the SCU by plugging the headset cable’s 9-pin connector to<br />
the SCU’s 9-pin plug.<br />
3. Connect the USB microphone cable for PS3 to the SCU’s USB connector and the<br />
respective USB connector of the game pad.<br />
4. Connect the power supply delivered with the X-<strong>Tatic</strong> to a wall outlet, the adapter‘s<br />
angled power plug to the SCU‘s ISO power jack and the straight power plug to the<br />
respective headset cable’s power connector.<br />
Note:<br />
In case you are using the version with two separate power adapters, proceed as<br />
follows:<br />
4. a) Connect one of the included power supplies to a wall outlet and the angled<br />
power plug to the SCU’s ISO power connector.<br />
4. b) Connect the second power supply delivered with the X-<strong>Tatic</strong> to a wall outlet<br />
and the straight power plug to the headset cable’s ISO power connector.<br />
5. Switch on the SCU and the game pad.<br />
6. From the game pad’s settings menu (“Settings” > “Sound Settings” > “Audio Output<br />
Settings” > “<strong>Digital</strong> Out (Optical)”) select Dolby <strong>Digital</strong> 5.1 as output format.<br />
X-TATIC DIGITAL
7. Under “Settings” > “Audio Device Settings” define “C-Media USB Audio Device” as<br />
input device and “C-Media USB Audio Device” as output device.<br />
Note:<br />
From the PS2’s settings menu select Dolby <strong>Digital</strong> 5.1 as output format.<br />
10. Connecting the headset to a PC or any other source<br />
(analog)<br />
1. Connect the included power supply to a wall outlet and the straight power plug to the<br />
headset’s ISO power connector.<br />
2. Connect the cable adapter’s 9-pin connector to the according connector of the headset<br />
cable.<br />
3. Connect the X-<strong>Tatic</strong> <strong>Digital</strong>‘s single 3.5 mm stereo plugs to the respective analog<br />
connector jacks of your PC’s 5.1 sound card (or any other compatible device). For<br />
convenient handling, the connectors are color coded. The headset is ready to use.<br />
11. The power supply<br />
D<br />
B<br />
A<br />
C<br />
• Interlock (press to open / A)<br />
• Turn anticlockwise to open (B)<br />
• Turn clockwise to close (C)<br />
• Lifting/connecting the adapter (D)<br />
X-TATIC DIGITAL
12. Important notes<br />
The X-<strong>Tatic</strong> Analog, the X-<strong>Tatic</strong> <strong>Digital</strong> and the X-<strong>Tatic</strong> Sound Control Unit are not<br />
compatible to the X-<strong>Tatic</strong> Revision I, the X-<strong>Tatic</strong> Revision II and the respective control<br />
boxes! To avoid damages do not use the older versions with the new one and vice<br />
versa.<br />
Avoid listening at a high volume level for a longer period of time.<br />
Doing so may harm your hearing.<br />
Xbox, Xbox 360, Xbox Advanced AV Pack, Xbox Communicator, Xbox Live and the respective images/logos are<br />
registered trademarks or trademarks of Microsoft Corporation in the U.S. and/or other countries.<br />
PlayStation, PlayStation 2, PlayStation 3, PS2, PS3 and the respective images/logos are registered trademarks or<br />
trademarks of Sony Computer Entertainment Inc.<br />
Dolby, Pro Logic, the double-D symbol and the respective images/logos are registered trademarks or trademarks<br />
of Dolby Laboratories.<br />
All named products and descriptions are trademarks and / or registered trademarks of the respective manufacturers<br />
and are accepted as protected.<br />
As a continuing policy of product improvement at SHARKOON, the design and specifications are subject to change<br />
without prior notice. National product specifications may vary.<br />
All rights reserved especially (also in extracts) for translation, reprinting, reproduction by copying or other<br />
technical means. Infringements will lead to compensation.<br />
All rights reserved especially in case of assignation of patent or utility patent. Means of delivery and technical<br />
modifications reserved.<br />
Disposal of your old product<br />
Your product is designed and manufactured with high quality materials and components, which can be recycled<br />
and reused.<br />
When this crossed-out wheeled bin symbol is attached to a product, it means the product is covered by the<br />
European Directive 2002/96/EC.<br />
Please be informed about the local separate collection system for electrical and electronic products.<br />
Please act according to your local rules and do not dispose of your old products with your normal household<br />
waste. The correct disposal of your old product will help prevent potential negative consequences to the<br />
environment and human health.<br />
© SHARKOON Technologies GmbH 2010<br />
www.sharkoon.com<br />
X-TATIC DIGITAL