silent instlallation via network push instructions - eInstruction
silent instlallation via network push instructions - eInstruction
silent instlallation via network push instructions - eInstruction

You also want an ePaper? Increase the reach of your titles
YUMPU automatically turns print PDFs into web optimized ePapers that Google loves.
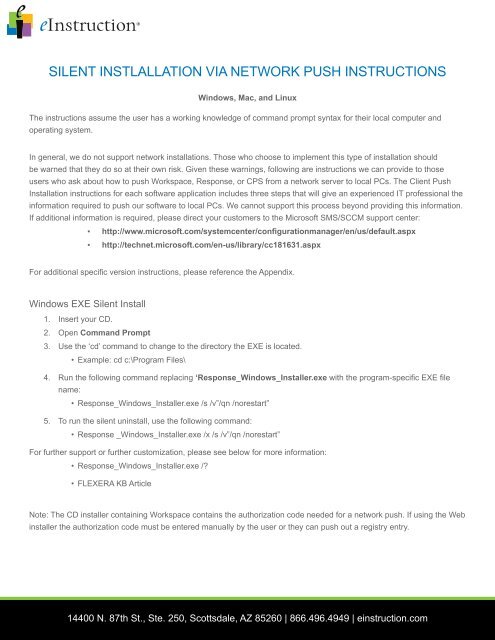
SILENT INSTLALLATION VIA NETWORK PUSH INSTRUCTIONS<br />
Windows, Mac, and Linux<br />
The <strong>instructions</strong> assume the user has a working knowledge of command prompt syntax for their local computer and<br />
operating system.<br />
In general, we do not support <strong>network</strong> installations. Those who choose to implement this type of installation should<br />
be warned that they do so at their own risk. Given these warnings, following are <strong>instructions</strong> we can provide to those<br />
users who ask about how to <strong>push</strong> Workspace, Response, or CPS from a <strong>network</strong> server to local PCs. The Client Push<br />
Installation <strong>instructions</strong> for each software application includes three steps that will give an experienced IT professional the<br />
information required to <strong>push</strong> our software to local PCs. We cannot support this process beyond providing this information.<br />
If additional information is required, please direct your customers to the Microsoft SMS/SCCM support center:<br />
▪▪<br />
http://www.microsoft.com/systemcenter/configurationmanager/en/us/default.aspx<br />
▪▪<br />
http://technet.microsoft.com/en-us/library/cc181631.aspx<br />
For additional specific version <strong>instructions</strong>, please reference the Appendix.<br />
Windows EXE Silent Install<br />
1. Insert your CD.<br />
2. Open Command Prompt<br />
3. Use the ‘cd’ command to change to the directory the EXE is located.<br />
• Example: cd c:\Program Files\<br />
4. Run the following command replacing ‘Response_Windows_Installer.exe with the program-specific EXE file<br />
name:<br />
• Response_Windows_Installer.exe /s /v”/qn /norestart”<br />
5. To run the <strong>silent</strong> uninstall, use the following command:<br />
• Response _Windows_Installer.exe /x /s /v”/qn /norestart”<br />
For further support or further customization, please see below for more information:<br />
• Response_Windows_Installer.exe /?<br />
• FLEXERA KB Article<br />
Note: The CD installer containing Workspace contains the authorization code needed for a <strong>network</strong> <strong>push</strong>. If using the Web<br />
installer the authorization code must be entered manually by the user or they can <strong>push</strong> out a registry entry.<br />
14400 N. 87th St., Ste. 250, Scottsdale, AZ 85260 | 866.496.4949 | einstruction.com
For additional specific version <strong>instructions</strong>, please reference the Appendix.<br />
Linux Silent Installer – BIN<br />
1. Insert your CD.<br />
2. Open terminal from Applications > Accessories > Terminal<br />
3. Use the ‘cd’ command to change to the directory the BIN is located.<br />
• Example: cd Downloads/<br />
4. Run the following command replacing ‘Installer.bin’ with the program-specific file name:<br />
• sudo Installer.bin –i <strong>silent</strong><br />
• Note: You will need to extract the bin file from the zip file before installation.<br />
5. To run the <strong>silent</strong> uninstall, use the following command:<br />
• sudo /opt/<strong>eInstruction</strong>/Response/Uninstall/Uninstall –i <strong>silent</strong><br />
For further support or further customization is needed please see below for more Information:<br />
• FLEXERA KB Article - Running an Installer Silently<br />
• FLEXERA KB Article - Create Response File<br />
Note: Maintenance Mode is not enabled on our installers. The CD installer containing Workspace contains the<br />
authorization code needed for a <strong>network</strong> <strong>push</strong>. If using the Web installer the authorization code must be entered manually<br />
by the user or they can <strong>push</strong> out a registry entry.<br />
For additional specific version <strong>instructions</strong>, please reference the Appendix<br />
Mac Silent Installer – APP<br />
1. Insert your CD.<br />
2. Open terminal from Applications > Utilities > Terminal.<br />
3. You need to create a properties file in the Resources folder of the installer first.<br />
Use the cd command to change to the Resources folder in Installer.app.<br />
▪▪<br />
▪▪<br />
Example: cd Downloads/Installer.app/Contents/Resources<br />
Note: You may have to extract the app file from the zip file before installation.<br />
The following command will create the file plus the necessary lines for the <strong>silent</strong> install:<br />
• echo INSTALLER_UI=SILENT > installer.properties<br />
To run the <strong>silent</strong> install, use the following command from the same directory as the app file:<br />
• sudo ./Installer.app/Contents/MacOS/Installer<br />
To Uninstall <strong>silent</strong>ly, you need to create same file as before in the Uninstall.app:<br />
• Run the following command replacing ‘Response’ with your application: cd /Applications/<strong>eInstruction</strong>/<br />
Response/Uninstall/Uninstall.app/Contents/Resources<br />
14400 N. 87th St., Ste. 250, Scottsdale, AZ 85260 | 866.496.4949 | einstruction.com
Create the installer.properties file with the following command:<br />
• echo INSTALLER_UI=SILENT > installer.properties<br />
Then run the Uninstall with this command:<br />
• sudo /Applications/<strong>eInstruction</strong>/Response/Uninstall/Uninstall.app/Contents/MacOs/Uninstall<br />
For further support or further customization, please see below for more Information:<br />
• FLEXERA KB Article - Running an Installer Silently<br />
For additional specific version <strong>instructions</strong>, please reference the Appendix.<br />
14400 N. 87th St., Ste. 250, Scottsdale, AZ 85260 | 866.496.4949 | einstruction.com
Appendix<br />
Network/Silent Install Instructions, detailed per <strong>eInstruction</strong> ® software solution<br />
Wave Tools Windows/ Mac:<br />
• Windows Installer (.EXE):<br />
▪▪<br />
Command: Wave tools.exe /s /v”/qn /norestart”<br />
• Mac Package (.PKG):<br />
▪▪<br />
Command: sudo installer -pkg “Wave tools.pkg” -target /<br />
Insight360 Windows / Mac v2:<br />
• Windows Installer (.EXE):<br />
▪▪<br />
Command: Insight_360_Installer_Windows_2.x.exe /s /v”/qn /norestart”<br />
• Mac Package (.PKG):<br />
▪▪<br />
Command: sudo installer -pkg “Insight_360.pkg” -target /<br />
CPS / CPS PPT Windows:<br />
• Windows Installer (.EXE):<br />
▪▪<br />
▪▪<br />
Command: CPS_Web_6.72.293.62968.exe /s /v”/qn /norestart”<br />
CPS_PPT_Web_6.72.346.62947.exe /s /v”/qn /norestart”<br />
CPS / CPS PPT Mac:<br />
• Mac Package (.MPKG):<br />
▪▪<br />
Command: sudo installer -pkg “Install CPS.mpkg” -target /<br />
▪▪<br />
sudo installer -pkg “Install CPS for PowerPoint.mpkg” -target /<br />
Workspace Windows:<br />
• Windows Installer (.EXE):<br />
▪▪<br />
Command: Workspace_Windows_9.0.452.59838.exe /s /v”/qn /norestart”<br />
Workspace Mac/Linux:<br />
• Mac Application Bundle (.APP):<br />
▪▪<br />
See “Mac Silent Installer – APP” section above<br />
• Linux binary:<br />
▪ ▪ Command: sudo Workspace_Linux_Installer -i <strong>silent</strong><br />
14400 N. 87th St., Ste. 250, Scottsdale, AZ 85260 | 866.496.4949 | einstruction.com
Workspace Content Windows / Mac / Linux v 3.16:<br />
• Windows Installer (.EXE): (•The MSI, EXE and Data1.cab file must be together in the same directory)<br />
▪▪<br />
Command: Install_Workspace_Content.exe /s /v”/qn /norestart”<br />
Mac Application Bundle (.APP) See “Mac Silent Installer – APP” section above<br />
• Linux binary:<br />
▪▪<br />
Workspace Language Packs Windows :<br />
Command: sudo Install_Workspace_Content -i <strong>silent</strong><br />
• Windows Installer (.EXE) All-In-One Language Packs from CD: (The MSI, EXE and Data1.cab file must be<br />
together in the same directory)<br />
▪▪<br />
Command: Install_Workspace_Language_Packs.exe /s /v”/qn /norestart”<br />
• Windows Installer (.EXE) Individual Language Packs from Web<br />
▪▪<br />
ExamView ® Windows / Mac v8.0:<br />
Command: WorkspaceLanguagePackInstaller-Arabic.exe -i <strong>silent</strong><br />
• Windows Installer (.EXE):<br />
▪▪<br />
Command: ExamView_Retail_Windows_8.0.1289.63203.exe /s /v”/qn /norestart”<br />
• Mac Package (.PKG):<br />
▪▪<br />
Command: sudo installer -pkg “ExamView.pkg” -target /<br />
ExamView ® Learning Series Windows / Mac v9.1:<br />
• Windows Installer (.EXE):<br />
▪▪<br />
Command: EV_LS_Arizona_Windows_9.1x.exe /s /v”/qn /norestart”<br />
Note: The Windows <strong>silent</strong> install process for EV LS 9.1x will remove all previous versions<br />
in the default installation path.<br />
• Mac Package (.PKG):<br />
▪▪<br />
Command: sudo installer -pkg “EV_LS_Arizona.pkg” -target /<br />
Response Windows / Mac / Linux:<br />
• Windows Installer (.EXE):<br />
▪▪<br />
Command: Response_Windows_6.72.369.63146.exe /s /v”/qn /norestart”<br />
• Mac Application Bundle (.APP):<br />
▪▪<br />
• Linux binary:<br />
See “Mac Silent Installer – APP” section above<br />
▪▪<br />
Command: sudo Response_Linux_Installer -i <strong>silent</strong><br />
14400 N. 87th St., Ste. 250, Scottsdale, AZ 85260 | 866.496.4949 | einstruction.com
Device Manager Windows / Mac / Linux v7.1:<br />
Device Manager gets installed automatically with CPS, CPS PPT, Workspace, and Response<br />
• Windows Installer (.EXE):<br />
▪▪<br />
Command: Device_Manager_Windows_Installer_7.1.19.63896.exe -i <strong>silent</strong><br />
• Mac Application Bundle (.APP):<br />
▪▪<br />
See “Mac Silent Installer – APP” section above<br />
• Linux binary:<br />
▪▪<br />
Command: sudo Device_Manager_Installer -i <strong>silent</strong><br />
14400 N. 87th St., Ste. 250, Scottsdale, AZ 85260 | 866.496.4949 | einstruction.com