

Setup & Calibration Manual - Rice Lake Weighing Systems
Setup & Calibration Manual - Rice Lake Weighing Systems
Setup & Calibration Manual - Rice Lake Weighing Systems

You also want an ePaper? Increase the reach of your titles
YUMPU automatically turns print PDFs into web optimized ePapers that Google loves.
2.1 MTX/MTB<br />
The MTX and MTB Series scales have the same configuration and setup procedures.<br />
NOTE: Configuration settings must be set before calibrating the MTX/MTB series scales.<br />
2.1.1 Configuration<br />
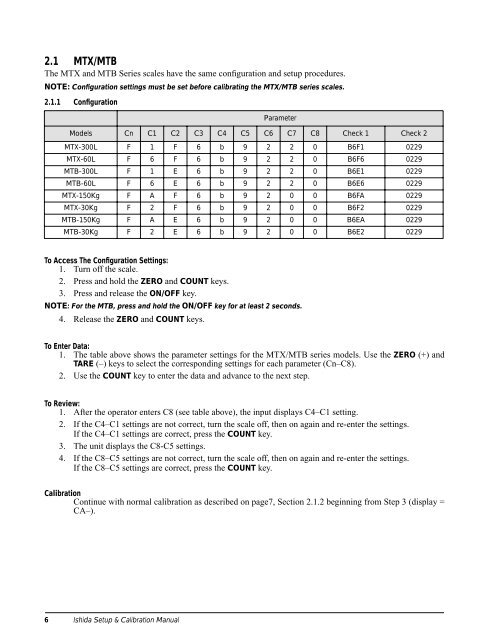
Parameter<br />
Models Cn C1 C2 C3 C4 C5 C6 C7 C8 Check 1 Check 2<br />
MTX-300L F 1 F 6 b 9 2 2 0 B6F1 0229<br />
MTX-60L F 6 F 6 b 9 2 2 0 B6F6 0229<br />
MTB-300L F 1 E 6 b 9 2 2 0 B6E1 0229<br />
MTB-60L F 6 E 6 b 9 2 2 0 B6E6 0229<br />
MTX-150Kg F A F 6 b 9 2 0 0 B6FA 0229<br />
MTX-30Kg F 2 F 6 b 9 2 0 0 B6F2 0229<br />
MTB-150Kg F A E 6 b 9 2 0 0 B6EA 0229<br />
MTB-30Kg F 2 E 6 b 9 2 0 0 B6E2 0229<br />
To Access The Configuration Settings:<br />
1. Turn off the scale.<br />
2. Press and hold the ZERO and COUNT keys.<br />
3. Press and release the ON/OFF key.<br />
NOTE: For the MTB, press and hold the ON/OFF key for at least 2 seconds.<br />
4. Release the ZERO and COUNT keys.<br />
To Enter Data:<br />
1. The table above shows the parameter settings for the MTX/MTB series models. Use the ZERO (+) and<br />
TARE (–) keys to select the corresponding settings for each parameter (Cn–C8).<br />
2. Use the COUNT key to enter the data and advance to the next step.<br />
To Review:<br />
1. After the operator enters C8 (see table above), the input displays C4–C1 setting.<br />
2. If the C4–C1 settings are not correct, turn the scale off, then on again and re-enter the settings.<br />
If the C4–C1 settings are correct, press the COUNT key.<br />
3. The unit displays the C8-C5 settings.<br />
4. If the C8–C5 settings are not correct, turn the scale off, then on again and re-enter the settings.<br />
If the C8–C5 settings are correct, press the COUNT key.<br />
<strong>Calibration</strong><br />
Continue with normal calibration as described on page7, Section 2.1.2 beginning from Step 3 (display =<br />
CA–).<br />
6 Ishida <strong>Setup</strong> & <strong>Calibration</strong> <strong>Manual</strong>


