

Setup & Calibration Manual - Rice Lake Weighing Systems
Setup & Calibration Manual - Rice Lake Weighing Systems
Setup & Calibration Manual - Rice Lake Weighing Systems

You also want an ePaper? Increase the reach of your titles
YUMPU automatically turns print PDFs into web optimized ePapers that Google loves.
2.2 MTE Series<br />
Follow the steps below to set up and calibrate the MTE Series scale.<br />
Step Action Display<br />
1 Start with the display ON.<br />
2 Push both ON/OFF plus VALUE key at the same time. C1 10<br />
3 Press the TARE key three times to access the Lb calibration mode. C2 20<br />
C3 1<br />
L 1<br />
4 Press the TARE key again to display the initial A/D value.<br />
8280<br />
NOTE: A normal A/D initial value is between 6000 and 10000 count.<br />
5 Press the ZERO key to set the A/D zero point value. 2000<br />
6 Place a 300 Lb weight on the scale platter, then press the TARE key to set the A/D full 70040 ± 2<br />
capacity value.<br />
7 Remove the weight, then press the ZERO key to set the A/D zero point value. 2000<br />
8 Place the weight on the platter again.<br />
NOTE: If the displayed value is not 70040 ± 2, remove the calibration weight and repeat the<br />
above procedures starting with Step 4.<br />
70040 ± 2<br />
9 Remove the plastic screw from the bottom of the display. Use a non-metallic device to<br />
press the memory switch, then replace the plastic screw.<br />
10 Turn the scale off, then on again. Test the calibration by placing a known weight on the scale.<br />
11 The MTE automatically calibrates the Kg mode.<br />
5<br />
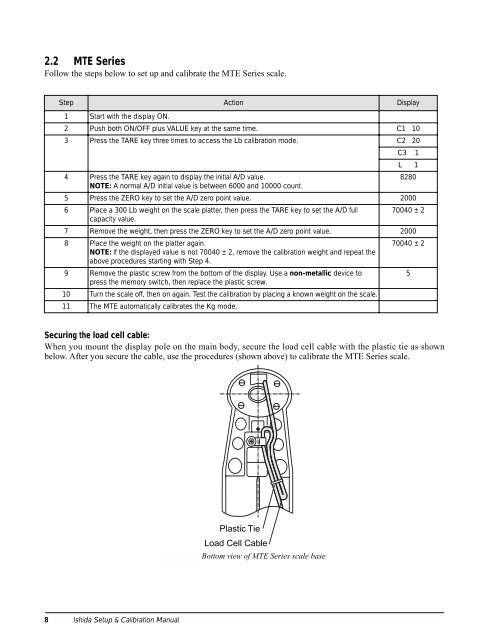
Securing the load cell cable:<br />
When you mount the display pole on the main body, secure the load cell cable with the plastic tie as shown<br />
below. After you secure the cable, use the procedures (shown above) to calibrate the MTE Series scale.<br />
Plastic Tie<br />
Load Cell Cable<br />
Figure 2-2. Bottom view of MTE Series scale base<br />
8 Ishida <strong>Setup</strong> & <strong>Calibration</strong> <strong>Manual</strong>


