Speedflow SF05K, SF10K and SF15K Instruction Manual
Speedflow SF05K, SF10K and SF15K Instruction Manual
Speedflow SF05K, SF10K and SF15K Instruction Manual

You also want an ePaper? Increase the reach of your titles
YUMPU automatically turns print PDFs into web optimized ePapers that Google loves.
DIAGRAM B - Cold draw off nearby<br />
5. OPERATION<br />
Switch on the mains supply. The external neon lamp indicates when the element<br />
is heating.<br />
USE THE LOWEST ACCEPTABLE TEMPERATURE SETTING TO<br />
SAVE ENERGY.<br />
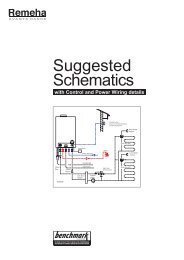
DIAGRAM C - Pressure above 4.2 bar<br />
4. ELECTRICAL INSTALLATION<br />
Accessory SF3 needed to prevent exp<strong>and</strong>ed<br />
warm water entering cold water supply.<br />
Kit comprises expansion vessel <strong>and</strong> check valve.<br />
Installation must comply with the latest IEE regulations.<br />
Accessory SF4 needed to prevent pressure<br />
relief valve discharging constantly<br />
Kit comprises pressure reducing valve,<br />
expansion vessel <strong>and</strong> check valve<br />
HOT WATER MAY PRESENT A SCALDING HAZARD, ESPECIALLY<br />
TO CHILDREN OR THE INFIRM. A THERMOSTATIC BLENDING<br />
VALVE IS RECOMMENDED IN HIGH RISK SITUATIONS.<br />
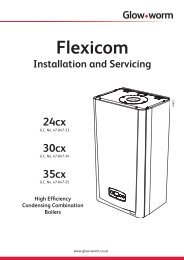
6. THERMAL CUTOUT RESET, ELEMENT REPLACEMENT<br />
AND ANODE REPLACEMENT<br />
DISCONNECT ELECTRICITY SUPPLY BEFORE MAINTENANCE.<br />
A re-settable safety thermal cut-out switches off the element in the event of the<br />
unit over-heating.<br />
The thermal cut-out may trip occasionally in normal use. If this happens the heater<br />
will not heat water <strong>and</strong> the element light will not come on.<br />
The thermal cut-out is located underneath the unit behind the grey access plate.<br />
Depending on the mounting position of the unit, you may need to uninstall the<br />
unit for ease of access to the cutout.<br />
In these cases, disconnect electricity supply <strong>and</strong> unscrew fl exible hose connectors.<br />
Drain water from heater <strong>and</strong> locate grey access plate.<br />
Remove the cover retaining screws <strong>and</strong> gently prise cover off.<br />
The thermal cut-out will be visible, as shown below.<br />
Thermal cutout -<br />
Press to reset.<br />
3<br />
Connection should be to a fused switched 13A spur. If the cable length is<br />
insuffi cient, it is recommended that the entire cable is replaced <strong>and</strong> no joins made<br />
to the original.<br />
This product must be earthed.<br />
IMPORTANT: DO NOT SWITCH THE HEATER ON UNLESS YOU ARE<br />
CERTAIN THAT IT IS COMPLETELY FULL OF WATER. FAILURE TO DO SO<br />
WILL VOID THE WARRANTY.<br />
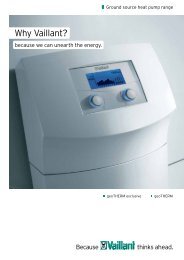
Element fl ange - remove to access anode.<br />
Element securing bolt (x4)<br />
Allen key required to remove.<br />
4