Colossus Instructions - Trakker Products
Colossus Instructions - Trakker Products
Colossus Instructions - Trakker Products

Create successful ePaper yourself
Turn your PDF publications into a flip-book with our unique Google optimized e-Paper software.
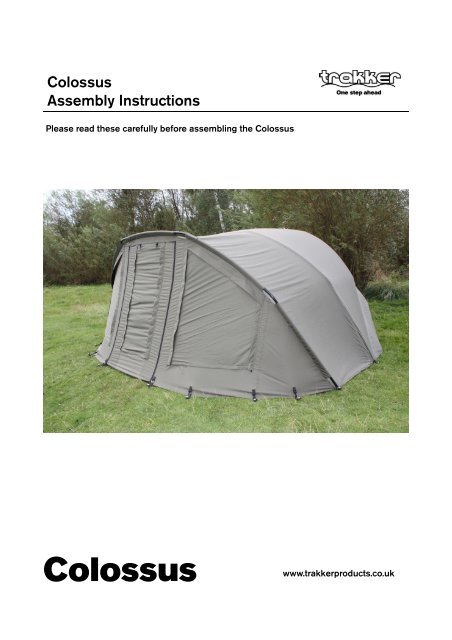
<strong>Colossus</strong><br />
Assembly <strong>Instructions</strong><br />
Please read these carefully before assembling the <strong>Colossus</strong><br />
<strong>Colossus</strong><br />
www.trakkerproducts.co.uk
Inner skin:<br />
Spread the heavy-duty groundsheet out in<br />
the area you wish to erect your <strong>Colossus</strong>;<br />
you will need a swim with plenty of room<br />
and the doorway is indicated by a small<br />
<strong>Trakker</strong> label.<br />
(Figure 1)<br />
This is the base that everything sits on,<br />
including the sewn-in groundsheet of the<br />
poly-cotton inner.<br />
Place the poly-cotton inner part of the bivvy<br />
in to the middle of the groundsheet, kneel<br />
down and spread the poles, plugging the<br />
frame sections together as you go, ensuring<br />
that the spigots are fully inserted. Once you<br />
have the poles assembled, you will need to<br />
clip the base of the poles into the sewn-in<br />
groundsheet of the inner bivvy, using the<br />
locating rings and corresponding hooks on<br />
the groundsheet. This will tension the ribs in<br />
to the correct position.<br />
(Figure 2)<br />
Attach the frame support across the top of<br />
the bivvy, taking up slack in the material as<br />
you go. Once you are happy with the tension<br />
you have on the inner frame, you can peg the<br />
rest of the points around the inner in place to<br />
secure it fully. We strongly recommend that<br />
you peg all of the pegging points for<br />
maximum stability.<br />
(Figure 3)<br />
Before you peg the inner bivvy in to place,<br />
make sure it is in the correct position, with<br />
front door corresponding with the pegging<br />
points in the heavy-duty groundsheet. To<br />
peg the poly-cotton inner out, start with the<br />
rear pegging points first. Once this has been<br />
done, pull the inner forwards and peg the<br />
front down through the holes in the outer<br />
groundsheet.<br />
(Figure 4)<br />
For extra storage space, the colossus inner<br />
features a mesh canopy, which simply clips<br />
in to place on the roof of the inner capsule.
Outer Skin:<br />
Now you have assembled the inner bivvy, take the Aquatexx® outer skin from its carry bag and<br />
lay it on the front of the heavy-duty groundsheet. Kneel down and spread the poles, plugging the<br />
frame sections together as you go, ensuring that the spigots are fully inserted. Now pull the<br />
back of the outer skin over the inner bivvy and ensure the pegging points either side of the door<br />
line up at the front of the bivvy. The front rib of the outer skin has its own base-plates, which<br />
need connecting to the hooks on the base of the heavy-duty groundsheet to tension the pole.<br />
Now the outer is in place, you can peg out the back pegging points and once this has been<br />
done, you can then peg the front of the outer skin in to place. Now peg out the rest of the<br />
pegging points, ensuring you tension the skin as you go. Again, there are many pegs here and<br />
we strongly recommend that you use all pegging points available to maximise the stability of the<br />
bivvy.<br />
(Figure 5)<br />
Disassembly:<br />
To disassemble your <strong>Colossus</strong>, reverse the above procedure, making sure that you are careful<br />
not to trap any material in any of the arms when folding them away, as this can cause wear in<br />
the cover if repeated over a period of time. When disconnecting the frame, un-plug the section<br />
and twist it 90 degrees to prevent it plugging itself back together. It may help if you shake the<br />
pole slightly when pulling it apart as this helps to dislocate the spigot from the sleeve.
<strong>Colossus</strong><br />
________________________________________________<br />
Aftercare:<br />
Your <strong>Colossus</strong> must be dried out as soon as possible after use to prevent mildew from forming.<br />
The cover should be treated once year with reputable reproofing agent compatible with<br />
hydrophilic material. At <strong>Trakker</strong> we recommend Fabsil and this can be purchased from our<br />
website www.trakkerproducts.co.uk. Look after your <strong>Colossus</strong> and it will give you years of<br />
service.<br />
<strong>Trakker</strong> <strong>Products</strong> Ltd Tel: 0044 (0) 114 2727783<br />
Unit C5B Fax: 0044 (0) 114 2725904<br />
Parkway Ind Estate<br />
Nunnery Drive<br />
Sheffield<br />
S2 1TA<br />
<strong>Colossus</strong><br />
www.trakkerproducts.co.uk