A-Lite Instructions - Trakker Products
A-Lite Instructions - Trakker Products
A-Lite Instructions - Trakker Products

You also want an ePaper? Increase the reach of your titles
YUMPU automatically turns print PDFs into web optimized ePapers that Google loves.
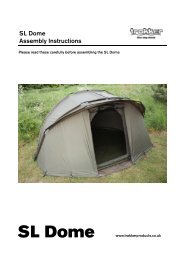
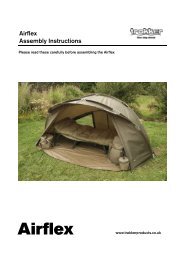
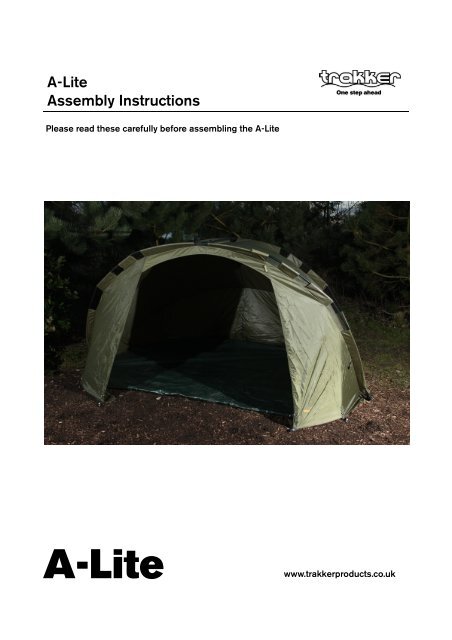
A-<strong>Lite</strong><br />
Assembly <strong>Instructions</strong><br />
Please read these carefully before assembling the A-<strong>Lite</strong><br />
A-<strong>Lite</strong><br />
www.trakkerproducts.co.uk
Select a suitable area to place your bivvy and spread the groundsheet, a small <strong>Trakker</strong><br />
label indicates the position of the doorway.<br />
Place the A-<strong>Lite</strong> in the centre of the ground sheet, Kneel down and splay the arms of the<br />
A-<strong>Lite</strong>, plugging together the frame sections as you go. Ensure the spigots are fully<br />
inserted as any that are loose could cause damage when erecting your bivvy.<br />
The assembled frame should be wider than the ground sheet. Attach the two rings on<br />
the inside edges of the frame to the supplied tension strap as this tensions the frame<br />
and takes up the play in the spigots.<br />
Peg the rings out at the rear of the A-<strong>Lite</strong> using the ground sheet as a guide. Please<br />
note that the ground sheet is slightly oversized to allow for uneven ground, so do not<br />
stretch it out too tight. The ground sheet is only a rough guide and adjustments can be<br />
made in any direction. Pull the A-<strong>Lite</strong> forward and peg down using the rings at either<br />
side of the door. Peg the rest of the pegging points out in a logical order and ensure the<br />
draft skirt is tucked under the ground sheet.<br />
The frame support system clips onto the poles in the centre of the bivvy and pushes the<br />
frame forward; this supports the A-<strong>Lite</strong> frame without the need to secure the front with<br />
pegs. However, this will compromise its stability and should only be done when the<br />
weather conditions allow.<br />
To dis-assemble the A-<strong>Lite</strong>, un-peg and collapse the frame, then Release the tension by<br />
disconnecting the tension strap. Starting from the centre, unplug the frame sections and<br />
twist them approximately 90 o to prevent them plugging back together. You may need to<br />
shake the poles slightly as you unplug them from the frame sections as this will help to<br />
release the spigot. Fold the arms into the middle as you go, making sure there is no<br />
material wrapped around the ends of the frame sections as this could damage your<br />
material, especially if done over a prolonged period of time.<br />
Your A-<strong>Lite</strong> must be dried out as soon as possible after use to prevent mildew from<br />
forming. We recommend that you reproof the material once a year with Fabsil Gold<br />
(available from the <strong>Trakker</strong> website: www.trakkerproducts.co.uk).<br />
Look after you’re A-<strong>Lite</strong> and it will give you years of service.
A-<strong>Lite</strong><br />
<strong>Trakker</strong> <strong>Products</strong> Ltd Tel: 0044 (0) 114 2727783<br />
Unit C5B Fax: 0044 (0) 114 2725904<br />
Parkway Ind Estate<br />
Nunnery Drive<br />
Sheffield<br />
S2 1TA<br />
A-<strong>Lite</strong><br />
www.trakkerproducts.co.uk