EXHAUSTO - Enervex
EXHAUSTO - Enervex
EXHAUSTO - Enervex

Create successful ePaper yourself
Turn your PDF publications into a flip-book with our unique Google optimized e-Paper software.
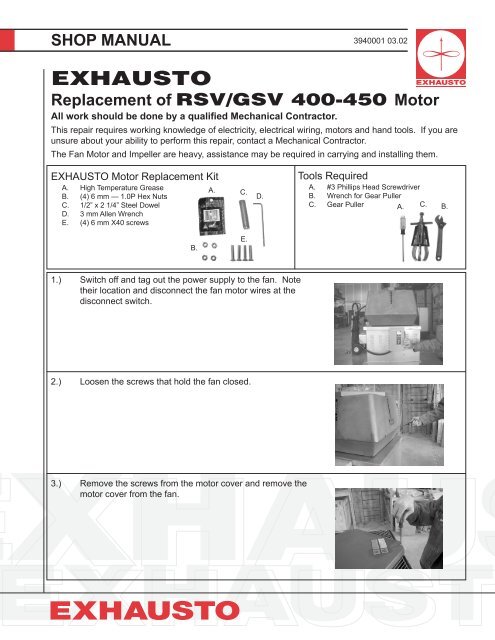
SHOP MANUAL 3940001 03.02<br />
<strong>EXHAUSTO</strong><br />
Replacement of RSV/GSV 400-450 Motor<br />
All work should be done by a qualified Mechanical Contractor.<br />
This repair requires working knowledge of electricity, electrical wiring, motors and hand tools. If you are<br />
unsure about your ability to perform this repair, contact a Mechanical Contractor.<br />
The Fan Motor and Impeller are heavy, assistance may be required in carrying and installing them.<br />
<strong>EXHAUSTO</strong> Motor Replacement Kit<br />
A. High Temperature Grease<br />
B. (4) 6 mm — 1.0P Hex Nuts<br />
C. 1/2” x 2 1/4” Steel Dowel<br />
D. 3 mm Allen Wrench<br />
E. (4) 6 mm X40 screws<br />
A.<br />
C.<br />
D.<br />
Tools Required<br />
A. #3 Phillips Head Screwdriver<br />
B. Wrench for Gear Puller<br />
C. Gear Puller A.<br />
C.<br />
B.<br />
B.<br />
E.<br />
1.) Switch off and tag out the power supply to the fan. Note<br />
their location and disconnect the fan motor wires at the<br />
disconnect switch.<br />
2.) Loosen the screws that hold the fan closed.<br />
3.) Remove the screws from the motor cover and remove the<br />
motor cover from the fan.
4.) Open the fan and place the motor cover inside to cover the<br />
stack opening. This will prevent any parts from falling down<br />
into the stack.<br />
5.) Note the location of the Impeller on the motor shaft. Using a<br />
3 mm Allen Wrench, loosen the (2) impeller set screws.<br />
Set Screws (2)<br />
6.) Mount puller on impeller hub.<br />
7.) This picture shows using the 1/2” dowel to aid in removal of<br />
the impeller<br />
8.) Support the Impeller while removing it from the motor shaft.
9.) Using a #3 Phillips Head Screwdriver, remove all but the top<br />
bolt.<br />
10.) Support the motor with one hand while removing the top bolt.<br />
11.) Lay the motor inside of the top section. Being careful not to lose<br />
the motor spacers. Close the lid.<br />
12.) If replacing the motor wiring, remove it from the electrical<br />
conduit. Otherwise, note their locations and disconnect motor<br />
wiring.<br />
NOTE: Before beginning the installation of the new motor. Check<br />
to see that the motor is set for the proper voltage. Some of our<br />
motors are capable of operating on 2 or more voltages. Please<br />
refer to the Motor Nameplate Data for more information.
13.) Remove the motor mounting plate and transfer it to the new<br />
motor.<br />
14.) Open the fan. Place one of the new motor mounting bolts<br />
through the top bolt hole and place one motor spacer onto<br />
the bolt.<br />
15.) While holding the bolt in place with one hand, position the<br />
motor with the motor wires hanging downward. Start the bolt<br />
into the plate.<br />
16.) Install the remaining bolts and spacers.<br />
Tighten the bolts equally in a cross<br />
pattern beginning with the bottom bolt.<br />
Repeat tightening sequence at least twice<br />
17.) Place one 6 mm Hex Nut onto the motor mounting bolt.<br />
Tighten the nut carefully! Over-tightening will loosen the<br />
bolts.
18.) Test fit the Impeller onto the new motor. It should slide<br />
on without much resistance. Filing or sanding of the inside<br />
of the impeller hub or motor shaft may be needed.<br />
19.) Remove the Impeller and coat the motor shaft with high<br />
temperature grease.<br />
20.) Place the impeller back onto the motor shaft. Be sure to<br />
position the Impeller so that it does not contact the top section<br />
of the fan or the impeller inlet. Tighten the set screws.<br />
21.) Reconnect all electrical wiring. Power-up the fan and check<br />
rotation. If rotation is incorrect, reverse the phasing.
Notes
Notes
For Technical Assistance, please call:<br />
(800) 255-2923<br />
1200 Northmeadow Pkwy, STE 180 • Roswell, GA 30076<br />
(770) 587-3238 (800) 255-2923 Fax (770) 587-4731<br />
info@exhausto.com us.exhausto.com