Build a singing steel guitar - Vintage Projects
Build a singing steel guitar - Vintage Projects
Build a singing steel guitar - Vintage Projects

You also want an ePaper? Increase the reach of your titles
YUMPU automatically turns print PDFs into web optimized ePapers that Google loves.
<strong>Build</strong><br />
a <strong>singing</strong><br />
<strong>steel</strong> <strong>guitar</strong><br />
By ROY L. CLOUGH<br />
Plug this multichord instrument<br />
into any good speaker<br />
and you'll make music like<br />
you never thought you could<br />
SO MAYBE it's not an authentic Hawaiian<br />
<strong>guitar</strong>. But what is? That amplified vibrato<br />
we associate with blood-stirring hulas and<br />
plaintive island tunes was really invented in<br />
California. At any rate, the sound has become<br />
part of American music—you hear it in hootenannies,<br />
dance bands and those weird sound<br />
effects in science-fiction movies.<br />
That sound is yours for a couple weekends'<br />
work. This standing model perches on 24-in. legs,
leaving both hands free for playing. Since the<br />
strings are "stopped" with a straight <strong>steel</strong> bar<br />
instead of the fingers, the choice of chords is limited<br />
to those that can be covered with the <strong>steel</strong>—<br />
plus a few open-string-and-<strong>steel</strong> combinations.<br />
Early <strong>guitar</strong>s were limited to major chords and<br />
a few bobtailed sevenths. Efforts to overcome<br />
this resulted in <strong>guitar</strong>s with several banks of<br />
strings, or with mechanical tone changers to alter<br />
the tuning.<br />
In both cases, provision had to be made for<br />
"damping" unused strings, to prevent them from<br />
vibrating sympathetically and producing unwanted<br />
dissonances. This involved some sort of<br />
mechanical or electrical switching method to take<br />
the unused strings out of play. Then, if you<br />
suddenly wanted to include the dead strings<br />
while playing, you had to switch them back on.<br />
This meant kicking a foot or hand lever.<br />
Our model avoids all this by using just one<br />
bank of 12 strings, hardly wider than a simple<br />
<strong>guitar</strong>. Thus, all damping can be performed as in<br />
classical <strong>steel</strong> technique—with the edge of the<br />
hand. Strings are arranged in three groups: The<br />
first five form the melody or major chords; the<br />
next four, a diminished seventh; and the last<br />
three—farthest from the player—make up the<br />
less-frequently-used minor chords. The result is<br />
a close-knit fingering arrangement which makes<br />
playing much easier and simplifies construction.<br />
build the body first<br />
Laminate the body from three pieces of exterior<br />
plywood or any %-in. kiln-dried stock. Cut<br />
out the recesses for volume and tone controls and<br />
phone jack.<br />
The headstock should be hardwood, preferably<br />
maple. After it's cut, you'll have to make up a<br />
taper block to hold it in position on the drill<br />
press while you bore clean, accurate holes for the<br />
shafts of the machine heads which are used for<br />
tuning the strings. When you've done the other<br />
drilling and slotting, check all parts for clearance<br />
and glue and screw the head in place, with a<br />
scrap of 1/4-in. Plexiglas between it and the top<br />
lamination, so you'll be able to slip in the nut<br />
later on. Finish and paint the <strong>guitar</strong> body now.<br />
Paint the hardboard fingerboard flat black and<br />
line off the fret positions with white ceiling-coater<br />
type paint in a draftsman's ruling pen. Follow<br />
the spacing chart carefully—these positions govern<br />
the pitch of the notes. Glue the fret board in<br />
place.<br />
The bridge must be iron angle—not brass or<br />
aluminum—because of the heavy load on it when<br />
the strings are taut. The nut, on the other hand,<br />
can be Plexiglas. The grooves in the beveled top<br />
edge are just deep enough, for now, to catch the<br />
strings. Push the nut into the slot between top<br />
lamination and headstock, using a paper shim for<br />
a tight fit, if necessary.<br />
The pickup core consists of two identicallydrilled<br />
pieces of 3/32-in. plastic sheet (styrene or<br />
acrylic). Cement in the 12 alnico cylinder magnets<br />
with poles facing the same way, then take<br />
one turn of electrical insulating tape around the<br />
magnets before winding on 1200 ohms' worth of<br />
No. 40 Nylclad magnet wire. A 1/4-lb. spool<br />
should do it, but you determine the amount with<br />
an ohmmeter, since the frequency response<br />
changes if you wind on too little or too much.<br />
For the winding, pin the assembly to a block of<br />
wood chucked in a lathe.<br />
Use short lengths of stranded hookup wire<br />
for leads. Cement the wire's insulation into the<br />
pickup body so the leads won't pull out. Close<br />
in the pickup with thin phenolic covers and wrap<br />
the whole unit in aluminum foil, rubber-cemented<br />
in place; leave a tab of foil to twist up in the<br />
wire that comes from the outside windings of the<br />
pickup. Cement the foil-covered pickup into a<br />
recess which you can now mark and cut to fit it<br />
—making it deep enough to provide the proper<br />
clearance between the top of the pickup and the<br />
strings. You can check this by laying a straightedge<br />
across the bridge and nut.<br />
the control panel<br />
The control panel and end plate can be cut<br />
from 1/8-in. hardboard—or more elegant opaque<br />
plastic, if you've some on hand. The plates are<br />
similar, except that there's only one 3/8-in. hole in<br />
the end one.<br />
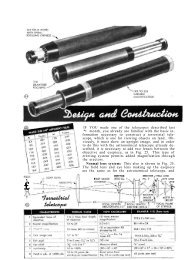
When you install the machine heads (available<br />
from any musical supply house) in the headstock,<br />
note the position of the worm drive. Measure<br />
off the bridge location from the nut, as<br />
shown; this is a critical dimension for pitch—it<br />
shouldn't be over 22-3/4 in or under 22-11/16 in<br />
Note there's a grounding lug under one of the<br />
screws; feed a bit of hook-up wire from it to<br />
the outside braid of the pickup cable. Wire up the<br />
control pots and the phone jack as shown in the<br />
schematic and screw their plates in place. The<br />
<strong>guitar</strong> plays through any standard amplifier and<br />
speaker system. In stringing and tuning it follow<br />
the diagram just below the wiring schematic,<br />
bearing in mind that in each group the lightestweight<br />
string is located farthest from the player.<br />
After tuning, pull lightly on all strings, to take
out the initial stretch, and retune. They'll stay<br />
tuned, now. Check the level of the strings by<br />
laying the <strong>steel</strong> bar across them. Squeaks mean<br />
a high string. Loosen it and file its nut groove<br />
a bit deeper—a touch-up operation that's necessary<br />
because the diameters of strings vary.<br />
The way the strings are located and tuned<br />
puts the major with its seventh and relative minor<br />
in a straight line across the fret board. This means<br />
no groping around for related chords. They're<br />
right under your fingertips—leaving you free to<br />
watch the hula your music inspires.