LS-135 & LS-150 Operator Manual - Welch Allyn
LS-135 & LS-150 Operator Manual - Welch Allyn
LS-135 & LS-150 Operator Manual - Welch Allyn

You also want an ePaper? Increase the reach of your titles
YUMPU automatically turns print PDFs into web optimized ePapers that Google loves.
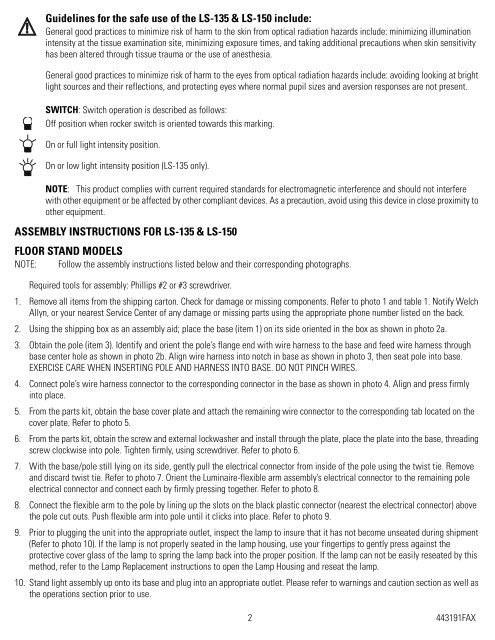
Guidelines for the safe use of the <strong>LS</strong>-<strong>135</strong> & <strong>LS</strong>-<strong>150</strong> include:<br />
General good practices to minimize risk of harm to the skin from optical radiation hazards include: minimizing illumination<br />
intensity at the tissue examination site, minimizing exposure times, and taking additional precautions when skin sensitivity<br />
has been altered through tissue trauma or the use of anesthesia.<br />
General good practices to minimize risk of harm to the eyes from optical radiation hazards include: avoiding looking at bright<br />
light sources and their reflections, and protecting eyes where normal pupil sizes and aversion responses are not present.<br />
SWITCH: Switch operation is described as follows:<br />
Off position when rocker switch is oriented towards this marking.<br />
On or full light intensity position.<br />
On or low light intensity position (<strong>LS</strong>-<strong>135</strong> only).<br />
NOTE: This product complies with current required standards for electromagnetic interference and should not interfere<br />
with other equipment or be affected by other compliant devices. As a precaution, avoid using this device in close proximity to<br />
other equipment.<br />
ASSEMBLY INSTRUCTIONS FOR <strong>LS</strong>-<strong>135</strong> & <strong>LS</strong>-<strong>150</strong><br />
FLOOR STAND MODE<strong>LS</strong><br />
NOTE: Follow the assembly instructions listed below and their corresponding photographs.<br />
Required tools for assembly: Phillips #2 or #3 screwdriver.<br />
1. Remove all items from the shipping carton. Check for damage or missing components. Refer to photo 1 and table 1. Notify <strong>Welch</strong><br />
<strong>Allyn</strong>, or your nearest Service Center of any damage or missing parts using the appropriate phone number listed on the back.<br />
2. Using the shipping box as an assembly aid; place the base (item 1) on its side oriented in the box as shown in photo 2a.<br />
3. Obtain the pole (item 3). Identify and orient the pole’s flange end with wire harness to the base and feed wire harness through<br />
base center hole as shown in photo 2b. Align wire harness into notch in base as shown in photo 3, then seat pole into base.<br />
EXERCISE CARE WHEN INSERTING POLE AND HARNESS INTO BASE. DO NOT PINCH WIRES.<br />
4. Connect pole’s wire harness connector to the corresponding connector in the base as shown in photo 4. Align and press firmly<br />
into place.<br />
5. From the parts kit, obtain the base cover plate and attach the remaining wire connector to the corresponding tab located on the<br />
cover plate. Refer to photo 5.<br />
6. From the parts kit, obtain the screw and external lockwasher and install through the plate, place the plate into the base, threading<br />
screw clockwise into pole. Tighten firmly, using screwdriver. Refer to photo 6.<br />
7. With the base/pole still lying on its side, gently pull the electrical connector from inside of the pole using the twist tie. Remove<br />
and discard twist tie. Refer to photo 7. Orient the Luminaire-flexible arm assembly’s electrical connector to the remaining pole<br />
electrical connector and connect each by firmly pressing together. Refer to photo 8.<br />
8. Connect the flexible arm to the pole by lining up the slots on the black plastic connector (nearest the electrical connector) above<br />
the pole cut outs. Push flexible arm into pole until it clicks into place. Refer to photo 9.<br />
9. Prior to plugging the unit into the appropriate outlet, inspect the lamp to insure that it has not become unseated during shipment<br />
(Refer to photo 10). If the lamp is not properly seated in the lamp housing, use your fingertips to gently press against the<br />
protective cover glass of the lamp to spring the lamp back into the proper position. If the lamp can not be easily reseated by this<br />
method, refer to the Lamp Replacement instructions to open the Lamp Housing and reseat the lamp.<br />
10. Stand light assembly up onto its base and plug into an appropriate outlet. Please refer to warnings and caution section as well as<br />
the operations section prior to use.<br />
2 443191FAX