Download - Fuji Xerox Printers
Download - Fuji Xerox Printers
Download - Fuji Xerox Printers

You also want an ePaper? Increase the reach of your titles
YUMPU automatically turns print PDFs into web optimized ePapers that Google loves.
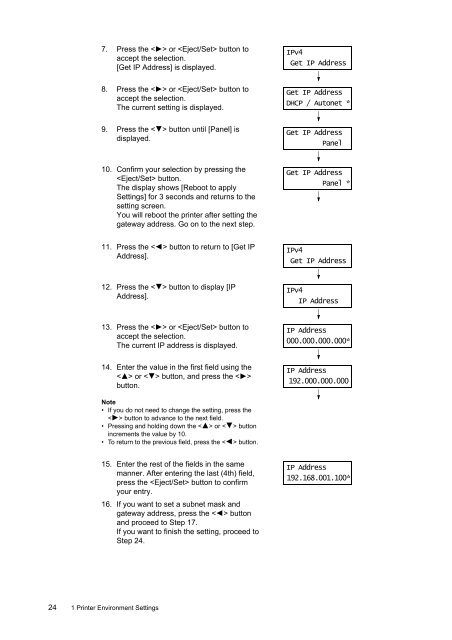
7. Press the < > or button to<br />
accept the selection.<br />
[Get IP Address] is displayed.<br />
IPv4<br />
Get IP Address<br />
8. Press the < > or button to<br />
accept the selection.<br />
The current setting is displayed.<br />
Get IP Address<br />
DHCP / Autonet *<br />
9. Press the < > button until [Panel] is<br />
displayed.<br />
Get IP Address<br />
Panel<br />
10. Confirm your selection by pressing the<br />
button.<br />
The display shows [Reboot to apply<br />
Settings] for 3 seconds and returns to the<br />
setting screen.<br />
You will reboot the printer after setting the<br />
gateway address. Go on to the next step.<br />
Get IP Address<br />
Panel *<br />
11. Press the < > button to return to [Get IP<br />
Address].<br />
IPv4<br />
Get IP Address<br />
12. Press the < > button to display [IP<br />
Address].<br />
IPv4<br />
IP Address<br />
13. Press the < > or button to<br />
accept the selection.<br />
The current IP address is displayed.<br />
IP Address<br />
000.000.000.000*<br />
14. Enter the value in the first field using the<br />
< > or < > button, and press the < ><br />
button.<br />
IP Address<br />
192.000.000.000<br />
Note<br />
• If you do not need to change the setting, press the<br />
< > button to advance to the next field.<br />
• Pressing and holding down the < > or < > button<br />
increments the value by 10.<br />
• To return to the previous field, press the < > button.<br />
15. Enter the rest of the fields in the same<br />
manner. After entering the last (4th) field,<br />
press the button to confirm<br />
your entry.<br />
16. If you want to set a subnet mask and<br />
gateway address, press the < > button<br />
and proceed to Step 17.<br />
If you want to finish the setting, proceed to<br />
Step 24.<br />
IP Address<br />
192.168.001.100*<br />
24 1 Printer Environment Settings