QRS Assessment in SIMS Working with Marksheets - EiS Kent
QRS Assessment in SIMS Working with Marksheets - EiS Kent
QRS Assessment in SIMS Working with Marksheets - EiS Kent

Create successful ePaper yourself
Turn your PDF publications into a flip-book with our unique Google optimized e-Paper software.
Quick Reference Sheet<br />
<strong>Assessment</strong> <strong>in</strong> <strong>SIMS</strong><br />
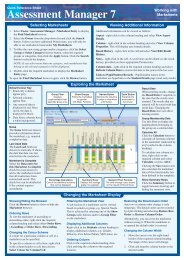
Select<strong>in</strong>g <strong>Marksheets</strong><br />
Work<strong>in</strong>g <strong>with</strong><br />
<strong>Marksheets</strong><br />
View<strong>in</strong>g Additional Information<br />
1. Select Focus | <strong>Assessment</strong> | Marksheet Entry to display the F<strong>in</strong>d<br />
Marksheet browser.<br />
2. Select the Owner from the drop-down list and click the Search button.<br />
Unless you have additional permissions, you will only be able to see<br />
marksheets listed under My <strong>Marksheets</strong>.<br />
3. To filter the view us<strong>in</strong>g groups and/or categories, click the Select<br />
Group or Select Category browser button, select the required groups<br />
or categories, then click the Apply button. Click the Search button to<br />
refresh the display.<br />
NOTE: If you select more than one category, only marksheets that<br />
belong to all selected categories are displayed.<br />
4. Double-click the marksheet to display the Marksheet Entry page.<br />
TIP: To open the F<strong>in</strong>d Marksheet browser aga<strong>in</strong>, click the Browse<br />
button.<br />
Additional <strong>in</strong>formation can be viewed as follows:<br />
Aspect - right-click the column head<strong>in</strong>g and select View Aspect<br />
Details.<br />
Column - right-click the column head<strong>in</strong>g and select View Column<br />
Properties to display any formula details.<br />
Result History - right-click the cell and select View/Edit Result<br />
History.<br />
Notes - right-click the cell and select View/Edit Note. A saved note<br />
can also be edited via the result history, provided you have appropriate<br />
permissions.<br />
Column data - right-click the required column head<strong>in</strong>g and select<br />
Refresh Column Data to restore the data to the po<strong>in</strong>t of the last save.<br />
L<strong>in</strong>ks to Pupil/Student Records - Pupil/student names <strong>in</strong> the<br />
marksheet are hyperl<strong>in</strong>ks to the Student Teacher View (read-only).<br />
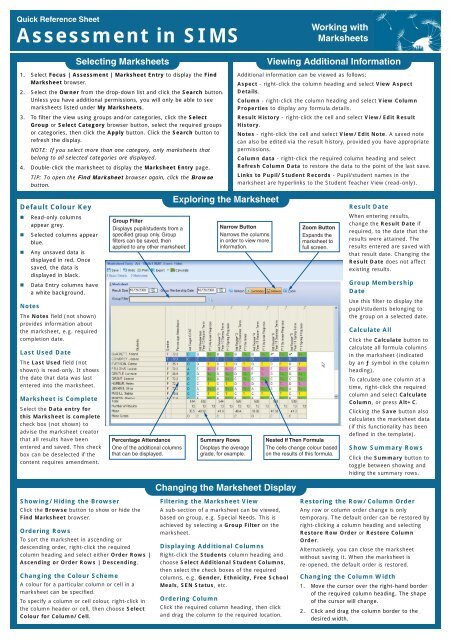
Default Colour Key<br />
• Read-only columns<br />
appear grey.<br />
• Selected columns appear<br />
blue.<br />
• Any unsaved data is<br />
displayed <strong>in</strong> red. Once<br />
saved, the data is<br />
displayed <strong>in</strong> black.<br />
• Data Entry columns have<br />
a white background.<br />
Notes<br />
The Notes field (not shown)<br />
provides <strong>in</strong>formation about<br />
the marksheet, e.g. required<br />
completion date.<br />
Last Used Date<br />
The Last Used field (not<br />
shown) is read-only. It shows<br />
the date that data was last<br />
entered <strong>in</strong>to the marksheet.<br />
Marksheet is Complete<br />
Select the Data entry for<br />
this Marksheet is complete<br />
check box (not shown) to<br />
advise the marksheet creator<br />
that all results have been<br />
entered and saved. This check<br />
box can be deselected if the<br />
content requires amendment.<br />
Group Filter<br />
Displays pupil/students from a<br />
specified group only. Group<br />
filters can be saved, then<br />
applied to any other marksheet.<br />
Percentage Attendance<br />
One of the additional columns<br />
that can be displayed.<br />
Explor<strong>in</strong>g the Marksheet<br />
Narrow Button<br />
Narrows the columns<br />
<strong>in</strong> order to view more<br />
<strong>in</strong>formation.<br />
Summary Rows<br />
Displays the average<br />
grade, for example.<br />
Chang<strong>in</strong>g the Marksheet Display<br />
Zoom Button<br />
Expands the<br />
marksheet to<br />
full screen.<br />
Nested If Then Formula<br />
The cells change colour based<br />
on the results of this formula.<br />
Result Date<br />
When enter<strong>in</strong>g results,<br />
change the Result Date if<br />
required, to the date that the<br />
results were atta<strong>in</strong>ed. The<br />
results entered are saved <strong>with</strong><br />
that result date. Chang<strong>in</strong>g the<br />
Result Date does not affect<br />
exist<strong>in</strong>g results.<br />
Group Membership<br />
Date<br />
Use this filter to display the<br />
pupil/students belong<strong>in</strong>g to<br />
the group on a selected date.<br />
Calculate All<br />
Click the Calculate button to<br />
calculate all formula columns<br />
<strong>in</strong> the marksheet (<strong>in</strong>dicated<br />
by an ƒ symbol <strong>in</strong> the column<br />
head<strong>in</strong>g).<br />
To calculate one column at a<br />
time, right-click the required<br />
column and select Calculate<br />
Column, or press Alt+C.<br />
Click<strong>in</strong>g the Save button also<br />
calculates the marksheet data<br />
(if this functionality has been<br />
def<strong>in</strong>ed <strong>in</strong> the template).<br />
Show Summary Rows<br />
Click the Summary button to<br />
toggle between show<strong>in</strong>g and<br />
hid<strong>in</strong>g the summary rows.<br />
Show<strong>in</strong>g/Hid<strong>in</strong>g the Browser<br />
Click the Browse button to show or hide the<br />
F<strong>in</strong>d Marksheet browser.<br />
Order<strong>in</strong>g Rows<br />
To sort the marksheet <strong>in</strong> ascend<strong>in</strong>g or<br />
descend<strong>in</strong>g order, right-click the required<br />
column head<strong>in</strong>g and select either Order Rows |<br />
Ascend<strong>in</strong>g or Order Rows | Descend<strong>in</strong>g.<br />
Chang<strong>in</strong>g the Colour Scheme<br />
A colour for a particular column or cell <strong>in</strong> a<br />
marksheet can be specified.<br />
To specify a column or cell colour, right-click <strong>in</strong><br />
the column header or cell, then choose Select<br />
Colour for Column/Cell.<br />
Filter<strong>in</strong>g the Marksheet View<br />
A sub-section of a marksheet can be viewed,<br />
based on group, e.g. Special Needs. This is<br />
achieved by select<strong>in</strong>g a Group Filter on the<br />
marksheet.<br />
Display<strong>in</strong>g Additional Columns<br />
Right-click the Students column head<strong>in</strong>g and<br />
choose Select Additional Student Columns,<br />
then select the check boxes of the required<br />
columns, e.g. Gender, Ethnicity, Free School<br />
Meals, SEN Status, etc.<br />
Order<strong>in</strong>g Column<br />
Click the required column head<strong>in</strong>g, then click<br />
and drag the column to the required location.<br />
Restor<strong>in</strong>g the Row/Column Order<br />
Any row or column order change is only<br />
temporary. The default order can be restored by<br />
right-click<strong>in</strong>g a column head<strong>in</strong>g and select<strong>in</strong>g<br />
Restore Row Order or Restore Column<br />
Order.<br />
Alternatively, you can close the marksheet<br />
<strong>with</strong>out sav<strong>in</strong>g it. When the marksheet is<br />
re-opened, the default order is restored.<br />
Chang<strong>in</strong>g the Column Width<br />
1. Move the cursor over the right-hand border<br />
of the required column head<strong>in</strong>g. The shape<br />
of the cursor will change.<br />
2. Click and drag the column border to the<br />
desired width.
Quick Reference Sheet<br />
<strong>Assessment</strong> <strong>in</strong> <strong>SIMS</strong><br />
Complet<strong>in</strong>g <strong>Marksheets</strong><br />
Select the required marksheet from the F<strong>in</strong>d Marksheet browser.<br />
Change the marksheet display, if required<br />
(e.g. column widths, order, show/hide browser, pupil/student detail columns, etc.).<br />
Enter results as appropriate. View column or aspect properties to determ<strong>in</strong>e the<br />
type of result expected (Mark, Grade, Comment, etc.), if required.<br />
View Summary Rows and calculate any formula columns, if required.<br />
Edit and correct results, as required.<br />
Select the Data entry for this Marksheet is complete check box<br />
so that the marksheet creator knows that you have f<strong>in</strong>ished.<br />
Save the marksheet.<br />
Aspect Types<br />
Work<strong>in</strong>g <strong>with</strong><br />
<strong>Marksheets</strong><br />
Mov<strong>in</strong>g Around <strong>Marksheets</strong><br />
Move around the marksheet us<strong>in</strong>g any of the<br />
follow<strong>in</strong>g methods:<br />
• Click <strong>in</strong> a cell to enter data<br />
• Right cursor key moves one cell to the right<br />
• Left cursor key moves one cell to the left<br />
• Up cursor key moves up one cell<br />
• Down cursor key moves down one cell<br />
• Tab key moves one cell to the right<br />
• Shift+Tab moves one cell to the left<br />
• Page Up and Page Down moves up or down<br />
the grid <strong>in</strong> steps equal to the number of rows<br />
that can be displayed on the screen<br />
• Ctrl+Home moves to the top left cell of the<br />
grid<br />
• Ctrl+End moves to the bottom right cell of the<br />
grid<br />
Enter<strong>in</strong>g Results<br />
There are five types of result (and therefore five aspect types) that can<br />
be entered <strong>in</strong>to a marksheet:<br />
Marks (Decimal) - e.g. 82.95, 56.45, etc.<br />
Marks (Integer) - e.g. 52, 67, 89, etc.<br />
Grades - e.g. A+, A, A-, etc.<br />
Age - <strong>in</strong> years/months, e.g. 11/6<br />
Comments - 1000 characters available<br />
The method of enter<strong>in</strong>g these results is similar for each aspect type but<br />
you must make sure that the appropriate result type is entered for that<br />
column. You cannot for example, enter a grade <strong>in</strong> a marks (decimal)<br />
column.<br />
If you are not sure of the type of result expected, right-click the<br />
appropriate column head<strong>in</strong>g and select View Aspect Details from the<br />
pop-up menu. A read-only dialog is opened,<br />
display<strong>in</strong>g <strong>in</strong>formation applicable to the relevant column.<br />
Click the Close button to return to the marksheet and enter the<br />
appropriate data <strong>in</strong> the cells for that column.<br />
Only the Result Date, Result and Notes fields are editable. Right-click<br />
<strong>in</strong> the cell and select View/Edit Result History.<br />
NOTES: To edit a result, you must be the Owner of the result, i.e. the<br />
Supervisor of the group <strong>in</strong>cluded <strong>in</strong> the marksheet, or have <strong>Assessment</strong><br />
Co-ord<strong>in</strong>ator/<strong>Assessment</strong> Operator permissions and can edit all results.<br />
Changes made <strong>in</strong> the View/Edit Result History dialog are saved<br />
automatically. If a change is made <strong>in</strong> error, manually edit back to the<br />
orig<strong>in</strong>al result.<br />
Edit<strong>in</strong>g the Result Date<br />
Open the View/Edit Result History dialog and select a new date from<br />
the Result Date calendar.<br />
Edit<strong>in</strong>g the Result<br />
Edit<strong>in</strong>g the Result History<br />
1. Open the View/Edit Result History dialog, double-click the<br />
appropriate Result cell and enter the new result.<br />
2. Press the Tab key to move off the cell.<br />
NOTE: If an <strong>in</strong>valid result is entered, the result reverts to the orig<strong>in</strong>al<br />
entry.<br />
Delet<strong>in</strong>g an Exist<strong>in</strong>g Result<br />
1. Open the View/Edit Result History dialog and click the result you<br />
want to delete.<br />
2. Click the Delete Result History button.<br />
3. Click the Yes button to confirm the deletion.<br />
Ensure that a valid result of the correct type is entered. Right-click the<br />
column head<strong>in</strong>g and select View Aspect Details, if necessary.<br />
1. Result Date - Today’s date is displayed by default. To enter and save<br />
results <strong>with</strong> a different date, enter the required date or click the<br />
Calendar button and select the date.<br />
2. Group Membership Date - Today’s date is displayed by default. If<br />
required, change the date then click the Refresh button (Ctrl+R).<br />
3. Navigate to the appropriate cell(s) and enter the result(s).<br />
Copy<strong>in</strong>g and Past<strong>in</strong>g Columns<br />
Right-click the column head<strong>in</strong>g to copy and paste its contents to a<br />
different column. It is only possible to copy the content of a column to<br />
another column <strong>in</strong> the same marksheet.<br />
Enter<strong>in</strong>g the Same Grade for Every Pupil/Student<br />
1. Right-click the required grade column head<strong>in</strong>g and choose Select<br />
Grade for Column.<br />
2. Highlight the required grade and click the OK button.<br />
Enter<strong>in</strong>g the Same Value for Every Pupil/Student<br />
1. Enter a value <strong>in</strong> a cell.<br />
2. Right-click the cell and select Copy Value.<br />
3. Right-click the column head<strong>in</strong>g and select Paste Value <strong>in</strong>to<br />
Column.<br />
Blank<strong>in</strong>g a Column<br />
This functionality can be used when enter<strong>in</strong>g<br />
results <strong>in</strong> a column that conta<strong>in</strong>s exist<strong>in</strong>g saved<br />
data. Right-click the column head<strong>in</strong>g and select<br />
Blank Column from the pop-up menu. Exist<strong>in</strong>g<br />
results will not be lost, as they are stored<br />
separately. It can also be used if a column has<br />
been completed <strong>in</strong> error but has not been saved.<br />
NOTE: Blank<strong>in</strong>g a column is temporary. It is advisable to re-enter all<br />
results for a blanked column before sav<strong>in</strong>g, so that a mixture of historic<br />
and new results is not shown when the marksheet is re-opened.<br />
This guide is based on the version of the software (7.116) <strong>in</strong><br />
use at the time of publication.<br />
© Capita Bus<strong>in</strong>ess Services Ltd 2009. All rights reserved.<br />
No part of this publication may be reproduced, photocopied,<br />
stored on a retrieval system, translated or transmitted <strong>with</strong>out<br />
the express written consent of the publisher.<br />
Capita Children’s Services, Frankl<strong>in</strong> Court,<br />
Priory Bus<strong>in</strong>ess Park, Stannard Way, Bedford, MK44 3JZ<br />
Tel: 01234 838080 http://www.sims.co.uk<br />
Did you know that<br />
you can click a<br />
Comment cell and<br />
press F4 to enter text?<br />
Also, click<strong>in</strong>g a<br />
comment column and<br />
press<strong>in</strong>g F5 enables<br />
you to Spell Check.