SP-200 BOOKLET - Sporty's
SP-200 BOOKLET - Sporty's
SP-200 BOOKLET - Sporty's

You also want an ePaper? Increase the reach of your titles
YUMPU automatically turns print PDFs into web optimized ePapers that Google loves.
<strong>SP</strong>-<strong>200</strong> <strong>BOOKLET</strong> 9/28/04 5:46 PM Page 3<br />
Sporty’s <strong>SP</strong>-<strong>200</strong><br />
Handheld NAV/COM<br />
Operator’s Manual<br />
© <strong>200</strong>3 Sportsman’s Market, Inc.
<strong>SP</strong>-<strong>200</strong> <strong>BOOKLET</strong> 9/28/04 5:46 PM Page 4<br />
Simplified Directions<br />
1. Install the batteries.<br />
2. Turn the unit on (rotate volume knob clockwise).<br />
3. Enter the first six digits of desired frequency<br />
(1 2 2 9 7 5 for 122.975 MHz).<br />
4. Listen and transmit.
<strong>SP</strong>-<strong>200</strong> <strong>BOOKLET</strong> 9/28/04 5:46 PM Page 5<br />
Table of Contents<br />
General Information . . . . . . . . . . . . . . . . . . . . . . . . . . . . . . . . . . . 2<br />
Introduction . . . . . . . . . . . . . . . . . . . . . . . . . . . . . . . . . . . . . . . 2<br />
Features . . . . . . . . . . . . . . . . . . . . . . . . . . . . . . . . . . . . . . . . . . 2<br />
Warranty . . . . . . . . . . . . . . . . . . . . . . . . . . . . . . . . . . . . . . . . . 3<br />
License Requirements . . . . . . . . . . . . . . . . . . . . . . . . . . . . . . . 3<br />
Antenna Requirements . . . . . . . . . . . . . . . . . . . . . . . . . . . . . . . 3<br />
Batteries . . . . . . . . . . . . . . . . . . . . . . . . . . . . . . . . . . . . . . . . . . 4<br />
Precautions . . . . . . . . . . . . . . . . . . . . . . . . . . . . . . . . . . . . . . . . 6<br />
Controls . . . . . . . . . . . . . . . . . . . . . . . . . . . . . . . . . . . . . . . . . . . . . 8<br />
Top View . . . . . . . . . . . . . . . . . . . . . . . . . . . . . . . . . . . . . . . . . 9<br />
Left Side View . . . . . . . . . . . . . . . . . . . . . . . . . . . . . . . . . . . . 10<br />
Front View . . . . . . . . . . . . . . . . . . . . . . . . . . . . . . . . . . . . . . . 10<br />
Right Side View . . . . . . . . . . . . . . . . . . . . . . . . . . . . . . . . . . . 11<br />
Operating Instructions . . . . . . . . . . . . . . . . . . . . . . . . . . . . . . . . 12<br />
Manual Frequency Selection . . . . . . . . . . . . . . . . . . . . . . . . . . 12<br />
Frequency Search . . . . . . . . . . . . . . . . . . . . . . . . . . . . . . . . . . 13<br />
Frequency Memory . . . . . . . . . . . . . . . . . . . . . . . . . . . . . . . . 14<br />
Memory Recall . . . . . . . . . . . . . . . . . . . . . . . . . . . . . . . . . . . . 15<br />
Memory Scan . . . . . . . . . . . . . . . . . . . . . . . . . . . . . . . . . . . . . 16<br />
Memory Clear . . . . . . . . . . . . . . . . . . . . . . . . . . . . . . . . . . . . 17<br />
Transmitting . . . . . . . . . . . . . . . . . . . . . . . . . . . . . . . . . . . . . . 18<br />
VOR Operations . . . . . . . . . . . . . . . . . . . . . . . . . . . . . . . . . . . 19<br />
Localizer Operations . . . . . . . . . . . . . . . . . . . . . . . . . . . . . . . 21<br />
Key Lock . . . . . . . . . . . . . . . . . . . . . . . . . . . . . . . . . . . . . . . . 22<br />
Screen and Keypad Lighting . . . . . . . . . . . . . . . . . . . . . . . . . . 22<br />
Last Frequency . . . . . . . . . . . . . . . . . . . . . . . . . . . . . . . . . . . . 22<br />
Accessories . . . . . . . . . . . . . . . . . . . . . . . . . . . . . . . . . . . . . . . . . . 23<br />
Specifications . . . . . . . . . . . . . . . . . . . . . . . . . . . . . . . . . . . . . . . . 27
<strong>SP</strong>-<strong>200</strong> <strong>BOOKLET</strong> 9/28/04 5:46 PM Page 6<br />
General Information<br />
Introduction<br />
This manual contains only operational information relative to<br />
Sporty’s <strong>SP</strong>-<strong>200</strong> NAV/COM. This manual is not intended as a<br />
service or maintenance manual and does not contain any theory or<br />
schematic diagrams.<br />
Features<br />
Sporty’s <strong>SP</strong>-<strong>200</strong> is a hand-held, aircraft communication and<br />
navigation transceiver with the following features:<br />
• 2,280 COMM frequencies (118.000 MHz to 136.975 MHz)<br />
(unit will also receive 137.000 MHz to 142.975 MHz)<br />
• 8.33KHz spacing<br />
• <strong>200</strong> NAV frequencies (108.000 MHz to 117.950 MHz)<br />
• Last Frequency Function<br />
• Duplex communications — unit transmits on the Flight<br />
Service Station (FSS) frequency, 122.100 MHz, while<br />
listening over the VOR frequency<br />
• Course Deviation Indicator (CDI) with Omni Bearing<br />
Selector (OBS) and TO/FROM Indicator<br />
• Localizer with CDI<br />
• VOR with CDI<br />
• Back-Lit Keypad and Screen<br />
• 20 Memory Channels<br />
• Full Feature Scanner — Scan the 20 Memory Channels or<br />
the entire frequency range<br />
• Key Lock<br />
• Low Battery Indicator<br />
• External Power and Antenna Options<br />
• Easiest to use hand-held transceiver available<br />
2
<strong>SP</strong>-<strong>200</strong> <strong>BOOKLET</strong> 9/28/04 5:46 PM Page 7<br />
Warranty<br />
Our Warranty is simple. If, in its first five years, your <strong>SP</strong>-<strong>200</strong><br />
NAV/COM fails due to defective workmanship or parts under normal<br />
use, we will replace it or repair it at our option.<br />
The warranty does not apply to units subject to misuse, battery<br />
leakage, neglect or accidents. Nor does the warranty apply to units<br />
damaged by lightning, excess current, moisture, units repaired or<br />
altered outside the factory, units with altered or removed serial<br />
numbers, or units used with accessories other than those listed in the<br />
Accessories section of this manual.<br />
To have your unit serviced under this warranty, return it postage<br />
paid with proof of purchase to: Sporty’s Pilot Shop, Clermont<br />
County/Sporty’s Airport, Batavia, Ohio 45103-9747.<br />
Note: When returning your unit for warranty service, do NOT<br />
include any accessories (belt clip, headset adapter, etc.).<br />
If your <strong>SP</strong>-<strong>200</strong> is no longer under warranty, you may still have it<br />
serviced at Sporty’s. Call Sporty’s Customer Service at 513.735.9000<br />
for instructions.<br />
License Requirements<br />
Operating the transceiver in an aircraft that has an aircraft radio station<br />
license requires no additional license. To get an aircraft radio station<br />
license fill out FCC Form 601. Operating the radio on the ground<br />
requires a ground station authorization. This form is available from<br />
the FCC by calling 800.418.3676.<br />
Antenna Requirements<br />
Included with the <strong>SP</strong>-<strong>200</strong> is a flexible rubber antenna (Rubber Duck),<br />
which may be used for both COMM and NAV frequencies. However,<br />
an external antenna may be needed if operating inside an aircraft (must<br />
be properly installed by an aircraft radio shop), automobile or other<br />
metal enclosure.<br />
3
<strong>SP</strong>-<strong>200</strong> <strong>BOOKLET</strong> 9/28/04 5:46 PM Page 8<br />
On top of the <strong>SP</strong>-<strong>200</strong> is a BNC connector, which is standard for use<br />
on aircraft radios. Therefore, little difficulty should be encountered in<br />
connecting an existing aircraft radio antenna to the <strong>SP</strong>-<strong>200</strong>.<br />
When using the flexible antenna inside an aircraft or other enclosure,<br />
the optional remote antenna mount allows the antenna to be<br />
positioned in a side window or other favorable location for improved<br />
reception. The <strong>SP</strong>-<strong>200</strong> can also be positioned in a side window or<br />
other favorable location by using the optional suction cup transceiver<br />
holder. See the accessories section of this manual for these products.<br />
Batteries<br />
An Alkaline Battery Pack is standard equipment with the <strong>SP</strong>-<strong>200</strong>.<br />
Alkaline batteries, such as Eveready ® Energizers, are a good power<br />
source for a backup radio because they have excellent storage life and<br />
no maintenance is required.<br />
The Alkaline Battery Pack is NOT rechargeable. The batteries must<br />
be replaced. To replace the batteries, turn the power OFF and then<br />
remove the battery pack from the unit by pushing the Battery Pack<br />
Release up (see Controls section of this manual) and sliding the<br />
battery pack left toward the Battery Pack Release. The case splits into<br />
two sections by pressing on the top of the case. Push in the center on<br />
the positive (+) terminal side and gently pull the two sections apart.<br />
Eight 1.5 volt AA alkaline batteries are required.<br />
Replace the batteries by following the positive (+) and negative (-)<br />
terminal markings inside the case. When the batteries are replaced, snap<br />
the two sections back together and attach the battery pack to the radio.<br />
To attach the Alkaline or Nicad Battery Pack, make sure the power is<br />
OFF and then align the grooves on the <strong>SP</strong>-<strong>200</strong> and battery pack.<br />
Slide the battery pack onto the radio until it locks in place.<br />
The following table is a conservative estimate of the life of fresh<br />
Alkaline batteries at some common duty cycles with the audio<br />
background noise silenced by the Squelch.<br />
4
<strong>SP</strong>-<strong>200</strong> <strong>BOOKLET</strong> 9/28/04 5:46 PM Page 9<br />
Life Transmit Receive Standby Light<br />
15.4 hrs 2% 3% 95% Off<br />
12.8 hrs 2% 3% 95% On<br />
9.5 hrs 10% 10% 80% Off<br />
7.9 hrs 10% 10% 80% On<br />
6.0 hrs 20% 20% 60% Off<br />
5.0 hrs 20% 20% 60% On<br />
The optional Nicad (nickel-cadmium) Battery Pack is rechargeable and<br />
must be charged upon receipt before using. If possible, completely<br />
discharge the Nicad Battery Pack before recharging. Repeated<br />
recharging, after minimal usage (discharging) of Nicad batteries, results<br />
in very poor battery performance.<br />
The Nicad Battery Pack is not recommended when the <strong>SP</strong>-<strong>200</strong><br />
will be used as a backup radio. The storage life of Nicad batteries<br />
is not as predictable as Alkaline batteries. The Nicad Battery Pack<br />
is recommended when the <strong>SP</strong>-<strong>200</strong> will be used on a daily or frequent<br />
basis.<br />
The following table is a conservative estimate of the life of a fully<br />
charged Nicad Battery Pack at some common duty cycles with the<br />
audio background noise silenced by the Squelch.<br />
Life Transmit Receive Standby Light<br />
6.0 hrs 2% 3% 95% Off<br />
5.0 hrs 2% 3% 95% On<br />
3.8 hrs 10% 10% 80% Off<br />
3.2 hrs 10% 10% 80% On<br />
2.5 hrs 20% 20% 60% Off<br />
2.1 hrs 20% 20% 60% On<br />
Use only the chargers listed in the Accessories section of this manual.<br />
When the alkaline batteries need replaced or the Nicad Battery Pack<br />
needs recharged, the screen will display “BATT” as shown below and<br />
the selected frequency will flash.<br />
Note: Will maintain memory one hour<br />
with batteries removed.<br />
122.975<br />
BATT<br />
5
<strong>SP</strong>-<strong>200</strong> <strong>BOOKLET</strong> 9/28/04 5:46 PM Page 10<br />
Precautions<br />
• Changes or modifications not expressly approved by the<br />
manufacturer for compliance could void the user’s authority<br />
to operate the equipment.<br />
• Never attempt to service this unit yourself. It should be<br />
referred to qualified service personnel. Please read the<br />
Warranty section in this manual.<br />
• If liquid spills or some solid object falls into the unit, remove<br />
the battery pack or external power adapter and have the unit<br />
checked by a qualified person before further operation.<br />
• The optional Nicad (nickel-cadmium) Battery Pack is<br />
recyclable. It may be unlawful in your state to dispose of<br />
Nicad batteries in a municipal landfill. Please contact your<br />
local solid waste officials for disposal and recycling options.<br />
• Never dispose of batteries or battery packs in a fire. They<br />
may explode.<br />
• Never leave weak or dead batteries in the Alkaline Battery<br />
Pack. They may leak and cause permanent damage.<br />
• Never store a battery pack where it may be accidentally<br />
shorted.<br />
• Never crush or disassemble a Nicad battery pack. Nicad<br />
batteries contain toxic chemicals.<br />
• Never store a discharged Nicad Battery Pack. The cell<br />
polarity may reverse, making it impossible to recharge.<br />
• Use only the approved external power adapters, Nicad<br />
battery chargers and battery packs listed in the Accessories<br />
section of this manual.<br />
6
<strong>SP</strong>-<strong>200</strong> <strong>BOOKLET</strong> 9/28/04 5:46 PM Page 11<br />
• Never touch an external antenna when the danger of<br />
lightning is present.<br />
• Do not leave the transceiver near heat sources, such as<br />
radiators or air ducts, or place the transceiver in an<br />
environment where the radio will be subjected to moisture,<br />
excessive dust, shock or mechanical vibration.<br />
• Abrasive cleaners or chemical solvents may mar or damage<br />
the case. Clean the transceiver with a soft cloth dampened<br />
with a mild detergent solution.<br />
• If operating the transceiver at temperatures outside the range<br />
of -20°F to 122°F (-30°C to 50°C), the LCD (screen) may<br />
not display the selected frequency. If the <strong>SP</strong>-<strong>200</strong> is used<br />
in temperatures lower than the recommended range, the<br />
characters being displayed may change very slowly. These<br />
irregularities will disappear, with no harm to the <strong>SP</strong>-<strong>200</strong>,<br />
when operation is resumed within the recommended<br />
temperature range.<br />
7
<strong>SP</strong>-<strong>200</strong> <strong>BOOKLET</strong> 9/28/04 5:46 PM Page 12<br />
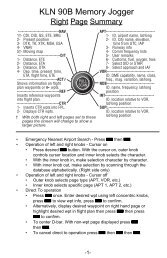
Controls<br />
TOP<br />
B<br />
C<br />
A<br />
ANT<br />
EAR<br />
MIC<br />
D<br />
LAST FREQ<br />
E<br />
SQ<br />
OFF<br />
VOL<br />
F<br />
J<br />
<strong>SP</strong>-<strong>200</strong><br />
V<br />
G<br />
LIGHT<br />
H<br />
PTT<br />
K<br />
L<br />
I<br />
M<br />
N<br />
1 2 3<br />
4 5 6<br />
7 8 9<br />
DWN 0 UP<br />
KEY LOC MEM CLR<br />
CLR<br />
ALL CLR<br />
OBS<br />
MEM<br />
RCL<br />
P<br />
Q<br />
R<br />
S<br />
DC 9V<br />
W<br />
O<br />
<strong>SP</strong>-<strong>200</strong><br />
T<br />
U<br />
LEFT SIDE FRONT RIGHT SIDE<br />
8
<strong>SP</strong>-<strong>200</strong> <strong>BOOKLET</strong> 9/28/04 5:46 PM Page 13<br />
This section serves only to identify and briefly describe the <strong>SP</strong>-<strong>200</strong>’s<br />
external features. Please see the Operating Instructions section for<br />
detailed instructions on the use of the <strong>SP</strong>-<strong>200</strong>.<br />
Top View<br />
(A)<br />
(B)<br />
(C)<br />
(D)<br />
(E)<br />
(F)<br />
Antenna Connector<br />
The flexible rubber antenna or an external antenna may be<br />
attached to this BNC connector.<br />
Earphone Jack<br />
Using the optional Headset Adapter (#8635A) the earphone of<br />
a standard aviation noise attenuating headset may be plugged<br />
into this jack. The internal speaker is disabled when this jack<br />
is used.<br />
Microphone Jack<br />
Using the optional Headset Adapter (#8635A) the microphone<br />
of a standard aviation noise attenuating headset may be<br />
plugged into this jack. The internal microphone is disabled<br />
only when this jack is used with a microphone connected to<br />
the adapter.<br />
Last Frequency<br />
Lets you toggle between your last two frequencies.<br />
Squelch<br />
Rotate clockwise to increase squelch and counterclockwise to<br />
decrease squelch.<br />
On/Off and Volume Control<br />
Combination on/off and volume control. Turn the knob<br />
clockwise from the OFF position to turn the unit on and to<br />
increase volume. Turn the knob counterclockwise to decrease<br />
volume and to turn the unit off.<br />
9
<strong>SP</strong>-<strong>200</strong> <strong>BOOKLET</strong> 9/28/04 5:46 PM Page 14<br />
Left Side View<br />
(G)<br />
(H)<br />
(I)<br />
Light Button<br />
This button activates the back lighting for the screen and<br />
keypad.<br />
Push-To-Talk Button<br />
This button activates the internal microphone or an external<br />
microphone when using the optional headset adapter.<br />
Battery Pack Release<br />
Pushing this button upward releases the battery pack for<br />
removal.<br />
Front View<br />
(J)<br />
(K)<br />
(L)<br />
(M)<br />
(N)<br />
(O)<br />
Screen<br />
This LCD displays the current frequency, Course Deviation<br />
Indicator (CDI) and other information to the operator.<br />
Internal Speaker<br />
Internal Microphone<br />
Numeric Keypad<br />
These keys are used whenever the <strong>SP</strong>-<strong>200</strong> requires a numeric<br />
input such as setting the frequency or Omni Bearing Selector<br />
(OBS).<br />
Down Key/Key Lock Key<br />
This key is used to select the next lower frequency, select the<br />
next lower OBS setting or to initiate search and scan functions.<br />
This key is also used in combination with the Clear key to lock<br />
out all inputs to the keyboard.<br />
Memory Clear Key<br />
This key is used to delete a selected memory channel.<br />
10
<strong>SP</strong>-<strong>200</strong> <strong>BOOKLET</strong> 9/28/04 5:46 PM Page 15<br />
(P)<br />
(Q)<br />
(R)<br />
(S)<br />
(T)<br />
(U)<br />
Clear Key<br />
This key is used to clear erroneous key entries and to exit<br />
functions such as search, scan, and memory storage and<br />
recall. This key is also used in combination with the Down<br />
key to lock out all inputs to the keyboard.<br />
Omni Bearing Selector Key<br />
This key is used to activate the Omni Bearing Selector (OBS)<br />
function for the Course Deviation Indicator (CDI).<br />
Memory Key<br />
This key is used while storing frequencies in one of the 20<br />
memory channels.<br />
Recall Key<br />
This key is used to recall stored frequencies from the 20<br />
memory channels.<br />
Up Key<br />
This key is used to select the next higher frequency, select the<br />
next higher OBS setting or to initiate search and scan functions.<br />
Battery Pack<br />
Right Side View<br />
(V)<br />
(W)<br />
Wrist Strap Pin<br />
The wrist strap (included as standard equipment) attaches to<br />
this location.<br />
External Power Jack<br />
The <strong>SP</strong>-<strong>200</strong> may be powered externally, with or without a<br />
battery pack attached, or the Nicad batteries charged by<br />
plugging the optional 12/24 Volt Cigarette Lighter Power<br />
Adapter (#8634A) or the 115 Volt Wall Power Adapter<br />
(#8633A) into this location.<br />
11
<strong>SP</strong>-<strong>200</strong> <strong>BOOKLET</strong> 9/28/04 5:46 PM Page 16<br />
Operating Instructions<br />
To perform the following functions you must be in the basic operating<br />
mode of the <strong>SP</strong>-<strong>200</strong>. To ensure that you are in the basic operating<br />
mode, press the clear key until the last frequency you entered<br />
manually is displayed.<br />
Manual Frequency Selection<br />
The <strong>SP</strong>-<strong>200</strong> will receive <strong>200</strong> NAV frequencies (108.000 MHz to<br />
117.950 MHz) and 3000 COMM frequencies (118.000 MHz to<br />
142.975 MHz). The <strong>SP</strong>-<strong>200</strong> will transmit on 2280 COMM frequencies<br />
(118.000 MHz to 136.975 MHz). The frequency currently selected is<br />
always displayed in the lower right-hand side of the <strong>SP</strong>-<strong>200</strong>’s screen.<br />
122.975<br />
From the example above, the <strong>SP</strong>-<strong>200</strong> is receiving 122.975 MHz.<br />
To manually enter a desired frequency such as 118.700 MHz, enter<br />
1 1 8 7 0 0 using the numeric keypad. As each digit is entered, the<br />
flashing cursor moves to the next digit. Six digits are always required<br />
to select a frequency.<br />
The <strong>SP</strong>-<strong>200</strong> will return to the previous frequency if there is a pause of<br />
five seconds or more between key entries while entering a new<br />
frequency. The Clear Key may be pressed any time prior to entering the<br />
fifth digit to clear the digits entered and return to the previous frequency.<br />
Any frequency outside of the range listed above will not be accepted.<br />
The <strong>SP</strong>-<strong>200</strong> will beep when such a digit is entered. For example, starting<br />
any frequency selection with a number other than 1 or attempting to place<br />
a 5, 6, 7, 8 or 9 in the second digit will result in a beep.<br />
12
<strong>SP</strong>-<strong>200</strong> <strong>BOOKLET</strong> 9/28/04 5:46 PM Page 17<br />
Frequency Search<br />
To manually search through the frequency range (COMM and NAV),<br />
the Up Key or Down Key may be pressed at any time to select the<br />
next higher or lower frequency. This uses 8.33 KHz steps in the<br />
COMM frequency range and 50 KHz steps in the NAV frequency<br />
range. The Up and Down Keys may be pressed repeatedly to continue<br />
changing the selected frequency.<br />
To automatically search the entire COMM frequency range for a<br />
broadcasting signal, the Up Key or Down Key may be pressed and<br />
held for one second. The Screen will display SEARCH as seen below.<br />
SEARCH<br />
122.975<br />
The frequencies will either scroll up or down in 8.33 KHz steps<br />
depending upon whether the Up or Down Key was used to initiate<br />
the Search.<br />
When a broadcasting signal is found, the word SEARCH will flash and<br />
the <strong>SP</strong>-<strong>200</strong> will stop temporarily on that frequency. If the broadcasting<br />
signal is cut off for more than two seconds, the Search will resume<br />
until another signal is found. When 142.975 MHz is reached during an<br />
upward Search, the Search automatically continues at 118.000 MHz.<br />
Likewise, when 118.000 MHz is reached during a downward Search,<br />
the Search automatically continues at 142.975 MHz.<br />
The Search may be canceled at any time by pressing the Clear Key.<br />
The direction of the Search may also be reversed at any time by<br />
pressing and holding the Up or Down Key (whichever is appropriate)<br />
for one second.<br />
It is very important that the Squelch be properly adjusted prior to<br />
initiating a Search. The background static received with the squelch<br />
off may be strong enough to disrupt a Search. If a Search gets “stuck”<br />
on a frequency with too much background noise, increase the Squelch<br />
or press and hold the Up or Down Key for one second to skip that<br />
frequency and resume Searching.<br />
13
<strong>SP</strong>-<strong>200</strong> <strong>BOOKLET</strong> 9/28/04 5:46 PM Page 18<br />
Frequency Memory<br />
The <strong>SP</strong>-<strong>200</strong> has 20 memory channels numbered 00 to 19 to store those<br />
frequencies used most often. These memory channels may be used to<br />
store COMM and NAV frequencies.<br />
Select a desired frequency, such as 122.975, to be stored by using<br />
either manual frequency selection or frequency search. To store this<br />
frequency, press the Memory Key. The following screen will appear.<br />
01<br />
122.975<br />
The first available memory channel will be displayed on the top line<br />
of the screen. In this example, memory channel 01 is the first<br />
available location, so we know a frequency is already stored in<br />
memory channel 00. To store the frequency, press the Memory Key a<br />
second time. The screen will now display the following for one<br />
second to verify 122.975 has been stored in memory channel 01.<br />
01 122.975<br />
122.975<br />
You may also overwrite an existing memory channel or select an<br />
available memory channel other than the first one displayed. Once<br />
again, select the desired frequency and then press the Memory Key.<br />
01<br />
122.975<br />
Now press either the Up or Down Key to scroll through the 20<br />
memory channels. If a memory channel is already storing a<br />
frequency, the memory channel number and the stored frequency will<br />
14
<strong>SP</strong>-<strong>200</strong> <strong>BOOKLET</strong> 9/28/04 5:46 PM Page 19<br />
be displayed on the top line of the screen while your selected<br />
frequency remains on the bottom line.<br />
04 118.700<br />
122.975<br />
Once the desired memory channel is selected on the top line of the<br />
screen, press the Memory Key and the frequency will be stored.<br />
Remember, if a channel was selected that was already storing a<br />
frequency, the old frequency will be erased when your selected<br />
frequency is stored.<br />
You may exit the memory function by pressing the Clear Key any<br />
time prior to storing the frequency (pressing the Memory Key the<br />
second time).<br />
Memory Recall<br />
To recall a frequency stored in a memory channel, press the Recall<br />
Key. The memory channel number and the corresponding frequency<br />
of the first memory channel that is being used will be displayed. This<br />
frequency immediately becomes the active frequency and is received<br />
by the <strong>SP</strong>-<strong>200</strong>.<br />
01<br />
122.975<br />
In this example, memory channel 01 is listed first, so we know that no<br />
frequency is currently being stored in memory channel 00.<br />
At this point you may select any stored memory channel by either<br />
pressing the Up or Down Key to scroll through the stored frequencies<br />
or by entering the memory channel number by using the Numeric<br />
15
<strong>SP</strong>-<strong>200</strong> <strong>BOOKLET</strong> 9/28/04 5:46 PM Page 20<br />
Keypad. For example, to receive memory channel 08 you may either:<br />
1. Press the Recall Key followed by the Up or Down Key to scroll to 08<br />
or<br />
2. Press the Recall Key followed by 0 8.<br />
Once in the Recall function, the <strong>SP</strong>-<strong>200</strong> stays in Recall until the Clear<br />
Key is pressed. This allows you to sequence your frequencies in the<br />
order you may wish to use them. For example, you may wish to store<br />
your airport’s ATIS in memory channel 00, Clearance Delivery in<br />
channel 01, Ground in channel 02, Tower in channel 03 and Departure<br />
in channel 04. For this example you would press the Recall Key once<br />
followed by the Up Key for every frequency change instead of having<br />
to enter each frequency manually.<br />
While in the Recall function the only entries accepted are Numeric<br />
Keypad entries between 00 and 19, the Up or Down Key or the Clear<br />
Key. All other inputs cause the <strong>SP</strong>-<strong>200</strong> to beep. Remember, you may<br />
press the Clear Key at any time to exit the Recall function. Once you<br />
have left the Recall function, the <strong>SP</strong>-<strong>200</strong> will remain on the last<br />
frequency that was being received.<br />
Memory Scan<br />
The Memory Scan function is very similar to the Search function,<br />
except it only scans those COMM frequencies stored in the memory<br />
channels. To Scan the memory channels, press the Recall Key to enter<br />
the Recall function. Then press and hold the Up or Down Key for one<br />
second to initiate either an upward or downward Scan. The word<br />
SCAN will appear on the top line of the screen and the memory<br />
channel number and frequency will be displayed on the bottom line of<br />
the screen.<br />
01<br />
SCAN<br />
122.975<br />
When a broadcasting signal is found, the word SCAN will flash and<br />
the <strong>SP</strong>-<strong>200</strong> will stop temporarily on that frequency. If the<br />
16
<strong>SP</strong>-<strong>200</strong> <strong>BOOKLET</strong> 9/28/04 5:46 PM Page 21<br />
broadcasting signal is cut off for more than two seconds, the Scan will<br />
resume until another signal is found.<br />
The Scan may be canceled at any time by pressing the Clear Key. The<br />
direction of the Scan may also be reversed at any time by pressing and<br />
holding the Up or Down Key (whichever is appropriate) for one second.<br />
Once you have pressed the Clear Key to exit a Scan, you are still in<br />
the Recall function. Press the Clear Key again to exit the Recall<br />
function. The <strong>SP</strong>-<strong>200</strong> will remain on the last frequency received.<br />
It is very important that the Squelch be properly adjusted prior to<br />
initiating a Scan. The background static received with the squelch off<br />
may be strong enough to disrupt a Scan. If a Scan gets “stuck” on a<br />
frequency with too much background noise, increase the Squelch or<br />
press and hold the Up or Down Key for one second to skip that<br />
frequency and resume Scanning. Please note, since ATIS broadcasts<br />
continually, a Scan will always stop on an ATIS frequency if it is<br />
included in the Scan.<br />
Memory Clear<br />
To clear or erase a memory channel, press and hold the Clear Key<br />
followed by the Memory Key. Release the keys when MEM CLR is<br />
displayed on the top line of the screen.<br />
MEM CLR<br />
01 122.975<br />
The first memory channel with a stored frequency will be displayed<br />
on the bottom line of the screen. Press the Up or Down Key to scroll<br />
through the memory channels to select the memory channel to clear.<br />
Once the desired memory channel is displayed, press the Memory<br />
Clear Key (also the 0 Key on the Numeric Keypad) to clear the<br />
selected channel. Additional channels may be cleared by once again<br />
pressing the Up or Down Key to make another selection and then<br />
pressing the Memory Clear Key.<br />
17
<strong>SP</strong>-<strong>200</strong> <strong>BOOKLET</strong> 9/28/04 5:46 PM Page 22<br />
Press the Clear Key at any time to exit the Memory Clear function.<br />
To clear every memory channel, hold down the Clear Key while turning<br />
on the power. Please note, there is no way to reverse this process. The<br />
screen will display the following to verify all of the memory channels<br />
have been cleared.<br />
ALL<br />
MEM CLR<br />
Transmitting<br />
Press the Push-To-Talk Button (PTT) at any time while tuned to a<br />
COMM frequency to broadcast over the selected frequency. While the<br />
PTT is pressed the screen will display TX next to frequency to verify<br />
the <strong>SP</strong>-<strong>200</strong> is broadcasting.<br />
TX122.975<br />
Release the PTT to end the transmission and the <strong>SP</strong>-<strong>200</strong> will once again<br />
receive the selected COMM frequency. If the optional Headset Adapter<br />
is being used with the microphone plugged in the <strong>SP</strong>-<strong>200</strong>, the <strong>SP</strong>-<strong>200</strong>’s<br />
internal microphone will be deactivated and the microphone on the<br />
headset may be activated by either pressing the <strong>SP</strong>-<strong>200</strong>’s PTT or<br />
pressing an inline, remote PTT.<br />
Anytime the PTT is pressed while receiving a NAV frequency, the<br />
Duplex Communications feature will be activated. Duplex<br />
Communications enable the <strong>SP</strong>-<strong>200</strong> to broadcast over 122.100 MHz<br />
(Flight Service Station frequency) while listening over the NAV<br />
frequency. For example, if the selected frequency is 117.000 MHz (a<br />
NAV frequency) and the PTT is pressed, the <strong>SP</strong>-<strong>200</strong> will broadcast over<br />
122.100 MHz. When the PTT is released the <strong>SP</strong>-<strong>200</strong> will once again<br />
receive 117.000 MHz.<br />
18
<strong>SP</strong>-<strong>200</strong> <strong>BOOKLET</strong> 9/28/04 5:46 PM Page 23<br />
VOR Operations<br />
Enter a NAV frequency (108.000 MHz to 117.950 MHz) by using<br />
either manual frequency selection or frequency search. The frequency<br />
selection is done in the same manner used to select a COMM<br />
frequency. As usual, the selected frequency will appear in the lower<br />
right-hand side of the screen.<br />
If a VOR signal is not received on the selected frequency, the screen<br />
will display the selected frequency only and nothing else. This is<br />
similar to the flag on a panel-mounted NAV display. When a VOR<br />
signal is received, a screen similar to the following will be displayed.<br />
090T117.000<br />
The Course Deviation Indicator (CDI) is on the top line of the screen.<br />
The CDI will always be initially centered when a VOR signal is first<br />
acquired. When receiving a VOR signal, each division on the CDI<br />
(starting with the edge of the center circle) represents a two degree<br />
deviation. Therefore, the CDI on the <strong>SP</strong>-<strong>200</strong> has the ability to display<br />
up to a 10 degree deviation to the right or left in VOR mode. The<br />
following example shows a 6 degree deviation to the right if your<br />
desired course is flying to the station on the 90 degree radial (fly left<br />
towards the needle to be on course).<br />
090T117.000<br />
The three digits in the lower left-hand side of the screen are the Omni<br />
Bearing Selector (OBS) setting. Whenever the CDI needle is<br />
centered, such as when a VOR signal is first received, the OBS setting<br />
represents your bearing to or radial from the selected VOR station.<br />
The T or F following the OBS setting specifies whether the OBS<br />
setting is a bearing to (T) or a radial from (F) the VOR.<br />
19
<strong>SP</strong>-<strong>200</strong> <strong>BOOKLET</strong> 9/28/04 5:46 PM Page 24<br />
The Clear Key may be pressed to toggle the OBS between To and From<br />
indications. In the previous diagram, the OBS setting was 090T. By<br />
pressing the Clear Key, the following OBS setting of 270F is obtained.<br />
270F117.000<br />
The OBS setting will remain set to the initial bearing or radial until<br />
otherwise changed. The CDI needle will continuously update to show<br />
the deviation from the selected radial or bearing as the aircraft moves.<br />
To enter a desired bearing or radial, press the OBS Key. The OBS<br />
setting will begin to flash. Enter the desired three digit radial or<br />
bearing using the Numeric Keypad. For example, OBS 0 3 0 will<br />
enter 30 degrees as the OBS setting. The CDI will automatically<br />
display the deviation from the selected bearing or radial. This process<br />
may be exited any time prior to entering the third digit by pressing the<br />
Clear Key. As long as the OBS setting is flashing, the <strong>SP</strong>-<strong>200</strong> will<br />
accept numeric inputs between 0 and 360. Once three digits have<br />
been entered, or five seconds pass without an entry being completed,<br />
the <strong>SP</strong>-<strong>200</strong> will not accept additional input until the OBS Key is<br />
pressed again.<br />
Another method of selecting an OBS setting is using the Up and<br />
Down Keys. Once the OBS Key is pressed and the OBS setting is<br />
flashing, the Up or Down Key may be used to scroll through all 360<br />
degrees until the desired radial or bearing is selected. Input from the<br />
Up or Down Key is accepted as long as the OBS setting is flashing.<br />
Once the desired bearing or radial is selected, the flashing will<br />
“time out” after five seconds.<br />
The CDI needle may be centered and the actual bearing to or radial<br />
from the selected VOR station may be displayed at any time by<br />
pressing the OBS Key followed by the Clear Key. Pressing the Clear<br />
Key any time the OBS setting is flashing will center the CDI.<br />
Remember, any time the OBS Key is pressed, the OBS setting will<br />
flash. During this time the <strong>SP</strong>-<strong>200</strong> will accept three digits, the UP or<br />
Down Key or the Clear Key to change the OBS setting.<br />
20
<strong>SP</strong>-<strong>200</strong> <strong>BOOKLET</strong> 9/28/04 5:46 PM Page 25<br />
To exit the navigation function, enter a COMM frequency. As long as<br />
the OBS setting is not flashing, any inputs, such as manual frequency<br />
selection or recalling a frequency stored in a memory channel, will<br />
change the active frequency being received. If the NAV frequency<br />
was selected using the Recall Function, the Clear Key must be pressed<br />
to exit the Recall Function before using manual frequency selection.<br />
Localizer Operations<br />
Enter a Localizer frequency by using either manual frequency<br />
selection or frequency search. The selected frequency will appear in<br />
the lower right-hand side of the screen.<br />
If a Localizer signal is not received on the selected frequency, the<br />
screen will display the selected frequency only and nothing else. This<br />
is similar to the flag on a panel-mounted display. When a Localizer<br />
signal is received, a screen similar to the following will be displayed.<br />
LOC 108.100<br />
The Course Deviation Indicator (CDI) is on the top line of the screen.<br />
When receiving a Localizer signal, each division on the CDI (starting<br />
with the edge of the center circle) represents a one degree deviation.<br />
Therefore, the CDI on the <strong>SP</strong>-<strong>200</strong> has the ability to display up to a 5<br />
degree deviation to the right or left in Localizer mode. The above<br />
example shows a 3 degree deviation to the left (fly right towards the<br />
needle to be on course).<br />
The bottom line of the screen displays LOC to identify the selected<br />
frequency as a Localizer. To exit the Localizer function, enter a<br />
COMM or VOR frequency. If the Localizer frequency was selected<br />
using the Recall Function, the Clear Key must be pressed to exit the<br />
Recall Function before using manual frequency selection.<br />
21
<strong>SP</strong>-<strong>200</strong> <strong>BOOKLET</strong> 9/28/04 5:46 PM Page 26<br />
Key Lock<br />
Inputs from the keypad may be locked out at any time by holding the<br />
Clear key and pressing the Down key. When Key Lock is active,<br />
KEY.L is displayed at the bottom of the screen as shown below.<br />
KEY.L<br />
122.975<br />
Key Lock is deactivated by holding the Clear key and pressing the<br />
Down key a second time. Key Lock only locks out the <strong>SP</strong>-<strong>200</strong>’s<br />
keypad. The PTT and Light functions are not affected.<br />
Screen and Keypad Lighting<br />
Press and release the Light Button to activate the <strong>SP</strong>-<strong>200</strong>’s screen and<br />
keypad lighting for five seconds. To activate the screen and keypad<br />
lighting indefinitely, press and hold the Light Button for one second<br />
until a beep is heard. When this is done, the Light Button must be<br />
pressed a second time to turn the lighting off.<br />
Last Frequency<br />
Pressing the Last Frequency button allows you to toggle between your<br />
last two frequencies—great for switching between ground and tower.<br />
22
<strong>SP</strong>-<strong>200</strong> <strong>BOOKLET</strong> 9/28/04 5:46 PM Page 27<br />
Accessories<br />
Call Sporty’s Pilot Shop at 1.800.<strong>SP</strong>ORTYS (776.7897) or<br />
513.735.9000, or fax 513.735.9<strong>200</strong> to order any of the following<br />
optional accessories. Accessories are also available at<br />
www.sportys.com/sp<strong>200</strong>.<br />
Spare Alkaline Battery Case and Rubber Terminal Cover (#7153A)<br />
Spare Alkaline Battery Case holds eight AA batteries,<br />
allowing for a quick change of batteries while in-flight.<br />
An ideal way to ensure fresh batteries are on board if the<br />
<strong>SP</strong>-<strong>200</strong> is to be used as a backup radio. Rubber Terminal<br />
Cover covers and protects the electrical contacts on the<br />
bottom of the <strong>SP</strong>-<strong>200</strong>.<br />
Nicad Battery Pack (#8631A)<br />
The Nicad Battery Pack should be used if the <strong>SP</strong>-<strong>200</strong> will be<br />
used on a daily or frequent basis. Requires at least one of the<br />
four available Power Adapters/Chargers (#8632A, #8633A,<br />
#8628A or #8634A). Charges in 12 hours. Due to the<br />
unpredictable shelf life of Nicad (nickel-cadmium) batteries,<br />
the Nicad Battery Pack is not recommended when the <strong>SP</strong>-<strong>200</strong><br />
will be used as a backup radio.<br />
Desktop Nicad Battery Charger (#8632A)<br />
A desktop drop-in charger for the Nicad Battery Pack. This<br />
two-piece charger includes the molded desktop base and<br />
Wall Power Adapter/Nicad Battery Charger (#8633A). For<br />
desktop use, the Wall Power Adapter/Nicad Battery Charger is<br />
plugged into the desktop base. The included Wall Power<br />
Adapter/Nicad Battery Charger may also be plugged directly<br />
into the <strong>SP</strong>-<strong>200</strong> as described below. Please note, the optional<br />
Leather Holster (#8638A) must be removed prior to using<br />
23
<strong>SP</strong>-<strong>200</strong> <strong>BOOKLET</strong> 9/28/04 5:46 PM Page 28<br />
Desktop Nicad Battery Charger. The <strong>SP</strong>-<strong>200</strong> will not<br />
transmit while sitting in the Desktop Nicad Battery Charger.<br />
Desktop base measures 2.76" h x 3.90" w x 3.46" d. Power<br />
cord measures 6 ft. long.<br />
115 Volt Wall Power Adapter/Nicad Battery Charger (#8633A)<br />
Allows the <strong>SP</strong>-<strong>200</strong> to be powered externally from a 115 Volt<br />
wall outlet. Plugs into the side of the <strong>SP</strong>-<strong>200</strong>, which allows<br />
the unit to be powered with or without a battery pack<br />
attached. Also charges the optional Nicad Battery Pack<br />
(#8631A). Included with the 115 Volt Desktop Nicad Battery<br />
Charger (#8632A). Safe for use with the Alkaline Battery<br />
Pack. Power cord measures 6 ft. long.<br />
230 Volt Wall Power Adapter/Nicad Battery Charger (#8628A)<br />
Allows the <strong>SP</strong>-<strong>200</strong> to be powered externally from a 230 Volt<br />
wall outlet. Plugs into the side of the <strong>SP</strong>-<strong>200</strong>, which allows<br />
the unit to be powered with or without a battery pack<br />
attached. Also charges the optional Nicad Battery Pack<br />
(#8631A). Safe for use with the Alkaline Battery Pack.<br />
Power cord measures 6 ft. long.<br />
Cigarette Lighter Power Adapter/Nicad Battery Charger (#8634A)<br />
Allows the <strong>SP</strong>-<strong>200</strong> to be powered externally from a cigarette<br />
lighter in aircraft with 12, 24 or 28 Volt electrical systems<br />
(accepts input voltage of 10 to 30 Volts DC). Plugs into the<br />
side of the <strong>SP</strong>-<strong>200</strong>, which allows the unit to be powered with<br />
or without a battery pack attached. Also charges the optional<br />
Nicad Battery Pack (#8631A). Safe for use with the Alkaline<br />
Battery Pack. Power cord measures 6 ft. long.<br />
24
<strong>SP</strong>-<strong>200</strong> <strong>BOOKLET</strong> 9/28/04 5:46 PM Page 29<br />
Headset Adapter (#8635A)<br />
Allows the use of a standard aviation noise attenuating headset.<br />
The <strong>SP</strong>-<strong>200</strong>’s internal speaker and microphone are disabled<br />
only when the Headset Adapter is attached with the<br />
microphone plugged in the <strong>SP</strong>-<strong>200</strong>.<br />
Leather Holster (#8638A)<br />
Custom made to allow access to the <strong>SP</strong>-<strong>200</strong>’s exterior buttons.<br />
Made of black leather with a detachable belt loop.<br />
Metal Belt Clip (#3920A)<br />
Attaches to the back of the <strong>SP</strong>-<strong>200</strong> with screws installed in the<br />
unit as standard equipment.<br />
Suction Cup Transceiver Holder (#6489A)<br />
Allows the <strong>SP</strong>-<strong>200</strong> to be mounted on a window or other<br />
smooth surface with a rubber suction cup. An internal ratchet<br />
locks the <strong>SP</strong>-<strong>200</strong> firmly in place. Measures 5.00" h x 4.00" w<br />
x 3.63" d.<br />
Antenna Adapter (#7140A)<br />
Allows the <strong>SP</strong>-<strong>200</strong> to be connected to an existing aircraft antenna.<br />
Home VHF Antenna (#8107A)<br />
Includes antenna, hardware for mounting through roof and<br />
50 feet of cable.<br />
25
<strong>SP</strong>-<strong>200</strong> <strong>BOOKLET</strong> 9/28/04 5:46 PM Page 30<br />
Magnetic Base Antenna (#7986A)<br />
Includes antenna, magnetic base and 10 feet of cable.<br />
Permanent Mount Car Antenna Kit (#7995A)<br />
Includes antenna, hardware for mounting through metal surface<br />
and 10 feet of cable.<br />
Cordura ® Carrying Case (#8629A)<br />
Made of rugged Du Pont Cordura ® nylon this patented carrying<br />
case is an ideal way to keep the <strong>SP</strong>-<strong>200</strong> dust-free and close<br />
at hand. Features sewn-in sleeve for antenna storage. Black<br />
carrying case features a sewn belt loop.<br />
Remote Antenna Mount (#1646A)<br />
Suction cup mount allows the antenna to be positioned in a side<br />
window or other favorable location for improved reception.<br />
The <strong>SP</strong>-<strong>200</strong> can then be mounted on a kneeboard, yoke or<br />
instrument panel. Cable measures 6 ft. long.<br />
26
<strong>SP</strong>-<strong>200</strong> <strong>BOOKLET</strong> 9/28/04 5:46 PM Page 31<br />
Specifications<br />
General<br />
Communication Frequencies<br />
2280 Frequencies from 118.000 MHz to 136.975 MHz (8.33 KHz steps)<br />
Receive Only Frequencies<br />
720 Frequencies from 137.000 MHz to 142.975 MHz (8.33 KHz steps)<br />
Navigation Frequencies<br />
<strong>200</strong> Frequencies from 108.000 MHz to 117.950 MHz (50 KHz steps)<br />
Memory Channels<br />
20 channels numbered 00 to 19<br />
Weight with Alkaline Battery Pack (including antenna)<br />
16.64 oz. (473 grams)<br />
Weight with Nicad Battery Pack (including antenna)<br />
15.68 oz. (443 grams)<br />
Weight without battery pack (including antenna)<br />
8.16 oz. (233 grams)<br />
Dimensions with either battery pack<br />
Height 6.65 in. (169 mm)<br />
Width 2.36 in. (60 mm)<br />
Depth 1.46 in. (37 mm)<br />
Dimensions without battery pack<br />
Height 3.90 in. (99 mm)<br />
Width 2.36 in. (60 mm)<br />
Depth 1.46 in. (37 mm)<br />
Operating Temperature Range<br />
-22°F to 122°F (-30°C to 50°C)<br />
27
<strong>SP</strong>-<strong>200</strong> <strong>BOOKLET</strong> 9/28/04 5:46 PM Page 32<br />
Frequency Stability<br />
± 10 PPM (0.001%) at 25C<br />
Battery Pack Power<br />
Nicad Battery Pack 9.6 VDC / 600 mAH<br />
Alkaline Battery Pack 12.0 VDC (8 AA batteries x 1.5 VDC each)<br />
Receiver<br />
Audio Output<br />
350 mW into 8 Ohms, 10%<br />
Adjacent Channel Rejection<br />
-60 dB<br />
Sensitivity<br />
AM 6 dB (S+N)/N at 1 µV soft<br />
Selectivity<br />
-6 dB ± 7 KHz<br />
Band Width<br />
± 25 KHz at 60 dB down<br />
Power Consumption<br />
68 mA (on; no reception, no noise)<br />
<strong>200</strong> mA (max at voice output)<br />
Transmitter<br />
Transmitter Power<br />
1.5 Watts ± 20%, 5 Watt (PEP) at 85% modulation<br />
Antenna Impedance<br />
50 Ohms<br />
28
<strong>SP</strong>-<strong>200</strong> <strong>BOOKLET</strong> 9/28/04 5:46 PM Page 33<br />
Spurious Radiation<br />
-60 dB below carrier<br />
Unnecessary Emissions<br />
-60 dB or less<br />
Power Consumption<br />
1 A (max)<br />
29
<strong>SP</strong>-<strong>200</strong> <strong>BOOKLET</strong> 9/28/04 5:45 PM Page 2<br />
Sporty’s <strong>SP</strong>-<strong>200</strong> Handheld NAV/COM and various<br />
components are protected under patent and copyright<br />
laws of the United States of America and other nations,<br />
including U.S. Patents 4,843,399 and 5,771,018.