Hinge Mortising Jig - Woodsmith Woodworking Seminars
Hinge Mortising Jig - Woodsmith Woodworking Seminars
Hinge Mortising Jig - Woodsmith Woodworking Seminars

You also want an ePaper? Increase the reach of your titles
YUMPU automatically turns print PDFs into web optimized ePapers that Google loves.
<strong>Hinge</strong><br />
<strong>Mortising</strong><br />
<strong>Jig</strong><br />
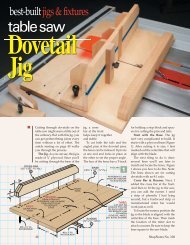
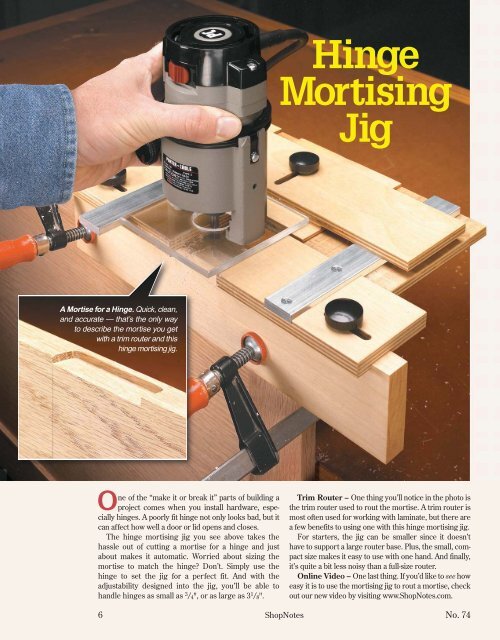
A Mortise for a <strong>Hinge</strong>. Quick, clean,<br />
and accurate — that’s the only way<br />
to describe the mortise you get<br />
with a trim router and this<br />
hinge mortising jig.<br />
One of the “make it or break it” parts of building a<br />
project comes when you install hardware, especially<br />
hinges. A poorly fit hinge not only looks bad, but it<br />
can affect how well a door or lid opens and closes.<br />
The hinge mortising jig you see above takes the<br />
hassle out of cutting a mortise for a hinge and just<br />
about makes it automatic. Worried about sizing the<br />
mortise to match the hinge? Don’t. Simply use the<br />
hinge to set the jig for a perfect fit. And with the<br />
adjustability designed into the jig, you’ll be able to<br />
handle hinges as small as 3 / 4", or as large as 3 1 / 8".<br />
Trim Router – One thing you’ll notice in the photo is<br />
the trim router used to rout the mortise. A trim router is<br />
most often used for working with laminate, but there are<br />
a few benefits to using one with this hinge mortising jig.<br />
For starters, the jig can be smaller since it doesn’t<br />
have to support a large router base. Plus, the small, compact<br />
size makes it easy to use with one hand. And finally,<br />
it’s quite a bit less noisy than a full-size router.<br />
Online Video – One last thing. If you’d like to see how<br />
easy it is to use the mortising jig to rout a mortise, check<br />
out our new video by visiting www.ShopNotes.com.<br />
6 ShopNotes No. 74
If you’d<br />
like to see<br />
the hinge<br />
mortising jig in use, you<br />
can view a demonstration<br />
video by logging on to:<br />
www.shopnotes.com<br />
Hardware & Materials<br />
A Small Base (1) 2 11 / 16 x 5 7 / 16 - 1 / 2 Ply.<br />
B Main Base (1) 7 1 / 2 x 11 - 1 / 2 Ply.<br />
C Back Stop (1) 2 3 / 4 x 11 - 1 / 2 Ply.<br />
D Fence (1) 3<br />
/ 4 x 2 3 / 4 - 13 1 / 2<br />
E Baseplate (1) 4 x 4 - 1 / 4 Plexiglas<br />
• (4)<br />
• (2)<br />
• (3)<br />
• (3)<br />
• (3)<br />
#6 x 1 / 2" Fh Woodscrews<br />
1<br />
/ 4" x 1" - 7 1 / 2" Aluminum Bars<br />
1<br />
/ 4" Threaded Brass Inserts<br />
1<br />
/ 4" x 1" Round Studded Knobs<br />
1<br />
/ 4" Flat Washers<br />
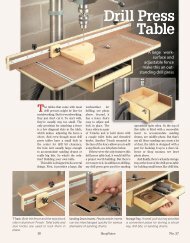
Face Mortise. With<br />
the hinge mortising jig,<br />
you can rout a mortise in<br />
the face of a workpiece just as<br />
easily as the edge.<br />
No. 74 ShopNotes 7
JIGS & ACCESSORIES<br />
Two-Part Base, Stop, & Fence ————————————————<br />
1<br />
OVERVIEW<br />
a.<br />
b.<br />
{ Countersink.<br />
Drill a deep<br />
countersink to<br />
ensure the screw<br />
head is below the<br />
surface of the bar.<br />
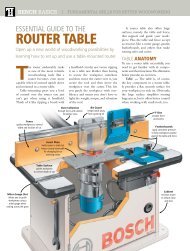
To get a tight-fitting mortise, you<br />
need to control two things — the<br />
width and length of the mortise. To<br />
do this, the mortising jig consists of<br />
a two-part base, an adjustable stop,<br />
and a pair of aluminum guide bars.<br />
An overview of how these parts fit<br />
together is illustrated in Figure 1.<br />
2<br />
FIGURE<br />
Start With One Piece – As you<br />
can see in the drawing, the aluminum<br />
guide bars fit into dadoes<br />
and rabbets cut in the base parts<br />
and the adjustable stop. Instead of<br />
working with each part individually<br />
as I cut the dadoes and rabbets, I<br />
found it easiest to start with a single<br />
blank — and then cut it into separate<br />
pieces once the joinery was complete,<br />
as in Figure 2. Working with a<br />
larger piece is easier and safer —<br />
and it pretty much guarantees that<br />
the dadoes and rabbets will align<br />
perfectly with each other.<br />
The first thing I did was cut a<br />
single groove in the bottom of the<br />
blank. This groove is sized to match<br />
the thickness of the fence ( 3 / 4") that’s<br />
added later, like you see in Figure 5.<br />
Once the groove was complete, I<br />
cut the dadoes you see in Step 1 of<br />
Figure 2. These two dadoes are cut<br />
in the top of the blank and sized to fit<br />
the aluminum bars that act as guides<br />
for the base of the trim router.<br />
The only thing to keep in mind<br />
here is to be sure to cut the dadoes at<br />
least half the thickness of the bar, as<br />
shown in Figure 1b. A hair deeper is<br />
fine, but if they’re too shallow the<br />
back stop on the jig won’t rest<br />
against the base during use.<br />
Finally, to allow you to lock the<br />
base pieces and back stop in place,<br />
you’ll need to cut a series of slots and<br />
holes for the adjusting knobs and an<br />
insert. You can see where these are<br />
located in Step 1 of Figure 2.<br />
Cut the Base Apart – Now<br />
you’re ready to do what I talked<br />
about earlier — start cutting the<br />
main parts of the jig from the blank.<br />
8 ShopNotes No. 74
JIGS & ACCESSORIES<br />
The first step is to form the small<br />
base (A). I did this by making a pair<br />
of intersecting cuts on the band saw.<br />
Doing this on the band saw allows<br />
you to leave your table saw and dado<br />
blade set up. This way, you can<br />
easily go back and cut the wide<br />
rabbet on the “leg” of the blank. You<br />
can see all this clearly in Step 2 of<br />
Figure 2 and in Figure 4.<br />
Form the Main Base & Stop –<br />
All that’s left to do at this point is trim<br />
a narrow strip off the back of the<br />
blank to form the main base (B) and<br />
back stop (C). Once that’s complete,<br />
cut the aluminum guide bars to<br />
length and screw one to the back stop<br />
and the other to the small base, like<br />
you see illustrated in Figure 1.<br />
To see how the construction<br />
process resulted in perfectly<br />
matched dadoes and rabbets, just flip<br />
the back stop over and set it in place.<br />
Make the Fence – With the<br />
main part of the jig assembled,<br />
you’re ready to start on the fence.<br />
The fence references the jig against<br />
the workpiece and provides a way to<br />
clamp the jig in place.<br />
The fence (D) is just a piece of<br />
3 / 4"-thick hardwood that fits the<br />
groove cut in the bottom of the base.<br />
Install the Inserts – After cutting<br />
the fence to final size, all that’s<br />
5 FIGURE<br />
3<br />
4<br />
left to do is add the rest of the hardware.<br />
A threaded insert at each end<br />
of the fence accepts the studded<br />
knobs that allow you to clamp the<br />
base pieces in place once you set the<br />
jig for the length of the mortise, like<br />
you see in Figure 5a.<br />
The Shop Tip below shows a<br />
handy way to install the inserts perfectly<br />
straight. This method requires<br />
nothing more than a cut-off bolt and<br />
a couple hex nuts. Just be sure to<br />
turn the chuck by hand as you press<br />
it down with the drill press lever.<br />
Finally, don’t forget to install a<br />
threaded insert in the main base.<br />
Note: Depending on how thick your<br />
plywood actually is, you may have to<br />
file or sand the insert flush with the<br />
bottom face of the base.<br />
Shop Tip<br />
a.<br />
{ Installing Inserts. A quick and<br />
easy way to install an insert perfectly<br />
straight is to use a cut-off bolt, a pair<br />
of hex nuts, and a drill press.<br />
No. 74 9
JIGS & ACCESSORIES<br />
Final Details ——————————————<br />
Although the basic construction of<br />
the jig is complete, there are still a<br />
few things left to do before you can<br />
use it to rout a mortise for a hinge.<br />
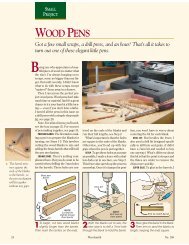
Add an Auxiliary Plate – The<br />
first thing you’ll want to do is add an<br />
auxiliary baseplate to your trim<br />
router, like the one you see in the<br />
photo. The auxiliary baseplate<br />
serves two purposes.<br />
First, using a square piece of clear<br />
plastic for the baseplate provides<br />
better visibility and more support<br />
during use. And second, it limits<br />
where the router bit cuts to match<br />
the hinge you’re installing. You can<br />
see how I added the baseplate by<br />
looking at Figure 6.<br />
Create a Custom Fit — As I<br />
mentioned earlier, the jig will automatically<br />
take care of sizing the mortise<br />
to match the width and length of<br />
the hinge. But to do this, you first<br />
have to custom fit the opening for<br />
6 FIGURE<br />
New Baseplate.<br />
To improve accuracy<br />
and visibility, replace the<br />
round baseplate with a<br />
square piece of clear plastic.<br />
your baseplate and the router bit<br />
you’ll be using to rout the mortises.<br />
Note: The jig is designed to be<br />
used with a 1 / 4"-dia. straight bit. This<br />
will allow you to rout a mortise for a<br />
hinge as small as 3 / 4" long.<br />
Start by sliding the two base pieces<br />
all the way open. And then slide the<br />
stop to the back. Next, you’ll need to<br />
cut past the bottom face of each base.<br />
After adjusting the depth of cut to 5 / 8",<br />
rout clockwise around the inside of<br />
the jig, keeping the baseplate against<br />
the guides and stop (Figure 7).<br />
“Zeroing Out” the Stop – The<br />
last step is to “zero out” the stop so<br />
7<br />
you can easily set the width of the<br />
mortise. To do this, clamp a scrap<br />
against the inside face of the fence and<br />
adjust the stop so the cutting edge of<br />
the router bit is just touching the<br />
scrap when the back edge of the<br />
baseplate is against the stop, as illustrated<br />
in Figure 8a.<br />
After you lock the back stop in<br />
place, use a scratch awl to scribe a<br />
mark on the top of the aluminum bar.<br />
You can see this in Figure 8.<br />
Using the <strong>Jig</strong> – With the scribe<br />
mark in place, using the jig is just a<br />
matter of following the four-step<br />
process on the opposite page.<br />
8<br />
a.<br />
10 ShopNotes No. 74
Corrections<br />
There are corrections on file for this article ( <strong>Hinge</strong> <strong>Mortising</strong> <strong>Jig</strong> from ShopNotes No. 74 (March 2004) ).<br />
Please compare this list of corrections to the article content.<br />
• the Figure 2 (page 8):<br />
Measurement of height along right edge printed as 7 1/2" but should be 10 3/8". (Image fixed for<br />
bound volumes.)<br />
Thank you for your interest in August Home Publishing!<br />
If you have questions about this article please contact us at orders@augusthome.com or 1-800-333-5441.<br />
All content in this document ©August Home Publishing. All rights reserved.