16CH H.264 Digital Video Recorder - Footprint Security
16CH H.264 Digital Video Recorder - Footprint Security
16CH H.264 Digital Video Recorder - Footprint Security

You also want an ePaper? Increase the reach of your titles
YUMPU automatically turns print PDFs into web optimized ePapers that Google loves.
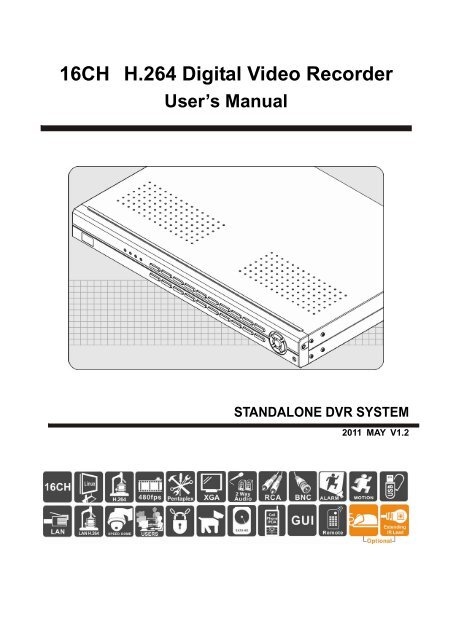
<strong>16CH</strong> <strong>H.264</strong> <strong>Digital</strong> <strong>Video</strong> <strong>Recorder</strong><br />
User’s Manual<br />
STANDALONE DVR SYSTEM<br />
2011 MAY V1.2
WARNING<br />
‣ Do not expose the DVR under the sunlight, heat or wet environment while<br />
installation. As it could decrease the performance of DVR and damage the<br />
machine.<br />
‣ Do not touch the power plug or case with wet hands as this could result<br />
electric shock.<br />
‣ Do not forcedly bend or put heavy object on power cable as this could<br />
result in injury to personal or equipment.<br />
‣ Do not operate with damaged power cord or loose electrical outlet as this<br />
could result in electric shock or accident.<br />
‣ Please use individual power instead of share electrical outlets with other<br />
electrical equipment as this could result in damage or accident.<br />
‣ Do not attempt to service this DVR by yourself as it may expose you to<br />
dangerous voltage or other hazards. Please refer all service to the<br />
qualified servicing distributor.<br />
‣ Do not open the covers or insert any object into DVR.<br />
CAUTION<br />
‣ Do not place the machine on an uneven surface or it would decrease the<br />
DVR efficiency or malfunction.<br />
‣ Avoid any shock or bumping of the DVR while recording. Improper<br />
handling could damage the system.<br />
CAUTION<br />
Make sure the voltage selector switch<br />
(100V/240V) is set to appropriate<br />
setting before plug in!<br />
ii
CONTENTS<br />
1. Specification ................................................................................................................. 1<br />
2. Front Panel ................................................................................................................... 2<br />
3. Rear Panel ................................................................................................................... 3<br />
4. DVR Installation ............................................................................................................ 3<br />
5. System Operation ......................................................................................................... 4<br />
6. Display Mode ................................................................................................................ 6<br />
7. Main Menu .................................................................................................................. 10<br />
7.1 Tools .................................................................................................................... 10<br />
7.1.1 HDD ......................................................................................................... 10<br />
7.1.2 User ......................................................................................................... 11<br />
7.1.3 Default ...................................................................................................... 12<br />
7.1.4 Clear ........................................................................................................ 12<br />
7.1.5 Upgrade ................................................................................................... 12<br />
7.1.6 Time ......................................................................................................... 13<br />
7.1.7 Info ........................................................................................................... 13<br />
7.2 Setup ................................................................................................................... 13<br />
7.2.1 Setup........................................................................................................ 14<br />
7.2.2 Record ..................................................................................................... 15<br />
7.2.3 <strong>Video</strong> ........................................................................................................ 15<br />
7.2.4 Alarmin ..................................................................................................... 16<br />
7.2.5 Alarmout ................................................................................................... 17<br />
7.2.6 Schedule .................................................................................................. 17<br />
7.2.7 Network .................................................................................................... 18<br />
7.2.8 PTZ .......................................................................................................... 19<br />
7.2.9 MTD ( Motion Detect ) .............................................................................. 20<br />
7.3 Log ...................................................................................................................... 22<br />
7.4 Logout ................................................................................................................. 22<br />
8. Player ......................................................................................................................... 22<br />
9. Internet Explorer (IE ) operational instruction ............................................................. 25<br />
9.1 IE <strong>Security</strong> setting: ................................................................................................ 25<br />
9.2 IE Login ................................................................................................................ 26<br />
9.2.1 Main surveillance interface ......................................................................... 27<br />
9.2.2 Remote Setup ............................................................................................. 28<br />
9.2.3 Remote Playback ....................................................................................... 31<br />
9.2.4 Remote surveillance function ...................................................................... 32<br />
10. Instructions of Software Installation on Mobile Phones .............................................. 33<br />
11. HDD Support List ....................................................................................................... 34<br />
12. USB Flash Memory Stick Support List ........................................................................ 35<br />
iii
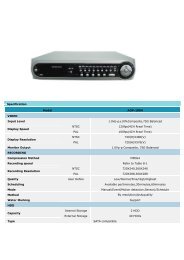
1. Specification<br />
<strong>Video</strong> Format NTSC PAL<br />
Recording<br />
Resolution<br />
<strong>Video</strong> Input<br />
Audio Input<br />
<strong>Video</strong> Output<br />
Audio Output<br />
XGA Output<br />
Alarm Input<br />
Alarm Output<br />
Display Mode<br />
16 CH Input / BNC<br />
4 x RCA (CH4 Two-way Audio)<br />
1 CH Output / BNC<br />
1 CH Output / RCA<br />
800x600、1024x768、1280x1024<br />
4CH Alarm In<br />
Buzzer,2 x Relay Out (N.O、N.C)<br />
Full Screen, 4/9/13/16 CH Split Screen, Auto Switch<br />
Display Resolution 720 x 480 720 x 576<br />
CIF 360 x 240 360 x 288<br />
Recording Frame Max. 480 FPS Max. 400 FPS<br />
Compression Algorithm <strong>H.264</strong><br />
Operating System<br />
Pentaplex<br />
Recording Mode<br />
Schedule Recording<br />
Status Indicator<br />
Event Mode<br />
System Log<br />
Playback Mode<br />
Network Protocol<br />
Inter-communication<br />
HDD Type<br />
PTZ Control<br />
Backup Device<br />
Firmware Update<br />
Multi-Language<br />
Control Mode<br />
Network Control<br />
Network Function<br />
IR Extension<br />
Power Supply<br />
Unit Dimension<br />
Weight<br />
Embedded Linux<br />
Record / Playback / Network / Mobile Phone / Back up<br />
Manual, Schedule, Event<br />
Full Recording, Motion, Alarm, Manual Recording<br />
Power, Network, HDD1, HDD2<br />
Alarm Trigger, Motion Trigger, <strong>Video</strong> Loss<br />
Recording Duration: 1~60 sec.<br />
Up to 2000 recording list displayed<br />
Normal Speed: x1<br />
Fast Forward: x2 / x4 / x8 / x16 multiple speed<br />
Slow Forward: 1/2、1/4、1/8 multiple speed<br />
Fast Rewind: x2 / x4 / x8 / x16 multiple speed<br />
Frame by Frame Playback: Forward<br />
Search Function: Time / Event<br />
TCP/IP / PPPoE / DHCP / SMTP / DDNS<br />
Yes<br />
SATA 3.5”HDD x 2 (No HDD Included)<br />
Communication Protocol (PELCO P, PELCO D, MIKAMI) (RS-485)<br />
USB 2.0 Flash Memory Stick<br />
Host USB、LAN / WAN<br />
English/ Traditional Chinese / Germany /Russian/ French / Spanish /<br />
Italian / Portuguese / Turkish/ Japanese / Korean/ Simple Chinese<br />
/ Czech Republic / Poland<br />
Front Panel / Remote Control / USB Mouse / Internet<br />
IE Browser / Multiwindow(CMS) Remote Control<br />
Live Display / Playback / PTZ Control / System Setup<br />
YES (Optional)<br />
DC 12V / 4A(AC100V~240V 50/60HZ)<br />
430mm (W) x 314mm (D) x 53mm (H)<br />
3kg ( HDD and Power Adapter Not Included)<br />
Operating Temperature 0℃ ~ 46℃<br />
1
2. Front Panel<br />
MENU<br />
Stop<br />
Manual Record<br />
Pause<br />
Step Forward<br />
Play<br />
Under the live viewing mode, press MENU to enter the main<br />
menu.<br />
Under the menu mode, press MENU to go to the upper menu.<br />
To stop the operation or go to the upper menu under the playback<br />
mode.<br />
Press the Manual Record button to start recording under the live<br />
mode.<br />
To pause the playback under the playback mode.<br />
To playback frame by frame in each time under the pause mode<br />
during the playback.<br />
Under the live viewing mode, press the Play button to enter the<br />
playback mode.<br />
Fast Rewind Rewind speed: x2 / x4 / x8 /x16<br />
Fast Forward<br />
Forward speed: x2 / x4 / x8 / x16<br />
Slow Forward Slow forward speed: 1/2、1/4、1/8<br />
Up<br />
Down<br />
Left<br />
Right<br />
Enter<br />
Power Indicator<br />
LED<br />
Network Indicator<br />
LED<br />
HDD 1 Indicator<br />
LED<br />
HDD 2 Indicator<br />
LED<br />
0(+10)-9 Channel 1~16<br />
To move up or down of the selection setting in the menu.<br />
Under the live mode of Single/Quad/9 display, use the button to<br />
control video display.<br />
To move left or right of the selection setting in the menu.<br />
Change to Single/Quad/9/13/16 division display under the living<br />
mode.<br />
Press the Enter button to confirm the setup or go into sub-menu.<br />
The LED will light on when power on.<br />
The LED will light on when network connected.<br />
The LED will light on when the HDD 1 is written.<br />
The LED will light on when the HDD 2 is written.<br />
Under the live viewing mode or playback mode, press channel<br />
1~16 button to display the individual channel screen.<br />
9 / 16 CH Split 9 / 16 channel split screen display.<br />
Quad<br />
Auto Switching<br />
USB2.0 Slot<br />
Quad screen display.<br />
Select start / end time, when setting the MD area.<br />
Keyboard switch to number, English Capital or symbol.<br />
Under the live viewing mode, press the button to start/stop the<br />
auto switching function.<br />
For USB 2.0 Flash Memory Stick to Backup and Firmware<br />
Update. (There are a front and a back USB that can be used one<br />
at a time.)<br />
2
3. Rear Panel<br />
1 USB Mouse Port 1.0 USB Mouse<br />
2 VIDEO IN 1~16 CH <strong>Video</strong> Input (BNC)<br />
3 VIDEO OUT <strong>Video</strong> Output (BNC)<br />
4 AUDIO OUT Audio Output (RCA)<br />
5 AUDIO IN 1~4 CH Audio Input ( CH.4 is for external input )<br />
6 ALARM Includes 4 DI AND 2 DO (Default N.O.)<br />
7 DC12V Power Input<br />
8 XGA LCD Monitor Output<br />
9 LAN RJ45 Network Connection<br />
10 RS-485 RS-485 Connection, For Speed Dome Use<br />
11 HOOK Cable Hook<br />
• Alarm I/O Instruction<br />
Instruction<br />
Pin 1. CH 1 SENSOR INPUT<br />
Pin 2. CH 2 SENSOR INPUT<br />
Pin 3. CH 3 SENSOR INPUT<br />
Pin 4. CH 4 SENSOR INPUT<br />
Pin 5. Ground<br />
Pin 6. 1 ST RELAY : COM<br />
Pin 7. 1 ST RELAY : N.O ( Default )<br />
Pin 8. 2 ND RELAY : COM<br />
Pin 9. 2 ND RELAY : N.O ( Default )<br />
4. DVR Installation<br />
‣ Connect the camera video output to the DVR video input port with<br />
BNC connectors.<br />
The camera install coaxial cable is suggested RG-59 or above.<br />
‣ DVR Network installation<br />
Please connect DVR to HUB or router by using RJ-45 network cable and make<br />
sure the DVR network indicator LED is on.<br />
(Please refer to 7.2.7 Network for further network setting information of using<br />
static IP, PPPoE or DHCP. )<br />
‣ Alarm Installation<br />
Please refer to 3. Rear Panel for external alarm I/O installation.<br />
(Please refer to 7.2.4 Alarm in & 7.2.5 Alarm out.)<br />
‣ Speed Dome Installation<br />
3
This product can be installed protocol (Pelco D, Pelco P, MIKAMI, LILIN,<br />
Samsung)<br />
‣ Power Installation<br />
Please use the provided power cable and adaptor to connect the DVR<br />
(AC100V~AC240V).<br />
Please refer to 3. Rear Panel for connecting position.<br />
The DVR system will enter into live viewing mode when power is connected.<br />
Please refer to 6. Display Mode for more information.<br />
5. System Operation<br />
There are 3 kinds of DVR control method: front panel, remote control and USB mouse.<br />
Please refer to 2. Front panel.<br />
• Mouse Operation<br />
‣ Right click the mouse button under the live viewing mode for enter into<br />
Quick Menu.<br />
‣ Left click the mouse button under the main menu to go to menu<br />
selection.<br />
‣ Left click the mouse button under the select menu to go to the<br />
sub-select menu.<br />
‣ Right click the mouse button under menu selection to EXIT.<br />
‣ Use the mouse or Virtual Keyboard to change the setting<br />
• Remote control operation<br />
‣ Please refer to 2. Front panel and the reference table of the button as<br />
below.<br />
Stop<br />
Record<br />
Play<br />
Fast Rewind<br />
Fast Forward<br />
Zoom in/out<br />
PTZ Setup<br />
Mute<br />
Auto Switch<br />
Up Selection<br />
Left Selection<br />
MENU<br />
Down Selection<br />
9 Disivion Display<br />
Quad Display<br />
Lock<br />
Step/Pause<br />
Slow Forward<br />
Remote ID Setup<br />
PTZ IRIS<br />
Remote ID Setup<br />
Search<br />
Information<br />
Enter<br />
Right Selection<br />
Cancel<br />
13 Disivion Display<br />
16 Disivion Display<br />
Number 1-9,<br />
Channel 1-16(Switchable)<br />
4
• Virtual Keyboard Operation<br />
The text input of the virtual keyboard is as below:<br />
※ To key in data, press “Quad” button to switch to number, English Capital<br />
or symbol by using front panel or remote control.<br />
Menu Operation<br />
Front Panel & Remote<br />
Control Operation<br />
Mouse Operation<br />
Select character from virtual<br />
keyboard<br />
[Up/Down/Left/Right]<br />
[Move Cursor]<br />
Key in the select character [Enter] [Left Click]<br />
Exit the virtual keyboard [MENU] [Right Click]<br />
Key Description of Virtual Keyboard<br />
Num<br />
Capital letter shift<br />
123 Number<br />
abc<br />
lowercase letter shift<br />
, Symbol<br />
• Main Menu Operation<br />
Setup Operation<br />
Front Panel & Remote<br />
Control<br />
USB Mouse<br />
Select Item [Up/Down/Left/Right] [Move Cursor]<br />
Enter Select Item [Enter] [Left Click]<br />
Exit Main Menu [MENU & ESC] [Right Click]<br />
5
6. Display Mode<br />
There are 3 kinds of screen display mode: Live, Auto Switching and PTZ.<br />
• Live Viewing Mode<br />
The DVR will go to the live viewing mode after boot up. There are 5 different<br />
status icons:<br />
1. :Record<br />
2. :Motion Triggered<br />
3. :Alarm Triggered<br />
4. :Schedule Record<br />
5. :Manual Record<br />
Setup Operation<br />
CH. 1~16 SINGLE<br />
DISPLAY<br />
4/9/13/16 channel Split<br />
Display<br />
Front Panel & Remote<br />
Control<br />
[ Channel 0(+10)~9 and<br />
1~16]<br />
USB Mouse<br />
Left click upon selected<br />
channel<br />
[4/9/13/16 Split] Left click upon UI Menu<br />
Quick Menu [MENU] [Right Click]<br />
Playback Mode<br />
[Play / Search]<br />
Left click upon Recording<br />
data of UI Menu to operate<br />
Start/Stop the Manual<br />
Record<br />
Start/Stop the Auto<br />
Switching<br />
Start/Stop the PTZ Auto<br />
Tracking<br />
[record] and select option<br />
in Manual Recording of UI<br />
Menu<br />
[Auto Switching]<br />
Set Up in UI Menu<br />
Left click upon Manual<br />
Recording of UI Menu to<br />
select option<br />
Set Up in UI Menu<br />
Set Up in UI Menu<br />
Start/Stop Mute [Mute] Set Up in UI Menu<br />
6
• Quick Menu<br />
Setup Operation<br />
Front Panel & Remote<br />
Control<br />
USB Mouse<br />
Select Item [up / down、right / left] [Moving Cursor]<br />
Enter the Select Item [enter] [Left Click]<br />
Exit [MENU / ESC] [Right Click]<br />
• PTZ<br />
Please set the speed dome properly before control PTZ. Please refer to<br />
7.2.8 PTZ for setup.<br />
Setup Operation Front Panel & Remote Control USB Mouse<br />
Select Item [up / down、right / left] [Moving Cursor]<br />
Enter Select Item [enter] [Left Click]<br />
Select PTZ Channel [up / down] [Left Click]<br />
Zoom +,- ZOOM + -<br />
Focus, +- Focus + -<br />
Iris, +- IRIS + -<br />
Adjust Movement Speed<br />
Fast、Normal、Slow<br />
PTZ Upward<br />
PTZ Downward<br />
PTZ Left<br />
PTZ Right<br />
Start/Stop Auto Tracking<br />
Exit [MENU] [Right Click]<br />
• Auto Switching<br />
Auto switch starts from orderly CH1 to CH16, or split display orderly<br />
(exclude 13 and 16 split display).<br />
• Manual Recording<br />
Enable manual: here shows selected camera’s status,<br />
setup and signal:<br />
Setup Operation Front Panel & Remote Control USB Mouse<br />
Select Item [right / left] [Moving Cursor]<br />
Enter Select Item [up / down] and [enter] [Left Click]<br />
Exit [MENU] or [ESC] [Right Click]<br />
7
Signal Instruction<br />
1. :Not in recording.<br />
2. :In recording.<br />
3. :Not in recording yet in internet surveillance.<br />
4. :In recording and internet surveillance simultaneously.<br />
• Recording Data option : playback and back-up<br />
a. Select channel (Selected item would be shown as light blue).<br />
b. Select recording mode: manual, alarm, motion and schedule.<br />
c. Enter Start and End time to search or playback.<br />
d. Select “search “and recording list be shown.<br />
e. Select from the list with mouse or remote controller to playback.<br />
f. Mouse right click to select (Multi-selection be available) from list for<br />
backup, for remote controller, with “INFO” to select or remove select<br />
(press Enter will playback the selected item directly), “Select all” to<br />
back-up all.<br />
g. Backup device:Select the backup path to device.<br />
8
h. Select backup file type: ifv or avi.<br />
Ifv: Needs to be played by Player.<br />
Avi: Available to be played by other media player.<br />
• Playback operation<br />
a. Afer set up a~c, press Playback to start the video like below picture; or<br />
continue d~f to select file to backup or playback.<br />
b. Instruction of Playback:<br />
Setup Operation<br />
Front Panel & Remote<br />
Control<br />
USB Mouse<br />
Fast Rewind [Fast Rewind] [Left Click]<br />
Fast Forward [Fast Forward] [Left Click]<br />
Step Forward [Step Forward] [Left Click]<br />
Step/Pause [Step/Pause] [Left Click] /<br />
Play 1x [Play] [Left Click]<br />
Stop [Stop] [Left Click]<br />
Mute ON/OFF [Left Click] /<br />
1~16 Single Channel<br />
Display<br />
[CH. 1~16]<br />
[Left Click] to select cannel;<br />
Another [Left Click] back<br />
9
7. Main Menu<br />
7.1 Tools<br />
Setup Operation Front Panel & Remote Control USB Mouse<br />
Select Item [up / down、right / left] [Moving Cursor]<br />
Enter Select Item [enter] [Left Click]<br />
Exit Main Menu [MENU / ESC] [Right Click]<br />
7.1.1 HDD<br />
Formatted HDD and display HDD’s information<br />
10
7.1.2 User<br />
Add or Edit User’ s password and permissions: includes monitor, play-back,<br />
management, remote access, recording and ETC… (Login with default user<br />
name: admin and no password needed as higest authority to do all settings.<br />
Admin could change the password and create other user accounts.)<br />
1. Edit user name and password<br />
Select the user to Modify<br />
※ Default account (user name):admin ; No password needed<br />
Please contact the manufacturer or distributor for password if it is<br />
forgotten. The password is valid for only 1 hour to the relative DVR.<br />
11
7.1.3 Default<br />
Setup every parameter back to default value.<br />
7.1.4 Clear<br />
Clear Alarm is for stopping the current alert action. As MD, alarm input or<br />
video loss to trigger the alarm output, Clear Alarm can stop the link actions to<br />
relative setting. (EX: buzzer, alarm output, recording or PTZ)<br />
7.1.5 Upgrade<br />
Pop-up window as below when “upgrade” selected:<br />
Setup path for firmware to process. (Notice: STOP recording while up-grade)<br />
※ Do not turn off the power during updating process, to avoid faulty<br />
updating.<br />
12
7.1.6 Time<br />
Setup system date, time and display mode, as fig. below:<br />
1. Setup system date.<br />
2. Setup system time.<br />
3. Select display format.<br />
7.1.7 Info<br />
Display system information and firmware version.<br />
1. Device Name:Can be set on System tool ->System Setting.<br />
2. Model:<strong>H.264</strong> <strong>16CH</strong> DVR SP1.<br />
3. Version:Shows the current DVR firmware version and date.<br />
7.2 Setup<br />
Main Menu of Setup includes: setup, record, video, Alarmin, Alarmout,<br />
Schedule, Network, PTZ and MTD (Motion Detect).<br />
13
7.2.1 Setup<br />
a. Setup DVR ID (000-255): Can be operated with different ID. The<br />
setting of remote control should be changed to correspond to<br />
different ID. Otherwise the remote control cannot function to the<br />
DVR. For example: The ID of DVR and remote control is set to 255.<br />
If the DVR ID’s changed to 123, then the remote control should be<br />
set up as below procedures:<br />
(1) Press “DVR” button on remote control.<br />
(2) Key in the number “1”, “2”, “3” in sequence then press ENTER.<br />
b. Setup DVR Name.<br />
c. Setup if overwrite or not.<br />
d. Lock Time:Auto log-out after staying idle for certain time. (Action<br />
will be like LOCK)<br />
e. Auto Switch.<br />
f. VGA: Supports resolution: 800x600, 1024x768 and 1280x1024.<br />
g. Transparency for menu display.<br />
h. Language: supports multi-language.<br />
i. Show Status: on/off Show Status: (alarm, manual, motion,<br />
schedule and etc…)<br />
j. Channel Switch: Select single channel to do auto switch.<br />
k. <strong>Video</strong> conserve term: unit-“day”.<br />
l. Keypad tone: Front Panel keypad and remote controller tone On or<br />
OFF.<br />
14
7.2.2 Record<br />
a. Channel: Separately setup parameters of each camera<br />
b. Stream: Dual-mode stream for Option:<br />
Main stream is for recording terminal and Sub-stream as the<br />
alternative for internet surveillance.<br />
c. Stream: Audio recording; please disable when no audio to save<br />
system<br />
d. CBR/VBR: CBR (Constant bitrate) and VBR (Variable bitrate).<br />
e. Max Bitrate: setup the limitation of image transmission.<br />
f. Frame Rate: setup recording frame.<br />
g. Quality: Setup recording Quality (6 as the best).<br />
★<br />
VBR files vary the amount of output data per time segment. It<br />
allows a higher bitrate (and therefore more storage space) to<br />
be allocated to the more complex segments of media files<br />
while less space is allocated to less complex segments. CBR<br />
file fixed the amount of output data per time segment.<br />
Notice: Each camera could be setup individuality and check all camera setup be highly<br />
necessary; and “copy“ setup to rest camera intrusted as fig. below:<br />
7.2.3 <strong>Video</strong><br />
Setup parameter<br />
a. Select camera<br />
b. Setup camera name<br />
c. Setup the camera name if displayed or not and its position<br />
d. Setup the time if displayed or not and its position<br />
e. Setup the brightness, contrast, hue and saturation<br />
15
f. Setup blind area and recording<br />
※ The DVR can be set up for different channel individually, user<br />
should be careful when setting up individually. (To avoid only<br />
one channel be set up).<br />
7.2.4 Alarmin<br />
There are four alarm in to setup:<br />
a. Input: Select camera<br />
b. Detect: Select if enable the alarm<br />
c. Select the type of alarm input<br />
d. Duration: setup the time of alarm output<br />
e. And relative setup for alarm output as follows:<br />
1. Duration : setup the time of alarm output<br />
2. PTZ: setup the movement of PTZ (SPEED DOME) when triggered.<br />
3. Recording CH: Setup certain cameras to recording when triggered.<br />
4. Alarmout: enable alarmout when triggered.<br />
16
7.2.5 Alarmout<br />
There are two alarmout to setup as NC or NO: Also setup Email sending<br />
address in this window.<br />
7.2.6 Schedule<br />
Except manual recording, all must be setup in Schedule, or the relative setup<br />
would be faild, and its setup as follows:<br />
a. Channel : Setup camera<br />
b. Week : select the date for each week and all for everyday<br />
c. Time # : select recording interval<br />
d. Select recording type; Schedule, Motion detect and Alarm which goes<br />
after recording interval selecting<br />
e. Time axis means: Schedule (in Red ), Motion detect (in Green)and<br />
Alarm(in Yellow )<br />
※ The DVR can be set up for different channel individually, user<br />
should be careful when setting up individually. (To avoid only<br />
one channel be set up).<br />
17
7.2.7 Network<br />
Set the connection method:<br />
a. LAN:Static IP or DHCP<br />
1. DHCP: IP auto-dispatched when selected.<br />
2. Static IP: IP Address, default gateway, net mask, DNS be required<br />
when selected.<br />
3. Port 1: Value of Control port. Default:8670<br />
Port 2: Mobile port and HTTP port. Mobile port default: 101, HTTP<br />
port default: 80.<br />
※ The mobile software (TMEye) is supported starting from the<br />
versionV3.0.14. (port 2) For the mobile port setting, please follow<br />
DVR network port 2. Try to download the latest mobile software. If<br />
need to use the old version mobile software, please plus “1” on the<br />
mobile setting. (Ex: If the DVR port 2 setting is: 101, then the old<br />
version mobile software should set to 102.)<br />
b. PPPoE: for ADSL user to setup<br />
1. Select: enable.<br />
2. Enter User Name and Password offered from ISP.<br />
3. This page will show the IP address when linked successfully.<br />
18
c. DDNS Setup: Required to register Dynamic Domain Name Service at<br />
first<br />
1. Select enable and DDNS provider.<br />
2. Enter User Name and Password.<br />
3. Enter registered DDNS provider’s Domain Name.<br />
7.2.8 PTZ<br />
a. PTZ: PTZ setup needs to match Speed Dome’s parameter: Baud Rate,<br />
Protocal land ID.<br />
b. Supports Default spot, cruiser and tracking setup.<br />
19
7.2.9 MTD ( Motion Detect )<br />
Supports three mods for motion detect:<br />
A. Motion detect: Enable / disable motion detect and related setup<br />
a. Select MTD. (Please set the detect type on the Top-Right of the<br />
page)<br />
b. Select Camera. (It can be set up for different channel individually,<br />
user should be careful when setting up individually. To avoid<br />
only one channel be set up.)<br />
c. Setup sensitivity: Lowest, low, Middle, High, Hightest and<br />
Disable.<br />
d. Setup detect area: offer multi area as 22*15 units (transparency<br />
means not selected; and Red Area selected). It can be set up by<br />
mouse. Click the block or click and drag to the area you would<br />
like to detect. Click or click and drag again to remove it. The<br />
instruction of using front panel button or remote control to select<br />
the area as below:<br />
1. Move UP DOWN LEFT RIGHT to the position of selected<br />
area and press Quad to select.<br />
2. It could continue to move UP DOWN LEFT RIGHT to enlarge<br />
the area and press Quad to select.<br />
3. If want to select multi areas, please repeat the step 2.<br />
4. Press “MENU” to remove the selected motion detection area.<br />
e. Relative setup as follows, when triggered:<br />
1. Duration: setup the time of alarm output. Unit: Second.<br />
2. Rec. CH: setup recording channel when triggered.<br />
3. Buzzer: Enable / disable buzzer.<br />
4. Alarmout: Enable / disable alarm-out when triggered.<br />
5. Send Mail: Enable / disable SMTP when triggered (refer to<br />
7.2.6 Schedule for setup).<br />
※ The DVR can be set up for different channel individually, user<br />
should be careful when setting up individually. (To avoid only<br />
one channel be set up.)<br />
B. Vloss: Enable / disable <strong>Video</strong> loss detect and related setup.<br />
a. Select type to Vloss. (Select <strong>Video</strong> Loss in the detect mode)<br />
b. Select Camera. (It can be set up for different channel individually,<br />
user should be careful when setting up individually. To avoid only<br />
20
one channel be set up.)<br />
c. Relative setup as follows, when triggered:<br />
1. Duration: setup the time of alarm output. Unit: Second.<br />
2. Buzzer: Enable / disable buzzer.<br />
3. Alarmout:Enable / disable alarm-out when triggered.<br />
4. Send Mail:Enable / disable SMTP when triggered (refer to<br />
7.2.6 Schedule for setup )<br />
C. Blind: Enable / disable Blind detect and related setup<br />
a. Select type to Blind. (Select Blind in the detect mode)<br />
b. Select Camera. (It can be set up for different channel individually,<br />
user should be careful when setting up individually. To avoid<br />
only one channel be set up.)<br />
c. Relative setup as follows, when triggered:<br />
1. Duration: setup the time of alarm output. Unit: Second.<br />
2. Buzzer: Enable / disable buzzer.<br />
3. Alarmout: Enable / disable alarm-out when triggered.<br />
4. Send Mail: Enable / disable SMTP when triggered (refer to<br />
7.2.6 Schedule for setup).<br />
21
7.3 Log<br />
Log is record of every setup and modification, up to 4000 lists.<br />
Operation:<br />
a. Select event type: alarm, local event, remote event, video abnormal and<br />
all.<br />
b. Setup time segment and then “search “.<br />
7.4 Logout<br />
Options for Logout and Restart.<br />
8. Player<br />
Recording backup file formatted is .ifv, and need to be played by Player, which will be:<br />
A.In the CD attached, B.With the backup file to USB device, C. Directly download via<br />
IE from DVR, D.Our website: www.fuho.com.tw<br />
To install Player after un-zip the file, its steps as follows:<br />
22
Step 1: Click ”NEXT”<br />
Step 2: Select the Install Location and then<br />
“Install”.<br />
Step3: Installing.<br />
Shows the icon as right as the PLAYER<br />
Step 4: Click “Finish” to complete install.<br />
after finish install<br />
Executive the Player or backup file directly, it would be shown as follows:<br />
Functional instruction is as follows:<br />
a. “ ”: Open file.<br />
b. “ ”: play / pause file.<br />
c. “ ”: stop file.<br />
d. “ ”: slow play at 1/2, 1/4 and 1/8<br />
speed.<br />
e. “ ”: Quick play at X2, X4 adn X8<br />
speed.<br />
f. “ ”: backward play to 10% of file time.<br />
g. “ ”: foreward play to 10% of file time.<br />
h. “ ”: play frame by frame.<br />
i. “ ”: Directly snap shot images, as<br />
saving path will be required.<br />
23
2. <strong>Video</strong> cut instruction:<br />
a. Select “Control” on the tool bar and then select “<strong>Video</strong> Cut” as Picture 1.<br />
b. Move the mouse to the time zone which requested as start point of time and right<br />
click to select “Add cut point” as picture 2. Then add another “Add cut point” on<br />
the time zone which requested as end point of time. Therefore, the video<br />
between those two “Add cut points” will be the one requested. To save the file,<br />
please right click and select “Backup shear <strong>Video</strong>” as picture 3. The saving path<br />
will be as picture 4.<br />
Picture 1 Picture 2<br />
Picture 3 Picture 4<br />
24
9. Internet Explorer (IE ) operational instruction<br />
9.1 IE <strong>Security</strong> setting:<br />
There two method to solve when internet interface be loaded improperly:<br />
Method 1:<br />
1. To IE 6.0 and 7.0, for example, select “ Tools” and then “ Internet<br />
Option “ as follows:<br />
2. Select“<strong>Security</strong>”above and then ” reliable Website” , change to “ low<br />
security “ after set “ default” and then apply , and select “ site “ after all :<br />
25
3. Type http://122.117.84.239 in the pop-up next, as the fig below, and<br />
remove the hook from the block marked,and click “yes” that everything<br />
be all set; The same way for WINDOW 7.<br />
Method 2:<br />
Select “Tools” and then “Internet Option “and then “Custom level” of security<br />
Change “download un-regestered ActiveX “option to enable.<br />
9.2 IE Login<br />
Enter DVR’s IP address and log-in window will pop-up as fig. below, and then<br />
select Language and enter user name and password, that access will be<br />
after interface be loaded successfully.<br />
26
9.2.1 Main surveillance interface<br />
It’s shown as below: Monitor, PTZ, Split display ( single, quad, 9 , 16<br />
split ) , Stream ( main stream,/ sub-stream ), Camera switch on/ off, Start<br />
VOIP, config, playback and log out and etc..<br />
Key-icon Instruction:<br />
1. logout<br />
2. Split monitor:display live images<br />
27
3. PTZ option:<br />
a. movement control.<br />
b. Iris: Adjust PTZ iris.<br />
c. Focus: Adjust PTZ focus.<br />
d. Zoom in / out for PTZ.<br />
4. Split monitor: option for single, quad, 9 and 16 split<br />
5. Stream: refer to 7.2.2 Record, sub-stream is for weak internet<br />
condition<br />
6. Camera condition: pick up camera to on / off ,<br />
means Camera on, means Camera off; Red marked<br />
means selected channel, and switch on/off by double click, and all<br />
camera position be arrange-able.<br />
7. Start VOIP: Enable/ Disable audio communication.<br />
8. Config: Setup DVR relative parameter.<br />
9. Playback: Playback/ download recording data from time segment,<br />
motion detection, alarm and manual.<br />
9.2.2 Remote Setup<br />
Setup / modify parameter in “ Config “:<br />
a. Sever Parameter: Setup / modify DVR Name, Over-write, lock time,<br />
Auto-switch, VGA, transparency, State Display, IP Address, DDNS<br />
and etc…<br />
28
. Channel Parameter: Setup / modify Camera Name, Display<br />
Mode, Time mode, recording frame, Quality、Bit-type and that of<br />
Sub-stream, PTZ and etc…<br />
c. Alarm Parameter: Setup / Modify Alarm input/ output.<br />
29
d. User Info Parameter: Setup / modify user permission.<br />
e. Other:Manual recording, System time, clear alarm, event, Log<br />
list, reboot, update, restore, client record and snapshot file<br />
saving directory.<br />
30
9.2.3 Remote Playback<br />
Playback / download recording data from time segment, motion<br />
detection, alarm, manual and operation:<br />
a. Select camera.<br />
b. Setup the time segment and then“Search”( or click“Time<br />
Playback”to playback directly ).<br />
c. Selected list could be played by double click or“file playback”.<br />
d. And download the file to local terminal by “file download”.<br />
e. Refer to 8 . Player for operation.<br />
f. Can also click the position as below picture for full screen playback<br />
or click it again to turn back to normal.<br />
31
9.2.4 Remote surveillance function<br />
Right click upon certain channel in main display and the quick manu<br />
would be shown as below:<br />
a. OpenAudio: CH. 1-3 could be recording with audio synchronously<br />
( CH. 4 is for audio inter-communication ), click directly to enable<br />
remote monitor; and disable one channel’s audio is needed before<br />
enable another channel.<br />
b. Snapshot: live snapshot to .bmp or JPG file.<br />
c. Record: remotely recording selected channel.<br />
d. PTZ option: setup PTZ’s default spot, cruiser, tracking and etc….<br />
e. OSD option: setup OSD of the camera name and time display.<br />
f. MD param: setup motion detect area (available for mouse select<br />
directly).<br />
g. PIC adjust: setup selected channel’s brightness, contrast, hue, and<br />
saturation.<br />
h. Envelop: setup area and blind function.<br />
32
10. Instructions of Software Installation on<br />
Mobile Phones<br />
Mobile device application software can be remotely connected DVR, monitor<br />
real-time images display. Mobile device must install the application software<br />
beforehand. Supported operating systems are Symbian, Windows Mobile,<br />
APPLE iPhone, Google Android and Blackberry.<br />
※ The mobile software (TMEye) can be supported starting from the<br />
versionV3.0.14. (port 2) For the mobile port setting, please follow DVR<br />
network port 2. Try to downlaod the latest mobile software. If needed to<br />
use the old verion mobile software, please plus “1” for the mobile setting.<br />
(Ex: If the DVR port 2 setting is: 101, then the old version mobile<br />
software should set to 102.)<br />
※ Please see the Mobile viewer instruction for setting up the cell phone<br />
software.<br />
33
11. HDD Support List<br />
All in the list below has been tested and be recommended for functional ensuring.<br />
Brand Model Number Capacity<br />
SEAGATE<br />
ST3250310CS<br />
ST3320410SV<br />
ST3500418AS<br />
ST3500312CS<br />
ST3750528AS<br />
ST31000424CS<br />
250G<br />
320G<br />
500G<br />
500G<br />
750G<br />
1T<br />
ST31500541AS 1.5T<br />
HITACHI<br />
WD<br />
ST32000542AS<br />
HCT721025SLA380<br />
HCT721032SLA380<br />
HCP725050GLA380<br />
HCT721010SLA360<br />
HDHCT721010LAS360<br />
WD3200AVVS<br />
WD3200AAKS<br />
WD5000AVVS<br />
WD5000AAKX<br />
WD10EURS<br />
WD10EVDS<br />
WD10EVVS<br />
2T<br />
250G<br />
320G<br />
500G<br />
1T<br />
1T<br />
320G<br />
320G<br />
500G<br />
500G<br />
1T<br />
1T<br />
1T<br />
WD15EARS 1.5T<br />
WD20EARS<br />
WD2001FASS<br />
2T<br />
2T<br />
34
12. USB Flash Memory Stick Support List<br />
All in the list below has been tested and be recommended for functional ensuring.<br />
Brand Model Number Capacity<br />
Transcend<br />
Adata<br />
SONY<br />
SanDisk<br />
Kingston<br />
Jetflash V20<br />
Jetflash V20<br />
Jetflash V30<br />
Jetflash V20<br />
PD1<br />
PD1<br />
PD1<br />
C801<br />
C801<br />
Microvault<br />
Microvault<br />
Cruzer Micro<br />
Cruzer Micro<br />
Cruzer Micro<br />
DTIG2<br />
DTIG2<br />
DTIG2<br />
4G<br />
8G<br />
16G<br />
32G<br />
1G<br />
4G<br />
8G<br />
16G<br />
32G<br />
8G<br />
16G<br />
4G<br />
8G<br />
16G<br />
4G<br />
8G<br />
16G<br />
35