16CH H.264 Digital Video Recorder - Footprint Security
16CH H.264 Digital Video Recorder - Footprint Security
16CH H.264 Digital Video Recorder - Footprint Security

Create successful ePaper yourself
Turn your PDF publications into a flip-book with our unique Google optimized e-Paper software.
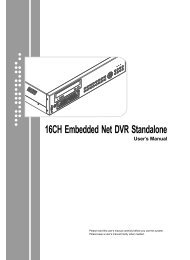
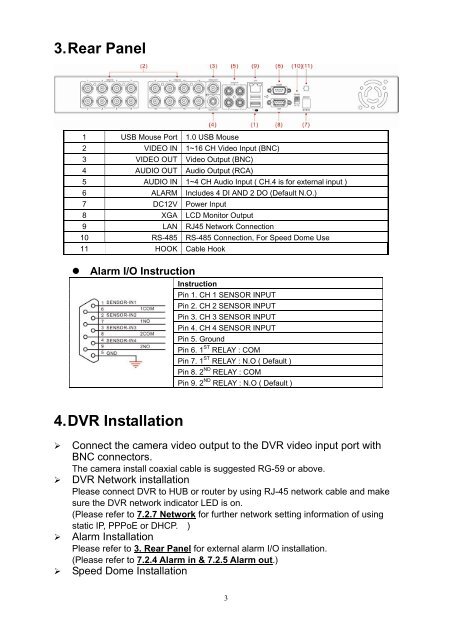
3. Rear Panel<br />
1 USB Mouse Port 1.0 USB Mouse<br />
2 VIDEO IN 1~16 CH <strong>Video</strong> Input (BNC)<br />
3 VIDEO OUT <strong>Video</strong> Output (BNC)<br />
4 AUDIO OUT Audio Output (RCA)<br />
5 AUDIO IN 1~4 CH Audio Input ( CH.4 is for external input )<br />
6 ALARM Includes 4 DI AND 2 DO (Default N.O.)<br />
7 DC12V Power Input<br />
8 XGA LCD Monitor Output<br />
9 LAN RJ45 Network Connection<br />
10 RS-485 RS-485 Connection, For Speed Dome Use<br />
11 HOOK Cable Hook<br />
• Alarm I/O Instruction<br />
Instruction<br />
Pin 1. CH 1 SENSOR INPUT<br />
Pin 2. CH 2 SENSOR INPUT<br />
Pin 3. CH 3 SENSOR INPUT<br />
Pin 4. CH 4 SENSOR INPUT<br />
Pin 5. Ground<br />
Pin 6. 1 ST RELAY : COM<br />
Pin 7. 1 ST RELAY : N.O ( Default )<br />
Pin 8. 2 ND RELAY : COM<br />
Pin 9. 2 ND RELAY : N.O ( Default )<br />
4. DVR Installation<br />
‣ Connect the camera video output to the DVR video input port with<br />
BNC connectors.<br />
The camera install coaxial cable is suggested RG-59 or above.<br />
‣ DVR Network installation<br />
Please connect DVR to HUB or router by using RJ-45 network cable and make<br />
sure the DVR network indicator LED is on.<br />
(Please refer to 7.2.7 Network for further network setting information of using<br />
static IP, PPPoE or DHCP. )<br />
‣ Alarm Installation<br />
Please refer to 3. Rear Panel for external alarm I/O installation.<br />
(Please refer to 7.2.4 Alarm in & 7.2.5 Alarm out.)<br />
‣ Speed Dome Installation<br />
3