Manual
Manual
Manual

Create successful ePaper yourself
Turn your PDF publications into a flip-book with our unique Google optimized e-Paper software.
Simulation Acceleration<br />
Algorithm Acceleration<br />
Logic Emulation<br />
ASIC Emulation<br />
ASIC Verification<br />
FPGA Boards<br />
Consulting<br />
User Guide<br />
DN9200K10PCIE8T
DN9200K10PCIE8T User <strong>Manual</strong><br />
Major Revision 1<br />
Last Update March 27, 2009 by fullsail user<br />
7469 Draper Avenue<br />
La Jolla, CA92037 USA<br />
Phone 858.454.3419 • Fax 858.454.1728<br />
support@dinigroup.com<br />
www.dinigroup.com
I N T R O D U C T I O N<br />
1 Table of Contents<br />
1 TABLE OF CONTENTS .......................................................................................... 5<br />
2 LIST OF FIGURES ................................................................................................. 15<br />
CHAPTER 1: INTRODUCTION .................................................................................. 19<br />
1 MANUAL CONTENTS .......................................................................................... 19<br />
1.1 INTRODUCTION ...................................................................................................... 19<br />
1.2 QUICK START GUIDE ............................................................................................. 19<br />
1.3 CONTROLLER SOFTWARE ...................................................................................... 20<br />
1.4 HARDWARE ........................................................................................................... 20<br />
1.5 THE REFERENCE DESIGN ...................................................................................... 20<br />
1.6 ORDERING INFORMATION ..................................................................................... 20<br />
2 AUDIENCE .............................................................................................................. 20<br />
3 CONVENTIONS...................................................................................................... 20<br />
3.1 NOTATIONS ............................................................................................................ 21<br />
3.2 FILE PATHS............................................................................................................. 21<br />
3.3 PHYSICAL DIMENSIONS ......................................................................................... 21<br />
3.4 PART PIN NAMES ................................................................................................... 21<br />
3.5 SCHEMATIC CLIPPINGS .......................................................................................... 21<br />
4 GLOSSARY .............................................................................................................. 22<br />
5 RESOURCES ........................................................................................................... 24<br />
5.1 USER CD ............................................................................................................... 24<br />
5.2 DINIGROUP.COM .................................................................................................... 26<br />
5.3 ERRATA LIST ......................................................................................................... 26<br />
5.3.1 Existing Errata ................................................................................................ 26<br />
5.4 REFERENCE DESIGN .............................................................................................. 26<br />
5.5 SCHEMATICS AND NETLIST ................................................................................... 26<br />
5.5.1 Netlist ............................................................................................................... 26<br />
5.5.2 Net name conventions ..................................................................................... 27<br />
5.6 DATASHEET LIBRARY ........................................................................................... 27<br />
5.7 XILINX ................................................................................................................... 28<br />
5.8 DINI GROUP REFERENCE DESIGNS ....................................................................... 28<br />
5.9 BOARD MODELS .................................................................................................... 28<br />
5.9.1 Base System Builder ....................................................................................... 28<br />
5.9.2 Using Partitioning and 3 rd party synthesis tools. .......................................... 28<br />
5.10 PCI EXPRESS DETAILS .......................................................................................... 28
I N T R O D U C T I O N<br />
5.11 EMAIL AND PHONE SUPPORT ................................................................................ 28<br />
CHAPTER 2: QUICK START GUIDE ....................................................................... 31<br />
1 PROVIDED MATERIALS .................................................................................... 31<br />
1.1 SYSTEM REQUIREMENTS ....................................................................................... 32<br />
2 WARNINGS ............................................................................................................. 32<br />
2.1 ESD ....................................................................................................................... 32<br />
2.2 OTHER ................................................................................................................... 33<br />
3 PRE-POWER ON INSTRUCTIONS ................................................................... 33<br />
3.1 INSTALL MEMORY (OPTIONAL) ............................................................................. 34<br />
3.2 PREPARE CONFIGURATION FILES ........................................................................... 34<br />
3.3 INSERT THE COMPACT FLASH CARD ..................................................................... 34<br />
3.4 INSTALL DN9200K10PCIE8T IN COMPUTER (OPTIONAL) .................................. 34<br />
3.5 CONNECT RS232 CABLE....................................................................................... 35<br />
3.6 CONNECT USB CABLE .......................................................................................... 35<br />
3.7 CONNECT POWER CABLE ...................................................................................... 35<br />
3.8 DAUGHTER CARDS ................................................................................................ 36<br />
4 POWER ON INSTRUCTIONS ............................................................................. 36<br />
4.1 VIEW CONFIGURATION FEEDBACK OVER RS232 .................................................. 36<br />
4.2 CHECK LED STATUS LIGHTS ................................................................................. 38<br />
5 RUN USB CONTROLLER .................................................................................... 39<br />
5.1 DRIVER INSTALLATION ......................................................................................... 39<br />
5.2 OPERATING THE USB CONTROLLER PROGRAM ................................................... 40<br />
5.2.1 Configure an FPGA ........................................................................................ 41<br />
5.2.2 Set Clock Frequencies .................................................................................... 42<br />
5.3 RUN HARDWARE TESTS ........................................................................................ 42<br />
5.3.1 Clock Frequencies .......................................................................................... 42<br />
5.3.2 DDR2 ............................................................................................................... 42<br />
5.3.3 Other Hardware Tests .................................................................................... 43<br />
5.4 GETTING DATA TO AND FROM THE FPGA ............................................................ 43<br />
6 RUN AETEST_WDM ............................................................................................. 44<br />
6.1.1 Use AETest ...................................................................................................... 44<br />
7 SCAN THE JTAG CHAIN .................................................................................... 46<br />
8 MOVING ON ........................................................................................................... 47<br />
CHAPTER 3: CONTROLLER SOFTWARE ............................................................ 49<br />
1 USB CONTROLLER .............................................................................................. 50
I N T R O D U C T I O N<br />
1.1 MAIN WINDOW ..................................................................................................... 50<br />
1.1.1 Refresh Button ................................................................................................. 51<br />
1.1.2 Disable/Enable USB ....................................................................................... 51<br />
1.1.3 Log Window .................................................................................................... 52<br />
1.1.4 Board Graphic ................................................................................................ 52<br />
1.2 MENU OPTIONS ..................................................................................................... 53<br />
1.2.1 File Menu ........................................................................................................ 53<br />
1.2.2 Edit Menu ........................................................................................................ 54<br />
1.2.3 FPGA Configuration Menu ............................................................................ 54<br />
1.2.4 FPGA Reference Design ................................................................................ 55<br />
1.2.5 Main Bus ......................................................................................................... 55<br />
1.2.6 Settings/Info Menu .......................................................................................... 56<br />
1.2.7 Production Test ............................................................................................... 57<br />
1.2.8 Service Menu ................................................................................................... 58<br />
1.2.9 Debugging Menu ............................................................................................ 58<br />
1.3 INI FILE ................................................................................................................. 58<br />
2 AETEST USB ........................................................................................................... 58<br />
3 PCI EXPRESS AETEST APPLICATION .......................................................... 58<br />
3.1 COMPILING AETEST_USB ..................................................................................... 59<br />
3.1.1 Compiling the Driver ...................................................................................... 59<br />
3.2 FUNCTIONALITY .................................................................................................... 59<br />
3.3 RUNNING AETEST ............................................................................................... 60<br />
4 ROLLING YOUR OWN SOFTWARE ............................................................... 62<br />
4.1 USB ....................................................................................................................... 62<br />
4.1.1 Windows XP/Vista .......................................................................................... 62<br />
4.1.2 Linux ................................................................................................................ 62<br />
4.2 PCIE ....................................................................................................................... 63<br />
4.2.1 Windows Driver Hooks .................................................................................. 63<br />
4.2.2 Linux Driver Hooks ........................................................................................ 64<br />
5 UPDATING THE FIRMWARE ........................................................................... 64<br />
5.1 OBTAINING THE UPDATES ..................................................................................... 65<br />
5.2 UPDATING THE SPARTAN (PROM) FIRMWARE .................................................... 65<br />
5.2.1 Using JTAG cable ........................................................................................... 65<br />
5.2.2 Using USBController ..................................................................................... 67<br />
5.2.3 Using AEtest_USB .......................................................................................... 68<br />
5.3 UPDATING THE MCU (FLASH) FIRMWARE ........................................................... 69<br />
5.4 PCI EXPRESS ENDPOINT FIRMWARE .................................................................... 70<br />
5.4.1 Using JTAG USB cable (Xilinx products - iMpact) ...................................... 70<br />
5.4.2 Using USBController ..................................................................................... 72<br />
5.4.3 Using AETest_USB ......................................................................................... 72
I N T R O D U C T I O N<br />
CHAPTER 4: HARDWARE .......................................................................................... 73<br />
1 GENERAL OVERVIEW ....................................................................................... 73<br />
2 VIRTEX 5 FPGAS ................................................................................................... 74<br />
2.1 STUFFING OPTIONS ................................................................................................ 74<br />
2.1.1 Q: So Can I get two SX240s? ......................................................................... 74<br />
2.1.2 FPGA A and B: ............................................................................................... 74<br />
2.1.3 CES Parts ........................................................................................................ 74<br />
2.1.4 “Small” FPGAs .............................................................................................. 74<br />
2.1.5 FPGA Q (PCI Express FPGA) Options ........................................................ 76<br />
2.1.6 Speed Grades .................................................................................................. 77<br />
2.2 USING IO ............................................................................................................... 77<br />
2.2.1 Timing.............................................................................................................. 77<br />
2.3 HARDWARE ERRATA DETAILS .............................................................................. 78<br />
2.4 UPGRADE POLICY .................................................................................................. 78<br />
2.4.1 Upgrading to new board ................................................................................ 78<br />
2.4.2 Adding FPGAs to a DN9200K10PCIE8T ..................................................... 78<br />
3 PCB ............................................................................................................................ 78<br />
3.1 TRACE DELAY ........................................................................................................ 78<br />
3.2 SIGNAL QUALITY .................................................................................................. 78<br />
4 CONFIGURATION SECTION ............................................................................ 78<br />
4.1 CONFIGURATION SECTION FEEDBACK.................................................................. 79<br />
4.2 FPGA CONFIGURATION ........................................................................................ 80<br />
4.3 PCI EXPRESS ......................................................................................................... 82<br />
4.3.1 BAR0 Map (LO).............................................................................................. 82<br />
4.3.2 BAR0 Map (HI)............................................................................................... 83<br />
4.3.3 FPGA Configuration ...................................................................................... 83<br />
4.3.4 Readback ......................................................................................................... 84<br />
4.4 CLOCK CONTROL .................................................................................................. 84<br />
4.4.1 Synthesizer Frequencies ................................................................................. 84<br />
4.4.2 Clock Sources ................................................................................................. 85<br />
4.5 COMPACTFLASH INTERFACE ................................................................................ 85<br />
4.5.1 Main.txt ........................................................................................................... 86<br />
4.5.2 Unimportant CompactFlash Hardware Notes .............................................. 89<br />
4.6 USB ....................................................................................................................... 89<br />
4.6.1 Configuring an FPGA .................................................................................... 89<br />
4.6.2 Readback ......................................................................................................... 90<br />
4.7 CONFIGURING THE “PCI EXPRESS” FPGA ........................................................... 91<br />
4.8 CONFIGURATION REGISTERS ................................................................................ 91<br />
4.8.1 Undocumented controls .................................................................................. 93<br />
4.9 FIRMWARE ............................................................................................................. 93
I N T R O D U C T I O N<br />
5 CLOCK NETWORK .............................................................................................. 94<br />
5.1 GLOBAL CLOCKS ................................................................................................... 94<br />
5.1.1 Clock Test points ............................................................................................. 95<br />
5.2 G0, G1, G2 CLOCKS .............................................................................................. 96<br />
5.2.1 Synthesizer Circuit .......................................................................................... 97<br />
5.3 EXT CLOCKS .......................................................................................................... 99<br />
5.3.1 Daughtercard zero-delay mode ..................................................................... 99<br />
5.3.2 SMA input ...................................................................................................... 100<br />
5.4 MB CLOCK .......................................................................................................... 101<br />
5.5 FBA AND FBB CLOCKS ...................................................................................... 101<br />
5.6 PCI EXPRESS REFCLK NETWORK .................................................................... 103<br />
5.7 NON-GLOBAL CLOCKS ....................................................................................... 103<br />
5.7.1 Clock TP ........................................................................................................ 103<br />
5.7.2 Ethernet Clock .............................................................................................. 104<br />
5.7.3 DDR2 Clocks ................................................................................................ 105<br />
5.7.4 SMA Clock B and E ...................................................................................... 105<br />
5.8 CLOCK USE NOTES .............................................................................................. 106<br />
5.8.1 Achieving Zero clock-to-out ......................................................................... 106<br />
5.8.2 Forwarding Clocks FPGA-to-FPGA........................................................... 106<br />
6 TEST POINTS........................................................................................................ 110<br />
7 USB INTERFACE ................................................................................................. 112<br />
7.1 VENDOR REQUESTS ............................................................................................. 113<br />
7.1.1 VR_CLEAR_FPGA ...................................................................................... 113<br />
7.1.2 VR_SETUP_CONFIG .................................................................................. 114<br />
7.1.3 VR_END_CONFIG ...................................................................................... 114<br />
7.1.4 VR_SET_EP6TC (Read buffer size) ............................................................ 114<br />
7.1.5 VR_MEM_MAPPED (Configuration Registers) ........................................ 114<br />
7.2 MAIN BUS ACCESSES .......................................................................................... 114<br />
7.2.1 Note about Endpoint Terminology ............................................................... 115<br />
7.2.2 Performance .................................................................................................. 116<br />
7.3 FPGA CONFIGURATION MODE ........................................................................... 116<br />
7.4 MASS STORAGE DEVICE MODE .......................................................................... 117<br />
7.5 FIRMWARE UPDATE MODE ................................................................................. 117<br />
7.5.1 Activity LED .................................................................................................. 117<br />
7.6 HARDWARE ......................................................................................................... 117<br />
7.7 TROUBLESHOOTING ............................................................................................ 117<br />
7.7.1 USB Controller Freezes ............................................................................... 117<br />
8 FPGA Q RESOURCES ........................................................................................ 118<br />
8.1 FPGA A INTERCONNECT .................................................................................... 118<br />
8.2 UNUSABLE IO ...................................................................................................... 118<br />
8.3 ROCKETIO (“MGT”, “GTP”, “GTX”) ............................................................... 118
I N T R O D U C T I O N<br />
8.4 SPI FLASH ........................................................................................................... 119<br />
8.5 LEDS ................................................................................................................... 119<br />
8.6 RS232 .................................................................................................................. 119<br />
8.7 SYNTHESIZER ...................................................................................................... 119<br />
9 PCI EXPRESS INTERFACE .............................................................................. 119<br />
9.1 HOST INTERFACE, ELECTRICAL .......................................................................... 121<br />
9.1.1 Power ............................................................................................................ 122<br />
9.1.2 PCI-X ............................................................................................................. 122<br />
9.2 HOST INTERFACE, MECHANICAL ........................................................................ 122<br />
9.3 PROVIDED “FULL-FUNCTION PCI EXPRESS ENDPOINT” .................................... 123<br />
9.3.1 BAR 0 Access ................................................................................................ 124<br />
9.3.2 BAR 1-5 Access ............................................................................................. 125<br />
9.3.3 DMA Channels 0 and 1 ................................................................................ 125<br />
9.3.4 DMA Posted Mode ....................................................................................... 125<br />
9.3.5 DMA Main Bus ............................................................................................. 126<br />
9.3.6 Electrical ....................................................................................................... 126<br />
9.3.7 Timing............................................................................................................ 126<br />
9.3.8 FPGA Interface ............................................................................................. 127<br />
9.3.9 Host Interface, Software ............................................................................... 128<br />
9.4 OTHER PROVIDED DESIGNS FOR THE LXT ......................................................... 131<br />
9.4.1 No design ....................................................................................................... 131<br />
9.4.2 PIPE .............................................................................................................. 132<br />
9.4.3 Slowdown PIPE Core ................................................................................... 132<br />
9.5 TROUBLESHOOTING ............................................................................................ 133<br />
10 UNUSABLE PINS ................................................................................................. 133<br />
10.1 ADJACENT ROCKETIO ........................................................................................ 134<br />
10.2 NO CONNECT ....................................................................................................... 134<br />
10.3 CONFIGURATION ................................................................................................. 134<br />
10.4 VREF/DCI .......................................................................................................... 134<br />
11 SYSTEM MONITOR/ADC ................................................................................. 134<br />
12 RESET ..................................................................................................................... 135<br />
12.1 POWER RESET ...................................................................................................... 135<br />
12.2 USER RESET ......................................................................................................... 136<br />
13 JTAG ........................................................................................................................ 136<br />
13.1 FPGA JTAG ....................................................................................................... 136<br />
13.1.1 Compatible Configuration Devices ............................................................. 137<br />
13.1.2 ChipScope ..................................................................................................... 137<br />
13.2 FIRMWARE UPDATE HEADER.............................................................................. 138<br />
13.3 TROUBLESHOOTING ............................................................................................ 138
I N T R O D U C T I O N<br />
14 RS232 INTERFACE ............................................................................................. 138<br />
14.1.1 Configuration RS232 .................................................................................... 139<br />
15 TEMPERATURE SENSORS .............................................................................. 139<br />
16 ENCRYPTION BATTERY ................................................................................. 140<br />
16.1 EXTERNAL BATTERY........................................................................................... 141<br />
17 LED INTERFACE ................................................................................................ 142<br />
17.1 CONFIGURATION SECTION LEDS ....................................................................... 142<br />
17.2 USER LEDS ......................................................................................................... 143<br />
17.3 ETHERNET LEDS ................................................................................................. 145<br />
17.4 POWER LEDS ...................................................................................................... 145<br />
17.5 UNUSED LEDS .................................................................................................... 146<br />
18 DDR2 DIMM SOCKETS ..................................................................................... 146<br />
18.1 POWER ................................................................................................................. 147<br />
18.1.1 Interface Voltages ......................................................................................... 147<br />
18.1.2 Changing the DIMM voltage ....................................................................... 148<br />
18.1.3 DIMM warning LED .................................................................................... 149<br />
18.2 CLOCKING ........................................................................................................... 150<br />
18.2.1 DQS timing .................................................................................................... 151<br />
18.2.2 Serial Interface .............................................................................................. 151<br />
18.2.3 Timing............................................................................................................ 151<br />
18.3 COMPATIBLE MODULES ...................................................................................... 152<br />
18.4 INCOMPATIBLE MODULES ................................................................................... 152<br />
18.5 TEST POINTS ........................................................................................................ 152<br />
19 FPGA INTERCONNECT. ................................................................................... 153<br />
20 MAIN BUS .............................................................................................................. 155<br />
20.1 MB SIGNALS ....................................................................................................... 155<br />
20.1.1 MB vs. MainBus Disambiguation ................................................................ 156<br />
20.1.2 Electrical ....................................................................................................... 156<br />
20.1.3 Timing............................................................................................................ 156<br />
20.2 ERROR CODES ..................................................................................................... 156<br />
20.3 MAIN BUS FPGA INTERFACE ............................................................................. 157<br />
20.3.1 mb_target.v ................................................................................................... 158<br />
20.3.2 Conventional Memory map .......................................................................... 158<br />
21 ETHERNET ........................................................................................................... 159<br />
21.1 RGMII ................................................................................................................. 159<br />
21.1.1 Electrical ....................................................................................................... 160<br />
21.1.2 Timing............................................................................................................ 160
I N T R O D U C T I O N<br />
21.2 CONFIGURATION REGISTERS .............................................................................. 161<br />
21.3 MII INTERFACE ................................................................................................... 162<br />
21.4 EXTERNAL EPROM ............................................................................................ 162<br />
21.5 EPROM PHY CONFIGURATION ......................................................................... 162<br />
21.6 JTAG ................................................................................................................... 163<br />
21.7 ETHERNET MAC ................................................................................................. 163<br />
22 EPROM ................................................................................................................... 163<br />
23 SPI FLASH ............................................................................................................. 164<br />
23.1 ON FPGAS A AND B ........................................................................................... 164<br />
23.2 ON FPGA Q ........................................................................................................ 165<br />
24 MICTOR CONNECTORS .................................................................................. 165<br />
24.1 FPGA A MICTOR ................................................................................................ 166<br />
24.2 FPGA B MICTOR ................................................................................................ 167<br />
24.3 MAINBUS MICTOR .............................................................................................. 168<br />
25 POWER ................................................................................................................... 169<br />
25.1 POWER 12V ......................................................................................................... 170<br />
25.2 POWER 3.3V ........................................................................................................ 170<br />
25.3 POWER 2.5V ........................................................................................................ 170<br />
25.4 GROUND .............................................................................................................. 170<br />
25.5 VOLTAGE REGULATION ...................................................................................... 170<br />
25.6 POWER CONNECTIONS ........................................................................................ 171<br />
25.7 POWER MONITORS .............................................................................................. 171<br />
25.8 POWER THRU-HOLE ACCESS POINTS .................................................................. 172<br />
25.9 POWER MEASUREMENT TP ................................................................................. 173<br />
25.10 HEAT ................................................................................................................. 173<br />
25.10.1 Fans ............................................................................................................ 174<br />
25.10.2 Removing Heatsinks .................................................................................. 174<br />
25.10.3 Fan Tachometers ....................................................................................... 174<br />
26 CONNECTORS ..................................................................................................... 176<br />
26.1.1 Comments ...................................................................................................... 176<br />
27 MECHANICAL ..................................................................................................... 177<br />
28 DAUGHTERCARD HEADERS ......................................................................... 178<br />
28.1 DAUGHTER CARD PHYSICAL .............................................................................. 179<br />
28.1.1 Daughter Card Locations and Mounting .................................................... 180<br />
28.1.2 Standard Daughtercard Size ........................................................................ 182<br />
28.1.3 Insertion and removal ................................................................................... 182<br />
28.2 DAUGHTER CARD ELECTRICAL .......................................................................... 183<br />
28.2.1 Pin assignments ............................................................................................ 190
I N T R O D U C T I O N<br />
28.2.2 CC, VREF, DCI ............................................................................................ 192<br />
28.2.3 Global clocks ................................................................................................ 192<br />
28.2.4 Timing and Clocking .................................................................................... 193<br />
28.2.5 Incorrect Clocking Methods ......................................................................... 197<br />
28.2.6 Power and Reset ........................................................................................... 199<br />
28.2.7 VCCO Voltage .............................................................................................. 199<br />
28.2.8 VCCO bias generation ................................................................................. 200<br />
28.3 ROLLING YOUR OWN DAUGHTERCARD ............................................................... 200<br />
29 TROUBLESHOOTING ....................................................................................... 201<br />
29.1 THE BOARD IS DEAD ............................................................................................ 201<br />
29.2 THE BOARD DOES NOT RESPOND OVER PCI EXPRESS......................................... 201<br />
29.3 THE BOARD DOES NOT RESPOND OVER USB ...................................................... 202<br />
29.4 THE FPGAS WON’T PROGRAM ............................................................................ 202<br />
29.5 MY DESIGN DOESN’T DO ANYTHING ................................................................... 202<br />
29.6 THE DCMS WON’T LOCK .................................................................................... 203<br />
29.7 IT’S SO WEIRD… IT’S LIKE SOMETIMES WHEN I PROGRAM MY FPGAS, THE<br />
SIGNALS BETWEEN THE FPGAS ARE DELAYED BY ONE CLOCK CYCLE. THEN, WHEN I HIT<br />
THE RESET BUTTON, SOMETIMES IT STARTS WORKING AGAIN. ...................................... 203<br />
29.8 MY PACEMAKER STOPS WORKING WHEN I INCREASE THE CLOCK FREQUENCY . 203<br />
29.9 THE SIGNAL ON MY BOARD IS GOING BAT CRAZY ON MY OSCILLOSCOPE .......... 203<br />
CHAPTER 5: REFERENCE DESIGN ...................................................................... 205<br />
1 PURPOSE ............................................................................................................... 205<br />
1.1 INTERFACES USED BY REFERENCE DESIGN .......................................................... 205<br />
1.2 INTERFACES NOT USED BY THE REFERENCE DESIGN ........................................... 206<br />
2 HARDWARE TESTS ........................................................................................... 206<br />
2.1.1 Testing PCI Express interface ...................................................................... 206<br />
2.1.2 Testing FPGA-to-FPGA interconnect ......................................................... 206<br />
2.1.3 Testing DDR2 Interfaces .............................................................................. 206<br />
2.1.4 Testing USB .................................................................................................. 207<br />
2.1.5 Testing Ethernet ............................................................................................ 207<br />
2.1.6 Testing Daughtercard Connectors .............................................................. 207<br />
3 REFERENCE DESIGN TYPES ......................................................................... 207<br />
3.1 MAIN TEST .......................................................................................................... 207<br />
3.2 LVDS .................................................................................................................. 208<br />
3.3 SINGLE FAST ........................................................................................................ 208<br />
3.4 V5 INTERCONNECT .............................................................................................. 208<br />
3.5 ETHERNET............................................................................................................ 208<br />
3.6 HEADER ............................................................................................................... 208<br />
4 USING THE REFERENCE DESIGN ................................................................ 208
I N T R O D U C T I O N<br />
4.1 REFERENCE DESIGN MEMORY MAP ................................................................... 208<br />
5 INTERCONNECT (SINGLE) ............................................................................. 210<br />
5.1 USING THE DESIGN .............................................................................................. 210<br />
5.2 RUNNING THE TEST ............................................................................................. 211<br />
5.3 DDR2 INTERFACE ............................................................................................... 211<br />
5.4 PROVIDED FILES .................................................................................................. 211<br />
5.5 USING THE DESIGN .............................................................................................. 211<br />
5.6 RUNNING THE TEST ............................................................................................. 212<br />
5.7 CLOCK COUNTERS .............................................................................................. 212<br />
5.8 LEDS ................................................................................................................... 212<br />
5.9 SIMULATING THE REFERENCE DESIGN ............................................................... 212<br />
6 LVDS REFERENCE DESIGN ............................................................................ 213<br />
6.1 PROVIDED FILES .................................................................................................. 213<br />
6.2 USING THE DESIGN .............................................................................................. 213<br />
6.3 RUNNING THE TEST ............................................................................................. 213<br />
6.4 IMPLEMENTATION DETAILS ................................................................................ 214<br />
6.4.1 Lane Alignment ............................................................................................. 214<br />
6.4.2 Funny Banks ................................................................................................. 214<br />
7 PCIE INTERFACE REFERENCE DESIGN ................................................... 215<br />
7.1 PROVIDED FILES .................................................................................................. 215<br />
7.2 USING THE DESIGN .............................................................................................. 215<br />
7.3 RUNNING THE TEST ............................................................................................. 215<br />
1 COMPILING THE REFERENCE DESIGN .................................................... 216<br />
1.1 THE XILINX EMBEDDED DEVELOPMENT KIT (EDK) ......................................... 216<br />
1.2 XILINX ISE .......................................................................................................... 216<br />
1.3 THE BUILD UTILITY: MAKE.BAT ........................................................................ 217<br />
1.4 BITGEN OPTIONS ................................................................................................. 217<br />
1.5 VHDL ................................................................................................................. 218<br />
CHAPTER 6: ORDERING INFORMATION .......................................................... 219<br />
1 HOW TO ORDER ................................................................................................. 219<br />
2 OPTIONAL EQUIPMENT ................................................................................. 219<br />
2.1 COMPATIBLE DINI GROUP PRODUCTS ................................................................ 219<br />
2.1.1 Interface Boards ........................................................................................... 219<br />
2.1.2 Memories ....................................................................................................... 219<br />
2.1.3 Daughter cards ............................................................................................. 220<br />
2.2 COMPATIBLE THIRD-PARTY SOFTWARE ............................................................. 221<br />
2.3 COMPATIBLE THIRD-PARTY HARDWARE ............................................................ 221
I N T R O D U C T I O N<br />
3 COMPLIANCE DATA ......................................................................................... 222<br />
3.1 DISCLAIMER ........................................................................................................ 222<br />
3.2 COMPLIANCE ....................................................................................................... 222<br />
3.2.1 FCC EMI ....................................................................................................... 222<br />
3.2.2 PCIe-SIG ....................................................................................................... 223<br />
3.3 ENVIRONMENTAL ................................................................................................ 223<br />
3.3.1 Temperature .................................................................................................. 223<br />
3.4 EXPORT CONTROL ............................................................................................... 223<br />
3.4.1 Lead-Free ...................................................................................................... 223<br />
3.4.2 The USA Schedule B number based on the HTS ......................................... 223<br />
3.4.3 Export control classification number ECCN .............................................. 224<br />
2 List of Figures<br />
Figure 1 - DN9200K10PCIE8T – Heat sinks negligently left uninstalled. .............................................................. 19<br />
Figure 2 – An example circuit on the board. .................................................................................................................... 27<br />
Figure 3 – How that circuit appears on the customer netlist. ...................................................................................... 27<br />
Figure 4 - An engineer demonstrates use of a grounding wrist strap ...............Error! Bookmark not defined.<br />
Figure 5 - DN9200K10PCIE8T stuff you need to know about to get started. ...................................................... 33<br />
Figure 6 - A six-pin PCI Express "Graphics Power" adapter...................................................................................... 36<br />
Figure 7 - A power supply "starter" .................................................................................................................................... 36<br />
Figure 8 – Figure 8 ..........................................................................................................Error! Bookmark not defined.<br />
Figure 9 - RS232 Output ........................................................................................................................................................ 38<br />
Figure 10 - LEDs ..................................................................................................................................................................... 39<br />
Figure 11 - Driver installation Wizard ................................................................................................................................ 39<br />
Figure 12 - USB Controller Window.. ................................................................................................................................ 40<br />
Figure 13 - USB Controller Log Output ........................................................................................................................... 41<br />
Figure 14 - USB Controller Log Output ........................................................................................................................... 43<br />
Figure 15 - Splash screen ........................................................................................................................................................ 44<br />
Figure 16 - AETest Main Menu ........................................................................................................................................... 45<br />
Figure 17 - Memory Menu .................................................................................................................................................... 45<br />
Figure 18 - JTAG Headers .................................................................................................................................................... 46<br />
Figure 19 - iMPACT connected to FPGA JTAG .......................................................................................................... 47<br />
Figure 20 - USB Controller Main Window ....................................................................................................................... 51<br />
Figure 21 - Refresh Button ...........................................................................................Error! Bookmark not defined.<br />
Figure 22 - Enable USB Button ..................................................................................Error! Bookmark not defined.<br />
Figure 23 - USB Controller complains if board is not detected .................................................................................. 52<br />
Figure 24 - Configuring FPGAs .......................................................................................................................................... 53<br />
Figure 25 - AETest splash screen ........................................................................................................................................ 60<br />
Figure 26 - AETest main menu ........................................................................................................................................... 61<br />
Figure 27 - AETest PCI menu ............................................................................................................................................. 61<br />
Figure 28 - AETest memory menu ............................................................................Error! Bookmark not defined.<br />
Figure 29 - AETest Testing menu ..............................................................................Error! Bookmark not defined.<br />
Figure 30 - Firmware Update Header ................................................................................................................................ 66<br />
Figure 31 - iMPACT Window .............................................................................................................................................. 67<br />
Figure 32 - Switch S2 .............................................................................................................................................................. 69<br />
Figure 33 - USB Controller Firmware Update Mode .................................................................................................... 69
I N T R O D U C T I O N<br />
Figure 34 - JTAG Headers .................................................................................................................................................... 70<br />
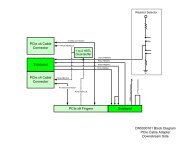
Figure 35 - DN9200K10PCIE8T Block Diagram ......................................................................................................... 73<br />
Figure 36 - DN9200K10PCIE8T LX110 Block Diagram ........................................................................................... 75<br />
Figure 37 - LX Selection Guide ........................................................................................................................................... 76<br />
Figure 38 - LXT FXT Selection Guide .............................................................................................................................. 76<br />
Figure 39 - Config Section Block Diagram ....................................................................................................................... 79<br />
Figure 40 - Serial Port Headers ............................................................................................................................................ 80<br />
Figure 41 - DONE LED circuit .......................................................................................................................................... 81<br />
Figure 42 - EXT0 EXT1 Circuit.......................................................................................................................................... 85<br />
Figure 43 - CompactFlash card socket ............................................................................................................................... 86<br />
Figure 44 - Main.txt Commands .......................................................................................................................................... 88<br />
Figure 45 - Spartan "Firmware" JTAG Chain .................................................................................................................. 93<br />
Figure 46 - Clock network block diagram ......................................................................................................................... 95<br />
Figure 47 - Clock Test points ............................................................................................................................................... 95<br />
Figure 48 - Clock G network synthesizer circuit ............................................................................................................. 97<br />
Figure 49 - EXT clock sources diagram ......................................................................................................................... 100<br />
Figure 50 - EXT0 SMA locator ........................................................................................................................................ 101<br />
Figure 51 - EXT0 SMA circuit .......................................................................................................................................... 101<br />
Figure 52 - FBA typical use ................................................................................................................................................ 102<br />
Figure 53 - FBA typical use with synchronization ....................................................................................................... 102<br />
Figure 54 - Clock Testpoint circuit ................................................................................................................................... 104<br />
Figure 55 - Clock Test point locator ................................................................................................................................ 104<br />
Figure 56 - SMA circuit ....................................................................................................................................................... 105<br />
Figure 57 - SMA locator ...................................................................................................................................................... 106<br />
Figure 58 - Not using GCLK pins ................................................................................................................................... 107<br />
Figure 59 - Not using an external feedback ................................................................................................................... 108<br />
Figure 60 - Two divide DCMs .......................................................................................................................................... 108<br />
Figure 61 - Outputting a clock with an assign statement ........................................................................................... 109<br />
Figure 62 - Cascading DCMs ............................................................................................................................................. 109<br />
Figure 63 - DCM on same reset as logic ......................................................................................................................... 110<br />
Figure 64 - USB locator ....................................................................................................................................................... 112<br />
Figure 65 - PCI SIG Compliance Base Board .............................................................................................................. 118<br />
Figure 66 - FPGA Q LEDs ............................................................................................................................................... 119<br />
Figure 67 - PCI Express block diagram .......................................................................................................................... 120<br />
Figure 68 - PCI Express circuit ......................................................................................................................................... 121<br />
Figure 69 - PCI Express eye diagram .............................................................................................................................. 122<br />
Figure 70 - Full function design block diagram ............................................................................................................ 123<br />
Figure 71 - FPGA A to Q clocking diagram ................................................................................................................. 127<br />
Figure 72 - PIPE design block diagram .......................................................................................................................... 132<br />
Figure 73 - PIPE Slowdown block diagram .................................................................................................................. 133<br />
Figure 74 - Sysytem monitor circuit ................................................................................................................................. 134<br />
Figure 75 - FPGA JTAG circuit ....................................................................................................................................... 136<br />
Figure 76 - FPGA JTAG locator ...................................................................................................................................... 137<br />
Figure 77 - FPGA JTAG block diagram ........................................................................................................................ 137<br />
Figure 78 - RS232 circuit ..................................................................................................................................................... 138<br />
Figure 79 - RS232 locator ................................................................................................................................................... 139<br />
Figure 80 - Battery locator .................................................................................................................................................. 141<br />
Figure 81 - battery circuit .................................................................................................................................................... 142<br />
Figure 82 - LED circuit ....................................................................................................................................................... 143<br />
Figure 83 - LED locator ...................................................................................................................................................... 144<br />
Figure 84 - Ethernet locator ............................................................................................................................................... 145
I N T R O D U C T I O N<br />
Figure 85 - Power fail LED locator ................................................................................................................................. 145<br />
Figure 86 - Unused LED locator ...................................................................................................................................... 146<br />
Figure 87 - DIMM block diagram .................................................................................................................................... 147<br />
Figure 88 - DIMM Voltage selection circuit .................................................................................................................. 148<br />
Figure 89 - DIMM Voltage locator .................................................................................................................................. 149<br />
Figure 90 - DIMM warning LED locator ...................................................................................................................... 149<br />
Figure 91 - DIMM clock diagram .................................................................................................................................... 150<br />
Figure 92 - DIMM signal test point locator .............................................................Error! Bookmark not defined.<br />
Figure 93 - Interconnect block diagram .......................................................................................................................... 153<br />
Figure 94 - Main Bus block diagram ................................................................................................................................ 155<br />
Figure 95 - Inaccurate Mani Bus read timing ................................................................................................................ 157<br />
Figure 96 - Inaccurate Main Bus write timing ............................................................................................................... 158<br />
Figure 97 - Ethernet locator ............................................................................................................................................... 159<br />
Figure 98 - Ethernet timing ................................................................................................................................................ 160<br />
Figure 99 - 1000Base-T circuit........................................................................................................................................... 162<br />
Figure 100 - EPROM circuit.............................................................................................................................................. 164<br />
Figure 101 - SPI Flash circuit ............................................................................................................................................. 164<br />
Figure 102 - SPI Flash circuit Q ........................................................................................................................................ 165<br />
Figure 103 - Mictor locator................................................................................................................................................. 166<br />
Figure 104 - Mictor cable .................................................................................................................................................... 166<br />
Figure 105 - Mictor A circuit.............................................................................................................................................. 167<br />
Figure 106 - Mictor B circuit .............................................................................................................................................. 167<br />
Figure 107 - MainBus mictor locator ............................................................................................................................... 168<br />
Figure 108 - Main Bus mictor circuit ............................................................................................................................... 168<br />
Figure 109 - Board power topology diagram ................................................................................................................ 169<br />
Figure 110 - PCI Express graphics power locator ....................................................................................................... 171<br />
Figure 111 - Power Test points ......................................................................................................................................... 172<br />
Figure 112 - Power Fail LED locator .............................................................................................................................. 173<br />
Figure 113 - Power probe point circuit ........................................................................................................................... 173<br />
Figure 114 - Heatsink fan locator ..................................................................................................................................... 174<br />
Figure 115 - Fan tachometer circuit ................................................................................................................................. 175<br />
Figure 116 - Fan power locator ......................................................................................................................................... 175<br />
Figure 117 - Mechanical drawing ...................................................................................................................................... 177<br />
Figure 118 - Ground rail locator ....................................................................................................................................... 178<br />
Figure 119 - Daughter card locator .................................................................................................................................. 178<br />
Figure 120 - Daughter card block diagram .................................................................................................................... 179<br />
Figure 121 - Mechanical Drawing .................................................................................................................................... 180<br />
Figure 122 - Daughter card side mechanical.................................................................................................................. 181<br />
Figure 123 - DNMEG_EXT mechanical ...................................................................................................................... 181<br />
Figure 124 - Standard daughter card dimensions ......................................................................................................... 182<br />
Figure 125 - Daughter card installation step 1 .............................................................................................................. 183<br />
Figure 126 - Install Daughter card step 2 ....................................................................................................................... 183<br />
Figure 127 - Daughter card pinout diagram .................................................................................................................. 191<br />
Figure 128 - Daughter card clock pin functions ........................................................................................................... 193<br />
Figure 129 - Daughtercard clocking local ....................................................................................................................... 194<br />
Figure 130 - Daughter card clocking global ................................................................................................................... 195<br />
Figure 131 - Daughter card clocking source synchronous ........................................................................................ 196<br />
Figure 132 - Daughter card clocking skew tolerant ..................................................................................................... 197<br />
Figure 133 - Daughter card Clock forwarding fail ....................................................................................................... 198<br />
Figure 134 - Daughter card clocking PLL cascade fail ............................................................................................... 198<br />
Figure 135 - Tacoma Narrows Fail ............................................................................Error! Bookmark not defined.
I N T R O D U C T I O N<br />
Figure 136 - MEG Array power circuit........................................................................................................................... 199<br />
Figure 137 - MEG Array bias circuit ............................................................................................................................... 200<br />
Figure 138 - Dini Group corporate strategy diagram .................................................................................................. 205<br />
Figure 139 - LVDS Reference design clocking global ................................................................................................ 214<br />
Figure 140 - LVDS Reference design clocking local ................................................................................................... 215<br />
Figure 141 - Disclaimer block diagram ........................................................................................................................... 222
Chapter 1: Introduction<br />
Congratulations on your purchase of the DN9200K10PCIE8T logic emulation board. If you are<br />
unfamiliar with Dini Group products, you should read Chapter 2, Quick Start Guide to<br />
familiarize yourself with the user interfaces the DN9200K10PCIE8T provides.<br />
Figure 1 DN9200K10PCIE8T – Heat sinks negligently left uninstalled.<br />
1 <strong>Manual</strong> Contents<br />
This manual contains the following chapters:<br />
1.1 Introduction<br />
Reader‟s Guide to this manual; List of available documentation and resources; Section 1<br />
contains a list of the manual contents, including the introduction.<br />
1.2 Quick Start Guide<br />
This chapter includes step-by-step instructions for powering on the DN9200K10PCIE8T for<br />
the first time. It will guide you through using the board‟s most important features. For users very<br />
familiar with FPGA boards, this is likely the only part of the manual that will need to be read<br />
completely. The rest of the book can be used for reference.<br />
DN9200K10PCIE8T User Guide www.dinigroup.com 19
I N T R O D U C T I O N<br />
1.3 Controller Software<br />
A summary of the functionality of the provided software; Implementation details for the remote<br />
USB board control functions and instructions for developing your own USB host software<br />
1.4 Hardware<br />
This chapter is to be used as a reference for use of the individual circuits available to the user.<br />
When implementing an interface on the FPGA, you should read its corresponding section in<br />
this chapter in conjunction with the parts datasheets and the board schematic.<br />
1.5 The Reference Design<br />
This chapter will describe parts of the provided FPGA code and project files that seem like they<br />
are important. Users very familiar with FPGA boards probably will not use the reference<br />
designs. People new to FPGA board development might want to start from one of the example<br />
designs.<br />
1.6 Ordering Information<br />
This chapter contains a list of the available options and available optional equipment; some<br />
suggested parts and equipment available from third party vendors; Also information about the<br />
board that has nothing to do with actually using the board.<br />
2 Audience<br />
Certain assumptions are made about the audience of this manual. Below is a list of the<br />
prerequisite skills to successfully use the board and the manual. A resource is suggested for<br />
further reading is necessary.<br />
The reader is fluent in Verilog or VHDL.<br />
A Verilog HDL Primer by Jayaram Bhasker<br />
www.amazon.com<br />
The reader understands how to calculate required timing parameters on an electrical interface<br />
using an IC manufacturer‟s part datasheet.<br />
The reader knows how to implement an HDL design using the Xilinx XST design flow.<br />
http://www.xilinx.com/support/software_manuals.htm<br />
3 Conventions<br />
This document uses the following conventions. An example illustrates each convention.<br />
DN9200K10PCIE8T User Guide www.dinigroup.com 20
I N T R O D U C T I O N<br />
3.1 Notations<br />
Prefix “0x” The radix on numbers is usually decimal. By convention, I‟ve started radix-16<br />
numbers with “0x”<br />
Postfix “#” and “n” and “m” On signal names or logical values whose names end in # or N<br />
usually have an inverted logical value. Or, in the case of physical signals on the board, have an<br />
active state represented by a low voltage.<br />
3.2 File paths<br />
Paths to documents included on the User CD are prefixed with “D:\”. This refers to your CD<br />
drive‟s root directory when the User CD is inserted in your Windows computer.<br />
For some things to work correctly (compilations, executables, projects) you will probably need<br />
to copy the entire contents of the User CD to your hard drive. In this case, D:\ will to refer to<br />
the path of the copy on your hard drive. Due to limitations of the Xilinx ISE software in<br />
Windows, we recommend a path without space characters in it. (Bad places include<br />
C:/Documents and Settings/username/Desktop/)<br />
3.3 Physical Dimensions<br />
By convention, the board is oriented as shown in the above board photo, with the “top” of the<br />
board being the edge with the Ethernet RJ45 connectors. The “right” edge is near FPGA C and<br />
F. The “left” side is the side with the PCIe bracket. “Top” side refers to the side of the PWB<br />
with FPGAs and fans; the “back” side is the side with the three daughtercard connectors. The<br />
reference origin of the board is the center of the lower PCI bracket mounting hole.<br />
All physical dimensions are given in millimeters, when no units are specified.<br />
3.4 Part Pin Names<br />
References to individual part‟s pin are given in the form .; The is one of: U<br />
for ICs, R for resistors, C for capacitors, P or J for connectors, FB or L for inductors, TP for<br />
test points, MH for mounting structures, FD for fiducials, BT for sockets, DS for displays (lightemitting<br />
diodes), F for fuses, PSU for power supply modules, Q for discrete semiconductors,<br />
RN for resistor networks, G for oscillators, X for sockets, Y for crystals and the PCIe bezel.<br />
is a number uniquely identifying each part from other parts of the same class. is the<br />
pin or terminal number or name, as defined in the datasheet of the part. Datasheets for all<br />
standard and optional parts used on the DN9200K10PCIE8T are included in the Document<br />
library on the user CD.<br />
3.5 Schematic Clippings<br />
Partial schematic drawings are included in this document to aid quick understanding of the<br />
features of the DN9200K10PCIE8T. These clippings have been modified for clarity and<br />
brevity, and may be missing signals, parts, net names, labels and connections. Unmodified<br />
Schematics are included in the User CD as a PDF.<br />
DN9200K10PCIE8T User Guide www.dinigroup.com 21
I N T R O D U C T I O N<br />
Designing interface logic for external parts on this board will certainly require at least some use<br />
of the schematic. Use the PDF search feature to search for nets and parts.<br />
4 Glossary<br />
In this manual, references are made to these things that may have no meaning to you:<br />
Spartan………………. Spartan refers to the Spartan-3 FPGA device used by the<br />
Config FPGA DN9200K10PCIE8T to perform configuration circuit functions. It is<br />
U0<br />
used also interchangeably with “configuration circuit”. This FPGA is<br />
not intended to be used by you.<br />
FPGA Q……………… There are four FPGAs on this board: FPGA A, FPGA B, FPGA Q<br />
V5T<br />
and the Spartan. The first three are intended for the user to use. The<br />
PCI Express FPGA Spartan is reserved for board control and should not be considered<br />
LXT<br />
for emulating your logic. Dini Group provides bit files that can be<br />
FXT<br />
used in FPGA Q in bitstream from (we do not provide the RTL for<br />
U3<br />
some of these). These bit files implement PCI express and can be<br />
“QL”<br />
used as a ready-to-go PCI Express endpoint, or you may chose to use<br />
FPGA Q as a third user FPGA. If you need PCI Express, in this<br />
case, you will have to implement your own PCI Express endpoint or<br />
uses the Xilinx Block+ core.<br />
ISE…………………… These are software products provided by Xilinx<br />
bitgen<br />
iMPACT<br />
XST<br />
EDK<br />
CoreGen<br />
MIG<br />
Bitfile…………………. This is the contents of the SRAM that controls the FPGA‟s internal<br />
Configuration Stream behavior. The data file that contains this data is a .bit file and is<br />
.bit file<br />
generated by Xilinx bitgen<br />
DCM…………………. These terms refer to features of the Virtex-5 FPGA that it assumed<br />
DCI<br />
that you know about. Understanding the function (and using) all of<br />
BUFG<br />
these primitives is definitely required to make your design work<br />
DIFF_TERM properly.<br />
ODDR<br />
IOB<br />
DN9200K10PCIE8T User Guide www.dinigroup.com 22
I N T R O D U C T I O N<br />
MGT………………….. These all refer to features of the Virtex-5 FPGA that is assumed that<br />
GTP<br />
you know about. Understanding the function (and using) these<br />
GTX<br />
features may be required to make your design work properly. See the<br />
BUFR<br />
Virtex-5 user guide.<br />
BUFIO<br />
OSERDES<br />
IDELAY<br />
LVDS…………………. These refer to signaling standards (voltage levels) that are required to<br />
SSTL<br />
make some interfaces external to the FPGA work properly. When<br />
LVCMOS<br />
you know the IO standard of external signal that must be driven, it is<br />
LVDCI<br />
usually sufficient to simply select the corresponding output and input<br />
standard in the FPGA. In the case when this is not possible, you are<br />
expected to look up the drive standard and ensure that the selected<br />
FPGA output class is appropriate.<br />
UCF…………………... This is the something constraint file. This along with your RTL<br />
LOC<br />
specifies the behavior of the FPGA, once it‟s configured. The UCF<br />
IOSTANDARD contains information about the IO pins electrical and timing<br />
DRIVE<br />
behavior. Using a UCF is required. Your design will not work without<br />
one.<br />
Net……………………. These names all refer to a physical conductor on the circuit board<br />
Signal<br />
connecting pads of ICs on the board.<br />
Plane<br />
Rail<br />
Transmission Line<br />
GND………………….. GND is a net on the DN9200K10PCIE8T. All absolute voltages<br />
ground<br />
given are offsets with respect to this net. It may also refer to a signal<br />
grounded<br />
or net whose measured voltage is equal to this net.<br />
0V<br />
AppNote……………… These are publications from Xilinx that are available on the Xilinx<br />
XAPP<br />
website.<br />
Verilog……………….. This is the code that you put in an FPGA<br />
VHDL<br />
RTL<br />
Core<br />
IP<br />
Design<br />
PCIE………………….. PCI Express<br />
Gen2…………………... PCI Express specification revision 2.0<br />
Mux…………………… Multiplexer<br />
DN9200K10PCIE8T User Guide www.dinigroup.com 23
I N T R O D U C T I O N<br />
MBs…………………... Mega Byte per second. (1,000,000 bytes)<br />
MB……………………. Mega Bytes (1,048,576 bytes)<br />
GBs…………………… Giga Byte per second (1,000,000,000 bytes)<br />
Mbs…………………… Mega bit per second (1,0000,000 bits)<br />
Gbs……………………. Giga bit per second (1,000,000,000 bits)<br />
MTs…………………... Mega Transfers per second. Same as MHz, except it is not ambiguous<br />
with respect to spectral power content like MHz.<br />
MHz………………….. Megahertz; “One million cycles per second” (1,000,000). Can either<br />
to the number of transactions per second, or the spectral content of<br />
the synchronizing clock of a signal, which is half the transfer rate.<br />
DDR………………….. “Double data rate”. This probably refers to a specific memory<br />
interface specification for DRAMs. It can also refer to the practice of<br />
running the clock on a synchronous system at half-frequency to<br />
improve the signal integrity of the clock.<br />
5 Resources<br />
The following electronic resources will help you during development with your board.<br />
5.1 User CD<br />
The User CD contains all the electronic documents required for you to operate the<br />
DN9200K10PCIE8T. These include schematics, the user manual, FPGA reference designs, and<br />
datasheets. The directory structure of the CD is as follows<br />
Config_Section_Code\<br />
Datasheets\<br />
DNMEG_xxx\<br />
DNPCIE_CBL_CableAdapterDaughtercard\<br />
Documentation\<strong>Manual</strong>\<br />
Documentation\MEG400_connectio…<br />
The DN9200K10PCIE8T firmware source<br />
code. This code is provided in case Dini<br />
Group gets hit by a meteor. Under other<br />
circumstances, you shouldn‟t need to look in<br />
this directory.<br />
A datasheet for every part used on the board.<br />
You will need these to interface successfully<br />
with resources on the DN9200K10PCIE8T<br />
Information about some common (optional)<br />
daughtercards<br />
Information about some common (option)<br />
daughtercards<br />
Contains this document.<br />
Contains a spreadsheet the lists the pinout of<br />
all off-the-shelf Dini Group daughter cards.<br />
DN9200K10PCIE8T User Guide www.dinigroup.com 24
I N T R O D U C T I O N<br />
Documentation\Dini_USB_Spec<br />
FPGA_Reference_Designs\<br />
common\<br />
DN9200K10PCIE8T\<br />
Programming_Files\<br />
opencore\<br />
pcie\<br />
FPGA_Reference_Designs\common\<br />
Contains information about implementing<br />
USB software that interfaces with the board.<br />
This document is more detailed about the<br />
actual software required in a Windows or<br />
Linux application.<br />
Contains the source and compiled programming<br />
files for the Dini group‟s DN9200K10-<br />
PCIe reference design; Also, board description<br />
files and simulation models<br />
Contains code that is used by many Dini<br />
Group products. Some subdirectories may not<br />
be applicable. This directory must be in the<br />
include path of your Xilinx project when<br />
compiling the reference design or it won‟t<br />
work very well.<br />
FPGA_Reference_Designs\DN9200K10PCIE8T \<br />
Contains code specific to<br />
DN9200K10PCIE8T; Also contains<br />
partitioning models for some automatic<br />
partitioning tools.<br />
FPGA_Reference_Designs\pcie<br />
Contains information and code for interfacing<br />
with the provided PCI Express endpoint<br />
bitstream for FPGA Q.<br />
PCI_Software_Applications\AETest\<br />
Schematics\Rev_01\<br />
USB_Software_Applications\<br />
driver\<br />
AETEST_USB\<br />
USBController\<br />
Source and binaries for the provided PCI<br />
Express host software.<br />
Contains a PDF version of the board<br />
schematic. Search the PDF using control-F.<br />
Also contains an ASCII netlist of the board.<br />
Contains source and binaries for the provided<br />
USB-hosted controller applications.<br />
DN9200K10PCIE8T User Guide www.dinigroup.com 25
I N T R O D U C T I O N<br />
5.2 Dinigroup.com<br />
The most recent versions of the following documents are found on the product web page<br />
http://dinigroup.com/DN9200k10PCIe-8T.php<br />
User‟s <strong>Manual</strong> (this document)<br />
Board Errata (if exists)<br />
Wild marketing promises<br />
Updates to the constantly “improving” USB Controller Windows executable<br />
Links to other things you might buy<br />
5.3 Errata List<br />
The Errata sheet (available at www.dinigroup.com) lists all cases where the<br />
DN9200K10PCIE8T is found to have failed to meet advertised specifications, or where an<br />
error in schematics or documentation is likely to cause a difficult-to-debug error by the user.<br />
5.3.1 Existing Errata<br />
The errata list was empty at August 1, 2008<br />
5.4 Reference Design<br />
The reference design implements something on every user IO in the device. For many users, the<br />
UCF provided with the reference design is the primary reference document.<br />
5.5 Schematics and Netlist<br />
Unmodified Schematics are included in the User CD as a PDF. Use the PDF search feature to<br />
search for nets and parts.<br />
5.5.1 Netlist<br />
In lieu of providing a machine-readable version of the schematic, the Dini Group provides a<br />
text netlist of the board. This netlist contains all nets on the board that connect to user IO on<br />
any FPGA. It does not contain all nets on the board. The schematic is the only provided<br />
resource that completely describes the board.<br />
When interfacing with any device or connector on the DN9200K10PCIE8T you should use<br />
either the provided .ucf, or the netlist to generate the pinout. The netlist is located on the user<br />
CD at D:\Schematics\Rev_01\DN9200K10PCIE8T_customer_netlist.txt<br />
It is in a difficult-to-use “wirelist” format, which is fixed-column-width format. You will<br />
probably need to mangle it in Excel to make any use of it.<br />
Remember that logical signals may be represented by multiple nets on the board, for example, a<br />
clock signal that has a DC blocking capacitor on it, may only appear in the netlist as a<br />
connection to some useless dangling capacitors… but they aren‟t.<br />
DN9200K10PCIE8T User Guide www.dinigroup.com 26
I N T R O D U C T I O N<br />
Figure 2 – An circuit on the board.<br />
Figure 3 – How that circuit appears on the customer netlist.<br />
5.5.2 Net name conventions<br />
All “power” nets begin with a +, - symbol, or GND<br />
All clock signals begin with “CLK”<br />
Two sides of a differential signal differ by one character “p” or “n”. This character is near the<br />
end of the net name.<br />
Active low signals end in # or N. In the provided UCF files, the # is replaced by an “N”.<br />
5.6 Datasheet Library<br />
Datasheets for all parts used, or interfaced to, on the DN9200K10PCIE8T are provided on the<br />
user CD. In order to successfully use the DN9200K10PCIE8T, you will have to reference these<br />
datasheets. The interface descriptions given in this user manual typically end with electrical<br />
connectivity.<br />
Especially read the Virtex-5 user guide. The copy provided on the user CD is only recent as of<br />
the DN9200K10PCIE8T product announcement.<br />
DN9200K10PCIE8T User Guide www.dinigroup.com 27
I N T R O D U C T I O N<br />
5.7 Xilinx<br />
The internal behavior of the Virtex-5 device is beyond the scope of technical support for this<br />
board, although we might happen to know the answer to your questions. Technical questions<br />
about the internal operation of the FPGA and ISE software behavior should be directed to a<br />
Xilinx FAE. Also use:<br />
WebCase<br />
AnswerBrowser<br />
ISE <strong>Manual</strong><br />
Virtex 5 <strong>Manual</strong>(s)<br />
http://www.xilinx.com/support/clearexpress/websupport.htm<br />
http://www.xilinx.com/xlnx/xil_ans_browser.jsp<br />
http://www.xilinx.com/support/sw_manuals/xilinx82/index.htm<br />
http://www.xilinx.com/support/documentation/virtex-5.htm<br />
(Also on the User CD)<br />
5.8 Dini Group Reference Designs<br />
The source code to the reference designs are on the User CD. Please copy and use any code you<br />
would like without restriction. The reference designs themselves are intended as examples, and<br />
are likely not suitable for a particular purpose. Therefore, support for these products is limited to<br />
their ability to demonstrate how certain interfaces might be implemented.<br />
5.9 Board Models<br />
Auspy board partitioning models, other partitioning models, and simulation models for the<br />
DN9200K10PCIE8T are provided on the user CD.<br />
D:\FPGA_Reference_Designs\DN9200K10PCIE8T\source\<br />
5.9.1 Base System Builder<br />
There is not a provided BSB file for the board; however creating new projects is not very<br />
difficult.<br />
5.9.2 Using Partitioning and 3 rd party synthesis tools.<br />
We cannot support directly third party synthesis tools and partitioning tools that we do not<br />
have. Therefore, support for these tools must be obtained from the software vendor.<br />
5.10 PCI Express Details<br />
A separate file contains details about the behavior of the LXT “PCI Express FPGA” when it is<br />
loaded with our provided “Full function PCI Express endpoint now with DMA” bitfiles.<br />
That document can be found on the user CD here:<br />
D:\FPGA_Reference_Designs\common\PCIE_x8_Interface<br />
5.11 Email and Phone Support<br />
Our phone number is (USA) 858-454-3419.<br />
Dave Palmer x30 Questions about board hardware, complaints about the user manual<br />
Ivan Yulaev x12 All other technical questions, complaints about life<br />
Mike Dini x11 Sales Questions, complaints about employees<br />
DN9200K10PCIE8T User Guide www.dinigroup.com 28
I N T R O D U C T I O N<br />
Dini Group technical support for products can be reached via email at support@dinigroup.com.<br />
If you just want to buy accessories, email sales@dinigroup.com<br />
Please do not send .exe files, .vb files, .zip files containing other .zip files, or certain types of<br />
image files as attachments, as we will not receive these emails due to virus scanner ultra<br />
technology. Please include the board‟s serial number in your email. This will allow us to<br />
reference our records regarding your board.<br />
Before contacting support for hardware failures, you should complete the following:<br />
1) Follow the debugging steps in the troubleshooting sections at the end of the hardware<br />
chapter, and in any applicable interface sections.<br />
2) Test the applicable interface(s) using the provided software and .bit files, to help rule out<br />
hardware failures.<br />
DN9200K10PCIE8T User Guide www.dinigroup.com 29
Chapter 2: Quick Start Guide<br />
The Dini Group DN9200K10PCIE8T can be used and controlled using many interfaces. In<br />
order to learn the use of the most fundamental interfaces of the board (FPGA Configuration,<br />
USB data movement, etc.) please follow the instructions in this quick start guide. The guide will<br />
also show you how to run the board‟s hardware test to verify board functionality. (The board<br />
has already been tested at the factory).<br />
1 Provided Materials<br />
Examine the contents of your DN9200K10PCIE8T kit. Print this page and check off the<br />
following:<br />
DN9200K10PCIE8T board<br />
Compact Flash card containing the FPGA configuration “.bit” files required to run the<br />
hardware test.<br />
Card reader USB to Compact Flash<br />
Adapter Cable for RS232 (10-pin header to female DB9)<br />
Adapter cable for PCI Express “graphics power” connector<br />
PSU Starter<br />
USB cable; black or zebra-striped<br />
Mounting hardware (for daughter cards)<br />
CD ROM containing:<br />
- Virtex 5 Reference Designs<br />
- User manual PDF<br />
- Board Schematic PDF<br />
- USB program (usbcontroller.exe)<br />
- PCIe program (Aetest.exe)<br />
- Source code for USB program, PCIe program and DN9200K10PCIE8T firmware<br />
- Board netlist<br />
Gray Foam<br />
DN9200K10PCIE8T User Guide www.dinigroup.com 31
Q U I C K S T A R T G U I D E<br />
1.1 System Requirements<br />
Virtex-5 requires ISE 8.2, however this guide is written assuming ISE 10.2.04 is installed.<br />
Versions before this may have different steps required which aren‟t given here. (Just download<br />
10.2)<br />
The board is provided with software that can be used in various versions of Windows or Linux,<br />
however in this guide, it is assumed that you have access to an Intel-compatible 32-bit computer<br />
with Windows XP SP2 or SP3 installed, USB 2.0 and a PCI Express x16 slot. Otherwise,<br />
different steps may be required which aren‟t given here. (Just borrow the office manager‟s<br />
Windows machine)<br />
It is assumed that you have a Xilinx Platform USB or Platform USB II cable for use with JTAG.<br />
Use of this board is possible without this cable; however this guide assumes that you have one.<br />
Steps for using JTAG or updating firmware may be different if you do not have this cable. (Just<br />
order a Xilinx JTAG cable)<br />
Your life will also be easier with an oscilloscope and a multi-meter.<br />
2 Warnings<br />
2.1 ESD<br />
The DN9200K10PCIE8T is sensitive to static electricity, so treat the PCB accordingly. The<br />
target markets for this product include engineering departments who are familiar with FPGAs<br />
and circuit boards. If you are unfamiliar with electrostatic discharge, please go read about it on<br />
Wikipedia before touching the board. There are exposed ESD-sensitive points all over the<br />
DN9200K10PCIE8T. Shocking one of the exposed IOs of one of the FPGAs could lead to a<br />
costly repair or having to pretend like it was like that when you got it. However, if needed, the<br />
following web page has an excellent tutorial on the “Fundamentals of ESD” for those of you<br />
who are new to ESD sensitive products: http://www.esda.org/basics/part1.cfm<br />
There are two large grounded metal rails on the DN9200K10PCIE8T. The user should grip the<br />
board using these rails like a Mawashi.<br />
The 400-pin connectors are not 5V tolerant. In fact, very few exposed surfaces on the board are<br />
tolerant of voltages greater than 4V. According to the Virtex 5 datasheets, the maximum applied<br />
voltage to any IO signals on the FPGA is the “VCCO” voltage associated with the daughter<br />
card. This means you should not try to over-drive IOs in an FPGA interface above the interface<br />
voltage specified in this manual.<br />
DN9200K10PCIE8T User Guide www.dinigroup.com 32
Q U I C K S T A R T G U I D E<br />
2.2 Other<br />
Some parts of the board are physically fragile. Take extra care when handling the board to avoid<br />
touching the daughtercard connectors. Leave the covers on the daughtercard connectors<br />
whenever they are not in use. Use mounting hardware to secure daughtercards.<br />
Surface mount headers with cables attached to them will eventually damage the board when<br />
your chair rolls over the cable. If you have cables attached to your board, use cable ties.<br />
3 Pre-Power on Instructions<br />
Most of the cables and connectors on the board are not suitable for hot-swap and should<br />
therefore be connected before the board powers on.<br />
The image below represents your DN9200K10PCIE8T. You will need to know the location of<br />
the following parts referenced in this chapter.<br />
Figure 4 DN9200K10PCIE8T stuff you need to know about to get started.<br />
The FPGAs on the board are named “FPGA A”, “FPGA B”, FPGA C, FPGA D, FPGA E,<br />
and FPGA F as shown in the above photo. The “FPGA Q” is Virtex 5 LX50T.<br />
To begin working with the DN9200K10PCIE8T, follow the steps below.<br />
DN9200K10PCIE8T User Guide www.dinigroup.com 33
Q U I C K S T A R T G U I D E<br />
3.1 Install Memory (optional)<br />
The DN9200K10PCIE8T comes packaged without memory installed. The board does not need<br />
memory to run, however the hardware test might report failure on the DDR2 sockets if you do<br />
not install some now.<br />
The reference design supports DDR2 SODIMM modules in any densities up to 4 GB (more<br />
than 4 GB is not tested). If you find an incompatible DIMM, email us the part number so we<br />
can add support for it.<br />
Install the memory in sockets DIMMA and DIMMB<br />
3.2 Prepare configuration files<br />
The DN9200K10PCIE8T can read FPGA configuration data from a CompactFlash card. To<br />
program the FPGAs on the DN9200K10PCIE8T, you can place FPGA design files (with a .bit<br />
file extension) on the root directory of the CompactFlash card file using the provided USB card<br />
reader.<br />
The DN9200K10PCIE8T ships with a 256MB Compact Flash card preloaded with the Dini<br />
Group reference design. These “bit” files can also be found on the User CD. You can also<br />
compile the reference design source (provided on the CD) and place the generated .bit files on<br />
the Compact Flash card.<br />
Insert the provided Compact Flash card labeled “Reference Design” into your USB card reader.<br />
Make sure the card contains at least these three files:<br />
FPGA_A.bit (if FPGA A stuffed)<br />
FPGA_B.bit (if FPGA B stuffed)<br />
main.txt<br />
The files FPGA_A-B.bit are files created by the Xilinx program bitgen, part of the ISE 9.2 tools.<br />
The file main.txt contains instructions for the DN9200K10PCIE8T configuration controller,<br />
including which FPGAs to configure, and to which frequency the global clock networks should<br />
be automatically adjusted.<br />
An example main.txt file can be found on the provided CompactFlash card, or on the user CD.<br />
3.3 Insert the Compact Flash card<br />
This step involves inserting the CompactFlash card into the DN9200K10PCIE8T‟s<br />
CompactFlash slot. No further advice is given.<br />
3.4 Install DN9200K10PCIE8T in computer (optional)<br />
If you plan to use the DN9200K10PCIE8T in a PCI express slot, install it now. Do this with<br />
power turned off. I do not think this is hot-swappable.<br />
DN9200K10PCIE8T User Guide www.dinigroup.com 34
Q U I C K S T A R T G U I D E<br />
If you are not using the DN9200K10PCIE8T in a PCIe Express slot, skip this step. The board<br />
may instead be operated table-top. The DN9200K10PCIE8T is compatible with PCIe-Express<br />
1, 4,8, or 16-lane slots. To physically fit the board into a 4x or 1x slot will require an adapter<br />
card, such as those available from Catalyst.<br />
If you skip this step, then AETest cannot be used.<br />
3.5 Connect RS232 Cable<br />
The configuration controller displays status messages to an RS232 terminal. If (when) something<br />
goes wrong with configuration, this terminal will output error messages. Normally, you would<br />
only connect this cable when something is not working and you want to debug the problem.<br />
Use the provided ribbon cable to connect the MCU RS232 port (P3) to a computer serial port<br />
to view feedback from the configuration circuitry during FPGA configuration. Run a serial<br />
terminal program on your PC (On Windows you can use HyperTerminal<br />
Start->Programs->Accessories->Communications->HyperTerminal) and make sure the<br />
computer serial port is configured with the following options:<br />
Bits per second: 19200<br />
Data bits: 8<br />
Parity: None<br />
Stop Bits: 1<br />
Flow control: None<br />
Terminal Emulation: VT100 (or none, if available)<br />
HyperTerminal is a poor program. You can use putty or SecureCRT from Vandyke software if<br />
you are a less tolerant person.<br />
3.6 Connect USB Cable<br />
Use the provided USB cable to connect the DN9200K10PCIE8T to a Windows computer<br />
(Windows XP or Vista is recommended).<br />
If your board is installed in a PCIe slot, you can connect USB from the same host computer if<br />
you wish. A different computer is also okay.<br />
3.7 Connect Power cable<br />
The power cable connected to J3 is required. If you do not plug a cable in here, the board will<br />
not power on. This is true whether or not the board is installed into a PCI Express slot. Most<br />
new computer power supplies have a 6-pin “PCI Express Graphics” power connector. If yours<br />
does not, you can use the provided adapter cable.<br />
DN9200K10PCIE8T User Guide www.dinigroup.com 35
Q U I C K S T A R T G U I D E<br />
Figure 5 - A six-pin PCI Express "Graphics Power" adapter<br />
If you are operating desk-top, and not in a motherboard, then you will need a standalone<br />
computer power supply (not provided). Your power supply might not turn on if its 20 or 24-pin<br />
“motherboard” power connector is not connected to anything. In this case, connect the<br />
provided PSU starter to the PSU.<br />
Figure 6 - A power supply "starter"<br />
3.8 Daughter Cards<br />
I know you want to plug your daughter cards in right now, but let‟s wait until you are familiar<br />
with the board first. Also note that these daughtercard interfaces were specifically designed for<br />
very high speed, which means they are also specifically designed to break easily. Read the<br />
“Hardware” chapter about how to properly install daughter cards before trying it.<br />
4 Power on Instructions<br />
Turn on the Desktop computer power supply (for desktop operation) or the computer (PCIe<br />
operation).<br />
When the DN9200K10PCIE8T powers on, it automatically loads Xilinx FPGA design files<br />
(ending with a .bit extension), found on the CompactFlash card in the CompactFlash slot into<br />
the FPGAs, according to the instruction in the main.txt file on the CompactFlash card.<br />
This process may take 5 or 10 seconds. As each FPGA is configured a nearby blue “DONE”<br />
LED will light.<br />
4.1 View configuration feedback over RS232<br />
The purpose of the “MCU” RS232 port is to allow you to determine why the board is not<br />
behaving how you expect. There are a few controls available over RS232; however most people<br />
do not use them.<br />
DN9200K10PCIE8T User Guide www.dinigroup.com 36
Q U I C K S T A R T G U I D E<br />
As the DN9200K10PCIE8T powers on, your RS232 terminal (connected to P3) will display<br />
information about the Configuration process. If FPGAs ever fail to configure using the<br />
Compact Flash card, this is the best place to look for help.<br />
A typical RS232 power-on session is given below.<br />
DINI GROUP FLP EEPROM VERSION NEW<br />
No USB Cable detected<br />
Rebooting from flash. Please wait.<br />
DN9200K10PCIE8T FLASH BOOT<br />
G0 CHECK: PASS<br />
G1 CHECK:PASS<br />
G2 CHECK:PASS<br />
……………………………………………………<br />
………………………………………………….<br />
FPGAs Found<br />
A B Q<br />
Resetting CompactFlash: DONE<br />
Configuration Files on card:<br />
FPGA A: FPGA_A.BIT<br />
FPGA B: FPGA_B.BIT<br />
OPTIONS:<br />
Message Level:2<br />
SanityCheck: ON<br />
*************CONFIGURING FPGA A****************<br />
Sanity Check:pass<br />
Bit File Properties<br />
Name: FPGA_A.BIT<br />
File Size: 009806AB bytes<br />
Part: 5vlx330ff1760<br />
Date: 2007/12/20<br />
PASS<br />
…………………………………………………….<br />
……………………………………………..<br />
DONE CONFIGURING A<br />
*************CONFIGURING FPGA B****************<br />
Sanity Check:pass<br />
Bit File Properties<br />
Name: FPGA_B.BIT<br />
File Size: 009806AB bytes<br />
Part: 5vlx330ff1760<br />
Date: 2007/12/20<br />
PASS<br />
…………………………………………………….<br />
……………………………………………..<br />
DONE CONFIGURING B<br />
Running out of EPROM.<br />
Running out of Flash<br />
Hardware checks.<br />
Hardware self-test<br />
Displays which files were found on the CompactFlash card.<br />
Configuring FPGA A according to main.txt<br />
Configuring FPGA B according to main.txt<br />
OPTIONS: Message Level set to 2.<br />
I2C_CONTROL = 0x04<br />
Temperature Sensors<br />
A YES<br />
B YES<br />
DN9200K10PCIE8T User Guide www.dinigroup.com 37
Q U I C K S T A R T G U I D E<br />
Q YES<br />
Threshold: 80 C<br />
Initializing USB: DONE<br />
MAIN MENU (Serial Number #0806013)<br />
1) Configure from Main.txt<br />
2) Interactive Configuration Menu<br />
3) Check Configuration Status<br />
4) Select new configuration file<br />
5) List Files on CompactFlash card<br />
6) Dump file on CompactFlash card<br />
7) NA<br />
g) Display FPGA Temperatures<br />
h) Set Temperature Threshold<br />
i) Read IIC register<br />
j) write IIC register<br />
k) Reset USB<br />
Main Menu allows control of some limited functions over<br />
RS232. All of these functions can be controller from other<br />
interfaces, so typically this menu is only used for debugging.<br />
ENTER SELECTION:<br />
Figure 7 RS232 Output<br />
4.2 Check LED status lights<br />
The DN9200K10PCIE8T has many status LEDs to help the user confirm the status of the<br />
configuration process.<br />
Check the power Failure LEDs to confirm that all voltage rails of the DN9200K10PCIE8T are<br />
within tolerance. If the voltage of any critical power net on the DN9200K10PCIE8T is too high<br />
or too low, the board will be held in reset and at least one of the red LEDs will light. In addition,<br />
nothing will work on the board. The LEDs are located along the left edge. Each one is labeled<br />
with the voltage that it represents. Normally, all of these LEDs are off. If any of these LEDs<br />
light, there is a power problem with the board, and you should contact us. The most common<br />
problem that will cause these LEDs to light is a problem with the power supply. More on this<br />
topic is later, but for now you can try another supply.<br />
Reset LED. When the board is in reset for any reason, including power failure or pressing the<br />
reset button, this LED will light RED. The LED is located above the bank of power fail LEDs,<br />
next to the “SYS RESET” button. In most situations a RED LED on the board indicates some<br />
sort of failure, and you should know why the LED is on.<br />
Spartan DONE. Check the Spartan FPGA status LED located near the Spartan FPGA. If this<br />
LED is not BLUE, there is a serious problem with the board. Nothing on the board will work<br />
properly is the Spartan did not configure for some reason. One reason this LED might be off is<br />
that a recent firmware update failed. Try re-installing the firmware.<br />
User LEDs. When the Main Reference design of each FPGA is loaded, the FPGAs will blink<br />
their Yellow/Red/Green “USER LED”s. These LEDs are connected directly to each of the<br />
FPGAs.<br />
DN9200K10PCIE8T User Guide www.dinigroup.com 38
Q U I C K S T A R T G U I D E<br />
CF Activity: When the board is in the process of loading FPGA configuration data from the<br />
CompactFlash card, the yellow LED next to the CompactFlash card will flicker.<br />
Figure 8: LEDs<br />
5 Run USB Controller<br />
This section will get you started with USB and show you how to operate the provided software.<br />
5.1 Driver Installation<br />
When the DN9200K10PCIE8T powers on, or you connect it to a USB port for the first time,<br />
the computer will ask you to install a driver.<br />
Figure 9 - Driver installation Wizard<br />
DN9200K10PCIE8T User Guide www.dinigroup.com 39
Q U I C K S T A R T G U I D E<br />
In the window that appears, select “Install from a list or specific location”. Select Next.<br />
Click “Include this location in the search” and browse to<br />
D:\USB_Software_Applications\driver\windows_wdm<br />
Select Next.<br />
In the next window, select the item in the list “Dini Group ASIC Emulator”. Click FINISH.<br />
After Windows installs the driver, you will be able to see the following device in the “ASIC<br />
Emulators” group in the Windows device manager: “DiniGroup Product FLASH Boot ”.<br />
5.2 Operating the USB Controller program<br />
Run the USB controller application found on the product CD in<br />
D:\USB_Software_Applications\USBController\USBController.exe<br />
Some parts of the program may break if you try to run the program from the User CD without<br />
copying it to your hard drive.<br />
Figure 10: USB Controller Window.<br />
DN9200K10PCIE8T User Guide www.dinigroup.com 40
Q U I C K S T A R T G U I D E<br />
This window will appear showing the current state of the DN9200K10PCIE8T. If FPGA<br />
configured, next to each FPGA a blue light will appear.<br />
The window shown above should appear. If the program shows a message box that says, “No<br />
devices found”, then either the driver is not installed properly, or the computer does not see the<br />
device over USB.<br />
5.2.1 Configure an FPGA<br />
Even though the reference design should already be loaded (because you had a Compact Flash<br />
card installed when the board powered on), let‟s configure an FPGA over USB.<br />
To clear an FPGA of its configuration, right-click on an FPGA, and selecting from the popup<br />
menu, “Clear FPGA”. The blue light above the FPGA on the board, and the virtual blue LED<br />
above the FPGA in the GUI should both turn off.<br />
To re-configure that FPGA using the USB Controller program, right-click on the FPGA and<br />
select Configure FPGA via USB from the popup menu. The program will open a dialog box for<br />
you to select the configuration file to use for configuration. Browse to the provided user‟s CD<br />
“D:\FPGA_Reference_Designs\Programming_Files\DN9200K10PCIE8T\MainRef\LX330<br />
\fpga_a.bit”<br />
If you are configuring an LX220 or LX110 device you should select a bit file from the LX220 or<br />
LX110 directories instead. Failing to select the correct type of bit file will result in the USB<br />
Controller program to warn you, and the FPGA will fail to configure. The program will report<br />
the status of the configuration when it finishes. “DONE did not go high”. (“DONE” refers to<br />
the DONE SelectMap signal, which is asserted by the FPGA when it is properly configured.<br />
“DONE” is semantically the same as “is configured”)<br />
If you are configuring FPGA B or FPGA Q, you should select fpga_b.bit or fpga_q.bit instead.<br />
Should you configure the wrong FPGA with a bitfile intended for another FPGA, the FPGA<br />
will succeed to configure, but probably won‟t function properly (because the pinout are different<br />
for each of the six FPGAs). This is not recommended because it could lead to bus contention<br />
and excessive heat generation.<br />
Done<br />
FPGA B cleared successfully.<br />
FPGA A cleared successfully.<br />
Doing a sanity check...Sanity Check passed. Configuring FPGA B via USB...please<br />
wait.<br />
File<br />
D:\\dn_BitFiles\DN9200K10PCIE8T\MainRef\LX330\fpga_b.bit transferred.<br />
Configured FPGA B via USB<br />
Figure 11: USB Controller Log Output<br />
DN9200K10PCIE8T User Guide www.dinigroup.com 41
Q U I C K S T A R T G U I D E<br />
The message box below the DN9200K10PCIE8T graphic should display some information<br />
about the configuration process. When the configuration is successful, the green LED should<br />
re-appear next to the FPGA.<br />
5.2.2 Set Clock Frequencies<br />
The FPGA logic is run on external clocks whose frequencies are generated on the board<br />
according to the commands in the main.txt file. Three of these clocks, G0, G1 and G2 can be of<br />
whatever frequency the user desires.<br />
To change the clock frequencies of G0, G1 or G2, select the “Clock settings” option from the<br />
“Settings” menu.<br />
A dialog box appears asking to which frequency you would like to set each clock. Enter 200,<br />
250, and 200 MHz for G0, G1 and G2 respectively. The Dini Group reference design may only<br />
work when the clocks are set within a given frequency range.<br />
5.3 Run Hardware Tests<br />
The provided bit files on the CompactFlash card can be used to interact over USB with the<br />
USB Controller program.<br />
Let‟s run two tests. Make sure the reference design is configured in both FPGAs.<br />
5.3.1 Clock Frequencies<br />
First, hit the “Enable USB->FPGA communication” button. From the “reference design”<br />
menu, select “read back clock frequencies”. Select any FPGA that is configured. It should print<br />
out a list of all clocks connected to that FPGA, along with its frequency, measured from within<br />
the FPGA logic.<br />
5.3.2 DDR2<br />
If you do not have DDR2 modules installed in the memory sockets, you might as well skip this<br />
step, unless you would like to simulate running the test in a failure condition.<br />
If you haven‟t already, hit the “Enable USB->FPGA communication” button. This must be<br />
done before the program can interact with the reference design.<br />
The DDR2 test requires certain frequencies to be set for it to work without errors. The correct<br />
settings are G0: 250MHz, G1: 250MHz, G2: 200MHz.<br />
Additionally, changing clock frequencies while an FPGA design is running can cause errors in<br />
the logic. To combat this you will need to reset the logic in the FPGAs. You can do this by<br />
pressing the “User Reset” button on the board.<br />
From the FPGA Memory menu, select Test DDR. A box will appear and ask which FPGA<br />
should be tested. Select A or B is the correct answer. The log window will report whether the<br />
test passed. If it fails, it will print a list of addresses and data that failed.<br />
DN9200K10PCIE8T User Guide www.dinigroup.com 42
Q U I C K S T A R T G U I D E<br />
5.3.3 Other Hardware Tests<br />
This program can somehow be used to test all of the hardware on the board including<br />
interconnect and clocks.<br />
5.4 Getting data to and from the FPGA<br />
The USB Controller program also allows you to easily configure and transfer data to and from<br />
the user design on the emulation board. This data transfer occurs over the board‟s “MainBus”.<br />
This interface is described in the Hardware chapter.<br />
Before USB can be used to operate “MainBus”, you must hit the “Enable USB->FPGA<br />
communication” button near the top of the USB window.<br />
To read data from the FPGA design (the Dini Group reference design), select from the menu<br />
MainBus->Read<br />
In the resulting dialog box, enter “080000000” in the “Start Address” box and “10” in the<br />
“Size” box. Press OK, and then DONE. The result of the read is printed to the USB Controller<br />
log window.<br />
--- FPGA READ ---<br />
…<br />
ADDRESS<br />
0x08000000<br />
0x08000001<br />
0x08000002<br />
0x08000003<br />
0x08000004<br />
0x08000005<br />
0x08000006<br />
0x08000007<br />
DATA<br />
0xdead5566<br />
0x00000000<br />
0x05000135<br />
0xffffffee<br />
0x34561111<br />
0x00000001<br />
0x00000000<br />
0x00000000<br />
Figure 12: USB Controller Log Output<br />
The address 0x080000000 is by “MainBus” convention assigned as part of the space available<br />
for implementation by FPGA A on the DN9200K10PCIE8T. If FPGA A is not loaded with<br />
the Dini Group reference design (or a design that implements the MainBus slave), then all<br />
address reads will return 0xDEADDEAD.<br />
Reading from the address 0x18000000 will demonstrate communication with FPGA B.<br />
DN9200K10PCIE8T User Guide www.dinigroup.com 43
Q U I C K S T A R T G U I D E<br />
6 Run AETest_wdm<br />
If you did not install the DN9200K10PCIE8T into a PCI express slot before you powered on<br />
your computer, then you will have to skip this step.<br />
The program provided to access the DN9200K10PCIE8T over PCIe is called AETest. It is<br />
located on the user CD<br />
D:\PCIe_Software_Applications\Aetest\aetest\aetest_wdm.exe<br />
If you are running Linux or Solaris, you must compile AETest (and driver) before continuing<br />
this quick-start guide. This involves installing the kernel source packages on the computer, then<br />
loading a kernel module somehow. Details are in the Software Chapter. The rest of this guide<br />
assumes you are using Windows XP or Vista.<br />
After you turn your computer on the computer will display a dialog asking for the driver for a<br />
“Dini Group board with Virtex 5 PCI Express”<br />
Click “Choose a driver to install” -> Click “Have Disk” and browse to<br />
D:\ PCIe_Software_Applications\Aetest\wdmdrv\drv\dndev.inf<br />
6.1.1 Use AETest<br />
Run AETEST_wdm. The AETest application should display its main menu.<br />
Figure 13 - Splash screen<br />
If this window says something like “GUID not found”, then the driver is not installed properly.<br />
Check in the windows device manager and see if a device with VID 0x17DF and PID 0x1900 is<br />
there.<br />
DN9200K10PCIE8T User Guide www.dinigroup.com 44
Q U I C K S T A R T G U I D E<br />
Figure 14 - AETest Main Menu<br />
This is the menu, with some things you can do. To read and write to the user design in the<br />
FPGAs, use the “Memory Menu”. The “Main Bus” is accessible. This is the same address space<br />
that was available to us earlier over USB.<br />
You can additionally access the fast direct PCI Express interface to FPGA A, using the PCI<br />
“Bar Read” and “Bar Write” functions. The lowest 4Kb of space in Bar 2 is assigned to a<br />
scratch memory residing within FPGA A.<br />
Figure 15 - Memory Menu<br />
To test high-speed PCI Express access directly to FPGA A (assuming FPGA A is configured),<br />
select “PCI BAR Memory Display”. Chose bar 0, offset 0. The output of this menu option is<br />
DN9200K10PCIE8T User Guide www.dinigroup.com 45
Q U I C K S T A R T G U I D E<br />
memory on FPGA A. On PCI, when a read result is 0xFFFFFFFF it could indicate a failure.<br />
(This is the result returned to software when a hardware timeout occurs on PCI or PCI<br />
Express).<br />
It is acceptable to access the DN9200K10PCIE8T from USB and PCIe at the same time. The<br />
mutual exclusivity of all features is not finalized, but it‟s a safe bet that if you use the “MainBus”<br />
feature from PCIe and USB simultaneously, the board will do something other than work<br />
properly.<br />
7 Scan the JTAG chain<br />
If you wish, you can program the FPGAs using their JTAG interface. Connect a Xilinx Platform<br />
USB cable into the FPGA JTAG port (J5), and open the iMPACT program that is installed with<br />
Xilinx ISE 10.2.<br />
Figure 16 - JTAG Headers<br />
When you connect the Platform USB cable for the first time, Windows will automatically install<br />
a driver three times in a row, like a retarded parrot.<br />
The program “scans the chain” to auto-detect the type and number of FPGAs installed on your<br />
board and display them on the screen. Right click on an FPGA and select “choose configuration<br />
file”. Browse to the bit files provided on the user CD. For example:<br />
D:\FPGA_Reference_Designs\Programming_Files\DN9200K10PCIE8T\MainRef\LX330\f<br />
pga_A.bit<br />
This JTAG port should also be used for visibility products like Xilinx ChipScope.<br />
DN9200K10PCIE8T User Guide www.dinigroup.com 46
Q U I C K S T A R T G U I D E<br />
Figure 17 - iMPACT connected to FPGA JTAG<br />
The first item in the chain represents FPGA A, then B, then C and finally at the end of the chain<br />
is the PCI Express FPGA (called “Q” by convention).<br />
8 Moving On<br />
Congratulations! You have just programmed the DN9200K10PCIE8T and learned all of the<br />
features that you have to know to start your emulation project. Experienced users may want to<br />
copy the UCF for the reference design from the user CD into their own projects and never look<br />
at the user manual again.<br />
For those new to Xilinx FPGA, the following are suggested starting places:<br />
DN9200K10PCIE8T User Guide www.dinigroup.com 47
Q U I C K S T A R T G U I D E<br />
Using the ISE tool flow, create a bit file that does nothing but routes a clock to an LED, routes<br />
reset to an LED, and turns one LED on.<br />
Add a small amount of logic to the reference design.<br />
Read the section describing the external interfaces you wish to use in the hardware section. Find<br />
the external interface on the schematic, and the interface chip datasheet on the user CD.<br />
Read the Virtex-5 User Guide, UG200. It can be found in the datasheet directory of the CD.<br />
DN9200K10PCIE8T User Guide www.dinigroup.com 48
Chapter 3: Controller Software<br />
The DN9200K10PCIE8T can be hosted from USB or PCI Express. As an example to hosting<br />
using these interfaces, the Dini Group provides some controller software that allows configuring<br />
FPGAs, and changing the board settings. For more complex host behavior, such as interactively<br />
transferring data to and from the board from the host computer, you may have to develop your<br />
own host software, either USB or PCIe. At the end of this chapter, there is a programmer‟s<br />
guide to help you interface to the DN9200K10PCIE8T. This, along with the source code of the<br />
example software should be able to get you communicating with the DN9200K10PCIE8T.<br />
The software included with the DN9200K10PCIE8T is<br />
USB Controller<br />
AETest_usb<br />
AETest<br />
A Windows XP or Vista-only GUI application capable of configuring<br />
FPGAs, sending data to the user FPGA core via USB,<br />
changing board settings, and running hardware tests.<br />
A cross-platform (Windows, DOS, Linux, Solaris) command-line<br />
application capable of configuring FPGAs, sending data to FPGAs via<br />
USB, and changing board settings<br />
A cross-platform (Windows XP, Windows98, DOS, Linux,<br />
Solaris) command-line program capable of configuring FPGAs,<br />
and sending data to and from user FPGA via PCI Express.<br />
These programs and the source code for them can be found on the user CD<br />
D:\PCI_Software_Applications\Aetest\<br />
D:\USB_Software_Applications\ AETEST_USB\<br />
D:\USB_Software_Applications\USBController\<br />
Precompiled Windows XP binaries for USB Controller, and AETest_usb, and AETest are<br />
provided on the user CD as a Microsoft Visual Studio 6 project. Visual Studio 6 or later is<br />
required to compile these programs.<br />
All three programs use a driver provided by the Dini Group.<br />
The PCIe drivers can be found at<br />
PCI_Software_Applications\Aetest\wdmdrv<br />
PCI_Software_Applications\Aetest\linuxdrv<br />
PCI_Software_Applications\Aetest\solaris\driver<br />
The USB driver can be found at<br />
USB_Software_Applications\driver<br />
DN9200K10PCIE8T User Guide www.dinigroup.com 49
C O N T R O L L E R S O F T W A R E<br />
The Linux version of AETest_usb does not require a driver, but does require root access.<br />
1 USB Controller<br />
USB Controller is a GUI program demonstrating the USB capabilities of the<br />
DN9200K10PCIE8T. It is compatible with Windows XP and Vista. All capabilities of USB are<br />
possible under Linux; however there is no GUI that looks good in these operating systems.<br />
The USB Controller program is intended to<br />
- Verify Configuration Status<br />
- Configure FPGAs over USB<br />
- Configure FPGAs via CompactFlash card<br />
- Clear FPGAs<br />
- Reset FPGAs<br />
- Set Global clocks frequency<br />
- Update firmware (for MCU and Spartan)<br />
- Demonstrate good user interface design practices<br />
- Run hardware tests<br />
1.1 Main Window<br />
The main USB Controller window has the following components: a menu bar, a refresh button,<br />
a “Disable USB” button, and board graphic, and a message log. Each item in the menu bar is<br />
described later in this section.<br />
DN9200K10PCIE8T User Guide www.dinigroup.com 50
C O N T R O L L E R S O F T W A R E<br />
1.1.1 Refresh Button<br />
Figure 18 - USB Controller Main Window<br />
Figure 19 refresh button<br />
The Refresh button updates the board graphic by querying the DN9200K10PCIE8T and<br />
reading back its status. The USB Controller program now polls the board constantly, so this<br />
button is largely meaningless.<br />
1.1.2 Disable/Enable USB<br />
Figure 20 Enable/Disable button<br />
DN9200K10PCIE8T User Guide www.dinigroup.com 51
C O N T R O L L E R S O F T W A R E<br />
To communicate to the FPGA design using USB, the “MainBus” interface is used. See the<br />
hardware chapter for more information on this interface. Some users elect not to use the Main<br />
Bus for USB communication. To allow these users to make use of the signals in the Main Bus<br />
for their own purposes, the USB Controller is careful not to use the Main Bus unless explicitly<br />
given permission by the user. The user can give permission to use Main Bus by pressing the<br />
“Enable USB->FPGA communication” button. It can revoke that permission by pressing the<br />
“Disable USB->FPGA communication” button. When the DN9200K10PCIE8T powers on, it<br />
begins in the disabled state. The state is stored on the board, so that multiple programs accessing<br />
the DN9200K10PCIE8T may prevent each other from using the Main Bus.<br />
1.1.3 Log Window<br />
This text box prints the result of each user command in USB Controller. There is a “clear log”<br />
button to clear the contents of this text box.<br />
1.1.4 Board Graphic<br />
USB Controller‟s main window shows a graphic representing your DN9200K10PCIE8T. The<br />
number of FPGAs that are installed on your board should appear in this graphic. If one or more<br />
FPGAs are configured on the board, a blue LED will glow next to the FPGA in this graphic<br />
window, just exactly like on the actual real board hardware itself.<br />
If the USB Controller could not find a DN9200K10PCIE8T connected to any USB port, this<br />
window will appear.<br />
Figure 21 - USB Controller complains if board is not detected<br />
If the board is turned on and plugged in, the USB Controller should be able to detect it. If it<br />
does not, try opening the Device manager. You can right-click on the “My computer” icon and<br />
select “Hardware tab” and click the “Device Manager” button. This will display a list of the<br />
devices connected to your computer. If a Dini Group Logic Emulator appears in the USB<br />
section, then USB is working properly on the board, but the program is unable to connect to it.<br />
There could be a problem with the driver setup. Select “Switch Device” from the File menu.<br />
If the board does not appear in the Hardware manager, then the DN9200K10PCIE8T may be<br />
stuck in reset. See the “Troubleshooting” section in the Hardware chapter. Also, check the red<br />
“Reset” LED.<br />
DN9200K10PCIE8T User Guide www.dinigroup.com 52
C O N T R O L L E R S O F T W A R E<br />
As well as providing visual feedback, the board graphic can be used to control configuration of<br />
the FPGAs. To do this, right-click on an FPGA in the graphic to show a contextual menu with<br />
the options: Configure, Clear and Reconfigure.<br />
Figure 22 - Configuring FPGAs<br />
Configure will show an Open… dialog for you to select the bit file you wish to use with the<br />
FPGA. Clear FPGA will clear and reset the FPGA of its current configuration. Reconfigure<br />
FPGA will configure the FPGA with whatever bit file that this instance of USB Controller used to<br />
successfully configure that FPGA last.<br />
1.2 Menu Options<br />
The following sections describe each menu option and its function.<br />
1.2.1 File Menu<br />
About<br />
Displays USB Controller version number, along with other things.<br />
Switch device<br />
Displays a list of all Dini Group USB devices detects and allows the user to switch the “current”<br />
device. The USB Controller will behave as if the “current device” is the only attached Dini<br />
Group USB product. Under some situations, the USB Controller may automatically switch<br />
device when the “current device” is not valid.<br />
DN9200K10PCIE8T User Guide www.dinigroup.com 53
C O N T R O L L E R S O F T W A R E<br />
1.2.2 Edit Menu<br />
The Edit Menu performs the basic edit commands on the command log in the bottom half of<br />
the USBController window.<br />
Copy, Delete, Select All<br />
1.2.3 FPGA Configuration Menu<br />
The FPGA Configuration Menu has the following options:<br />
Configure Via USB (individual)<br />
This menu option allows you to configure an FPGA. It is equivalent to selecting an FPGA by<br />
clicking on it and selecting “Configure”, except that this menu option will display a dialog asking<br />
which FPGA to configure. Before any FPGA is configured in USB Controller, a “sanity check”<br />
is performed. This reads the header out of the binary bit file and determines whether the bit file<br />
is compatible with the FPGA installed on the DN9200K10PCIE8T. It will prevent<br />
configuration if the “sanity check is not passed” This check can be disabled from the<br />
“Settings/Info” menu.<br />
Configure via USB (using file)<br />
This command allows the user to configure more than one FPGA over USB at a time. To use<br />
this option you must create a setup file that contains information on which FPGA(s) should be<br />
configured and what bitfiles should be used for each FPGA. The syntax of this file is similar or<br />
identical to the syntax of the CompactFlash main.txt interface. Details are found in the USB<br />
Controller manual on the user CD at<br />
D:\USB_Software_Applications\USBController\doc\USBController_<strong>Manual</strong>.pdf<br />
Configure via CompactFlash<br />
This command causes the FPGAs to configure based on the instructions in the main.txt file on<br />
the CompactFlash card. It will also cause the commands and settings on the main.txt file to be<br />
re-issued.<br />
Clear All FPGAs<br />
This command resets all FPGAs, causing them to lose their configuration.<br />
Reconfigure All FPGAs<br />
This menu command is equivalent to selecting “reconfigure FPGA” in the context menu of<br />
each of the FPGAs. Each FPGA is cleared before being configured. The last bit file that was<br />
loaded via USB for each FPGA is loaded again into the FPGA. If an FPGA has not been<br />
loaded with a bit file using this instance of USB controller, it is skipped.<br />
DN9200K10PCIE8T User Guide www.dinigroup.com 54
C O N T R O L L E R S O F T W A R E<br />
Reset<br />
This command asserts the RESET# signal to all FPGAs simultaneously. This is the same signal<br />
that is asserted when the user hits the “Soft Reset” (User Reset) button. Its function in the user<br />
design is left for the user to define. In the reference design, it causes a global, asynchronous<br />
reset. This option also causes the SYS_RSTn signal on the daughtercards to be asserted.<br />
1.2.4 FPGA Reference Design<br />
This menu is not enabled unless “Enable USB” is pressed, and at least one FPGA is configured<br />
with the reference design. The USB Controller knows if this is true because it reads a main bus<br />
register that is implemented in the reference design. If you compile the reference design yourself,<br />
this menu will continue to work as long as you have not removed this main bus register from<br />
the design.<br />
Read DDR2 IIC Data<br />
This option will read the contents of the IIC device contained on the DDR2 connected to either<br />
of the DDR2 sockets on the board and display them. The reference design automatically<br />
configures its DDR2 controller for any DIMM so this feature is more or less useless these days.<br />
Read FPGA Clock Frequencies<br />
This menu option measures and reads back the frequencies of the eight global clock networks,<br />
and displays them on the message log. This can help assure you that the clock networks are<br />
functioning properly.<br />
1.2.5 Main Bus<br />
The way that user FPGA designs can communicate over USB is the “Main Bus” interface. The<br />
“Reference design” menu uses the main bus to read and write registers in the reference design to<br />
control the board tests. These tests can be done by the using these menu options without the<br />
user having to understand the Main Bus interface or the main bus memory space and its<br />
mapping to the reference design. The Main Bus menu allows direct control of the Main Bus.<br />
This can be useful if you are using your own FPGA core that implements the main bus.<br />
Write and Read DWORD<br />
This displays a dialog box for writing to the Main Bus address space. It includes some debugging<br />
features. All main bus transactions are of length 4 bytes (“DWORD”). The options when using<br />
this menu allow the program to automatically read back all written memory locations and<br />
compare them to the written bytes. This can be useful when testing a 32-bit memory space.<br />
Test Address Space<br />
This menu option is equivalent to the “Write and Read DWORD” option selecting read, write,<br />
use random data, not verbose, show errors. It is much faster. This can be used to test for<br />
reliability problems in an address space, for example a DDR memory controller with marginal<br />
timing.<br />
DN9200K10PCIE8T User Guide www.dinigroup.com 55
C O N T R O L L E R S O F T W A R E<br />
Read Address Space to File<br />
This reads data from the main bus at the address specified, and writes the data to a binary file<br />
specified. Data on the main bus is in little-endian order. The address after each DWORD is<br />
implicitly incremented. (Incrementing behavior can be turned off if a FIFO read behavior is<br />
required).<br />
Write Address space from file.<br />
This reads binary data from a file and writes the data to the address on main bus specified. The<br />
data is written in little-endian order. The address is implicitly incremented after each DWORD<br />
of data. This behavior can be changed to write to a FIFO address (contact support)<br />
Send Command File<br />
This option reads an ASCII file that can contain both reads and writes. Reads will cause the data<br />
to be displayed on the log window. The specification for the format of this file is the one which<br />
can be inferred from the example below:<br />
AD 08000000<br />
WR 0000FFFF<br />
WR 000000FF<br />
AD 08000000<br />
RD 3<br />
This example writes 0x0000FFFF to address 0x08000000, 0x000000FF to address 0x08000001,<br />
then prints out the contents of addresses 0x08000000 through 0x08000002.<br />
1.2.6 Settings/Info Menu<br />
FPGA Stuffing information<br />
Displays a list of the FPGAs on the board, and their type and speed grade. This information is<br />
stored in the firmware flash, and is not detected dynamically. You can also get this information<br />
off the FPGA JTAG chain (except for speed grade).<br />
Board/Spartan/MCU version<br />
This option is used to read the version number of the current board‟s firmware. There are two<br />
types of firmware, the “Flash” and the “Prom”. The two types of firmware, the reference<br />
design, and the USB Controller application are only guaranteed to work when using<br />
corresponding versions of each. If you update one, you should update the others.<br />
Read FPGA temperatures<br />
Displays the current temperature of the on-die FPGA temperature sensors.<br />
Force Memory Menu display<br />
When the Dini Group reference design is not loaded in at least one FPGA, the “FPGA<br />
Reference Design” menu is disabled. This menu command forces that menu to be displayed in<br />
this situation. The USB Controller determines if the Dini Group reference design is loaded by<br />
DN9200K10PCIE8T User Guide www.dinigroup.com 56
C O N T R O L L E R S O F T W A R E<br />
reading a memory location on Main Bus and comparing the result to a predetermined value.<br />
This menu may also be disabled because the “USB->FPGA Communication” is disabled.<br />
Turn on Mass Storage Device<br />
This menu option will change the USB behavior of the board so that it appears as a<br />
CompactFlash card reader to your computer.<br />
Toggle Sanity Check<br />
normally, the software will prevent the programming of an FPGA with a bit file compiled for<br />
any type of FPGA other than the one installed on your board. This menu option will disable this<br />
behavior.<br />
FPGA Readback<br />
This menu option will read the entire contents of the FPGA programming memory and write<br />
them to a file. The file is a raw binary from the SelectMap bus, so to make any sense out of it,<br />
you will have to parse through the binary data.<br />
Hide Board Image<br />
This will make the window much smaller to make use of the USB Controller program easier on<br />
small displays, like those on an oscilloscope or iPhone.<br />
Setup clock frequencies<br />
This menu option displays a dialog box allowing the three frequency-selectable global clock<br />
networks to be configured.<br />
Global Clock Mux Settings<br />
This allows you to change the frequency source for the clock networks that have a selectable<br />
frequency source.<br />
1.2.7 Production Test<br />
Test DDR<br />
This menu option runs a MainBus address range test on the DDR that is selected. This menu<br />
item does not configure the FPGA with the reference design, correctly set the clocks or reset the<br />
FPGAs. It will fail if these steps are not complete.<br />
One Shot Test<br />
This menu option contains most of the hardware tests that can be run on your board. The tests<br />
that this menu run work identically to the hardware tests that your board passes before shipping.<br />
There are some options available in the settings dialog window:<br />
-Main One Shot Test: contains interconnect, main bus, clock, pull-ups<br />
-DDRs Test: Tests DIMMA and DIMMB connections. You must have a DDR2 SODIMM<br />
installed in each socket before the test is run.<br />
-Headers Test: You should uncheck this box. It will fail without a test fixture.<br />
DN9200K10PCIE8T User Guide www.dinigroup.com 57
C O N T R O L L E R S O F T W A R E<br />
-Ethernet Test: You should uncheck this box. It requires a test fixture.<br />
-External clocks test: This test requires a test fixture.<br />
-Test FPGA Q. This will test interconnect between FPGA A and FPGA Q<br />
-LVDS Frequency: This is the frequency that the FPGA-to-FPGA interconnects will run<br />
during the test. 450 is the standard test frequency.<br />
-Bitfile Path: This is where the program will get the reference design bit files. They were on the<br />
provided user CD.<br />
-Iterations Count: The number of consecutive times the entire test will run.<br />
1.2.8 Service Menu<br />
Update Firmware<br />
Update Synthesizer Tables<br />
1.2.9 Debugging Menu<br />
There is pretty much nothing in the debugging menu that you would want to look at except<br />
maybe the “Read Configuration Register” and “Write Configuration Register”. These menu<br />
options read and write to the “Configuration Registers” Described in the “config section” part<br />
of the hardware chapter.<br />
1.3 INI File<br />
Some command considered “debugging” commands save persistence information in an “ini”<br />
file that gets created in the same directory as the USB Controller executable. This file should not<br />
be generated for most users. If it is generated, you can safely delete it, unless you like it. Some of<br />
the settings that can be stored in this file are the Text Editor Selection settings, the location of<br />
(path to) the reference design programming files (for one-shot-test), and enabling the debug<br />
menu.<br />
2 AETest USB<br />
The command line USB controller program is called “AETEST_USB”. It provides a subset of<br />
the features available on USB Controller and is cross platform. This program is a convenient<br />
place to start if you are going to be writing a custom IO controller for USB to communicate<br />
with the DN9200K10PCIE8T.<br />
3 PCI Express AETest Application<br />
AETEST utility program can test and verify the functionality of the DN9200K10PCIE8T Logic<br />
Emulation board, and provide data transfer to and from the User design.<br />
All AETEST source code is included on the CD-ROM shipped with your<br />
DN9200K10PCIE8T Logic Emulation kit. AETEST can be installed on a variety of operating<br />
systems, including: Windows 2000/XP/Vista (Windows WDM) and Linux<br />
DN9200K10PCIE8T User Guide www.dinigroup.com 58
C O N T R O L L E R S O F T W A R E<br />
3.1 Compiling AETest_usb<br />
AETest_usb can be compiled using Microsoft Visual Studio 6 or later, or on any version of<br />
Linux that supports the usbdevfs library.<br />
A make file is provided, but you must un-comment one of the following lines to define which<br />
operating system you are running. In Windows, you should run nmake.<br />
#DESTOS = WIN_WDM<br />
#DESTOS = LINUX<br />
#DESTOS = SOLARIS<br />
Run nmake on windows and make on linux.<br />
3.1.1 Compiling the Driver<br />
Compiling the driver on windows requires the windows driver development kit. A script<br />
“Makeit.bat” can be run from within the windows DDK build environment.<br />
Most people don‟t need to compile the driver in windows because it already works.<br />
In Linux, the driver must be compiled unless you happen to be using the same architecture and<br />
OS version as ours when we compiled it.<br />
3.2 Functionality<br />
All communication to the board using this program is over PCI express. In this way, the basic<br />
functionality of PCI Express is tested.<br />
The AETEST utility program contains the following tests:<br />
DMA and BAR accesses over PCI Express (When using the “full function PCI Express<br />
endpoint now with DMA” design for LXT)<br />
DDR2 Memory Test<br />
Flash Test<br />
AETEST also provides the user with the following abilities:<br />
Recognize the DN9200K10PCIE8T<br />
Display Vendor and Device ID<br />
Set PCIe Device and Function Number<br />
Display all configured PCIe devices<br />
Various loops for PCIe device-function and ID numbers<br />
Write and Read Configuration DWORD (for board settings)<br />
Access to the “Main Bus” interface.<br />
BAR Memory operations<br />
Configure/Save BARs from/to a file<br />
Configure FPGAs.<br />
DN9200K10PCIE8T User Guide www.dinigroup.com 59
C O N T R O L L E R S O F T W A R E<br />
3.3 Running AETEST<br />
The following images show a terminal session in Windows XP.<br />
Figure 23 - AETest splash screen<br />
The initial display of AETest shows the results of its scan of the PCIe bus. If the driver for the<br />
DN9200K10PCIE8T is not installed, then the software will display a message that no device<br />
was found. If this occurs, (and you are using windows), look into the computer‟s hardware<br />
manager and see if a PCI Device with Vendor ID 0x17DF appears. If it does then there is a<br />
software or driver problem. If it does not then there is a hardware problem. Look on the board<br />
near the 6-pin PCI Express power connector. There is a row of LEDs corresponding to the<br />
PCI Express status signals. RED LEDs for LOS indicated the board is not linking with its link<br />
partner. Yellow is activity. Three green LEDs a valid link in 1x, 4x or 8x mode respectively.<br />
Below is the main menu.<br />
DN9200K10PCIE8T User Guide www.dinigroup.com 60
C O N T R O L L E R S O F T W A R E<br />
Figure 24 - AETest main menu<br />
Below is the PCI menu. It can help you debug a software problem detecting or communicating<br />
with the board. The “config DWORD” refers to PCI configuration space, which is normally<br />
only controlled by the operating system or BIOS.<br />
Figure 25 - AETest Memory menu<br />
Below is the memory menu. From here you can communicate with the User design in any of<br />
the FPGAs (using Main Bus) or directly to FPGA A. Bar memory and MainBus are different<br />
memory spaces.<br />
DN9200K10PCIE8T User Guide www.dinigroup.com 61
C O N T R O L L E R S O F T W A R E<br />
4 Rolling Your Own Software<br />
Most customers who need to use USB or PCIe as a data interface to their FPGA designs write<br />
their own USB and PCIe controller programs, since the USBController and AETest programs<br />
do not meet their requirements.<br />
Most of the time, you only need a small change, like for example, you want to read a file off disk<br />
and write it to the MainBus interface, blink an LED 4 times, and post the result on Facebook. In<br />
this case, let me recommend just modifying the provided AETest or AETest_usb program.<br />
These programs are written so that a third-grader could understand them by third graders.<br />
4.1 USB<br />
The behavior of the DN9200K10PCIE8T with respect to a USB interface is given in the<br />
Hardware chapter. To access PCI Express from a host software program probably requires a<br />
driver. You can use our driver, write your own driver, or try to modify ours.<br />
4.1.1 Windows XP/Vista<br />
BTW: We didn‟t write this driver. This is the example driver from Cypress provided with the<br />
CY7C68013.<br />
When the driver is properly installed in windows, the device will appear as a file in the file<br />
system with the following path: “\\\\.\\Ezusb-0”.<br />
To interact with the device, open a HANDLE to the device using CreateFile<br />
HANDLE handle = CreateFile(“\\\\.\\Ezusb-0”, GENERIC_WRITE,<br />
FILE_SHARE_WRITE, NULL, OPEN_EXISTING,<br />
0, NULL);<br />
In the case of multiple devices, the paths may be “EzUSB-1”, “EzUSB-2”, etc.<br />
The functions available using the driver are implemented as “control” operations. Use the<br />
DeviceIoControl() function in Windows.h.<br />
4.1.2 Linux<br />
To use USB in Linux, use the provided usbdrvlinux.c file provided on the user CD in<br />
AETest_usb/driver<br />
Connecting to the device occurs using the driver‟s usb_open function.<br />
int handle = usb_open(0x1234, 0x1234, 0);<br />
DN9200K10PCIE8T User Guide www.dinigroup.com 62
C O N T R O L L E R S O F T W A R E<br />
usb_devfs provides the functions required to do a vendor request or bulk transfer. These are the<br />
only two types of communication required.<br />
4.2 PCIe<br />
The behavior of the DN9200K10PCIE8T with respect to a PCI Express interface is given in<br />
the Hardware chapter. To access PCI Express from a host software program probably requires<br />
a driver. You can use our driver, write your own driver, or try to modify ours.<br />
4.2.1 Windows Driver Hooks<br />
In Windows, to work with a hardware device, it‟s driver must be loaded. After this, you can<br />
interact with the device using a HANDLE object like a file.<br />
To find a path to the device, use these functions:<br />
SetupDiGetClassDevs()<br />
SetupDiEnumDeviceInterfaces()<br />
SetupDiGetDeviceInterfaceDetail()<br />
You will need to know the device‟s “GUID” in order to get a list of Dini Group devices on the<br />
system. (Otherwise, you will have to get a list of all devices on the system and then filter them).<br />
The correct GUID is called DNDEV_GUID. The value is defined in a header file “GUIDs.h” in<br />
the driver code director.<br />
From the device interface detail, you can get the device path, which can be opened using<br />
CreateFile()<br />
Once you have a HANDLE object for the device, all operations on the device can be done<br />
through “control” operations on the HANDLE. Use the function<br />
DeviceIoControl()<br />
The available control codes (IOCTL‟s) available to pass to this function are given in the file<br />
Ioctl.h in the driver directory. The ones you will use are<br />
IOCTL_DNDEV_BAR_READ_U32<br />
The output buffer should contain<br />
struct { uint32 offset,<br />
uint32 barnum};<br />
The input buffer will be a single uint32. Offset is a byte offset from the BAR specified in<br />
barnum.<br />
IOCTL_DNDEV_BAR_WRITE_U32<br />
The output buffer should contain<br />
struct { uint32 offset,<br />
uint32 barnum,<br />
uint32 data };<br />
Where offset is a the desired byte offset from the BAR location, barnum is the number of the<br />
DN9200K10PCIE8T User Guide www.dinigroup.com 63
C O N T R O L L E R S O F T W A R E<br />
BAR that you wish to access, and data is the 32-bit word that you would like to write to the<br />
given offset.<br />
4.2.2 Linux Driver Hooks<br />
When the device driver is loaded, the devices will appear on the filesystem at /dev/dndev/<br />
Open the device using open(). The driver implements a hander for the mmap() routine.<br />
Therefore, to access PCI Space, you need only to mmap the file to user address space.<br />
Call ioctl using the control code DNDEV_IOC_GETDEVICE. This will return an object giving the<br />
contents of the base address registers and BAR rangers of the device. When calling mmap() you<br />
need to tell the device which BAR you wish to map. This is done by using the offset field of<br />
mmap(). When the offset field is somewhere within page 0, BAR0 is mapped. When it is<br />
somewhere within page 2, BAR2 is mapped, etc.<br />
Void* User_space_pointer =<br />
mmap(NULL, bar_sizePROT_READ | PROT_WRITE,<br />
MAP_SHARED,filedes,desired_bar_number*getpagesize());<br />
Now PCI Express accesses can be completed by dereferencing *user_space_pointer.<br />
5 Updating the Firmware<br />
Dini Group may release firmware bug fixes or added features to the DN9200K10PCIE8T. If a<br />
firmware update is released you will need to download this new code to the firmware flash of<br />
the DN9200K10PCIE8T.<br />
There are three firmware files that Dini Group may release.<br />
MCU Flash<br />
The on-board microcontroller controls the configuration of FPGAs, the setting of clocks, USB<br />
transactions, temperature sensors, CompactFlash and various other functions. The firmware is<br />
stored on a Flash chip.<br />
Spartan Flash<br />
The Spartan “Config” FPGA controls the data paths for Main Bus (PCIe and USB),<br />
CompactFlash and some other functions. This FPGA is programmed from a Xilinx<br />
configuration PROM. Sometimes, this prom needs to be updated.<br />
PCI Express Flash<br />
If you are using the “Full function PCI Express endpoint now with DMA” design provided<br />
with the board (default), then Dini Group may offer updates and features to this endpoint. The<br />
data is stored in an SPI flash which contains the FPGA configuration data for the “FPGA Q”<br />
LXT part.<br />
DN9200K10PCIE8T User Guide www.dinigroup.com 64
C O N T R O L L E R S O F T W A R E<br />
Clock Frequency Tables<br />
This table contains all the PLL settings required to set the Si5326 clock synthesizers. This table<br />
will probably never need to be updated.<br />
Stuffing Tables<br />
This table contains a table describing which FPGAs are installed on the board, so the software<br />
can act more intelligently. This table probably will not need to be updated ever.<br />
When updating any firmware, the “Flash”, “Prom” and USBController.exe should all is updated<br />
simultaneously, since Dini Group only tests this code using corresponding versions of each.<br />
5.1 Obtaining the updates<br />
The firmware update files are not posted on the web site. In order to obtain them, you must<br />
request them from support@dinigroup.com. You may be required to perform a firmware<br />
update to your board to receive support and some features. If a firm ware update is deemed<br />
critical to the proper function of the board, a customer notice may be issued.<br />
5.2 Updating the Spartan (PROM) firmware<br />
When updating firmware, you should update in the following order:<br />
1) USB Controller.exe<br />
2) Spartan PROM firmware<br />
3) MCU Flash<br />
4) LTX Bitfile (hex file)<br />
All firmware may have interdependencies, so all four software should be updated at the same<br />
time.<br />
5.2.1 Using JTAG cable<br />
This update can be accomplished with the Xilinx JTAG programming program, iMPACT. A<br />
Xilinx Platform USB cable ($145) or Xilinx Platform USB Cable II helps updating firmware<br />
faster. Or you can update Spartan FPGA using USBController under “Settings/Info”-<br />
>“Update Spartan” menu. This option takes longer than Xilinx Platform USB cable (about 3-5<br />
min) to complete updating.<br />
Connect a Xilinx Platform USB configuration cable to your computer. When the cable is<br />
working properly, but not connected to a JTAG chain, the LED on the cable turns amber.<br />
When connected to the DN9200K10PCIE8T, the LED turns green.<br />
Connect the cable to the “Firmware” header, J9<br />
DN9200K10PCIE8T User Guide www.dinigroup.com 65
C O N T R O L L E R S O F T W A R E<br />
Figure 26 Firmware Update Header<br />
Power on the DN9200K10PCIE8T; When the Platform USB cable is connected to a header,<br />
the status light turns green.<br />
Open the Xilinx program iMPACT, usually found at<br />
Start->programs->Xilinx ISE 10.2->Accessories->iMPACT<br />
Choose the menu option File->Initialize Chain. (You may need to create a new project for this<br />
menu option to be available)<br />
iMPACT should detect 2 devices in the JTAG chain: xc3s1000 and xc18v04. For each item in<br />
the chain iMPACT will direct you to select a programming file for each. For the xc3s1000, press<br />
Bypass. iMPACT will then ask for a programming file to program the xc18v04 device. Select the<br />
Spartan Firmware update file provided by Dini Group (“prom_flp.mcs”). Hit Open.<br />
DN9200K10PCIE8T User Guide www.dinigroup.com 66
C O N T R O L L E R S O F T W A R E<br />
Figure 27 iMPACT Window<br />
To program the prom, right-click on the prom and select “Program…” from the popup menu.<br />
In the options dialog that follows, the options “Erase before programming” should be selected,<br />
and “Verify” should be selected. Press OK. The programming process should take about 15<br />
seconds over a platform USB cable.<br />
Power cycle the DN9200K10PCIE8T. The new firmware is now loaded. You can close<br />
iMPACT and disconnect the Xilinx JTAG cable<br />
5.2.2 Using USBController<br />
If you do not have a JTAG cable, you will need to use the following instructions to update your<br />
“Spartan PROM” firmware.<br />
DN9200K10PCIE8T User Guide www.dinigroup.com 67
C O N T R O L L E R S O F T W A R E<br />
Run USBController.exe. Under “Settings/Info” select “Update Spartan”. A warning message<br />
will appear to ensure that you want to update Spartan. If you do, hit the “Yes” button. An open<br />
file Dialog will appear after that. Please select file “prom_flp.xsvf” provided by The Dini Group.<br />
This process will take approximately 75 seconds.<br />
5.2.3 Using AEtest_USB<br />
If you do not have a JTAG cable, you will need to use the following instructions to update your<br />
“Spartan PROM” firmware. This update is depending on AEtest_USB and Flash firmware<br />
version. Please double check with us (support@dinigroup.com) to make sure that your current<br />
version (MCU version, AEtest_USB) supports this option and request *.xsvf file from us.<br />
1. Run aeusb_wdm.exe (or aeusb_linux).<br />
2. At the main menu, please select option 3 “FPGA Configuration Menu”<br />
3. In “Flash Boot Menu”, please select option „9‟. Note: the option menu is not displayed<br />
for security purpose.<br />
4. Please enter the full path filename for the *.xsvf file.<br />
5. Verbose level is „0‟. The higher verbose level, the slower the program runs.<br />
Figure 28 aetest_usb window<br />
6. The progress will start from 0 to 100%. This will take long time to complete (10<br />
minutes). Please do not disturb the process.<br />
7. Power cycle the board when finish.<br />
DN9200K10PCIE8T User Guide www.dinigroup.com 68
C O N T R O L L E R S O F T W A R E<br />
You can also use commend line: “aeusb_wdm_cmd.exe -XSVF ” (or<br />
“aeusb_linux_cmd.exe -XSVF ”).<br />
5.3 Updating the MCU (Flash) firmware<br />
To protect against accidental erasure, the MCU firmware cannot be updated unless the board is<br />
put in firmware update mode during power-on. Find Switch S2 (“User Reset”) on the<br />
DN9200K10PCIE8T.<br />
Figure 29 Switch S2<br />
Hold down the “User reset” button while the DN9200K10PCIE8T powers on. Or alternately,<br />
while holding down the “User reset” switch, tap the “Hard reset” button. The<br />
DN9200K10PCIE8T samples the user-reset button on power on to enter into firmware update<br />
mode.<br />
Open the USB Controller program. If the DN9200K10PCIE8T powered on in firmware<br />
update mode, there will be dialog boxes, ignore them (press “No”) if you not intent to use it.<br />
There will be an “Update Flash” button near the top of the USB Controller window. Click on<br />
this button.<br />
Figure 30 USB Controller Firmware Update Mode<br />
Do NOT use the “Set FPGA Stuffing” button, as this may cause one or more FPGAs on the<br />
board to be inaccessible from the USB Controller program.<br />
When the Open… dialog box appears, navigate to the Firmware image file supplied by Dini<br />
Group. The file name should be “firmware.hex”. Press OK.<br />
DN9200K10PCIE8T User Guide www.dinigroup.com 69
C O N T R O L L E R S O F T W A R E<br />
The USB Controller should take about 10 seconds while the firmware update is taking place. A<br />
fairly uninformative progress bar should appear while this is happening. When the download is<br />
complete, the Log window should print, “Update Complete”<br />
Power cycle the board before doing anything else to make sure the board is no longer in update<br />
mode.<br />
You can also use Aeusb_wdm.exe (or aeusb_linux.exe) to update the MCU (flash) firmware. Put<br />
the board in the firmware mode and aeusb_wdm. Select option 3 “Firmware Menu” -> option<br />
2 “Update Flash from .hex”. Enter the ful path filename. It should be firmware.hex<br />
that we provide you. The process will take about 2 minutes. When it finishes, please hit “Hard<br />
Reset” (S3) on the board or recycle power the board so that DN9200k10PCIE8T can boot<br />
from the new User Mode.<br />
5.4 PCI Express Endpoint Firmware<br />
Although the provided configuration files for the LXT “Q” FPGA on your board (responsible<br />
to the PCI Express endpoint) are known to be completely perfect in every way, Dini Group<br />
may release updates to add features or fix bugs in the PCI Express endpoint. In this case, Dini<br />
Group will provide a programming (.hex) file to reprogram the LXT FPGA. This information is<br />
stored in an SPI flash device on the board.<br />
5.4.1 Using JTAG USB cable (Xilinx products - iMpact)<br />
To install this updates, plug the USB JTAG cable into the header marked<br />
“JTAG FPGA A, B, Q” (J5) on the left edge of the board.<br />
Figure 31 - JTAG Headers<br />
Run iMpact, when you scan the JTAG chain, you will see two user FPGAs of device type<br />
LX110, LX220 or LX330. In addition, the last device in the chain will be either a LX50T or<br />
FX70T device. Right click on this device and choose “add SPI flash”. Then select a firmware file<br />
provided by Dini Group that might be called “pcie_v5t.mcs”. The program will then for some<br />
DN9200K10PCIE8T User Guide www.dinigroup.com 70
C O N T R O L L E R S O F T W A R E<br />
reason ask for what type of prom you have. The correct answer is “AT48DB642D”. Now, the<br />
picture with the six FPGAs will have a little picture of an SPI prom attached to the last FPGA<br />
(figure 32). Right click on this, and hit “program”. A Box asking about a bunch of programming<br />
options will appear. Please check “Erase Before Programming” and uncheck “Verify”. Then hit<br />
OK. Then wait a little while.<br />
Your SPI Flash is programmed.<br />
Figure 32 SPI flash is added<br />
The SPI prom that is connected to the LX50T (or FX70T) FPGA is where the LX50T (or<br />
FX70T) FPGA gets its load file. The LX50T (or FX70T) FPGA can be programmed directly<br />
(using a .bit file), but then it will lose its configuration once the board is reset. When you<br />
program the SPI flash, it will keep its configuration when the board is reset. A .bit file is used to<br />
program an FPGA, a .mcs file is used to program a SPI flash. You can use the Xilinx program<br />
iMPACT to generate an .mcs file from a .bit file. The SPI flash can also be updated using USB<br />
Controller. When using this method, a .hex file is required.<br />
DN9200K10PCIE8T User Guide www.dinigroup.com 71
C O N T R O L L E R S O F T W A R E<br />
To generate an .mcs file from a .bit file: in iMPACT, select “generate prom file” and open the<br />
provided .bit file. It will ask what the target device is, and it is an SPI Flash of type<br />
AT42DB642D. Then double-click generate.<br />
To generate an .hex file from an mcs file. Use the Xilinx program promgen<br />
promgen -w -p hex -r mcsfilename -o outputfilename<br />
5.4.2 Using USBController<br />
You can either generate .hex file from .bit file or contact support@dinigroup.com for new .hex<br />
file. Please plug in USB cable and turn the board on.<br />
1. Open USBController.ini and add “service_mode=1”. Save and close the<br />
USBContrller.ini file<br />
2. Lauch USBController.exe, the Service menu should be selectable.<br />
3. Select “Service”->”ProgramV5TProm”, select *.hex file<br />
4. The status bar will be on the bottom of the window. The process takes about 1-2<br />
minutes. Please recycle power the board.<br />
5.4.3 Using AETest_USB<br />
You can either generate .hex file from .bit file or contact support@dinigroup.com for new .hex<br />
file. Please plug in USB cable and turn the board on.<br />
1. Run aeusb_wdm.exe (aeusb_linux.exe). Select option „3‟<br />
(FPGA Configuration Menu)<br />
2. Select optin „8‟ (Load V5T Prom with filename.hex), and enter the file name .hex<br />
3. The process takes about 1-2 minutes.<br />
DN9200K10PCIE8T User Guide www.dinigroup.com 72
Chapter 4: Hardware<br />
1 General Overview<br />
The DN9200K10PCIE8T ASIC emulation platform is optimized for providing the maximum<br />
amount of interconnect between the Virtex-5 FPGAs. It is the lowest cost Virtex-5 FPGA<br />
board that has USB, PCI Express and that is exactly 143mm tall.<br />
Below is a block diagram of the DN9200K10PCIE8T.<br />
Figure 33 - DN9200K10PCIE8T Block Diagram<br />
The user is expected to implement his external interfaces by designing his own daughtercard to<br />
connect to one of the three expansion headers, or hope that Dini Group happens to have a<br />
daughtercard or SODIMM card that provides the required external interface.<br />
The board can operate inside a PC as a PCI Express card, or stand-alone on a desk top or swivel<br />
chair.<br />
DN9200K10PCIE8T User Guide www.dinigroup.com 73
H A R D W A R E<br />
2 Virtex 5 FPGAs<br />
The DN9200K10PCIE8T allows the use of LX110, LX155, LX220 or LX330 FPGAs in each<br />
of the positions of FPGA A and B. These FPGAs are in the FF1760 package.<br />
Virtex 5 is the same as Virtex 4, but with a 6 input LUT instead of a 4 input LUT. According to<br />
Xilinx, this makes the Virtex 5 30-50% denser and faster than Virtex 4, but it‟s a lie. Additionally<br />
there are some added features over the previous generation of FPGAs, like PLL, ODELAY and<br />
“serial transceivers that don‟t self-destruct after 300 hours of use”.<br />
2.1 Stuffing options<br />
Either A or B can be left with no FPGA installed to reduce cost. These FPGAs must be in the<br />
FF1760 package.<br />
A third FPGA, a Virtex 5 LX50T part is used (as FPGA “Q”) for a PCI Express interface. This<br />
part is not optional. It will be installed with a LX50T part unless you request a FX70T part<br />
instead. An FX70T upgrade is required for Gen 2 PCI Express.<br />
Installing any FPGA other than LX330 for FPGAs A and B impacts the hardware resources<br />
available on this board. The block diagrams and feature lists assume LX330 parts.<br />
2.1.1 Q: So Can I get two SX240s?<br />
A: No. It‟s not a FF1760.<br />
2.1.2 FPGA A and B:<br />
Select an FPGA part to be supplied in each position, A and B. Possible selections are<br />
NONE<br />
LX110 –1 –2 –3<br />
LX155 -1 -2 -3<br />
LX220 –1 –2<br />
LX330 –1 –2<br />
2.1.3 CES Parts<br />
Engineering sample (“CES”) parts are no longer offered on this board.<br />
2.1.4 “Small” FPGAs<br />
The DN9200K10PCIE8T is optimized for two Xilinx Virtex-5 LX330 FPGAs. Optionally, it<br />
can be ordered with LX110, LX155 or LX220 FPGAs instead. When installed with one or more<br />
LX110, LX155 or LX220 FPGAs, the amount of available interconnect is reduced due to the<br />
fact the on these parts, some of the package balls have no corresponding IO sites on the chip. A<br />
block diagram is given below showing the available resources on the board, where both FPGAs<br />
are “Small” type.<br />
DN9200K10PCIE8T User Guide www.dinigroup.com 74
H A R D W A R E<br />
Figure 34 - DN9200K10PCIE8T LX110 Block Diagram<br />
- The amount of interconnect between FPGAs are reduced.<br />
- Daughtercard DCBT is not available.<br />
- FPGA A cannot directly communicate directly with FPGA Q<br />
Note: PCI Express can still be used for either configuration of FPGAs, or for user data. For user data, the<br />
user must use the MainBus interface.<br />
-FPGA B Mictor is not available.<br />
DIMMs, Ethernet, Flash Memory, and MainBus are not affected.<br />
Also, you should analyze your design to determine if the internal resources available in the<br />
LX110 and LX220 are sufficient to meet your needs. The FPGA selection guide from Xilinx is<br />
printed below.<br />
DN9200K10PCIE8T User Guide www.dinigroup.com 75
H A R D W A R E<br />
Figure 35 - LX Selection Guide<br />
2.1.5 FPGA Q (PCI Express FPGA) Options<br />
By default, an LX50T FPGA is installed in the FPGA Q position, providing a PCI Express<br />
interface for the board. At your request, a different FPGA can be installed here. A list of the<br />
available options is given below.<br />
Figure 36 - LXT FXT Selection Guide<br />
The “PCI Express full-function w/DMA” bit files are only provided for LX50T and FX70T<br />
parts. To use PCI Express generation 2, an FX70T part is required. The available hardware<br />
resources on the board external to the FPGA are unchanged. The only difference between these<br />
two FPGA options are the internal capabilities of the FPGA.<br />
DN9200K10PCIE8T User Guide www.dinigroup.com 76
H A R D W A R E<br />
2.1.5.1 Q: How many gates will I need?<br />
A: You have to run a design through ISE to get an estimate. You can get a rough estimate by<br />
counting the number of flip-flops in your design and using the above selection charts. Always<br />
allow for a 40% increase in required area. If you have any minimum frequency requirements,<br />
then assume you will only be able to achieve 60% utilization in the FPGA. If you have high fanouts<br />
(average above 5 or 6), then you will only be able to achieve 60% utilization.<br />
2.1.6 Speed Grades<br />
The interface performance characterizations included in this manual and in advertisements are<br />
valid for all shipped FPGAs, regardless of speed grade. These numbers are characterizations,<br />
and not guaranteed minimum operating conditions.<br />
Therefore, the requirement for higher speed grade parts comes only from the requirements of<br />
your design. Before you buy a board, you might want to run a test place and route on the design<br />
in Xilinx ISE so that you can see how easily timing can be met in a slower FPGA.<br />
For FPGA Q, the PCI Express FPGA, we will provide the minimum speed grade part required<br />
for our provided “full-function PCI Express endpoint now with DMA” design.<br />
Some interfaces may run at increased speeds above and beyond Dini Group‟s advertised<br />
performances when used with –2 or –3 speed grade parts. Xilinx advertises FPGA-to-FPGA<br />
interconnect performance up to 1.2 GHz and DDR2 performance up to 667 MHz. We‟ve<br />
never tried.<br />
2.2 Using IO<br />
You must use the provided UCF for the LOC constraint of each pin and the correct IO<br />
standard.<br />
2.2.1 Timing<br />
For all interfaces described in this section, the responsibility for meeting IO timing and correctly<br />
implementing the physical interface is the users responsibility. For your convenience, a use<br />
model is provided for many interfaces where timing is guaranteed by the hardware. Typically, to<br />
get the best IO performance from the FPGA, the user will use a DCM in the FPGA to<br />
compensate the delay of the internal clock network. When using this method, the timing<br />
parameters for the FPGA are given below:<br />
Clock-to-out time:<br />
Input-to-clock time (setup):<br />
Clock-to-input time (hold):<br />
3.37 ns<br />
1.0 ns<br />
0 ns<br />
Higher speed grade parts may have improved performance. If additional performance is<br />
required, there are two possibilities:<br />
-Use and external clock feedback path for the DCM. This will reduce clock-to-out time to about<br />
zero, but may also cause a non-zero hold time.<br />
DN9200K10PCIE8T User Guide www.dinigroup.com 77
H A R D W A R E<br />
-Use a DCM to dynamically adjust the output and input phases of the clocks. This will allow a<br />
maximum operating frequency of 500 MHz to 900 MHz, depending on the IO skew. This<br />
method is required also on interfaces where there is significant clock skew between the FPGA<br />
and external device (like daughter cards or DDR2 SODIMMs).<br />
Always use the minimum IO timing constraints in the UCF because these constraints will<br />
prevent flip-flops from getting moved outside of the IO block.<br />
2.3 Hardware Errata Details<br />
There are no errata for Virtex-5 production (non- CES) parts.<br />
2.4 Upgrade Policy<br />
2.4.1 Upgrading to new board<br />
2.4.2 Adding FPGAs to a DN9200K10PCIE8T<br />
Prices are not cost-prohibitive. Call or email sales@dinigroup.com for a quote. Note that there<br />
is a physical limit to the number of FPGAs that can be added to your board because the board<br />
and FPGAs have a limited number of solder cycles allowed.<br />
3 PCB<br />
3.1 Trace delay<br />
The delay of some signals is given in the user guide. This is additive delay, that is, it should be<br />
added to the clock-to-out time provided by the Xilinx tool during place-and-route. For example,<br />
if a signal has a trace delay of 0.5ns and the clock-to-out time of an output in your UCF is 3.4ns,<br />
then the signal will not be an output high at the receiver pin until 3.9ns after the clock edge.<br />
These numbers are only valid if the outputs are using a correct IO methodology, usually<br />
requiring match-impedance outputs (DCI), or terminated receivers. All signals on the board are<br />
matched to 50Ω.<br />
Trace delays are only valid on signals from a single source with a single receiver.<br />
3.2 Signal Quality<br />
The maximum noise possible on any user IO signal on the board is about 0.5V<br />
4 Configuration Section<br />
The circuit on the board controlling the FPGA configuration signals is called the “configuration<br />
section”. It is built around a Spartan 3 FPGA. This FPGA controls the bus on the FPGA that<br />
control the FPGA‟s internal configuration SRAM memory (“SelectMap”). Access to this bus is<br />
provided to CompactFlash, USB, and PCI Express.<br />
DN9200K10PCIE8T User Guide www.dinigroup.com 78
H A R D W A R E<br />
MainBus is also controlled through this FPGA, but details on using MainBus are given in some<br />
other section.<br />
This circuit also has secondary functions:<br />
- Temperature Sensors<br />
- Clock Frequency Control<br />
- Clock Frequency Source Control<br />
- Blink Activity LEDs<br />
- Voltage Monitoring<br />
Some housekeeping functions are performed by a Microcontroller (IDE and USB initialization,<br />
serial port).<br />
The configuration data for the Spartan (“Prom”) and the code for the microprocessor (“flash”<br />
and “Eprom”) are collectively known as the “firmware”.<br />
Most technical details about the configuration circuit are omitted from this manual, since the<br />
user should not require it.<br />
Figure 37 - Config Section Block Diagram<br />
Above it a block diagram of the configuration circuit. Access to the SelectMap and MainBus<br />
interfaces are available to USB, CompactFlash and PCI. The “Config Registers” are also<br />
available and required to control the SelectMap interface fully.<br />
4.1 Configuration Section Feedback<br />
During normal operation, and in error situations, the configuration section prints messages to<br />
the RS232 terminal header (P3). Some very limited functions are also able to be controlled from<br />
this interface. See the RS232 output for instructions. These functions include settings the clocks,<br />
controlling the process of configuring from CompactFlash, and temperature sensor controls.<br />
DN9200K10PCIE8T User Guide www.dinigroup.com 79
H A R D W A R E<br />
Figure 38 - Serial Port Headers<br />
The configuration section RS232 terminal header, labeled “MCU” above, can be connected to a<br />
computer serial port, using the settings:<br />
19200 Baud<br />
No flow control<br />
One stop bits<br />
No parity<br />
The syntax and content of the output messages changes are not given because they change<br />
rapidly. This interface is not at all fun to use, and is intended mostly for Dini Group to debug<br />
hardware or software failures.<br />
If you need RS232 for your FPGA design, this is not the correct header to use.<br />
4.2 FPGA Configuration<br />
Normally, configuration of the Virtex-5 FPGA occurs over the Virtex-5 “SelectMap” interface.<br />
The only configuration method possible on the DN9200K10PCIE8T that does not use this<br />
interface is JTAG. For a description of the SelectMap interface, see the Virtex-5 configuration<br />
guide.<br />
Typically, the user will supply a “bit” file generated by ISE, and put it on a CompactFlash card,<br />
or supply it to software over PCI Express or USB, and the user does not have to understand the<br />
SelectMap interface.<br />
USB, CompactFlash and PCIe configuration occur over the SelectMap bus. The configuration<br />
section makes no modification of the “bit stream” sent to it over PCIe or USB. It only copies<br />
the data to the SelectMap interface. The “bit stream” must contain all of the SelectMap<br />
commands necessary to configure and startup the FPGA. These SelectMap commands are<br />
created automatically by Xilinx tool bitgen (part of ISE). Not all of the bitstream generation<br />
options available in bitgen are compatible with the DN9200K10PCIE8T.<br />
DN9200K10PCIE8T User Guide www.dinigroup.com 80
H A R D W A R E<br />
Currently, before configuring the FPGA using any method (except JTAG), the configuration<br />
section asserts the PROG# signal of the FPGA to clear it. For this reason, the “disable<br />
SelectMap” option in bitgen has no effect.<br />
On each FPGA, the DONE signal is connected to a blue LED located next to each FPGA.<br />
This signal gives a quick indication of whether each FPGA is configured or not.<br />
Figure 39 - DONE LED circuit<br />
The data signals, D[7-0] are dual-purpose signals and can be used as additional interconnect pins<br />
after all FPGAs have been configured. Care must be taken that the FPGA design does not drive<br />
these signals until after all FPGAs have been configured. The configuration section will assert<br />
the FPGA_RESET# signal until this occurs (CompactFlash configuration only).<br />
If you use the SelectMap data signals as interconnect, interfacing to the board using USB or PCI<br />
may interfere with your design, unless the software is careful. Certainly the provided programs<br />
USB Controller, AETEST, and AETest_USB were not written with this possibility in mind.<br />
If using these signals as interconnect, the appropriate drive standard is LVCMOS25. The IO<br />
voltage is 2.5V<br />
SelectMap Readback is possible on the DN9200K10PCIE8T. This can be accomplished over<br />
PCIe or USB. In order to complete readback over USB, a vendor request is sent to select<br />
“readback mode” on one of the USB endpoints, and to automatically send a sequence of<br />
SelectMap commands to the FPGA.<br />
The Virtex-5 JTAG configuration method does not go through the configuration circuit. See the<br />
JTAG interface section for details about this.<br />
DN9200K10PCIE8T User Guide www.dinigroup.com 81
H A R D W A R E<br />
4.3 PCI Express<br />
PCI Express access to the configuration circuit is only available when the provided “fullfunction<br />
PCI Express endpoint now with DMA” bit files are used in FPGA Q. When a user<br />
design or the PIPE design is used, the controls in this section are not available.<br />
In the “full-function” design, BAR0 is reserved for configuration functions. Within BAR 0,<br />
offsets below 0x200 are contained within the endpoint‟s internal registers, and the offsets above<br />
0x200 represent registers within the Spartan FPGA.<br />
4.3.1 BAR0 Map (LO)<br />
Bar0 (LO) are registers contained within the LXT FPGA. The primary use is to control DMA<br />
functions. Code to implement DMA using the design is found in the AETest driver directory.<br />
The addresses are byte offsets from the BAR0 location. All registers are 32-bit and should not<br />
be written or read using byte enables.<br />
0x 00 VERSION Version number for the “full function PCI Express endpoint”<br />
0x 04 DATE Compile data of the “full function PCI Express endpoint”<br />
0x 08 DESIGN_TYPE Constant value<br />
0x 0C GTPCLK_SYNTH IIC Control of the GTP refclk synthesizer<br />
0x 10 RESET_CTRL<br />
0x 14 RS232_CTRL Turns on and off the RS232 RX and TX signals<br />
0x 18 LED_CTRL Allow manual control of the status LEDs<br />
0x 1C FAN_TACH Counter connected to the fan tachometer input<br />
0x 20 DESC_DMA0_A0 DMA control<br />
0x 24 DESC_DMA0_A1 “<br />
0x 28 DESC_DMA0_AMASK “<br />
0x 2C DESC_DMA0_CTRL “<br />
0x 30 DESC_DMA0_POLLI “<br />
0x 34 DESC_DMA0_CURRARD “<br />
0x 38 DESC_DMA0_CURRAEX “<br />
0x 3C DESC_DMA0_FIFO_COUNT “<br />
0x 40 DESC_DMA1_A0 “<br />
0x 44 DESC_DMA1_A1 “<br />
0x 48 DESC_DMA1_AMASK “<br />
0x 4C DESC_DMA1_CTRL “<br />
0x 50 DESC_DMA1_POLLI “<br />
0x 54 DESC_DMA1_CURRARD “<br />
0x 58 DESC_DMA1_CURRAEX “<br />
0x 5C DESC_DMA1_FIFO_COUNT “<br />
0x 60 CLK_CNT_DMA Clock counter<br />
0x 64 CLK_CNT_USER Clock counter<br />
0x 68 CLK_CNT_CONFIG Clock counter<br />
0x 6C CLK_CNT_MB48Q Clock counter<br />
0x 70 CLK_CNT_REFQ Clock counter<br />
0x 74 CLK_CNT_GTPQ Clock counter<br />
0x 78 CLK_CNT_EXT0_Q Clock counter<br />
0x 7C CLK_CNT_EXT1_Q Clock counter<br />
0x 80 CLK_CNT_G0_Q Clock counter<br />
DN9200K10PCIE8T User Guide www.dinigroup.com 82
H A R D W A R E<br />
0x 84 CLK_CNT_G1_Q Clock counter<br />
0x 88 CLK_CNT_G2_Q Clock counter<br />
0x 8C CLK_CNT_TP_Q Clock counter<br />
0x 90 CLK_CNT_MB Clock counter<br />
0x 94 CLK_CNT_CFG Clock counter<br />
0x 98 INTERRUPT Read/clear interrupt flags<br />
0x 9C INTERRUPT_MASK Interrupt enable/disable<br />
0x A0 RS232_TOGGLE_CTRL Enable/Disable RS232<br />
4.3.2 BAR0 Map (HI)<br />
These registers are contained in the Spartan 3 FPGA. Addresses are offsets from the BAR0<br />
location. All registers are 32-bit and should not be written to or read using byte enables.<br />
0x200 DMA_WR_CNT_ADDR Do not use.<br />
0x208 CONFIG_CONTROL “Selects” FPGAs. Returns config status<br />
0x210 CONFIG_DATA Sends one byte of data to SelectMap<br />
0x218 MCU_CLOCK_CONTROL Do not use.<br />
0x238 FPGA_STUFFING Array Says which FPGAs are installed<br />
0x240 FPGA_ADDR Set “current” MainBus address<br />
0x248 FPGA_WRITE Send word to MainBus<br />
0x250 FPGA_READ Get word from MainBus<br />
0x258 MCU_WRITE Write to “Config Registers”<br />
0x260 MCU_READ Do not use.<br />
0x268 MCU_READ_2 Read from “Config Registers”<br />
0x270 MB_CONTROL Turn on or off MainBus Auto-Increment<br />
4.3.3 FPGA Configuration<br />
To configure and FPGA over PCI Express follow the steps below. Remember that all BAR0<br />
registers are 32-bit “word” registers (byte-writes have undefined behavior). Addresses are all<br />
offsets from the BAR 0 address.<br />
1) “Select” an FPGA.<br />
Address 0x208 is the “Config Control” Register. Its bits [3:0] “select” an FPGA, and bit 4<br />
controls the “Selected” FPGA‟s PROGn signal.<br />
Write 0x00000011to “select” FPGA A or 0x00000012 to “select” FPGA B.<br />
2) Reset the selected FPGA (“Assert PROGn”).<br />
Write 0x00000001 to “prog” FPGA A or 0x00000002 to “prog” FPGA B.<br />
3) Read the current initialization state of the selected FPGA.<br />
When read, address 0x208 will return the SelectMap status signals. Bits [3:0] give the “selected”<br />
FPGA, bit 5 is the “PROGn” state, bit 6 is the “INITn” state, bit 7 is the “DONE” state.<br />
After you have set “prog” on an FPGA, poll 0x208 and wait for the “INITn” state to go low<br />
(0), to show that it is in reset.<br />
DN9200K10PCIE8T User Guide www.dinigroup.com 83
H A R D W A R E<br />
4) Release PROGn<br />
Write a bit 1 to the PROGn of the “Config Control” register. (Use a mask so as not to change<br />
the “selected” FPGA<br />
5) Poll INITn to wait for the device to be released from reset.<br />
6) Bang configuration bytes into CONFIG_DATA<br />
CONFIG_DATA register is at address 0x210. Write one byte at a time into the low bits of this<br />
32-bit register. Use bytes directly from the configuration file generated by bitgen. This byte<br />
stream contains SelectMap commands and data.<br />
7) Bang junk. Continue banging bytes onto CONFIG_DATA. This is not required is your .bit<br />
file already contains enough bytes to account for whatever you startup sequence requires.<br />
8) Poll DONE<br />
Read from address 0x208 and wait for the DONE bit to be high.<br />
9) De-select the FPGA (optional)<br />
Write a 0 to address 0x208 to select “no FPGA”<br />
4.3.4 Readback<br />
This is possible, but not implemented over PCI Express. You can either use the USB readback,<br />
or yell at us until we implement over PCI as well.<br />
4.4 Clock Control<br />
4.4.1 Synthesizer Frequencies<br />
The networks that are sourced from Synthesizers (CLK_G0, CLK_G1, CLK_G2) can have<br />
their frequencies set over CompactFlash, USB or PCI Express. In order to set the frequency of<br />
these clocks, write to the appropriate “Configuration Registers”. To correctly use configuration<br />
registers of PCI Express, USB, or CompactFlash, see the section on configuration registers.<br />
To set the frequency of G0, first decompose the desired frequency into its whole number and<br />
fractional parts. Encode the whole number part in Binary. Encode the fractional part as parts in<br />
1000. Then encode this as a binary number. Write the low 8 bits of the whole number into the<br />
register G0_INTEGER_B0 and the rest into register G0_INTEGER_B1. Write the low 8 bits<br />
of the fractional part into G0_FRACTIONAL_B0 and the rest into G0_FRACTIONAL_B1.<br />
Finally, write a bit into the register PENDING_CLKS to indicate which frequency should be<br />
updated. 0x01 is G0, 0x02 is G1 and 0x04 is G2.<br />
To set G1 or G2 use different registers.<br />
Example: Set G2 to 233.75 MHz.<br />
233 in binary is 0xE9<br />
0.75 is 750 parts in 1000.<br />
750 in binary is 2EE.<br />
DN9200K10PCIE8T User Guide www.dinigroup.com 84
H A R D W A R E<br />
Write 0xE9 to G2_INTEGER_B0<br />
Write 0x00 to G2_INTEGER_B1<br />
Write 0xEE to G2_FRACTIONAL_B0<br />
Write 0x02 to G2_FRACTIONAL_B1<br />
Write 0x04 to PENDING_CLKS<br />
(0xDFC8)<br />
(0xDFC9)<br />
(0xDFCA)<br />
(0xDFCB)<br />
(0xDF40)<br />
4.4.2 Clock Sources<br />
The networks EXT0 and EXT1 can have their PLL frequencies set, their divider values set,<br />
their frequency source set from USB, CompactFlash, or PCI Express.<br />
The control of these devices is via bits in a two Configuration Registers, SYNTH_EXT0_CTRL<br />
and SYNTH_EXT1_CTRL.<br />
Figure 40 - EXT0 EXT1 Circuit<br />
For operation of the ICS8745B, see the provided datasheet. Register bit 0 controls the CLKSEL<br />
signal, bit 1 is the PLLSEL signal, bit 2 is S0, bit 3 is signal S1, and bit 4 is both signals SEL2 and<br />
SEL3.<br />
Example: Set CLK_EXT0 to the SMA input (input 1) and bypass the PLL.<br />
Write 0x1E to SYNTH_EXT0_CTRL (0xDF24)<br />
4.5 CompactFlash Interface<br />
Most important settings on the DN9200K10PCIE8T can be controller through the Compact<br />
Flash interface. This interface can also be used to configure FPGAs. The CompactFlash<br />
interface is not under the direct control of the user, but is accessed only by the configuration<br />
logic.<br />
DN9200K10PCIE8T User Guide www.dinigroup.com 85
H A R D W A R E<br />
Figure 41 - CompactFlash card socket<br />
The CompactFlash interface can take any sort of CompactFlash card that we know of. If you<br />
find one that doesn‟t work, email it to us and we can add support. The slot is hot-swappable.<br />
In order to make the board configure from the card, you can:<br />
- Reset the board by power-cycling it, or by pressing “Sys Reset” button<br />
- Use the “MCU” RS232 menu option<br />
- Use the USB Controller program (or USB Vendor request)<br />
4.5.1 Main.txt<br />
On the CompactFlash card, you should place a text file with the filename “Main.txt”. When the<br />
board powers on, it will read this file to determine what to do. You can:<br />
-Configure FPGAs<br />
-Set clock frequencies<br />
-Write to MainBus<br />
-Write to “configuration registers”<br />
A main.txt file contains a list of commands, separated by newline characters. A list of valid<br />
main.txt commands is given below.<br />
DN9200K10PCIE8T User Guide www.dinigroup.com 86
H A R D W A R E<br />
// <br />
FPGA :<br />
CLOCK FREQUENCY: G0 [MHz]<br />
CLOCK FREQUENCY: G1 [MHz]<br />
CLOCK FREQUENCY: G2 [MHz]<br />
SOURCE: G0 2<br />
SOURCE: G1 2<br />
SOURCE: G2 2<br />
SANITY CHECK: <br />
VERBOSE LEVEL: <br />
MEMORY MAPPED: 0x 0x<br />
MAIN BUS 0x 0x<br />
FILE TRANSFER:<br />
DCLK: DC0 250MHz<br />
can be any string of characters except for newline.<br />
can be one of these: A, B, C, D, E or F<br />
can be the name of a file on the root directory of the CompactFlash Card.<br />
can be any positive number in decimal. Decimal points are allowed.<br />
can be the letter y or the letter n<br />
can be 0, 1, 2 or 3<br />
is a 4-digit number in hexadecimal (16 bits)<br />
is a 2-digit number in hexadecimal (8 bits)<br />
8-digit (32 bit) number in hexadecimal representing a main bus address<br />
8-digit (32 bit) number in hexadecimal containing data for a main bus<br />
transaction<br />
The following table describes the function of each of the available main.txt commands.<br />
Instruction<br />
Function<br />
// The configuration circuitry performs no operation and moves to<br />
the next command.<br />
VERBOSE LEVEL:<br />
<br />
FPGA A:<br />
FPGA B:<br />
This command will set the amount of output that will be produced<br />
over the RS232 port during configuration. When level is set to 0,<br />
the port will produce only error output.<br />
The Virtex 5 FPGA “A” will be configured with the file named by<br />
<br />
The Virtex 5 FPGA “B” will be configured with the file named by<br />
DN9200K10PCIE8T User Guide www.dinigroup.com 87
H A R D W A R E<br />
<br />
SANITY CHECK: If is set to y, then the MCU will examine the headers in the<br />
.bit files on the CompactFlash card before using them to configure<br />
each FPGA. If the target FPGA annotated in the .bit file header is<br />
not the same type as the FPGA the MCU detects on the board, it<br />
will reject the file and flash the error LED.<br />
Before this command is executed, is set to the default value<br />
y.<br />
If you want to encrypt of compress your bit files, you will need to<br />
set to n.<br />
MAIN BUS<br />
0x<br />
0x<br />
MEMORY MAPPED:<br />
0x<br />
0x<br />
SOURCE: G0 2<br />
SOURCE: G1 2<br />
SOURCE: G2 2<br />
CLOCK FREQUENCY:<br />
<br />
MHz<br />
Writes data in to the address on the main bus<br />
interface at . This command only makes sense<br />
in the context of the Dini Group reference design, unless your<br />
design implements a compatible controller on the main bus pins.<br />
The Specification for this interface is in MainBus section<br />
Writes to a configuration Register. This command can be used to<br />
access features that do not have a main.txt command. Example<br />
applications include setting clock sources, settings the EXT0 or<br />
EXT1 clock buffers to zero-delay mode, or setting the clocks to<br />
frequencies lower than 31MHz.<br />
The SOURCE instructions cause the global clock networks to<br />
output a clock from an alternate source. When source of G0 is set<br />
to “2”, then the global clock G0 becomes a step clock, which can<br />
be accessed through config register 0xDF23. When source of G1<br />
is set to “2”, the global clock network G1 becomes a step clock<br />
which can be toggled by writing to config register 0xDF23. When<br />
Source of G2 is set to “2”, then the source of the G2 clock<br />
network becomes FPGA A, using the “FBACLK” signal.<br />
The MCU will adjust the clock synthesizer producing clock<br />
to the frequency .<br />
Figure 42 Main.txt Commands<br />
DN9200K10PCIE8T User Guide www.dinigroup.com 88
H A R D W A R E<br />
An example main.txt file is given below.<br />
FPGA A: fpga_a.bit<br />
FPGA B: fpga_b.bit<br />
FPGA C: fpga_c.bit<br />
FPGA D: fpga_d.bit<br />
FPGA E: fpga_e.bit<br />
FPGA F: fpga_f.bit<br />
clock frequency: G0 200MHz<br />
clock frequency: G1 250MHz<br />
clock frequency: G2 200MHz<br />
Even if you are not planning to configure your Virtex 5 FPGAs using a CompactFlash card, you<br />
may want to leave a CompactFlash card in the socket to automatically program your global<br />
clock. (Clocks may also be programmed using the provided USB application, or over the PCI<br />
Express bus.)<br />
4.5.2 Unimportant CompactFlash Hardware Notes<br />
The Compact Flash interface is hot-swappable.<br />
An activity LED, DS148, located next to the Compact Flash slot indicates activity on this<br />
interface.<br />
Please contact support@dinigroup.com if you find an incompatible card, so that we can add<br />
software support for it.<br />
Also, the board only accepts CompactFlash cards formatted in the FAT file system. Most new<br />
compact flash cards come pre-formatted with the FAT32 file system. In this case, the<br />
DN9200K10PCIE8T will not be able to recognize files on the card.<br />
4.6 USB<br />
The USB and PCI Express interfaces can be used for both configuration (FPGA configuration,<br />
and clock settings, etc.) or for direct communication with the user design in the FPGA. These<br />
interfaces are described individually in their own sections in the hardware chapter.<br />
4.6.1 Configuring an FPGA<br />
The following procedure is used by software on the host computer to configure an FPGA over<br />
USB. This procedure is followed by the USBController program and AETest_usb program on<br />
the user CD.<br />
DN9200K10PCIE8T User Guide www.dinigroup.com 89
H A R D W A R E<br />
1) USB Software gets a handle to a USB device with VID 0x1234 PID 0x1234.<br />
2) USB host software sends vendor request VR_SETUP_CONFIG 0xB7 (see Vendor Requests)<br />
with 1 byte in the data buffer representing which FPGA to configure. (A is 0x01, B is 0x02, C is<br />
0x03…)<br />
3) The configuration circuit on receiving this vendor request asserts the PROG signal of the<br />
selected FPGA. This resets the FPGA and clears any configuration data it may already have.<br />
This Vendor request also selects the FPGA, so that SelectMap bus activity only affects the<br />
selected FPGA. Bulk transfers initiated after this command to endpoint 2 are interpreted as<br />
SelectMap transfers, rather than Main Bus transfers (See Main Bus access above). This will be so<br />
until vendor request VR_SETUP_END (0xBD) is called.<br />
4) USB host software sends a bulk write USB request to EP2. Each byte of data in the bulk<br />
write is sent to the selected FPGA over the SelectMap bus, and the FPGA signal CCLK is<br />
pulsed once for each byte of data sent. Note that the LSBit in the USB transaction is sent to the<br />
LSBit in the SelectMap interface, so bit swapping as described in the Virtex 5 Configuration<br />
Guide is not required. A standard .bit file from Xilinx bitgen can be transferred in binary over<br />
this USB interface to correctly configure an FPGA on the DN9200K10PCIE8T. Make sure<br />
CCLK is selected as the startup clock in the bitgen settings. This is the default setting.<br />
5) After an FPGA configures, the DONE signal will go high, lighting the blue LED next to the<br />
FPGA (labeled “DONE”).<br />
6) The USB Controller sends a vendor request out VR_SETUP_END (0xBD). This request<br />
deselects the FPGA, so that further bulk requests are interpreted as Main Bus transactions.<br />
4.6.2 Readback<br />
Readback is performed in the same way that configuration, except that the direction of the bulk<br />
transfer is BULK_READ instead of BULK_WRITE.<br />
Reading from this endpoint causes one CCLK cycle on the SelectMap bus of the selected<br />
FPGA. In order to initiate readback, you must send a vendor request to put the endpoint in<br />
readback mode, and send a vendor request that will initiate a SelectMap sequence that puts the<br />
FPGA SelectMap bus into read mode.<br />
The data returned from the endpoint is the raw data from the SelectMap bus. In order to make<br />
any sense of this data, you will have to muck through the binary data and match it up with the<br />
read back, mask, register location list, bitfile, files that were produced by bit gen. Also note that<br />
the first few thousand bits are junk, as described in the Xilinx Virtex 5 configuration user guide.<br />
In order to get register state data from the readback stream, you will have to implement the<br />
ICAP module in your Verilog. This might mean having a controlled clock with a breakpoint and<br />
a trigger condition and a lot of other things that we haven‟t thought about because nobody<br />
seems to care about readback.<br />
DN9200K10PCIE8T User Guide www.dinigroup.com 90
H A R D W A R E<br />
4.7 Configuring the “PCI Express” FPGA<br />
All the files that mentioned below are located from the user CD:<br />
D:\FPGA_Reference_Designs\Programming_Files\pcie_fpga\pcie_dma folder. Depend on<br />
what type of FPGA, you can select which folder LX50T or FX70T. To configure the “pci<br />
express” fpga (also referred to as “V5T”, “FPGA Q”, “LX50T”, “MAX”, “John‟s FPGA”,<br />
“mishap”), there are several methods:<br />
1) Configure from compact flash card. Add a line to the main.txt file:<br />
FPGA Q: bitfilename.bit<br />
The next time the board power off and on, this programming data will remain in the<br />
card and program the FPGA again.<br />
2) Load image directly over JTAG. Using a Xilinx JTAG cable, connect to the “FPGA<br />
JTAG” connector on the board. The last item on the JTAG chain is the “PCI Express<br />
FPGA”. Right-click on this device and select a bit file. Program the device. The next<br />
time the board powers on, this programming data will be lost.<br />
3) Load image into prom over JTAG. Using a Xilinx JTAG cable, connect to the “FPGA<br />
JTAG” connector on the board. The last item on the JTAG chain is the “PCI Express<br />
FPGA”. Right-click on this device (in iMPACT), and select “add SPI flash…” select the<br />
image file (a .mcs file). Program the SPI device attached to the FPGA. The next time<br />
the board powers on, this image will automatically load into the FPGA.<br />
4) Load the image into the prom over USB. Using the windows USB controller program,<br />
you can select from the “Service” menu, “program V5T flash”. From the open…<br />
dialog, you can select a .hex file. After a minute, the program will load the hex file into<br />
the prom. When you power cycle the board, then the programming data will be loaded<br />
into the FPGA Q.<br />
5) Load image directly into FPGA over USB. In the windows program USB Controller,<br />
you can right-click on the FPGA Q and select “program this fpga”. After selecting a .bit<br />
file, the program will load the FPGA. When the board powers down and back on, the<br />
programming data will be lost.<br />
6) Program the PROM over PCI Express. This isn‟t very reliable.<br />
PCI Express cannot be used to program the FPGA directly because the FPGA is required to be<br />
configured for PCI Express to function.<br />
4.8 Configuration Registers<br />
Some of the controls on the board, specifically the clocks, are accessed though the<br />
“configuration registers”. PCI Express, CompactFlash and USB all have access to these registers<br />
somehow. See the corresponding section.<br />
DN9200K10PCIE8T User Guide www.dinigroup.com 91
H A R D W A R E<br />
FPGA Configuration Registers<br />
FPGA_SELECT 0xDF0C “Selects” an FPGA for the SelectMap interface<br />
FPGAQ_CONTROL 0xDFB0 Allows access to the MSEL pins of FPGA Q<br />
BEGIN_READBACK 0xDFDD sends a command sequence on SelectMap<br />
END_READBACK 0xDFDE Sends a command sequence on SelectMap<br />
MainBus Control Registers<br />
PCI_COMMUNICATION 0xDF15 Switches MainBus between PCI and USB mode<br />
FPGA_COMMUNICATION 0xDF39 Disables MainBus (for use as interconnect)<br />
GPIF_EP2TC0 0xDFA0 Maintain Read/Write ordering on MainBus<br />
GPIF_EP2TC1 0xDFA1 “<br />
GPIF_EP2TC2 0xDFA2 “<br />
GPIF_EP2TC3 0xDFA3 “<br />
Clock Control Registers<br />
CLKS_CTRL 0xDF23 Controls the “step clock” on CLK_G0<br />
SYNTH_EXT0_CTRL 0xDF24 Controls the PLL settings inCLK_EXT0<br />
SYNTH_EXT1_CTRL 0xDF25 Controls the PLL settings in CLK_EXT1<br />
PENDING_CLKS 0xDF40 Causes clocks G0-G2 to update frequency<br />
G0_INTEGER_B0 0xDFC0 (LSB) Controls frequency of CLK_G0<br />
G0_INTEGER_B1 0xDFC1 (MSB)<br />
G0_FRACTIONAL_B0 0xDFC2 Adjust frequency of GLK_G0<br />
G0_FRACTIONAL_B1 0xDFC3 “<br />
G1_INTEGER_B0 0xDFC4 (LSB) Controls frequency of CLK_G1<br />
G1_INTEGER_B1 0xDFC5 (MSB)<br />
G1_FRACTIONAL_B0 0xDFC6 Adjust frequency of CLK_G1<br />
G1_FRACTIONAL_B1 0xDFC7 “<br />
G2_INTEGER_B0 0xDFC8 (LSB) Controls frequency of CLK_G1<br />
G2_INTEGER_B1 0xDFC9 (MSB)<br />
G2_FRACTIONAL_B0 0xDFCA Adjust frequency of CLK_G2<br />
G2_FRACTIONAL_B1 0xDFCB “<br />
Misc Control Registers<br />
PENDING_RST 0xDF4C Sends a pulse on the user reset (button).<br />
Information Registers<br />
SERIAL_NUM_BYTE0 0xDFF6 Board serial number (ASCII)<br />
SERIAL_NUM_BYTE1 0xDFF7 Board serial number (ASCII)<br />
SERIAL_NUM_BYTE2 0xDFF8 Board serial number (ASCII)<br />
SERIAL_NUM_BYTE3 0xDFF9 Board serial number (ASCII)<br />
MCU_STUFFING1 0xDF27 Bit field indicates which FPGA are installed<br />
TEMP_A 0xDF50 Temperature of FPGA A in units C (binary)<br />
TEMP_B 0xDF51 Temperature of FPGA B<br />
TEMP_Q 0xDFE0 Temperature of FPGA Q<br />
FPGA_A_TYPE 0xDF78 Which type of FPGA is A (encoded)<br />
DN9200K10PCIE8T User Guide www.dinigroup.com 92
H A R D W A R E<br />
FPGA_B_TYPE 0xDF79 Which type of FPGA is B (encoded)<br />
CONFIG_ VERSION 0xDFFB Version of Spartan Firmware<br />
MCU_VERSION 0xDFFC Version of MCU (“flash”) firmware<br />
BOARD_VERSION_NEW 0xDFFE Type of board (9200K10PCIE8T) encoded.<br />
4.8.1 Undocumented controls<br />
There are some features that aren‟t documented because then we couldn‟t change them. If you<br />
need a certain feature, email support@dinigroup.com and ask if we are interested in<br />
implementing it.<br />
- Turn off auto-increment on USB<br />
- Main Bus error detection<br />
- Main Bus timeout change<br />
- PCI Register read timeout change<br />
4.9 Firmware<br />
A Spartan 3 FPGA and a Cypress micro controller control the configuration circuitry. The<br />
programming data for the FPGA is stored on a flash device, and the code for the micro<br />
controller is stored on a separate flash device. The instructions for updating the firmware are<br />
given in the software section. The flash that stores the Spartan FPGA programming information<br />
is made available via a JTAG header, which can be used with the Xilinx program iMPACT. The<br />
Dini Group does not recommend doing any sort of development on this FPGA, because if you<br />
add custom code, you will not be able to use firmware updates from Dini Group without<br />
merging it with your custom code.<br />
Figure 43 - Spartan "Firmware" JTAG Chain<br />
There is a JTAG chain and header (J6) that is connected to the Spartan and its configuration<br />
prom.<br />
Instructions for updating the firmware are in the Controller software section. The Spartan<br />
configures from a Xilinx configuration PROM. The microcontroller boots from an IIC<br />
EEPROM. It then runs additional code off an external Flash device. The LXT FPGA<br />
configures from an external SPI Flash.<br />
DN9200K10PCIE8T User Guide www.dinigroup.com 93
H A R D W A R E<br />
5 Clock Network<br />
The board provides a bunch of clocks that go to both FPGAs on GC pins on the FPGA. These<br />
clocks are suitable for synchronous communication between the FPGAs. When this manual<br />
refers to a “clock input” of an FPGA, it means the “GC” pin described in the Virtex-5 user<br />
manual. These pins have the capability of driving a DCM, PLL, or BUFG input with a known<br />
(accounted for) delay within the FPGA.<br />
Almost without exception, and clock (or edge sensitive signal) should connect only to a GC pin<br />
on the FPGA.<br />
5.1 Global Clocks<br />
All of the “global clock networks” on the DN9200K10PCIE8T are LVDS, point-to-point<br />
signals. The arrival times of the clock edges at each FPGA are phase-aligned (length-matched on<br />
the PCB) within about 100ps. These clocks are all suitable for synchronous communication<br />
among FPGAs.<br />
Since LVDS is a very low voltage-swing differential signal, you cannot receive these signals<br />
without using a differential input buffer. Single-ended inputs will not work. An example Verilog<br />
implementation of a differential clock input is given below.<br />
Wire aclk_ibufds;<br />
IBUFGDS G0CLK_IBUFG (.O(g0clk_ibufg), .I(GCLK0p), .IB(GCLK0n)) ;<br />
always@(g0clk_ibufg) begin<br />
// Registers<br />
end<br />
Either in the UCF or using a synthesis directive, you should set the DIFF_TERM attribute of<br />
the IBUFGDS to TRUE. This is recommended because there are no external termination<br />
resistors on the DN9200K10PCIE8T.<br />
All global clock networks have a differential test point. The positive side of the differential signal<br />
is connected to pin 1 (square) and the negative side is connected to pin 2 (circular).<br />
DN9200K10PCIE8T User Guide www.dinigroup.com 94
H A R D W A R E<br />
Figure 44 - Clock network block diagram<br />
Each of the nine clock outputs of the clock network is distributed to both FPGAs.<br />
5.1.1 Clock Test points<br />
Each of the “Global clock” networks has a test point. These points are not length-matched with<br />
the global clock network, so there may be some phase offset between this point and the FPGA<br />
input.<br />
Figure 45 - Clock Test points<br />
DN9200K10PCIE8T User Guide www.dinigroup.com 95
H A R D W A R E<br />
All of test points output LVDS signaling. LVDS test points have the “p” signal connected to pin<br />
1 (square) and “n” connected to pin 2 (circular).<br />
A 100Ω resistor connects the P and N side of these clock signals. This is excellent for probing<br />
with a high-impedance probe, but not so good for connecting wires. You can remove this<br />
resistor if needed.<br />
5.2 G0, G1, G2 Clocks<br />
The G0, G1 and G2 clocks are the primary clock resource for your FPGA design. Each of these<br />
clocks can be set to a wide range of frequencies between 0.125 MHz and 550 MHz.<br />
On the schematic, these signals are named<br />
CLK_G*_*p<br />
where * is 0,1 or 2 and * is the name of the FPGA connected to that signal.<br />
Additionally, the reference frequency of each of the can (optionally) come from an alternate<br />
source.<br />
G0 can act as a step-clock source controlled via PCI Express or USB.<br />
G1 can be locked to G0<br />
G2 can be controlled from FPGA A<br />
To control the step clock, write to the “configuration register” 0xDF23 using the PCI or USB<br />
configuration register interface.<br />
To control the source of each clock, use USB Controller (the “clock sources” option in the<br />
Settings menu) or use the SOURCE: command on CompactFlash.<br />
By default, the alternate sources for these clocks are off.<br />
The configuration register that sets the source of the clocks is at location 0xDF16.<br />
bit 0 corresponds to G0, bit 1 corresponds to G1 and bit 2 corresponds to G2. To change the<br />
source to the stop clock, write a „1 to the bit location corresponding to the clock network. Then<br />
write a „1 to the bit corresponding to the clock network in the “update” register, 0xDF40.<br />
Writing to this register will cause a glitch in the clock.<br />
From the compact flash card, source can be set by using the source instruction:<br />
source: G0 2 # sets G0 to step clock 0<br />
source: G1 2 # sets G1 to step clock 1<br />
source: G2 2 # sets G2 to “feedback A”<br />
In USB Controller, from the settings menu, select DN9200K10PCIE8T clock source settings<br />
To control G2 from FPGA A, the FPGA drives a 2.5V clock signal on the CLK_FBA_INT<br />
output.<br />
DN9200K10PCIE8T User Guide www.dinigroup.com 96
H A R D W A R E<br />
5.2.1 Synthesizer Circuit<br />
The G0, G1, and G2 clock synthesis source is driven by an si5326 clock synthesizer chip. This<br />
chip is capable of driving a wide range of output frequencies. The “configuration registers” that<br />
control the output frequency are capable of correctly configuring each frequency multiple of<br />
0.125MHz up to 550MHz. If the desired frequency is between one of these steps, or above or<br />
below the range, then you will have to use a compact flash card to set the frequency.<br />
2<br />
+3.3V<br />
24MHz<br />
1<br />
OE Vcc<br />
2<br />
CLK_FBA_INT<br />
Gnd OUT<br />
From FPGA A<br />
4<br />
3<br />
+3.3V<br />
31 SYNTH_SCL_ALL<br />
31 SYNTH_SDA_ALL<br />
U61<br />
4<br />
1<br />
2<br />
GND XTAL_A<br />
3<br />
GND XTAL_B<br />
114.285000Mhz<br />
OSC_TXC_7MA1400014<br />
16<br />
17<br />
12<br />
13<br />
15<br />
11<br />
1<br />
22<br />
23<br />
24<br />
25<br />
26<br />
36<br />
19<br />
20<br />
27<br />
U62<br />
CKIN2+<br />
CKIN2-<br />
RATE1<br />
RATE0<br />
RSTn<br />
Rate0-Rate1 X[A:B] ref<br />
L M 38.88Mhz<br />
M M 114.285Mhz<br />
H H DataSheet<br />
___LVCMOS<br />
SCL<br />
SDA_SDO<br />
A0<br />
A1<br />
A2_SSn<br />
CMODE<br />
DEC<br />
INC<br />
SDI<br />
I2C address<br />
1101A[2]A[1]A[0]<br />
CMODE<br />
0 -> I2C mode<br />
1 -> SPI mode<br />
6<br />
7<br />
18<br />
21<br />
32<br />
5<br />
10<br />
+2.5V<br />
LVDS<br />
CLKGp2 2<br />
CLKGn2 2<br />
RED<br />
To All FPGAs<br />
2<br />
14<br />
9<br />
33<br />
30<br />
37<br />
31<br />
8<br />
NC<br />
NC<br />
NC<br />
NC<br />
NC<br />
XA<br />
XB<br />
CKIN1+<br />
CKIN1-<br />
Si5326<br />
QFN50P600X600X90-37N<br />
28<br />
CKOUT1+<br />
29<br />
CKOUT1-<br />
3<br />
INT_C1B<br />
35<br />
CKOUT2+<br />
34<br />
CKOUT2-<br />
4<br />
C2B<br />
GND PAD<br />
LOL<br />
CS_CA<br />
VDD<br />
VDD<br />
VDD<br />
GND<br />
GND<br />
Figure 46 - Clock G network synthesizer circuit<br />
The synthesizer outputs can be set to any frequency within the capability of the synthesizer<br />
device. However, the microcontroller cannot calculate the correct settings on the synthesizer<br />
because it would require math. In order to obtain an arbitrary frequency setting, you must use<br />
the main.txt file on the compact flash card. The main.txt lines required to set clock G1 to a large<br />
number of frequencies are given below.<br />
SOURCE: G1 1 7 29393 1599 7 146969 # 0.003000 MHz<br />
SOURCE: G1 1 1 969 23 6 96999 # 0.005000 MHz<br />
SOURCE: G1 1 1 969 23 6 48499 # 0.010000 MHz<br />
SOURCE: G1 1 6 44035 2178 3 44035 # 0.015734 MHz<br />
SOURCE: G1 1 5 22453 999 5 22453 # 0.024000 MHz<br />
SOURCE: G1 1 3 10825 374 3 21651 # 0.032000 MHz<br />
SOURCE: G1 1 7 63915 3478 7 13455 # 0.032768 MHz<br />
SOURCE: G1 1 4 15787 624 4 15787 # 0.038400 MHz<br />
SOURCE: G1 1 7 139971 7618 7 9997 # 0.044100 MHz<br />
SOURCE: G1 1 7 9185 499 7 9185 # 0.048000 MHz<br />
SOURCE: G1 1 1 969 23 6 9699 # 0.050000 MHz<br />
SOURCE: G1 1 3 5773 199 3 11547 # 0.060000 MHz<br />
SOURCE: G1 1 2 10777 319 2 10777 # 0.075000 MHz<br />
SOURCE: G1 1 5 168383 7498 5 7015 # 0.076810 MHz<br />
SOURCE: G1 1 5 5613 249 5 5613 # 0.096000 MHz<br />
DN9200K10PCIE8T User Guide www.dinigroup.com 97
H A R D W A R E<br />
SOURCE: G1 1 1 969 23 6 4849 # 0.100000 MHz<br />
SOURCE: G1 1 0 4041 79 4 4041 # 0.150000 MHz<br />
SOURCE: G1 1 3 72667 2516 3 3927 # 0.176400 MHz<br />
SOURCE: G1 1 4 3157 124 4 3157 # 0.192000 MHz<br />
SOURCE: G1 1 7 1377 74 4 2755 # 0.220000 MHz<br />
SOURCE: G1 1 3 13857 479 3 2131 # 0.325000 MHz<br />
SOURCE: G1 1 7 1377 74 4 1377 # 0.440000 MHz<br />
SOURCE: G1 1 3 13857 479 6 1065 # 0.455000 MHz<br />
SOURCE: G1 1 7 1377 74 0 1377 # 0.880000 MHz<br />
SOURCE: G1 1 4 15791 624 3 375 # 1.843199 MHz<br />
SOURCE: G1 1 4 15791 624 3 281 # 2.457600 MHz<br />
SOURCE: G1 1 4 47487 1874 3 211 # 3.276800 MHz<br />
SOURCE: G1 1 5 7909 351 2 225 # 3.579545 MHz<br />
SOURCE: G1 1 4 15791 624 3 187 # 3.686399 MHz<br />
SOURCE: G1 1 7 2303 124 7 107 # 4.096000 MHz<br />
SOURCE: G1 1 6 36307 1790 6 115 # 4.194304 MHz<br />
SOURCE: G1 1 6 49867 2462 0 273 # 4.433617 MHz<br />
SOURCE: G1 1 7 2303 124 7 89 # 4.915200 MHz<br />
SOURCE: G1 1 4 631 24 1 157 # 6.144000 MHz<br />
SOURCE: G1 1 4 15791 624 3 93 # 7.372799 MHz<br />
SOURCE: G1 1 7 2303 124 7 53 # 8.192000 MHz<br />
SOURCE: G1 1 1 2153 52 7 49 # 8.867238 MHz<br />
SOURCE: G1 1 7 2303 124 7 47 # 9.216000 MHz<br />
SOURCE: G1 1 4 15871 624 4 61 # 9.830400 MHz<br />
SOURCE: G1 1 2 507 14 6 47 # 10.160000 MHz<br />
SOURCE: G1 1 3 23221 799 3 67 # 10.245000 MHz<br />
SOURCE: G1 1 7 2303 124 7 39 # 11.059200 MHz<br />
SOURCE: G1 1 5 5613 249 5 47 # 11.228000 MHz<br />
SOURCE: G1 1 3 3611 124 1 85 # 11.289600 MHz<br />
SOURCE: G1 1 7 2303 124 7 35 # 12.288000 MHz<br />
SOURCE: G1 1 3 2549 87 6 33 # 14.318181 MHz<br />
SOURCE: G1 1 7 2303 124 7 29 # 14.745599 MHz<br />
SOURCE: G1 1 4 383 14 6 29 # 16.384000 MHz<br />
SOURCE: G1 1 5 14111 624 5 31 # 16.934400 MHz<br />
SOURCE: G1 1 0 190485 3735 2 45 # 17.734475 MHz<br />
SOURCE: G1 1 0 6085 119 4 33 # 17.900000 MHz<br />
SOURCE: G1 1 7 2303 124 7 23 # 18.432000 MHz<br />
SOURCE: G1 1 4 383 14 4 31 # 19.200000 MHz<br />
SOURCE: G1 1 5 269 11 1 49 # 19.440000 MHz<br />
SOURCE: G1 1 1 31249 767 1 49 # 19.531250 MHz<br />
SOURCE: G1 1 4 15871 624 0 61 # 19.660800 MHz<br />
SOURCE: G1 1 7 2303 124 7 19 # 22.118400 MHz<br />
SOURCE: G1 1 7 2303 124 7 17 # 24.576000 MHz<br />
SOURCE: G1 1 1 3909 95 0 45 # 26.562500 MHz<br />
SOURCE: G1 1 4 383 14 1 29 # 32.768000 MHz<br />
SOURCE: G1 1 7 605 31 1 29 # 33.330000 MHz<br />
SOURCE: G1 1 5 1133 49 5 13 # 38.880000 MHz<br />
SOURCE: G1 1 7 403 19 6 7 # 66.660000 MHz<br />
SOURCE: G1 1 7 6749 363 7 5 # 74.175824 MHz<br />
SOURCE: G1 1 4 383 14 4 7 # 76.800000 MHz<br />
SOURCE: G1 1 5 575 24 4 7 # 77.760000 MHz<br />
SOURCE: G1 1 4 383 14 1 9 # 98.304000 MHz<br />
SOURCE: G1 1 4 383 14 6 3 # 122.880000 MHz<br />
SOURCE: G1 1 5 575 24 6 3 # 124.416000 MHz<br />
SOURCE: G1 1 0 26665 479 6 3 # 133.330000 MHz<br />
SOURCE: G1 1 5 575 24 4 3 # 155.520000 MHz<br />
SOURCE: G1 1 4 9765 374 4 3 # 156.256000 MHz<br />
SOURCE: G1 1 1 509 11 4 3 # 159.375000 MHz<br />
SOURCE: G1 1 7 485 24 4 3 # 160.380000 MHz<br />
SOURCE: G1 1 0 10741 199 4 3 # 161.130000 MHz<br />
DN9200K10PCIE8T User Guide www.dinigroup.com 98
H A R D W A R E<br />
SOURCE: G1 1 4 50353 1874 4 3 # 161.132800 MHz<br />
SOURCE: G1 1 3 1173 39 1 5 # 164.360000 MHz<br />
SOURCE: G1 1 0 33325 639 1 5 # 166.630000 MHz<br />
SOURCE: G1 1 0 333333 6399 1 5 # 166.667000 MHz<br />
SOURCE: G1 1 5 92961 3999 1 5 # 167.331600 MHz<br />
SOURCE: G1 1 0 2157 39 1 5 # 172.640000 MHz<br />
SOURCE: G1 1 3 11557 399 3 3 # 173.370000 MHz<br />
SOURCE: G1 1 3 1173 39 3 3 # 176.100000 MHz<br />
SOURCE: G1 1 3 8841 299 3 3 # 176.840000 MHz<br />
SOURCE: G1 1 4 671 24 3 3 # 184.320000 MHz<br />
SOURCE: G1 1 3 6249 191 3 3 # 195.312500 MHz<br />
SOURCE: G1 1 3 2961 99 4 1 # 311.010000 MHz<br />
5.3 Ext Clocks<br />
There are two clock networks on the DN9200K10PCIE8T that are designed to provide clocks<br />
from an external frequency reference. EXT0 and EXT1. Each of these clocks is delivered<br />
synchronously to both FPGAs and is suitable for synchronous communication among the<br />
FPGAs.<br />
EXT0 can be sourced from either the external clock input SMAs connectors or the<br />
daughtercard attached to FPGA A (DCA). By default, EXT0 is set to be sourced from the<br />
DCA.<br />
EXT1 can be sourced from either DCBB (DaughterCard on fpga B on the Bottom) or DCBT<br />
(DaughterCard on fpga B on the Top). By default, the source is DCBB.<br />
The source settings can be made from the USB Controller by selecting menu<br />
settings->global clock muxes.<br />
To make the setting from the compact flash card, in the main.txt file, use the MEMORY<br />
MAPPED: command to write to the EXT0 register 0xDF27 or the EXT1 register 0xDF28.<br />
The register bit map is as follows:<br />
0xDF28[4:0] = S23, S1, S0, PLLSEL, CLKSEL<br />
Write value 0x02 to select the daughtercard<br />
Write value 0x01 to select the FBA clock.<br />
Example: Set EXT0 to use SMA (PLL off):<br />
MEMORY MAPPED: 0xDF27 0x1D<br />
Example: Set EXT1 to use DCBB (PLL off):<br />
MEMORY MAPPED: 0xDF28 0x1C<br />
5.3.1 Daughtercard zero-delay mode<br />
EXT0 and EXT1 can be set to zero-delay mode, where each FPGA is able to receive the clock<br />
synchronous to the daughtercard. This feature requires configuring the clock distribution<br />
network with the frequency of the clock.<br />
DN9200K10PCIE8T User Guide www.dinigroup.com 99
H A R D W A R E<br />
Figure 47 - EXT clock sources diagram<br />
Before you implement read the daughtercard section for more clocking ideas. To set the PLL<br />
correctly, use the DCLK command in the main.txt file. For other PLL features such as<br />
frequency range and divide/multiply, you must read the PLL data sheet and use the MEMORY<br />
MAPPED command in the main.txt file to set the S0 S1 S2 and S3 signals of the PLL.<br />
Note that the phase matching between the FPGAs and connectors is from the FPGA pins to<br />
the daughtercard pins, and from the SMA connector to the FPGA pins, therefore, the delay on<br />
the daughtercard and on the SMA Cable is not accounted for. The default for the PLL is OFF,<br />
so, by default, the phase matching does not occur.<br />
5.3.2 SMA input<br />
The EXT0 clock can be sourced from a pair of SMA inputs, J10, J11. These SMAs connectors<br />
can be connected to a differential source or a single-ended source. For single-ended, connect to<br />
either the P or N connector. The voltage swing must be between 0.15V and 3.3V.<br />
DN9200K10PCIE8T User Guide www.dinigroup.com 100
H A R D W A R E<br />
Figure 48 - EXT0 SMA locator<br />
CONN_SMA<br />
LIGHTHORSE_SASF546-P26-X1<br />
3 4<br />
1<br />
2 5<br />
3 4<br />
1<br />
2 5<br />
CLK_USERpc<br />
CLK_USERnc<br />
CONN_SMA<br />
LIGHTHORSE_SASF546-P26-X1<br />
R62<br />
100R<br />
4.7uF<br />
C177<br />
C176<br />
4.7uF<br />
R61<br />
100R<br />
+2.5V<br />
R59<br />
100R<br />
R60<br />
100R<br />
6<br />
6<br />
CLK_USERp<br />
CLK_USERn<br />
CLKIN_DCAp<br />
CLKIN_DCAn<br />
3 SYNTH_EXT0_CLKSEL<br />
3 SYNTH_EXT0_S0<br />
3 SYNTH_EXT0_S1<br />
3 SYNTH_EXT0_S23<br />
3 SYNTH_EXT0_PLLSEL<br />
3 SYNTH_EXT_MR<br />
R54<br />
100R<br />
+3.3V<br />
+3.3V<br />
U41<br />
9<br />
28<br />
32<br />
VDD1/3.3 VDDO1<br />
22<br />
30<br />
VDD2/3.3 VDDO2<br />
16<br />
VDDA/3.3 VDDO3<br />
3<br />
4<br />
CLK0<br />
15<br />
nCLK0 Q0<br />
14<br />
5<br />
nQ0<br />
18<br />
6<br />
CLK1 LVDS Q1<br />
17<br />
nCLK1 nQ1<br />
21<br />
7<br />
Q2<br />
20<br />
1<br />
CLKSEL nQ2<br />
24<br />
2<br />
SEL0<br />
Q3<br />
23<br />
12<br />
SEL1 nQ3<br />
27<br />
29<br />
SEL2<br />
Q4<br />
26<br />
31<br />
SEL3 nQ4<br />
8<br />
PLL_SEL<br />
MR<br />
13<br />
11<br />
GND1<br />
19<br />
10<br />
FB_IN GND2<br />
25<br />
nFB_IN GND3<br />
ICS8745B<br />
LVDS<br />
TP31<br />
DNI<br />
CLK_EXT0_Tp<br />
CLK_EXT0_Tn<br />
CLK_EXT0_Ap<br />
CLK_EXT0_An<br />
CLK_EXT0_Bp<br />
CLK_EXT0_Bn<br />
CLK_EXT0_Qp<br />
CLK_EXT0_Qn<br />
R424<br />
100R<br />
Figure 49 - EXT0 SMA circuit<br />
CLK_EXT0_FBn<br />
CLK_EXT0_FBp<br />
The inputs are AC-coupled. This limits the minimum possible frequency of the clock input to<br />
around 50 kHz. If you require an external clock with a frequency lower than this, you should<br />
modify the board by removing the 4.7µF resistors shown above and replacing them with 0Ω<br />
resistors. The maximum recommended swing on the differential inputs is 3.3V.<br />
5.4 MB Clock<br />
This is a differential clock (must use differential input buffers) that is run at a constant 48 MHz.<br />
This clock can be used for whatever you want if you want, but it can also be used for the<br />
“MainBus” interface that provides access to USB and PCI Express.<br />
5.5 FBA and FBB clocks<br />
The FPGAs A and B are the source of a global clock network designed to allow an FPGA to<br />
generate a frequency for all FPGAs. The name of these signals is<br />
DN9200K10PCIE8T User Guide www.dinigroup.com 101
H A R D W A R E<br />
FBA network:<br />
FBA_A (FeedBack from fgpa A to fpga B)<br />
FBA_B<br />
FBB network:<br />
FBB_A (FeedBack from fpga B to fpga A)<br />
FBB_B<br />
FPGA A should drive both FBA signals, and FPGA B should drive both FBB signals. FBA_A<br />
is driven out of FPGA A back into FPGA A. This signal can be used as an analogue to FBA_B<br />
or it can be used as a feedback.<br />
Similarly, FPGA B drives a signal to itself, FBB_B.<br />
The use model for these clocks requires that FPGA A or B drives an identical clock on both<br />
legs of the network output and both FPGAs receive an identical clock on their inputs for use in<br />
matching clock networks.<br />
Figure 50 - FBA typical use<br />
You may need to also match this clock‟s phase with an external phase source. In this case, the<br />
feedback signal will need to be used as the feedback to a DCM or PLL. This requirement is<br />
common if you have a daughtercard.<br />
Figure 51 - FBA typical use with synchronization<br />
DN9200K10PCIE8T User Guide www.dinigroup.com 102
H A R D W A R E<br />
The additive delays on the feedback network are given below:<br />
FBB 0.86ns<br />
FBA 0.40ns<br />
The FBB network is additionally phase-matched to the daughtercard signals<br />
DCBB0p31 and DCBB0n31<br />
DCBT0p31 and DCBT0n31<br />
The FBA network is additionally phase-matched to the daughtercard signals<br />
DCA0p31 and DCA0n31<br />
This fact can be used to create a low-skew clock to the daughtercards.<br />
5.6 PCI Express REFCLK Network<br />
A clock network driven from the FPGA “Q” is called “REFCLK”. When the Dini Group PCI<br />
Express endpoint bitfile is loaded into the FPGA “Q”, and the board is linked to a motherboard<br />
over PCI Express, then this network will be driven with a 250 MHz clock which is equal to 2.5<br />
times the PCI Express REFCLK in frequency.<br />
The network can be used for any other purpose, however, when the FPGA Q is programmed<br />
with your own bitfile.<br />
The clock is a differential LVDS signal which should be received on each FPGA with a<br />
differential clock input buffer with DIFF_TERM set to TRUE.<br />
When not installed in a PCI Express slot, this clock will be zero MHz (when “full function PCI<br />
Express endpoint now with DMA” core is loaded in FPGA Q).<br />
5.7 Non-Global Clocks<br />
The following sections describe clocks that are not considered “global” because they do not<br />
distribute to both FPGAs on the board. These clocks may be used for specific interfaces and<br />
details on the clocking required for those interfaces are found in a different section in the<br />
hardware chapter.<br />
5.7.1 Clock TP<br />
Each FPGA is connected to a two-pinned test point. This test point can be used to input a<br />
differential clock from off-board. Each of these test points has a 100Ω jumper installed shorting<br />
the negative and positive signals. To input or output differentially, you must remove this resistor.<br />
The net name on the schematic and in the provided UCF for this signal is<br />
CLK_DIMMB_DQS3p/n and<br />
CLK_DIMMA_DQS3p/n<br />
DN9200K10PCIE8T User Guide www.dinigroup.com 103
H A R D W A R E<br />
R324<br />
100R<br />
DNI<br />
TESTPOINT3<br />
K15<br />
K14<br />
M27<br />
N26<br />
L27<br />
M28<br />
L15<br />
K28<br />
K29<br />
M14<br />
L14<br />
J30<br />
K30<br />
N16<br />
M16<br />
L29<br />
L30<br />
U1-3<br />
XC5VLX330FF1760<br />
L0P_CC_GC_3L4N_GC_VREF_3<br />
L0N_CC_GC_3<br />
L1P_CC_GC_3<br />
L1N_CC_GC_3<br />
L3P_GC_3<br />
L3N_GC_3<br />
L4P_GC_3<br />
L5P_GC_3<br />
L5N_GC_3<br />
L6P_GC_3<br />
L6N_GC_3<br />
L7P_GC_3<br />
L7N_GC_3<br />
L8P_GC_3<br />
L8N_GC_3<br />
L9P_GC_3<br />
L9N_GC_3<br />
L2P_GC_VRN_3<br />
L2N_GC_VRP_3<br />
VCCO_3<br />
VCCO_3<br />
L16<br />
K13<br />
J13<br />
J24<br />
E26<br />
Figure 52 - Clock Testpoint circuit<br />
The schematic clipping above shows FPGA B‟s test point, but all FPGAs use the same pinout.<br />
A list of all test points on the board can be found in the test points section.<br />
Figure 53 - Clock Test point locator<br />
This signal can also be used as an external feedback path for a DCM. Drive a single-ended clock<br />
out the “N” side and receive it on the “P” side. The additive external delay for this feedback<br />
path is 1.6ns. The maximum frequency for the feedback path is 250 MHz.<br />
5.7.2 Ethernet Clock<br />
The VSC8601 Ethernet PHY device outputs a 125 MHz clock. The signals in the schematic are<br />
CLK125_ETHA. This signal is LVCMOS25, single-ended signals. The frequency is fixed.<br />
This clock input can be used as a general-purpose 125 MHz source.<br />
Details about appropriate clock methodology for the Ethernet interface is in the Ethernet<br />
section.<br />
DN9200K10PCIE8T User Guide www.dinigroup.com 104
H A R D W A R E<br />
5.7.3 DDR2 Clocks<br />
The CK signals in the DDR2 interface are described in the DDR2 interface section.<br />
OUTPUTS<br />
CLK_DIMMA_CK2p<br />
CLK_DIMMA_CK2n<br />
CLK_DIMMB_CK2p<br />
CLK_DIMMB_CK2n<br />
INPUTS<br />
CLK_DIMMA_CK2p<br />
CLK_DIMMA_CK2n<br />
CLK_DIMMB_CK2p<br />
CLK_DIMMB_CK2n<br />
E39<br />
E40<br />
AC33<br />
AD32<br />
AM13<br />
AN14<br />
AM13<br />
AN14<br />
Note that on the netlist, these signals connect to the FPGA twice: once on the DDR2 interface<br />
bank (1.8V), and once on the global clock input bank (2.5V). The 2.5V, clock bank connections<br />
should be used as inputs, and the 1.8V bank signals should be configured as outputs. For input<br />
signals, use the LVDSEXT standard with the DIFF_TERM attribute set to TRUE.<br />
If the DIMM interfaces are not used, these can be used as external feedback traces. The external<br />
delays are given here:<br />
CLK_DIMMA_CK2 0.65ns<br />
CLK_DIMMB_CK2 0.63ns<br />
5.7.4 SMA Clock B and E<br />
All FPGAs have a pair of SMA connector connected directly to global clock inputs. The bank<br />
connected to these signals is a +2.5V bank. Allowed input standards are LVCMOS25, SSTL25,<br />
LVDS, DIFF_SSTL18.<br />
FPGA A pins AM28, AN28<br />
FPGA B pins AK28, AK27<br />
R266<br />
4.7K<br />
+2.5V<br />
CONN_SMA<br />
LIGHTHORSE_SASF546-P26-X1<br />
3 4<br />
1<br />
2 5<br />
3 4<br />
1<br />
2 5<br />
CONN_SMA<br />
LIGHTHORSE_SASF546-P26-X1<br />
Figure 54 - SMA circuit<br />
CLK_SMA_Apr<br />
CLK_SMA_Anr<br />
R1152<br />
0R<br />
0R<br />
R1153<br />
CLK_SMA_Ap<br />
CLK_SMA_An<br />
AK28<br />
AK27<br />
AL16<br />
AK17<br />
AM29<br />
AN30<br />
AN16<br />
AM16<br />
AP30<br />
AM13<br />
AM14<br />
AM28<br />
AN28<br />
AL27<br />
AM27<br />
AP13<br />
AN13<br />
L0P_GC_D15_4L4N_GC_VREF_4<br />
L0N_GC_D14_4<br />
L1P_GC_D13_4<br />
L1N_GC_D12_4<br />
L2P_GC_D11_4<br />
L2N_GC_D10_4<br />
L3P_GC_D9_4<br />
L3N_GC_D8_4<br />
L4P_GC_4<br />
L5P_GC_4<br />
L5N_GC_4<br />
L6P_GC_4<br />
L6N_GC_4<br />
L8P_CC_GC_4<br />
L8N_CC_GC_4<br />
L9P_CC_GC_4<br />
L9N_CC_GC_4<br />
U1-4<br />
XC5VLX330FF1760<br />
L7P_GC_VRN_4<br />
L7N_GC_VRP_4<br />
VCCO_4<br />
VCCO_4<br />
AN29<br />
AN15<br />
AN14<br />
BA18<br />
AV17<br />
VRN04A<br />
VRP04A<br />
+2.5V<br />
R267<br />
4.7K<br />
R299<br />
50R<br />
R303<br />
50R<br />
DN9200K10PCIE8T User Guide www.dinigroup.com 105
H A R D W A R E<br />
Figure 55 - SMA locator<br />
These connections are DC-coupled, meaning the user must ensure that the levels received on<br />
this input are within the limits of the Virtex-5 device to prevent damage to the part.<br />
This pair of SMA connectors can also be used as outputs, as single-ended inputs or for nonclock<br />
signals.<br />
DCI is enabled on these inputs. You can use SSTL2_II_DCI as end-terminated inputs.<br />
5.8 Clock Use notes<br />
The following sections give hints for successful clock network design.<br />
5.8.1 Achieving Zero clock-to-out<br />
Many high-speed chips are designed to have a zero hold time requirement on their inputs. This<br />
convention is convenient because it means that the optimal output timing is always where a<br />
clock edge that it aligned perfectly with the data. In the FPGA, there are two easy ways to<br />
achieve this.<br />
1) Output the clock for the external interface from a DDR flip-flop, using the same clock as the<br />
output data.<br />
2) Use an external feedback with zero additive phase.<br />
5.8.2 Forwarding Clocks FPGA-to-FPGA<br />
Creating a frequency in one FPGA and sending it to other FPGAs is very common (34.2%).<br />
Often a clock needs to be dynamically selectable between two sources, or be turned on and off.<br />
Or maybe you need to do a multiplication or division of a clock, or you want your entire system<br />
to be clocked off a single frequency, provided by an interface only available to one FPGA. In<br />
this case, you need a low-skew way to forward clocks from FPGA-to-FPGA.<br />
DN9200K10PCIE8T User Guide www.dinigroup.com 106
H A R D W A R E<br />
First, please consider using the FBA and FBB clock networks. This is exactly what these<br />
networks are intended for. There are other available methods, however. I‟ve listed some of them<br />
here (in order of how good I think they are), but I‟m sure there are others.<br />
1) Use the FBA and FBB networks<br />
2) Use the FBA_INT signal to control the frequency of clock G2<br />
3) Drive the clock onto a daughtercard and feed it back to the EXT0 or EXT1 network. (We<br />
can provide a loopback daughtercard if you want).<br />
4) Use one of the global clock networks as a phase source, and over an FPGA interconnect<br />
signal send up to 16 synchronous clock enables. Use the BUFGMUX macro in your FPGA to<br />
gate the clock. The effective clock periods for the resulting 16 clocks will vary from cycle-tocycle,<br />
however each frequency can be independent.<br />
5) Drive a clock signal out the FPGA to the SMA connector and feed it through a cable back to<br />
the EXT0 SMA input.<br />
6) Drive the clock signal on standard IO pins, and use a DCM in the receiving FPGA to<br />
dynamically align its clock to the input. Use the DCM‟s output as a clock and sample the<br />
forwarded clock in a flip flop. Then adjust the phase of the DCM‟s output back and forth so<br />
that the logic level on the flip-flop bang-bangs from a 0 to a 1 and so forth.<br />
The following methods are incorrect, but common. Note that if you use one of these methods,<br />
it will only work as if there is plenty of time before your project deadline. When the deadline<br />
approaches, it will stop working correctly.<br />
5.8.2.1 Always Use GCLK Pin<br />
Customer Ophelia Payne, who has been trying to get a job at Google for 4 years, has routed a<br />
signal to a “non GCLK” pin of FPGA A. She uses the signal AB03p13 as a clock from B to A.<br />
Figure 56 - Not using GCLK pins<br />
Unfortunately, there is a long (13ns) skew from the arrival of the clock to the flip-flops of<br />
FPGA A and FPGA B. What‟s worse, a DCM could be used to account for the delay because<br />
the routing between the pins and the DCMs is not in the feedback path! Furthermore, there are<br />
degradations in performance of the clock like low maximum frequency, duty cycle distortion,<br />
jitter, glitches, low birth weight, poor precision from timing analysis, and inconsistent skew from<br />
one place-and-route to another. Ophelia should use a GCLK pin on FPGA A. She should use<br />
the FBB* clock network instead.<br />
DN9200K10PCIE8T User Guide www.dinigroup.com 107
H A R D W A R E<br />
5.8.2.2 Always use a low-skew network<br />
Mel Loewe, a 12-year ASIC design veteran, has synthesized a frequency in FPGA B. He uses<br />
this frequency in FPGA B for his IO outputs, and also drives the clock out to FPGA A, using<br />
the FBB network that I told him to use. In FPGA A, this clock comes in on a GCLK pin and is<br />
used to clock the inputs of FPGA A.<br />
Figure 57 - Not using an external feedback<br />
Oops! Mel has some hold time violations on FPGA B because the external delay of the clock<br />
from FPGA B to FPGA A is not mirrored in the clock scheme of FPGA A. Mel should drive<br />
the other leg of the FBB* network “FBB_B” from FPGA B to FPGA B, so that both A and B<br />
have an external clock trace in the delay path.<br />
5.8.2.3 Synthesized Frequencies<br />
Anita Mann, janitor who found a DN9200K10PCIE8T discarded in a waste bin, has two<br />
domains, a 48 MHz core and a related 24 MHz IO. She says, “gee wiz, I‟ll just divide down that<br />
clock in the FPGA!” She knows that the DCM is guaranteed to have zero skew between inputs<br />
and divided outputs, and therefore zero skew between the two FPGAs.<br />
Figure 58 - Two divide DCMs<br />
Wait a second, Ann. There are two valid output phases from a divide-by-two operation, each<br />
180° apart from the other. One of the FPGA‟s clock might have opposite polarity as the other.<br />
Ms. Mann could have distributed a 24 MHz clock and multiplied by 2. Or she could send some<br />
sort of synchronization signal across the FPGAs. Finally, she could synthesize the divide-by-two<br />
clock in one FPGA, then distribute this clock on a network, using one of the methods described<br />
in “Forwarding clocks FPGA-to-FPGA”.<br />
DN9200K10PCIE8T User Guide www.dinigroup.com 108
H A R D W A R E<br />
5.8.2.4 Use an ODDR for clock outputs<br />
Justin Casey Howells III, an untrustworthy vegan, needs to drive a clock out to an external<br />
device (or another FPGA). So he looks in his A Verilog Pocket Reference that his wife got him for<br />
Kwanza. It says that the proper syntax is<br />
assign clkout = f;<br />
Figure 59 - Outputting a clock with an assign statement<br />
This seems to work fine, except when it failed constantly. The problem here is that the FPGA is<br />
incapable of routing a clock signal with low-skew to the output pad. In order to get consistent<br />
timing on this signal, Justin should use an ODDR like this:<br />
ODDR justins_oddr(.C(f), .I(1’b1), .IB(1’b0), .O(clkout));<br />
5.8.2.5 Cascading DCMs<br />
Mickey, a giant talking mouse, decided he needs to synthesize a frequency in one FPGA. Mickey<br />
(who is called “Mick” by his friends) knows all about clock phases, so he uses a DCM in the<br />
receive FPGAs to dynamically center the clock optimally in the data valid window. Also, he is<br />
sure to reset the DCMs, like the Virtex-5 User Guide requires.<br />
Figure 60 - Cascading DCMs<br />
Mick forgot that before DCM #1 gets it‟s reset, it isn‟t outputting a clock, and so the clock input<br />
to DCM #2 isn‟t stable until after reset is released. Oops! Mick should either put a timer on the<br />
reset of DCM #2, or else route the LOCKED signal from DCM #1 to the RESET #1 port of<br />
DCM #2.<br />
DN9200K10PCIE8T User Guide www.dinigroup.com 109
H A R D W A R E<br />
5.8.2.6 DCM Reset Timing<br />
Anna Graham, a tenured professor who couldn‟t care less about her “research”, connects<br />
SYS_RESET to her DCM and her logic, like she learned in ASIC camp.<br />
Figure 61 - DCM on same reset as logic<br />
The problem here is that the DCM doesn‟t output a stable clock until 50us after it receives reset.<br />
Now all the flip-flops in her design have to survive 50us of complete pandemonium.<br />
6 Test points<br />
This section lists all of the test points on the DN9200K10PCIE8T. A more detailed description<br />
may be found in the section about the system that the test point is part of, but all test points are<br />
listed here for reference.<br />
Part<br />
Reference Net name Purpose<br />
Ground Points<br />
MP1,MP2 GND Ground rails good for probe clips<br />
M2,M1,Y2 GND Ground holes good for mounting board<br />
Power Access Pointes<br />
TP15 +12V +12V power from power connector<br />
TP33 +1.0V_A 1V nominal for FPGA A internal power (1.05V actual)<br />
TP40 +1.0V_B 1V nominal for FPGA B internal power (1.05V actual)<br />
TP1 +2.5V +2.5V for FPGA IO<br />
TP3 +3.3V +3.3V for configuration circuit<br />
TP28 +5.0V +5V for daughtercards<br />
TP13 +VDIMM_B Voltage for DIMM connected to FPGA B (1.5V – 3.3V)<br />
TP16 +VDIMM_A Voltage for DIMM connected to FPGA A (1.5V – 3.3V)<br />
TP8 +0.9V_B Half of VDIMM_B (for termination)<br />
TP20 +0.9V_A Half of VDIMM_A (for termination)<br />
TP32 +1.2_S +1.2V for Spartan internal<br />
TP41 +3.3_MGT +3.3V for PCI Express clock synthesizers<br />
DN9200K10PCIE8T User Guide www.dinigroup.com 110
H A R D W A R E<br />
TP45 +2.5_MGT +2.5V for PCI Express clock synthesizers<br />
TP34 +VBATT_TP Input 1V-3V for Encryption battery<br />
TP27 SYS_RST# Hardware-generated reset (for power-on)<br />
TP29 BUTTON_S#r User button (“FPGA Reset”)<br />
TP30 ADC_A0p/n System monitors analogue input for FPGA A<br />
TP31 ADC_B0p/n System monitors analogue input for FPGA B<br />
TP38 ADC_Q0p/n System monitors analogue input for FPGA Q<br />
TP35 CLK_DIMMA_DQSp/n3 Connects to “GCLK” pins of FPGA A<br />
TP36 CLK_DIMMB_DQSp/n3 Connects to “GCLK” pins of FPGA B<br />
TP37 CLK_TP_Qp/n Connects to “GCLK” pins of FPG Q<br />
TP39 CLK_GTP_118p/n Connects to GTP “refclk” pins of FPGA Q<br />
GLOBAL CLOCK TESTPOINTS<br />
TP47 CLK_G0_Tp/n these test points are suitable for checking the<br />
TP48 CLK_G1_Tp/n frequency and stability of the global clock<br />
TP43 CLK_G2_Tp/n networks<br />
TP49 CLK_MB48p/n<br />
TP42 CLK_REF_Tp/n<br />
TP46 CLK_EXT0_Tp/n<br />
TP44 CLK_EXT1_Tp/n<br />
Voltage Measurement Test points<br />
TP2 +1.0V_A these test points are intended for<br />
TP4 +1.0V_B measuring the board voltages; They<br />
TP7 +2.5V are located conveniently along the left<br />
TP9 +3.3V edge of the board next to LEDs. They<br />
TP10 +5.0V are connected to the power supplies<br />
TP5 +VDIMM_A with thin wires, so you should not try<br />
TP6 +VDIMM_B to draw more than 100mA from these<br />
TP11 +MGT_AVCC points<br />
TP12 +MGT_AVTT<br />
TP14 +MGT_AVCCPLL<br />
TP17 +VIO_DCA0<br />
TP18 +VIO_DCA1<br />
TP19 +VIO_DCA2<br />
TP21 +VIO_DCBB0<br />
TP22 +VIO_DCBB1<br />
TP23 +VIO_DCBB2<br />
TP24 +VIO_DCBT0<br />
TP25 +VIO_DCBT1<br />
TP26 +VIO_DCBT2<br />
DIMM signal test points<br />
TP50 DIMMA_CAS# These signals are under the DIMMs on the<br />
DN9200K10PCIE8T User Guide www.dinigroup.com 111
H A R D W A R E<br />
TP51 DIMMA_WE# back side of the board. They are intended for<br />
TP52 DIMMA_DQSp0 probing the DDR2 signals for debugging user<br />
TP53 DIMMA_DQ00 logic<br />
TP58 CLK_DIMMA_CK0p/n<br />
TP60 DIMMA_RAS#<br />
TP54<br />
TP55<br />
TP56<br />
TP57<br />
TP59<br />
TP61<br />
DIMMB_CAS#<br />
DIMMB_WE#<br />
DIMMB_DQSp0<br />
DIMMB_DQ00<br />
CLK_DIMMB_CK0p/n<br />
DIMMB_RAS#<br />
7 USB interface<br />
The DN9200K10PCIE8T allows the user FPGA to communicate to a host PC over USB. The<br />
configuration circuitry allows this by bridging USB to the Main Bus interface. For most users,<br />
implementing USB communication will be as simple as making a Main Bus controller. In the<br />
reference design, there is an example Main Bus controller. See the Main Bus section of this<br />
chapter for more information on the Main Bus.<br />
Figure 62 - USB locator<br />
USB on the DN9200K10PCIE8T also allows control of the configuration circuitry from a host<br />
PC. This includes configuring FPGAs, setting clock frequencies and others<br />
This section will describe the software interface required to communicate to the<br />
DN9200K10PCIE8T. In addition to reading this section, you may chose to modify the<br />
provided software (USB Controller and AETest_usb). The source code for these programs is<br />
on the user CD. These programs collectively implement all of the available controls on the<br />
DN9200K10PCIE8T.<br />
DN9200K10PCIE8T User Guide www.dinigroup.com 112
H A R D W A R E<br />
7.1 Vendor Requests<br />
Most of the “control” functions available over USB are accomplished using a “vendor request”.<br />
Programming a USB vendor request is out of the scope of this document, but you can copy the<br />
code provided in the USB Controller program.<br />
The following table describes the USB interface presented to the host by the MCU micro<br />
controller.<br />
Vendor Request Name Code Purpose<br />
VR_CONFIG 0xaf Causes FPGAs to configure from CF card<br />
VR_CHECK_FPGA_CONFIG 0xb5 Read the “DONE” status of the FPGA<br />
VR_MEM_MAPPED 0xbe Write to a “configuration register”<br />
VR_CLEAR_FPGA 0x90 Clear (“PROGn”) an FPGA<br />
VR_SET_EP6TC 0xbb Set the size of Bulk Transfer reads (required)<br />
VR_SET_EP2TC 0xba Set the size of Bulk Transfer reads (required)<br />
VR_SETUP_CONFIG 0xb7 Put the USB Endpoint into configure mode<br />
VR_END_CONFIG 0xbd End configuration mode (required)<br />
VR_ENABLE_MSD 0xC0 Put the USB endpoint in card reader mode<br />
VR_DISABLE_MSD 0xC1 Finish card reader mode<br />
VR_DEFAULT_ENABLE_MSD 0xC2<br />
VR_DEFAULT_DISABLE_MSD 0xC3<br />
Put the USB endpoint in card reader mode<br />
Finish card reader mode (permanent)<br />
VR_FLASH_VERSION 0xb2 Read “flash” firmware version<br />
VR_SM_CD<br />
0xb8<br />
VR_BOARD_VERSION 0xb9 Read the type of board (DN9200K10PCIE8T)<br />
FLASH_VERSION_ADDR 0x08 Read “flash” firmware version again<br />
Each vendor request has a direction, request type, request, and value, size and buffer pointer<br />
fields. The request type is always TYPE_VENDOR. The request field is the ID listed in the<br />
table above. The value and data in the buffer pointer fields are vendor-request specific. The size<br />
field is the number of bytes in the buffer. The details of how to implement a vendor request are<br />
outside the scope of this manual.<br />
7.1.1 VR_CLEAR_FPGA<br />
This vendor request clears an FPGA.<br />
Direction is OUT. Size is 0. Value represents which FPGA should be cleared. 0 is FPGA A. 1 is<br />
FPGA B… and so on.<br />
DN9200K10PCIE8T User Guide www.dinigroup.com 113
H A R D W A R E<br />
7.1.2 VR_SETUP_CONFIG<br />
This vendor request must be called before sending configuration data to an FPGA. It tells the<br />
DN9200K10PCIE8T which FPGA should receive the next configuration stream sent over<br />
USB. It also clears that FPGA of its current configuration.<br />
Direction is OUT. Size is 1. In the buffer is a number representing which FPGA should be<br />
selected. 0 is FPGA A, 1 is FPGA B, 2 is FPGA C… and so on.<br />
7.1.3 VR_END_CONFIG<br />
This vendor request de-selects and FPGA (so that configuration data sent will go to no FPGA)<br />
and checks the configuration status of an FPGA.<br />
7.1.4 VR_SET_EP6TC (Read buffer size)<br />
The SetReadBufferSize vendor request must be used before any “bulk read” bulk transfer. This<br />
sets the size (in bytes) of the data that will be requested by the bulk transfer. If this vendor<br />
request is not sent before the bulk read, the behavior is undefined.<br />
The direction is OUT. The size is 0. The value is the number of bytes required for the next bulk<br />
transfer.<br />
7.1.5 VR_MEM_MAPPED (Configuration Registers)<br />
This Vendor request allows access to the “Configuration Registers” on the board. These are<br />
primarily required for configuring clocks. A full list of these is given in the “Configuration<br />
Section”<br />
To write to a configuration register, use the VR_MEMORY_MAPPED vendor request.<br />
The direction is OUT. The “value” field is the address you wish to write to (example 0xDF39,<br />
the disable Main Bus register). The size field should be 1. The buffer should contain a single<br />
byte containing the byte to be written to the Configuration Register. All configuration registers<br />
are one byte.<br />
7.2 Main Bus Accesses<br />
The only way to get user data to and from the FPGA is to use the Main Bus interface. To<br />
implement a MainBus slave on your FPGA, see the Main Bus section in the Hardware chapter.<br />
To request a Main Bus interface write transaction, the USB Controller program sends a USB<br />
bulk write to EP2 (endpoint 2). The first byte contains an op code, (0x00 or 0x01), determining<br />
whether the next 4 bytes contain an address or a datum. If this byte is a 0x00, the next 4 bytes in<br />
the bulk transfer are stored into an address register. All data transferred to and from the main<br />
bus is LSB first.<br />
DN9200K10PCIE8T User Guide www.dinigroup.com 114
H A R D W A R E<br />
Example: Set the current MainBus address to 0x18000000.<br />
Send a Bulk Transfer OUT request to endpoint 2, of length 5 bytes: 0x00, 0x00, 0x00, 0x00,<br />
0x18.<br />
Example: Write the data 0xFF00FFAA to the current MainBus address.<br />
Send a Bulk Transfer OUT request to endpoint 2, of length 5 bytes: 0x01, 0xAA, 0xFF, 0x00,<br />
0xFF.<br />
If a sequence is sent that does not start with a known op code, or the data afterwards is of an<br />
unexpected length, MainBus and/or USB will hang.<br />
After each data word is sent, the current address on MainBus automatically increments to the<br />
next address. (This behavior can be disabled).<br />
To request a main bus read operation, the USB Controller sends a USB bulk write to EP2 to set<br />
the address register, as described in the above paragraph. Then, the USB Controller sends a bulk<br />
read to EP6 (endpoint 6), with the USB bulk request SIZE field set to the number of bytes<br />
requested. The number of bytes requested must be divisible by 4. After the bulk read is<br />
complete, the address register is incremented by SIZE ÷ 4.<br />
Before starting a USB read using a bulk transfer, you must tell the DN9200K10PCIE8T how<br />
many bytes are going to be read by using the VR_SET_EP6TC (0xBB) vendor request<br />
described in the Vendor Requests section.<br />
Example: Read one MainBus DWORD from address 0x18000004.<br />
Send a Bulk Transfer OUT request to endpoint 2, of length 5 bytes: 0x00, 0x04, 0x00, 0x00,<br />
0x18.<br />
Send a Vendor Request of type VR_SET_EP6TC with value of 4.<br />
Send a Bulk Transfer IN request to endpoint 2 of size 4.<br />
Notice that using the above methods; the write bandwidth is limited by the overhead of<br />
interleaving op-codes and data. A method of writing to Main Bus with a smaller overhead is the<br />
op code 0x03. Using this op code, the 4 bytes following the op code give a number of<br />
DWORDs that will follow, which are all data that should be written to consecutive MainBus<br />
addresses. This data must be of a length divisible by 4.<br />
Example: Write the data pattern 0xFFFFFFFF, 0x00000000 to MainBus address 0x18220016.<br />
Send a Bulk Transfer OUT request to endpoint 2 containing the data sequence:<br />
0x00,0x16,0x00,0x22,0x18,0x03,0xFF,0xFF,0xFF,0xFF,0x00,0x00,0x00,0x00<br />
7.2.1 Note about Endpoint Terminology<br />
In USB an endpoint is either read or write. It is either for Vendor Requests, or for Bulk<br />
Transfers<br />
2 – Host-to-board (Main Bus, FPGA Configuration, Prom JTAG)<br />
4 – Host-to-board (Mass Storage mode)<br />
DN9200K10PCIE8T User Guide www.dinigroup.com 115
H A R D W A R E<br />
6 – Board-to-host (Main Bus, Readback, Prom JTAG)<br />
8 – Board-to-host (Mass Storage mode)<br />
In the Windows USB model, there are “Pipes” that can be used for bulk transfers. Which pipe<br />
connects to which endpoint is determined dynamically by the Windows driver subsystem. Since<br />
some of the endpoints on the Dini Board can be enabled or disabled, the correct windows<br />
“pipe” to use for a given function can change. Therefore, the user should iterate through the<br />
available pipes and check their endpoint numbers.<br />
In the Linux USB model (either usbdevfs or usblib), endpoints are colloquially numbered by the<br />
endpoint number byte in a USB packet, where the MSB describes the direction of the endpoint.<br />
Therefore in Linux code, the endpoints may be numbered 0x02, 0x84, 0x06 and 0x88.<br />
Endpoint 0 is a control (vendor request only) endpoint and the driver will automatically specify<br />
endpoint 0 when the vendor request function is called. Users can pretend it does not exist.<br />
7.2.2 Performance<br />
Main Bus over USB runs at a maximum speed of 80 Mbs in either direction. This number<br />
assumes that the FPGA operates the Main Bus interface with zero wait cycles. If the FPGA<br />
design has more wait cycles, this speeds decreases. The approximate speed of Main Bus over<br />
USB is given below as a function of Main Bus wait states.<br />
0 cycles 80Mbs read<br />
1 cycle 76Mbs read<br />
5 cycles 64Mbs read<br />
30 cycles 32Mbs read<br />
100 cycles 13Mbs read<br />
250 cycles 6Mbs read<br />
Also, each USB operation requires about 0.5 ms of latency. So for small Bulk Transfers,<br />
bandwidth will be limited. The code provided with the board is not as efficient is possible. For<br />
each Main Bus read, for example, it might write a Vendor Request to enable USB, one Bulk<br />
Transfer to set the Main Bus address, one Vendor Request to set the endpoint read size to 4,<br />
and one Bulk Transfer to read the data.<br />
Here are ways performance can be improved:<br />
- Keep track of the current read size in the host software.<br />
- Keep track of the current MainBus address in the host software.<br />
- Make MainBus registers consecutive so that reads and writes don‟t require changing the<br />
address<br />
- Always pack consecutive writes and address changes into one Bulk Transfer<br />
- Always keep reads the same size<br />
7.3 FPGA Configuration Mode<br />
Instructions for programming FPGAs over USB can be found under “Configuration Section”<br />
DN9200K10PCIE8T User Guide www.dinigroup.com 116
H A R D W A R E<br />
7.4 Mass Storage Device Mode<br />
When a certain vendor request is made, the MainBus endpoint is replaced by the CompactFlash<br />
card slot on the board, which will appear to the computer as a Mass Storage Device. From<br />
Windows, or another operating system, you can read and write files to the CompactFlash card.<br />
While you are in this mode, Main Bus cannot be used over USB.<br />
7.5 Firmware Update Mode<br />
When a certain vendor request is made, the Main Bus endpoint is put in Firmware Update<br />
mode. The interface in this mode is not described here. It‟s purpose is to allow firmware updates<br />
for customers that do not have a JTAG cable. However you probably do have this cable<br />
because it‟s very useful.<br />
7.5.1 Activity LED<br />
A yellow LED located next to the USB connector flickers when there is USB activity.<br />
7.6 Hardware<br />
The USB hardware implementation is not documented, but I‟m sure you can figure it out from<br />
the schematic.<br />
- USB is Hot-Swappable<br />
- DN9200K10PCIE8T does not draw power from USB<br />
7.6.1.1 Cypress CY7C68013A<br />
The Physical USB interface is provided by a Microcontroller. You do not need to know<br />
anything about it. The code is provided if you care.<br />
The source code for the MCU firmware (“Flash”) is provided in<br />
D:\Config_Section_Code\MCU<br />
as a Keil Studios MicroVision 2.11 project file.<br />
7.7 Troubleshooting<br />
If you cannot get USB to communicate with your design over Main Bus, please try using the<br />
USB Controller software with your design, and using the Dini Group reference design with your<br />
software. This will help determine whether the software or the hardware is causing the error.<br />
If USB appears to not work at all, try connecting to a Windows computer, and checking if the<br />
device shows up in the Device Manager. If so, then the Hardware is working correctly and there<br />
is a driver or software problem. If not, there is a hardware problem. (Board stuck in reset? Bad<br />
firmware update?)<br />
7.7.1 USB Controller Freezes<br />
The Vendor requests on the DN9200K10PCIE8T are blocking. Only one can be completed at<br />
a time. This includes vendor requests that take a very long time like “Configure from<br />
DN9200K10PCIE8T User Guide www.dinigroup.com 117
H A R D W A R E<br />
CompactFlash” (10 seconds). During this time USB Controller, a single-threaded application,<br />
freezes when any Vendor Request is issued. (All the time). If a process fails, USB Controller will<br />
hang forever. You can unplug USB or turn off the board, and USB Controller will work again.<br />
The normal way to avoid problems like this is to create a separate hardware-IO thread.<br />
8 FPGA Q Resources<br />
8.1 FPGA A Interconnect<br />
The interconnect between FPGA A and FPGA Q is single-ended only. However it is also<br />
completely length-matched, with an additive delay of 1.12ns. The clocks PCIE_PCLKA and<br />
PCIE_PCLKQ are also matched to this length, making the interface perfect for a sourcesynchronous<br />
interface with no per-bit alignment required. The maximum frequency achievable<br />
using this method is about 300 MHz<br />
8.2 Unusable IO<br />
FPGA Q has some IO pins that are connected directly to ground. These pins are AA5, AB5,<br />
AF4, AF3, A3, B4, B5, D5, E5. It is recommended that you drive these pins with a constant low<br />
value, and assign a high drive-strength driver to the IO type. These pins are intended to help<br />
shield the sensitive RocketIO power supply pins from IO switching noise.<br />
8.3 RocketIO (“MGT”, “GTP”, “GTX”)<br />
All 8 of the available serial channels on this board are used for PCI Express. They cannot be<br />
used for anything else unless you plug into some sort of adapter card. If you really want, we can<br />
provide this for you. It might look like this:<br />
Figure 63 - PCI SIG Compliance Base Board<br />
You may notice that the FX70T actually has 12 GTX and not 8 like I say. Trust me, these<br />
cannot be used because in the small package, the extra 4 GTX channels do not connect to pins<br />
on the package.<br />
DN9200K10PCIE8T User Guide www.dinigroup.com 118
H A R D W A R E<br />
8.4 SPI Flash<br />
8.5 LEDs<br />
+3.3V<br />
YELLOW<br />
RED<br />
GREEN<br />
GREEN<br />
GREEN<br />
LEDQ_YELLOW_ACT<br />
LEDQ_RED_LOS<br />
LEDQ_GREEN_LINK<br />
LEDQ_GREEN_4LINK<br />
LEDQ_GREEN_8LINK<br />
W11<br />
Y10<br />
Y20<br />
AA19<br />
AA10<br />
Y11<br />
AA18<br />
Y18<br />
Y12<br />
AA12<br />
AA17<br />
Y17<br />
AA13<br />
AA14<br />
Y16<br />
W16<br />
Y13<br />
W14<br />
Y15<br />
AA15<br />
AA16<br />
AD17<br />
U3-2 VIRTEX5_FF665<br />
IO_L0P_CC_RS1_2<br />
IO_L0N_CC_RS0_2<br />
IO_L1P_CC_A25_2<br />
IO_L1N_CC_A24_2<br />
IO_L2P_A23_2<br />
IO_L2N_A22_2<br />
IO_L3P_A21_2<br />
IO_L3N_A20_2<br />
IO_L4P_FCS_B_2<br />
IO_L4N_VREF_FOE_B_MOSI_2<br />
IO_L5P_FWE_B_2<br />
IO_L5N_CSO_B_2<br />
IO_L6P_D7_2<br />
IO_L6N_D6_2<br />
IO_L7P_D5_2<br />
IO_L7N_D4_2<br />
IO_L8P_D3_2<br />
IO_L8N_D2_FS2_2<br />
IO_L9P_D1_FS1_2<br />
IO_L9N_D0_FS0_2<br />
VCCO_2<br />
VCCO_2<br />
+2.5V<br />
LEDQ_YELLOW_DBUGr0<br />
LEDQ_YELLOW_DBUGr2<br />
LEDQ_YELLOW_DBUGr1<br />
LEDQ_YELLOW_DBUGr3_GEN2<br />
YELLOW<br />
YELLOW<br />
YELLOW<br />
YELLOW<br />
G15<br />
G16<br />
H13<br />
G14<br />
G17<br />
F17<br />
F15<br />
F14<br />
F18<br />
G19<br />
F13<br />
G12<br />
H18<br />
H19<br />
G11<br />
H11<br />
G20<br />
H21<br />
G10<br />
H9<br />
E14<br />
B13<br />
U3-1 VIRTEX5_FF665<br />
IO_L0P_A19_1<br />
IO_L0N_A18_1<br />
IO_L1P_A17_1<br />
IO_L1N_A16_1<br />
IO_L2P_A15_D31_1<br />
IO_L2N_A14_D30_1<br />
IO_L3P_A13_D29_1<br />
IO_L3N_A12_D28_1<br />
IO_L4P_A11_D27_1<br />
IO_L4N_VREF_A10_D26_1<br />
IO_L5P_A9_D25_1<br />
IO_L5N_A8_D24_1<br />
IO_L6P_A7_D23_1<br />
IO_L6N_A6_D22_1<br />
IO_L7P_A5_D21_1<br />
IO_L7N_A4_D20_1<br />
IO_L8P_CC_A3_D19_1<br />
IO_L8N_CC_A2_D18_1<br />
IO_L9P_CC_A1_D17_1<br />
IO_L9N_CC_A0_D16_1<br />
VCCO_1<br />
VCCO_1<br />
Figure 64 - FPGA Q LEDs<br />
8.6 RS232<br />
8.7 Synthesizer<br />
9 PCI Express Interface<br />
The DN9200K10PCIE8T can be installed in a PCIe slot. 16x or 8x slots are acceptable. The<br />
board will work in a 1x, 2x, or 4x slot, if you can physically manage to install them there (using<br />
an adapter such as the ones available from Catalyst enterprises).<br />
DN9200K10PCIE8T User Guide www.dinigroup.com 119
H A R D W A R E<br />
The board can support 2.5Gb PCI Express 1.1-compliant signaling, or “Gen2” PCI Express 2.0<br />
compliant signaling at 5.0 Gbs.<br />
PCI Express interface is provided by FPGA Q, a Xilinx Virtex-5 LXT or FXT FPGA. For Gen<br />
2 speeds, FX70T part is required.<br />
Figure 65 - PCI Express block diagram<br />
Normally, a user will place his PCI Express endpoint IP in FPGA Q, and his high-density logic<br />
in FPGA A. A large amount of interconnect is provided between FPGA A and Q to easily keep<br />
up with a full-speed, 8-lane PCI Express endpoint.<br />
The user can provide his own PCI Express IP, he can use the Xilinx PCI Express endpoint hard<br />
macro, or he can use the free, provided “full function PCI Express endpoint now with<br />
DMA” core.<br />
DN9200K10PCIE8T User Guide www.dinigroup.com 120
H A R D W A R E<br />
9.1 Host Interface, Electrical<br />
The PCI Express signals from the host computer are connected directly to the LXT RocketIO<br />
IOs. As required by PCI express standard, the transmit signals (from the FPGA) are passed<br />
through ac-coupling capacitors. For fun, the receive signals (from the host) are also passed<br />
through ac-coupling capacitors.<br />
The RocketIO requires a reference clock frequency to operate. On boards with an LX50T, this<br />
clock is provided on the MGTREFCLKP_112 pin at 100 MHz. As required by Xilinx, this<br />
frequency is identical to the frequency supplied by the host connector on the PCI Express<br />
REFCLK signal. On boards with an FX70T, the clock frequency is instead 250 MHz, exactly<br />
2.5 times the frequency of the REFCLK signal provided by the host connector.<br />
When creating a core using the Xilinx PCI Express core generator, you must tell the wizard<br />
program the frequency of this clock, and to which pins it connects.<br />
There is also a Synthesizer that can generate 100 or 250 MHz for use with RocketIO. This<br />
synthesizer is described in another section. Xilinx does not recommend synthesizing a reference<br />
clock frequency for use with PCI Express because it is not a supported use model.<br />
PCIE_PERp0r<br />
0.1uF PCIE_PERp0<br />
PCIE_PERn0r<br />
PCIE_PETp0r<br />
0.1uF<br />
1uF<br />
PCIE_PERn0<br />
PCIE_PETp0<br />
PCIE_PETn0r<br />
PCIE_PERp1r<br />
1uF<br />
0.1uF<br />
PCIE_PETn0<br />
PCIE_PERp1<br />
PCIE_PERn1r<br />
0.1uF PCIE_PERn1<br />
PCIE_PETp1r<br />
1uF PCIE_PETp1<br />
PCIE_PETn1r<br />
1uF PCIE_PETn1<br />
PCIE_PERp2r<br />
0.1uF PCIE_PERp2<br />
PCIE_PERn2r<br />
PCIE_PETp2r<br />
0.1uF<br />
1uF<br />
PCIE_PERn2<br />
PCIE_PETp2<br />
PCIE_PETn2r<br />
1uF PCIE_PETn2<br />
PCIE_PERp3r<br />
0.1uF PCIE_PERp3<br />
PCIE_PERn3r<br />
0.1uF PCIE_PERn3<br />
PCIE_PETp3r<br />
1uF PCIE_PETp3<br />
PCIE_PETn3r<br />
1uF PCIE_PETn3<br />
PCIE_PERp4r<br />
PCIE_PERn4r<br />
PCIE_PETp4r<br />
0.1uF<br />
0.1uF<br />
1uF<br />
PCIE_PERp4<br />
PCIE_PERn4<br />
PCIE_PETp4<br />
PCIE_PETn4r<br />
1uF PCIE_PETn4<br />
PCIE_PERp5r<br />
0.1uF PCIE_PERp5<br />
PCIE_PERn5r<br />
0.1uF PCIE_PERn5<br />
PCIE_PETp5r<br />
1uF PCIE_PETp5<br />
PCIE_PETn5r<br />
1uF PCIE_PETn5<br />
PCIE_PERp6r<br />
0.1uF PCIE_PERp6<br />
PCIE_PERn6r<br />
0.1uF PCIE_PERn6<br />
PCIE_PETp6r<br />
1uF PCIE_PETp6<br />
PCIE_PETn6r<br />
1uF PCIE_PETn6<br />
PCIE_PERp7r<br />
0.1uF PCIE_PERp7<br />
PCIE_PERn7r<br />
0.1uF PCIE_PERn7<br />
PCIE_PETp7r<br />
1uF PCIE_PETp7<br />
PCIE_PETn7r<br />
1uF PCIE_PETn7<br />
Figure 66 - PCI Express circuit<br />
B2<br />
C2<br />
C1<br />
D1<br />
G2<br />
F2<br />
F1<br />
E1<br />
H2<br />
J2<br />
J1<br />
K1<br />
N2<br />
M2<br />
M1<br />
L1<br />
P2<br />
R2<br />
R1<br />
T1<br />
W2<br />
V2<br />
V1<br />
U1<br />
Y2<br />
AA2<br />
AA1<br />
AB1<br />
AE2<br />
AD2<br />
AD1<br />
AC1<br />
U3-6<br />
MGTTXP0_116<br />
MGTTXN0_116<br />
MGTRXP0_116<br />
MGTRXN0_116<br />
GTP_DUAL_X0Y4<br />
MGTTXP1_116<br />
MGTTXN1_116<br />
MGTRXP1_116<br />
MGTRXN1_116<br />
MGTTXP0_112<br />
MGTTXN0_112<br />
MGTRXP0_112<br />
MGTRXN0_112<br />
GTP_DUAL_X0Y3<br />
MGTTXP1_112<br />
MGTTXN1_112<br />
MGTRXP1_112<br />
MGTRXN1_112<br />
MGTTXP0_114<br />
MGTTXN0_114<br />
MGTRXP0_114<br />
MGTRXN0_114<br />
GTP_DUAL_X0Y2<br />
MGTTXP1_114<br />
MGTTXN1_114<br />
MGTRXP1_114<br />
MGTRXN1_114<br />
MGTTXP0_118<br />
MGTTXN0_118<br />
MGTRXP0_118<br />
MGTRXN0_118<br />
GTP_DUAL_X0Y1<br />
MGTTXP1_118<br />
MGTTXN1_118<br />
MGTRXP1_118<br />
MGTRXN1_118<br />
VIRTEX5_FF665<br />
MGTREFCLKP_116<br />
MGTREFCLKN_116<br />
MGTREFCLKP_112<br />
MGTREFCLKN_112<br />
MGTREFCLKP_114<br />
MGTREFCLKN_114<br />
MGTREFCLKP_118<br />
MGTREFCLKN_118<br />
D4<br />
D3<br />
K4<br />
K3<br />
T4<br />
T3<br />
AB4<br />
AB3<br />
PCIE_REFCLK_P<br />
PCIE_REFCLK_M<br />
CLK_GTP_250_LOW_JITTp<br />
CLK_GTP_250_LOW_JITTn<br />
CLK_GTP_SYNTHp<br />
CLK_GTP_SYNTHn<br />
CLK_GTP_118p<br />
CLK_GTP_118n<br />
FROM<br />
FINGERS<br />
250Mhz From<br />
low-jitter<br />
source<br />
Any<br />
Frequency<br />
from<br />
low-jitter<br />
source<br />
Test point<br />
for<br />
external<br />
clock<br />
The order of the lanes is as shown above. Oh, also none of the lanes have inverted polarity, and<br />
you are required to support that if you are writing your own PCI Express endpoint.<br />
We can run the PCI SIG electrical compliance test for you if you want.<br />
DN9200K10PCIE8T User Guide www.dinigroup.com 121
H A R D W A R E<br />
Figure 67 - PCI Express eye diagram<br />
Here is the board installed with an FX70T passing the PCI Express electrical compliance test.<br />
9.1.1 Power<br />
The DN9200K10PCIE8T current capacity greatly exceeds the maximum allowed power<br />
requirements for a PCIe card (35W). As a result, the external power cable is required for<br />
operation, regardless of whether the board is installed into a PCI Express slot. The only voltage<br />
that is required for operation is 12V. All other voltages used on the board are regulated from<br />
this source.<br />
The DN9200K10PCIE8T is designed to operate in hot-plug environments; however, most<br />
motherboards are not hot-plug capable. (They do not shut off 12V and 3.3V power signals<br />
when physical connections are lost). Therefore, a hot plug extender will be required for hot plug.<br />
Additionally we don‟t know how the provided “full function PCI Express endpoint now with<br />
DMA” will behave, or how the Xilinx PCI Express endpoint hard macro will behave.<br />
9.1.2 PCI-X<br />
We assume you know the difference between PCIX and PCI Express. This board is designed to<br />
burst into flames when installed in a PCIX slot.<br />
9.2 Host Interface, Mechanical<br />
The form factor of the DN9200K10PCIE8T exceeds the allowable form factor for PCI<br />
Express in the vertical direction. This means that you will likely have to design the case for your<br />
system around the DN9200K10PCIE8T. Additionally, many “ATX” type computer cases do<br />
not fit the DN9200K10PCIE8T in the horizontal direction. If you are married to your<br />
computer case and motherboard, you can get one of these:<br />
http://www.adexelec.com/pciexp.htm#PEX8LX<br />
DN9200K10PCIE8T User Guide www.dinigroup.com 122
H A R D W A R E<br />
Otherwise, just get a case that fits the board.<br />
9.3 Provided “Full-Function PCI Express endpoint”<br />
Unless you need to prototype and test PCI Express logic, we recommend that you just use our<br />
provided PCI Express endpoint bit file. The provided bit file contains a high-speed<br />
implementation of the Xilinx PCI Express hard macro, adds a high-speed DMA engine, FPGAinitiated<br />
posting, implements high-speed IO between FPGAs A and Q at any frequency, allows<br />
PCI Express control of board functions such as configuration and clock settings, and comes<br />
with a working Windows and Linux driver. It will save you an approximate man month of work<br />
and writing and fully testing a custom implementation of a PCI Express Endpoint.<br />
Figure 68 - Full function design block diagram<br />
Access to FPGA A is through an allocation of memory space in the BAR regions of BAR2, 3, 4<br />
and 5.<br />
BAR0 is used for control of the DMA engine, for MainBus accesses to all FPGAs, and for<br />
board control and FPGA configuration.<br />
Two DMA channels allow communication to FPGA using the full PCI Express bus bandwidth.<br />
The best resource for using this endpoint (both from a host software and FPGA<br />
implementation standpoint) is the document provided at<br />
FPGA_Reference_Designs\common\PCIE_x8_Interface\pcie8t_user_interface_manual.pdf<br />
The BAR resources available are given below. These cannot be changed through any settings<br />
made available to the user.<br />
DN9200K10PCIE8T User Guide www.dinigroup.com 123
H A R D W A R E<br />
Bar0: 0x0-0x1ff: PCI-E FPGA registers, rest is Configuration FPGA registers (8MB)<br />
Bar1: 32-bit BAR, for User FPGA (8 MB)<br />
Bar2-3: 64 bit BAR, for User FPGA (32MB)<br />
Bar4-5: 64 bit BAR, for User FPGA (32MB)<br />
By default, prefetch is turned off on 32-bit BARs<br />
It may be on for the 64-bit bars.<br />
The back end (FPGA A) interface is fixed at 64-bit.<br />
In a 32-bit addressing machine, it will appear as if BAR2 is configured as a 32-bit bar and BAR3<br />
will not be implemented. BAR4 will appear as a 32-bit bar, and BAR5 will not be implemented.<br />
9.3.1 BAR 0 Access<br />
The “Bar 0” accesses are reserved for board settings, FPGAs configuration and “Main Bus”<br />
communication. User-mode programs can access these registers to control the board from the<br />
PCI Host. Some of the useful offsets are given below:<br />
Byte Size Name Description<br />
0x000 31:0 Version Contains a version code for the firmware of LXT device (Read only)<br />
0x008 31:0 ID Always returns 0x4675_6C6C for “full function” design (Read only)<br />
0x020 31:0 DMA0 Lower 32 bit byte address of physical address where the DMA0<br />
Base Address descriptor chain starts. This address must have the lower bytes<br />
cleared to match the DMA0 Address Mask register.<br />
0x024 31:0 DMA0 Upper 32 bits of Base Address [63:0], to form a 64 bit address.<br />
Base Address Set to 0 if using 32 bit addressing.<br />
0x02C 31:0 DMA0 Control<br />
0x030 31:0 DMA0 Poll Immediate<br />
0x040 31:0<br />
0x04C 31:0<br />
0x050 31:0<br />
DMA1<br />
Base Address<br />
DMA1 Control<br />
DMA1 Poll Immediate<br />
0x98 357 Scratch Pad Read/Write space for user having fun and exercise<br />
Bytes<br />
imaginations<br />
0x208 6:0 Config Control Selects and FPGA and returns the value of these FPGA‟s<br />
PROG, INIT and DONE signals.<br />
0x210 31:0 Config Data Sends the given configuration word to the selected FPGA<br />
0x238 FPGA Stuffing<br />
0x240 Main Bus ADDR<br />
0x248 MainBus Write<br />
DN9200K10PCIE8T User Guide www.dinigroup.com 124
H A R D W A R E<br />
0x250<br />
0x258<br />
MainBus Read<br />
“Config Space” Write<br />
9.3.2 BAR 1-5 Access<br />
PCI Express reads and writes in the BAR1 – BAR5 memory space result in communication to<br />
FPGA A over the PCIE_IN* and PCIE_OUT* signals on FPGA A. This should be used in<br />
conjunction with the provided PCIe_interface module in FPGA A.<br />
See source code here:<br />
D:\FPGA_Reference_Designs\common\PCIE_x8_Interface<br />
9.3.3 DMA Channels 0 and 1<br />
There are two independent DMA controllers that are capable of descriptor chaining in the fullfunction<br />
endpoint. The register interface is described on the user CD in the documents at<br />
D:\FPGA_Reference_Designs\common\PCIE_x8_Interface<br />
It is best that you read the details there. Most users will not need to understand the control of<br />
DMA because the driver source code and binary in Windows and Linux is provided and works.<br />
There are two software interfaces to DMA.<br />
9.3.3.1 Scatter/Gather<br />
The DMA controller is capable of fetching descriptors from the host memory, allowing the<br />
DMA engine to follow scatter/gather chains.<br />
The driver hooks for this weren‟t written yet when I wrote this. You might have to call for an<br />
update.<br />
9.3.3.2 Large Buffers<br />
In large buffers mode, the segment list is fixed and points to a ring of buffers in pre-allocated,<br />
locked driver memory space. The user has unsynchronized access functions that allow copying<br />
to and from these fixed buffers. The DMA engines loop around the fixed buffers constantly<br />
completing the DMA on the buffers. The user has access to controls that turn on and off the<br />
DMA when not in use.<br />
Example use of this code is provided in the AETEST program in the file pcie_functions.cpp<br />
9.3.4 DMA Posted Mode<br />
Posted mode allows the FPGA A to initiate DMA transactions to and from the host memory<br />
space. This mode is possible using the Dini Group full-function DMA endpoint, but is not<br />
enabled in the user interface module due to lack of interest. Contact us to get access to posted<br />
mode.<br />
DN9200K10PCIE8T User Guide www.dinigroup.com 125
H A R D W A R E<br />
9.3.5 DMA Main Bus<br />
Main Bus is already pretty fast (100MB/s), however, if you really more over main bus then we<br />
can tell you how to do DMA on Main Bus. You might have to deal with synchronization issues<br />
on your own (read/write ordering).<br />
9.3.6 Electrical<br />
The electrical input and output characteristics are based on the PCI Express revision 1.1 and 2.0<br />
requirements. The transmitted signal is slightly higher amplitude than that allowed by the<br />
specification in order to allow more flexible connection options (cabling or adapters) without<br />
compromising reliability. In addition, Pre-emphasis in the transceivers is set to ultra, which is not<br />
optimal, but will improve reliability in crappy systems.<br />
If you need to pass PCI Express compliance electrical test with your board, please request the<br />
PCI Express compliance bit files from support. They are identical in function, but will pass<br />
compliance tests.<br />
9.3.7 Timing<br />
The provided module for FPGA A takes care of the external interface timing, so you can<br />
probably skip this section.<br />
When using the full-function PCI Express endpoint, a source-synchronous communication<br />
technique is used between FPGA A and FPGA Q. Since the FPGAs both have zero-hold-time<br />
inputs, the optimal phase alignment between clock and data is when they are perfectly in phase.<br />
Therefore, the clock for FPGA A (PCIE_PCLK_A) is driven from the IOs of FPGA Q in the<br />
exact same manner as the IOs, and the clock for FPGA Q (PCIE_PCLK_Q) is driven from<br />
FPGA A in the exact same manner as the IOs. On the board, the data and clock lines are all<br />
phase-matched.<br />
DN9200K10PCIE8T User Guide www.dinigroup.com 126
H A R D W A R E<br />
Figure 69 - FPGA A to Q clocking diagram<br />
Driving clocks from IOs is best accomplished using a ODDR flip-flop. If you don‟t know what<br />
I am talking about, there is a description of exactly what to do elsewhere in this manual.<br />
9.3.8 FPGA Interface<br />
A Verilog module is provided that correctly implements the interface between the FPGA and<br />
the FPGA Q for PCI Express communication. The source for this module is provided on the<br />
user CD in the following location.<br />
D:\FPGA_Reference_Designs\common\PCIE_x8_Interface\<br />
A module, contained in the provided source file pcie_x8_user_interface.v, is an implementation<br />
of the interface that must be included in the FPGA A user design.<br />
The user (“FPGA”) interface presents 6 separate interface ports: Target Write, Target Read,<br />
DMA R0, DMA R1, DMA T0, and DMA T1. The Target Write and Target Read interfaces<br />
share BAR and address lines, as target reads and writes cannot happen simultaneously. Each<br />
interface has its own "enable", "accept", and "data" ports. Read interfaces also have a<br />
"data_valid" port. The "enable" signals are held active until the associated "accept" signal goes<br />
active. The "accept" signal for an interface may be tied high if it is guaranteed that transfers for<br />
that interface can be accepted every clock cycle (i.e. if the interface is connected to a block<br />
RAM). "Data_valid" can be pulsed with the "accept" signal, or any time after- this allows reads<br />
to be pipelined.<br />
For the purposes of simulation, a model of low synthesizability of the LXT is provided.<br />
DN9200K10PCIE8T User Guide www.dinigroup.com 127
H A R D W A R E<br />
9.3.8.1 LEDs<br />
Six LEDs are controlled by the PCI Express FPGA:<br />
Activity, Link1, Link4, Link8, and PERSTn, GEN2, and LOS<br />
PERSTn directly shows the state of the PCI Express reset signal from the host. This is typically<br />
only during power-on. Activity is generated by the PCI Express FPGA whenever a packet is<br />
received. This signal on certain Intel-based hosts may blink constantly because of some<br />
mysterious configuration register read that gets generated all the time.<br />
The Link1 LED will only be active when the PCI Express LED is communicating without error<br />
to a link partner, with a 1x negotiated lane width.<br />
The Link4 LED will only be active when the PCI Express LED is communicating without error<br />
to a link partner, with a 4x negotiated lane width.<br />
The Link8 LED will only be active when the PCI Express LED is communicating without error<br />
to a link partner, with a 8x negotiated lane width.<br />
When the PCI Express LED has negotiated a 2x link, both Link 1 and Link8 will light. How did<br />
you manage to link in 2x mode? Send your interesting anecdotes to support@dinigroup.com<br />
The LOS LED will light when there is no receiver detected on lane 0, or when some other thing<br />
isn‟t working.<br />
Gen 2 will light if the design has linked at 5.0 Gbs.<br />
9.3.8.2 FPGA-initiated DMA<br />
The DMA controller is capable of issuing PCI Express transactions initiated from the FPGA A.<br />
This function is tested, but the interface is not documented. Contact us.<br />
9.3.9 Host Interface, Software<br />
Example software capable of configuring FPGAs, communicating over MainBus and DMA<br />
transfers to FPGA A is provided (AETest). You may wish to copy this code and use it as a<br />
starting point.<br />
To communicate with the DN9200K10PCIE8T, you will need to find the device on the PCIe<br />
Bus with VendorID=17DF and DeviceID=1900. The device will register itself with the<br />
operating system as "Dini Group ASIC Emulator with Virtex 5 PCI Express" (OS dependant).<br />
Note that many Dini Group products use this vendor and device ID, so differentiating between<br />
boards requires you to read at a minimum, the board type register and the board serial number<br />
register.<br />
9.3.9.1 Driver<br />
The source code for the DN9200K10PCIE8T‟s PCIe driver is provided.<br />
DN9200K10PCIE8T User Guide www.dinigroup.com 128
H A R D W A R E<br />
Windows XP/Vista<br />
Binaries for 32-bit windows, 64-bit windows (Itanium) and 64-bit windows (AMD/Pentium) are<br />
provided as a binary. Use the windows hardware manager to install these drivers. Source is<br />
provided, but shouldn't be required by most of you.<br />
Linux<br />
Source is provided for the linux driver. Compilation is probably required. (Provided binaries are<br />
unlikely to work). Also, source is only tested with the latest version of Linux, and may not be<br />
compatible with older version. To compile you will need the kernel source module installed on<br />
your computer. The executable created by the source is a kernel module which is loaded<br />
dynamically. A kernel module load script is provided.<br />
DOS<br />
Under DOS, only direct device access is supported. The DOS version of AETest program does<br />
not use a driver. You therefore need to figure out how to configure and access a device on the<br />
PCI subsystem. DMA is not supported.<br />
Solaris<br />
The Solaris driver does not support DMA.<br />
9.3.9.2 Configuration Register writes<br />
Board settings (clocks, FPGA temperatures, etc.) can be changed over PCIe by accessing the<br />
“Configuration Register” interface. A description of the registers in this interface is in the<br />
Configuration Section of this chapter.<br />
Writes<br />
To write to a configuration register, write to BAR0, offset 0x258. Send a 32-bit word of data.<br />
This data is encoded as follows<br />
Bits 31-16: “Configuration Register” address in (only addresses 0xDF00-0xDFFF are valid. See<br />
the “Configuration Register” map in the “Configuration Section” section)<br />
Bits 15-8: Ignored<br />
Bits 7-0: The Data value to write to the register<br />
Reads<br />
To read from a configuration register, read one byte from PCIe at an address within Bar0,<br />
encoded as follows:<br />
Bits 31-24: The DN9200K10PCIE8T‟s BAR0<br />
DN9200K10PCIE8T User Guide www.dinigroup.com 129
H A R D W A R E<br />
Bits 23-16: the lower 8 bits of the address of the configuration register you would like to read<br />
(The upper 8 bits must be 0xDF, or the read will not be valid)<br />
Bits 15-0: 0x0260<br />
9.3.9.3 Main Bus<br />
The Main Bus interface is how you can communicate to all FPGAs on the<br />
DN9200K10PCIE8T over PCIe (not just FPGA A). The bandwidth available over the Main<br />
Bus is much lower than that of PCIe, so performance is not as great using this method. For<br />
details about the Main Bus, see the Main Bus section in this chapter. Expected speeds will be 30<br />
to 80 MB/sec.<br />
To write to Main Bus over PCIe, write to BAR0 at the address QLPCI_REG_MBADDR with<br />
the 32-bit value representing the main bus address you would like to write to. Then, write a<br />
second PCIe write to address QLPCI_REG_MBWRDATA with 32-bit data representing the<br />
data that you would like to write to main bus. After the Spartan 3 has received a write to both<br />
the MBADDR and MBWRDATA registers, it will write to the main bus interface.<br />
To read from the Main Bus over PCIe, first write to BAR0 address QLPCI_REG_MBADDR<br />
with the 32-bit value representing the main bus address you would like to read from. Then, read<br />
from BAR0, QLPCI_REG_MBRDDATA. The returned value will be the value read off the<br />
main bus at the selected address. When an error has occurred (No FPGA responded to the read<br />
request) the read will return the value 0xBBBBBBBB. If all you get is 0x1234567 this means the<br />
main bus is being used by USB at the moment.<br />
QLPCI_REG_MBADDR<br />
QLPCI_REG_MBCTRL<br />
QLPCI_REG_MBWRDATA<br />
QLPCI_REG_MBRDDATA<br />
0x240<br />
0x270<br />
0x248<br />
0x250<br />
9.3.9.4 FPGA Configuration<br />
The sequence required to configure FPGAs over PCI Express is given in the Configuration<br />
Section.<br />
9.3.9.5 Direct PCIe to FPGA, DMA<br />
Detail about the software required by the host of the DN9200K10PCIE8T can be found in<br />
D:\ FPGA_Reference_Designs\common\PCIE_x8_Interface\pcie8t_user_interface_manual.pdf<br />
This document should be used to design software to access the user design in FPGA A. DMA<br />
in particular requires accessing the either LX50T registers (in BAR0) to setup each transaction.<br />
Using the device driver provided use the dma_scatter_gather_read() and<br />
dma_scatter_gather_write() functions.<br />
DN9200K10PCIE8T User Guide www.dinigroup.com 130
H A R D W A R E<br />
Performance has been characterized using the DN9200K10PCIE8T reference design on<br />
Windows XP on a MSI MS6728 motherboard using the AETest application. The speeds are:<br />
Read (DN9200K10PCIE8T to software): I have not yet performed this test.<br />
Write (software to DN9200K10PCIE8T): I have not yet performed this test.<br />
9.3.9.6 Direct PCIe to FPGA A, Target access<br />
If DMA is not required, accessing FPGA A from the host software is super simple. Simply read<br />
or write to an address in BAR 1,2,3,4 or 5. In Linux this can be performed by mapping a page of<br />
memory in a user mode program to the physical address of a DN9200K10PCIE8T bar. In<br />
Windows driver, an IOCTL code is provided that will read and write individual bytes to the<br />
DN9200K10PCIE8T bar address range, or a block or memory.<br />
9.3.9.7 Performance<br />
Using the provided “Full function PCI Express endpoint now with DMA” the following<br />
speed measurements were taken:<br />
DMA from host to FPGA 1<br />
DMA from FPGA to host 1<br />
Target access from host to FPGA 2<br />
Target access from FPGA to host 2<br />
Main Bus to FPGA from host 3<br />
Main Bus from FPGA to host 3<br />
510 MB/s<br />
350 MB/s<br />
66 MB/s<br />
4 MB/s<br />
11 MB/s<br />
2.4 MB/s<br />
Note 1: Using the “large buffers” DMA method in the driver. This method eliminates driver overhead.<br />
Note 2: This speed can be increased by 2x using double-double word writes.<br />
Note 3: This speed can be increased to the Target access speed in FIFO mode.<br />
9.3.9.8 64-bit addressing<br />
64-bit addressing has no effect on operation.<br />
9.4 Other Provided Designs for the LXT<br />
If you are not testing PCI Express endpoint logic specifically, you most likely want to use the<br />
provided “full function PCI Express endpoint now with DMA” design. Otherwise, you have<br />
the following options<br />
9.4.1 No design<br />
You can implement your design directly within the LXT, connecting directly to the Xilinx<br />
MGT. In this case, you will have to learn the peculiarities of the MGTs, and you will have to<br />
convert the output of the MGT into PIPE (fairly easy). You can also use the LXT as an<br />
additional FPGA in the case that you are not operating in a PCI Express slot at all.<br />
DN9200K10PCIE8T User Guide www.dinigroup.com 131
H A R D W A R E<br />
9.4.2 PIPE<br />
The “PIPE” bitfile provides the ability to have a standard, 125 MHz, 16-bit PIPE interface. Like<br />
the full-function design, you are required to use in FPGA a provided interface module. This<br />
module takes care of translating from the native GTP back end into a standard PIPE interface.<br />
It also takes care of external bus timing and clocking.<br />
Figure 70 - PIPE design block diagram<br />
We can also provide 8-bit, 250 MHz PIPE or PIPE that takes in an external clock. These<br />
modifications are not on the user CD but can be generated to suit your needs on request.<br />
9.4.3 Slowdown PIPE Core<br />
It can be challenging to place-and-route a PCI Express MAC in an FPGA which is capable of<br />
8x operation and runs with a 125 MHz or even 250 MHz system clock. The PIPE slowdown<br />
core reduces the system clock “PCLK” frequency from full frequency to either 2, 4 or 8 times<br />
slower.<br />
DN9200K10PCIE8T User Guide www.dinigroup.com 132
H A R D W A R E<br />
Figure 71 - PIPE Slowdown block diagram<br />
Using this core, a PCI Express controller can interact with a real, full-speed link partner and test<br />
control paths that a non-interactive simulation might never test.<br />
There is a fee for use of the PIPE slowdown core.<br />
9.5 Troubleshooting<br />
In PCI or PCI Express, when a bus master does not receive a responds for a read request within<br />
a certain timeout period, it will return 0xFFFFFFFF to the upstream requestor. This can happen<br />
for various reasons:<br />
- The board has lost its configuration data (the PCI configuration space registers are not<br />
programmed)<br />
- The FPGA on BAR<br />
10 Unusable pins<br />
Some pins on the FPGA do not appear in the UCF file, and are not usable by the FPGAs.<br />
DN9200K10PCIE8T User Guide www.dinigroup.com 133
H A R D W A R E<br />
10.1 Adjacent RocketIO<br />
FPGA Q has some IO pins that are connected directly to ground. These pins are AA5, AB5,<br />
AF4, AF3, A3, B4, B5, D5, and E5. It is recommended that you drive these pins with a constant<br />
low value, and assign a high drive-strength driver to the IO type. These pins are intended to help<br />
shield the sensitive RocketIO power supply pins from IO switching noise.<br />
10.2 No Connect<br />
10.3 Configuration<br />
The following pins (All FPGAs) are the SelectMap data pins, used to configure the FPGAs.<br />
These pins are connected to both Virtex-5 FPGAs. Using these signals for FPGA interconnect<br />
is possible, but may interfere with the configuration circuitry on the DN9200K10PCIE8T.<br />
10.4 VREF/DCI<br />
If you try to use a pin reserved for DCI calibration or a VREF reference voltage, then the tool<br />
will not let you complete the place-and-route.<br />
11 System Monitor/ADC<br />
The new Virtex 5 feature System Monitor allows the FPGA to use some of its IO as analog-todigital<br />
inputs.<br />
Figure 72 - Sysytem monitor circuit<br />
The voltage measurements at these inputs are referenced to the voltage on the pin VREFP. On<br />
the DN9200K10PCIE8T, this voltage is generated by a high-precision external voltage<br />
reference IC.<br />
DN9200K10PCIE8T User Guide www.dinigroup.com 134
H A R D W A R E<br />
The primary ADC input is routed to a differential test point. There is one test point labeled<br />
“ADC” for each FPGA.<br />
12 Reset<br />
There are two reset circuits on the DN9200K10PCIE8T. One is the power-on reset, or “Hard<br />
Reset”, that holds the board, including the configuration circuitry in reset until all power supplies<br />
on the board are within their tolerances. The second reset circuit is the user reset, “FPGA reset”,<br />
“user button” or “Soft reset”.<br />
12.1 Power Reset<br />
The power-reset signal holds the configuration circuit (including a micro controller and Spartan<br />
3 FPGA) in reset. It also causes the FPGAs to become un-configured, and causes the RSTn<br />
signal on the daughtercards to be asserted. When the board is “in reset”, the “Hard Reset”<br />
LED, DS20, is lit red. It is located about an inch above the USB connector.<br />
When the board is in reset, FPGAs cannot be configured, USB does not function (the host<br />
computer will not be able to communicate with the device), PCIe cannot access the FPGA or<br />
configuration functions (the device will still be accessible from PCIe, and LX50T registers can<br />
still be read and written). When in reset, the Spartan configuration FPGA remains configured,<br />
but all of the logic in the device is cleared.<br />
Pressing the “HARD RESET” button, S1, located near the ATX power connector, can trigger<br />
the Power reset. This reset cannot be triggered over PCI Express or USB. It is also triggered<br />
with one or more voltages on the board fall below, or above a certain threshold. These<br />
thresholds are given below:<br />
Voltage Min Max<br />
1.0V (A): 0.94V 1.1V<br />
1.0V (B): 0.94V 1.1V<br />
1.8V: 1.67V 3.8V<br />
3.3V: 2.7V 3.8V<br />
5.0V: 4.0V 5.6V<br />
12V: -- --<br />
2.5V 2.25V 2.7V<br />
When the board comes out of reset, the micro controller goes through an initialization process<br />
that will cause all current settings to be lost, including clock settings. Also, the configuration<br />
circuit will act as if the board has just powered on and read from the main.txt file to configure<br />
FPGAs.<br />
When reset is triggered, it remains triggered until 55us after all trigger conditions are removed.<br />
This behavior prevents USB from behaving in such a way to permanently disable USB on the<br />
host machine.<br />
DN9200K10PCIE8T User Guide www.dinigroup.com 135
H A R D W A R E<br />
12.2 User Reset<br />
The “USER RESET” circuit is intended for use by the user. When this reset is asserted, the<br />
RESET_*# signal (from the schematic), is asserted to each FPGA. After at least 200ns, this<br />
signal is de-asserted simultaneously to each FPGA. This signal is connected to a regular user IO<br />
on the FPGA, so it is up to the FPGA designer to implement reset correctly within his design.<br />
The User Reset is asserted whenever the “User Reset” button is pressed. This button, S2, is<br />
located just above the USB connector. There is no LED indicating the state of user reset. User<br />
reset is also asserted when the reset vendor request is sent over USB.<br />
When User reset is asserted, the RSTn signal to each daughtercard is also asserted.<br />
The arrival time of the assertion and de-assertion of reset is the same at all FPGA inputs.<br />
Additionally, the reset signal is timed such that it can be sampled synchronous to CLK_MB48.<br />
13 JTAG<br />
There are two JTAG headers on the DN9200K10PCIE8T. The first, J6, is used only to update<br />
the board‟s firmware. The second, J5 is connected to the JTAG port of the Virtex-5 FPGAs.<br />
This interface can be used for configuring the FPGAs, or using debugging tools like ChipScope<br />
or Identify.<br />
13.1 FPGA JTAG<br />
The connector for FPGA JTAG is shown below.<br />
J7<br />
1 2<br />
3 4<br />
5 6<br />
7 8<br />
9 10<br />
11 12<br />
13 14<br />
+2.5V<br />
FPGA_TMS<br />
FPGA_TCK<br />
FPGAB_TDO<br />
FPGAA_TDI<br />
87832-1420 2mm<br />
CON14A<br />
Figure 73 - FPGA JTAG circuit<br />
DN9200K10PCIE8T User Guide www.dinigroup.com 136
H A R D W A R E<br />
Figure 74 - FPGA JTAG locator<br />
Figure 75 - FPGA JTAG block diagram<br />
Note that the signal “TDO” on the header and in the schematic refers to the “TDO” port of<br />
the FPGA, not the connector.<br />
The order of the FPGA JTAG chain is FPGA A->FPGA B->FPGA Q. There are no other<br />
components in the chain. If you received your board with fewer than two FPGAs installed, then<br />
the chain will be shorter.<br />
The voltage of the JTAG chain is fixed at 2.5V and cannot change. Hot-plug on this header is<br />
allowed. The header is a 2mm pin grid dual row with shroud and polarization key.<br />
13.1.1 Compatible Configuration Devices<br />
The JTAG header is designed to work with the Xilinx Platform USB cable. The JTAG chain is<br />
tested at manufacture using a Platform USB cable at 12 MHz.<br />
The driver installation process for the Platform USB cable is relatively difficult for a USB device.<br />
Follow the instructions carefully.<br />
In order to achieve high-speed configuration using a Parallel IV cable, you need to enable ECP<br />
mode on your parallel port. This is probably a BIOS setting on your computer.<br />
13.1.2 ChipScope<br />
In order to use JTAG debugging tools on the DN9200K10PCIE8T, you do not need to<br />
configure via JTAG.<br />
DN9200K10PCIE8T User Guide www.dinigroup.com 137
H A R D W A R E<br />
13.2 Firmware Update Header<br />
The firmware update JTAG header J6, should not be used unless you are updating the<br />
DN9200K10PCIE8T firmware. This header is used with a Xilinx Platform USB or Parallel IV<br />
cable. The instructions for updating the firmware are in the Controller software chapter.<br />
13.3 Troubleshooting<br />
If you are having problems getting JTAG to work, try connecting the Xilinx Platform USB cable<br />
to the JTAG header and running the Xilinx program iMPACT. iMPACT will generate a failure<br />
log that you can email to support@dinigroup.com. If you have an upgraded board, please<br />
mention this in your email.<br />
14 RS232 Interface<br />
RS232 access is available to all FPGAs through the header P4 "FPGA RS232". To connect to<br />
this header, use the provided .1" header-to-DB9 cable to connect to a PC's serial port.<br />
The TX and RX signals use the RS232 data protocol, so the FPGA will have to implement a<br />
UART in its logic.<br />
All FPGA share the same RX and TX signals, so only one FPGA should use the interface at a<br />
time. RS232 requires a 12V to -12V signaling level, which is not available on Virtex5 FPGAs, so<br />
an external RS232 buffer is used.<br />
7<br />
8<br />
9<br />
13<br />
12<br />
10<br />
U23<br />
MAX3388E<br />
TSOP24<br />
21<br />
20<br />
19<br />
18<br />
17<br />
16<br />
11 15<br />
SWOUT SWIN<br />
24<br />
22<br />
T1IN<br />
T2IN<br />
T3IN<br />
R1OUT<br />
R2OUT<br />
LOUT<br />
SHDN<br />
1<br />
3<br />
C1+<br />
4<br />
C1-<br />
5<br />
C2+<br />
C2-<br />
GND<br />
T1OUT<br />
T2OUT<br />
T3OUT<br />
Figure 76 - RS232 circuit<br />
R1IN<br />
R2IN<br />
LIN<br />
VCC<br />
VL<br />
V+<br />
V-<br />
23<br />
14<br />
2<br />
6<br />
RS232_FPGA_TXD<br />
RS232_MCU_TXD<br />
RS232_FPGA_RXD<br />
RS232_MCU_RXD<br />
FPGA<br />
MCU<br />
TSM-136-01-T-DV<br />
1 2<br />
3 4<br />
5 6<br />
7 8<br />
9 10<br />
1 2<br />
3 4<br />
5 6<br />
7 8<br />
9 10<br />
TSM-136-01-T-DV<br />
TENTH INCH<br />
DN9200K10PCIE8T User Guide www.dinigroup.com 138
H A R D W A R E<br />
Figure 77 - RS232 locator<br />
One the board, pin 1 is marked with a big, unmistakable, white circle dot. On the provided<br />
cable, pin one is marked with a red stripe on the cable. Hot-plugging this connector is acceptable<br />
and encouraged.<br />
The port settings required on the serial ("COM") port of your computer are dependent on the<br />
UART in the FPGA. Since the flow-control signals on the serial cable are not connected to the<br />
FPGA, you cannot use "hardware handshaking".<br />
The other port settings: software flow control, parity, stop bits, speed and data bits are user<br />
design dependent. There is no provided RS232 reference design.<br />
14.1.1 Configuration RS232<br />
A second RS232 header (P3) is for the configuration circuitry to give feedback to the user. It is<br />
described in the section "Configuration Section".<br />
15 Temperature Sensors<br />
Each FPGA is connected to a temperature monitor. This monitor can internally measure the<br />
temperature of the FPGA silicon die. The maximum recommended operating temperature of<br />
the FPGA is 85°. The accuracy of the temperature sensor is about +0C° to +5C°. When the<br />
configuration circuitry measures the temperature of any FPGA rise above 80°, it will<br />
immediately un-configure the hot FPGA, and prevent it from re-configuring. When the<br />
temperature drops below 80, the configuration circuitry will again allow the FPGA to configure.<br />
When this occurs a message will appear on the CONFIG RS232 port (P3). An example test<br />
output is given below.<br />
**********************************************************************<br />
TEMPERATURE ALERT: FPGA A<br />
DN9200K10PCIE8T User Guide www.dinigroup.com 139
H A R D W A R E<br />
CURRENT TEMPERATURE: 81 DEGREES C<br />
THRESHOLD TEMPERATURE: 80 DEGREES C<br />
THE FPGA IS BEING CLEARED IN AN ATTEMPT TO PREVENT HEAT DAMAGE.<br />
SOFTWARE WILL PREVENT RECONFIGURATION UNTIL THE TEMPERATURE<br />
DROPS A FULL DEGREE BELOW THE THRESHOLD TEMPERATURE.<br />
**********************************************************************<br />
**********************************************************************<br />
TEMPERATURE ALERT: FPGA A<br />
CURRENT TEMPERATURE: 79 DEGREES C<br />
THRESHOLD TEMPERATURE: 80 DEGREES C<br />
THE FPGA HAS DROPPED BELOW THE ALARM THRESHOLD<br />
AND MAY NOW BE RECONFIGURED.<br />
**********************************************************************<br />
The FPGA operate as hot as 120°C before melting, ejecting hot acid on your hand, but at<br />
temperatures above 80°C, logical operation is not guaranteed. You can use the temperature<br />
setting in the ISE place and route tool to make timing allowances for operating the FPGA outof-range.<br />
If you want to disable the temperature limit on the DN9200K10PCIE8T, you can do<br />
that using a menu option in the configuration RS232 interface. You can also increase the<br />
maximum temperature allowed.<br />
On designs with pathologically noisy IO, there is a significant “ground bounce” effect in the<br />
FPGA, and the temperature sensors can have errors as high as 30 C°. To correct this you can<br />
- Increase temperature threshold to 100°C. (Adjusting timing in ISE)<br />
- Reduce IO frequency to below 150 MHz<br />
- Follow the Xilinx SSO limits on IOs<br />
- Use LVDS IO<br />
16 Encryption Battery<br />
The Virtex5 FPGA supports bit stream encryption. When using encryption, the FPGA must<br />
decode the bitstream using a secret key that is stored in a persistent memory in the FPGA.<br />
When the DN9200K10PCIE8T is powered off, a voltage is supplied to the FPGA by a battery<br />
installed in socket X2.<br />
X2 is designed to house a CR1220-type lithium coin-cell battery. Typically, these batteries<br />
produce 3.0V. The socket may also work with battery types DB-T13, L04, PA. These however,<br />
have not been tested. Insert the battery positive side up.<br />
DN9200K10PCIE8T User Guide www.dinigroup.com 140
H A R D W A R E<br />
Figure 78 - Battery locator<br />
The same battery is used for both FPGAs. Removing the battery will cause the FPGAs to lose<br />
their encryption memories, and will have to be re-programmed before they can work with<br />
encrypted bitfiles again.<br />
To create encrypted bitfiles, turn on the “encryption” option in bitgen. The program will<br />
produce an additional output file with an .nky extension. Use the program iMPACT with a<br />
Platform USB JTAG cable (plugged into the FPGA JTAG connector on the<br />
DN9200K10PCIE8T) to load this .nky file into each FPGA.<br />
When using a bitfile with encryption enabled, the DN9200K10PCIE8T will not be able to read<br />
the FPGA type out of the bitstream. It will therefore prevent your FPGA design from loading<br />
into the FPGA. To disable this behavior, you must disable sanity check. Adding the following<br />
line to your main.txt file can do this<br />
Sanity check: n<br />
Also, when using encryption, you must be careful to correctly set the "startup clock" option<br />
correctly in bitgen, or the FPGA will fail to configure, and won‟t tell you why.<br />
Whatever you do, if you love your FPGAs, do not disable the “CRC Check” option in bitgen.<br />
This option was originally called “Do you want your FPGAs to not catch on fire?”<br />
16.1 External Battery<br />
Normally, swapping the battery without losing the encryption data requires having the board<br />
powered on while changing the battery. This is tricky.<br />
In order to allow the swapping of a battery with the board powered off, there is a test point<br />
connected to the battery power that can be used to attach an external battery or voltage source.<br />
DN9200K10PCIE8T User Guide www.dinigroup.com 141
H A R D W A R E<br />
DNI<br />
+VBATT<br />
3<br />
BAV790<br />
B<br />
T<br />
T<br />
1<br />
2<br />
3001<br />
KEYSTONE_3001<br />
Figure 79 - battery circuit<br />
17 LED Interface<br />
This section lists all of the LEDs. More detailed explanations of the LED functions may be in<br />
the sections describing the board system that contains the LED.<br />
17.1 Configuration Section LEDs<br />
These LEDs are controlled by the board (User has no control).<br />
Reference Name Color “ON” Condition<br />
Power LEDs<br />
DS9 +1VA RED +1.0V on FPGA A has failed<br />
DS12 +1VB RED +1.0V on FPGA B has failed<br />
DS13 +DIMM_A RED Voltage on DIMM A has failed<br />
DS14 +DIMM_B RED Voltage on DIMM B has failed<br />
DS15 +2.5V RED +2.5V has failed<br />
DS16 +3.3V RED +3.3V has failed<br />
DS17 +5.0V RED +5.0V has failed<br />
DS10 WARN DIMM A RED Voltage on DIMM A is not 1.8V<br />
DS11 WARN DIMM B RED Voltage on DIMM B is not 1.8V<br />
DS1 POWER WARN RED You didn‟t connect power cable<br />
DS18 ON GREEN Always when board is on<br />
DS20 SYS RESET RED Board is stuck in reset<br />
Configuration Status LEDs<br />
DS23 ERRCONFIG RED An FPGA has failed to configure<br />
DS24 ERRTEMP RED An FPGA has overheated<br />
DS27 MB ACT YELLOW MainBus has activity<br />
DS28 USB ACT YELLOW MainBus has activity over USB<br />
DS90 PCI ACT YELLOW MainBus has activity over PCIE<br />
DS89 CFACT YELLOW CompactFlash card is being read<br />
DS30,DS31, MEANINGLESS RED You least expect it<br />
DS32,DS33<br />
DS35,DS36, MEANINGLESS GREEN You least expect it<br />
DS37,DS38<br />
DN9200K10PCIE8T User Guide www.dinigroup.com 142
H A R D W A R E<br />
DS88 FPGA_Q_LOL RED GTP clock synthesizer failed<br />
DS22 G0_LOL RED CLK_G0 synthesizer failed<br />
DS25 G2_LOL RED CLK_G1 synthesizer failed<br />
DS29 G1_LOL RED CLK_G2 synthesizer failed<br />
DS19 A DONE BLUE FPGA A is configured<br />
DS26 B DONE BLUE FPGA B is configured<br />
DS34 SPARTAN_DONE BLUE Spartan is configured (always on!)<br />
DS87 Q DONE BLUE FPGA Q is configured<br />
PCI Express status LEDs<br />
DS7 PCIE GEN2 YELLOW PCI Express is linked at 5Gbs<br />
DS4 LINK1 GREEN PCI Express is linked with 1 lane<br />
DS6 LINK4 GREEN PCI Express is linked with 4 lanes<br />
DS5 LINK8 GREEN PCI Express is linked with 8 lanes<br />
DS3 PCIE LOS RED PCI Express could not link<br />
DS8 PCIE_PERSTn RED PCI Express is reset by host<br />
DS2 PCIE ACT YELLOW PCI Express is in use<br />
DS91,DS92, PCIE DEBUG YELLOW General Purpose LED for FPGA Q<br />
DS93<br />
17.2 User LEDs<br />
These LEDs are connected to an FPGA and are controller by the user. The meaning of the<br />
LED is design-dependent. Below is the general circuit used to connect user LEDs. To turn the<br />
LED on, drive the signal low. To turn off, tri-state or drive-high the signal.<br />
+2.5V<br />
1<br />
2<br />
3<br />
4<br />
1<br />
2<br />
3<br />
4<br />
RN28<br />
140R<br />
RN29<br />
140R<br />
8<br />
7<br />
6<br />
5<br />
8<br />
7<br />
6<br />
5<br />
LED_E00q<br />
LED_E01q<br />
LED_E02q<br />
LED_E03q<br />
LED_E04q<br />
LED_E05q<br />
LED_E06q<br />
Figure 80 - LED circuit<br />
DS22<br />
DS23<br />
DS24<br />
DS25<br />
DS26<br />
DS27<br />
DS28<br />
YELLOW<br />
YELLOW<br />
YELLOW<br />
YELLOW<br />
YELLOW<br />
YELLOW<br />
YELLOW<br />
LED_E00<br />
LED_E01<br />
LED_E02<br />
LED_E03<br />
LED_E04<br />
LED_E05<br />
LED_E06<br />
DN9200K10PCIE8T User Guide www.dinigroup.com 143
H A R D W A R E<br />
Figure 81 - LED locator<br />
The user LEDs are connected to banks where the daughtercards are connected. The “Bank<br />
Voltage” may not match the LED‟s current source voltage. In this case, use the drive standard<br />
corresponding to the bank, and not the LED. For example, when a LVCMOS25 daughtercard<br />
is attached and all other signals on the bank are using the LVCMOS25 standard, use the<br />
LVCMOS25 standard for the LED on that bank. Do not use DCI on LED signals. You can<br />
control the brightness of LEDs by either using a low-drive setting (DRIVE=2ma in the .ucf<br />
file), or by making the output bounce rapidly high and low like my cat.<br />
Part Reference LED Name Color<br />
DS39,DS40,DS41,DS42, USER LEDs (FPGA A) YELLOW<br />
DS43,DS44,DS45,DS46,<br />
DS47,DS48,DS49,DS50,<br />
DS51,DS52,DS53,DS54<br />
DS59,DS60,DS61,DS62 USER LEDs (FPGA A) RED<br />
DS55,DS56,DS57,DS58 USER LEDS (FPGA A) GREEN<br />
DS63,DS64,DS65,DS66, USER LEDs (FPGA B) YELLOW<br />
DS67,DS68,DS69,DS70,<br />
DS71,DS72,DS73,DS74,<br />
DS75,DS76,DS77,DS78<br />
DS83,DS84,DS85,DS86 USER LEDs (FPGA B) RED<br />
DS79,DS80,DS81,DS82 USER LEDs (FPGA B) GREEN<br />
T1 Ethernet LINK1000 GREEN<br />
T1 Ethernet Activity YELLOW<br />
DS21 Ethernet LINK100 GREEN<br />
FPGA A and B each have a total of 24 user-access LEDs. The LEDs are numbered 0 to 23.<br />
The location of the IOs to use for these LEDs can be found in the provided UCF file or the<br />
netlist. The name of each LED is labeled in silkscreen next to the LED.<br />
DN9200K10PCIE8T User Guide www.dinigroup.com 144
H A R D W A R E<br />
17.3 Ethernet LEDs<br />
These LEDs are controlled by the Ethernet PHYs connected to FPGA B. They can also be<br />
user-controller by setting registers in the serial interface of the PHYs.<br />
Figure 82 - Ethernet locator<br />
T1 and T2 are the RJ45 jacks on the top edge of the board. There is a yellow and a green LED<br />
embedded in this connector, facing the board edge.<br />
17.4 Power LEDs<br />
These LEDs indicate is one or more power supplies fail, either outputting a voltage that is too<br />
high or too low. The voltage that the LED indicates is marked in silkscreen near the LED.<br />
Figure 83 - Power fail LED locator<br />
DN9200K10PCIE8T User Guide www.dinigroup.com 145
H A R D W A R E<br />
17.5 Unused LEDs<br />
These LEDs are controlled by the configuration circuitry. One GREEN LED is always on. One<br />
yellow one flickers when something undefined is happening. Two RED ones signal which<br />
FPGA is undergoing some sort of configuration operation, and will pause with that indication if<br />
there is an error.<br />
The primary purpose of these LEDs if for Dini Group to debug its software, so I wouldn‟t be<br />
surprised if this information was outdated already.<br />
Figure 84 - Unused LED locator<br />
18 DDR2 DIMM Sockets<br />
There are two “DDR2” memory socket interfaces on the DN9200K10PCIE8T.. By<br />
convention, the name of this interface connected to FPGA A is DIMMA, the one connected to<br />
FPGA B is DIMMB. In this section, the interfaces may be called “DIMM”, “SODIMM” or<br />
“DDR2” interface interchangeably.<br />
DN9200K10PCIE8T User Guide www.dinigroup.com 146
H A R D W A R E<br />
Figure 85 - DIMM block diagram<br />
Signal names given in this section, and in other documentation (ucf files) are given in the form<br />
DIMMB_.<br />
18.1 Power<br />
Each DIMM and its associated FPGA bank receives current from a dedicated adjustable power<br />
supply. Each DDR2 SODIMM is capable of drawing 5A of current when in continuous autoprecharge<br />
mode.<br />
The DN9200K10PCIE8T is capable of providing this amount of current.<br />
18.1.1 Interface Voltages<br />
The “standard‟ DDR2 interface voltage is +1.8V. The banks that connect to the DIMM<br />
interface are powered by 1.8V, and the power pins on the socket is connected to this same<br />
power net. In a DDR2 interface, most of the DIMM signals are driven using the SSTL18_DCI<br />
drive standard<br />
DIMM_A*<br />
DIMM_CAS#<br />
DIMM_RAS#<br />
DIMM_BA*<br />
DIMM_WE<br />
DIMM_ODT*<br />
DIMM_CSE*<br />
DIMM_S*<br />
DIMM_DQS*P<br />
DIMM_DQS*N<br />
CLK_DIMM_CK*P<br />
CLK_DIMM_CK*N<br />
CLK_DIMM_CK2P<br />
CLK_DIMM_CK2N<br />
SSTL18_I<br />
SSTL18_I<br />
SSTL18_I<br />
SSTL18_I<br />
SSTL18_I<br />
SSTL18_I<br />
SSTL18_I<br />
SSTL18_I<br />
DIFF_SSTL18_II_DCI<br />
DIFF_SSTL18_II_DCI<br />
DIFF_SSTL18_I<br />
DIFF_SSTL18_I<br />
LVDS_EXT<br />
LVDS_EXT<br />
DN9200K10PCIE8T User Guide www.dinigroup.com 147
H A R D W A R E<br />
DIMM_DQ*<br />
DIMM_DM<br />
DIMM_SDA<br />
DIMM_SCL<br />
DIMM_DQ64<br />
SSTL18_II_DCI<br />
SSTL18_II_DCI<br />
SSTL2_I_DCI or LVDS<br />
SSTL2_I_DCI or LVDS<br />
SSTL18_I and SSTL18_I_DCI<br />
The DIMM interfaces are not designed for hot-plug.<br />
The CLK_DIMM_CK2P/N signal is intended to be driven from the FPGA (at 1.8V) into the<br />
FPGA (at 2.5V). Its arrival at the FPGA and the arrival of CLK_DIMM_CK0 and<br />
CLK_DIMM_CK1 at the SODIMM module are synchronized. It can be used as a feedback<br />
clock for a PLL, or as a primary clock for the DIMM interface.<br />
The DIMM_DQ64 is length-matched to the other DQ* signals. It has no known purpose.<br />
18.1.2 Changing the DIMM voltage<br />
If you need to change the voltage of the DIMM interface, there is a set of jumper points<br />
provided for each interface allowing power to be regulated at a different voltage. The jumper has<br />
four settings:<br />
PIN 1 – PIN 2 DIMM Voltage is 3.3V<br />
PIN 3 – PIN 4 DIMM Voltage is 2.5V<br />
PIN 5 – PIN 6 DIMM Voltage is 1.8V<br />
NO JUMPER DIMM Voltage is 1.5V<br />
Any other combination of jumpers produces some other voltage that is too high for the FPGA<br />
to handle.<br />
+12V<br />
3<br />
U15<br />
Vin<br />
Vo<br />
6<br />
TP16<br />
0R<br />
+VDIMM_A<br />
2<br />
4<br />
TRACK<br />
Inhibit#<br />
ADJ<br />
GND<br />
5<br />
1<br />
PTH12050W-AS<br />
REG_PTH12050W-AS<br />
Figure 86 - DIMM Voltage selection circuit<br />
R209<br />
24.3K<br />
JP1<br />
1 2<br />
3 4<br />
5 6<br />
TSM-103-01-T-DV<br />
R195<br />
21.5K<br />
R208<br />
5.23K<br />
3.3V - 2.0K<br />
2.5V 4.32K<br />
1.8V 11.5K<br />
1.5V - 24.3K (no Jumper)<br />
R212<br />
2.94K<br />
If you are interested, you can see how the jumpers affect the voltage output of the regulator. If<br />
you want to store he jumper (when in 1.5V mode), you could safely do that by connecting the<br />
jumper PIN 1 – PIN 3 or PIN 2 – PIN 4 or something.<br />
DN9200K10PCIE8T User Guide www.dinigroup.com 148
H A R D W A R E<br />
Some Dini Group SODIMMs requires these strange power supply voltage. (DNSODM_SDR,<br />
DNSODM_DDR1, DNSODM_DDR3).<br />
Figure 87 - DIMM Voltage locator<br />
The jumper blocks for the two DIMMs are located next to the DIMM sockets. The one on the<br />
left controls DIMM A and the one on the right controls DIMM B.<br />
18.1.3 DIMM warning LED<br />
Figure 88 - DIMM warning LED locator<br />
When the DIMM voltage is something other than 1.8V, there is a red LED that lights next to<br />
the DIMM. This LED means that you should get a voltage probe and measure the voltage being<br />
DN9200K10PCIE8T User Guide www.dinigroup.com 149
H A R D W A R E<br />
supplied to the FPGA and DIMM. If this voltage is above 3.3V, you could be damaging your<br />
FPGA.<br />
18.2 Clocking<br />
The data signals in the DDR2 interface are clocked source-synchronously. In order to clock in<br />
and out the “DQ” data signals, the DQS signal is used as a clock using the Virtex-5 “BUFIO”<br />
clock driver. Details on how to implement a DDR2 controller are in the Xilinx application note<br />
XAPP858. You can also see the provided DDR2 reference design for example code.<br />
A basic block diagram of the clocking is given below.<br />
Figure 89 - DIMM clock diagram<br />
Note that the DIMM_CK2 signal is driven by the FPGA from a 1.8V bank. The output should<br />
be a DIFF_SSTL18. It is received by a global clock (“GC”) pin on the Virtex-5 device. To<br />
receive the signal, use an LVDS_EXT input with DIFF_TERM attribute set to TRUE.<br />
The CK0, CK1 and CK2 signals are length-matched, so this input should be synchronous to the<br />
clock input of the DIMM module.<br />
The DQ and DM signals are synchronous to the DQS signals in each bank. See the DDR2<br />
SODIMM module specification for information on the timing of this interface.<br />
DN9200K10PCIE8T User Guide www.dinigroup.com 150
H A R D W A R E<br />
18.2.1 DQS timing<br />
In order to clock the DQ and DM inputs using the DQS signal, you can use a BUFIO clock<br />
buffer on the DQS signal. The provided DDR2 controller does not use this method. (It<br />
dynamically adjusts a DCM global clock for inputs)<br />
18.2.2 Serial Interface<br />
The SDA and SCL interfaces are connected to 2.5V LVCMOS buffers. External pull-ups are<br />
provided on these signals. The address of all DIMMs on the DN9200K10PCIE8T is set to<br />
zero. You can (optionally) read the IIC prom off the DDR2 SODIMM to dynamically<br />
determine the correct settings for the DDR2 controller. The provided DDR2 controller does<br />
this. Or, you can use our provided DDR2 controller to read the IIC contents of the DIMM,<br />
then use this information to configure your own DDR2 controller.<br />
The SDA and SCL signals are also routed to GCLK signals on the FPGA (2.5V). These signals<br />
can be used as clock inputs on daughtercards of the SODIMM form factor.<br />
18.2.3 Timing<br />
The length matching of the DDR2 interface signals includes all signals except for DIMM_SCL<br />
and DIMM_SDA signals.<br />
Due to the source-synchronous clocking techniques used by the DDR2 interface, the delay<br />
from FPGA to DIMM should not be needed, but is provided here anyway.<br />
DIMMA<br />
DIMMB<br />
0.658 ns<br />
0.623 ns<br />
The trace impedance to each of the connectors is controlled to 50Ω. All signals in the interface<br />
are ground-referenced. Note that this is contradictory to the recommendations of the DDR2<br />
SODIMM specification.<br />
To increase the setup time available for control signals, modules may be set into T2 mode. In<br />
the reference design, the modules are in T1 mode.<br />
Address and Control signals:<br />
FPGA:<br />
Assume a DCM in system-synchronous mode.<br />
Worst clock-to-out time of Virtex 5 : 3.37 with DCM. No phase-shift.<br />
Worst setup time: 0.097<br />
Worst hold time: 0.21<br />
DIMM:<br />
setup 600ps<br />
hold 600ps<br />
DN9200K10PCIE8T User Guide www.dinigroup.com 151
H A R D W A R E<br />
DQ signals:<br />
DIMM:<br />
DQS must be within 350ps of DQ, DM<br />
setup 400ps<br />
Hold 400ps<br />
FPGA:<br />
IDELAY<br />
setup –1.23<br />
hold 2.14<br />
clock-to-out 5.34<br />
18.3 Compatible Modules<br />
The list is in a later chapter. (Ordering information)<br />
18.4 Incompatible Modules<br />
Figure 90 - Lunar Module<br />
18.5 Test points<br />
Each DDR2 interface exposes five signals as test points, located on the bottom of the PCB right<br />
under the SODIMM connector. These signals are DQ0, DQS0p, CK0p, RAS# and CAS#. The<br />
test points are labeled in silkscreen. The test points near DIMMA implicitly are part of the<br />
DIMMA interface, and so on.<br />
DN9200K10PCIE8T User Guide www.dinigroup.com 152
H A R D W A R E<br />
19 FPGA Interconnect.<br />
The point-to-point interconnect on the DN9200K10PCIE8T is designed to operate at the<br />
maximum switching frequency possible on the DN9200K10PCIE8T. The fastest switching<br />
standard available on the Virtex 5 FPGA is LVDS. Using this standard on interconnect of a<br />
DN9200K10PCIE8T; we have demonstrated switching frequencies as high as 950Mbs.<br />
A block diagram of the point-to-point interconnect is below.<br />
Figure 91 - Interconnect block diagram<br />
The interconnect in the above diagram is confusingly described as sets of two busses. “AB” is<br />
the bus between FPGA A and FPGA B. It contains:<br />
100 “p” signals that are available only if you have two LX330s.<br />
100 “n” signals that are available only if you have two LX330s.<br />
134 “p” signals that are always available.<br />
134 “n” signals that are always available.<br />
This is a total of 468 signals that can be used between A and B (that don‟t also have another<br />
purpose).<br />
Each FPGA-to-FPGA interconnect signal is tested at 900 Mbs prior to shipping, no matter<br />
which speed grade is installed on your board. Higher speeds are possible, given appropriate IO<br />
timing methodology and speed grade parts.<br />
DN9200K10PCIE8T User Guide www.dinigroup.com 153
H A R D W A R E<br />
Virtex-5 parts are advertized to go as fast as 1.2 Gbs, but I haven‟t tried it (The Dini Group<br />
reference design implements an older method from a Virtex-4 app note). Information on how<br />
to achieve this interconnect switching speed can be obtained by examining the Xilinx application<br />
note XAPP855. Other methods of implanting high-bandwidth interconnect are described in<br />
XAPP860.<br />
In a synchronous system between two FPGAs and a DCM in zero-delay mode, the following<br />
timing is possible.<br />
Clock-to-out<br />
Trace Delay<br />
Clock Skew<br />
Duty Cycle<br />
Jitter<br />
Setup<br />
3.4ns<br />
1.7ns<br />
0.2ns<br />
0.05ns (DDR mode only)<br />
0.1ns (adjust for BER)<br />
1.0ns<br />
6.4ns<br />
Maximum Frequency: 156 MHz<br />
If LVDS is used, make sure to assign the DIFF_TERM attribute to the IBUFDS in the receiver<br />
FPGA.<br />
As the frequency of synchronous communication between FPGAs increases, the user must<br />
implement more difficult techniques. Some of these techniques are described below, with a<br />
rough frequency range for their implementation.<br />
0 MHz Whatever<br />
20 MHz The user should use the “Pack the IOBs” by using synthesis attributes. The<br />
output delay for each output and setup time for each input is a known value.<br />
100 MHz Use DCMs in each FPGA to eliminate the variation of clock network skew<br />
internal to each FPGA and to reduce clock-to-out time.. The clock must be<br />
free-running<br />
250 MHz Use DDR clocking, and DDR IO buffers<br />
300 MHz Use source-synchronous clocking between FPGAs. The clock is driven with the<br />
data for each bus. The receiving FPGA uses the clock signal, received on a<br />
“CC” pin to clock the IOs in the bus. An IDELAY element on the CC pin<br />
input delays the clock with respect to the data by a fixed amount to allow some<br />
setup time.<br />
550 MHz Use the Virtex 5 build in ISERDES and OSERDES modules.<br />
600 MHz Use Virtex 5 PLL devices to reduce cycle-to-cycle jitter on the clocks.<br />
700 MHz Individually de-skew each bit using IDELAY elements. Use a training pattern<br />
or hard-code the correct delay values for each input.<br />
800 MHz Use LVDS signal standard<br />
900 MHz Dynamically de-skew each bit to account for temperature and voltage variation<br />
1+ GHz Highest speed grade parts are required.<br />
Note that for speeds above 550 MHz, you must use the ISERDES and OSERDES modules,<br />
which add latency to your interconnect. (At speeds greater than 500 MHz, there is more than<br />
one clock-cycle of latency in board trace delay alone).<br />
DN9200K10PCIE8T User Guide www.dinigroup.com 154
H A R D W A R E<br />
Also note that when using either the ISERDES or IDELAY technique, the latency is no longer<br />
fixed between the FPGAs, and per-lane “cycle” de-skew will also be required.<br />
For the maximum bandwidth between two parts, use single-ended signaling at 700 MHz. For<br />
single-ended signaling, an IOSTANDARD of LVCMOS25 is appropriate. Use drive strength of<br />
6mA or 8mA. When using single-ended signaling, the SSO limits of the device must be<br />
maintained. You could do this by having multiple output phases, by balancing the number of<br />
outputs and inputs on a single bank, or by applying a switching-balanced parallel encoding to the<br />
data.<br />
20 Main Bus<br />
Main Bus is the interface that the DN9200K10PCIE8T uses to bring USB and PCIe access to<br />
both of the Virtex-5 FPGAs. If you want to use USB in your design, or want PCIe access<br />
without implementing PCIe in FPGA, then you must implement a Main Bus slave in your<br />
FPGAs. The reference designs include one such controller, and you are free to use it.<br />
Drive strength.<br />
Please use the highest drive strength IOs available (24mA)<br />
20.1 MB Signals<br />
The DN9200K10PCIE8T, in addition to the dense interconnect available between FPGAs in a<br />
point-to-point topology, provides a 36-signal-wide “MB” bus that is connected to both Virtex-5<br />
FPGAs.<br />
Figure 92 - Main Bus block diagram<br />
These signals are reserved for USB and PCI Express communication using the “Main Bus”<br />
interface.<br />
DN9200K10PCIE8T User Guide www.dinigroup.com 155
H A R D W A R E<br />
20.1.1 MB vs. MainBus Disambiguation<br />
I try my best to say “MainBus” when I am talking about the interface definition that allows<br />
FPGAs to access USB and PCI Express. I try to say “MB” when I‟m talking about the actual 36<br />
physical signals that these interfaces use.<br />
20.1.2 Electrical<br />
The MB signals are fixed at a 2.5V signaling level. LVCMOS25 is an appropriate singling<br />
standard. Due to heavy capacitive loads on the MB signals, you should use drive strength of<br />
24mA to use main bus. DCI should not be used because the signals are not impedancecontrolled.<br />
Although not required, by convention, data on the MB signals is synchronous to the<br />
MB48 clock. In order to use the “Main Bus” interface to communicate with USB or PCI<br />
Express, you must use the MB48 clock. This clock runs at a fixed 48 MHz.<br />
Note that as well as the 36 “MB” signals, there are also 16 signals in the “selectmap_d[15:0]”<br />
that connect to all FPGAs that could be used for user data. Dini Group does not directly<br />
support using these signals. If you chose to use these signals, note that the FPGA design can<br />
interfere with the programming of FPGAs. You would have to keep the outputs on these<br />
signals tri-stated until all FPGA configurations are complete.<br />
20.1.3 Timing<br />
As described above, the MB signals are typically run synchronous to the 48 MHz CLK_MB48<br />
clock. The delay for each main bus trace is not given. However the interface is at least fast<br />
enough to run synchronously at 48 MHz.<br />
You may be able to achieve performance from FPGA-to-FPGA on this bus as high as 125<br />
MHz, or higher if you adjust input and output clocks and perform a timing analysis.<br />
20.2 Error Codes<br />
The Main Bus interface has no way of signaling an error condition on read requests, but some<br />
errors will result in the same sentinel values being returned. Following is a list of these values.<br />
0xABCDABCD:<br />
0xDEADDEAD:<br />
0xFFFFFFFF:<br />
0xDEAD5566:<br />
The Main Bus read timed out. (PCIe only)<br />
The Main Bus read times out (USB only). When this condition occurs, a register,<br />
accessible as part of the “configuration register” space, increments. In this way, it is<br />
possible for a Main Bus access program to verify that a MainBus transaction has<br />
succeeded.<br />
The PCIe bus timed out. This is not a value returned by the DN9200K10PCIE8T.<br />
The PCIe request was not returned. FPGA Q may not be configured correctly.<br />
This value is returned by the Dini Group reference design as a default value, when<br />
a read request is to an address that has no registers associated with it.<br />
DN9200K10PCIE8T User Guide www.dinigroup.com 156
H A R D W A R E<br />
0x12345678: The Main Bus is disabled. This is the default state of the DN9200K10PCIE8T<br />
when it powers on. To set the DN9200K10PCIE8T to enable, a configuration<br />
register must be written. This behavior is intended to protect users who do not<br />
wish to implement Main Bus interface, but who wish to use the MB0-MB35 signals<br />
for their own purposes.<br />
20.3 Main Bus FPGA Interface<br />
All memory-mapped transactions in the reference design occur over the MB bus. This 36-signal<br />
bus connects to all Virtex 5 FPGAs and to the Spartan 3 configuration FPGA. The<br />
Configuration circuit (Spartan 3) is the master of the bus. All access to the MB bus (reads and<br />
writes) is initiated by the Spartan 3 FPGA when the reference design is in use.<br />
Figure 93 - Inaccurate Main Bus read timing<br />
All transfers a synchronous to the CLK_MB48 signal. This clock is fixed at 48 MHz, and cannot<br />
be changed by the user. This clock is LVCMOS, single-ended. For best performance, the<br />
highest available drive strength in the FPGA can be use. When the configuration circuit asserts<br />
the ALE signal, the slave device on the bus (the FPGA) is required to register the data on the on<br />
AD bus. This is the “main bus address”. All future transfers over the main bus are said to be at<br />
this address, until a new address is latched. On a later clock cycle, the master may assert the<br />
“RD” signal. Sometime after this, (within 200 clock cycles), the FPGA should assert<br />
MB_DONE for one clock cycle. On this cycle, the master (Spartan) will register the data on the<br />
AD bus, and that will be the read data. If MB_DONE is not asserted, then a timeout will be<br />
recorded and the transaction cancelled.<br />
Here is a write transaction:<br />
DN9200K10PCIE8T User Guide www.dinigroup.com 157
H A R D W A R E<br />
Figure 94 - Inaccurate Main Bus write timing<br />
When the Spartan asserts the “WR” signal, the FPGA should register the data on the AD bus.<br />
Sometime after this, the FPGA should assert the MB_DONE signal. This will allow the Spartan<br />
to begin more transactions. The FPGA may delay this for up to 200 clock cycles before a<br />
timeout is recorded and the transaction is cancelled.<br />
Main bus can be controlled from the USB Controller program. (Read and write single addresses,<br />
or to/from files) It can also be written from the main.txt configuration method. The main.txt<br />
syntax is<br />
MAIN BUS 0x 0x<br />
Where and are 8-digit (32-bit) hexadecimal numbers.<br />
Cycle Count: 1.0×10 0 1.0×10 5 1.0×10 10 1.0×10 15 1.0×10 20 1.0×10 25<br />
Behavior:<br />
20.3.1 mb_target.v<br />
A file is provided that can be used as a drop-in MainBus target interface. It also implements the<br />
conventional memory allocation between FPGAs by the use of a compile-time parameter. In<br />
order to change the conventional memory allocation, you will have to modify mb_target.v<br />
20.3.2 Conventional Memory map<br />
By convention, FPGAs on the main bus interface are assigned address ranges. Assigning address<br />
ranges is required because the “FPGA sourced” signals (MB_DONE) need to be driven by only<br />
one FPGA at a time.<br />
DN9200K10PCIE8T User Guide www.dinigroup.com 158
H A R D W A R E<br />
The convention that Dini Group uses is to reserve the upper four bits in the address as an<br />
FPGA-select address. The address range (hex)<br />
0x00000000 – 0x0FFFFFFF is reserved for FPGA A,.<br />
0x10000000 – 0x1FFFFFFF is reserved for FPGA B,<br />
and so on.<br />
The user need not follow this convention, but unless you really need 32-bit addresses, we<br />
recommend using it. Only one FPGA has “control” of the DONE signal. If the last address<br />
latched by ALE was not for a given FPGA, it should tri-state the output. Before tri-stating any<br />
signal with a pull-up or pull-down resistor, it is good practice to drive the signal to the DC value<br />
before tri-stating. (So that simulation will match emulation result).<br />
21 Ethernet<br />
An Ethernet interface is available to FPGA A. It is provided by a Vitesse VSC8601 tri-mode<br />
Ethernet PHY. The RJ45 connector can be used to connect to a regular 10Base-T, 100Base-TX,<br />
or 1000Base-T Ethernet network connection.<br />
Figure 95 - Ethernet locator<br />
The VCS8601 device does not contain an Ethernet MAC. The FPGA must implement a<br />
complete network stack to make use of the Ethernet connection.<br />
http://www.opencores.org/projects.cgi/web/ethernet_tri_mode/overview<br />
21.1 RGMII<br />
The 4-bit GMII interface is the only strictly required interface on the PHY device. The<br />
EEPROM, MDIO, and other signals are only required if you want to put the PHY into a mode<br />
that is not default.<br />
The SMI (MDC, MDIO signals) address is set to 0000.<br />
DN9200K10PCIE8T User Guide www.dinigroup.com 159
H A R D W A R E<br />
21.1.1 Electrical<br />
The appropriate electrical standard to use is LVDCI_25. In Gigabit mode (default), the MII<br />
interface runs at 125MHz, DDR.<br />
The CLK_ETH125 signal should use the SSTL_II_25_DCI signaling standard.<br />
21.1.2 Timing<br />
The board is designed intending for a particular use model for the IO timing.<br />
Figure 96 - Ethernet timing<br />
The clocking plan here assumes you are running in gigabit mode. If in 100 or 10 megabit mode,<br />
then some other thing might be required.<br />
The interface requires a 125 MHz system clock. The part conveniently provides this with the<br />
CLK_ETH125 signal. This signal should be used to drive the TX interface and the MAC<br />
controller.<br />
For the TX interface timing, you can output clock and data with zero skew between them, as<br />
shown in the above diagram, and set the TX clock compensation register in the Vitesse part to<br />
meet the setup and hold time requirements. Alternately, you can do something else. In order to<br />
output a clock with zero skew from the data, you use a output DDR register (ODDR) with the<br />
rising edge data set to 1 and the falling edge set to 0.<br />
For input timing, you can clock the RX data signals off the RXCLK, and then make an<br />
asynchronous domain change to the Ethernet MAC, or you can figure out what the correct<br />
DN9200K10PCIE8T User Guide www.dinigroup.com 160
H A R D W A R E<br />
phase offset is between the CLK_ETH125 signal and the RXCLK signal and make a<br />
synchronous domain change. We do the former because RGMII is very easy to put into an<br />
elastic buffer.<br />
All signals on RGMII are skew-matched on the board to within: 100ps<br />
FPGA:<br />
DCM is in system-synchronous mode with no phase adjustment<br />
Worst clock-to-out 3.37<br />
Worst setup time 0.097<br />
Worst hold time 0.21<br />
PHY: (clock measured at PHY pin)<br />
clock-out<br />
2ns<br />
setup<br />
2ns<br />
valid<br />
1.2ns<br />
21.2 Configuration Registers<br />
In order to read and write registers on the Vitesse part, you must implement a MDIO controller.<br />
You will probably need to look at the Vitesse datasheet to see where register locations are and<br />
IO timing, etc. This step is probably required, because the default register settings may or may<br />
not be what you want.<br />
If you do not implement the MDIO interface, then the default settings are used for the device.<br />
This includes settings that are specified by multi-level inputs connected to resistors.<br />
The CMODE options of the Ethernet PHYs has been set as follows<br />
CMODE0 – 0100 (8.25 kΩ resistor)<br />
CMODE1 – 0000 (0 Ω resistor)<br />
CMODE2 – 0001 (2.2 kΩ resistor)<br />
CMODE3 – 0000 (0 Ω resistor)<br />
This results in the following settings<br />
ADDR = 00000 MDIO address<br />
CLKOUT = TRUE Drives the CLK_ETH_125 signal<br />
PAUSE = 00 I don‟t know<br />
DOWNSHIFT = FALSE I don‟t know<br />
SPEED = 00 Gigabit mode only<br />
ACTIPHY® = FALSE I don‟t know what this is.<br />
SKEW = 11 This controls the MII timing. It probably<br />
won‟t work until you set this.<br />
MAC CALIBRATION MODE = 00 ????????<br />
DN9200K10PCIE8T User Guide www.dinigroup.com 161
H A R D W A R E<br />
The LEDs on the RJ45 connector are controlled by the PHY. The Amber LED indicates<br />
activity and the Green LED indicates link in gigabit. The LED, DS64, located next to the RJ45<br />
connector, indicates link in 100Mbit mode. The 10Mb link LED is not configured.<br />
Hot plug is acceptable on a 1000Base-T connection.<br />
The Ethernet PHY works with the Xilinx Ethernet IP, but only in 10 and 100Mbit modes.<br />
21.3 MII Interface<br />
The physical interface is 1000Base-T, 100Base-T or 10Base-T. It has an “RJ45” style modular<br />
connector. It is connected through a transformer. It is hot-swappable.<br />
Figure 97 - 1000Base-T circuit<br />
The above schematic clipping is useless but looks cool and technological.<br />
I don‟t know what else to say about this. Look up 1000Base-T<br />
21.4 External EPROM<br />
Every FPGA that has an Ethernet connector on it also has a very small EPROM. This is<br />
typically used to store a MAC address and phone numbers. The limited details about it are in<br />
another section.<br />
21.5 EPROM PHY Configuration<br />
The EEDAT and EECLK signals are intended to connect the PHY to an EPROM that would<br />
contain configuration settings for the device (LED behavior, MII timing, Link speed, duplex,<br />
auto negotiation, etc.). Since the MDIO interface is connected to the FPGA, it is unlikely you<br />
DN9200K10PCIE8T User Guide www.dinigroup.com 162
H A R D W A R E<br />
would ever use these signals, unless you just like emulating EPROMs on weekends and<br />
vacations.<br />
This can be used instead of the MDIO interface.<br />
21.6 JTAG<br />
The VSC8601 device is attached to a JTAG chain. I don‟t know why you would need access to<br />
this. It isn‟t tested or thought about ever. This JTAG chain does not connect to the FPGA<br />
JTAG chain. It‟s 3.3V.<br />
21.7 Ethernet MAC<br />
There is no MAC provided. You might think “I can use the Virtex-5 built-in tri-mode MAC!!”<br />
However, you‟ll be disappointed because this isn‟t available in the LX330. You can route the<br />
MII interface all the way over to the LXT (FPGA Q) and use its hard MAC if you want. This<br />
wouldn‟t be very hard.<br />
You can also buy access to the Xilinx soft MAC. You probably need to implement a processor<br />
and a software network stack. The way we did it is using the Xilinx demonstration version of<br />
their 10/100 MAC, and connected it to a Microblaze running lwip stack. We had to write a<br />
converted between GMII and RGMII, which is basically just adding a DDR flip-flop.<br />
22 EPROM<br />
A small EPROM (1 kΩ) is attached to FPGA A. These devices are intended to store<br />
identification data for generating a unique MAC address for the Ethernet interfaces. However,<br />
the EPROM can be used for any user-defined purpose requiring static-memory intensive tasks,<br />
like remembering your name and birthday.<br />
The interface to the EPROM is a standard IIC at 1.8V. The IIC address of the devices is<br />
(binary) 1010 000<br />
The maximum clock speed of the IIC interface is 400 kHz<br />
DN9200K10PCIE8T User Guide www.dinigroup.com 163
H A R D W A R E<br />
Figure 98 - EPROM circuit<br />
23 SPI Flash<br />
For non-volatile memory needs, a medium-density SPI serial flash is provided on each FPGA.<br />
23.1 On FPGAs A and B<br />
The SPI flashed on FPGA A and B are 16 Mb, part number AT45DB161D. You should look<br />
in the datasheet for this part to see the IO interface and timing requirements. The signals are<br />
LVCMOS25. The flash devices cannot be used for configuration, only for user data.<br />
FPGA_A<br />
U1-2<br />
L0P_CC_RS1_2<br />
L0N_CC_RS0_2<br />
L1P_CC_A25_2<br />
L1N_CC_A24_2<br />
L2P_A23_2<br />
L2N_A22_2<br />
L3P_A21_2<br />
L3N_A20_2<br />
L4P_FCS_B_2<br />
L4N_VREF_FOE_B_MOSI_2<br />
L5P_FWE_B_2<br />
L5N_CSO_B_2<br />
L6P_D7_2<br />
L6N_D6_2<br />
L7P_D5_2<br />
L7N_D4_2<br />
L8P_D3_2<br />
L8N_D2_FS2_2<br />
L9P_D1_FS1_2<br />
L9N_D0_FS0_2<br />
VCCO_2<br />
VCCO_2<br />
XC5VLX330FF1760<br />
Figure 99 - SPI Flash circuit<br />
AH16<br />
AJ15<br />
AH30<br />
AH29<br />
AJ16<br />
AJ17<br />
AK30<br />
AJ30<br />
AK14<br />
AK15<br />
AL29<br />
AL30<br />
AJ13<br />
AK13<br />
AJ28<br />
AK29<br />
AL15<br />
AL14<br />
AJ26<br />
AJ27<br />
AR26<br />
AV27<br />
SPI_FPGA_RSTn_A<br />
SPI_FPGA_SCK_Ar<br />
SPI_FPGA_FCSn_A<br />
SPI_FPGA_MOSI_A<br />
SPI_FPGA_WPn_A<br />
+2.5V<br />
R1156<br />
33R<br />
SPI_FPGA_MOSI_A<br />
SPI_FPGA_SCK_A<br />
SPI_FPGA_RSTn_A<br />
SPI_FPGA_FCSn_A<br />
SPI_FPGA_WPn_A<br />
SPI_FPGA_SCK_A<br />
+2.5V<br />
R952 1.6K<br />
R953<br />
DNI<br />
R954 1.6K<br />
R955<br />
DNI<br />
R951 1.6K<br />
1<br />
6<br />
2<br />
SI VCC<br />
3<br />
SCK<br />
8<br />
4<br />
RESET SO<br />
5<br />
CS<br />
7<br />
WP GND<br />
AT45DB161D<br />
SOIC127P793X216-8N<br />
SPI_FPGA_FCSn_A<br />
SPI_FPGA_MOSI_A<br />
SPI_FPGA_WPn_A<br />
SPI_FPGA_RSTn_A<br />
+2.5V<br />
FPGAA_DIN<br />
Please note that the input signal “DIN” connects to the “DIN” pin of the FPGA. This pin<br />
cannot be placed like a normal IO. In order to access this pin as an input, you need to instantiate<br />
a STARTUP_VIRTEX5 in your design, and use the DINSPI port of that module. Also, since<br />
nobody knows the timing of that port, we have no idea what the maximum speed of the SPI<br />
interface is.<br />
DN9200K10PCIE8T User Guide www.dinigroup.com 164
H A R D W A R E<br />
23.2 On FPGA Q<br />
One FPGA Q, the situations is similar, but with some important differences. The signal<br />
standard is LVCMOS33. The part number is AT45DB642D. The part can and should be used<br />
for configuring the FPGA. However, if you are very clever, you can also use the flash for user<br />
data. In the same way, the DIN input needs to be gotten from the STARTUP_VIRTEX5<br />
module. Additionally, the SCK signal needs to be driven from the USRCCLKO port of the<br />
STARTUP_VIRTEX5 module.<br />
U3-2<br />
IO_L0P_CC_RS1_2<br />
IO_L0N_CC_RS0_2<br />
IO_L1P_CC_A25_2<br />
IO_L1N_CC_A24_2<br />
IO_L2P_A23_2<br />
IO_L2N_A22_2<br />
IO_L3P_A21_2<br />
IO_L3N_A20_2<br />
IO_L4P_FCS_B_2<br />
IO_L4N_VREF_FOE_B_MOSI_2<br />
IO_L5P_FWE_B_2<br />
IO_L5N_CSO_B_2<br />
IO_L6P_D7_2<br />
IO_L6N_D6_2<br />
IO_L7P_D5_2<br />
IO_L7N_D4_2<br />
IO_L8P_D3_2<br />
IO_L8N_D2_FS2_2<br />
IO_L9P_D1_FS1_2<br />
IO_L9N_D0_FS0_2<br />
VIRTEX5_FF665<br />
VCCO_2<br />
VCCO_2<br />
Figure 100 - SPI Flash circuit Q<br />
W11<br />
Y10<br />
Y20<br />
AA19<br />
AA10<br />
Y11<br />
AA18<br />
Y18<br />
Y12<br />
AA12<br />
AA17<br />
Y17<br />
AA13<br />
AA14<br />
Y16<br />
W16<br />
Y13<br />
W14<br />
Y15<br />
AA15<br />
AA16<br />
AD17<br />
FPGAQ_WPn<br />
FPGAQ_SPI_RSTn<br />
FPGAQ_FCSn<br />
FPGAQ_MOSI<br />
+3.3V<br />
FPGAQ_MOSI<br />
FPGAQ_CCLK<br />
FPGAQ_SPI_RSTn<br />
FPGAQ_FCSn<br />
FPGAQ_WPn<br />
FX70T bitstream: 27.1 Mbit<br />
+3.3V<br />
64Mbit PROM<br />
R970 1.6K<br />
R971 1.6K<br />
R972<br />
DNI<br />
R975 1.6K<br />
R978<br />
DNI<br />
U70<br />
1<br />
6<br />
2<br />
SI VCC<br />
3<br />
SCK<br />
8<br />
4<br />
RESET SO<br />
5<br />
CS<br />
7<br />
WP GND<br />
FPGAQ_SPI_RSTn<br />
FPGAQ_FCSn<br />
FPGAQ_MOSI<br />
FPGAQ_WPn<br />
+3.3V<br />
AT45DB642D<br />
SON127P800X610X100-8N<br />
FPGAQ_DIN<br />
In order to program this flash with a bit file, you can use the Xilinx program iMPACT. From<br />
here you can select the FPGA Q (last item on the JTAG chain) and chose “program SPI flash”.<br />
The iMPACT program will automatically load the FPGA with a bit file that allows the<br />
programming of the flash, program the flash using that bitfile, then program the FPGA with the<br />
bit file that you just loaded into the flash using JTAG. See the section on “updating firmware”,<br />
as that section has helpful things like screen captures and proofreading.<br />
24 Mictor Connectors<br />
There are three 38-pin “Mictor” connectors on the board for the purpose of using a logic<br />
analyzer. (If you are still using a logic analyzer- they are so 2002) Consider using an embedded<br />
logic analyzer instead like ChipScope ($500). This logic analyzer places-and-route within your<br />
design, either in the RTL, or post-synthesis. They are more flexible than a stand-alone analyzer<br />
and can simultaneously access more signals and triggers.<br />
Although the Mictors are designed to be used with a logic analyzer, they can also be used for<br />
cabling two boards together, or to a daughter card, or just for use as test points. The “trigger”<br />
signals connect to clock-capable IO pins, and so can be used as low-skew clock inputs.<br />
DN9200K10PCIE8T User Guide www.dinigroup.com 165
H A R D W A R E<br />
Figure 101 - Mictor locator<br />
Hot-plugging a Mictor connector is generally safe. When connected to a logic analyzer, signals<br />
MICTOR32 and MICTOR33 can be used as trigger signals. I‟ve never actually used a logic<br />
analyzer; I have no clue what I‟m talking about.<br />
Figure 102 - Mictor cable<br />
Signals connected to the Mictor are 50Ω. DCI and SSTL (referenced input) can be used on the<br />
Mictor interface.<br />
24.1 FPGA A Mictor<br />
The Mictor connected to FPGA A has a total of 34 signals (32 plus two triggers). The voltage<br />
level of each signal is determined by the voltage level of the bank that the signal connects to.<br />
You may need to change the trigger level of your logic analyzer. The “daughter card” voltage<br />
banks (when no daughtercard is installed) are 1.2V (use a 0.7V reference level).<br />
DN9200K10PCIE8T User Guide www.dinigroup.com 166
H A R D W A R E<br />
Figure 103 - Mictor A circuit<br />
This diagram shows how the voltages are controlled on the Mictor connector. The +VIO_DC*<br />
voltages can easily be changed if needed.<br />
24.2 FPGA B Mictor<br />
The FPGA B Mictor is pinned out exactly like the one on FPGA A, but the voltage splits are<br />
different. The daughtercard bank voltages are 1.2V (use a 0.7V reference). This voltage can be<br />
changed easily if needed.<br />
Figure 104 - Mictor B circuit<br />
DN9200K10PCIE8T User Guide www.dinigroup.com 167
H A R D W A R E<br />
24.3 MainBus Mictor<br />
A second Mictor connector, on the backside of the board, is connected to the MainBus and<br />
SelectMap interfaces of the DN9200K10PCIE8T.<br />
Figure 105 - MainBus Mictor locator<br />
Most of the signals attached to the Mictor are accessible from both FPGAs on the<br />
DN9200K10PCIE8T. Since these signals are heavily loaded, this connector is less suitable for<br />
high-speed signaling.<br />
J17<br />
3<br />
MICTOR_CLK_E<br />
3<br />
SELECTMAP_D[7:0]<br />
MB23_AD<br />
MB22_AD<br />
MB21_AD<br />
MB20_AD<br />
MB19_AD<br />
MB18_AD<br />
MB17_AD<br />
MB16_AD<br />
SELECTMAP_D7<br />
SELECTMAP_D6<br />
SELECTMAP_D5<br />
SELECTMAP_D4<br />
SELECTMAP_D3<br />
SELECTMAP_D2<br />
SELECTMAP_D1<br />
SELECTMAP_D0<br />
1<br />
3<br />
5<br />
7<br />
9<br />
11<br />
13<br />
15<br />
17<br />
19<br />
21<br />
23<br />
25<br />
27<br />
29<br />
31<br />
33<br />
35<br />
37<br />
39<br />
40<br />
41<br />
1<br />
3 GND<br />
5 CLK<br />
7 D15<br />
9<br />
11<br />
13<br />
15<br />
17<br />
19<br />
21<br />
23<br />
25<br />
27<br />
29<br />
31<br />
33<br />
35<br />
37 D0<br />
GND<br />
GND<br />
GND<br />
Do Not Connect<br />
2-767004-2<br />
CONN_MICTOR38<br />
CLK<br />
D15<br />
D0<br />
2<br />
4<br />
6<br />
8<br />
10<br />
12<br />
14<br />
16<br />
18<br />
20<br />
22<br />
24<br />
26<br />
28<br />
30<br />
32<br />
34<br />
36<br />
38<br />
LOC<br />
GND<br />
GND<br />
2<br />
4<br />
6<br />
8<br />
10<br />
12<br />
14<br />
16<br />
18<br />
20<br />
22<br />
24<br />
26<br />
28<br />
30<br />
32<br />
34<br />
36<br />
38<br />
44<br />
42<br />
43<br />
Figure 106 - Main Bus Mictor circuit<br />
FPGA15_CS#<br />
FPGA14_CS#<br />
FPGA_M_DONE<br />
FPGA_M_CCLK<br />
FPGA_M_PROG#<br />
MB35_DONE<br />
MB34_RD<br />
MB33_WR<br />
MB32_ALE<br />
MB31_AD<br />
MB30_AD<br />
MB29_AD<br />
MB28_AD<br />
MB27_AD<br />
MB26_AD<br />
MB25_AD<br />
MB24_AD<br />
CLK_48_MIC 3<br />
FPGA_RD/WR# 3<br />
The “clock” or “trigger” signals on this connector, CLK_48_MIC and MICTOR_CLK_E are<br />
driven at a fixed 48 MHz. If you need to use a logic analyzer, this is the only available trigger.<br />
All signals are 2.5V (use a 1.25V reference).<br />
DN9200K10PCIE8T User Guide www.dinigroup.com 168
H A R D W A R E<br />
If you use the signals SELECTMAP_D[7:0] for any purpose other than configuration, care<br />
must be taken to prevent the FPGAs from driving these signals before all FPGAs are<br />
configured, or else risk interfering with the configuration process.<br />
Some SelectMap control signals are connected to this connector, but are not user-accessible.<br />
This connector could potentially be used for configuring Virtex FPGAs on daughtercards. You<br />
would have to contact us for information about that possibility.<br />
25 Power<br />
The power used by the DN9200K10PCIE8T is derived from an external 12V voltage supply.<br />
The current at these voltages is supplied through the PCI Express power connector, J3.<br />
NO power is taken from the PCIe edge connector. Therefore, if installed in a PCI Express slot<br />
with no power connector, the board will not power on.<br />
Figure 107 - Board power topology diagram<br />
The maximum power draws on each of these rails is given below.<br />
+12V 9A<br />
+1.0VA<br />
15A<br />
+1.0VB<br />
15A<br />
+2.5V<br />
20A<br />
+3.3V<br />
6A<br />
+5.0V<br />
9A<br />
+VDIMM_A 2A<br />
+VDIMM_B 2A<br />
+1.2V_S 0.2A<br />
+0.9VA 0.2A<br />
+0.9VB 0.2A<br />
DN9200K10PCIE8T User Guide www.dinigroup.com 169
H A R D W A R E<br />
25.1 Power 12V<br />
The 12V rail is used to generate most other voltages on the board. The only places where 12V is<br />
used directly are the daughtercards.<br />
Below is a list of the maximum power draw of each of the 12V loads on the<br />
DN9200K10PCIE8T.<br />
Rail Max Current Uses 12V current<br />
1.0V_A 25 Internal FPGA power 2.3A<br />
1.0V_B 25 Internal FPGA power 2.3A<br />
1.8V 2.5 DIMM B 0.3A<br />
2.5 DIMM A 0.3A<br />
2.5V 9 Spartan 3 (1.2V) 2.6A<br />
FPGA IO<br />
FPGA Aux power<br />
Daughtercards 10W 1.2A<br />
TOTAL 9.0A<br />
The total possible power requirement of the DN9200K10PCIE8T is 9A on 12V (108W).<br />
More typically, each FPGA would only use 10W, and daughtercards would use little power<br />
(2W). Under these conditions, the 12V power requirement is only 2.5A (25W). Under these<br />
conditions use in a server rack would work.<br />
25.2 Power 3.3V<br />
3.3V is used by the DN9200K10PCIE8T to supply the clock distribution network, the<br />
configuration logic (Micro controller and Spartan 3 FPGA), and daughtercard power.<br />
The maximum power requirement for the DN9200K10PCIE8T on 3.3V is 1A. Current for<br />
3.3V is NOT taken directly from the ATX power supply or from the PCIe slot.<br />
25.3 Power 2.5V<br />
2.5V power is generated from the 12V using a 30A power supply.<br />
25.4 Ground<br />
All ground (0V) voltages on the DN9200K10PCIE8T are shared. A monolithic ground design<br />
strategy was used. The nets GND_SHIELD and GND_ANALOG are directly connected to<br />
the ground plane.<br />
25.5 Voltage Regulation<br />
Within 2% typically<br />
DN9200K10PCIE8T User Guide www.dinigroup.com 170
H A R D W A R E<br />
25.6 Power Connections<br />
The primary sources of power for the DN9200K10PCIE8T are the PCI Express “graphics”<br />
power connector. From these two sources, the DN9200K10PCIE8T draws current at 12V; all<br />
other voltages on the board are generated.<br />
Figure 108 - PCI Express graphics power locator<br />
This connector will work with a standard ATX power supply. Any supply rated above 300W is<br />
likely to be suitable for use with the DN9200K10PCIE8T.<br />
If no 6-pin PCI Express “graphics power” connector is available, you may use an adapter cable<br />
(provided). Most new power supplies now have this connector available.<br />
Note that only a 6-pin “PCI Express graphics” cable should be used. This is easily confused<br />
with the now-defunct “AUX POWER” connector (also 6-pin) and the 4-and 6-pin EPS “server<br />
motherboard” connections. The connector is keyed, so the wrong connectors will have<br />
difficulty fitting properly into the board.<br />
Fittings are supplied such that the board can be powered from the PCI Express slot if this<br />
feature is desired; however this operation is not recommended because it can easily overload the<br />
motherboard.<br />
25.7 Power Monitors<br />
The DN9200K10PCIE8T monitors the voltage levels on the board to ensure they are within<br />
tolerance. If they fall out of tolerance (above or below voltage) the board will enter a reset state.<br />
These tolerance ranges are listed below.<br />
DN9200K10PCIE8T User Guide www.dinigroup.com 171
H A R D W A R E<br />
1.0V (0.95 to 1.21)<br />
1.8V (1.65 to 3.00)<br />
2.5V (2.20 to 2.90)<br />
3.3V (2.89 to 4.00)<br />
5.0V (3.99 to 6.02)<br />
The following voltages are not monitored.<br />
1.2V_S, VCCO_B0, VCCO_B1, VCCO_B2, DIMM_VTT, DIMM_VREF<br />
When a power supply voltage falls out of tolerance, the board is put in reset (the SYS_RST#<br />
signal is asserted), and SYS_RSTn LED glows, and an LED along the right hand side of the<br />
board will light to indicate which power rail has failed.<br />
The voltage levels are measured with a RC filter “time constant” of around 1 kHz. This means<br />
transient voltage spikes may not trigger a board reset.<br />
25.8 Power Thru-hole Access points<br />
Each power rail requiring more than 100mA on the DN9200K10PCIE8T has a dedicated test<br />
point associated with it. This test point is a through-hole, two-pin location, where pin one is the<br />
power rail, and pin two is a ground connection. These test point locations are suitable for<br />
supplying at least 2A, regardless of the power requirements or capabilities of the power net.<br />
+1.0V_A<br />
TP16<br />
DNI<br />
Pin one is a square. Pin two is circular.<br />
Figure 109 - Power Test points<br />
These test-points are suitable for wiring to if power is needed off-board for some reason. Maybe<br />
you need to bring power in from an external source.<br />
DN9200K10PCIE8T User Guide www.dinigroup.com 172
H A R D W A R E<br />
25.9 Power measurement TP<br />
The following test-points are located along the left edge of the board, next to an LED associated<br />
with that power net. These test points are square pads. They are not suitable for supplying<br />
power to the board, or off the board.<br />
Figure 110 - Power Fail LED locator<br />
+1.0V_A<br />
TP14<br />
DNI<br />
COPPERDOT<br />
Figure 111 - Power probe point circuit<br />
The test point reference designator is not visible on the silkscreen of the DN9200K10PCIE8T.<br />
Instead, there is a label indicating which power net the test point is connected to. These test<br />
points are connected by thin traces that are not capable of conducting more than 100mA of<br />
current. You should only use these test points for probing. For noise measurements, it is better<br />
to use the test points next to each power supply.<br />
25.10 Heat<br />
The maximum power dissipation supported for each FPGA is 25W. Using the provided heat<br />
sink and fan assemblies, FPGAs will remain under the maximum recommended junction<br />
temperature (85°C). If your design exceeds this limit, you can assume the temperature of the<br />
device raises 2C° for each watt above this amount your design uses. Put this number in the<br />
settings of the timing analyzer.<br />
Power requirements of a design can be estimated using the power estimator tool in ISE 10.1.<br />
For this calculation the board is assumed to be in an ambient temperature of 35°C. In a closed<br />
computer case, the ambient temperature will increase.<br />
DN9200K10PCIE8T User Guide www.dinigroup.com 173
H A R D W A R E<br />
We have alternate fans and Heatsinks that can help reduce the FPGA temperature. We can ship<br />
you some if you request.<br />
25.10.1 Fans<br />
The fan units attached above the heat sinks are powered by 5V. Each fan has its own power<br />
connector.<br />
Figure 112 - Heatsink fan locator<br />
The fans spin counter-clockwise in the northern hemisphere, or clockwise in the southern<br />
hemisphere.<br />
25.10.2 Removing Heatsinks<br />
The heat sink/fan assemblies are attached using a plastic clip. There is a thermal interface<br />
material between the FPGA and heat sink that is slightly adhesive. The easiest way to get them<br />
off is to unplug all the fan power and turn the board on. After a few minutes, turn the board off<br />
and then try to unseat the heat sink/fan unit. The warm will make gooey the thermal interface<br />
material.<br />
25.10.3 Fan Tachometers<br />
Each FPGA fan has a tachometer connected to it for the detection of fan failure. If you intend<br />
to use this system in a rack or production system, you may want to monitor the fans. The fans<br />
are likely the least reliable component on the board, and may go bad. We have more.<br />
DN9200K10PCIE8T User Guide www.dinigroup.com 174
H A R D W A R E<br />
+2.5V<br />
FPGA_B<br />
U2-2<br />
XC5VLX330FF1760<br />
L0P_CC_RS1_2<br />
L0N_CC_RS0_2<br />
L1P_CC_A25_2<br />
L1N_CC_A24_2<br />
L2P_A23_2<br />
L2N_A22_2<br />
L3P_A21_2<br />
L3N_A20_2<br />
L4P_FCS_B_2<br />
L4N_VREF_FOE_B_MOSI_2<br />
L5P_FWE_B_2<br />
L5N_CSO_B_2<br />
L6P_D7_2<br />
L6N_D6_2<br />
L7P_D5_2<br />
L7N_D4_2<br />
L8P_D3_2<br />
L8N_D2_FS2_2<br />
L9P_D1_FS1_2<br />
L9N_D0_FS0_2<br />
VCCO_2<br />
VCCO_2<br />
AH16<br />
AJ15<br />
AH30<br />
AH29<br />
AJ16<br />
AJ17<br />
AK30<br />
AJ30<br />
AK14<br />
AK15<br />
AL29<br />
AL30<br />
AJ13<br />
AK13<br />
AJ28<br />
AK29<br />
AL15<br />
AL14<br />
AJ26<br />
AJ27<br />
AR26<br />
AV27<br />
FAN_B_TACH<br />
+2.5V<br />
R398<br />
4.7K<br />
R399<br />
4.7K<br />
FAN_B_TACHr<br />
Figure 113 - Fan tachometer circuit<br />
C707<br />
0.1uF<br />
+5.0V<br />
22-27-2031<br />
22-23-2031-3<br />
1<br />
2<br />
3<br />
Figure 114 - Fan power locator<br />
The fan tachometer inputs (AH16) can be LVCMOS25. The fan will produce 2 rising edges per<br />
revolution. You may need to de-bounce the signal if you intend to count the fan frequency with<br />
any precision.<br />
Do not allow gasoline to touch the board. Do not allow dogs to chew on the board. Do not<br />
place the board under a soldering iron or on the surface of the sun.<br />
DN9200K10PCIE8T User Guide www.dinigroup.com 175
H A R D W A R E<br />
26 Connectors<br />
This section lists all the connectors on the board<br />
JP1 Samtec TSM-136-01-T-DV Change DIMM voltage<br />
JP2 Samtec TSM-136-01-T-DV Change DIMM voltage<br />
JP16 Japan<br />
P1 Samtec TSM-136-01-T-DV<br />
P2 Samtec TSM-136-01-T-DV<br />
P3 Samtec TSM-136-01-T-DV<br />
P4 Samtec TSM-136-01-T-DV<br />
P5 Samtec TSM-136-01-T-DV<br />
P7 Samtec TSM-136-01-T-DV<br />
P8 Samtec TSM-136-01-T-DV<br />
J7 Molex 22-27-2031<br />
J15 Molex 22-27-2031<br />
J18 Molex 22-27-2031<br />
J5 Molex 87832-1420<br />
J6 Molex 87832-1420<br />
J2 JAE MM50-200B2-1E<br />
J1 JAE MM50-200B2-1E<br />
T1 Belfuse 0826-1X1T-23-F1<br />
J4 AMP/Tyco 2-5767004-2<br />
J8 AMP/Tyco 2-5767004-2<br />
J19 AMP/Tyco 2-5767004-2<br />
J9 Molex 67068-8000<br />
P5 FCI 84520102LF<br />
P9 FCI 84520102LF<br />
P10 FCI 84520102LF<br />
X1 AMP/Tyco 2-641260-1<br />
J10 Lighthorse LTI-SASF546-P26-X1<br />
J11 Lighthorse LTI-SASF546-P26-X1<br />
J13 Lighthorse LTI-SASF546-P26-X1<br />
J14 Lighthorse LTI-SASF546-P26-X1<br />
J16 Lighthorse LTI-SASF546-P26-X1<br />
J17 Lighthorse LTI-SASF546-P26-X1<br />
J12 Molex 53856-5070<br />
J3 Molex 45558-0002<br />
Y2 Gompf 9456-0216LC<br />
S1 ITT PTS645SH50SMTRLFS<br />
S2 ITT PTS645SH50SMTRLFS<br />
TP13 3M 923345-01-C<br />
TP16 3M 923345-01-C<br />
26.1.1 Comments<br />
If you have a board with fewer than two FPGAs installed, connectors to which noting connects<br />
will be un-installed from the board to prevent confusion and anger.<br />
DN9200K10PCIE8T User Guide www.dinigroup.com 176
H A R D W A R E<br />
27 Mechanical<br />
The DN9200K10PCIE8T is larger than the PCI Express specification allows, and is not<br />
guaranteed to fit into every ATX case. It will certainly fail to fit into a rack mount server<br />
enclosure. The vertical clearance with the fans installed and the ATX power connector not<br />
connector is 30mm. Lower-profile fans are available (14mm) but they may not have enough<br />
thermal performance for very power-hungry designs.<br />
Figure 115 - Mechanical drawing<br />
Mounting holes are all over the place. These are grounded.<br />
Metal runners are along both edges of the board. These are for ground oscilloscope probe<br />
ground clips. You should also handle the DN9200K10PCIE8T by its ground bars to help<br />
prevent ESD damage to the FPGAs.<br />
DN9200K10PCIE8T User Guide www.dinigroup.com 177
H A R D W A R E<br />
Figure 116 - Ground rail locator<br />
28 Daughtercard Headers<br />
The daughter card expansion capability of the DN9200K10PCIE8T is provided by two FCI<br />
„MEG-Array‟ family connectors. It is not compatible with the 300-pin MSA standard.<br />
Figure 117 - Daughter card locator<br />
Each daughtercard connector provides 186 signals (plus 4 clock signals) to its associated FPGA.<br />
The signals can be used with just about any setting of IOSTANDARD, and can be used<br />
differentially.<br />
DN9200K10PCIE8T User Guide www.dinigroup.com 178
H A R D W A R E<br />
Figure 118 - Daughter card block diagram<br />
Each daughter card header connection is arranged into three “Banks”, correlating to the banks<br />
of IO on the Virtex 5 FPGA. Two “IO Banks” on the Virtex-5 FPGA connect to each one<br />
“bank” on the daughtercard connector.<br />
This allows three different sets of voltage or timing requirements to be met on a single daughter<br />
card simultaneously. Each Bank on the daughter card is 62 signals. Each “bank” on an FPGA is<br />
40 signals.<br />
Other connections on the daughter card connector system include three dedicated, differential<br />
clock connections for inputting global clocks from an external source, power connections, bank<br />
VCCO power, and a buffered reset signal.<br />
28.1 Daughter Card Physical<br />
The connectors used in the expansion system are FCI MEG-Array 400-pin plug, 6mm, part<br />
#84520-102. This connector is capable of as much as 10 Gbs transmission rates using<br />
differential signaling.<br />
Two daughter card expansion headers on the DN9200K10PCIE8T are located on the bottom<br />
side of the PWB. This is done to eliminate the need for resolving board-to-board clearance<br />
issues, assuming the daughter card uses no large components on the backside.<br />
One expansion connector is provided on the front, for variety.<br />
The “Plug” of the system is located on the DN9200K10PCIE8T, and the “receptacle” is<br />
located on the expansion board.<br />
DN9200K10PCIE8T User Guide www.dinigroup.com 179
H A R D W A R E<br />
28.1.1 Daughter Card Locations and Mounting<br />
The 400-pin daughtercard header is located on the bottom (solder) side near the right side of the<br />
board. Each MEG-Array header on a Dini Group product has four standard-position mountain<br />
holes. The drawing below shows the location of the daughter card header and its associated<br />
mounting holes.<br />
Figure 119 - Mechanical Drawing<br />
This view of the DN9200K10PCIE8T daughter card locations is from the top of the PCB,<br />
looking through to the bottom side. The Dini Group standard daughtercard,<br />
DNMEG_OBS400 is compatible with the DN9200K10PCIE8T.<br />
The mounting holes are designed to be used with 14mm, M3 standoffs. Dini Group has<br />
available appropriate mounting hardware on request:<br />
Standoffs (Male-to-Female), (Part 1789)<br />
Harwin R30-3001402<br />
(Mouser 855-R30-3001402)<br />
“M3 x 14mm HEX 5mmA/F Harwin Metric Spacers RoHS: Compliant. Box/100”<br />
Big Round Nuts, (Part 1787)<br />
LMI HN4600300<br />
“M3 x 0.5mm<br />
Screws, (Part 1788)<br />
MPMS 003-0005-PH<br />
(Digi-key H742-ND)<br />
“SCREW MACHINE METRIC PH M3x5MM”<br />
DN9200K10PCIE8T User Guide www.dinigroup.com 180
H A R D W A R E<br />
With this host-plate-daughter card arrangement, there is a limited Z dimension clearance for<br />
backside components on the daughter card. This dimension is determined by the daughter card<br />
designer‟s part selection for the MEG-Array receptacle.<br />
Figure 120 - Daughter card side mechanical<br />
Note that the components on the topside of the daughter card and DN9200K10PCIE8T face<br />
in opposite directions.<br />
28.1.1.1 DNMEG_EXT<br />
If you need some more vertical clearance between daughtercard and DN9200K10PCIE8T (or<br />
need to install two daughtercards that interfere with each other mechanically, you can try using<br />
the DNMEG_EXT riser card.<br />
Figure 121 - DNMEG_EXT mechanical<br />
This card extends the vertical separation between daughter card and DN9200K10PCIE8T by an<br />
additional 14mm + 0.062”<br />
DN9200K10PCIE8T User Guide www.dinigroup.com 181
H A R D W A R E<br />
I‟d also like to point out that a daughtercard designer is free to use one of three different Meg<br />
Array receptacles with different stacking heights.<br />
28.1.2 Standard Daughtercard Size<br />
The daughtercard mechanical provisions on the DN9200K10PCIE8T are designed to mount a<br />
hypothetical daughtercard with the dimensions given below. The “observation daughtercard”,<br />
DNMEG400_OBS product conforms to these dimensions.<br />
2.75"<br />
2.75"<br />
Type 2 Short<br />
Type 0/1/4 Short<br />
View: Top Side<br />
400-Pin Receptacle on Back<br />
P/N: 74390-101<br />
View: Top Side<br />
300-Pin Receptacle on Back<br />
P/N: 84553-101<br />
A1<br />
0.500"<br />
0.750"<br />
0.500"<br />
5.000"<br />
3.250"<br />
4.250"<br />
5.000"<br />
3.250"<br />
A1<br />
1.950"<br />
0.500"<br />
Figure 122 - Standard daughter card dimensions<br />
1.950"<br />
0.500"<br />
The board edge constraints given above allow one daughtercard to be installed on all positions<br />
of the DN9200K10PCIE8T simultaneously. When making a daughtercard, you do not have to<br />
follow this size restriction.<br />
28.1.3 Insertion and removal<br />
Due to the small dimensions of the very high speed Meg Array connector system, the pins on<br />
the plug and receptacle of the Meg Array connectors are very delicate.<br />
When plugging in a daughter card, make sure to align the daughter card first before pressing on<br />
the connector. Be absolutely certain that both the small and the large keys at the narrow ends of<br />
the Meg Array line up BEFORE applying pressure to mate the connectors!<br />
DN9200K10PCIE8T User Guide www.dinigroup.com 182
H A R D W A R E<br />
Place it down flat, then press down gently.<br />
Figure 123 - Daughter card installation step 1<br />
Figure 124 - Install Daughter card step 2<br />
Mating can be started from either end. Locate and match the connector‟s A1 position marking<br />
[triangle] for both the Plug and Receptacle. (Markings are located on the long side of the<br />
housing.) Rough alignment is required prior to connector mating as misalignment of >0.8mm<br />
could damage connector contacts. Rough alignment of the connector is achieved through<br />
matching the Small alignment slot of the plug housing with the Small alignment key of the<br />
receptacle housing and the large alignment slot with the large alignment key. Both connector<br />
housings have generous lead-in around the perimeter and will allow the user to blind mate<br />
assemble the connectors. Align the two connectors by feel and when the receptacle keys start<br />
into the plug slots, push down on one end and then move force forward until the receptacle<br />
cover flange bottoms on the front face of the plug.<br />
Like mating, a connector pair can be unmated by pulling them straight apart. However, it<br />
requires less effort to un-mate if the force is originated from one of the slot/key ends of the<br />
assembly. (Reverse procedure from mating) Mating or un-mating of the connector by rolling in<br />
a direction perpendicular to alignment slots/keys may cause damage to the terminal contacts<br />
and is not recommended.<br />
28.2 Daughter Card Electrical<br />
The daughter card pin out and routing was designed to allow use of the Virtex 5‟s 1.2 Gbps<br />
general purpose IO. All signals on the DN9200K10PCIE8T are all routed as differential, 50 Ω<br />
DN9200K10PCIE8T User Guide www.dinigroup.com 183
H A R D W A R E<br />
(signal-to-ground) transmission lines. Signals can be used as single-ended also. Proper electrical<br />
levels are explained in the VCCO section.<br />
No length-matching is done on the PCB for daughter card signals, (except between two sides of<br />
a differential pair). However, the Virtex 5 is capable of variable-delay input or output using the<br />
built-in IDELAY or ODELAY modules. A signal delay report is available here. In order to<br />
simulate a length-match, you can instantiate an IDELAY and an ODELAY element on each<br />
IO, and add a tap delay to each IO.<br />
Signal Name Additive Delay (ps) Equivalent TAP value<br />
CLK_DCA_0 525<br />
CLK_DCA_1 600<br />
DCA1P06 160 7<br />
DCA1P10 182 7<br />
DCA1P26 200 6<br />
DCA1P14 200 6<br />
DCA0P24 201 6<br />
DCA2P27 201 6<br />
DCA1P18_C 209 6<br />
DCA0P20_C 210 6<br />
DCA1P22_C 211 6<br />
DCA2P06 216 6<br />
DCA0P04 218 6<br />
DCA1P25 220 6<br />
DCA0P08 221 6<br />
DCA2P25 224 6<br />
DCA2P10 227 6<br />
DCA1P17 230 6<br />
DCA0P30 232 6<br />
DCA1P21 234 6<br />
DCA2P18 235 6<br />
DCA0P03 237 6<br />
DCA2P22 239 6<br />
DCA2P21 240 6<br />
DCA0P19 241 6<br />
DCA0P18 242 6<br />
DCA0P07 245 6<br />
DCA1P31 247 6<br />
DCA1P13 247 6<br />
DCA0P11 249 6<br />
DCA2P12 253 6<br />
DCA0P23 255 6<br />
DCA1P08 257 6<br />
DCA0P22 263 6<br />
DCA2P31 265 6<br />
DCA1P16 270 5<br />
DCA1P05 273 5<br />
DCA0P16_C 275 5<br />
DCA2P11 277 5<br />
DCA1P29 279 5<br />
DN9200K10PCIE8T User Guide www.dinigroup.com 184
H A R D W A R E<br />
DCA2P26 281 5<br />
DCA0P21 281 5<br />
DCA1P12 283 5<br />
DCA2P13_C 289 5<br />
DCA0P09 295 5<br />
DCA2P05 295 5<br />
DCA0P25 298 5<br />
DCA2P30 300 5<br />
DCA2P28 302 5<br />
DCA2P03 303 5<br />
DCA1P07 304 5<br />
DCA0P14 309 5<br />
DCA0P17_C 310 5<br />
DCA2P29 310 5<br />
DCA2P09 311 5<br />
DCA2P14 315 5<br />
DCA1P27 318 5<br />
DCA2P17_C 320 5<br />
DCA1P09 321 5<br />
DCA1P03 333 5<br />
DCA2P04 346 4<br />
DCA2P08 346 4<br />
DCA1P11 346 4<br />
DCA2P02 353 4<br />
DCA2P20_C 354 4<br />
DCA1P01 355 4<br />
DCA0P15 373 4<br />
DCA0P12 376 4<br />
DCA0P13_C 379 4<br />
DCA1P23 381 4<br />
DCA2P07 393 4<br />
DCA1P30 393 4<br />
DCA2P23 398 4<br />
DCA2P01 398 4<br />
DCA0P31 399 4<br />
DCA0P10 400 4<br />
DCA0P05 402 4<br />
DCA0P29 408 4<br />
DCA1P02 410 4<br />
DCA1P19_C 412 4<br />
DCA0P02 412 4<br />
DCA2P16_C 413 4<br />
DCA1P15_C 414 4<br />
DCA0P01 415 4<br />
DCA1P20 419 3<br />
DCA1P24 422 3<br />
DCA0P06 476 3<br />
DCA0P26 486 3<br />
DCA0P27 501 2<br />
DCA2P15 509 2<br />
DCA0P28 543 2<br />
DN9200K10PCIE8T User Guide www.dinigroup.com 185
H A R D W A R E<br />
DCA1P04 561 2<br />
DCA2P24 570 1<br />
DCA2P19 638 1<br />
DCA1P28 681 0<br />
Signal Name Additive Delay Equivalent TAP value<br />
CLK_DCBB_0 575<br />
CLK_DCBB_1 450<br />
DCBB1P02 144 9<br />
DCBB2P04 158 9<br />
DCBB1P18_C 167 9<br />
DCBB1P26 167 9<br />
DCBB2P08 174 9<br />
DCBB1P22_C 179 9<br />
DCBB1P21 191 8<br />
DCBB1P01 192 8<br />
DCBB1P29 194 8<br />
DCBB1P25 194 8<br />
DCBB1P06 196 8<br />
DCBB1P14 199 8<br />
DCBB2P12 205 8<br />
DCBB1P05 205 8<br />
DCBB2P03 210 8<br />
DCBB2P16_C 213 8<br />
DCBB1P28 214 8<br />
DCBB0P18 223 8<br />
DCBB0P30 231 8<br />
DCBB2P11 233 8<br />
DCBB2P28 233 8<br />
DCBB2P27 237 8<br />
DCBB0P17_C 238 8<br />
DCBB2P14 239 8<br />
DCBB1P03 239 8<br />
DCBB1P30 241 8<br />
DCBB1P31 247 8<br />
DCBB1P10 252 8<br />
DCBB0P22 255 8<br />
DCBB0P21 256 8<br />
DCBB1P09 257 7<br />
DCBB1P13 257 7<br />
DCBB1P12 258 7<br />
DCBB1P04 270 7<br />
DCBB1P07 273 7<br />
DCBB2P30 275 7<br />
DCBB2P15 278 7<br />
DCBB2P24 280 7<br />
DCBB2P29 283 7<br />
DCBB1P11 284 7<br />
DCBB2P22 287 7<br />
DCBB2P31 288 7<br />
DN9200K10PCIE8T User Guide www.dinigroup.com 186
H A R D W A R E<br />
DCBB1P27 290 7<br />
DCBB2P23 293 7<br />
DCBB2P20_C 298 7<br />
DCBB1P16 298 7<br />
DCBB0P13_C 300 7<br />
DCBB0P09 306 7<br />
DCBB0P10 307 7<br />
DCBB0P25 307 7<br />
DCBB2P26 315 7<br />
DCBB0P06 317 7<br />
DCBB1P20 320 7<br />
DCBB0P23 320 7<br />
DCBB0P24 323 7<br />
DCBB2P01 329 7<br />
DCBB2P18 337 6<br />
DCBB1P08 337 6<br />
DCBB2P17_C 339 6<br />
DCBB1P17 340 6<br />
DCBB2P25 342 6<br />
DCBB0P15 345 6<br />
DCBB2P02 351 6<br />
DCBB0P20_C 351 6<br />
DCBB0P02 353 6<br />
DCBB0P16_C 364 6<br />
DCBB0P28 367 6<br />
DCBB0P27 371 6<br />
DCBB0P05 375 6<br />
DCBB2P19 376 6<br />
DCBB2P07 376 6<br />
DCBB2P21 385 6<br />
DCBB2P13_C 385 6<br />
DCBB0P01 390 6<br />
DCBB1P24 390 6<br />
DCBB0P26 390 6<br />
DCBB1P23 397 6<br />
DCBB0P29 405 6<br />
DCBB0P11 410 5<br />
DCBB1P15_C 434 5<br />
DCBB1P19_C 436 5<br />
DCBB0P03 441 5<br />
DCBB0P14 474 5<br />
DCBB2P09 504 4<br />
DCBB2P05 513 4<br />
DCBB0P19 539 4<br />
DCBB2P10 554 4<br />
DCBB0P07 574 3<br />
DCBB0P12 574 3<br />
DCBB0P08 585 3<br />
DCBB2P06 594 3<br />
DCBB0P04 783 0<br />
DCBB0P31 863 0<br />
DN9200K10PCIE8T User Guide www.dinigroup.com 187
H A R D W A R E<br />
Signal Name Additive Delay Equivalent TAP value<br />
CLK_DCBT_0 730<br />
CLK_DCBT_1 658<br />
DCBT2P30 318 10<br />
DCBT1P11 319 10<br />
DCBT1P15_C 322 10<br />
DCBT2P23 330 10<br />
DCBT1P28 349 9<br />
DCBT1P17 350 9<br />
DCBT1P25 354 9<br />
DCBT1P19_C 359 9<br />
DCBT1P29 359 9<br />
DCBT2P26 361 9<br />
DCBT2P21 362 9<br />
DCBT2P09 362 9<br />
DCBT2P13_C 365 9<br />
DCBT2P24 369 9<br />
DCBT2P15 371 9<br />
DCBT2P17_C 377 9<br />
DCBT2P28 380 9<br />
DCBT1P13 383 9<br />
DCBT0P01 384 9<br />
DCBT2P16_C 385 9<br />
DCBT1P21 387 9<br />
DCBT2P18 387 9<br />
DCBT2P22 391 9<br />
DCBT0P10 392 9<br />
DCBT2P19 395 9<br />
DCBT2P02 395 9<br />
DCBT1P05 396 9<br />
DCBT2P04 396 9<br />
DCBT0P17_C 398 9<br />
DCBT2P08 399 9<br />
DCBT2P11 402 9<br />
DCBT2P12 403 9<br />
DCBT1P18_C 405 9<br />
DCBT0P21 409 9<br />
DCBT0P13_C 412 9<br />
DCBT2P10 414 9<br />
DCBT1P08 418 8<br />
DCBT1P07 418 8<br />
DCBT0P06 427 8<br />
DCBT0P25 432 8<br />
DCBT2P07 435 8<br />
DCBT0P18 438 8<br />
DCBT0P26 439 8<br />
DCBT0P14 439 8<br />
DCBT1P09 439 8<br />
DCBT1P10 440 8<br />
DN9200K10PCIE8T User Guide www.dinigroup.com 188
H A R D W A R E<br />
DCBT2P03 441 8<br />
DCBT2P27 455 8<br />
DCBT0P30 460 8<br />
DCBT0P02 462 8<br />
DCBT0P15 464 8<br />
DCBT0P29 464 8<br />
DCBT2P20_C 465 8<br />
DCBT2P05 466 8<br />
DCBT2P25 472 8<br />
DCBT1P12 480 8<br />
DCBT0P03 483 8<br />
DCBT1P03 491 7<br />
DCBT0P12 494 7<br />
DCBT0P11 497 7<br />
DCBT1P04 499 7<br />
DCBT0P22 520 7<br />
DCBT1P02 535 7<br />
DCBT1P01 535 7<br />
DCBT1P14 537 7<br />
DCBT2P14 540 7<br />
DCBT1P06 552 7<br />
DCBT0P07 553 7<br />
DCBT0P16_C 560 7<br />
DCBT0P28 570 6<br />
DCBT0P19 571 6<br />
DCBT0P20_C 577 6<br />
DCBT1P22_C 581 6<br />
DCBT2P29 596 6<br />
DCBT1P26 598 6<br />
DCBT0P23 601 6<br />
DCBT0P27 610 6<br />
DCBT1P27 625 6<br />
DCBT0P24 663 5<br />
DCBT0P04 679 5<br />
DCBT0P08 686 5<br />
DCBT1P31 693 5<br />
DCBT1P20 724 4<br />
DCBT2P06 759 4<br />
DCBT2P01 771 4<br />
DCBT0P09 857 3<br />
DCBT2P31 859 3<br />
DCBT0P31 864 3<br />
DCBT1P16 865 3<br />
DCBT1P30 872 2<br />
DCBT1P24 885 2<br />
DCBT0P05 953 1<br />
DCBT1P23 1053 0<br />
DN9200K10PCIE8T User Guide www.dinigroup.com 189
H A R D W A R E<br />
28.2.1 Pin assignments<br />
The pin out of the DN9200K10PCIE8T expansion system was designed to reduce cross talk to<br />
manageable levels while operating at full speed of the Virtex 5. The ground to signal ratio of the<br />
connector is 1:1. General purpose IO is arranged in a GSGS pattern to allow high speed singleended<br />
or differential use. On the DN9200K10PCIE8T (host), these signals are routed as<br />
loosely-coupled differential signals, meaning when used differentially, they benefit from the<br />
noise-resistant properties of a differential pair, but when used single-ended-ly, do not interfere<br />
with each other excessively.<br />
DN9200K10PCIE8T User Guide www.dinigroup.com 190
H A R D W A R E<br />
Figure 125 - Daughter card pinout diagram<br />
All high-speed signals on the DN9200K10PCIE8T, including daughter card signals, are routed<br />
against a ground potential reference plane. When creating a daughter card, it is recommended<br />
that these signals remain against a ground plane to maintain trace impedance.<br />
DN9200K10PCIE8T User Guide www.dinigroup.com 191
H A R D W A R E<br />
The central columns of the connector pin out use a closely coupled, differential pair pin<br />
arrangement, which is uniformly surrounded by ground pins.<br />
Below is a graphic representation of the pin assignments for the 400-pin connectors. Note that<br />
this is a view from the backside of the connector. The green boxes represent ground<br />
connections.<br />
Special purpose pins are described below.<br />
28.2.2 CC, VREF, DCI<br />
Some of the signals connected to the daughter card expansion headers are “clock-capable”; the<br />
inputs on the Virtex 5 FPGA can be used for source-synchronous clocking. In the schematic<br />
and customer netlist on the user CD, these pins contain a “_C” in the pin name.<br />
Pins declared in the above diagram that are underlined are connected to “VREF” pins on the<br />
Virtex 5 FPGA. These FPGA pins are used to supply a voltage reference used as the threshold<br />
voltage for the signals on that bank. The use of these pins is only necessary when using<br />
threshold standards, such as SSTL.<br />
DCI is used on all FPGA IO banks connected to a daughter card header. The reference<br />
resistance is 50Ω. Each Virtex 5 bank that is connected to a header DCI in enabled.<br />
28.2.3 Global clocks<br />
The daughter card pin out defines 6 clock output pins. These clock outputs are intended to be<br />
used a 3 differential signals (LVDS). Two clock signals GCA and GCB connect to the “GC”<br />
clock inputs on the FPGA. These clocks can be used only by the FPGA that is associated with<br />
the header.<br />
DN9200K10PCIE8T User Guide www.dinigroup.com 192
H A R D W A R E<br />
Figure 126 - Daughter card clock pin functions<br />
The GCC(p/n) signal driven from each FPGA connects to a global clock buffer and can be<br />
used by all of the FPGAs on the DN9200K10PCIE8T. (EXT0 and EXT1 networks). Since the<br />
two daughter cards B share the same clock network (EXT1), only one of these two<br />
daughtercards can drive a global clock at one time. In order to have a phase match between the<br />
GCC clock pin at the clock input pins on the FPGA, the PLL on the EXT clock network must<br />
be enabled and set to the proper frequency. Also note that the PLL cannot account for delay on<br />
the daughtercard between the frequency source and the GCC pin.<br />
28.2.4 Timing and Clocking<br />
Signal from the FPGAs to the daughtercard connector are not length-matched. There is a<br />
length-report above somewhere.<br />
Each daughtercard has a global clock output pair “DCCLKCp/n”. This LVDS output is<br />
distributed on the DN9200K10PCIE8T to all Virtex-5 FPGAs. The clock buffer on the host<br />
board is designed to deliver the clock edge to all FPGA synchronized with the CCLK pin on the<br />
daughtercard header. The daughtercard is expected to distribute clocks on it so that ICs on the<br />
daughtercard receive the clock signal synchronized with the pin on the daughtercard header. In<br />
this way, the host and daughter boards should be able to communicate synchronously with<br />
equal, large IO periods in each direction.<br />
There are at least four methods of communicating FPGA-to-FPGA across the daughtercard<br />
interface.<br />
DN9200K10PCIE8T User Guide www.dinigroup.com 193
H A R D W A R E<br />
28.2.4.1 Local Synchronous<br />
Figure 127 - Daughtercard clocking local<br />
The daughtercard generates a clock and drives it over the GCAp/n or GCBp/n clock pins to<br />
the host board FPGA. The daughtercard drives a synchronized clock to the logic on the<br />
daughtercard, adding 0.5ns delay to account for the trace delay on the DN9200K10PCIE8T.<br />
The host FPGA will use a DCM in zero-delay mode, and the logic on the daughtercard should<br />
have a low clock-to-out and setup times. (or use a DCM). This method has the disadvantage of<br />
only allowing the one FPGA attached to the daughtercard to use this frequency. To<br />
communicate globally across the DN9200K10PCIE8T, the user would have to pass the data<br />
across clock domains, or add another layer of DCMs to adjust the daughtercard skew to match<br />
the rest of the board.<br />
DN9200K10PCIE8T User Guide www.dinigroup.com 194
H A R D W A R E<br />
28.2.4.2 Global Synchronous<br />
Figure 128 - Daughter card clocking global<br />
The daughter card generates a clock and drives it over the GCCp/n pins to the<br />
DN9200K10PCIE8T host board. The user will select the daughtercard source for either the<br />
EXT0 or EXT1 networks as appropriate. The user sets the EXT0 or EXT1 network into zerodelay<br />
mode. See EXT0 and EXT1 in the clocking section. The disadvantage of this method is<br />
that the EXT0 or EXT1 network must be used, and that the zero-delay configuration has to be<br />
calculated by looking at the datasheet, or by using the CompactFlash card. DCARD instruction.<br />
The advantage is that the entire system can be operated on a single clock domain.<br />
Zero-delay on the DN9200K10PCIE8T is allowed by enabling PLL devices (zero-delay buffers)<br />
connected to the GCC pins of each daughtercard header. To allow for a very wide range of<br />
clock frequencies sourced from the daughtercard, the PLL bandwidth of these buffers must be<br />
manually set. This can be done via USB, PCIe or Compact Flash. The PLL can also be<br />
bypassed, allowing a global system-synchronous clock to be used without configuring this PLL.<br />
When using this method, the daughtercard will have no information about the phase of the<br />
clock arrival at the FPGAs, and the FPGA will have to drive a clock back to the daughtercard.<br />
DN9200K10PCIE8T User Guide www.dinigroup.com 195
H A R D W A R E<br />
28.2.4.3 Source Synchronous<br />
Figure 129 - Daughter card clocking source synchronous<br />
The daughtercard drives a clock into the CC pins of the daughtercard connector. This clock is<br />
used to latch IOs. This method should be used for frequencies exceeding 150 MHz, because the<br />
phase-tolerance of the Virtex 5 FPGA and the clock buffer devices on the<br />
DN9200K10PCIE8T EXT0 and EXT1 signals will prevent a reliable system-synchronous<br />
design at high speeds. This method has the advantage of being the fastest design technique.<br />
Additionally, no DCMs or PLL are required. This is the only method that works with a non<br />
free-running clock.<br />
DN9200K10PCIE8T User Guide www.dinigroup.com 196
H A R D W A R E<br />
28.2.4.4 Skewed Clocks<br />
Figure 130 - Daughter card clocking skew tolerant<br />
It is possible to create a synchronous IO system that is tolerant of phase differences between<br />
link partners. In the above example, outputs are clocked on the falling edge of the clock, and<br />
inputs are clocked on the rising edge of the clock.<br />
The advantage of this system is that it is the simplest clock network; it does not require a freerunning<br />
clock (no DCM or PLL). The disadvantage is that is requires the use of DDR flip-flops,<br />
which may not be available on all parts (then you would need to drive two clocks to the<br />
daughter card out of phase from each other). You would also have to learn how to specify<br />
timing parameters within the FPGA from rising-edge to falling edge of a clock.<br />
Unless you are willing to use a non-50% duty cycle clock, this method‟s maximum frequency is<br />
exactly half that of the fully-synchronous methods.<br />
28.2.5 Incorrect Clocking Methods<br />
Sometimes people incorrectly create a daughtercard clock network. Usually, they don‟t notice<br />
their mistake, because the errors will only show up right before the project deadline.<br />
28.2.5.1 Clock Forwarding<br />
You may be thinking, “It‟s 4 PM and I want to go home.” But outputting a clock from the<br />
FPGA and using it to clock in data on the daughtercard will in most cases result in a hold-time<br />
violation.<br />
DN9200K10PCIE8T User Guide www.dinigroup.com 197
H A R D W A R E<br />
Figure 131 - Daughter card Clock forwarding fail<br />
If you do this, you have to slow down your clock somehow. You can use external feedback,<br />
ODELAY elements or glue. Violating hold is one of the most humiliating experiences that a<br />
young engineer will ever face.<br />
28.2.5.2 Cascading PLLs<br />
If you try to use the “global synchronous” clock method, and then use a DCM to try to match<br />
the phase to some external clock, you will have something like is shown below.<br />
Figure 132 - Daughter card clocking PLL cascade fail<br />
In this diagram, one PLL is within the feedback loop of another PLL. This may or may not<br />
result in harmonic instability.<br />
DN9200K10PCIE8T User Guide www.dinigroup.com 198
H A R D W A R E<br />
28.2.6 Power and Reset<br />
The +3.3V, +5.0V and +12V power rails are supplied to the Daughter card headers. Each pin<br />
on the MEG-Array connector is rated to tolerate 1A of current without thermal overload. Most<br />
of the power available to daughter cards through the connector comes from the two 12V pins,<br />
for a total of 24W. Each power rail supplied to the Daughter card is fused with a reset-able<br />
switch. Daughter cards are required to provide their own power supply bypassing and onrush<br />
current limiting.<br />
+3. 3V +5. 0V<br />
+12.0V<br />
F7<br />
7A<br />
F6<br />
5A<br />
F5<br />
5A<br />
P100-1<br />
DC _RSTn<br />
2<br />
1<br />
U254<br />
VC C<br />
O.D.<br />
A Y<br />
NC GN D<br />
5<br />
4<br />
3<br />
+3. 3V<br />
DC 0_RSTn<br />
A1<br />
K1<br />
C1<br />
H1<br />
B2<br />
D2<br />
G2<br />
J2<br />
P12V_1<br />
P12V_2<br />
P5V_1<br />
P5V_2<br />
P3.3V_1<br />
P3.3V_2<br />
P3.3V_3<br />
RSTn<br />
1A PER PIN<br />
GC AP<br />
GC AN<br />
GC BP<br />
GC BN<br />
GC CP<br />
GC CN<br />
Section 1 of 5<br />
Clock, Power, Reset<br />
E1<br />
F1<br />
E3<br />
F3<br />
E5<br />
F5<br />
DC 0_GC AP 104<br />
DC 0_GC AN 104<br />
DC 0_GC BP 104<br />
DC 0_GC BN 104<br />
DC 0_GC CP 85<br />
DC 0_GC CN 85<br />
74LVC1G07<br />
SOT95P280-5N<br />
MEG-Array 300-Pin<br />
Figure 133 - MEG Array power circuit<br />
The RSTn signal to the daughter card is an open-drain, buffered copy of the SYS_RST# signal.<br />
It is also asserted when the User Reset is active. When RSTn is de-asserted, the +3.3V, +5.0V<br />
and +12V power rails are guaranteed to be within the DN9200K10PCIE8T tolerance. If there<br />
are additional power requirements, the daughter card is required to ensure these.<br />
28.2.7 VCCO Voltage<br />
The daughter card is required to provide a voltage on the VCCO pin on the connector. This<br />
voltage is used on the DN9200K10PCIE8T to power the FPGA IOs that are connected with<br />
that daughter card. In this way, the daughter card can control what voltage the interface will use.<br />
Each bank of the connector (B0, B1, or B2) uses a separate VCCO pin, and can have a different<br />
voltage applied to it. When designing a daughter card, you must determine the current<br />
requirements for the DN9200K10PCIE8T and supply enough current capacity on these pins.<br />
The VCCO voltage impressed by the daughter card should be less than 3.75V to prevent<br />
damage to the Virtex 5 IOs connected to that daughter card. Additionally, the voltage applied to<br />
the header pins from a daughtercard or external source, should be equal to or less than the<br />
VCCO voltage of the bank that contains the IO. For example, a 2.5V daughtercard (one that<br />
uses 2.5V on each VCCO pin) should not drive a 3.3V signal onto the daughtercard pins.<br />
DN9200K10PCIE8T User Guide www.dinigroup.com 199
H A R D W A R E<br />
28.2.8 VCCO bias generation<br />
Since a daughter card will not always be present on a daughter card connector, a VCCO bias<br />
generator is used on the motherboard for each daughter card bank to keep the VCCO pin on<br />
the FPGA within its recommended operating range. The VCCO bias generators supply +1.2V<br />
to the VCCO pins on the FPGAs, and are back-biased by the daughter card when it drives the<br />
VCCO rails.<br />
+5. 0V<br />
U271<br />
8<br />
5<br />
3<br />
IN<br />
SH DN#<br />
GN D1<br />
OU T<br />
1<br />
C1803<br />
0.01uF<br />
R452<br />
0<br />
DC 0_B0_VC CO<br />
380mA MAX<br />
AT 1.22V<br />
6<br />
GN D2<br />
BY P<br />
4<br />
7<br />
GN D3<br />
AD J<br />
2<br />
LT1763C S8<br />
SOIC127P600-8N<br />
380mA MAX AT 1.22V<br />
Vadj = 1.22V<br />
R467<br />
10. 0K<br />
Figure 134 - MEG Array bias circuit<br />
The output voltage of this regulator can be adjusted if needed. This will require changing the<br />
resistors on the ADJ pin of the regulators. The bias regulators can provide up to 1.5A of<br />
current. Some low-speed designs may not need more than this. Dini Group recommends<br />
placing the IO voltage regulators on the daughtercards, because this does not require<br />
modification of the DN9200K10PCIE8T.<br />
28.3 Rolling your own daughtercard<br />
Small quantities of the connectors required for building a daughtercard can be obtained at cost<br />
or free from the Dini Group.<br />
The design files (PADS power PCB, schematic and Gerbers) for some example daughter cards<br />
are on the website.<br />
If you need help designing a daughtercard, we will be happy to review your schematic for errors.<br />
Send it. Here is a totally incomplete list of stuff that we found wrong with people‟s<br />
daughtercards that they sent in:<br />
- They used the schematic symbol and part footprint from the base-board when designing a<br />
daughtercard, so that pin A1 connected to pin A40 and pin K1 connected with K40.<br />
- They provide a clock to GCC that is single-ended.<br />
- They do not provide a voltage to +VIO0, +VIO1 and +VIO2.<br />
DN9200K10PCIE8T User Guide www.dinigroup.com 200
H A R D W A R E<br />
- They send a clock to the FPGA into a standard IO and not a GCLK pin.<br />
- They connected a power rail (+5V, +12V or +3.3V) to both the daughtercard and to an<br />
external power connector or a regulator on the daughter card. Dini board does not like this at<br />
all.<br />
- They used graham crackers and peanut butter instead of FR4 and copper to save money.<br />
- They drive a clock either from the daughtercard to the base-board or from the base board to<br />
the daughter card without accounting for clock skew. Hold time violations abound.<br />
29 Troubleshooting<br />
29.1 The board is dead<br />
If the board doesn‟t respond over USB or PCI Express it may be stuck in reset. When this<br />
happens, a red LED labeled “SYS RESET” or “HARD RESET” (near the USB connector) is<br />
on. This is usually the result of a power failure. You can see which of the voltages is causing the<br />
problem by looking at the line of red LEDs along the left edge of the board. One will be lit for<br />
each power that has failed.<br />
- Measure 12V with a multi-meter. It should be above 11.3V<br />
- 12V may be unstable. Connect an old hard drive to one of the 4-pin connectors on the power<br />
supply.<br />
- The board requires the 6-pin PCI Express graphics power connector, even when installed in a<br />
PCI Express slot.<br />
29.2 The board does not respond over PCI Express<br />
Check first that the board is not in reset, as described above. Next, see if the blue LED next to<br />
FPGA Q is on. This LED shows whether FPGA Q is configured. If it is not configured, then<br />
there could be a problem with the Flash programming file. You can see if this FPGA will<br />
program using USB or a JTAG cable.<br />
If the FPGA is programmed with a bitfile other than the provided “PCI Express full function<br />
endpoint now with DMA”, then you are on your own.<br />
Otherwise, check the Windows device manager. If and “unknown device” appears on PCI<br />
Express, then there is a problem with the driver.<br />
If the board appears to work, except all PCI transactions always respond with 0xFFFFFFFF,<br />
then the board lost its marbles. Check the lowest offsets of BAR0. If these respond with<br />
0xFFFFFFFF then the board ate it hard. If this range works, but BAR2 doesn‟t work, then<br />
maybe you‟ve just uncovered a bug in the FPGA A code.<br />
DN9200K10PCIE8T User Guide www.dinigroup.com 201
H A R D W A R E<br />
29.3 The board does not respond over USB<br />
If the provided software doesn‟t seem to be able to communicate with the board, first check<br />
that the board is not in reset (above). If it is not in reset, see if, in Windows, the board appears in<br />
device manager. If the device appears as an “Unknown Device” then the driver may not have<br />
been installed, or installed improperly. From device manager, you can see what the Vendor and<br />
Device ID of the device are. If they are both 0000, 0000 there may be a hardware problem.<br />
Also see if the board is appearing as a some kind of Audio Device, then there is a device<br />
conflict. Call us. There is some way to fix this.<br />
If the board is not in reset, but it still does not appear over USB, check the RS232 serial “MCU”<br />
output when the board powers on. If it stops before getting to the “main menu” then it has<br />
detected a problem and stopped before enabling USB. Send us the terminal capture.<br />
29.4 The FPGAs won’t program<br />
First, connect the RS232 terminal and restart the board. Usually, when an FPGA fails to<br />
program, the configuration section will detect the problem and print an error message to this<br />
terminal. Common problems the configuration section might report are:<br />
- The syntax in the main.txt file is incorrect<br />
- The bit file on the CompactFlash card is for the wrong type of FPGA.<br />
If the DN9200K10PCIE8T reports about one or more FPGAs that “DONE did not go high”,<br />
then there is a problem with the bit file. The bit file may have been generated using bitgen<br />
options that are not compatible with the DN9200K10PCIE8T.<br />
See if the FPGAs will configure using USB, PCIe or JTAG.<br />
When you contact Dini Group for support, we will need a capture of the RS232 terminal<br />
output.<br />
29.5 My design doesn’t do anything<br />
Make sure that the clock your design uses is running. Output the clock to an LED and probe it<br />
with an oscilloscope.<br />
Check the pinout in your constraint file. Check the .PAR report file to make sure that 100% of<br />
your IOBs used have LOC constraints. There is never a reason not to constrain an IO.<br />
Use the .PAD report to make sure your constraints were all applied. Some situations may cause<br />
constraints to be ignored.<br />
Double-check that the connections match between your FPGA pins and the daughtercard pins<br />
using the schematic.<br />
DN9200K10PCIE8T User Guide www.dinigroup.com 202
H A R D W A R E<br />
If “MainBus” interface is not working, make sure that none of the other FPGAs are driving<br />
those MB pins.<br />
Make sure that the "Unused IOBs" option in bitgen is set to "Float<br />
Check for Timing errors in the timing report<br />
Route the clock signal to a pin and observe it with an oscilloscope.<br />
29.6 The DCMs won’t lock<br />
1) The DCMs are required to be set in a frequency mode compatible with the frequency of the<br />
reference clock input. Check the following attributes of the DCMs.<br />
DFS_FREQUENCY_MODE<br />
DFS_PERFORMANCE_MODE<br />
2) All clock inputs of the DCM are required to be stable for a certain number of microseconds<br />
before releasing the DCMs reset signal. If you are generating the reference clock from an FPGA<br />
(or another DCM), you will need to build a delayed-reset circuit to reset the second DCM.<br />
3) Make sure the global clock you are using is being received with an LVDS receiver, not a<br />
single-ended one. Make sure the DIFF_TERM attribute is turned on (especially low frequency<br />
clocks).<br />
29.7 It’s so weird… It’s like sometimes when I program<br />
my FPGAs, the signals between the FPGAs are<br />
delayed by one clock cycle. Then, when I hit the<br />
reset button, sometimes it starts working again.<br />
Are you sending a high-speed clock to two FPGAs, them dividing the frequency in each FPGA?<br />
This doesn‟t work. Think about it for a second.<br />
29.8 My pacemaker stops working when I increase the<br />
clock frequency<br />
Make sure you have already paid the invoice.<br />
29.9 The signal on my board is going bat crazy on my<br />
oscilloscope<br />
Make sure the ground clip is attached to the probe.<br />
If there is an oscillation on the signal at 60Hz, there is a problem with the oscilloscope setup.<br />
Capture the oscilloscope view and email it to support@dinigroup.com.<br />
DN9200K10PCIE8T User Guide www.dinigroup.com 203
H A R D W A R E<br />
If you zoom too far out on a signal, it will look like a normal signal, except that the trigger won‟t<br />
work and the signal will look crazy and periodic. Just zoom in like 1000 times.<br />
If you have two oscilloscope probes and they their cables are running next to each other to the<br />
oscilloscope, you will see one signals bleeding onto the other signal. You can see if this is<br />
happening because the signals will become stronger when you grab both cables and let them<br />
couple through your hand.<br />
DN9200K10PCIE8T User Guide www.dinigroup.com 204
Chapter 5: Reference Design<br />
This chapter introduces the DN9200K10PCIE8T Reference Design, including information on<br />
what the reference design does, how to build it from the source files, and how to modify it for<br />
another application. This sentence has never been read.<br />
1 Purpose<br />
The purpose of the reference design is to demonstrate how one might implement most of the<br />
hardware capabilities of the board, to provide an example project for testing the design flow,<br />
and to test for electrical connectivity errors on the board.<br />
While the reference design or parts of it might be useful as a starting point for your project, it is<br />
not really a product, so helping you modify the reference design to suit your needs is not within<br />
the scope of support for your board. See diagram below.<br />
Figure 135 - Dini Group corporate strategy diagram<br />
1.1 Interfaces used by reference design<br />
The interfaces that the Dini Group design uses the following interfaces:<br />
DDR2 Memory<br />
PCI Express w/DMA support<br />
USB<br />
Main Bus<br />
LEDs<br />
User (“Reset”) Button<br />
Global Clock networks<br />
DN9200K10PCIE8T User Guide www.dinigroup.com 205
T H E R E F E R E N C E D E S I G N<br />
1.2 Interfaces not used by the reference design<br />
The following interfaces are not used by any reference design that Dini Group provides to users.<br />
These interfaces are fully tested, and we might even be able to give you bit files and test<br />
procedures for them.<br />
Ethernet<br />
Daughter Cards<br />
External Clock inputs<br />
RS232 (Serial Port)<br />
2 Hardware Tests<br />
The provided bit files and software is suitable for testing most of the hardware interfaces on<br />
your board. Some hardware tests require test fixtures, and these are not provided.<br />
2.1.1 Testing PCI Express interface<br />
Install the board into a windows machine in a PCI Express x16 or x8 slot (other slots will cause<br />
the test to erroneously report a failure). Turn on the machine. Run the provided executable<br />
aetest_wdm.exe. From the main menu, select “production tests” and then “PCI test”.<br />
The test should report PASS or FAIL.<br />
2.1.2 Testing FPGA-to-FPGA interconnect<br />
To test the FPGA interconnect, you will need to run the “one-shot test”. This is a feature of the<br />
windows program USB Controller.exe. Turn on the board and connect it to a windows<br />
computer over USB.<br />
From the “settings/info” menu, select “one shot test”. Enter in one of the text boxes the path<br />
to your user CD where the bit files are kept. Unselect “DDR” from the test options, so that<br />
only interconnect is tested.<br />
2.1.3 Testing DDR2 Interfaces<br />
Turn on the board and connect it to a windows machine.<br />
To test the DDR2 interface(s), configure an FPGA which has a DDR2 interface with the<br />
“Main” reference design. Install a DDR2 SODIMM into the socket of the FPGA.<br />
In USB Controller, click the “enable USB communication” button. Then, set the global clock<br />
networks to the following frequencies:<br />
G0 450 MHz<br />
G1 250 MHz<br />
G2 200 MHz<br />
DN9200K10PCIE8T User Guide www.dinigroup.com 206
T H E R E F E R E N C E D E S I G N<br />
The frequency of network G1 determines the DDR2 frequency of operation. From the<br />
“settings/info” menu, select “Test DDR”. In the dialog box, select the FPGA which is<br />
configured. The test will report PASS or FAIL.<br />
2.1.4 Testing USB<br />
USB can be tested by running the DDR2 test, or by configuring FPGAs over USB.<br />
2.1.5 Testing Ethernet<br />
This test can be performed by the user, however bit files are not provided. If you suspect a<br />
hardware failure you will have to contact technical support.<br />
2.1.6 Testing Daughtercard Connectors<br />
This test requires a test fixture and cannot be performed by the user.<br />
3 Reference Design Types<br />
“The Reference Design” in this chapter refers to the FPGA designs located on the user CD at<br />
D:\FPGA_Reference_Designs\DN9200K10PCIE8T\MainRef\<br />
D:\FPGA_Reference_Designs\Programming_Files\DN9200K10PCIE8T\MainRef\<br />
Four other self-contained designs are on the CD and described in this manual. These four<br />
designs are described in their own sections later in this chapter. The remaining sections describe<br />
the “MainRef” design. “MainTest”, “The reference design” and “The Dini Group reference<br />
design” are the same thing.<br />
The four additional designs are<br />
PCIe Interface Design: Tests the 64-bit interface between FPGA A and the LX50T (PCIe)<br />
LVDS Reference Design: Characterizes the FPGA interconnect using source-synchronous<br />
Ethernet Reference Design: Tests the Ethernet PHY.<br />
Other features of the board, such as memory sockets and daughtercard headers are tested using<br />
the Main Test.<br />
3.1 Main Test<br />
This reference design is also referred to as “SINGLE INTERCON”, because it is used to test<br />
the FPGA-to-FPGA interconnect. This reference design provides access to the following:<br />
-All FPGA clocks<br />
-DDR2 memory<br />
-MainBus (for USB and PCI Express)<br />
-RS232<br />
-“Tenth Inch” header pins<br />
DN9200K10PCIE8T User Guide www.dinigroup.com 207
T H E R E F E R E N C E D E S I G N<br />
3.2 LVDS<br />
This reference design is an implementation of Xilinx App Note 705. It achieves 900 Mt/sec per<br />
LVDS pair between FPGAs, the maximum speed possible using this method. (Other methods<br />
may improve bandwidth beyond this limit). The design provides MainBus registers to allow<br />
counting the bit error rate of each bank of 40 interconnect pins.<br />
3.3 Single Fast<br />
This reference design allows the characterization of FPGA-to-FPGA interconnect using<br />
standard synchronous IO methods between FPGAs. Main Bus registers are provided to allow<br />
the monitoring of the BER of each bank of 40 interconnect pins.<br />
3.4 V5 Interconnect<br />
This reference design might not be provided.<br />
3.5 Ethernet<br />
This reference design is a hardware test of the Ethernet interface. It may not be provided.<br />
3.6 Header<br />
This reference design is a hardware test of the Header interface. It requires a test fixture to work<br />
properly. It may not be provided.<br />
4 Using the Reference Design<br />
4.1 Reference Design Memory Map<br />
Each reference design uses the MainBus interface to supply status and controls. The following<br />
memory map is used. These registers are accessible using the windows USB Controller program<br />
using the “MainBus” menu, or from AETEST for PCI Express access.<br />
All addresses on main bus are 32-bits. Each address contains one 32-bit word. By convention,<br />
each FPGA has a fixed memory range. FPGA A will respond to all MB accesses in the range<br />
0x00000000 – 0x0FFFFFFF. FPGA B will respond to accesses from 0x10000000-<br />
0x1FFFFFFF. Other addresses are not defined.<br />
The addresses given below are offsets from the base address of any given FPGA. Some registers<br />
are not valid for all FPGAs. Some addresses are not valid for all of the Dini Group‟s reference<br />
designs. (Main Test does not have LVDS registers, and LVDS test does not have DDR2<br />
registers).<br />
Some of the address bits are decoded as “Don‟t care” bits. Therefore, accesses to undefined<br />
addresses may alter stuff.<br />
DN9200K10PCIE8T User Guide www.dinigroup.com 208
T H E R E F E R E N C E D E S I G N<br />
Address Register Register<br />
Range Name Contents<br />
0x00000000 - DDR2 Mapped to the DDR2 SODIMM memory<br />
0x07FFFFFF<br />
0x08000001 DDR2HIADDR Upper bits of DDR2 address (MainBus memory<br />
space is smaller than most DDR2 SODIMMs)<br />
0x08000002 IDCODE 0x05000142<br />
0x08000003 DDR2HIADDRSIZE The number of valid addresses in DDR2HIADDR<br />
0x08000004 INTERCONTYPE An ID code used to identify which design is loaded<br />
0x34561111 – Interconnect, Single<br />
0x34562222 – Interconnect, LVDS<br />
0x34563333 – Interconnect, LVDS (reversed)<br />
0x34560000 – Any Other Design (PCIe, Ethernet, etc.)<br />
0x08000005 DDR2SIZE A code to control how DDR2 memory is coded<br />
into MainBus memory<br />
0x08000006 RWREG Read/Write Scratch Register for testing<br />
0x08000007 DDR2TAPCNT0 The current “tap” settings of the IODELAY elements<br />
in the DQ IO buffers on the DDR2 interface (lower<br />
bytes)<br />
0x08000008 DDR2TAPCNT1 The current “tap” settings of the IODELAY elements<br />
in the DQ IO buffers on the DDR2 interface (upper<br />
bytes)<br />
0x0800000A -<br />
0x080000011<br />
This range of addresses is reserved for manufacturing<br />
tests (Daughtercards)<br />
0x080000012 SODIMM_SEL Does nothing on the DN9200K10PCIE8T<br />
0x080000013 FAN_TACH The current input value of the fan tachometer (0 or 1)<br />
0x080000014 IS_LX_330 0x1 if the FPGA is an LX330, 0x0 is it is not.<br />
0x08000001B SODIMM_RANK Data read from the SODIMM IIC interface<br />
0x08000001C SODIMM_COL -<br />
0x08000001D SODIMM_ROW -<br />
0x08000001E SODIMM_BANK -<br />
0x08000001F SODIMM_CAS -<br />
0x08000021 CLK_COUNTER Contains contents of G0 counter /4<br />
0x08000022 CLK_COUNTER Contains contents of G1 counter<br />
0x08000023 CLK_COUNTER Contains contents of G2 counter<br />
0x08000024 CLK_COUNTER Contains contents of CLK48 counter<br />
0x08000025 - RCLK_COUNTER LVDS source-synchronous clock<br />
0x08000032<br />
counters (LVDS design only)<br />
0x08000033 - MCLK_COUNTER Clock counters for (in backwards order!): DDR2 clock,<br />
0x0800003F<br />
EXTCLK0, EXTCLK1, SMACLK, CLK_FBE,<br />
CLK_FBB, CLK125_ETH, CLKP, CLK_TPp<br />
0x08000040 - DDR2TESTTAPCNT Reserved for manufacturing tests (DDR2)<br />
0x08000043<br />
DN9200K10PCIE8T User Guide www.dinigroup.com 209
T H E R E F E R E N C E D E S I G N<br />
0x08000044 LED_OE Controls LED output enables.<br />
0x08000045 LED_OUT Controls LED output values.<br />
0x08000046 DDR2SIZE_SODIMM2 Controls address mapping order on second<br />
DIMM interface (FGPA C only)<br />
0x08000047 HIADDRSIZE_SODIMM2 Number of unique addresses in HIADDR for<br />
second DIMM interface (FPGA C only)<br />
0x0800004B SODIMM2_RANK IIC data retrieved from the SODIMM in socket 2<br />
0x0800004C SODIMM2_COL (FPGA C only)<br />
0x0800004D SODIMM2_ROW -<br />
0x0800004E SODIMM2_BANK -<br />
0x0800004F SODIMM2_CAS -<br />
0x0800007E VRP_ALL Contains input signals on the “VRP” pins<br />
0x0800007F VRN_ALL Contains input values on the “VRN” pins<br />
0x0B000000 - BLOCKRAM Contents of an internal-FPGA block RAM<br />
0x0B0003FF<br />
0x0C000XX0 BUS XX OUT XX can be 0-21 hex. Current output status of<br />
IOs on bus XX.<br />
0x0C000XX4 BUS XX OE XX can be 0-21 hex. OE status of IOs<br />
0x0C000XX8 BUS XX IN XX can be 0-21 hex. The input values<br />
0x0C000XXC BUS XX Name A unique name of the bus (schematic)<br />
0x0xxxxxxx REG_DEFAULT 0xDEAD5566<br />
Any undefined register<br />
5 Interconnect (Single)<br />
The “single-ended” interconnect test tests the DC connectivity of FPGA-to-FPGA<br />
interconnect, and the “MB” signals.<br />
Presented on the MainBus, are registers allowing the interface to control the output value,<br />
output enable, and input value of each FPGA-to-FPGA interconnect pin. Each pin on the<br />
FPGAs is pulled high. This allows a test program to find single-stuck-at faults, open faults, and<br />
stuck-together faults.<br />
5.1 Using the Design<br />
The design can be controller over the MainBus. The register banks connected to the IO are<br />
arranged into “busses”. Each bus has an ID code, an OE register bank, an ENABLE register<br />
bank, and an IN register bank.<br />
The addresses of the IO registers are as follows:<br />
FpgaNum (4-bit) | MB_SEL_INTERCON (4 bit) | busnum (20-bit) | reg_offset (4-bit)<br />
DN9200K10PCIE8T User Guide www.dinigroup.com 210
T H E R E F E R E N C E D E S I G N<br />
FPGA NUM is 0x0 for FPGA A, 0x1 for FPGA B, 0x2 for FPGA C…<br />
MB_SEL_INTERCON is 0xC<br />
busnum is any number, but only low-values (less than LAST_ADDR) will constrain valid busses<br />
reg_offset is 0x0 for REG_OUT, 0x4 for REG_OE, 0x8 for REG_IN, and 0xC for<br />
REG_ENABLED<br />
To determine which bits (if any) in a bus are valid, read the REG_ENABLED register. The 32-<br />
bits returned „1 are a mask for which of the bits in the REG_OUT, REG_OE, and REG_IN<br />
registers are meaningful.<br />
To get the bus ID of a bus, write value 0x1 (32-bit) to REG_ENABLED, then read<br />
REG_ENABLED, then write 0x0 (32-bit) to REG_ENABLED. The value returned will be a<br />
coded name for the bus. Bits 0-15 are ASCII characters representing FPGA names. Bits 16-31<br />
are an arbitrary unique integer distinguishing the bus. Connecting busses from two different<br />
FPGAs have the same bus ID.<br />
To cause an FPGA to output signals on a bus, write 0xFFFFFFFF on REG_OE. To set the<br />
outputs all to “high” write 0xFFFFFFFF to REG_OUT.<br />
To read the current received value from the bus‟ inputs, read from REG_IN<br />
5.2 Running the Test<br />
In the USB Controller program, select Settings->OneShot Test. From the dialog box, check the<br />
Interconnect Test box. The program will automatically load the bit files, set the clocks and run<br />
the test.<br />
5.3 DDR2 Interface<br />
The DDR2 interface design is an example DDR2 controller running at 250MHz. You can use<br />
this controller as an example, especially for the purpose of required IO logic, timing and<br />
clocking. The controller bandwidth is most of the DDR2 bandwidth possible on the<br />
DN9200K10PCIE8T.<br />
5.4 Provided Files<br />
The DDR2 reference design is part of the “MainRef” reference design, and the MainRef files<br />
should be used.<br />
5.5 Using the Design<br />
The DDR2 memory interfaces are mapped to the address range<br />
0xNXX00000 – 0xNXXFFFFF<br />
Where the 4-bit “N” represents an FPGA ID, as described in the MainBus interface description.<br />
X are “don‟t-care”. Since the remaining 19 bits are insufficient to address an entire 4GB DRAM,<br />
there is a register DDR2HIADDR that selects the highest address bits of the DRAM. Each<br />
DN9200K10PCIE8T User Guide www.dinigroup.com 211
T H E R E F E R E N C E D E S I G N<br />
address refers to a 32-bit location in the DRAM. The lowest bit is not mapped to DRAM<br />
address, but instead selects between the upper and lower 32 bits of the DRAM data. This is<br />
necessary because MainBus is a 32-bit interface, and the DN9200K10PCIE8T DRAM<br />
interfaces are 64 bits wide.<br />
The bank and side controls are also mapped to the DDR2HIADDR register. The location of<br />
the DDR2HIADDR register is given in the Reference Design Memory Map section.<br />
The clock that this design uses (G1) must be set to between 180 and 250MHz. .<br />
5.6 Running the Test<br />
To run the hardware test, in the USB Controller application, select Settings->OneShotTest and<br />
check the DDR2 box. The program will automatically load the bit files, set the clocks and run<br />
the test, reporting any errors.<br />
5.7 Clock Counters<br />
Each clock available to the FPGA is connected to a counter register, and the value of this<br />
register is available on MainBus. In this way, the user can determine if each clock input is<br />
working properly.<br />
5.8 LEDs<br />
All of the LEDs are connected to an output enable register. When the LEDs are not enabled,<br />
the blink a pattern representing which FPGA the design is for. When enabled, each LED is<br />
controlled by the LED value register.<br />
5.9 Simulating the Reference Design<br />
The simulation environment the Dini Group uses is ModelSim. A ModelSim project file is<br />
provided, but it may not be compatible with your version of ModelSim. When you create a<br />
ModelSim project, add only the top-level design file (sim_board.v).<br />
Source can be found on the user CD:<br />
D:\ FPGA_Reference_Designs\DN9200K10PCIE8T\MainRef\source\<br />
Also, you must add to the project a simulation library. Simulation models of all of the primitives<br />
used in the reference design are found in the Xilinx ISE install directory in the unisims directory.<br />
Simulation models are also provided of the DN9200K10PCIE8T as a whole board, along with<br />
DDR2 modules, headers and the MainBus interface.<br />
DN9200K10PCIE8T User Guide www.dinigroup.com 212
T H E R E F E R E N C E D E S I G N<br />
6 LVDS Reference Design<br />
The "LVDS Interconnect" design is to show the user how to implement source-synchronous<br />
communication between FPGAs. Using this method, the advertised 900Mbs system speed can<br />
be achieved. If you do not wish to use source-synchronous interconnect, ignore this reference<br />
design with prejudice.<br />
All FPGA-to-FPGA interconnect in this design is constantly being driven by one FPGA<br />
sending (uni-directionally) a test pattern. The receiving FPGA checks the test pattern for<br />
correctness against a known pattern.<br />
The design is intended to characterize the bandwidth of the interconnect between FPGAs.<br />
Access to test status is provided over the MainBus interface.<br />
Note that there are two designs, “ADC” and “CBA”. In the design, the directions of LVDS<br />
connections between FPGAs are uni-directional. In the “CBA”, all of the signals are in a<br />
direction opposite to the “ABC” design signals.<br />
6.1 Provided Files<br />
The source is located at:<br />
D:\FPGA_Reference_Designs\DN9200K10PCIE8T\MainRef<br />
Note that this is the same source as the “Main Reference Design”. To compile the design for<br />
LVDS, #define statements in the Verilog code must be added or removed. The make.bat<br />
utility described in the “compiling the reference design” section automatically adds and removes<br />
these directives. The pre-compiled bitfiles for this design are located at<br />
D:\FPGA_Reference_Designs\Programming_Files\DN9200K10PCIE8T\LVDSIntercon\<br />
6.2 Using the Design<br />
The design‟s MainBus interface is undocumented<br />
The IOs in the LVDS reference design are clocked using the G0 clock. A clock setting of 300<br />
MHz on G0 results in data transmission from FPGA to FPGA of 600 Mbs per signal pair.<br />
The G2 clock is required to be 200 MHz, or IDELAY will not calibrate correctly, and<br />
performance will be degraded.<br />
6.3 Running the Test<br />
In the USB Controller program, select Settings->OneShot Test. From the dialog box, check the<br />
Interconnect Test box. The program will automatically load the bit files, set the clocks and run<br />
the test.<br />
DN9200K10PCIE8T User Guide www.dinigroup.com 213
T H E R E F E R E N C E D E S I G N<br />
6.4 Implementation Details<br />
Mostly, the LVDS design follows the Xilinx application note<br />
6.4.1 Lane Alignment<br />
The Xilinx application note only allows for the bit alignments so that all bits on a 16-bit bus are<br />
output as 8-bit words in the slow clock domain on the receiver FPGA. However, it‟s important<br />
to note that the alignment of the 8-bit words may be off by one cycle. That is, the cycle latency<br />
from one FPGA to another may be different from one byte lane to another. Additionally, the<br />
latency might change each time the bit alignment machine retrains. If you wanted to fix this you<br />
would have to put in some sort of automatic cycle delay element.<br />
6.4.2 Funny Banks<br />
Not all banks on the Virtex-5 FPGA have a BUFR resource available. In order to implement<br />
the LVDS design, we had to swap out the BUFR for a dynamically-adjusted clock from a DCM.<br />
Figure 136 - LVDS Reference design clocking global<br />
Here is how the design is supposed to look, according to the app note.<br />
DN9200K10PCIE8T User Guide www.dinigroup.com 214
T H E R E F E R E N C E D E S I G N<br />
Figure 137 - LVDS Reference design clocking local<br />
There is no difference in performance between the two methods, because the clock in question<br />
is not part of the critical data path. (The BUFIO).<br />
7 PCIe Interface Reference Design<br />
The PCIe reference design is an example of how to use the provided pcie_x8_user_interface.v<br />
module provided.<br />
7.1 Provided Files<br />
D:\FPGA_Reference_Designs\common\PCIE_x8_Interface<br />
7.2 Using the Design<br />
The PCIe reference design maps internal FPGA block rams to BAR 1 through BAR6 of the<br />
FPGA‟s PCIe interface, and a separate block ram to the DMA channel of the PCIe interface.<br />
When the design in loaded in the FPGA, a host machine can read and write to this memory<br />
space to verify the interface is working. Only 4 kB of memory is mapped to each BAR, even<br />
though the size of each BAR is larger. The block ram memory will wrap.<br />
7.3 Running the Test<br />
The PCIe Reference Design is an FPGA A-only design that implements the<br />
pcie_x8_user_interface module described the document<br />
D:\FPGA_Reference_Designs\common\PCIE_x8_interface\pcie8t_user_interface_maual.pdf<br />
This design implements a PCIe target access and DMA interface to a block ram inside FPGA A.<br />
The source code is located on the CD at:<br />
DN9200K10PCIE8T User Guide www.dinigroup.com 215
T H E R E F E R E N C E D E S I G N<br />
D:\FPGA_Reference_Designs\Programming_Files\pcie_fpga\pcie_dma<br />
The pre-compile bitfiles for your board are located at:<br />
D:\FPGA_Reference_Designs\Programming_Files\pcie_fpga\pcie_dma<br />
In this design, accesses to BAR2, BAR3, BAR4, BAR5 and both DMA channels are mapped to<br />
separate block rams in the FPGA. Upper bits of the address offset are ignored, so the block ram<br />
loops around. To use this design, see the PCIe section of the hardware chapter.<br />
1 Compiling the Reference Design<br />
All source code for the reference design is included on the CD and may be used freely by<br />
customers for anything legal. The MainRef reference design can be found on the user CD here.<br />
D:\FPGA_Reference_Designs\<br />
\common\DDR2\controller_ver\*<br />
\common\DDR2\ddr2_to_mb\*<br />
\DN9200K10PCIE8T<br />
\MainRef\source\*<br />
The top module is<br />
D:\FPGA_Reference_Designs\DN9200K10PCIE8T\MainRef\source\fpga.v<br />
This module includes all of the other required sources and expects the directory structure found<br />
on the CD.<br />
1.1 The Xilinx Embedded Development Kit (EDK)<br />
The DN9200K10PCIE8T does not use the EDK because it has no embedded processor.<br />
1.2 Xilinx ISE<br />
Xilinx ISE version 10.1 (service pack 1 or later) is required to use the reference designs. Earlier<br />
versions may work, but are not supported.<br />
If you are using a third-party synthesis tool, you can create a new ISE project file and add the<br />
.edf as a source. For part type, select the type of FPGA installed on your board. Make sure to<br />
add the provided .ucf file to the project, or the produced place-and-route will not work.<br />
Run the map, implement and generate steps.<br />
DN9200K10PCIE8T User Guide www.dinigroup.com 216
T H E R E F E R E N C E D E S I G N<br />
1.3 The Build Utility: Make.bat<br />
If you are not using a third-party synthesis tool, then you should use the provided batch script to<br />
generate the programming files from the reference design. The batch script will synthesize using<br />
XST from the source, assigning the correct value to each #define switch in the source.<br />
The Build Utility is found at „DN9200K10PCIE8T/build_xst/make.bat‟. This batch file can be<br />
used to run XST, ISE and bitgen. You may need to run make.bat from inside of a Cygwin<br />
session, or otherwise have the program sed installed. You may also need to add the Xilinx bin<br />
directory to your path so the command “par” calls the correct program.<br />
There are command line options that cause the script to output the correct reference design.<br />
(Since all the reference designs use the same source files). Most commonly, you would want to<br />
make the “single-ended” or “main” reference design. This includes the DDR2 controller.<br />
Type<br />
>make.bat SINGLE<br />
to change the current source compilation type to “Single ended”. Then type<br />
>make.bat LX330<br />
to change the current place-and-route type to LX330. Then type<br />
>make.bat<br />
to start synthesis, place and route, and bitfile generation. The build script creates a directory<br />
called “out” and places its output files there. After the script completes you will find files for<br />
each FPGA that was built. fpga_*.bit is the file to be downloaded to the FPGA.<br />
When using the provided VHDL, the generic definitions are not complete in the Dini Group<br />
code. Some of the signals that are governed by generics must be defined externally or (defined in<br />
the first place).<br />
1.4 Bitgen Options<br />
The Make.bat script correctly sets all bitgen options that are compatible with the<br />
DN9200K10PCI. The following options should be used with the DN9200K10PCI. Options<br />
that are not listed here can be selected by the user, or left to their default settings.<br />
Compress: OFF (Or you can disable “sanity check” option on board)<br />
UnusedPin: Pullnone<br />
Persist: Yes (Only required if Readback is used)<br />
Encrypt: No (YES requires that you disable “sanity check” option on board)<br />
DonePipe: No<br />
DriveDone: Yes<br />
Don‟t ever disable “CRC Check”. This is the easiest and most certain way to turn your FPGAs<br />
into little piles of carbon ash. I am pretty sure this option exists to increase sales of replacement<br />
FPGAs.<br />
DN9200K10PCIE8T User Guide www.dinigroup.com 217
T H E R E F E R E N C E D E S I G N<br />
1.5 VHDL<br />
The VHDL version of the reference design is included along with the Verilog version. The<br />
VHDL is a translation of the Verilog. It‟s updates are less granular and lag by a few months. It<br />
also may contain translation bugs that we haven‟t noticed. All of the pre-compiled bit files are<br />
generated from the Verilog source. If at all possible I would go with the Verilog. The reference<br />
design gets undocumented minor updates on a weekly basis. If you need a specific update, we<br />
can re-generate and test the VHDL for you.<br />
DN9200K10PCIE8T User Guide www.dinigroup.com 218
Chapter 6: Ordering Information<br />
Part Number<br />
DN9200K10PCIE8T<br />
1 How to order<br />
Request quotes by emailing sales@dinigroup.com.<br />
Fax a PO to: (858) 454-1728<br />
Do not fax cash.<br />
For technical questions email support@dinigroup.com<br />
2 Optional Equipment<br />
The following tools are suggested for use with the Dini Group DN9200K10PCIE8T.<br />
2.1 Compatible Dini Group products<br />
The Dini Group supplies standard daughtercards and memory modules that you can use with<br />
the DN9200K10PCIE8T.<br />
2.1.1 Interface Boards<br />
Debugging Connections<br />
Mictor<br />
http://dinigroup.com/dnsodm200_mictor.php<br />
http://dinigroup.com/dnsodm200_quadmic.php<br />
2mm Header<br />
http://dinigroup.com/dnsodm200_intercon.php<br />
PCI (3.3V)<br />
(Contact Us)<br />
USB (Host, peripheral, or OTG)<br />
http://dinigroup.com/dnsodm200_usb.php<br />
2.1.2 Memories<br />
The memory module solutions from Dini Group allow the user to install whichever type of<br />
memory his application requires.<br />
DN9200K10PCIE8T User Guide www.dinigroup.com 219
O R D E R I N G I N F O R M A T I O N<br />
SRAM (Synchronous) 64 x 1Mb @175 MHz<br />
GSI part number GS8320V32<br />
DNSODM200_SRAM<br />
http://dinigroup.com/dnsodm200_ssram.php<br />
Zero Bus Latency SRAM<br />
(Contact Us)<br />
RLDRAM 64 x 1Mb x 8bank<br />
Micron part number MT49H8M32<br />
DNSODM200_RLDRAM<br />
http://dinigroup.com/dnsodm200_rldram.php<br />
DDR3 64 x 16Mb @ 250 MHz<br />
http://dinigroup.com/dnsodm200_ddr3.php<br />
DDR1 64 x 32Mb @ 175 MHz<br />
http://dinigroup.com/dnsodm200_ddr1.php<br />
DRAM (Synch) 64 x 16Mb @75 MHz<br />
http://dinigroup.com/dnsodm200_sdr.php<br />
Mobile SDRAM<br />
Micron MT48H32M16<br />
http://dinigroup.com/dnsodm200_se.php<br />
NAND Flash<br />
Intel StrataFlash PE28F256P30<br />
http://dinigroup.com/dnsodm200_se.php<br />
NOR Flash 64 x 8Mb @ 66 MHz<br />
Spansion S71WS128NB0BFWAN0<br />
http://dinigroup.com/dnsodm200_flash.php<br />
PSRAM 32 x 4Mb @ 66 MHz<br />
Spansion S71WS128NB0BFWAN0<br />
http://dinigroup.com/dnsodm200_flash.php<br />
2.1.3 Daughter cards<br />
Dini Group daughtercards connect to the MEG-Array connector (400-pin) using the standard<br />
Dini Group daughter card interface description.<br />
PCI Express<br />
8 lanes<br />
http://dinigroup.com/dnmeg_v5tpcie.php<br />
DN9200K10PCIE8T User Guide www.dinigroup.com 220
O R D E R I N G I N F O R M A T I O N<br />
FPGA-to-FPGA Interconnect<br />
Connect two adjacent daughtercard connectors<br />
http://dinigroup.com/DNMEG_Intercon.php<br />
Board-to-Board Interconnect<br />
http://dinigroup.com/DNMEG_Mictor_Diff.php<br />
0.1” Header<br />
http://dinigroup.com/DNMEG_Obs.php<br />
DVI and HDMI<br />
http://dinigroup.com/dvidc.php<br />
High-Speed Serial (10Gig Ethernet, HSSDC, SATA, FibreChannel, XAUI)<br />
http://dinigroup.com/dnmeg_v5t.php<br />
ADC and DAC<br />
11+ ENOB @ 210 MHz<br />
http://dinigroup.com/DNMEG_ADDA.php<br />
Mictor<br />
http://dinigroup.com/DNMEG_Mictor_Diff.php<br />
Riser Card<br />
Dini Group T-Shirts, Hats<br />
FPGA Mood-rings<br />
2.2 Compatible third-party Software<br />
PCI Tree<br />
http://www.pcitree.de/<br />
CatScan<br />
http://www.getcatalyst.com/catalystcatscan.html<br />
Putty<br />
http://www.chiark.greenend.org.uk/~sgtatham/putty/<br />
2.3 Compatible third-party hardware<br />
The following products are recommended for use with the DN9200K10PCIE8T<br />
Standard DDR2 SODIMM modules<br />
www.crucial.com<br />
4GB - $550<br />
DN9200K10PCIE8T User Guide www.dinigroup.com 221
O R D E R I N G I N F O R M A T I O N<br />
2GB - $54<br />
1GB - $21<br />
512MB - $10<br />
Xilinx Platform II USB Cable<br />
HW-USB-II-G<br />
http://nuhorizons.com<br />
(required for JTAG connection to FPGA, ChipScope)<br />
Mictor breakout, Mictor Cables<br />
MIC-38-BREAKOUT, MIC-38-CABLE-MM-18<br />
http://www.emulation.com/catalog/off-the-shelf_solutions/mictor/<br />
PCI Express riser card<br />
PEX16LX $120<br />
http://www.adexelec.com/pciexp.htm<br />
PCI Express 2.0 Motherboard<br />
Asus P5E WS PRO LGA 775 Intel X38 ATX Server Motherboard<br />
http://www.newegg.com/<br />
3 Compliance Data<br />
3.1 Disclaimer<br />
Information is the manual is “as is” something about liability and medical devices, and space<br />
exploration.<br />
Figure 138 - Disclaimer block diagram<br />
Reference design and software might not work. Don‟t put all your money in only one or two<br />
stocks, etc.<br />
3.2 Compliance<br />
3.2.1 FCC EMI<br />
Since the DN9200K10PCIE8T is not intended for production systems, it has not undergone<br />
EMI testing. An FCC Compliance Screening can be done by special request, but requires the<br />
customer to provide a sample end use system with good EMI shielding.<br />
DN9200K10PCIE8T User Guide www.dinigroup.com 222
O R D E R I N G I N F O R M A T I O N<br />
3.2.2 PCIe-SIG<br />
The DN9200K10PCIE8T passes the electrical compliance test for PCI express 1.1 and 1.0a,<br />
using the Provided DMA-enabled PCI Express core, and with the Xilinx PCIe endpoint<br />
LogiCORE. Additionally, the LogiCORE endpoint passes the PCI-SIG compliance full test.<br />
The provided PCI Express DMA-enabled core has not been tested at a compliance workshop.<br />
The FX70T passes the PCI Express electrical compliance test for revision 2.0.<br />
EYE WIDTH:<br />
149ps<br />
TIE JITTER:<br />
-28 to 28ps<br />
TOTAL JITTER @ BER: 77ps<br />
DIFF PEAK VOLTAGE 1.12V<br />
3.3 Environmental<br />
3.3.1 Temperature<br />
The DN9200K10PCIE8T is designed to operate within an ambient temperature range of 0 – 50<br />
°C.<br />
In environments with a high ambient temperature, or where the total heat capacity of the<br />
adjacent air flow is restricted (such as inside a server), a new thermal evaluation will be required.<br />
All components on the DN9200K10PCIE8T are rated to operate within a temperate range of<br />
0° to 80°C.<br />
Dini Group has some larger Heatsinks and Fans if you need another few C° of temperature<br />
headroom.<br />
3.4 Export Control<br />
3.4.1 Lead-Free<br />
The DN9200K10PCIE8T meets the requirements of EU Directive 2002/95/EC, “RoHS”.<br />
Specifically, the DN9200K10PCIE8T contains no homogeneous materials that:<br />
a) contains lead (Pb) in excess of 0.1 weight-% (1000 ppm)<br />
b) contains mercury (Hg) in excess of 0.1 weight-% (1000 ppm)<br />
c) contains hexavalent chromium (Cr VI) in excess of 0.1 weight-% (1000 ppm)<br />
d) contains polybrominated biphenyls (PBB) or polybrominated dimethyl ethers (PBDE) in<br />
excess of 0.1 weight-% (1000 ppm)<br />
e) contains cadmium (Cd) in excess of 0.01 weight-% (100 ppm)<br />
No exemptions are claimed for this product.<br />
3.4.2 The USA Schedule B number based on the HTS<br />
8471 60 7080<br />
DN9200K10PCIE8T User Guide www.dinigroup.com 223
O R D E R I N G I N F O R M A T I O N<br />
3.4.3 Export control classification number ECCN<br />
EAR99<br />
DN9200K10PCIE8T User Guide www.dinigroup.com 224
![SODIMM Schematic [PDF]](https://img.yumpu.com/43758171/1/190x146/sodimm-schematic-pdf.jpg?quality=85)
![User's Manual [PDF - 8.3MB]](https://img.yumpu.com/36435641/1/190x245/users-manual-pdf-83mb.jpg?quality=85)