Strip-Plank like a Pro | Article Titles and Pages | Main ... - RC Universe
Strip-Plank like a Pro | Article Titles and Pages | Main ... - RC Universe
Strip-Plank like a Pro | Article Titles and Pages | Main ... - RC Universe

You also want an ePaper? Increase the reach of your titles
YUMPU automatically turns print PDFs into web optimized ePapers that Google loves.
<strong>Strip</strong>-<strong>Plank</strong> <strong>like</strong> a <strong>Pro</strong> | <strong>Article</strong> <strong>Titles</strong> <strong>and</strong> <strong>Pages</strong> | <strong>Main</strong> Site | Model Airplane News<br />
Other Air Age<br />
Publications<br />
Contributors<br />
Guidelines<br />
Forums<br />
it is easier than you think. The first thing you must do is<br />
modify your stripper. I use a Master Airscrew stripper<br />
because I have found it to be the easiest to modify for<br />
this purpose. Be careful how you adjust the blade; it<br />
shouldn’t dig into the work surface. This is true with any<br />
kind of stripping. Loosen the setscrews that hold the<br />
blade, then rest the stripper on a hard surface,<br />
preferably metal. Let the tip of the blade barely touch<br />
the surface; then tighten the screws. Don’t worry about<br />
the blade not cutting completely through the balsa; it<br />
doesn’t have to, <strong>and</strong> you won’t leave any cut marks in<br />
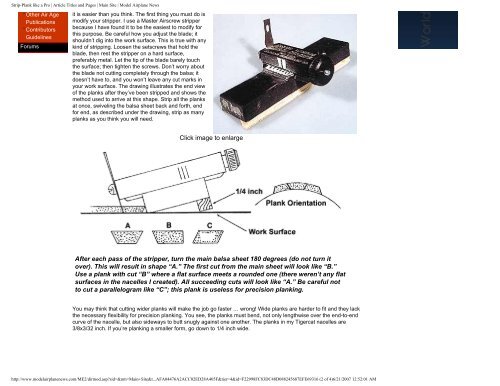
your work surface. The drawing illustrates the end view<br />
of the planks after they’ve been stripped <strong>and</strong> shows the<br />
method used to arrive at this shape. <strong>Strip</strong> all the planks<br />
at once, swiveling the balsa sheet back <strong>and</strong> forth, end<br />
for end, as described under the drawing, strip as many<br />
planks as you think you will need.<br />
Click image to enlarge<br />
After each pass of the stripper, turn the main balsa sheet 180 degrees (do not turn it<br />
over). This will result in shape “A.” The first cut from the main sheet will look <strong>like</strong> “B.”<br />
Use a plank with cut “B” where a flat surface meets a rounded one (there weren’t any flat<br />
surfaces in the nacelles I created). All succeeding cuts will look <strong>like</strong> “A.” Be careful not<br />
to cut a parallelogram <strong>like</strong> “C”; this plank is useless for precision planking.<br />
You may think that cutting wider planks will make the job go faster … wrong! Wide planks are harder to fit <strong>and</strong> they lack<br />
the necessary flexibility for precision planking. You see, the planks must bend, not only lengthwise over the end-to-end<br />
curve of the nacelle, but also sideways to butt snugly against one another. The planks in my Tigercat nacelles are<br />
3/8x3/32 inch. If you’re planking a smaller form, go down to 1/4 inch wide.<br />
http://www.modelairplanenews.com/ME2/dirmod.asp?sid=&nm=<strong>Main</strong>+Site&t...AFA04476A2ACC02ED28A405F&tier=4&id=F22998FC83DC48D088245687EFE69316 (2 of 4)6/21/2007 12:52:01 AM