
You also want an ePaper? Increase the reach of your titles
YUMPU automatically turns print PDFs into web optimized ePapers that Google loves.
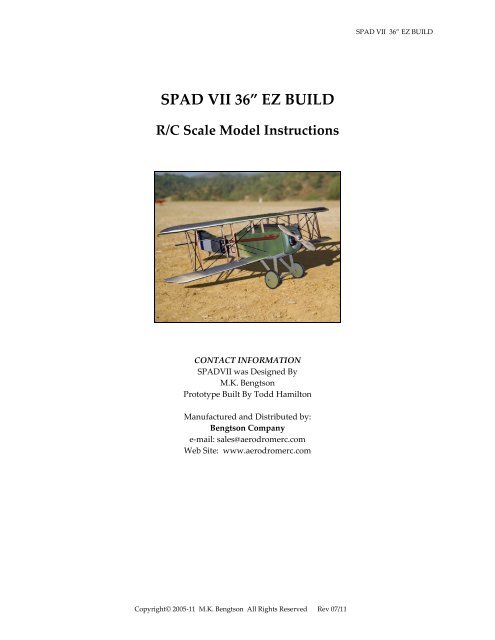
<strong>SPAD</strong> <strong>VII</strong> 36” <strong>EZ</strong> <strong>BUILD</strong><strong>SPAD</strong> <strong>VII</strong> 36” <strong>EZ</strong> <strong>BUILD</strong>R/C Scale Model InstructionsCONTACT INFORMATION<strong>SPAD</strong><strong>VII</strong> was Designed ByM.K. BengtsonPrototype Built By Todd HamiltonManufactured and Distributed by:Bengtson Companye‐mail: sales@aerodromerc.comWeb Site: www.aerodromerc.comCopyright© 2005‐11 M.K. Bengtson All Rights Reserved Rev 07/11
<strong>SPAD</strong> <strong>VII</strong> 36” <strong>EZ</strong> <strong>BUILD</strong> Page 2<strong>SPAD</strong> <strong>VII</strong> 36” <strong>EZ</strong> <strong>BUILD</strong>Thank you for purchasing the <strong>SPAD</strong> <strong>VII</strong> modelplans for electric flight.THE MODEL<strong>BUILD</strong>ING THE MODELBEFORE STARTINGA note about the photos: the photos were taken ofa prototype and the parts shown in the plan maylook slightly different from them. However, theconcepts illustrated are the same.COWLINGThe cowling is of built up construction with lasercut balsa parts.<strong>SPAD</strong> <strong>VII</strong> <strong>EZ</strong> <strong>BUILD</strong>A semi scale adaptation of the <strong>SPAD</strong> <strong>VII</strong>, thismodel is designed to be easy to build and excitingto fly.POWER SET UPThe model can be set up to be powered by the 6 vSpeed 400 or Long Can Speed 400 (sometimescalled a 480) with the 2.33:1 Mini‐Olympus gearboxand a 10x4.7 APC prop.R/C GEARA four function mini receiver and four microservos are all that are required.Model Specifications:SPECIFICATIONSMore than 160 laser cut partsScale: ~1/9Channel: R/E/A/TWingspan: 36ʺWing Area: 397 sq inWeight: 23 ozPower System: Speed 400/480 Mini‐Olympusgeared 2.33:1Prop: 9x7Wheels: Balsa & plywood, Neoprene foamtiresAirfoil Type: Flat bottomedCowl: Built up balsaDecals: Available on the websiteCovering: Litespan or PolyspanCowl constructionThe cowl should be sealed, sanded and primeduntil no wood grain is left showing. Baby (Talcum)powder in clear dope makes an excellent balsasealer. Talcum powder mixed in white glue makesexcellent filler for gaps or gouges. Sand down afterit dries.WINGSWing ConstructionPin down, over the plan, the t/e, l/e, spars and wingtip, gluing as required. Making sure that you areusing the correct ribs for the wing you arebuilding, glue all the ribs in place. Sand theleading edge stock to be rounded and meet theribs.Copyright© 2005‐11 M.K. Bengtson All Rights Reserved Rev 07/11Pin down, over the plan, the t/e, l/e, spars and wing tip,gluing as required.
<strong>SPAD</strong> <strong>VII</strong> 36” <strong>EZ</strong> <strong>BUILD</strong> Page 3FUSELAGE CONSTRUCTIONThe fuselage is built as a unitized box structure,using pre‐cut side frames with pre‐cut notches forthe formers.Building the FuselageAssembling the fuselage frames on the plan. Gluethe cabane struts into the 1/8” balsa sides. Connectthese frames by aligning them on the plan. Insertthe motor mount and battery tray. Connect F1thru F4 only at this point.Add the other formers and close the fuselage endNow it is time to add the other formers and closethe fuselage end taking care not to produce awarped or twisted structure. Then add the balsastringers top and bottom.Adding the Undercarriage PlatesOnce dry, remove from the board and add theplywood formers crosspieces that serve as u/cplates.Connect F1 thru F4 only at this point.Undercarriage PartsPlace Fuselage on SideThen turn the fuse on its side and add the otherfuse side balsa.Use thin CA to harden plywood undercarriageparts and epoxy together securely. Use Kevlaror Nylon thread binding to add an additionaldegree of strength to the joints. The axle isdesigned to have some shock absorbing character.Mount the axle in the center of the UC plate usingKevlar thread and epoxy. Bind the axle ends atthe uprights with elastic cord or rubber bands.There are cut outs in the uprights to allow somemovement of the axle during landing.Copyright© 2005‐11 M.K. Bengtson All Rights Reserved Rev 07/11
<strong>SPAD</strong> <strong>VII</strong> 36” <strong>EZ</strong> <strong>BUILD</strong> Page 4Undercarriage DetailAdding the DeckAdd all the decking stringers. Sections of 1/16”thick balsa are added next to the cabane strutsbefore covering. If a recessed dummy machine gunmount is desired, fabricate a slot with cardstock or1/32” balsa in the top of the fuselage.TAIL SURFACESLay out and glue parts of the tail surfaces on theplans.Control Surface PartsJoin the elevators with the 1/8” dowel joiner. Sandthe tail parts, rounding off all edges. Don’t add thehorns or hinge the surfaces until after covering iscomplete.COVERINGAny lightweight covering material can be used.Polyspan makes a good choice Litespan is alsopopular.DECALS AVAILABLE ON‐LINE: Downloadabledecal outlines are available on <strong>AerodromeRC</strong>website:http://www.aerodromerc.com/decals.htmWHEELSGluing the ply sides on the ¼ “balsa core makesthe basis for the wheels. Use the brass hub foralignment. Epoxy the hubs in place and add asufficient amount of epoxy around the base of thehub to reinforce the connection of the hub to theply. Plywood reinforcing hubs are provided thatare to slip over the brass tubing as shown.Alternatively, gluing an additional ½” square pieceof scrap 1/8” balsa with a hole drilled in the centercan be substituted. Next, CA glue the neoprenecording together to from a “tire”. Use thin CAsparingly as the CA bonds very aggressively to therubber. Press the CA wetted ends together for aninstant bond. The best way to align the ends is toglue them while they are in place on the wheel.Then attach the tires to the wheels and CA in place.A thin bead of CA around the rim makes for asecure tire.Paper cones supplied are cut out. Use a ballpointpen to score each line on the back to make animpression of “spokes”. It is helpful to do thisoperation on a paper tablet so that the pen makes agood crease. Fold the paper along the crease linesto exaggerate the raised lines. One of the sectionsforming a wedge is cut out. Make cuts to thecenter of the circle along a pair of the spokes.Close the paper cut‐out to form a cone and tape thejoint inside the cone.The inside cones may now be attached to thewheels. The outside cones may be attached at thispoint if wheel collars are to be used. Alternatively,after installing the wheels on the landing gear, awasher may be soldered to hold the wheel in placeand then the cone is attached. This method makesa very nice scale appearance.Wheel AssemblyCopyright© 2005‐11 M.K. Bengtson All Rights Reserved Rev 07/11
<strong>SPAD</strong> <strong>VII</strong> 36” <strong>EZ</strong> <strong>BUILD</strong> Page 5INSTALLING THE RADIO CONTROL GEARServo BayGet your R/C gear fitted at this stage, and also themotor.Fitting Tail SurfacesSlip the control horns onto the wire pushrod endsand, with both the servos and the control surfacescentered, glue the horns into their slots.Fitting the rigging wiresUse strong thread or Kevlar fishing line tosimulate rigging wires. Use small screws, fishinghook eyes, straight pinheads or small eyelets toattach the lines. While not technically requiredthese wires can add a degree of strength to yourmodel.Servo BayBatteryUse the battery position to balance the model asshown.ASSEMBLYWingThe first task is to epoxy the top wing accuratelyonto the fuselage. Use 5‐minute epoxy for thistask. After the top wing is attached, the struts areinserted and the model is turned upside down.Use the locating dowels to attach the lower wingsto the fuselage.Dummy machine gunLaser cut parts are provided for a dummy machinegun. Glue these parts together according to theplan and sand to shape. The machine gun caneither be sanded to fit on top of the fuselage or berecessed into a slot in the top of the fuselage. Theslot is not detailed on the plan.Finish the cowl front by installing a piece ofwindow screening in the opening at the nose of thefuselage. This screening simulates the radiatorvents and allows cooling air to enter the fuselage.Using Locating Dowels And Aligning WingPanelsApply epoxy to the wing rib that meets thefuselage. Attach the wings to the fuselage. Use thelocating dowels to assist with aligning the wingpanels. Allow epoxy to set.Nearly FinishedBalance The ModelBalance the model at the point shown. It is best toposition the battery to do this operation.Attach Wings to FuselageCopyright© 2005‐11 M.K. Bengtson All Rights Reserved Rev 07/11
<strong>SPAD</strong> <strong>VII</strong> 36” <strong>EZ</strong> <strong>BUILD</strong> Page 6<strong>SPAD</strong> <strong>VII</strong> <strong>EZ</strong> <strong>BUILD</strong>Finished Model, (radiator screening not shown)FLYINGThe model should ROG on pavement or hardsurfaces. On grass, the model may require handlaunching. Be careful that your hand or fingers donot catch on the lower rigging. Launch firmly andlevel. While the tail surfaces are small, they shouldnot need excessive throws. Let the model gainaltitude slowly off the runway. Applying toomuch up elevator at slow speeds asks for a stall.Make your turns gently as tight turns risk tipstalling in any model. Don’t expect the elevator tomake the model climb. Think of the elevator as adevice to change the attitude of the model. Thewing and airspeed ultimately make the modelclimb. Often down elevator applied at stalling canavoid a major crash. The most important detailsfor proper flight operations are:1. CG location. Tail heavy models never flywell or at all2. Down and right thrust3. Straight and non warped wingsBe sure you assemble and lube the gearbox so thatit is not binding. A binding gearbox will rob mostof your batteries power.CONTACT INFORMATIONDistributed by:Bengtson Companye‐mail: sales@aerodromerc.comWeb Site: www.aerodromerc.comCopyright© 2005‐11 M.K. Bengtson All Rights Reserved Rev 07/11