ExaRAID JBOD Quick Installation Guide - Accusys
ExaRAID JBOD Quick Installation Guide - Accusys
ExaRAID JBOD Quick Installation Guide - Accusys

You also want an ePaper? Increase the reach of your titles
YUMPU automatically turns print PDFs into web optimized ePapers that Google loves.
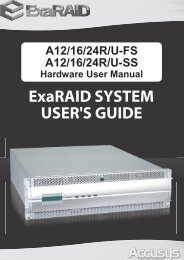
IO#2 ACT<br />
IO#1 ACT<br />
IO#2 RDY<br />
IO#1 RDY<br />
HDD<br />
Temp<br />
Fan<br />
Power<br />
<strong>JBOD</strong> System <strong>Quick</strong> Start <strong>Guide</strong><br />
Step 2: Mounting the <strong>JBOD</strong> System in a Rack<br />
The <strong>JBOD</strong> system can be installed in a standard 19-inch rack. Follow the<br />
procedures below:<br />
1.Attack eight rack nuts into the rack,<br />
making sure that they correspond with<br />
the mounting points on the rails.<br />
2.Adjust the length of the rails as<br />
needed.<br />
3.Secure the rails using two nuts and<br />
bolts on both the front and back posts<br />
of the rack.<br />
4.Tighten the locking screws.<br />
5.Slide the <strong>JBOD</strong> system into the rack<br />
and secure it into place using the<br />
fixing screws.<br />
10