

Denar® Universal Occlusal Stand Instruction Manual - Whip Mix
Denar® Universal Occlusal Stand Instruction Manual - Whip Mix
Denar® Universal Occlusal Stand Instruction Manual - Whip Mix

Create successful ePaper yourself
Turn your PDF publications into a flip-book with our unique Google optimized e-Paper software.
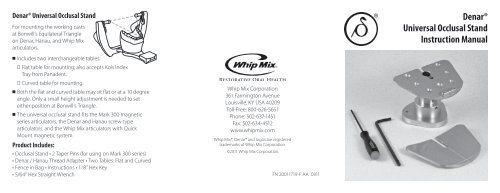
<strong>Denar®</strong> <strong>Universal</strong> <strong>Occlusal</strong> <strong>Stand</strong><br />
For mounting the working casts<br />
at Bonwill’s Equilateral Triangle<br />
on Denar, Hanau, and <strong>Whip</strong> <strong>Mix</strong><br />
articulators.<br />
<strong>Denar®</strong><br />
<strong>Universal</strong> <strong>Occlusal</strong> <strong>Stand</strong><br />
<strong>Instruction</strong> <strong>Manual</strong><br />
Includes two interchangeable tables:<br />
▫ Flat table for mounting; also accepts Kois Index<br />
Tray from Panadent.<br />
▫ Curved table for mounting.<br />
Both the flat and curved table may sit flat or at a 10 degree<br />
angle. Only a small height adjustment is needed to set<br />
either position at Bonwill’s Triangle.<br />
The universal occlusal stand fits the Mark 300 magnetic<br />
series articulators, the Denar and Hanau screw type<br />
articulators, and the <strong>Whip</strong> <strong>Mix</strong> articulators with Quick<br />
Mount magnetic system.<br />
Product Includes:<br />
• <strong>Occlusal</strong> <strong>Stand</strong> • 2 Taper Pins (for using on Mark 300 series)<br />
• Denar / Hanau Thread Adapter • Two Tables: Flat and Curved<br />
• Fence in Bag • <strong>Instruction</strong>s • 1⁄8” Hex Key<br />
• 5/64” Hex Straight Wrench<br />
<strong>Whip</strong> <strong>Mix</strong> Corporation<br />
361 Farmington Avenue<br />
Louisville, KY USA 40209<br />
Toll-Free: 800-626-5651<br />
Phone: 502-637-1451<br />
Fax: 502-634-4512<br />
www.whipmix.com<br />
<strong>Whip</strong> <strong>Mix</strong>®, <strong>Denar®</strong> and logos are registered<br />
trademarks of <strong>Whip</strong> <strong>Mix</strong> Corporation.<br />
©2011 <strong>Whip</strong> <strong>Mix</strong> Corporation.<br />
FN 20011719-F AA 0311
Flat or Curved Table:<br />
Using the top set screw and 1/8”<br />
Hex Key, loosen the screw until<br />
you are able to remove either<br />
the flat or curved table. Set in<br />
the table you choose to use, and<br />
tighten the top set screw.<br />
Bonwill Settings:<br />
Mounting without Kois<br />
Index Tray<br />
▫ Using the front set screw on<br />
the bottom cylinder and 5/64”<br />
straight wrench, loosen the<br />
screw until you are able to<br />
move the middle cylinder up<br />
and down.<br />
Top Set<br />
Screw<br />
Set<br />
Screw<br />
▫ Set the middle cylinder at its highest point and lock<br />
into place.<br />
Mounting with Kois<br />
Index Tray<br />
▫ Using the front set screw on<br />
the bottom cylinder and 5/64”<br />
straight wrench, loosen the<br />
screw until you are able to<br />
move the middle cylinder up<br />
and down.<br />
▫ Set the middle cylinder at<br />
its lowest point and lock<br />
into place.<br />
Set<br />
Screw<br />
Table Angles<br />
The table may be set at<br />
either a flat (0˚) angle or<br />
10˚ angle. Using the Flat<br />
Head screw on the side<br />
underneath the table and<br />
the 1/8” Hex Key, loosen<br />
the screw until you are<br />
able to freely move the<br />
table to a flat or angled<br />
position. Set the table to<br />
the desired position and<br />
secure by tightening the<br />
Flat Head screw.<br />
Flat Head<br />
Screw<br />
1 2 3
Articulator Setting<br />
Using the side set screw on the middle cylinder and the<br />
5/64” straight wrench, loosen the screw until you are able to<br />
raise and lower the top cylinder.<br />
You will notice four markings on the cylinder:<br />
▫ WM – 0<br />
▫ D/H – 0<br />
▫ WM – 10<br />
▫ D/H – 10<br />
If you are using a <strong>Whip</strong> <strong>Mix</strong><br />
articulator with the table at 0˚<br />
move the cylinder so that the<br />
WM – 0 line is positioned at the<br />
Settings<br />
Set<br />
Screw<br />
top of the middle cylinder. The WM – 0 lettering should be<br />
visible if aligned correctly. Tighten the set screw to secure<br />
the cylinder position.<br />
If you are using a Denar or Hanau articulator with the table at<br />
0˚, use the D/H – 0 position.<br />
If you are using a <strong>Whip</strong> <strong>Mix</strong> articulator with the table at 10˚,<br />
use the WM – 10 position.<br />
If you are using a Denar or Hanau articulator with the table at<br />
10˚, use the D/H – 10 position.<br />
Articulator Mounting<br />
<strong>Denar®</strong> Mark 300 series articulators<br />
▫ Be sure the two taper<br />
pins are in place on the<br />
bottom of the occlusal<br />
stand. If not, snap into<br />
place.<br />
▫ Leave the Denar /<br />
Hanau thread adapter<br />
in place for additional<br />
magnetic strength.<br />
▫ After cleaning each Taper Pins<br />
surface, place the<br />
stand on the lower member of the articulator by lining<br />
up the pins to the divots on the articulator.<br />
▫ Be sure the stand is fully seated on the articulator.<br />
Thread<br />
Adapter<br />
6<br />
5<br />
3<br />
2<br />
1<br />
▫ Using a flat screwdriver or coin, loosen the Denar / Hanau<br />
thread adapter and remove. Be sure to save the thread<br />
adapter in your fence bag in case needed in the future.<br />
▫ After cleaning each surface, snap the occlusal stand on<br />
to the quick mount system on the lower member of the<br />
articulator.<br />
▫ For <strong>Whip</strong> <strong>Mix</strong> screw type articulators, please contact<br />
customer service for information on converting to a<br />
magnetic system.<br />
8<br />
5<br />
7 4 7<br />
10<br />
11<br />
9<br />
When using the flat table at a<br />
0° angle (flat), the fence may be<br />
used to line up the incisal edge<br />
of the casts. Be sure the text<br />
Flat on the fence is next to the<br />
casts.<br />
When using the flat table at<br />
a 10° angle, the fence may be<br />
used to line up the incisal edge<br />
of the casts. Be sure the text<br />
10 Degree on the fence is next<br />
to the casts.<br />
Denar / Hanau articulators<br />
▫ Remove the two taper pins if<br />
they are in place by using the<br />
5/64” straight wrench to push<br />
through the holes above the<br />
pins on top of the stand base.<br />
Be sure to save the taper pins<br />
in your fence bag in case they<br />
are needed in the future.<br />
▫ If needed, remove magnetic<br />
converter plate from the lower member of your articulator.<br />
▫ After cleaning each surface, attach the occlusal stand to<br />
the lower member of the articulator by locating on the<br />
dowel pins and tightening the mounting screw.<br />
<strong>Whip</strong> <strong>Mix</strong> articulators with Quick Mount magnetic<br />
system<br />
▫ Remove the two taper pins if they are in place by using the<br />
5/64” straight wrench to push through the holes above<br />
the pins on top of the stand base. Be sure to save the taper<br />
pins in your fence bag in case they are needed in the<br />
future.<br />
Key # Part # Description<br />
1 Base*<br />
2 Base Post (Lower Cylinder)*<br />
3 Extension (Middle Cylinder)*<br />
4 20011711 Thread Adapter<br />
5 R20011714 10-32 Flat Head Screw<br />
6 Flat Plate<br />
7 20011665 Taper Pin<br />
8 20011717 Fence Assembly<br />
9 R3556 1/8” Hex Key<br />
10 3261-3 5/64” Hex Straight Wrench<br />
11 MA2225 Curved Plate<br />
*Requires Factory Repair<br />
4 5 6


