GF55 & GFI55 - Regency Fireplace Products
GF55 & GFI55 - Regency Fireplace Products
GF55 & GFI55 - Regency Fireplace Products

Create successful ePaper yourself
Turn your PDF publications into a flip-book with our unique Google optimized e-Paper software.
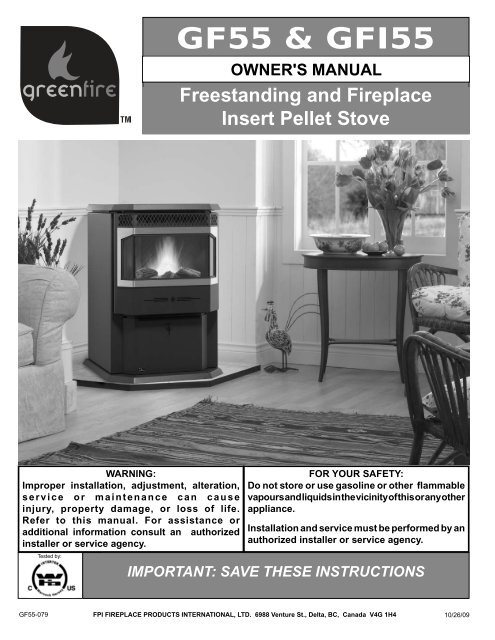
<strong>GF55</strong> & <strong>GFI55</strong><br />
OWNER'S MANUAL<br />
Freestanding and <strong>Fireplace</strong><br />
Insert Pellet Stove<br />
WARNING:<br />
Improper installation, adjustment, alteration,<br />
service or maintenance can cause<br />
injury, property damage, or loss of life.<br />
Refer to this manual. For assistance or<br />
additional information consult an authorized<br />
installer or service agency.<br />
Tested by:<br />
FOR YOUR SAFETY:<br />
Do not store or use gasoline or other flammable<br />
vapours and liquids in the vicinity of this or any other<br />
appliance.<br />
Installation and service must be performed by an<br />
authorized installer or service agency.<br />
IMPORTANT: SAVE THESE INSTRUCTIONS<br />
<strong>GF55</strong>-079 FPI FIREPLACE PRODUCTS INTERNATIONAL, LTD. 6988 Venture St., Delta, BC, Canada V4G 1H4<br />
10/26/09
TO THE NEW OWNER<br />
Congratulations! You are the owner of a state-of-the-art Pellet Stove.<br />
Thank-you for purchasing a<br />
FPI FIREPLACE PRODUCT.<br />
The pride of workmanship that goes into each of our products will give you years of trouble-free<br />
enjoyment. Should you have any questions about your product that are not covered in this manual,<br />
please contact the GREENFIRE DEALER in your area.<br />
Safety Note: If this stove is not properly installed, a house fi re may result. For your safety,<br />
follow the installation instructions, contact local building, fi re offi cials, or authority having jurisdiction<br />
about restrictions and installation inspection requirements in your area.<br />
The authority having jurisdiction should be consulted before installation to determine the need to<br />
obtain a permit.<br />
2<br />
Greenfire Pellet Stove and Insert Owner's Manual
TABLE OF CONTENTS<br />
SAFETY LABEL<br />
Copy of Serial No. Decal ...............................................4<br />
INSTALLATION<br />
Safety Warnings & Recommendations ..........................5<br />
Important Safety Information .........................................6<br />
Pellet Quality .................................................................6<br />
OPERATING INSTRUCTIONS<br />
Control Board Functions ................................................7<br />
Automatic Safety Features ............................................7<br />
Operating Your Pellet Stove ..........................................8<br />
Manual Mode ............................................................8<br />
High / Low Mode.......................................................8<br />
Auto / Off Mode .........................................................8<br />
Slider / Damper Set-Up .................................................9<br />
Hopper Grate Installation...............................................9<br />
MAINTENANCE<br />
Routine Cleaning & Maintenance ................................10<br />
Opening the Door ...................................................10<br />
Burn Pot & Liner .....................................................10<br />
Door Glass Cleaning ..............................................10<br />
Ash Pan & Door Gaskets ........................................10<br />
Ash Pan .................................................................. 11<br />
Heat Exchanger Tubes ........................................... 11<br />
Fresh Air Intake ...................................................... 11<br />
Exhaust Vent .......................................................... 11<br />
Blower Mechanisms ............................................... 11<br />
All Hinges................................................................ 11<br />
Exhaust Passages ..................................................12<br />
Post Season Clean-Up ...........................................12<br />
Cleaning Plated Surfaces .......................................12<br />
Firebox Panel .........................................................12<br />
Replacing Door Glass.............................................12<br />
WARRANTY<br />
Warranty ......................................................................13<br />
Exclusions and Limitations ..........................................14<br />
Greenfi re Pellet Stove and Insert Owner's Manual 3
334<br />
Serial No. / No. De Serié:<br />
Listed Room Heater, Pelletized Fuel Type (Appareil de chauffage à granules certifié)<br />
Suitable For Mobile Home Installation (Accepté pour l'installation dans une maison mobile, test)<br />
Tested to (Testée selon): UL 14 82 -19 98 / ULC S627-00 / AST M 1509-95 / ULC S628-M93<br />
US Environmental Protection Agency, certified to comply July 1, 1990, particulate emission<br />
standards. (États-Unis Environnemental Protection Agence, a certifié pour conformer au Juillet 1,<br />
1990, les normes de particules d'émission.)<br />
This pellet appliance has been tested and listed for use in manufactured homes in accordance with Oregon<br />
Administration Rules 814-23-900 through 814-23-909. Install and use only in accordance with the Manufacture’s<br />
installation and operating instructions. Contact local building or fire officials about restrictions and installation inspection in<br />
your area. Do not connect this unit to a chimney flue serving another appliance. See local building codes and<br />
manufacturers instructions for precautions required for passing a chimney through a combustible wall or ceiling. Electrical<br />
rating: 120 volts, 60 hz, 4.3 Amps. Route cord away from the heater.<br />
Cet appareil a été testé et certifié pour utilisation dans les maisons mobiles en accord avec les "Règles Administratives<br />
de l'Oregon 814-23-900 à 814-23-909". Installez et utilisez cet appareil seulement selon les instructions d'installation et<br />
d'opération du fabricant. Contactez les autorités locales de votre quartier concernant les restrictions et les inspections<br />
d'installation. Consultez les codes de bâtiment locaux et les instructions du fabricant pour les précautions à prendre<br />
lorsque une cheminée doit être installée au travers un mur ou un plafond combustible. CLASSEMENT ÉLECTRIQUE :<br />
120 Volts, 60 Hz, 4.1 Amps. Placez le câble électrique loin de la chaleur.<br />
For Use With Only Pelletized Wood fuels. Operate only with viewing door and ash removal door closed. Only replace<br />
glass with ceramic glass. Components required for installation: a 3 inch (75 mm) or 4inch (100 mm) listed PL vent,<br />
complete with components. Insert and Hearth mount installations; a listed single wall chimney liner may be used. Inspect<br />
and clean Exhaust Venting system frequently.<br />
Utilisation avec les combustibles sous forme de boulets uniquement. Utiliser seulement lorsque les portes avants et la<br />
porte du réceptacle de cendre sont fermées. Si une ou des vitres devaient être remplacées, utilisez seulement du verre<br />
céramique. Les composantes requises pour l'installation sont un évent PL certifié de 3in/75mm or 4in/100mm avec ses<br />
composantes. Les installations insertion et de mont de foyer ; un paquebot de cheminée de mur de seul énuméré peut<br />
être utilisé.<br />
Input Rating (Les données évaluant): 12,000 to 45,000 BTU/Hr (3.5 to 13.2 kWh)<br />
CAUTION:<br />
Hot while operating. Do not<br />
touch, severe burns may<br />
result. Keep children, clothing,<br />
furniture, gasoline or other<br />
flammable vapors away.<br />
Model / Modèle:<br />
Greenfire <strong>GF55</strong> (Stove) <strong>GFI55</strong> (Insert)<br />
ATTENTION:<br />
Très chaud quand allumé. Ne touchez pas,<br />
les brûlures sévères peuvent résulter.<br />
Tenez loin des enfants, des vêtements, des<br />
meubles,de l’essence ou d’autres fluides<br />
produisant des vapeurs inflammables.<br />
See installation and operating instructions accompanying appliance. /<br />
The unit can be installed on a hard,<br />
stable non-combustible surface.<br />
L'unité peut être installée sur un dur,<br />
la surface non-combustible stable.<br />
DO NOT REMOVE THIS LABEL / NE RETIREZ PAS CETTE ÉTIQUETTE<br />
INSTALLED AS A FREESTANDING STOVE MODEL (<strong>GF55</strong>) / A INSTALLE COMME UN<br />
MODÈLE FS, QU’IL SOIT ENCASTRÈ, SUR PIED OU DANS UNE MAISON MOBILE.<br />
Minimum clearances to combustible materials./ Les dégagements minimums aux matériels<br />
combustibles:<br />
A Sidewall to Unit (Du mur de côté à l'appareil) 6” (152 mm)<br />
B Backwall to Unit (Du mur de derrière à l'appareil) 3” (76 mm)<br />
C Corner to Unit (Du coin à l'appareil) 2” (51 mm)<br />
D Wall to vent (Le mur pour donner vent) 3” (76 mm)<br />
E From door opening of unit to edge of floor protection<br />
(De la porte ouvrant au devant de protection de plancher) 6” (152 mm)<br />
NOTE: A combustible floor must be protected by a non-<br />
combustible material - Width 27" (686mm) by depth 34"<br />
(864mm). (Un plancher combustible doit etre protege par un<br />
materiel incombustible. La largeur 27" (686 mm) par la<br />
profondeur 34" (864mm).)<br />
Minimum Alcove Width (La largeur minimum de l'alcove) 36” (914 mm)<br />
Minimum Alcove Height (La hauteur minimum de l'alcove) 48” (1219 mm)<br />
Maximum Alcove Depth (La profondeur maximum de l'alcove) 30” (762 mm)<br />
A<br />
D<br />
Backwall<br />
B<br />
Certified for use in Canada & USA<br />
Certifié pour installation au<br />
Canada et aux Etats-Unis.<br />
INSTALLED AS A FIREPLACE INSERT STOVE MODEL (<strong>GFI55</strong>) / A INSTALLE<br />
COMME UN MODÈLE SUR PIED DE POELE.<br />
Minimum clearances to combustible materials./ Les dégagements minimums aux<br />
matériels combustibles:<br />
A Sidewall to Unit (Du mur de côté à l'appareil) 8” (203 mm)<br />
B Top of unit to an unshielded 8” (203 mm) mantle<br />
(Le sommet de l'unité à un manteau de cheminée non blindé) 8” (203 mm)<br />
C Unit to top facing (protruding ¾” [19 mm])<br />
(De l'unité au sommet du parement) 8” (203 mm)<br />
D Unit to side facing (protruding ¾” [19 mm])<br />
(De l'unité au côté du parement) 8” (203 mm)<br />
E From door opening of unit to edge of floor protection<br />
(De la porte ouvrant au devant de protection de plancher) 6” (152 mm)<br />
F From side of unit to edge of floor protection (De l'ouverture<br />
de porte pour prendre parti de protection de plancher) 6” (152 mm)<br />
Combustible floors must be protected by a non-combustible material. - See Owners Manual.<br />
Le plancher combustible doit être protégé par un matériel incombustible. - Consultez le manual.<br />
Adjacent wall<br />
Floor Protection<br />
C<br />
Sidewall<br />
E<br />
To Prime Auger: Restart the unit five (5) minutes into its startup or by putting a small hand full of pellets into the burnpot.<br />
To Operate Stove: MANUAL MODE: When a fire has been established the stove settings are adjustable. / HIGH/LOW MODE: (Requires a thermostat) When<br />
the thermostat calls for heat the stove settings are adjustable. When the thermostat contacts open, the HEAT LEVEL and Fans will drop down to the LOW<br />
setting until the thermostat contacts close again. / AUTO/OFF MODE: (Requires a thermostat) When the thermostat contacts close, the unit will light<br />
automatically. Once up to temperature the stove settings are adjustable. When the thermostat contacts open, the stove will drop down to the LOW settings for<br />
30 minutes. If within the 30 min the thermostat contacts close, the HEAT LEVEL will return to previous MANUAL setting or if the thermostat contacts remain<br />
open the stove begin its shutdown routine.<br />
To Turn Off Stove: MANUAL and HI / LOW mode: Press the ON / OFF button<br />
AUTO / OFF mode: Turn the thermostat down or off<br />
Pour démarrer le poêle: Appuyer sur le bouton "ON/OFF". Si le Auger nécessite d'être amorcé, appuyer sur le bouton manuel d'alimentation du Auger jusqu'à ce que les granules se déversent dans le pot de combustion.<br />
Pour faire fonctionner le poêle : MODE MANUEL : Lorsque le feu est bien établi, les réglages peuvent être ajustés. / MODE "HIGH/LOW" : (Nécessite un thermostat) Lorsque le thermostat requière de la chaleur, les réglages peuvent être ajustés. Lorsque les contacts du<br />
thermostat ouvrent, le réglage du niveau de chaleur et les ventilateurs s'ajusteront au réglage " bas " jusqu'à ce que les contacts du thermostat se referment. / MODE "AUTO/OFF" : (Nécessite un thermostat) Lorsque les contacts du thermostat ferment, le poêle s'allumera<br />
automatiquement. Lorsque la température adéquate est atteinte, les réglages peuvent être ajustés. Lorsque les contacts du thermostat ouvrent, le poêle s'ajustera aux réglages "LOW" pendant 30 minutes. Si les contacts du thermostat sont fermés pendant ces 30<br />
minutes, le réglage de niveau de chaleur retournera en réglages "MANUEL" ou si les contacts du thermostat restent ouverts, le poêle entamera le processus d'arrêt.<br />
Pour éteindre le poêle : MODE MANUEL ET " HIGH/LOW " : Appuyer sur le bouton "ON/OFF".<br />
MODE "AUTO / OFF" : Régler le thermostat à la baisse ou éteignez le.<br />
FS Model<br />
<strong>GF55</strong>-081a<br />
<br />
<br />
Manufactured in Canada for /<br />
Fabriqué dans le Canada pour:<br />
FPI <strong>Fireplace</strong> <strong>Products</strong> International Ltd.<br />
Delta, BC, Canada<br />
Model BIH Only Minimum Clearance to Combustible Materials / Espace de<br />
dégagement requis pour le modèle BIH:<br />
(Les murs côté et mur d'arrière à spacers) 0” (0 mm)<br />
H Recess depth (Le dos de poêle à une profondeur) 11” (280 mm)<br />
F<br />
A<br />
FPI or BIH<br />
Models<br />
DATE OF MANUFACTURE / DATE DE FABRICATION:<br />
J F M A M J J A S O N D 2009 2010 2011<br />
C<br />
D<br />
E<br />
G<br />
H<br />
B<br />
SAFETY LABEL<br />
INSTALLATION<br />
This is a copy of the label that accompanies<br />
each <strong>GF55</strong> & <strong>GFI55</strong>. We have<br />
printed a copy of the contents here for<br />
your reference.<br />
On the <strong>GF55</strong> the safety label is located<br />
on the underside of the hopper lid.<br />
On the <strong>GFI55</strong> the safety label is located<br />
on the hopper cover behind the top<br />
faceplate.<br />
G From Sides and rear walls to standoffs<br />
15956 B<br />
BIH Model E<br />
Consultez le manuel avec les instructions d’installation et d’opération.<br />
4<br />
Greenfire Pellet Stove and Insert Owner's Manual
INSTALLATION<br />
SAFETY WARNINGS & RECOMMENDATIONS<br />
CAUTION:<br />
Do not connect to any air distribution duct or system.<br />
Do not burn garbage or flammable fluids such as gasoline,<br />
naptha or engine oil.<br />
Unit hot while in operation. Keep children, clothing and furniture<br />
away. Contact may cause skin burns.<br />
SMOKE DETECTOR: Smoke detectors should be installed and<br />
maintained in the structure when installing and operating a pellet burning<br />
appliance.<br />
OPERATION: The ash pan and door must be closed securely for proper<br />
and safe operation of the pellet stove. Also ensure all gaskets on the door<br />
are checked and replaced when necessary.<br />
INSTALLATION<br />
FUEL: This pellet stove is designed and approved to only burn wood<br />
pellet fuel with up to 3% ash content. Dirty fuel will adversely affect the<br />
operation and performance of the unit and may void the warranty. Check<br />
with your dealer for fuel recommendations.<br />
THE USE OF CORDWOOD IS PROHIBITED BY LAW.<br />
SOOT: Operation of the stove with insuffi cient combustion air will result in<br />
the formation of soot which will collect on the glass, the heat exchanger,<br />
the exhaust vent system, and may stain the outside of the house. This is<br />
a dangerous situation and is ineffi cient. Frequently check your stove and<br />
adjust the slider/damper as needed to ensure proper combustion. See<br />
"Slider/Damper Setting".<br />
CLEANING: There will be some build up of fl y ash and small amounts of<br />
creosote in the exhaust. This will vary due to the ash content of the fuel<br />
used and the operation of the stove. It is advisable to inspect and clean<br />
the exhaust vent semi-annually or every two tons of pellets.<br />
ASHES: Disposed ashes should be placed in a metal container with a tight<br />
fitting lid. The closed container of ashes should be on a non-combustible<br />
floor on the ground, well away from all combustible materials pending<br />
final disposal. If the ashes are disposed of by burial in soil or otherwise<br />
locally dispensed, they should be retained in the closed container until all<br />
cinders have been thoroughly cooled.<br />
ELECTRICAL: The use of a surge protected power bar is<br />
recommended. The unit must be grounded. The grounded electrical<br />
cord should be connected to a standard 115 volts (4.6 Amps), 60 hertz<br />
electrical outlet. Be careful that the electrical cord is not trapped under<br />
the appliance and that it is clear of any hot surfaces or sharp edges and<br />
also must be accessible. If this power cord should become damaged, a<br />
replacement power cord must be purchased from the manufacture or<br />
a qualifi ed Greenfi re dealer. This unit's maximum power requirement is<br />
520 watts.<br />
GLASS: Do not abuse the glass by striking or slamming the door. Do not<br />
attempt to operate the stove with broken glass. The stove uses ceramic<br />
glass. Replacement glass must be purchased from an Greenfire dealer.<br />
Do not attempt to open the door and clean the glass while the unit is in<br />
operation or if glass is hot. To clean the glass, use a soft cotton cloth and<br />
mild window cleaner, gas or wood stove glass cleaner, or take a damp<br />
paper towel and dip into the fly ash. This is a very mild abrasive and will<br />
not damage the glass.<br />
FLAMMABLE LIQUIDS: Never use gasoline, gasoline-type lantern fuel,<br />
kerosene, charcoal lighter fluid, or similar liquids to start or “freshen up”<br />
a fire in the heater. Keep all such liquids well away from the heater while<br />
it is in use.<br />
KEEP ASH PAN FREE OF RAW FUEL.<br />
DO NOT PLACE UNBURNED OR NEW PELLET FUEL IN ASH PAN. A<br />
FIRE IN THE ASH PAN MAY OCCUR.<br />
INSTALLATION: Be sure to maintain the structural integrity of your<br />
home when passing a vent through walls, ceilings, or roofs. It is<br />
recommended that the unit be secured into its position in order to avoid<br />
any displacement.<br />
DO NOT INSTALL A FLUE DAMPER IN THE EXHAUST VENTING<br />
SYSTEM OF THIS UNIT.<br />
DO NOT CONNECT THIS UNIT TO A CHIMNEY FLUE SERVING<br />
ANOTHER APPLIANCE.<br />
FRESH AIR: Outside Fresh Air connection is optional. Must be<br />
connected to all units installed in Mobile and “Air Tight Homes” (R2000)<br />
or where required by local codes. Consider all large air moving devices<br />
when installing your unit and provide room air accordingly. Limited air<br />
for combustion may result in poor performance, smoking and other side<br />
effects of poor combustion.<br />
If you have any questions with regards to your stove or the abovementioned<br />
information, please feel free to contact your local dealer for<br />
further clarification and comments.<br />
SINCE FPI HAS NO CONTROL OVER THE INSTALLATION OF YOUR<br />
STOVE, FPI GRANTS NO WARRANTY IMPLIED OR STATED FOR THE<br />
INSTALLATION OR MAINTENANCE OF YOUR STOVE. THEREFORE,<br />
FPI ASSUMES NO RESPONSIBILITY FOR ANY CONSEQUENTIAL<br />
DAMAGE(S).<br />
Greenfi re Pellet Stove and Insert Owner's Manual 5
INSTALLATION<br />
INSTALLATION<br />
IMPORTANT SAFETY INFORMATION<br />
Please read this entire Owner’s Manual before installation and operating<br />
your Greenfire Pellet Stove. Failure to follow these instructions<br />
may result in property damage, bodily injury or even death.<br />
Contact your local building or fi re offi cial to obtain a permit and any<br />
information on installation restrictions and inspection requirements for<br />
your area.<br />
To prevent the possibility of a fi re, ensure that the appliance is properly<br />
installed by adhering to the installation instructions. A Greenfi re dealer<br />
will be happy to assist you in obtaining information with regards to your<br />
local building codes and installation restrictions.<br />
Be sure to maintain the structural integrity of the home when passing<br />
a vent through walls, ceilings, or roofs.<br />
The stove's exhaust system works with negative combustion chamber<br />
pressure and a slightly positive chimney pressure. It is very important<br />
to ensure that the exhaust system be sealed and airtight. The ash pan<br />
and viewing door must be locked securely for proper and safe operation<br />
of the pellet stove.<br />
Do not burn with insuffi cient combustion air. A periodic check is recommended<br />
to ensure proper combustion air is admitted to the combustion<br />
chamber. Setting the proper combustion air is achieved by adjusting<br />
the slider damper located on the left side of the stove.<br />
When installing the stove in a mobile home, it must be electrically grounded<br />
to the steel chassis of the home and bolted to the fl oor. Make sure that<br />
the structural integrity of the home is maintained and all construction<br />
meets local building codes.<br />
Minor soot or creosote may accumulate when the stove is operated<br />
under incorrect conditions such as an extremely rich burn (black tipped,<br />
lazy orange fl ames).<br />
If you have any questions with regard to your stove or the above-mentioned<br />
information, please feel free to contact your local dealer for further<br />
clarifi cation and comments.<br />
PELLET QUALITY<br />
Pellet quality is important, please read the following:<br />
Pellet quality is a major factor in how the Pellet stove will operate.<br />
If the pellets have a high moisture or ash content the fire will be<br />
less efficient and has a higher possibility of the fire building up and<br />
creating clinkers (hard ash build-up).<br />
Your Greenfire Pellet Stove has been designed to burn wood<br />
pellets only. Do not use any other type of fuel, as this will void any<br />
warranties stated in this manual.<br />
The performance of your pellet stove is greatly affected by the type<br />
and quality of wood pellets being burned. As the heat output of<br />
various quality wood pellets differs, so will the performance and<br />
heat output of the pellet stove.<br />
CAUTION: It is important to select and use only pellets that are dry<br />
and free of dirt or any impurities such as high salt content. Dirty fuel will<br />
adversely affect the operation and performance of the unit and will void<br />
the warranty. The Pellet Fuel Industries (P.F.I.) has established standards<br />
for wood pellet manufacturers. We recommend the use of pellets that<br />
meet or exceed these standards. Ask your dealer for a recommended<br />
pellet type.<br />
P.F.I. PELLET STANDARDS:<br />
Fines (fine particles)......1% maximum through a 1/8" screen<br />
Bulk Density.................. 40 pound per cubic foot minimum<br />
Size.............................. 1/4” - 5/16” diameter 1/2" - 1-1/2" long maximum<br />
Ash Content ..................1% maximum (Premium grade)<br />
..................3% maximum (Standard grade)<br />
Moisture Content...........8% maximum<br />
Heat Content.................approximately 8200 Btu per pound minimum<br />
ASH: The ash content of the fuel and operation of your stove will directly<br />
determine the frequency of cleaning. The use of high ash fuels may<br />
result in the stove needing to be cleaned daily. A low ash fuel may allow<br />
longer intervals between cleaning.<br />
CLINKERING: Clinkers are silica (sand) or other impurities in the<br />
fuel that will form a hard mass during the burning process. This hard<br />
mass will block the air flow through the Burn Pot Liner and affect the<br />
performance of the stove. Any fuel, even approved types, may tend to<br />
clinker. Check the Burn-Pot Liner daily to ensure that the holes are not<br />
blocked with clinkers. If they become blocked, remove the liner (when<br />
the unit is cold) and clean/scrape the clinkers out. Clean the holes with<br />
a small pointed object if required. Refer to the section Routine Cleaning<br />
and Maintenance.<br />
PELLET FEED RATES: Due to different fuel densities and sizes, pellet<br />
feed rates may vary. This may require an adjustment to the slider damper<br />
setting or to the auger feed trim setting on low.<br />
Since FPI has no control over the quality of pellets that you use, we<br />
assume no liability for negative results in selection of wood pellets.<br />
Store pellets at least 36” (1 m) away from the pellet stove.<br />
6<br />
Greenfire Pellet Stove and Insert Owner's Manual
OPERATING INSTRUCTIONS<br />
CONTROL BOARD FUNCTIONS<br />
1. AUGER LIGHT:<br />
This green light will fl ash in conjunction with the auger pulse.<br />
2. MODE LIGHT:<br />
Responsible for signaling the state of the control board. When the light<br />
is fl ashing the stove is in an automatic start mode or the thermostat<br />
has control of the unit. When the light is solid, the Heat Level Setting<br />
can be altered.<br />
3. THERMOSTAT SWITCH:<br />
Used to set the unit’s controls to one of three mode settings; Manual,<br />
High/Low, or Auto/Off.<br />
9<br />
AUGER<br />
MODE<br />
AUTO/OFF<br />
HIGH/LOW<br />
MANUAL<br />
1<br />
2<br />
3<br />
4. FEED RATE TRIM BUTTON:<br />
Used to change the feed rate trims in ¼ second increments for all<br />
feed settings. When this button is pressed, all the light will light up on<br />
the Heat Output Indicator except for the one that shows the current<br />
setting; the default setting is the number 4 light. To adjust the setting<br />
hold the Feed Rate Trim button down and press the Heat Level up or<br />
down buttons to adjust the setting.<br />
5. COMBUSTION BLOWER TRIM BUTTON: Used to change the<br />
Combustion Blower trims in 5 volt increments for all feed settings until<br />
it reaches line voltage. When this button is pressed, all the light will<br />
light up on the Heat Output Indicator except for the one that shows<br />
the current setting; the default setting is the number 2 light. To adjust<br />
the setting hold the Combustion Blower Trim button down and press<br />
the Heat Level up or down buttons to adjust the setting.<br />
8<br />
7<br />
HEAT LEVEL<br />
ROOM AIR<br />
FAN ON/OFF<br />
FEED<br />
TRIM<br />
COMBUSTION<br />
AIR TRIM<br />
ON/OFF<br />
4<br />
5<br />
6<br />
OPERATION<br />
6. ON/OFF BUTTON:<br />
Used to turn the unit On and Off.<br />
<strong>GF55</strong>-094<br />
7. ROOM AIR FAN ON/OFF BUTTON:<br />
Used to turn convection fan On or Off.<br />
Figure 3: Circuit Board Control Panel Decal.<br />
8. HEAT LEVEL ADJUSTMENT BUTTONS:<br />
When pressed, will change the heat level setting of the unit up or down.<br />
9. HEAT OUTPUT INDICATOR:<br />
Shows the present heat output setting.<br />
AUTOMATIC SAFETY FEATURES<br />
A. The stove and insert have a low limit safety switch located on the housing of the exhaust blower. If the exhaust temperatures drop below 120°F<br />
(49°C) the unit will shut down and will be required to go through a full start up procedure again.<br />
The most common cause for this is an empty hopper. This switch should only be by-passed for testing purposes by a technician.<br />
B. The stove and insert have a high limit safety switch located just below the hopper behind the external body panels. If the temperature of this<br />
switch reaches 200°F (93°C), the auger will stop feeding fuel and as the exhaust temperatures drop below 120°F (49°C), the unit will shut<br />
down.<br />
The 200°F (93°C) switch is a manual reset and should only be reset by a service person who can first diagnose the reason for failure.<br />
The two most likely causes are Convection Fan failure or High Limit Switch failure. Either one needs to be properly diagnosed and rectified.<br />
Since this is a safety switch it should never be by-passed for any reason other than the service technician to test the operation.<br />
Greenfi re Pellet Stove and Insert Owner's Manual 7
OPERATING INSTRUCTIONS<br />
OPERATING YOUR PELLET STOVE<br />
PRE-BURN INSTRUCTIONS: The burn pot liner holes must be clear and the liner installed properly against the ignitor tube for proper<br />
operation. Check the hopper for enough pellets to start the unit.<br />
Note: The thermostat mode can be changed during normal operation.<br />
MANUAL MODE:<br />
All control of circuit board function is adjusted at the circuit board.<br />
DO NOT OPERATE THE UNIT WITH THE DOOR OR ASH PAN OPEN.<br />
To START: Press the ON / OFF button. The stove will turn on. The system light will flash. The<br />
Auger Light will flash with each pulse of the auger (the Auger Feed Rate is pre-programmed during<br />
start-up). The Heat Level Indicator will show the Heat Level that the stove will run at after start-up<br />
and can be adjusted but the change will not take affect until the start -up has finished.<br />
OPERATION<br />
To PRIME AUGER: If this is the first time the unit has been started or the unit has run out of fuel,<br />
the auger will need to be primed. This can be done by restarting the unit five (5) minutes into its<br />
start-up or by putting a small hand full of pellets into the burnpot.<br />
To OPERATE: When a fire has been established, the System Light will turn solid (after approximately<br />
10 - 15 minutes) and the Auger Light will continue to flash to the corresponding Heat Level setting.<br />
The convection blower (room air blower) will turn on. The speed of this blower is controlled by the<br />
setting of the heat level output indicator. The convection blower can be turned off by depressing the<br />
room air on/off button. For the best efficiency and to prevent cycling the convection blower should<br />
be left on at all times.<br />
HIGH/LOW MODE: (Requires a thermostat)<br />
INITIAL START-UP: See manual mode above.<br />
OPERATION: When the thermostat calls for heat (contacts are closed) the stove settings are<br />
adjustable as per Manual Mode. When the thermostat contacts open, the HEAT LEVEL and Fans<br />
will drop down to the LOW setting until the thermostat contacts close again. *The LOW heat<br />
setting can be adjusted for different fuel qualities (see “OPERATING INSTRUCTIONS - CONTROL BOARD<br />
FUNCTIONS”). The stove will come back to the previous HEAT LEVEL setting when the thermostat<br />
contacts close again.<br />
Figure 1: Thermostat Switch in<br />
MANUAL position.<br />
Figure 2: Thermostat Switch in<br />
HIGH/LOW position.<br />
AUTO/OFF MODE: (Requires a thermostat)<br />
INITIAL START-UP: See manual mode above.<br />
OPERATION: When the thermostat contacts close, the unit will light automatically. Once up to<br />
temperature, the stove operates the same as in MANUAL. When the thermostat contacts open, the<br />
stove’s HEAT LEVEL and Fans will drop down to the LOW setting for 30 minutes. If the thermostat<br />
contacts close within the 30 minutes, the HEAT LEVEL will return to the previous MANUAL setting.<br />
If the thermostat contacts remain open the stove automatically begins its shutdown routine. The<br />
ON / OFF button can be presses at any time the the stove will immediately shut down. The stove<br />
will re-light when the thermostat contacts close again.<br />
TURNING YOUR PELLET STOVE OFF:<br />
• MANUAL and HI / LOW mode: To turn the unit OFF, simply press the ON / OFF button. This will<br />
stop the feed of pellets. The blowers will continue to operate and cool the stove down. When<br />
cool enough, the stove will turn off.<br />
Figure 3: Thermostat Switch in<br />
ON/OFF position.<br />
• AUTO / OFF mode: To turn the unit OFF, turn the thermostat down or off. NOTE: The unit will run<br />
on low for three (3) minutes before it turns off.<br />
DO NOT unplug unit while Combustion fan is operating.<br />
This may lead to smoke escaping from the stove.<br />
8<br />
Greenfire Pellet Stove and Insert Owner's Manual
OPERATING INSTRUCTIONS<br />
THE SLIDER / DAMPER MUST BE SET AT TIME OF INSTALLATION.<br />
A Qualified Service Technician or Installer must set the Slider<br />
Damper. This is used to regulate the airflow through the pellet stove. The<br />
slider damper knob is located on the left cab side (see Figure 7).<br />
SLIDER / DAMPER SET-UP<br />
Figure 8: Effi cient Flame.<br />
SPECIAL NOTES:<br />
Pellet quality is a major factor in how the Pellet stove will operate. If the<br />
pellets have a high moisture or ash content the fire will be less efficient<br />
and has a higher possibility of the fire building up and creating clinkers<br />
(hard ash build-up).<br />
OPERATION<br />
Figure 7: Slider / Damper Knob.<br />
If the fire should happen to go out and the heat output indicator has been<br />
set on the lowest setting, the Slider Damper should be pushed in slightly,<br />
decreasing the air in the firebox.<br />
If, after long periods of burning, the fi re builds up and overfl ows the burn pot<br />
or there is a build up of clinkers, this would be a sign that the pellet quality<br />
is poor, this requires more primary air, the slider damper must be pulled out<br />
to compensate. Pulling the slider damper out gives the fi re more air.<br />
The easiest way to make sure that an effi cient fl ame is achieved is to<br />
understand the characteristics of the fi re.<br />
• A tall, lazy fl ame with dark orange tips requires more air – Open slider<br />
(pull out) slightly.<br />
• A short, brisk fl ame, like a blowtorch, has too much air – Close slider<br />
(push in) slightly.<br />
• If the fl ame is in the middle of these two characteristics with a bright<br />
yellow/orange, active fl ame with no black tips then the air is set for<br />
proper operation, refer to Figure 8.<br />
The combustion exhaust blower is a variable speed blower controlled by<br />
the heat output button. This blower will decrease the vacuum pressure<br />
inside the stove and as the heat output button is turned down.<br />
NOTE:<br />
Incorrect use of the Damper will cause malfunction and poor<br />
results from your stove or insert.<br />
Greenfi re Pellet Stove and Insert Owner's Manual 9
MAINTENANCE<br />
ROUTINE CLEANING & MAINTENANCE<br />
The following list of components should be inspected and maintained<br />
routinely to ensure that the appliance is operating at its optimum and<br />
giving you excellent heat value:<br />
2-3 Days / Weekly Semi-Annually or 2 Tons of Fuel<br />
If after long periods of burning, the fi re continually builds up and overfl ows<br />
the burn pot or there is a build up of clinkers, this is an indication that<br />
the pellet fuel quality is poor or the stove may need cleaning. Check the<br />
stove for ash build up (clean if required) and adjust the slider / damper to<br />
produce the proper clean combustion.<br />
Burn Pot & Liner<br />
Ash Pan<br />
Inside Firebox<br />
Door Glass<br />
Heat Exchanger Tubes<br />
Ash Pan & Door Gaskets<br />
Door Latch<br />
Exhaust Vent<br />
Fresh Air Intake Tube<br />
Blower Mechanisms<br />
Heat Exchanger Tubes<br />
Behind Firebox Liners<br />
All Hinges<br />
Post Season Clean-Up<br />
TOOLS REQUIRED TO CLEAN UNIT<br />
a) Torx T-20 Screwdriver<br />
b) 5/16" Wrench or Socket<br />
c) 1" Soft Paint Brush<br />
d) Soft Cloth<br />
e) Vacuum with fi ne Filter Bag<br />
Figure 9: Burn Pot Assembly.<br />
MAINTENANCE<br />
OPENING THE DOOR<br />
The door lever can be found inbehind the right side of the door frame. To<br />
open the door, pivet the lever outwards and upwards until it unlocks.<br />
BURN POT AND LINER<br />
(2-3 days)<br />
Cleaning of the burn pot and liner must only be done when stove is cold.<br />
To remove the burn pot and burn pot liner, open the door using the door<br />
handle provided (located on the right-hand side of the stove). Swing the<br />
door open. Lift the liner from the burn pot. Lift the burn pot from the fi rebox<br />
by gently lifting up the front of the burn pot, then sliding the assembly from<br />
the air intake tube and the ignitor cartridge. See fi gure 9.<br />
DOOR GLASS CLEANING<br />
(2-3 days)<br />
Cleaning of the glass must only be done when stove is cold. Open the<br />
door by lifting the handle. The glass can be cleaned by wiping down the<br />
outside and inside of the glass with a dry soft cloth.<br />
If the glass has build up that can not be removed with only the cloth, clean<br />
the glass using paper towel and a gas appliance glass cleaner, this may<br />
be purchased through most dealers. If a gas appliance glass cleaner is<br />
not available, use a damp paper towel dipped in fl y ash to clean the glass.<br />
After the glass has been cleaned use the dry soft cloth to wiping down the<br />
outside and inside of the glass.<br />
This is the ‘pot’ where the pellets are burned. Every two (2) to three (3)<br />
days (when the unit is cold), remove the burn-pot liner from the stove and<br />
inspected it to ensure proper air fl ow through the liner. Failure to keep the<br />
liner clean may cause a build up of fuel past the burn pot liner and<br />
up the drop tube. This will cause the auger to jam and may result in<br />
pellets burning in the drop tube and hopper. Using a metal scraper,<br />
remove material that has accumulated or is clogging the liner’s holes.<br />
Then dispose of ashes from the liner and from inside the burn-pot. Place<br />
the burn-pot back into the stove, making sure that the pipes are properly<br />
inserted into the burn pot and locater tabs (see fi gure 9) are properly<br />
seated in the locater holes. Place the liner back into the burn-pot, making<br />
sure that the ignitor hole in the liner is aligned with the ignitor tube. Push<br />
the liner up against the ignitor tube.<br />
ASH PAN AND DOOR GASKETS<br />
(weekly)<br />
After extended use the gasketing may come loose. To repair this, glue the<br />
gasketing on using high-temperature fi berglass gasket glue / RTU silicone<br />
available from your local Greenfi re dealer. This is important to maintain<br />
an airtight assembly.<br />
10<br />
Greenfire Pellet Stove and Insert Owner's Manual
MAINTENANCE<br />
ASH PAN<br />
(weekly)<br />
The ash pan is located under the burner. Always dispose of the ashes into<br />
a metal container (never use cardboard, plastic or wood containers) stored<br />
away from combustibles. Monitor the ash level every week. Remember<br />
different pellet fuels will have different ash contents. Ash content is a good<br />
indication of fuel effi ciency and quality. Refer to "Safety Warnings and<br />
Recommendations" for disposal of ashes.<br />
Freestanding: To remove the ash pan, simply turn the knob and pull out<br />
towards the front.<br />
Insert: To remove the ash pan open the door, remove the burn pot liner<br />
and the burn pot, then pull the ash pan out.<br />
DO NOT PLACE UNBURNED OR RAW PELLET FUEL IN ASH PAN.<br />
Ash Pan Door Lock<br />
FRESH AIR INTAKE<br />
(season)<br />
Inspect periodically to be sure that the intake pipe is not clogged with any<br />
foreign materials.<br />
EXHAUST VENT<br />
(season)<br />
This vent should be cleaned every year or after two (2) tons of pellets<br />
(whichever happens fi rst). We recommend contacting your dealer for<br />
professional cleaning. To clean the vent pipe, tap lightly on the pipe to<br />
dislodge any loose ash. Open the bottom of the “T” to dump the ash, then<br />
vacuum as much of the ash out of the vent pipe as possible.<br />
BLOWER MECHANISMS<br />
(bi-annual)<br />
Locked<br />
Open<br />
12:00 o'clock position<br />
9:00 o'clock position<br />
Unplug the stove then open the right and left side panels to access the<br />
two blowers. Vacuum all dust from motors and impellers. The convection<br />
blower should be oiled twice yearly using 3 in 1 oil or similar light oil. The<br />
combustion blower requires no lubrication. Check gaskets and replace<br />
if needed.<br />
Figure 10: Ash Pan Door Lock<br />
shown in 12:00 o'clock position.<br />
ALL HINGES<br />
(season)<br />
Check all the hinges on the unit to ensure proper movement.<br />
HEAT EXCHANGER TUBES<br />
(weekly)<br />
Open the door and the rod is located under the unit top, in the center of the<br />
stove just behind the door (see Figure 11). This handle is to be pushed in<br />
and out a few times (ONLY WHEN THE UNIT IS COLD) in order to clean<br />
away any fl y ash that may have collected on the heat exchanger tubes.<br />
As different types of pellets produce different amounts of ash, cleaning<br />
of the tubes should be done on a regular basis to enable the unit to run<br />
effi ciently.<br />
MAINTENANCE<br />
Figure 11: Heat Exchanger Tube Cleaner.<br />
Greenfi re Pellet Stove and Insert Owner's Manual 11
MAINTENANCE<br />
EXHAUST PASSAGES<br />
(season)<br />
Removal of the firebox backing for bi-annual cleaning (refer to<br />
Figure 12):<br />
a) Open the door by lifting the handle, remove the burn pot and burn pot<br />
liner.<br />
b) Before trying to remove screws, lubricate all screws with penetrating<br />
oil. ie. WD-40.<br />
c) Loosen (do not remove) the four (4) screws that hold the brick liner<br />
retainers in place. Remove side brick liners by sliding them from<br />
under the screwheads.<br />
d) Pull the center panel out. Ensure not to damage the 1" insulation<br />
attached to the back of the center panel.<br />
e) Vacuum and clean thoroughly.<br />
Installation of firebox backing:<br />
a) Return center panel to its original position.<br />
b) Place the two (2) side panels back into the firebox, secure the two<br />
(2) retainers and lock down by tightening the two (2) screws on each<br />
side.<br />
c) Replace the burn pot and burn pot liner.<br />
d) Close the glass door and secure.<br />
POST SEASON CLEAN-UP<br />
Once you are fi nished using the pellet appliance for the season, unplug<br />
the stove for added electrical protection. It is very important that the stove<br />
be cleaned and serviced as stated above. Also remove any remaining fuel<br />
from the hopper and auger.<br />
CLEANING PLATED SURFACES<br />
Painted surfaces should be wiped with a damp cloth periodically.<br />
It is important to note that fi ngerprints and other marks can leave a permanent<br />
stain on plated fi nishes. To avoid this, give the surface a quick<br />
wipe with denatured alcohol on a soft cloth BEFORE lighting the fi replace.<br />
Never clean surfaces when they are hot. Do not use other cleaners or<br />
abrasives as they may leave a residue or scratches, which can become<br />
permanently etched into the surface.<br />
FIREBOX PANEL<br />
The paint on the steel fi rebox panels may peel. This is due to extreme<br />
conditions applied to the paint and is not covered under warranty.<br />
REPLACING DOOR GLASS<br />
It is recommended that your Greenfire dealer replace the glass if<br />
broken.<br />
The door glass is made of high temperature PYRO CERAMIC 5 mm thick.<br />
The center panel is 15.4” x 9.0” (39.0 cm x 22.9 cm) and side panels are<br />
2.6 x 9.0 inches (6.7 cm x 22.9 cm). They must be replaced with (Part #<br />
<strong>GF55</strong>-028 & <strong>GF55</strong>-029). Substitute materials will not be permitted.<br />
MAINTENANCE<br />
Figure 12: Firebox Components Removal.<br />
12<br />
Greenfire Pellet Stove and Insert Owner's Manual
WARRANTY<br />
FPI is the manufacturer of the Greenfire line of heating products. At FPI, our commitment to the highest level of quality and customer<br />
service is the most important thing we do. Each Greenfi re stove is built on a tradition of using only the fi nest materials and is backed<br />
by our Exclusive Lifetime Limited Warranty to the original purchaser. With Greenfire, you’re not just buying a stove, you’re buying a<br />
company with years of unequalled performance and quality.<br />
Limited Lifetime Warranty:<br />
Under this warranty, FPI covers the fi replace or stove body and accessories against defects in materials and workmanship, for part<br />
repair or replacement for the fi rst seven (7) years and limited labour for the fi rst two (2) years to the original purchaser. This Warranty<br />
covers: Firebox, Heat Exchanger, Burn Pot, Firebox Panels, Ceramic Glass, Pedestals, Panels, Legs, Log Sets and Door Assembly.<br />
Please see the exclusions and limitation section below as certain restrictions and exclusions apply to this warranty.<br />
Limited Three (3) Year Warranty<br />
Under this warranty, FPI covers the Burn Pot Liner against defects in materials and workmanship, for part repair or replacement for<br />
the fi rst three (3) years and limited labour for the fi rst two (2) years to the original purchaser. Please see the exclusions and limitation<br />
section below as certain restrictions and exclusions apply to this warranty.<br />
Limited Two (2) Year Warranty:<br />
Under this warranty, FPI covers: Auger Motor, Circuit Board, Timers, Temp Sensors, Blowers, Vacuum Switch and Wire Harness,<br />
against defects in materials and workmanship, for part repair or replacement for the fi rst two (2) years and limited labour for the fi rst<br />
two (2) years to the original purchaser. Please see the exclusions and limitation section below as certain restrictions and exclusions<br />
apply to this warranty.<br />
Limited One (1) Year Warranty:<br />
Under this warranty, FPI covers the Ignitor and all exterior surface fi nishes against defects in materials and workmanship, for part<br />
repair or replacement and limited labour for the fi rst (1) year to the original purchaser. Please see the exclusions and limitation section<br />
below as certain restrictions and exclusions apply to this warranty.<br />
Here is how our Warranty works<br />
If you have any concerns with your Greenfi re product please contact the dealer where you purchased the fi replace or stove. Your<br />
dealer shall make all claims in writing in reference to this warranty policy. Any and all parts and service will be handled through the<br />
selling dealer.<br />
To the Dealer<br />
When fi lling out a warranty claim please complete the following information on an offi cial warranty claim form:<br />
Customer information: Name, address and telephone number of purchaser and date of purchase.<br />
Dealer information: Date of installation, name of installer and dealer, serial number of the appliance, nature of complaint, defects or<br />
malfunction, description and part numbers of any parts replaced.<br />
To the Distributor<br />
Sign and verify that work and information are correct.<br />
Greenfi re Pellet Stove and Insert Owner's Manual 13
WARRANTY<br />
Exclusions and Limitations:<br />
1. This Warranty does not cover tarnish, discoloration or wear on the plating or paint.<br />
2. This Warranty excludes wear and tear or breakage caused by cleaning, moving or service on log set.<br />
3. A qualifi ed installer must install this stove or fi replace. This Limited Warranty covers defects in materials and workmanship only<br />
if the product has been installed in accordance with local building and fi re codes; in their absence, refer to the owner’s manual.<br />
If the product is damaged or broken as a result of any alteration, willful abuse, mishandling, accident, neglect, or misuse of the<br />
product, the Limited Warranty does not apply.<br />
4. The stove must be operated and maintained at all times in accordance with the instructions in the Owner’s Manual. If the unit<br />
shows signs of neglect or misuse, it is not covered under the terms of this Warranty policy. Performance problems due to operator<br />
error will not be covered by the Limited Warranty policy.<br />
5. As this is a heating appliance some changes in colour of surface fi nishes may occur. This is not a fl aw and as such is not covered<br />
under this warranty.<br />
6. Some minor expansion, contraction, or movement of certain parts and resulting noise, is normal and not a defect and therefore,<br />
is not covered under this Limited Warranty.<br />
7. Misuse includes over-fi ring. Over-fi ring this appliance can cause serious damage and will nullify the Limited Warranty.<br />
8. The Limited Warranty will cover glass thermal breakage only and will not cover misuse of the stove glass, including but not limited<br />
to glass that is struck, has surface contaminates or has had harsh or abrasive cleaners used on it.<br />
9. This warranty does not cover products made or provided by other manufacturers and used in conjunction with the operation of<br />
this stove without prior authorization from FPI The use of such products may nullify the Limited Warranty on this stove. If unsure<br />
as to the extent of this Limited Warranty, contact your authorized Greenfi re dealer before installation.<br />
10. FPI will not be responsible for inadequate performance caused by environmental conditions, or use of any fuel other than certifi ed<br />
wood pellets.<br />
11. The Limited Warranty does not cover installation and operational related problems such as spillage caused by environmental<br />
conditions. Environmental conditions include but are not limited to nearby trees, buildings, roof tops, wind, hills, mountains, inadequate<br />
venting or ventilation, excessive offsets, negative air pressures or other infl uences caused by mechanical systems such<br />
as furnaces, fans, clothes dryers etc.<br />
12. The Limited Warranty is void if:<br />
a) The stove has been operated in atmospheres contaminated by chlorine, fl uorine or other damaging chemicals.<br />
b) The stove is subject to submersion in water or prolonged periods of dampness or condensation.<br />
c) Any damage to the unit, combustion chamber or other components due to water, or weather damage which is the result of, but<br />
not limited to, improper chimney/venting installation.<br />
c) Salt air in coastal areas or high humidity can be corrosive to the fi nish; these environments can cause rusting. Damage caused<br />
by salt air or high humidity is not covered by the Limited Warranty.<br />
13.Exclusions to the Limited Warranty include: injury, loss of use, damage, failure to function due to accident, negligence, misuse,<br />
improper installation, alteration or adjustment of the manufacturer’s settings of components, lack of proper and regular maintenance,<br />
alteration, or act of God.<br />
14. The Limited Warranty does not cover damage caused to the fi replace or stove while in transit. If this occurs, do not operate the<br />
stove and contact your courier and/or dealer.<br />
15. The Limited Warranty does not extend to or include fi rebox paint, door or glass gaskets with damage caused by normal wear and<br />
tear, or exterior paint discoloration or chipping, worn gaskets, etc.<br />
16. The Limited Warranty does not include damage to the unit caused by abuse, improper installation, or modifi cation of the unit.<br />
14<br />
Greenfire Pellet Stove and Insert Owner's Manual
WARRANTY<br />
17. Damage to plated surfaces caused by fi ngerprints, scratches, melted items, or other external scores and residues left on the plated<br />
surfaces from the use of abrasive cleaners or polishes is not covered in this warranty.<br />
18. The Limited Warranty does not cover tarnish, discoloration or wear on the plated surfaces.<br />
19. The paint on the Metal Brick Liner may peel. This is due to the extreme conditions applied to the paint during normal usage. It is<br />
not a fl aw and is not covered under warranty.<br />
20. FPI is free of liability for any damages caused by the fi replace or stove, as well as inconvenience expenses and materials. The<br />
Limited Warranty does not cover incidental or consequential damages.<br />
21. The Limited Warranty does not cover any loss or damage incurred by the use or removal of any component or apparatus to or<br />
from the Greenfi re fi replace or stove without the express written permission of FPI and bearing a FPI label of approval.<br />
22. Any statement or representation of Greenfi re products and their performance contained in Greenfi re advertising, packaging literature,<br />
or printed material is not part of the Limited Warranty.<br />
23. The Limited Warranty is automatically voided if the fi replace or stove’s serial number has been removed or altered in any way. If<br />
the stove is used for commercial purposes, it is excluded from the Limited Warranty.<br />
24. No dealer, distributor, or similar person has the authority to represent or warrant Greenfi re products beyond the terms contained<br />
within the Limited Warranty. FPI assumes no liability for such warranties or representations.<br />
25. FPI will not cover the cost of the removal or re-installation of the stove, hearth, facing, mantels, venting or other components.<br />
26. Labour to replace or repair items under this Limited Warranty will be covered per our warranty service fee reimbursement schedule.<br />
Labour rates are set per component and as such total labour costs may not be covered.<br />
27. FPI is not liable for freight or labour on any stove replaced in-fi eld and is not liable for travel costs for service work. In the event of<br />
in-home repair work, the customer will pay any in-home travel fees or service charges required by the Authorized Dealer.<br />
28. At no time will FPI be liable for any consequential damages which exceed the purchase price of the unit. FPI has no obligation<br />
to enhance or modify any stove once manufactured (example: as a stove evolves, fi eld modifi cations or upgrades will not be<br />
performed).<br />
29. This Limited Warranty is applicable only to the original purchaser and it is non-transferable.<br />
30. This warranty only covers Greenfi re products that are purchased through an authorized Greenfi re dealer.<br />
31. If for any reason any section of the Limited Warranty is declared invalid, the balance of the warranty remains in effect and all other<br />
clauses shall remain in effect.<br />
32. The Limited Warranty is the only warranty supplied by FPI, the manufacturer of the stove. All other warranties, whether express<br />
or implied, are hereby expressly disclaimed and purchaser’s recourse is expressly limited to the Limited Warranty.<br />
33. FPI and its employees or representatives will not assume any damages, either directly or indirectly, caused by improper usage,<br />
operation, installation, servicing or maintenance of this stove.<br />
34. FPI reserves the right to make changes without notice. Please complete and mail the warranty registration card and have the<br />
installer fi ll in the installation data sheet in the back of the manual for warranty and future reference.<br />
Greenfi re Pellet Stove and Insert Owner's Manual 15
FPI fireplaces are designed with reliability and simplicity<br />
in mind. In addition, our internal Quality Assurance Team<br />
carefully inspects each unit thoroughly before it leaves<br />
our door.<br />
FPI <strong>Fireplace</strong> <strong>Products</strong> International Ltd. is pleased to<br />
extend this Limited Lifetime Warranty to the original<br />
purchaser of a FPI Product.<br />
Installer: Please complete the following information<br />
Dealer Name & Address: ______________________________________________<br />
___________________________________________________________________<br />
Installer: ___________________________________________________________<br />
Phone #: ___________________________________________________________<br />
Date Installed: ______________________________________________________<br />
Serial No.: __________________________________________________________<br />
Greenfi re is a trademark of FPI <strong>Fireplace</strong> <strong>Products</strong> International Ltd.<br />
© Copyright 2009, FPI <strong>Fireplace</strong> <strong>Products</strong> International Ltd. All rights reserved.<br />
Printed in Canada