GF55 & GFI55 - Regency Fireplace Products
GF55 & GFI55 - Regency Fireplace Products
GF55 & GFI55 - Regency Fireplace Products

Create successful ePaper yourself
Turn your PDF publications into a flip-book with our unique Google optimized e-Paper software.
MAINTENANCE<br />
ROUTINE CLEANING & MAINTENANCE<br />
The following list of components should be inspected and maintained<br />
routinely to ensure that the appliance is operating at its optimum and<br />
giving you excellent heat value:<br />
2-3 Days / Weekly Semi-Annually or 2 Tons of Fuel<br />
If after long periods of burning, the fi re continually builds up and overfl ows<br />
the burn pot or there is a build up of clinkers, this is an indication that<br />
the pellet fuel quality is poor or the stove may need cleaning. Check the<br />
stove for ash build up (clean if required) and adjust the slider / damper to<br />
produce the proper clean combustion.<br />
Burn Pot & Liner<br />
Ash Pan<br />
Inside Firebox<br />
Door Glass<br />
Heat Exchanger Tubes<br />
Ash Pan & Door Gaskets<br />
Door Latch<br />
Exhaust Vent<br />
Fresh Air Intake Tube<br />
Blower Mechanisms<br />
Heat Exchanger Tubes<br />
Behind Firebox Liners<br />
All Hinges<br />
Post Season Clean-Up<br />
TOOLS REQUIRED TO CLEAN UNIT<br />
a) Torx T-20 Screwdriver<br />
b) 5/16" Wrench or Socket<br />
c) 1" Soft Paint Brush<br />
d) Soft Cloth<br />
e) Vacuum with fi ne Filter Bag<br />
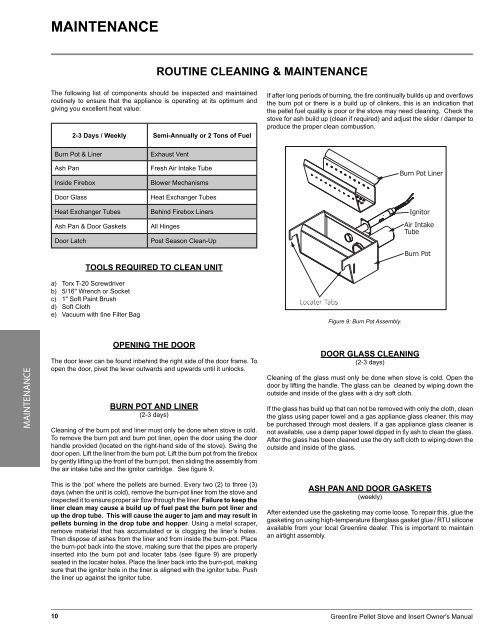
Figure 9: Burn Pot Assembly.<br />
MAINTENANCE<br />
OPENING THE DOOR<br />
The door lever can be found inbehind the right side of the door frame. To<br />
open the door, pivet the lever outwards and upwards until it unlocks.<br />
BURN POT AND LINER<br />
(2-3 days)<br />
Cleaning of the burn pot and liner must only be done when stove is cold.<br />
To remove the burn pot and burn pot liner, open the door using the door<br />
handle provided (located on the right-hand side of the stove). Swing the<br />
door open. Lift the liner from the burn pot. Lift the burn pot from the fi rebox<br />
by gently lifting up the front of the burn pot, then sliding the assembly from<br />
the air intake tube and the ignitor cartridge. See fi gure 9.<br />
DOOR GLASS CLEANING<br />
(2-3 days)<br />
Cleaning of the glass must only be done when stove is cold. Open the<br />
door by lifting the handle. The glass can be cleaned by wiping down the<br />
outside and inside of the glass with a dry soft cloth.<br />
If the glass has build up that can not be removed with only the cloth, clean<br />
the glass using paper towel and a gas appliance glass cleaner, this may<br />
be purchased through most dealers. If a gas appliance glass cleaner is<br />
not available, use a damp paper towel dipped in fl y ash to clean the glass.<br />
After the glass has been cleaned use the dry soft cloth to wiping down the<br />
outside and inside of the glass.<br />
This is the ‘pot’ where the pellets are burned. Every two (2) to three (3)<br />
days (when the unit is cold), remove the burn-pot liner from the stove and<br />
inspected it to ensure proper air fl ow through the liner. Failure to keep the<br />
liner clean may cause a build up of fuel past the burn pot liner and<br />
up the drop tube. This will cause the auger to jam and may result in<br />
pellets burning in the drop tube and hopper. Using a metal scraper,<br />
remove material that has accumulated or is clogging the liner’s holes.<br />
Then dispose of ashes from the liner and from inside the burn-pot. Place<br />
the burn-pot back into the stove, making sure that the pipes are properly<br />
inserted into the burn pot and locater tabs (see fi gure 9) are properly<br />
seated in the locater holes. Place the liner back into the burn-pot, making<br />
sure that the ignitor hole in the liner is aligned with the ignitor tube. Push<br />
the liner up against the ignitor tube.<br />
ASH PAN AND DOOR GASKETS<br />
(weekly)<br />
After extended use the gasketing may come loose. To repair this, glue the<br />
gasketing on using high-temperature fi berglass gasket glue / RTU silicone<br />
available from your local Greenfi re dealer. This is important to maintain<br />
an airtight assembly.<br />
10<br />
Greenfire Pellet Stove and Insert Owner's Manual