GF55 & GFI55 - Regency Fireplace Products
GF55 & GFI55 - Regency Fireplace Products
GF55 & GFI55 - Regency Fireplace Products

Create successful ePaper yourself
Turn your PDF publications into a flip-book with our unique Google optimized e-Paper software.
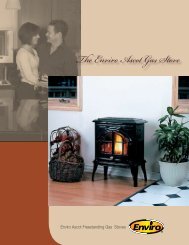
OPERATING INSTRUCTIONS<br />
CONTROL BOARD FUNCTIONS<br />
1. AUGER LIGHT:<br />
This green light will fl ash in conjunction with the auger pulse.<br />
2. MODE LIGHT:<br />
Responsible for signaling the state of the control board. When the light<br />
is fl ashing the stove is in an automatic start mode or the thermostat<br />
has control of the unit. When the light is solid, the Heat Level Setting<br />
can be altered.<br />
3. THERMOSTAT SWITCH:<br />
Used to set the unit’s controls to one of three mode settings; Manual,<br />
High/Low, or Auto/Off.<br />
9<br />
AUGER<br />
MODE<br />
AUTO/OFF<br />
HIGH/LOW<br />
MANUAL<br />
1<br />
2<br />
3<br />
4. FEED RATE TRIM BUTTON:<br />
Used to change the feed rate trims in ¼ second increments for all<br />
feed settings. When this button is pressed, all the light will light up on<br />
the Heat Output Indicator except for the one that shows the current<br />
setting; the default setting is the number 4 light. To adjust the setting<br />
hold the Feed Rate Trim button down and press the Heat Level up or<br />
down buttons to adjust the setting.<br />
5. COMBUSTION BLOWER TRIM BUTTON: Used to change the<br />
Combustion Blower trims in 5 volt increments for all feed settings until<br />
it reaches line voltage. When this button is pressed, all the light will<br />
light up on the Heat Output Indicator except for the one that shows<br />
the current setting; the default setting is the number 2 light. To adjust<br />
the setting hold the Combustion Blower Trim button down and press<br />
the Heat Level up or down buttons to adjust the setting.<br />
8<br />
7<br />
HEAT LEVEL<br />
ROOM AIR<br />
FAN ON/OFF<br />
FEED<br />
TRIM<br />
COMBUSTION<br />
AIR TRIM<br />
ON/OFF<br />
4<br />
5<br />
6<br />
OPERATION<br />
6. ON/OFF BUTTON:<br />
Used to turn the unit On and Off.<br />
<strong>GF55</strong>-094<br />
7. ROOM AIR FAN ON/OFF BUTTON:<br />
Used to turn convection fan On or Off.<br />
Figure 3: Circuit Board Control Panel Decal.<br />
8. HEAT LEVEL ADJUSTMENT BUTTONS:<br />
When pressed, will change the heat level setting of the unit up or down.<br />
9. HEAT OUTPUT INDICATOR:<br />
Shows the present heat output setting.<br />
AUTOMATIC SAFETY FEATURES<br />
A. The stove and insert have a low limit safety switch located on the housing of the exhaust blower. If the exhaust temperatures drop below 120°F<br />
(49°C) the unit will shut down and will be required to go through a full start up procedure again.<br />
The most common cause for this is an empty hopper. This switch should only be by-passed for testing purposes by a technician.<br />
B. The stove and insert have a high limit safety switch located just below the hopper behind the external body panels. If the temperature of this<br />
switch reaches 200°F (93°C), the auger will stop feeding fuel and as the exhaust temperatures drop below 120°F (49°C), the unit will shut<br />
down.<br />
The 200°F (93°C) switch is a manual reset and should only be reset by a service person who can first diagnose the reason for failure.<br />
The two most likely causes are Convection Fan failure or High Limit Switch failure. Either one needs to be properly diagnosed and rectified.<br />
Since this is a safety switch it should never be by-passed for any reason other than the service technician to test the operation.<br />
Greenfi re Pellet Stove and Insert Owner's Manual 7