

Harmer Floor & Shower Drains Oct 14-file045956
Harmer Floor & Shower Drains Oct 14-file045956
Harmer Floor & Shower Drains Oct 14-file045956

Create successful ePaper yourself
Turn your PDF publications into a flip-book with our unique Google optimized e-Paper software.
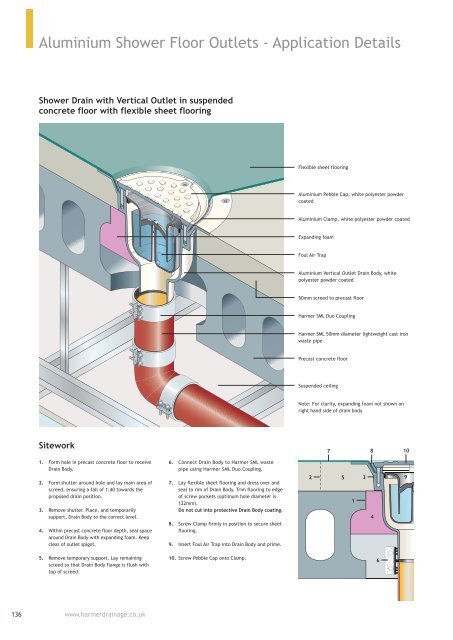
Aluminium <strong>Shower</strong> <strong>Floor</strong> Outlets - Application Details<br />
<strong>Shower</strong> Drain with Vertical Outlet in sus pend ed<br />
concrete floor with flexible sheet flooring<br />
Flexible sheet flooring<br />
Aluminium Pebble Cap, white polyester powder<br />
coated<br />
Aluminium Clamp, white polyester powder coated<br />
Expanding foam<br />
Foul Air Trap<br />
Aluminium Vertical Outlet Drain Body, white<br />
polyester powder coated<br />
50mm screed to precast floor<br />
<strong>Harmer</strong> SML Duo Coupling<br />
<strong>Harmer</strong> SML 50mm diameter lightweight cast iron<br />
waste pipe<br />
Precast concrete floor<br />
Suspended ceiling<br />
Note: For clarity, expanding foam not shown on<br />
right hand side of drain body<br />
Sitework<br />
7 8<br />
10<br />
1. Form hole in precast concrete floor to receive<br />
Drain Body.<br />
2. Form shutter around hole and lay main area of<br />
screed, ensuring a fall of 1:40 towards the<br />
proposed drain position.<br />
3. Remove shutter. Place, and temporarily<br />
support, Drain Body to the correct level.<br />
4. Within precast concrete floor depth, seal space<br />
around Drain Body with expanding foam. Keep<br />
clear of outlet spigot.<br />
6. Connect Drain Body to <strong>Harmer</strong> SML waste<br />
pipe using <strong>Harmer</strong> SML Duo Coupling.<br />
7. Lay flexible sheet flooring and dress over and<br />
seal to rim of Drain Body. Trim flooring to edge<br />
of screw pockets (optimum hole diameter is<br />
122mm).<br />
Do not cut into protective Drain Body coating.<br />
8. Screw Clamp firmly in position to secure sheet<br />
flooring.<br />
9. Insert Foul Air Trap into Drain Body and prime.<br />
2 5 3<br />
1<br />
4<br />
9<br />
5. Remove temporary support. Lay remaining<br />
screed so that Drain Body flange is flush with<br />
top of screed.<br />
10. Screw Pebble Cap onto Clamp.<br />
6<br />
136<br />
www.harmerdrainage.co.uk