

Harmer Floor & Shower Drains Oct 14-file045956
Harmer Floor & Shower Drains Oct 14-file045956
Harmer Floor & Shower Drains Oct 14-file045956

Create successful ePaper yourself
Turn your PDF publications into a flip-book with our unique Google optimized e-Paper software.
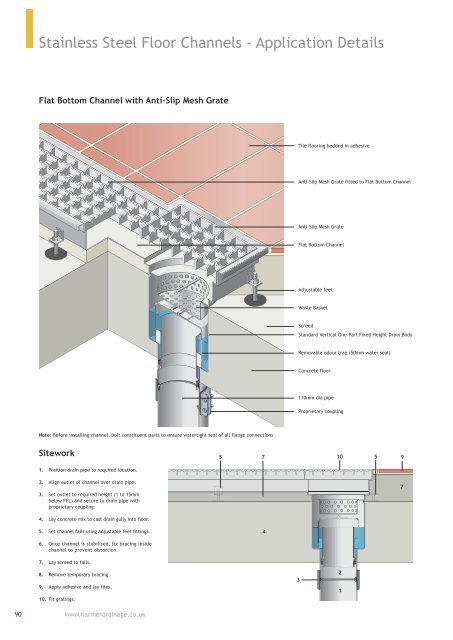
Stainless Steel <strong>Floor</strong> Channels - Application Details<br />
Flat Bottom Channel with Anti-Slip Mesh Grate<br />
Tile flooring bedded in adhesive<br />
Anti-Slip Mesh Grate fitted to Flat Bottom Channel<br />
Anti-Slip Mesh Grate<br />
Flat Bottom Channel<br />
Adjustable feet<br />
Waste Basket<br />
Screed<br />
Standard Vertical One-Part Fixed Height Drain Body<br />
Removable odour trap (50mm water seal)<br />
Concrete floor<br />
110mm dia pipe<br />
Proprietary coupling<br />
Note: Before installing channel, bolt constituent parts to ensure watertight seal of all flange connections<br />
Sitework<br />
5<br />
7 10<br />
5<br />
9<br />
1. Position drain pipe to required location.<br />
2. Align outlet of channel over drain pipe.<br />
3. Set outlet to required height (1 to 15mm<br />
below FFL) and secure to drain pipe with<br />
proprietary coupling.<br />
7<br />
4. Lay concrete mix to cast drain gully into floor.<br />
5. Set channel falls using adjustable feet fittings.<br />
4<br />
6. Once channel is stabilised, fix bracing inside<br />
channel to prevent distortion.<br />
7. Lay screed to falls.<br />
8. Remove temporary bracing.<br />
9. Apply adhesive and lay tiles.<br />
10. Fit gratings.<br />
3<br />
2<br />
1<br />
90<br />
www.harmerdrainage.co.uk