

Harmer Floor & Shower Drains Oct 14-file045956
Harmer Floor & Shower Drains Oct 14-file045956
Harmer Floor & Shower Drains Oct 14-file045956

You also want an ePaper? Increase the reach of your titles
YUMPU automatically turns print PDFs into web optimized ePapers that Google loves.
Cast Iron <strong>Floor</strong> Outlets - Application Details<br />
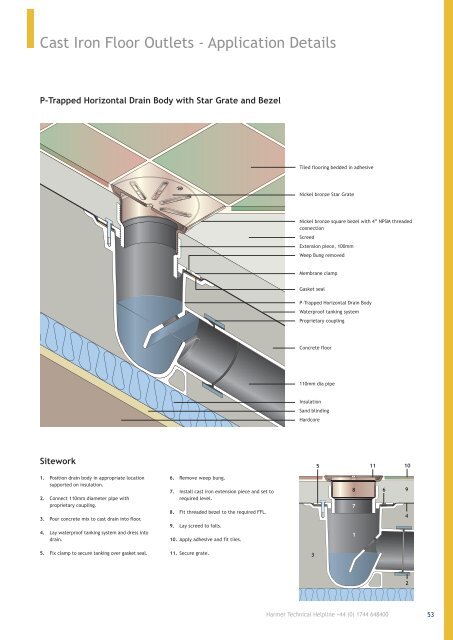
P-Trapped Horizontal Drain Body with Star Grate and Bezel<br />
Tiled flooring bedded in adhesive<br />
Nickel bronze Star Grate<br />
Nickel bronze square bezel with 4” NPSM threaded<br />
connection<br />
Screed<br />
Extension piece, 100mm<br />
Weep Bung removed<br />
Membrane clamp<br />
Gasket seal<br />
P-Trapped Horizontal Drain Body<br />
Waterproof tanking system<br />
Proprietary coupling<br />
Concrete floor<br />
110mm dia pipe<br />
Insulation<br />
Sand blinding<br />
Hardcore<br />
Sitework<br />
5 11<br />
10<br />
1. Position drain body in appropriate location<br />
supported on insulation.<br />
2. Connect 110mm diameter pipe with<br />
proprietary coupling.<br />
3. Pour concrete mix to cast drain into floor.<br />
4. Lay waterproof tanking system and dress into<br />
drain.<br />
6. Remove weep bung.<br />
7. Install cast iron extension piece and set to<br />
required level.<br />
8. Fit threaded bezel to the required FFL.<br />
9. Lay screed to falls.<br />
10. Apply adhesive and fit tiles.<br />
8<br />
7<br />
1<br />
6<br />
9<br />
4<br />
5. Fix clamp to secure tanking over gasket seal.<br />
11. Secure grate.<br />
3<br />
2<br />
<strong>Harmer</strong> Technical Helpline +44 (0) 1744 648400<br />
53