

Harmer Floor & Shower Drains Oct 14-file045956
Harmer Floor & Shower Drains Oct 14-file045956
Harmer Floor & Shower Drains Oct 14-file045956

Create successful ePaper yourself
Turn your PDF publications into a flip-book with our unique Google optimized e-Paper software.
Stainless Steel <strong>Floor</strong> Channels - Materials Care,<br />
Maintenance, Installation & Specifying/Ordering<br />
Materials<br />
<strong>Harmer</strong> Stainless Channels are<br />
manufactured in 1.5mm and 2mm thick<br />
sheets to material Grade 304. This is<br />
suitable for general use in and around<br />
buildings including most coastal locations.<br />
It is predominately considered for areas<br />
with food production, processing or<br />
preparation where corrosion resistance or<br />
minimum maintenance is required. For<br />
more aggressive atmospheres such as<br />
swimming pool applications, Grade 316 is<br />
available on request. Both grades are fully<br />
pickle passivated and all components are<br />
welded in argon shield to ensure high<br />
quality joints.<br />
All channels come complete with standard<br />
or compact cylindrical shape gullies from<br />
the <strong>Harmer</strong> Stainless <strong>Floor</strong> drain range<br />
Grating and baskets are available in various<br />
shapes, sizes and finishing versions. The<br />
grates are selected according to the loads<br />
and location of installation. We offer the<br />
following grate types:<br />
■<br />
Mesh Anti-Slip<br />
■<br />
Ladder<br />
■<br />
Ladder Hygienic<br />
■<br />
Plate<br />
■<br />
Perforated<br />
Grates and bezels are manufactured to<br />
material Grade 304 as standard with satin<br />
finish which is suitable for most<br />
applications. Material Grade 316 is<br />
available on request.<br />
Maintenance<br />
The high quality grates and bezels are<br />
maintenance free but should be<br />
inspected periodically and cleaned of any<br />
trapped matter.<br />
If drains are not used for a period of time<br />
the trap water may evaporate or become<br />
fetid. To remedy this, there is no need to<br />
remove the grate, simply reprime the<br />
Trap by pouring clean water through the<br />
drain. NEVER USE BLEACH OR CAUSTIC<br />
CLEANING AGENTS.<br />
To clean Stainless Steel grates, use only<br />
soapy water and wipe dry. Under no<br />
circumstances use metal scouring pads,<br />
metal scrapers or wire wool since this will<br />
contaminate surfaces leaving rust spots.<br />
Frequency of cleaning depends upon<br />
application. Generally, clean the metal<br />
when it is dirty in order to restore its<br />
original appearance. This may be once a<br />
day for a drain in hygienic or aggressive<br />
situations.<br />
Inverted or Bell Trap<br />
Should it be necessary to access the drain<br />
for maintenance or rodding purposes, the<br />
trap must first be removed.<br />
Equipment required:<br />
■<br />
Latex rubber gloves<br />
■<br />
Bucket of clean water<br />
■<br />
Sponge<br />
■<br />
Household disinfectant<br />
Procedure:<br />
■<br />
Put on protective latex gloves<br />
■<br />
Remove grate<br />
■<br />
Dry all surfaces<br />
■<br />
Remove basket<br />
■<br />
Remove trap<br />
Refitting trap:<br />
■<br />
Apply silicone lubricant to seal rim of<br />
funnel<br />
■<br />
Push fit the trap into the drain body<br />
■<br />
Replace basket<br />
■<br />
Refit grate<br />
■<br />
Reprime the trap with clean water<br />
■<br />
Dispose of dirty water<br />
Installation of Typical<br />
Channel<br />
1. Before installing the channel, bolt all its<br />
parts constituent parts to ensure<br />
tightness of all flange connections<br />
(flange-gasket--flange).<br />
2. Install the channel prepared as above in<br />
the sewer service pipe’s spigot.<br />
3. The next step involves placing of the<br />
channel on the required level. The<br />
channel edge should be 1-1.5 [mm]<br />
below the floor level.<br />
4. When the channel is stabilized, we<br />
recommend to secure it against<br />
displacement during concrete pouring.<br />
5. Pour concrete on the leveling legs and<br />
anchoring elements.<br />
6. In hard to access areas subjected to<br />
highest loads, insert the concrete with a<br />
spatula.<br />
7. Make sure the elements are clean, free<br />
of dirt.<br />
8. Fit gratings, waste baskets and traps.<br />
Channel Depth<br />
Regarding channels made with the<br />
bottom fall, the depth of the channels<br />
increases with its length. The channel<br />
depth at the outlet depends on the initial<br />
height, length and the channel fall.<br />
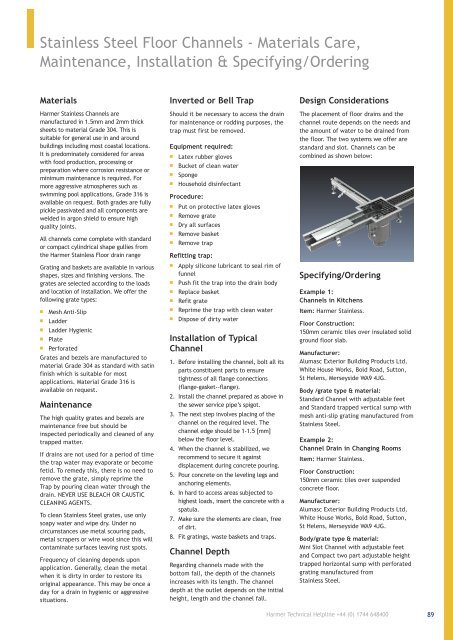
Design Considerations<br />
The placement of floor drains and the<br />
channel route depends on the needs and<br />
the amount of water to be drained from<br />
the floor. The two systems we offer are<br />
standard and slot. Channels can be<br />
combined as shown below:<br />
Specifying/Ordering<br />
Example 1:<br />
Channels in Kitchens<br />
Item: <strong>Harmer</strong> Stainless.<br />
<strong>Floor</strong> Construction:<br />
150mm ceramic tiles over insulated solid<br />
ground floor slab.<br />
Manufacturer:<br />
Alumasc Exterior Building Products Ltd,<br />
White House Works, Bold Road, Sutton,<br />
St Helens, Merseyside WA9 4JG.<br />
Body /grate type & material:<br />
Standard Channel with adjustable feet<br />
and Standard trapped vertical sump with<br />
mesh anti-slip grating manufactured from<br />
Stainless Steel.<br />
Example 2:<br />
Channel Drain in Changing Rooms<br />
Item: <strong>Harmer</strong> Stainless.<br />
<strong>Floor</strong> Construction:<br />
150mm ceramic tiles over suspended<br />
concrete floor.<br />
Manufacturer:<br />
Alumasc Exterior Building Products Ltd,<br />
White House Works, Bold Road, Sutton,<br />
St Helens, Merseyside WA9 4JG.<br />
Body/grate type & material:<br />
Mini Slot Channel with adjustable feet<br />
and Compact two part adjustable height<br />
trapped horizontal sump with perforated<br />
grating manufactured from<br />
Stainless Steel.<br />
<strong>Harmer</strong> Technical Helpline +44 (0) 1744 648400<br />
89