

Harmer Floor & Shower Drains Oct 14-file045956
Harmer Floor & Shower Drains Oct 14-file045956
Harmer Floor & Shower Drains Oct 14-file045956

You also want an ePaper? Increase the reach of your titles
YUMPU automatically turns print PDFs into web optimized ePapers that Google loves.
ABS <strong>Shower</strong> <strong>Floor</strong> Outlets - Application Details<br />
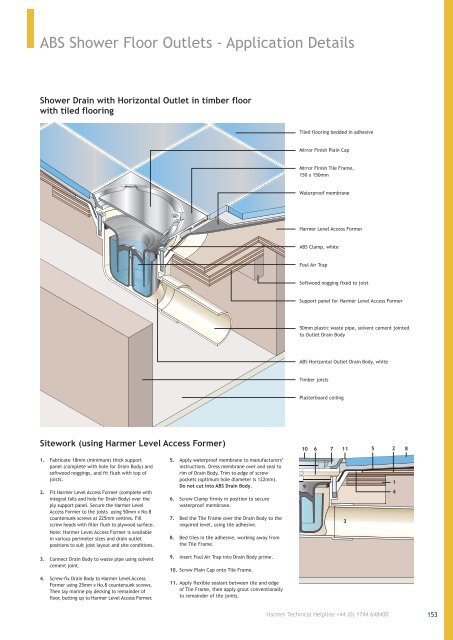
<strong>Shower</strong> Drain with Horizontal Outlet in timber floor<br />
with tiled flooring<br />
Tiled flooring bedded in adhesive<br />
Mirror Finish Plain Cap<br />
Mirror Finish Tile Frame,<br />
150 x 150mm<br />
Waterproof membrane<br />
<strong>Harmer</strong> Level Access Former<br />
ABS Clamp, white<br />
Foul Air Trap<br />
Softwood nogging fixed to joist<br />
Support panel for <strong>Harmer</strong> Level Access Former<br />
50mm plastic waste pipe, solvent cement jointed<br />
to Outlet Drain Body<br />
ABS Horizontal Outlet Drain Body, white<br />
Timber joists<br />
Plasterboard ceiling<br />
Sitework (using <strong>Harmer</strong> Level Access Former)<br />
10 6 7 11 5 2 8<br />
1. Fabricate 18mm (minimum) thick support<br />
panel (complete with hole for Drain Body) and<br />
softwood noggings, and fit flush with top of<br />
joists.<br />
2. Fit <strong>Harmer</strong> Level Access Former (complete with<br />
integral falls and hole for Drain Body) over the<br />
ply support panel. Secure the <strong>Harmer</strong> Level<br />
Access Former to the joists using 50mm x No.8<br />
countersunk screws at 225mm centres. Fill<br />
screw heads with filler flush to plywood surface.<br />
Note: <strong>Harmer</strong> Level Access Former is available<br />
in various perimeter sizes and drain outlet<br />
positions to suit joist layout and site conditions.<br />
5. Apply waterproof membrane to manufacturers’<br />
instructions. Dress membrane over and seal to<br />
rim of Drain Body. Trim to edge of screw<br />
pockets (optimum hole diameter is 122mm).<br />
Do not cut into ABS Drain Body.<br />
6. Screw Clamp firmly in position to secure<br />
waterproof membrane.<br />
7. Bed the Tile Frame over the Drain Body to the<br />
required level, using tile adhesive.<br />
8. Bed tiles in tile adhesive, working away from<br />
the Tile Frame.<br />
9<br />
3<br />
1<br />
4<br />
3. Connect Drain Body to waste pipe using solvent<br />
cement joint.<br />
9. Insert Foul Air Trap into Drain Body prime.<br />
10. Screw Plain Cap onto Tile Frame.<br />
4. Screw-fix Drain Body to <strong>Harmer</strong> Level Access<br />
Former using 25mm x No.8 countersunk screws.<br />
Then lay marine ply decking to remainder of<br />
floor, butting up to <strong>Harmer</strong> Level Access Former.<br />
11. Apply flexible sealant between tile and edge<br />
of Tile Frame, then apply grout conventionally<br />
to remainder of tile joints.<br />
<strong>Harmer</strong> Technical Helpline +44 (0) 1744 648400<br />
153