Avaya AP-6, AP-7, AP-8 Access Points ... - Avaya Support
Avaya AP-6, AP-7, AP-8 Access Points ... - Avaya Support
Avaya AP-6, AP-7, AP-8 Access Points ... - Avaya Support

Create successful ePaper yourself
Turn your PDF publications into a flip-book with our unique Google optimized e-Paper software.
<strong>Avaya</strong> <strong>AP</strong>-6, <strong>AP</strong>-7, <strong>AP</strong>-8 <strong>Access</strong> <strong>Points</strong><br />
Configuration and Deployment Guide<br />
Configuration Guide<br />
Field Verified<br />
This document details the specifications for configuring the <strong>Avaya</strong> <strong>AP</strong>-6, <strong>AP</strong>-7, and<br />
<strong>AP</strong>-8 access points (<strong>AP</strong>s) with wireless IP telephones.<br />
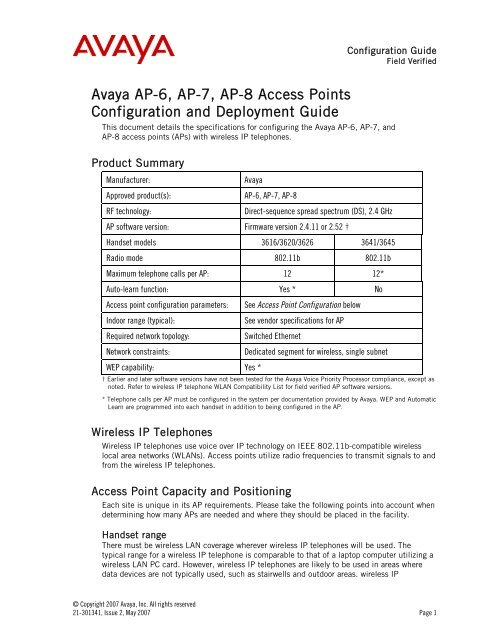
Product Summary<br />
Manufacturer: <strong>Avaya</strong><br />
Approved product(s): <strong>AP</strong>-6, <strong>AP</strong>-7, <strong>AP</strong>-8<br />
RF technology: Direct-sequence spread spectrum (DS), 2.4 GHz<br />
<strong>AP</strong> software version: Firmware version 2.4.11 or 2.52 †<br />
Handset models 3616/3620/3626 3641/3645<br />
Radio mode 802.11b 802.11b<br />
Maximum telephone calls per <strong>AP</strong>: 12 12*<br />
Auto-learn function: Yes * No<br />
<strong>Access</strong> point configuration parameters: See <strong>Access</strong> Point Configuration below<br />
Indoor range (typical): See vendor specifications for <strong>AP</strong><br />
Required network topology: Switched Ethernet<br />
Network constraints: Dedicated segment for wireless, single subnet<br />
WEP capability: Yes *<br />
† Earlier and later software versions have not been tested for the <strong>Avaya</strong> Voice Priority Processor compliance, except as<br />
noted. Refer to wireless IP telephone WLAN Compatibility List for field verified <strong>AP</strong> software versions.<br />
* Telephone calls per <strong>AP</strong> must be configured in the system per documentation provided by <strong>Avaya</strong>. WEP and Automatic<br />
Learn are programmed into each handset in addition to being configured in the <strong>AP</strong>.<br />
Wireless IP Telephones<br />
Wireless IP telephones use voice over IP technology on IEEE 802.11b-compatible wireless<br />
local area networks (WLANs). <strong>Access</strong> points utilize radio frequencies to transmit signals to and<br />
from the wireless IP telephones.<br />
<strong>Access</strong> Point Capacity and Positioning<br />
Each site is unique in its <strong>AP</strong> requirements. Please take the following points into account when<br />
determining how many <strong>AP</strong>s are needed and where they should be placed in the facility.<br />
Handset range<br />
There must be wireless LAN coverage wherever wireless IP telephones will be used. The<br />
typical range for a wireless IP telephone is comparable to that of a laptop computer utilizing a<br />
wireless LAN PC card. However, wireless IP telephones are likely to be used in areas where<br />
data devices are not typically used, such as stairwells and outdoor areas. wireless IP<br />
© Copyright 2007 <strong>Avaya</strong>, Inc. All rights reserved<br />
21-301341, Issue 2, May 2007 Page 1
<strong>Avaya</strong> <strong>AP</strong>-6, <strong>AP</strong>-7. <strong>AP</strong>-8 <strong>Access</strong> <strong>Points</strong> Configuration Guide<br />
Field Verified<br />
telephones have a Site Survey mode that displays dBm levels to determine adequate WLAN<br />
coverage. Refer to the wireless IP telephone Configuration and Administration document<br />
for details about this feature.<br />
Number of handsets per access point<br />
Estimate the number of wireless IP telephones and their anticipated call volume per <strong>AP</strong> area<br />
to ensure that the maximum number of calls per <strong>AP</strong> will not be exceeded. In this estimate,<br />
consider the data rates at which the handsets will operate. Higher data rates can only be<br />
sustained while well within the range of the <strong>AP</strong>. If the wireless IP telephones will be operating<br />
near the limits of the RF coverage from the <strong>AP</strong>, they will automatically drop to 1 Mb/s<br />
operation. Wireless IP telephones require approximately 15% of the available bandwidth per<br />
call for 1 Mb/s operation, approximately 10% of the available bandwidth per call for 2 Mb/s<br />
operation, approximately 7% of the available bandwidth per call for 5.5 Mb/s operation, and<br />
approximately 5% of the available bandwidth per call for 11Mb/s operation.<br />
Note: the maximum number of telephone calls per <strong>AP</strong> quoted in the summary table above is<br />
based on 11 Mb/s operation, and will be reduced if some or all wireless IP telephones are<br />
operating at 1, 2, or 5.5 Mb/s.<br />
LAN bandwidth<br />
Estimate anticipated peak call volume to ensure that the LAN has enough bandwidth available<br />
to handle the network traffic generated by all of the wireless devices. Network traffic can be<br />
monitored/analyzed using a network sniffer or a simple network management protocol (SNMP)<br />
workstation.<br />
Number of other wireless devices per <strong>AP</strong><br />
The wireless IP telephones share bandwidth with other wireless devices. To ensure adequate<br />
RF bandwidth availability, consider the number of wireless data devices in use per <strong>AP</strong>.<br />
VLAN <strong>Support</strong><br />
The <strong>Avaya</strong> <strong>AP</strong>-6, <strong>AP</strong>-7, and <strong>AP</strong>-8 access points have the ability to manage different VLANs,<br />
each with a unique ESSID. Many times customers will choose to place voice devices on a<br />
separate VLAN from data devices or they may choose to segment their network based on<br />
security policies.<br />
When VLANs are enabled, the <strong>AP</strong> uses 802.1Q tags on traffic entering the wired network.<br />
These tags must be removed by a VLAN-capable switch before the packets reach the <strong>Avaya</strong><br />
Call Server or <strong>Avaya</strong> Voice Priority Processor. On Cisco switches, the switch port to which the<br />
<strong>Avaya</strong> Call Server or <strong>Avaya</strong> Voice Priority Processor is connected must be configured as a nontrunked,<br />
or access port dedicated to the voice VLAN. If the port is set to trunked, the <strong>Avaya</strong><br />
equipment will not recognize the packet.<br />
If you are using a switch that is not capable of removing these 802.1Q tags, the wireless IP<br />
telephones must reside on the native (or management) VLAN.<br />
Notes on Configuration<br />
�<br />
The AVPP provides voice prioritization, called SpectraLink Voice Priority or<br />
SVP, for quality of service. SVP must be enabled in the <strong>AP</strong>. Contact your <strong>AP</strong><br />
vendor if you need to upgrade the <strong>AP</strong> software in order to enable SVP.<br />
Page 2
<strong>Avaya</strong> <strong>AP</strong>-6, <strong>AP</strong>-7. <strong>AP</strong>-8 <strong>Access</strong> <strong>Points</strong> Configuration Guide<br />
Field Verified<br />
If you encounter difficulties or have questions regarding the configuration process, please<br />
contact <strong>Avaya</strong> Technical <strong>Support</strong> at 1 800 242-2121 (USA only) or your local authorized<br />
<strong>Avaya</strong> dealer.<br />
<strong>Access</strong> Point Configuration (Up to Version 2.4.11)<br />
1. Connect to the <strong>AP</strong> via Netscape or Internet Explorer by navigating to the URL<br />
http:// (where is the IP address of the <strong>AP</strong>).<br />
Note: these configuration steps can also be accomplished using the SNMP-based <strong>Avaya</strong><br />
ScanTool program.<br />
2. From the main page, click on the Configure link.<br />
3. To configure WEP settings, obtain the key values from the local network administrator and<br />
use the <strong>Avaya</strong> <strong>AP</strong>-6, <strong>AP</strong>-7, or <strong>AP</strong>-8 User Guide for guidance in programming the<br />
encryption settings. The WEP configuration screen is reached from the main menu by<br />
clicking on Configure, followed by Security, followed by Encryption & Auth.<br />
Note that the handsets must each be configured manually with the identical WEP<br />
settings.<br />
4. Click Configure, then click the Interfaces link and choose the appropriate radio (Slot A or<br />
Slot B) to configure.<br />
5. From the Interfaces tab, confirm that the RTS/CTS Medium Reservation Threshold is greater<br />
than 600 or disabled.<br />
6. Set the Transmit Rate field to 11Mb/s.<br />
7. From the Filtering tab, select the Advanced tab. Enable the Proxy ARP function and disable<br />
IP/ARP Filtering.<br />
8. SVP is disabled by default in the <strong>Avaya</strong> <strong>AP</strong>-6, <strong>AP</strong>-7, <strong>AP</strong>-8 access point and must be<br />
enabled through the Command Line Interface (CLI). The CLI is available through both the<br />
serial port interface and over the Ethernet interface using a Telnet session.<br />
Once in the CLI, the following commands are used to enable SVP:<br />
9. To check to see if SVP is enabled:<br />
Type show spectralink, then press Enter; it will display enabled or disabled.<br />
To enable SVP:<br />
Type set speclinkstatus enable, then press Enter.<br />
Conditional: If you are not using a <strong>Avaya</strong> Voice Priority Processor and intend to use<br />
802.11b/g mode, you must also enter the command:<br />
Type set speclinklegacysupport, then press Enter.<br />
10. Restart the <strong>AP</strong>.<br />
The <strong>AP</strong> is now ready for use with wireless IP telephones.<br />
Page 3
<strong>Avaya</strong> <strong>AP</strong>-6, <strong>AP</strong>-7. <strong>AP</strong>-8 <strong>Access</strong> <strong>Points</strong> Configuration Guide<br />
Field Verified<br />
<strong>Access</strong> Point Configuration (Version 2.52)<br />
1. Connect to the <strong>AP</strong> via Netscape or Internet Explorer by navigating to the URL<br />
http:// (where is the IP address of the <strong>AP</strong>).<br />
2. From the main page, click on the Configure link.<br />
3. To configure WEP settings, obtain the key values from the local network administrator and<br />
use the <strong>Avaya</strong> <strong>AP</strong>-6, <strong>AP</strong>-7, or <strong>AP</strong>-8 User Guide for guidance in programming the<br />
encryption settings. The WEP configuration screen is reached from the main menu by<br />
clicking on Configure, followed by SSID/VLAN/Security, followed by Security Profile<br />
Note that the handsets must each be configured manually with the identical WEP<br />
settings.<br />
4. Click Configure, then click the Interfaces link and choose the appropriate radio (Slot A or<br />
Slot B) to configure.<br />
5. From the Interfaces tab, confirm that the RTS/CTS Medium Reservation Threshold is greater<br />
than 600 or disabled.<br />
6. Set the Transmit Rate field to 11Mb/s.<br />
7. From the Filtering tab, select the Advanced tab. Enable the Proxy ARP function and disable<br />
IP/ARP Filtering.<br />
8. The <strong>Avaya</strong> Voice Priority Processor is disabled by default in the <strong>Avaya</strong> <strong>AP</strong>-6, <strong>AP</strong>-7, and <strong>AP</strong>-<br />
8 access points. To enable SVP, select the QoS tab. Check the box beside Enable Quality of<br />
Service to enable SVP.<br />
9. Conditional: If you are not using a <strong>Avaya</strong> Voice Priority Processor and intend to use<br />
802.11b/g mode, it is necessary to use the Command Line Interface (CLI). The CLI is<br />
available through both the serial port interface and over the Ethernet interface using a<br />
Telnet session.<br />
Once in the CLI, enter:<br />
set speclinklegacysupport enable<br />
To ensure that SpectraLink legacy support is enabled, enter:<br />
show speclinklegacysupport<br />
A line should come back indicating:<br />
speclinklegacysupport<br />
enable<br />
10. Restart the <strong>AP</strong>.<br />
The <strong>AP</strong> is now ready for use with Wireless IP Telephones.<br />
Page 4