Hero Designer 6th Edition - Hero Games Company
Hero Designer 6th Edition - Hero Games Company
Hero Designer 6th Edition - Hero Games Company

You also want an ePaper? Increase the reach of your titles
YUMPU automatically turns print PDFs into web optimized ePapers that Google loves.
Created by dan Simon
Created By: Dan Simon<br />
Concept: Dan Simon and Steven S. Long<br />
Documentation: Rod Currie<br />
PDF Generation: B. Neumeier<br />
SPECIAL THANKS<br />
From Dan: It has been said that the <strong>Hero</strong> <strong>Games</strong> community is one of the best in the industry in terms of supporting each other and<br />
helping the HERO System to grow. Never has this been made more clear to me than in the massive effort put forth by the entire community in<br />
testing and helping to debug <strong>Hero</strong> <strong>Designer</strong>. Over the past several years, members of the <strong>Hero</strong> <strong>Games</strong> community have spent countless hours<br />
testing and retesting <strong>Hero</strong> <strong>Designer</strong>, finding all of my mistakes, and making suggestions on ways to improve the application.<br />
To all of the players that have helped make <strong>Hero</strong> <strong>Designer</strong> a reality: Thank you. This project would not have been possible without you.<br />
From Steve: <strong>Hero</strong> <strong>Games</strong> would also like to thank: Dan, for all his hard work; and Rod, for preparing this manual. Thanks, guys!<br />
DISCLAIMER<br />
While the programmer has worked hard to make <strong>Hero</strong> <strong>Designer</strong> follow the HERO System 5th <strong>Edition</strong> and HERO System <strong>6th</strong> <strong>Edition</strong><br />
rules, only the HERO System 5th <strong>Edition</strong> Revised and HERO System <strong>6th</strong> <strong>Edition</strong> rulebook, the Rules FAQs and errata pages maintained on<br />
the <strong>Hero</strong> <strong>Games</strong> website, and the rulings of the HERO System Line Developer are "official" explanations of the rules. As more gamers use<br />
the HERO System in more ways, situations sometimes arise which have not previously been considered, and our general understanding and<br />
interpretation of the rules grows and improves. In the event an official rules explanation differs from <strong>Hero</strong> <strong>Designer</strong>, the program will be<br />
updated at the earliest convenience of <strong>Hero</strong> <strong>Games</strong>.<br />
<strong>Hero</strong> <strong>Designer</strong> © 2002, 2003, 2006, 2009 by DOJ, Inc. d/b/a <strong>Hero</strong> <strong>Games</strong>. All rights reserved.<br />
HERO System ® is DOJ, Inc.'s trademark for its roleplaying system.<br />
HERO System Copyright © 1984, 1989, 2002, 2009 by DOJ, Inc. d/b/a <strong>Hero</strong> <strong>Games</strong>. All rights reserved.<br />
No part of this book may be reproduced or transmitted in any form or by any means, electronic or mechanical, including photocopying,<br />
recording, or computerization, or by any information storage and retrieval system, without permission in writing from the Publisher: DOJ,<br />
Inc., 226 E. 54th Street, #605, New York, NY 10022-48541
INTRODUCTION ...................................................................... 1<br />
What’s New In <strong>Hero</strong> <strong>Designer</strong> 6 th <strong>Edition</strong>? .......................................... 1<br />
<strong>Hero</strong> <strong>Designer</strong> Support ............................................................... 1<br />
<strong>Hero</strong> System Fifth <strong>Edition</strong> Revised ............................................. 1<br />
Standard Character Templates ................................................... 2<br />
BASIC CONCEPTS ................................................................... 2<br />
Character Templates ........................................................................... 2<br />
Export Formats ................................................................................... 2<br />
Configurable Preferences ................................................................... 2<br />
Configurable Campaign Rules ............................................................. 2<br />
Prefabs ................................................................................................ 2<br />
Package Deals (Templates) ................................................................. 3<br />
<strong>Hero</strong> <strong>Designer</strong> Math ............................................................................ 3<br />
Rounding Calculations ..................................................................... 3<br />
Formulae Versus Tables ................................................................... 3<br />
Sharing <strong>Hero</strong> <strong>Designer</strong> Files ....................................................... 3<br />
<strong>Hero</strong> <strong>Designer</strong> Character Packs .................................................. 4<br />
Editable Fields .................................................................................... 4<br />
Value Selector Boxes ....................................................................... 4<br />
Editable Text Fields .......................................................................... 4<br />
Pop-Up Boxes ..................................................................................... 4<br />
Install Directory ................................................................................... 4<br />
Updating <strong>Hero</strong> <strong>Designer</strong> ...................................................................... 4<br />
USING HERO DESIGNER ......................................................... 5<br />
Starting A Character............................................................................ 5<br />
Total Points In Sixth <strong>Edition</strong> ........................................................ 6<br />
Loading An Existing Character ......................................................... 6<br />
Changing The Character Template ...................................................... 6<br />
Exploring The <strong>Hero</strong> <strong>Designer</strong> Interface ............................................... 6<br />
Basic Info Tab ................................................................................... 7<br />
Cutting And Pasting From Other Applications ............................. 7<br />
A Note About Entering Characteristics ....................................... 8<br />
Background Tab ............................................................................... 8<br />
Characteristics Tab ........................................................................... 8<br />
Characteristic Maxima .................................................................. 8<br />
Ability And Complications Tabs ........................................................ 9<br />
Skills Tab ....................................................................................... 9<br />
Perks Tab ....................................................................................... 9<br />
Where Are Disadvantages? ......................................................... 9<br />
Talents Tab .................................................................................. 10<br />
Martial Arts Tab ........................................................................... 10<br />
Powers Tab .................................................................................. 10<br />
Complications Tab ....................................................................... 10<br />
Equipment Tab ............................................................................. 10<br />
Separating Tabs From Main Window ........................................... 10<br />
Adding Abilities And Complications .................................................. 11<br />
Adding An Item ............................................................................... 11<br />
Deleting An Item ............................................................................. 11<br />
Moving An Item .............................................................................. 11<br />
Editing An Item ............................................................................... 11<br />
Naming An Item.............................................................................. 11<br />
Modifiers and Templates .......................................................... 12<br />
Changing The Text Of An Item ........................................................ 12<br />
TABLE OF CONTENTS<br />
Attaching Adders And Modifiers ..................................................... 12<br />
Ability-Specific Adders ................................................................ 12<br />
Standard Modifiers ...................................................................... 12<br />
Custom Modifiers ........................................................................ 13<br />
Custom Adders ............................................................................ 13<br />
Modifier Intelligence ................................................................. 13<br />
Special Effects .......................................................................... 14<br />
Copying, Cutting, And Pasting Modifiers ........................................ 14<br />
Cost Multipliers .............................................................................. 14<br />
Assigning Special Effects ............................................................... 14<br />
Attaching Notes .............................................................................. 14<br />
Associating Files ............................................................................ 14<br />
Viewing An Ability’s Definition ........................................................ 15<br />
Copying, Cutting, And Pasting ........................................................ 15<br />
Unusual Everyman Skills .......................................................... 16<br />
Sorting ........................................................................................... 16<br />
Skills .............................................................................................. 16<br />
Custom Skills .............................................................................. 17<br />
Language Familiarity Chart ...................................................... 17<br />
Perks .............................................................................................. 18<br />
Custom Perks .............................................................................. 18<br />
Talents ............................................................................................ 18<br />
Custom Talents ............................................................................ 19<br />
Martial Arts ..................................................................................... 19<br />
Custom Maneuvers ..................................................................... 20<br />
Powers ........................................................................................... 21<br />
Characteristics From Powers ...................................................... 21<br />
Characteristics As Powers ........................................................... 21<br />
Buying SPD As A Power ............................................................ 21<br />
Targeting And Nontargeting Senses ......................................... 22<br />
Compound Powers ...................................................................... 22<br />
Naked Advantages ....................................................................... 22<br />
Custom Powers ........................................................................... 23<br />
Disadvantages And Fifth <strong>Edition</strong> Templates .............................. 24<br />
Complications ................................................................................ 24<br />
Custom Complications ................................................................ 24<br />
Equipment ...................................................................................... 24<br />
Working With Lists And Frameworks ................................................ 25<br />
Lists................................................................................................ 25<br />
Creating A List ............................................................................. 25<br />
Attaching Modifiers To Lists And Frameworks ......................... 25<br />
Attaching Custom Adders To Lists And Frameworks ................ 26<br />
Adding Items To A List ................................................................. 26<br />
Removing Items From A List........................................................ 26<br />
Deleting A List ............................................................................. 26<br />
Separators ...................................................................................... 26<br />
Elemental Controls ......................................................................... 26<br />
Multipowers ................................................................................... 27<br />
Variable Power Pools ..................................................................... 28<br />
Skill And Perk Enhancers ............................................................... 29<br />
Working With Multiple Characters .................................................... 29<br />
Combat Records ............................................................................... 30<br />
Exporting A Combat Record ........................................................... 30
Previewing A Combat Record ......................................................... 30<br />
Saving A Character ........................................................................... 30<br />
Closing A Character .......................................................................... 31<br />
Previewing, Exporting, And Printing A Character .............................. 31<br />
Setting The Export Format ............................................................. 31<br />
Exporting And Printing A Character ................................................ 31<br />
Previewing A Character .................................................................. 32<br />
Printing To PDF ............................................................................... 32<br />
CONFIGURING HERO DESIGNER ........................................... 33<br />
Application Preferences .................................................................... 33<br />
General Preferences ....................................................................... 33<br />
System Preferences ....................................................................... 33<br />
Display Preferences ....................................................................... 34<br />
Modifier Intelligence Preferences .................................................. 35<br />
Prefabs Settings ............................................................................. 35<br />
Template Preferences .................................................................... 35<br />
<strong>Hero</strong> <strong>Games</strong> Writers’ Guidelines ............................................... 35<br />
Campaign Rules ................................................................................ 36<br />
Point Limits Tab .............................................................................. 36<br />
Characteristic Maxima Tab ............................................................. 37<br />
Rules Tab ........................................................................................ 37<br />
Settings Tab ................................................................................... 38<br />
Saving Campaign Rules ................................................................. 39<br />
Attaching Campaign Rules To A Character ..................................... 39<br />
PREFABS AND PACKAGE DEALS ........................................... 40<br />
Prefabs .............................................................................................. 40<br />
Creating A Prefab ........................................................................... 40<br />
Creating A Prefab From A Character ............................................ 41<br />
Loading And Unloading Prefabs ..................................................... 41<br />
Using Prefabs ................................................................................. 41<br />
Editing A Prefab .............................................................................. 41<br />
Package Deals .................................................................................. 42<br />
Creating Package Deals ................................................................. 42<br />
Applying Package Deals ................................................................. 42<br />
Editing Package Deals ................................................................... 42<br />
CHARACTER TEMPLATES ..................................................... 43<br />
Saving A Character As A Template .................................................... 43<br />
Creating A Template From Scratch ................................................. 43<br />
Copies Of Standard Character Templates ................................. 43<br />
Custom Templates From Previous Versions .............................. 44<br />
The Hierarchical Structure of Character Templates ....................... 44<br />
XML Basics ..................................................................................... 44<br />
Structure Of A Character Template ................................................. 44<br />
Common Attributes ...................................................................... 44<br />
Common Subcontainers .............................................................. 45<br />
Basic Info Fields ....................................................................... 46<br />
Background Fields .................................................................... 46<br />
TEMPLATE Container ................................................................... 46<br />
Ability Containers ........................................................................ 46<br />
MAINAPP Section ........................................................................ 46<br />
CHARACTERISTICS Section .......................................................... 47<br />
Available Characteristics .......................................................... 47<br />
SKILLS Section ............................................................................ 48<br />
SKILL_ENHANCERS Section ........................................................ 48<br />
MARTIAL_ARTS Section ............................................................... 48<br />
PERKS Section ............................................................................. 49<br />
TALENTS Section ......................................................................... 49<br />
POWERS Section ......................................................................... 49<br />
MODIFIERS Section ..................................................................... 49<br />
Built-In Template Names .......................................................... 50<br />
DISADVANTAGES Section ............................................................. 50<br />
Creating Extension Templates ........................................................ 50<br />
EXPORT FORMATS ............................................................... 52<br />
Creating An Export Format ................................................................ 52<br />
Describing The Format ................................................................... 53<br />
Replacement Containers ................................................................ 53<br />
MATH Container ............................................................................. 53<br />
Conditional Containers ................................................................... 53<br />
Looping Containers ........................................................................ 53<br />
Combat Record Export Formats ........................................................ 54<br />
Available Tags And Containers .......................................................... 54<br />
Basic Tags ...................................................................................... 54<br />
Format Information Tags ............................................................. 54<br />
Character Information Tags ......................................................... 54<br />
Image Tags .................................................................................. 55<br />
Point Total Tags............................................................................ 55<br />
OCV, DCV, And ECV Tags ............................................................... 55<br />
Equipment Tags ........................................................................... 55<br />
Replacement Tags ....................................................................... 55<br />
Math Tags .................................................................................... 55<br />
Note Tags ..................................................................................... 55<br />
Combat Record Tags.................................................................... 55<br />
Movement Tags .............................................................................. 55<br />
Running Tags ............................................................................... 55<br />
Swimming Tags ........................................................................... 55<br />
Leaping Tags ............................................................................... 56<br />
Flight Tags ................................................................................... 56<br />
Gliding Tags ................................................................................. 56<br />
Swinging Tags ............................................................................. 56<br />
Teleportation Tags ....................................................................... 56<br />
Tunneling Tags ............................................................................. 56<br />
Characteristic Tags ......................................................................... 56<br />
General Characteristic Tags ......................................................... 56<br />
Specific Characteristic Tags ........................................................ 56<br />
Ability Tags ..................................................................................... 57<br />
General Tags ................................................................................ 57<br />
Combat Level Tags ...................................................................... 58<br />
Lightning Reflexes ....................................................................... 58<br />
Martial Art Tags ........................................................................... 58<br />
Skill Tags ..................................................................................... 58<br />
Perk Tags ..................................................................................... 58<br />
Talent Tags .................................................................................. 59<br />
Power Tags .................................................................................. 59<br />
Equipment Tags ........................................................................... 59<br />
Complication/Disadvantage Tags ................................................ 59
<strong>Hero</strong> <strong>Designer</strong> <strong>6th</strong> <strong>Edition</strong> Introduction ■ 1<br />
INTRODUCTION<br />
<strong>Hero</strong> <strong>Designer</strong> is a full-featured character<br />
design program for the HERO System Fifth<br />
<strong>Edition</strong> and HERO System Sixth <strong>Edition</strong>.<br />
With this program, you can create any type<br />
of character, vehicle, base, automaton, computer, or<br />
AI described in the HERO System Fifth <strong>Edition</strong> or<br />
HERO System Sixth <strong>Edition</strong> rules.<br />
Unlike other character design programs, <strong>Hero</strong><br />
<strong>Designer</strong> has been built from the ground up to help<br />
guide users through the myriad calculations and<br />
rules that go into creating a valid HERO System<br />
character. Wherever possible, the rules that govern<br />
how <strong>Hero</strong> <strong>Designer</strong> builds characters and abilities<br />
can be configured and altered by the user. It is our<br />
goal to provide a character design program that is<br />
as flexible as the HERO System itself.<br />
GMs, however, should still be on the lookout for<br />
potentially abusive characters. Just because <strong>Hero</strong><br />
<strong>Designer</strong> permits a player to build a character, it<br />
doesn’t mean that you have to accept the character<br />
in your campaign. <strong>Hero</strong> <strong>Designer</strong>, in the interest<br />
of flexibility, permits many options that normally<br />
require GM’s permission and as usual, GMs should<br />
make sure to approve all aspects of characters for<br />
their campaigns.<br />
Part of what makes <strong>Hero</strong> <strong>Designer</strong> unique is<br />
that it is very much a community application,<br />
drawing from the talents and designs of the <strong>Hero</strong><br />
<strong>Games</strong> community as a whole. The rules that the<br />
application uses, the abilities that are available, and<br />
the format of the final character sheets are all part of<br />
an ongoing community effort. You can find an everincreasing<br />
number of characters, custom templates,<br />
Prefabs, Package Deals, and character sheet formats<br />
in the <strong>Hero</strong> <strong>Designer</strong> section of the <strong>Hero</strong> <strong>Games</strong><br />
website (www.herogames.com)<br />
<strong>Hero</strong> <strong>Games</strong> supports <strong>Hero</strong> <strong>Designer</strong> in many<br />
ways. In addition to regular free upgrades to<br />
improve the functionality and flexibility of the<br />
program, we offer collections of characters, Package<br />
Deals, and other elements from our books, and<br />
anything else we can think of that we believe you’d<br />
like to have. So, if there’s something new and<br />
exciting you’d like to see for <strong>Hero</strong> <strong>Designer</strong>, please<br />
drop us a line at info@herogames.com.<br />
WHAT’S NEW IN HERO<br />
DESIgNER 6 TH EDITION?<br />
Since the release of the first version of <strong>Hero</strong><br />
<strong>Designer</strong> in December 2002, we have gained greater<br />
insight into what HERO System players desire in a<br />
character design program. And as that insight grew,<br />
<strong>Hero</strong> <strong>Designer</strong> grew and change to reflect it.<br />
With the release of the HERO System Sixth<br />
<strong>Edition</strong> in August 2009, it was time for <strong>Hero</strong><br />
<strong>Designer</strong> to grow and change again. The result is<br />
<strong>Hero</strong> <strong>Designer</strong> <strong>6th</strong> <strong>Edition</strong>.<br />
Not only is <strong>Hero</strong> <strong>Designer</strong> <strong>6th</strong> <strong>Edition</strong>, like all<br />
major revisions of <strong>Hero</strong> <strong>Designer</strong>, more efficient<br />
and more robust, but it also features a number of<br />
exciting new features:<br />
■ Full support for creating characters using either<br />
HERO System Fifth <strong>Edition</strong> or HERO System<br />
Sixth <strong>Edition</strong> rules.<br />
■ Improved Modifier assignment. You can now<br />
copy Modifiers from one ability to another.<br />
■ New display editing capability. You can now edit<br />
the text displayed for an ability.<br />
■ Improved Prefab handling. Prefabs are now<br />
handled more efficiently.<br />
■ New “print to PDF” functionality lets you<br />
generate PDF character sheets that resemble<br />
the blank character sheets provided in the<br />
rulebooks.<br />
■ New memory management option. You can now<br />
increase the amount of memory available to<br />
<strong>Hero</strong> <strong>Designer</strong>.<br />
■ And more.<br />
HERO DESIgNER<br />
SUPPORT<br />
Should you have problems<br />
with <strong>Hero</strong> <strong>Designer</strong> <strong>6th</strong> <strong>Edition</strong>, you can report<br />
them in the <strong>Hero</strong> <strong>Designer</strong><br />
forum on the <strong>Hero</strong> <strong>Games</strong><br />
website. To connect to this<br />
forum, select Go to <strong>Hero</strong><br />
<strong>Designer</strong> Forum… from<br />
the Help menu or type<br />
Alt-D. You can also e-mail<br />
support@herodesigner.<br />
com with your questions.<br />
You can discuss <strong>Hero</strong><br />
<strong>Designer</strong> <strong>6th</strong> <strong>Edition</strong> with<br />
its creators and other users<br />
in the <strong>Hero</strong> <strong>Designer</strong><br />
forum on the <strong>Hero</strong> <strong>Games</strong><br />
website (www.herogames.<br />
com).<br />
HERO SySTEM<br />
FIFTH EDITION<br />
REvISED<br />
This manual refers at times<br />
to the HERO System Fifth<br />
<strong>Edition</strong> rulebook. These<br />
references apply equally to<br />
both the original HERO<br />
System Fifth <strong>Edition</strong><br />
rulebook and the newer<br />
HERO System Fifth <strong>Edition</strong><br />
Revised rulebook.
2 ■ Basic Concepts <strong>Hero</strong> <strong>Designer</strong> <strong>6th</strong> <strong>Edition</strong><br />
STANDARD<br />
CHARACTER<br />
TEMPLATES<br />
<strong>Hero</strong> <strong>Designer</strong> includes<br />
the following standard<br />
character templates for<br />
use in creating both<br />
HERO System Fifth <strong>Edition</strong><br />
and HERO System Sixth<br />
<strong>Edition</strong> characters:<br />
■ <strong>Hero</strong>ic<br />
■ Superheroic<br />
■ Vehicle<br />
■ Base<br />
■ Automaton<br />
■ Computer<br />
■ Automaton<br />
■ AI<br />
In addition, <strong>Hero</strong> <strong>Designer</strong><br />
includes the following<br />
template for HERO System<br />
Fifth <strong>Edition</strong>:<br />
■ Normal<br />
To create Normal<br />
characters for HERO<br />
System Sixth <strong>Edition</strong>, use<br />
the <strong>Hero</strong>ic template.<br />
BASIC CONCEPTS<br />
This chapter introduces a number of the basic<br />
concepts associated with <strong>Hero</strong> <strong>Designer</strong>.<br />
Many of these concepts appear throughout<br />
this manual and discussing them up front<br />
will make it easier for you to understand them<br />
when they show up later.<br />
CHARACTER TEMPLATES<br />
A character template is an XML (Extensible<br />
Markup Language) file that defines a given type of<br />
HERO System character. Each template specifies<br />
Characteristics, abilities (Skills, Powers, Perks,<br />
and so forth), Disadvantages, and Modifiers<br />
(Advantages and Limitations) available to build that<br />
character type along with their costs.<br />
Because the character template also defines<br />
exactly what options are available for abilities and<br />
Modifiers as well as the relationships between<br />
different abilities and Modifiers, you can change<br />
how <strong>Hero</strong> <strong>Designer</strong> interprets the HERO System<br />
rules by changing the template. The “Character<br />
Templates” chapter on page 43 contains instructions<br />
for modifying and expanding existing character<br />
templates and creating new ones.<br />
Character templates should not be confused with<br />
Templates, the HERO System Sixth <strong>Edition</strong> name<br />
for Package Deals. Because character templates<br />
are such a central idea to <strong>Hero</strong> <strong>Designer</strong>, the game<br />
element called Templates will continue to be called<br />
Package Deals by this program.<br />
ExPORT FORMATS<br />
<strong>Hero</strong> <strong>Designer</strong> lets you export the characters you<br />
create in a variety of formats for viewing, editing<br />
or printing with a web browser, text editor, word<br />
processor, or other such program. To do this, it uses<br />
Export Formats.<br />
Export Formats are files which contain special<br />
fields that get replaced by information from your<br />
character when you export that character. These<br />
files could be HTML (for web browsers), plain text,<br />
or more complex formats such as RTF (used by<br />
many word processors including Microsoft Word).<br />
Because the Export Format determines what<br />
information is exported and where it is placed<br />
in the exported file, this feature lets you create<br />
character sheets with a wide variety of looks.<br />
<strong>Hero</strong> <strong>Designer</strong> provides a variety of Export<br />
Formats for both individual characters and multicharacter<br />
combat records, including HTML Export<br />
Format based on the standard HERO System Fifth<br />
<strong>Edition</strong> character sheet among others.<br />
Finally, <strong>Hero</strong> <strong>Designer</strong> lets you modify existing<br />
Export Formats or create your own. The “Export<br />
Formats” chapter on page 52 has instructions for<br />
creating and editing Export Formats.<br />
CONFIgURABLE<br />
PREFERENCES<br />
<strong>Hero</strong> <strong>Designer</strong> has many features you can<br />
turn on and off from the Preferences dialog. The<br />
Preferences dialog. To launch the Preferences<br />
dialog, select Preferences from the File menu.<br />
For a complete description of the Preferences<br />
dialog and the features it controls, see the<br />
“Application Preferences” section on page 33.<br />
CONFIgURABLE<br />
CAMPAIgN RULES<br />
You can tailor <strong>Hero</strong> <strong>Designer</strong> to your individual<br />
campaign by setting a variety of campaign-related<br />
configurable limits and options. These options<br />
can be saved and loaded as desired, allowing<br />
you to create characters for a variety of different<br />
campaigns.<br />
For a complete description of campaign rules,<br />
see the “Campaign Rules” section on page 36.<br />
PREFABS<br />
When creating HERO System characters, you<br />
will often find there are certain pre-built Powers,<br />
pieces of equipment, Skill lists, collections of<br />
Martial Maneuvers, and so forth that you use over<br />
and over again. To make reusing such items easier,<br />
<strong>Hero</strong> <strong>Designer</strong> features a concept called Prefabs.
<strong>Hero</strong> <strong>Designer</strong> <strong>6th</strong> <strong>Edition</strong> Basic Concepts ■ 3<br />
Prefabs are files containing items that you want<br />
to use on multiple characters. These files can be<br />
loaded and unloaded as needed. When a Prefab is<br />
loaded, you can copy any item from that Prefab to<br />
the active character. Prefabs are particularly useful<br />
for things like equipment lists, Martial Arts styles,<br />
and lists of standard Complications (Disadvantages<br />
in HERO System Fifth <strong>Edition</strong>).<br />
The “Prefabs And Package Deals” chapter on<br />
page 40 has full instructions for creating and using<br />
Prefabs.<br />
PACKAgE DEALS<br />
(TEMPLATES)<br />
Package Deals (renamed Templates in<br />
HERO System Sixth <strong>Edition</strong>) are collections<br />
of Characteristic modifications, abilities and<br />
Complications (Disadvantages in HERO System<br />
Fifth <strong>Edition</strong>) intended to be applied to characters<br />
to represent such things as occupations, unique<br />
cultures, and fantasy or alien races. While the<br />
HERO System Sixth <strong>Edition</strong> rulebook renamed<br />
Package Deals as Templates, <strong>Hero</strong> <strong>Designer</strong> will<br />
continue to use the name Package Deal to refer to<br />
such collections. This is to avoid confusion with<br />
Character Templates which are a central concept of<br />
<strong>Hero</strong> <strong>Designer</strong>.<br />
To create Package Deal using <strong>Hero</strong> <strong>Designer</strong>,<br />
create a character with the desired modifications,<br />
abilities, and Disadvantages (or Complications) and<br />
save it as a Package Deal. The saved Package Deal<br />
can then be applied to any new or existing <strong>Hero</strong><br />
<strong>Designer</strong> character.<br />
The “Prefabs And Package Deals” chapter on<br />
page 40 has full instructions for creating and using<br />
Prefabs.<br />
HERO DESIgNER MATH<br />
<strong>Hero</strong> <strong>Designer</strong> properly calculates the costs of<br />
all game elements in the HERO System Fifth <strong>Edition</strong><br />
and HERO System Sixth <strong>Edition</strong> rulebooks. The<br />
following sections offer greater insight into how<br />
<strong>Hero</strong> <strong>Designer</strong> arrives at some of these values.<br />
Rounding Calculations<br />
<strong>Hero</strong> <strong>Designer</strong> uses the standard rounding rules<br />
for the HERO System, though for programming<br />
reasons sometimes displays them a bit unusually<br />
during the process. Here’s a brief review of what’s<br />
going on to help alleviate any confusion about the<br />
costs the program shows for your character.<br />
As stated in the HERO System Fifth <strong>Edition</strong> and<br />
HERO System Sixth <strong>Edition</strong> rulebooks, rounding<br />
occurs at every step of a calculation with values<br />
rounded to the nearest whole number (values<br />
ending in .5 are rounded in the character’s favor).<br />
Note, however, that these rules only apply to<br />
division and multiplication . When you buy an<br />
ability that costs less than a full point, you must<br />
round it up to a full point – you do not get to round<br />
it down to zero because there is no division or<br />
multiplication involved.<br />
There are a few abilities in the HERO System that<br />
have a .5 in their costs. These include a half die of<br />
a 3 point Power (like Flash versus a nontargeting<br />
Sense Group or Dispel), and in HERO System Fifth<br />
<strong>Edition</strong>, a Penalty Skill Levels versus a specific<br />
OCV modifier on a single attack, both of which<br />
cost 1.5 points each. <strong>Hero</strong> <strong>Designer</strong> displays costs<br />
involving such values as integers (rounded up to<br />
next whole number, so a ½d6 Dispel is shown as<br />
costing 2 points); however, behind the scenes, the<br />
program properly keeps track of the fractional<br />
values. Thus, if you buy both a ½d6 Dispel and a<br />
½d6 Flash versus the Hearing Sense Group, <strong>Hero</strong><br />
<strong>Designer</strong> displays the cost of each as 2, but only<br />
adds a total of 3 points (not 4) to the character’s<br />
totals. If the subtotal for a tab on a character ends in<br />
.5, that subtotal is rounded up when it is displayed;<br />
however, the proper value is maintained internally<br />
and used when calculating the character’s overall<br />
point total. Finally, if the overall point total for<br />
a character is not a whole number, the total is<br />
rounded up to the next highest whole number (for<br />
example, 212.5 is rounded up to 213).<br />
Adding any Advantage or Limitation (even a<br />
+0 or -0 one) causes a calculation to take place<br />
and thus, the results are rounded down when<br />
the fractional value is .5 or less and up when the<br />
fractional value is greater than .5.<br />
By default, <strong>Hero</strong> <strong>Designer</strong> calculates to one<br />
decimal place before rounding. You can change<br />
the number of decimal places used (for example,<br />
the HERO System Fifth <strong>Edition</strong> rulebook and its<br />
supplements calculate to two decimal places) on the<br />
Preferences dialog as described in the “Application<br />
Preferences” section on page 33.<br />
Example: Joe buys a 6½d6 Dispel with the Affects<br />
Desolidified Advantage (+1/2) and the Inobvious<br />
Inaccessible Focus Limitation (-1/4). The Base<br />
Cost of the Power is 19.5 points (displayed as 20<br />
points by <strong>Hero</strong> <strong>Designer</strong>). Adding the Advantage<br />
makes the Active Cost 29 points (19.5 x (1 +<br />
.5) = 29.25 rounded down to 29). Applying the<br />
Limitation brings the Real Cost of the Power down<br />
to 23 points (29 / (1 + .25) = 23.2 rounded down<br />
to 23).<br />
This same Power without the Advantage but<br />
with the Limitation would have a Real Cost of 16<br />
points (19.5 / (1 + .25)=15.6 rounded up to 16).<br />
Formulae versus Tables<br />
Several tables in the HERO System Fifth <strong>Edition</strong><br />
and HERO System Sixth <strong>Edition</strong> rulebooks use<br />
simplified math to keep the numbers easy to use<br />
and remember. For example, the Vehicle Size Table<br />
on page 187 of Volume 2 of the HERO System Sixth<br />
<strong>Edition</strong> rulebook correctly shows the length and<br />
width of the vehicle doubling every three levels, but<br />
uses simplified values for the intervening levels and<br />
SHARINg HERO<br />
DESIgNER FILES<br />
The <strong>Hero</strong> <strong>Designer</strong> section<br />
of the <strong>Hero</strong> <strong>Games</strong> website<br />
(www,herogames.com)<br />
has an area called the<br />
Vault set aside for <strong>Hero</strong><br />
<strong>Designer</strong> users to share<br />
characters, character<br />
templates, Package Deals,<br />
and Prefabs.<br />
To access these shared<br />
resources in the Vault,<br />
select the appropriate<br />
action from the Tools<br />
menu or type the keyboard<br />
equivalent. This launches<br />
your default web browser<br />
and loads the web page<br />
from which you can<br />
download <strong>Hero</strong> <strong>Designer</strong><br />
files of the selected type.<br />
Note, however, that for this<br />
feature to work correctly<br />
you must be connected to<br />
the Internet and logged<br />
into the <strong>Hero</strong> <strong>Games</strong><br />
website with the login ID<br />
used to purchase <strong>Hero</strong><br />
<strong>Designer</strong>. In addition,<br />
some firewalls may prevent<br />
them from working<br />
properly.<br />
To add your own <strong>Hero</strong><br />
<strong>Designer</strong> files to the Vault,<br />
go to the appropriate<br />
section of the <strong>Hero</strong><br />
<strong>Designer</strong> Vault on the<br />
<strong>Hero</strong> <strong>Games</strong> web site and<br />
select the Upload option<br />
for that section.
4 ■ Basic Concepts <strong>Hero</strong> <strong>Designer</strong> <strong>6th</strong> <strong>Edition</strong><br />
HERO DESIgNER<br />
CHARACTER PACKS<br />
You can purchase <strong>Hero</strong><br />
<strong>Designer</strong> Character Packs<br />
for various HERO System<br />
books through the <strong>Hero</strong><br />
<strong>Games</strong> online store. These<br />
Character Packs include<br />
<strong>Hero</strong> <strong>Designer</strong> character,<br />
Prefab, and Package<br />
Deal files for characters,<br />
equipment, and templates<br />
(package deals) described<br />
in one or more books.<br />
Once you have purchased<br />
a Character Pack, you can<br />
download the compressed<br />
(zipped) file containing<br />
the various <strong>Hero</strong> <strong>Designer</strong><br />
files for that pack.<br />
To use a <strong>Hero</strong> <strong>Designer</strong><br />
Character Pack, extract the<br />
<strong>Hero</strong> <strong>Designer</strong> files from<br />
the compressed (zipped)<br />
file to a location on your<br />
system. Within <strong>Hero</strong><br />
<strong>Designer</strong>, you can then<br />
navigate to that location in<br />
the file selector when you<br />
are loading a character,<br />
Prefab, or Package Deal<br />
from that Pack.<br />
area (length x width). <strong>Hero</strong> <strong>Designer</strong>, on the other<br />
hand, uses more precise values based on formulae<br />
for these and other fields. This is not only easier<br />
for the program to handle, but also allows a greater<br />
degree of customization. Thus, if <strong>Hero</strong> <strong>Designer</strong> is<br />
showing you a different value for such an item than<br />
what it is shown in the rulebook, this is the reason.<br />
EDITABLE FIELDS<br />
Two types of editable fields are used throughout<br />
the <strong>Hero</strong> <strong>Designer</strong> interface: value selector boxes<br />
and editable text fields.<br />
value Selector Boxes<br />
A value selector box consists of a box with a<br />
number in it with a < and > on either side. Clicking<br />
< decreases the value in the box while clicking ><br />
increases the value in the box. You can also edit the<br />
number in the box directly.<br />
Editable Text Fields<br />
Throughout the <strong>Hero</strong> <strong>Designer</strong> interface,<br />
there are numerous text fields that are completely<br />
editable. This includes the Display field for most<br />
abilities, the descriptive text for Adders and<br />
Modifiers, and almost all fields on Complication<br />
(or Disadvantage) dialogs. Note, however, that costs<br />
associated with such text fields are not editable.<br />
Example: Suppose you are purchasing Change<br />
Environment with the -1 Characteristic Roll and<br />
all Skill Rolls based on Characteristic combat<br />
effect and want it to apply to DEX Rolls and<br />
DEX-based Skill Rolls. Because the combat effect<br />
description is an editable text field, you can edit<br />
that field to read “-1 DEX Roll and all Skill Rolls<br />
based on DEX”.<br />
POP-UP BOxES<br />
<strong>Hero</strong> <strong>Designer</strong> uses pop-up boxes for two<br />
purposes: warnings and definitions.<br />
Warnings boxes appear when you have done<br />
something that is illegal or not recommended<br />
according to the HERO System Fifth <strong>Edition</strong> or<br />
HERO System Sixth <strong>Edition</strong> rules. The box explains<br />
the problem and may describe an action taken by<br />
the program to correct it. The box also contains a<br />
checkbox labeled Do not show this again. Checking<br />
the box dismisses the box and prevents that<br />
particular warning from showing up again during<br />
the current session of the program, although the<br />
warning will show up again the next time you run<br />
<strong>Hero</strong> <strong>Designer</strong>. Clicking elsewhere on the warning<br />
simply dismisses the box.<br />
The exact situations which trigger a warning<br />
can vary, depending on the current application<br />
preferences and campaign rules. For details, see the<br />
“Application Preferences” section on page 33 and the<br />
“Campaign Rules” section on page 36.<br />
Definition boxes appear when you have asked<br />
for a definition of an item and contain a description<br />
of the item in question. Clicking anywhere on the<br />
box dismisses it.<br />
INSTALL DIRECTORy<br />
This manual occasionally refers to the <strong>Hero</strong><br />
<strong>Designer</strong> install directory. This is the directory in<br />
which you originally installed the <strong>Hero</strong> <strong>Designer</strong><br />
software. On Windows systems, if you do not<br />
change the default directory given by the installer,<br />
this is normally C:/Program Files/<strong>Hero</strong> <strong>Designer</strong>.<br />
If you chose to install <strong>Hero</strong> <strong>Designer</strong> in a<br />
different directory, that directory is the install<br />
directory.<br />
UPDATINg HERO<br />
DESIgNER<br />
From time to time, updates to <strong>Hero</strong> <strong>Designer</strong><br />
become available. These updates provide bug fixes,<br />
correct interpretations of HERO System rules, or<br />
add new features.<br />
To ensure that you are running the most recent<br />
version, connect to the Internet and select Get<br />
Application Updates… from the Tools menu. <strong>Hero</strong><br />
<strong>Designer</strong> launches your default web browser to<br />
connect to the <strong>Hero</strong> <strong>Designer</strong> section of the <strong>Hero</strong><br />
<strong>Games</strong> website (www.herogames.com) where you<br />
can download the update. You must be connected<br />
to the Internet and logged into the <strong>Hero</strong> <strong>Games</strong><br />
website with the login used to purchase <strong>Hero</strong><br />
<strong>Designer</strong>. Some firewalls may prevent this feature<br />
from working.<br />
Normally, updates to <strong>Hero</strong> <strong>Designer</strong> <strong>6th</strong><br />
<strong>Edition</strong> take the form of a file with a .jar extension.<br />
Download this file and save it in the <strong>Hero</strong> <strong>Designer</strong><br />
install directory (as described in the “Install<br />
Directory” section on page 4). When downloading<br />
this file on Windows, you should be careful. Some<br />
Windows systems (particular those with WinZip<br />
installed) want to interpret the file as a compressed<br />
(zipped) folder and save it with a .zip extension. To<br />
avoid this, select All Files from the dropdown list<br />
in the Save as type field of the file selector when<br />
saving the download.<br />
To view the changes that have been made in all<br />
updates to <strong>Hero</strong> <strong>Designer</strong> <strong>6th</strong> <strong>Edition</strong>, go to the<br />
Updates page of the <strong>Hero</strong> <strong>Designer</strong> area of the <strong>Hero</strong><br />
<strong>Games</strong> website.
<strong>Hero</strong> <strong>Designer</strong> <strong>6th</strong> <strong>Edition</strong><br />
Using <strong>Hero</strong> <strong>Designer</strong> ■ 5<br />
USINg HERO<br />
DESIgNER<br />
This chapter discusses how to use <strong>Hero</strong><br />
<strong>Designer</strong> to create characters (including<br />
vehicles, bases, automatons, computers, and<br />
AIs) for the HERO System Fifth <strong>Edition</strong> or<br />
HERO System Sixth <strong>Edition</strong>. It provides an overview<br />
of the <strong>Hero</strong> <strong>Designer</strong> interface as well as detailed<br />
instructions on adding, deleting, and editing<br />
Skills, Talents, Powers, and other abilities. It also<br />
shows you how to export the finished character for<br />
printing, viewing, or displaying on the web.<br />
STARTINg A CHARACTER<br />
Normally, when you start <strong>Hero</strong> <strong>Designer</strong>,<br />
an empty version of the main window appears.<br />
However, if any characters were still open when<br />
you last exited the program, the last saved versions<br />
of those characters are automatically loaded. (This<br />
behavior can be changed in the Preferences dialog<br />
as described in the “Application Preferences”<br />
section on page 33.)<br />
Creating A New Character<br />
To create a new character, select New Character<br />
from the File menu. A sub-menu appears with four<br />
choices: New Character (current template), New<br />
Character (<strong>Hero</strong> System 5th <strong>Edition</strong> Rules), New<br />
Character (<strong>Hero</strong> System <strong>6th</strong> <strong>Edition</strong> Rules), and<br />
New Character (Custom /Non-Standard Rules).<br />
Selecting New Character (current template)<br />
displays a blank character form based on the last<br />
template used during this session of <strong>Hero</strong> <strong>Designer</strong>.<br />
If no template has been used during current <strong>Hero</strong><br />
<strong>Designer</strong> session the new character is based on<br />
the Superheroic template. Typing Ctrl-N is the<br />
equivalent of selecting New Character > New<br />
Character (current template).<br />
Selecting New Character (<strong>Hero</strong> System <strong>6th</strong><br />
<strong>Edition</strong> Rules) or New Character (<strong>Hero</strong> System<br />
5th <strong>Edition</strong> Rules) displays a sub-menu showing<br />
the available templates (as described in the<br />
“Standard Character Templates” sidebar on page 2).<br />
From this sub-menu, you can select the template<br />
you want to use for the new character. Once you do<br />
so, the appropriate blank character form appears.<br />
Finally, selecting New Character (Custom/<br />
Non-Standard Rules) displays a sub-menu with<br />
one item: Choose File…. Selecting that item<br />
displays the Create Character From Template file<br />
selector. Select the character template you want to<br />
use and click Create Character. See the “Character<br />
Templates” chapter on page 43 for details on creating<br />
a template.<br />
Once you have begun work on a new character,<br />
you can change the template as described in the<br />
“Changing the Character Template” on page 6.<br />
Additionally, the last set of campaign rules used<br />
(in any <strong>Hero</strong> <strong>Designer</strong> session) is assigned to the<br />
character. For details on creating and assigning<br />
campaign rules, see the “Campaign Rules” section<br />
on page 36.
6 ■ Using <strong>Hero</strong> <strong>Designer</strong> <strong>Hero</strong> <strong>Designer</strong> <strong>6th</strong> <strong>Edition</strong><br />
TOTAL POINTS IN<br />
SIxTH EDITION<br />
HERO System Sixth<br />
<strong>Edition</strong> changed the way<br />
that the total Character<br />
Points available for a<br />
character are expressed.<br />
HERO System Fifth <strong>Edition</strong><br />
expressed a character’s<br />
available points as Base<br />
Points + Maximum<br />
Disadvantage Points. Thus,<br />
a 350 point superhero<br />
would be expressed as<br />
being built on 200 + 150.<br />
HERO System Sixth<br />
<strong>Edition</strong> expresses available<br />
character points as Total<br />
Points with a maximum<br />
number of points in<br />
Matching Complications.<br />
So, a 400 point superhero<br />
is expressed as 400 Total<br />
Points with a maximum<br />
of 75 points in Matching<br />
Complications.<br />
For HERO System Fifth<br />
<strong>Edition</strong> templates, the<br />
Basic Info tab has Base<br />
Points and Max. Disad.<br />
Points fields.<br />
For HERO System Sixth<br />
<strong>Edition</strong> templates, the<br />
Basic Info tab has<br />
instead Points and Max.<br />
Complication Points<br />
fields in which you enter<br />
the Total Points and<br />
the maximum number<br />
of points in Matching<br />
Complications.<br />
Note, however, that<br />
<strong>Hero</strong> <strong>Designer</strong> makes no<br />
adjustments in the Points<br />
value (that is, the Total<br />
Points available to the<br />
character) based on the<br />
actual points in Matching<br />
Complications. Therefore,<br />
if you are building a<br />
character that uses fewer<br />
than the maximum<br />
number of Complication<br />
Points available, you<br />
must manually lower the<br />
value of the Points field<br />
on the Basic Info tab<br />
by the amount that you<br />
are under the maximum<br />
Complication Points. For<br />
example, if you only use<br />
50 points of a maximum<br />
75 points in Matching<br />
Complications, you would<br />
lower the value of the<br />
Points field by 25 points.<br />
Loading An Existing<br />
Character<br />
To load a previously saved <strong>Hero</strong> <strong>Designer</strong><br />
character, select Open Character… from the File<br />
menu or type Ctrl-O. A standard file selector dialog<br />
appears. Select the file containing the character you<br />
want to load and click Open Character to load that<br />
file as well as the associated character template and<br />
campaign rules.<br />
You can also load a character that has been<br />
recently worked on by selecting Open Recent from<br />
the File menu which displays a sub-menu showing<br />
the most recently worked on files. Select the file<br />
containing the character you want to use to load<br />
that file and the associated character template and<br />
campaign rules.<br />
Normally, when you load a character, all<br />
Modifiers attached to that character’s abilities are<br />
checked to see if they are valid based on Modifier<br />
Intelligence (see the “Modifier Intelligence” sidebar<br />
on page 13). You are warned of any invalid Modifiers<br />
and the offending abilities are displayed in red on<br />
the appropriate tab. You can change this behavior<br />
from the Preferences dialog as described in the<br />
“Application Preferences” section on page 33.<br />
CHANgINg THE<br />
CHARACTER TEMPLATE<br />
When a character is active, its associated<br />
template is loaded into memory. That template<br />
remains loaded until either you change the template<br />
associated with the active character or a character<br />
built on another template is loaded. The currently<br />
loaded template is shown on the status line at the<br />
bottom of the <strong>Hero</strong> <strong>Designer</strong> window.<br />
To change the template associated with the<br />
current active character, select Change Current<br />
Template from the Current Character menu. This<br />
normally displays a sub-menu with three items:<br />
<strong>Hero</strong> System <strong>6th</strong> <strong>Edition</strong> Rules, <strong>Hero</strong> System 5th<br />
<strong>Edition</strong> Rules, and Custom/Non-Standard Rules.<br />
Selecting <strong>Hero</strong> System <strong>6th</strong> <strong>Edition</strong> Rules<br />
or <strong>Hero</strong> System 5th <strong>Edition</strong> Rules displays a<br />
sub-menu showing the available <strong>Hero</strong> <strong>Designer</strong><br />
template. From this sub-menu, you can select<br />
the new template to be assigned to the current<br />
character.<br />
Selecting Custom/Non-Standard Rules<br />
displays a sub-menu with one item: Choose File….<br />
Selecting that item displays the Load Template file<br />
selector. Select the character template you want to<br />
use and click Load Template. See the “Character<br />
Templates” chapter on page 43 for details on creating<br />
a template.<br />
Once the template has been changed for a<br />
character, a third item is added to the sub-menu:<br />
Revert to Original Template. As the name<br />
implies, selecting this item changes the template<br />
for the current character to the one with which the<br />
character was last saved (or the one with which the<br />
character was created in the case of a character that<br />
has not yet been saved).<br />
ExPLORINg THE HERO<br />
DESIgNER INTERFACE<br />
When you have one or more characters active,<br />
the main <strong>Hero</strong> <strong>Designer</strong> window displays a series<br />
of tabs. Each tab represents a different section of a<br />
typical HERO System character sheet and lets you<br />
enter and change information about that aspect<br />
of the character. Precisely which tabs are available<br />
depends upon the current character template<br />
and the current campaign rules. The standard AI,<br />
Automation, Base, Computer, and Vehicle templates<br />
disable the Background tab while the Equipment<br />
tab is only available for the Normal (only for Fifth<br />
<strong>Edition</strong> characters) and <strong>Hero</strong>ic templates unless<br />
enabled by the current campaign rules (see the<br />
“Campaign Rules” section on page 36).
<strong>Hero</strong> <strong>Designer</strong> <strong>6th</strong> <strong>Edition</strong> Using <strong>Hero</strong> <strong>Designer</strong> ■ 7<br />
This manual primarily discusses the Sixth<br />
<strong>Edition</strong> Superheroic template, but working with any<br />
of the standard templates is similar.<br />
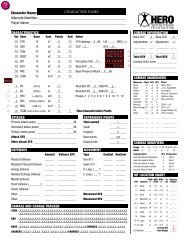
Basic Info Tab<br />
The Basic Info tab (shown on page 6) consists<br />
of two sections. On the right side of the tab is the<br />
Basic Configuration section. On the left side is the<br />
Character Information section.<br />
The Basic Configuration section consists of<br />
seven fields that describe the number of Character<br />
Points available and spent for the active character.<br />
The Points field is a value selector box specifying<br />
the total number of points available for building<br />
the character. The current campaign rules set the<br />
default value for this field. For HERO System Fifth<br />
<strong>Edition</strong> templates, this field is called Base Points<br />
and specifies the base number of points (before<br />
Disadvantages) available for building the character.<br />
The Max. Complication Points field is a value<br />
selector box specifying the maximum number of<br />
points in Matching Complications the character<br />
can take. The current campaign rules set the default<br />
value for this field. For HERO System Fifth <strong>Edition</strong><br />
characters, this field is called Max. Disad. Points.<br />
The Complications Points Used field displays<br />
the number of Complication Points currently taken<br />
on the Complications tab. If this value exceeds the<br />
value in the Max. Complication Points field, it is<br />
displayed in red. For HERO System Fifth <strong>Edition</strong><br />
characters, this field is called Disad. Points Used<br />
and it tracks Disadvantage Points in the same way.<br />
The Experience Earned field is a value selector<br />
box for setting the number of Experience Points the<br />
character has earned.<br />
The Experience Spent field shows how many<br />
Experience Points have been spent. This is the<br />
points spent on abilities in excess of the value of the<br />
Points field (or for HERO System Fifth <strong>Edition</strong>, the<br />
total of the values in the Base Points, and Disad<br />
Points Used fields). If this value is greater than the<br />
value of the Experience Earned field, it is displayed<br />
in red.<br />
The Unspent Experience field shows how<br />
many Experience Points have been earned by the<br />
character but not yet spent.<br />
The Total Points field shows how many points<br />
have been spent on abilities for the character.<br />
The Character Information section consists of<br />
several fields that provide information about the<br />
character and the campaign it is being played in.<br />
These fields are Character Name, Alternate IDs,<br />
Campaign Name, Genre, Player Name, and GM.<br />
Once you enter a name in the Character Name<br />
field, that name appears in the title bar of the <strong>Hero</strong><br />
<strong>Designer</strong> window and in the status line at the<br />
bottom of that window. It also appears in the Open<br />
CUTTINg<br />
AND PASTINg<br />
FROM OTHER<br />
APPLICATIONS<br />
With most operating<br />
systems on which <strong>Hero</strong><br />
<strong>Designer</strong> runs, you can use<br />
various shortcut keys to<br />
cut or copy text from other<br />
applications and paste it in<br />
<strong>Hero</strong> <strong>Designer</strong> text fields.<br />
■ Ctrl-C copies selected<br />
text to the system<br />
clipboard.<br />
■ Ctrl-V pastes text from<br />
the system clipboard at<br />
the current insertion<br />
point for text.<br />
■ Ctrl-X cuts selected<br />
text and places it on the<br />
system clipboard.<br />
For example, suppose you<br />
are entering a character<br />
into <strong>Hero</strong> <strong>Designer</strong><br />
whose background is in<br />
a Microsoft Word file. To<br />
copy that background to<br />
the Background/History<br />
field of <strong>Hero</strong> <strong>Designer</strong>’s<br />
Background tab, first<br />
select the text in Word that<br />
you want to copy and type<br />
Ctrl-C. Next, switch to<br />
<strong>Hero</strong> <strong>Designer</strong>. Place the<br />
cursor in the Background/<br />
History field of the<br />
Background tab and type<br />
Ctrl-V.
8 ■ Using <strong>Hero</strong> <strong>Designer</strong> <strong>Hero</strong> <strong>Designer</strong> <strong>6th</strong> <strong>Edition</strong><br />
A NOTE ABOUT<br />
ENTERINg<br />
CHARACTERISTICS<br />
When a Characteristic’s<br />
value changes, <strong>Hero</strong><br />
<strong>Designer</strong> automatically<br />
updates all other values<br />
based on it (such as Rolls,<br />
entries in the Notes<br />
column, and for HERO<br />
System Fifth <strong>Edition</strong><br />
templates, Figured<br />
Characteristics). It also<br />
checks for illegal values<br />
(such as selling back<br />
more than one Figured<br />
Characteristic). This can<br />
occasionally cause minor<br />
problems.<br />
For example, suppose you<br />
have already sold back the<br />
character’s STUN and you<br />
want to change the PD<br />
from its current value of<br />
6 to 10. If you attempt to<br />
do this by deleting the 6<br />
from the value selector box<br />
for PD and typing the 10<br />
in directly, as soon as you<br />
type the 1, <strong>Hero</strong> <strong>Designer</strong><br />
updates all values and<br />
performs the appropriate<br />
checks. Because the<br />
program thinks you have<br />
entered a 1 as the new PD<br />
and therefore, have sold<br />
back a second Figured<br />
Characteristic, it issues<br />
the appropriate error and<br />
restores the value to 6. In<br />
such a case, you can then<br />
either change the PD using<br />
< and > or by typing the 10<br />
in front of the 6 and then<br />
deleting the 6.<br />
Files menu. Some templates label the Character<br />
Name and Alternate IDs fields differently. For<br />
example, the Vehicle template, labels them as<br />
Vehicle Name and Vehicle Model.<br />
Also in the Character Information section is<br />
the Image field which lets you add an image to the<br />
character. To do so, click the Click to assign button.<br />
A standard file selector dialog appears. Select the<br />
file containing the image and click Set Image. The<br />
image must be in JPG, GIF, or PNG format. To<br />
remove an image assigned to the Image field, click<br />
the Clear Image… button beneath the image. To<br />
change an image, click on it and use the file selector<br />
dialog to choose the new image.<br />
Background Tab<br />
The Background tab (shown on the previous<br />
page) contains a number of fields relating to the<br />
appearance and background of the character. The<br />
exact fields that are available will depend upon the<br />
character template currently in use. Fill in these<br />
fields as desired to describe the character and his<br />
background.<br />
The standard AI, Automation, Base, Computer,<br />
and Vehicle templates disable this tab.<br />
Characteristics Tab<br />
The Characteristics tab lets you set the basic<br />
values for all Characteristics available in the<br />
current template as well as values for Running,<br />
Swimming, and Leaping (if appropriate) which for<br />
purposes of this discussion all will be considered<br />
Characteristics. For each available Characteristic,<br />
there are seven columns.<br />
The Value column has a value selector box<br />
used to set the value for the current Characteristic.<br />
This is the basic value of the Characteristic. If<br />
you want to attach any Limitations or Advantages<br />
to all or part of the Characteristic’s value, you<br />
should buy that part of the value as a Power (see<br />
“Characteristics as Powers” on page 21). You can<br />
move from one Characteristic to the next with the<br />
Tab key. The Char column displays the name of the<br />
Characteristic.<br />
The Base column displays the starting value for<br />
the Characteristic. For HERO System Sixth <strong>Edition</strong><br />
characters, the character template specifies these<br />
starting values. For HERO System Fifth <strong>Edition</strong><br />
characters, the character template supplies the<br />
starting values for Primary Characteristics while<br />
the starting values for Figured Characteristics<br />
are calculated from the appropriate Primary<br />
Characteristics.<br />
The Cost column displays the cost in Character<br />
Points for the current value of the Characteristic.<br />
The Total column shows the total value of the<br />
Characteristic. This is the value from the Value<br />
column plus any Characteristics from Powers<br />
(including Characteristics bought as Powers).<br />
Because Characteristics from Powers can be bought<br />
as affecting primary values, affecting secondary<br />
values, or not affecting totals, the Total column<br />
might contain a split value (for example, 13/23).<br />
In such cases, the value to the left of the / is the<br />
primary value (the total of the Value column plus<br />
any Characteristics from Powers bought as affecting<br />
the primary value). The value to the right of the<br />
/ is the secondary value (the total of the primary<br />
value plus any Characteristics from Powers bought<br />
as affecting the secondary value). For example, a<br />
character with a basic STR of 10 and a STR of 20 in<br />
his superheroic form (bought as a Power with the<br />
Only in Alternate Identity Limitation and affecting<br />
the secondary value) would have 10/20 in the Total<br />
column.<br />
The Roll column shows the Characteristic Roll<br />
associated with that Characteristic (if any).<br />
The Notes column shows other information<br />
related to the Characteristic. For example, the Notes<br />
entry for INT displays the character’s PER Roll.<br />
Finally, the bottom line on the tab shows<br />
the total number of Character Points spent on<br />
Characteristics with the total points spent on the<br />
character after it in parentheses.<br />
CHARACTERISTIC MAxIMA<br />
For HERO System Fifth <strong>Edition</strong> templates,<br />
the Characteristics tab also contains a checkbox<br />
labeled Normal Characteristic Maxima and a<br />
dropdown list with options for age restrictions.<br />
These appear beneath the Characteristic list but<br />
above the total line.<br />
The availability of the Normal Characteristic<br />
Maxima checkbox and its effect on the character
<strong>Hero</strong> <strong>Designer</strong> <strong>6th</strong> <strong>Edition</strong> Using <strong>Hero</strong> <strong>Designer</strong> ■ 9<br />
depends upon the current template and campaign<br />
rules.<br />
When using the standard Fifth <strong>Edition</strong> Normal<br />
or <strong>Hero</strong>ic templates, checking the Normal<br />
Characteristic Maxima box adds a 0 point<br />
Normal Characteristic Maxima Disadvantage to<br />
the Disadvantages tab. If you also select an age<br />
restriction, the appropriate Age Disadvantage is<br />
added as well.<br />
When using the standard Fifth <strong>Edition</strong><br />
Superheroic template, checking the Normal<br />
Characteristic Maxima box adds a basic 20 point<br />
Normal Characteristic Maxima Disadvantage to<br />
the Disadvantages tab. If you also select an age<br />
restriction, an appropriate Age Disadvantage is<br />
added as well.<br />
The campaign rules described in the “Campaign<br />
Rules” section on page 36 can specify whether or not<br />
the Normal Characteristic Maxima checkbox is<br />
automatically checked on Fifth <strong>Edition</strong> templates<br />
and whether or not the user can change this<br />
selection.<br />
The Normal Characteristic Maxima checkbox<br />
is never available (and cannot be made available by<br />
the campaign rules) with Fifth <strong>Edition</strong> Vehicle, Base,<br />
Automaton, Computer, or AI templates.<br />
HERO System Sixth <strong>Edition</strong> has implements<br />
characteristic maxima differently. There is<br />
no Normal Characteristic Maxima or Age<br />
Complication. Instead, GMs, who want to use<br />
Character Maxima for their campaigns, should<br />
select an appropriate set of maxima for each<br />
campaign. <strong>Hero</strong> <strong>Designer</strong> <strong>6th</strong> <strong>Edition</strong> supports this<br />
approach by allowing you to specify these Character<br />
Maxima in the campaign rules. See the “Campaign<br />
Rules” section on page 36 for details.<br />
Ability And Complications<br />
Tabs<br />
The ability and Complications tabs let you add<br />
abilities and Complications to a character. These<br />
tabs all have a layout similar to the Powers tab<br />
shown in the screenshot on the next page.<br />
On the left side is the character sheet pane. This<br />
pane shows the items purchased for the character in<br />
roughly the same format as they will appear when<br />
you export the character. At the top of this pane is<br />
the character sheet title bar. This title bar contains<br />
the name of the tab followed by the number of<br />
Character Points spent on this tab with the total<br />
points spent on the character and the maximum<br />
points available in parentheses after it.<br />
Beneath the pane’s toolbar is the character sheet<br />
menu bar. This menu bar features the Edit, List,<br />
and Sorting menus as well as tab-specific menus<br />
such as the Power Frameworks menu shown in the<br />
screenshot.<br />
On the right side is the available item pane.<br />
This pane displays the items that can be currently<br />
added to the character. It has two subtabs. One<br />
shares the name of the overall tab (for example,<br />
Powers for the Powers tab) and the other is the<br />
Prefabs subtab. The first subtab displays the items<br />
defined in the current character template (along<br />
with symbols similar to those used in the HERO<br />
System Fifth <strong>Edition</strong> and HERO System Sixth <strong>Edition</strong><br />
rulebooks to indicate the item’s potential for abuse).<br />
The second subtab displays the items defined in any<br />
currently loaded Prefabs.<br />
At bottom of the available item pane are the<br />
Select and Define buttons. The Select button selects<br />
the currently highlighted item for purchase and<br />
brings up the appropriate dialog while the Define<br />
button shows the definition of the highlighted item.<br />
To select a given tab, click the tab name or type<br />
Alt-1 to select the first tab, Alt-2 to select the second<br />
tab, and so forth.<br />
The following sections describe each of the tabs<br />
and their tab-specific features.<br />
SKILLS TAB<br />
From the Skills tab, you can purchase Skills<br />
(except Martial Arts, which has its own tab). The<br />
character sheet menu bar for this tab contains a<br />
Skill Enhancers menu in addition to the standard<br />
Edit, List, and Sorting menus.<br />
PERKS TAB<br />
From the Perks tab, you can purchase Perks.<br />
The character sheet menu bar for this tab contains<br />
a Perk Enhancers menu in addition to the standard<br />
Edit, List, and Sorting menus. Technically, there<br />
is no such thing as a Perk Enhancer in the HERO<br />
System rules, but because the Well-Connected Skill<br />
Enhancer actually affects the cost of Perks rather<br />
than Skills, it is listed on this menu.<br />
WHERE ARE<br />
DISADvANTAgES?<br />
As you may or may<br />
not know, <strong>Hero</strong> System<br />
Sixth <strong>Edition</strong> replaced<br />
Disadvantages with<br />
Complications in an effort<br />
to better describe their<br />
purpose in the game.<br />
However, the process<br />
of adding and editing<br />
Complications is exactly<br />
the same as adding and<br />
editing Disadvantages.<br />
This manual simply refer<br />
to Complications and<br />
the Complications tab.<br />
Unless otherwise, noted,<br />
this information applies<br />
equally to Disadvantages<br />
and the Disadvantages<br />
tab in HERO System Fifth<br />
<strong>Edition</strong> templates.
10 ■ Using <strong>Hero</strong> <strong>Designer</strong> <strong>Hero</strong> <strong>Designer</strong> <strong>6th</strong> <strong>Edition</strong><br />
TALENTS TAB<br />
From the Talents tab, you can purchase Talents.<br />
The character sheet menu bar for this tab contains<br />
only the standard Edit, List, and Sorting menus.<br />
MARTIAL ARTS TAB<br />
From the Martial Arts tab, you can purchase<br />
Martial Maneuvers, including Weapon Elements<br />
and extra Damage Classes. The character sheet<br />
menu bar for this tab contains only the standard<br />
Edit, List, and Sorting menus.<br />
POWERS TAB<br />
From the Powers tab, you can purchase Powers<br />
including Characteristics, Skills, Perks, and Talents<br />
bought as Powers. As shown in the screen shot<br />
below, the character sheet menu bar for this tab<br />
contains the Power Frameworks menu in addition<br />
to the standard Edit, List, and Sorting menus.<br />
COMPLICATIONS TAB<br />
From the Complications tab, you can assign<br />
Complications to the character. The character sheet<br />
menu bar for this tab contains only the standard<br />
Edit, List, and Sorting menus.<br />
For HERO System Fifth <strong>Edition</strong> templates, this<br />
is called the Disadvantages tab and is used to assign<br />
Disadvantages to the character.<br />
EqUIPMENT TAB<br />
The Equipment tab only appears when it is<br />
enabled by the current campaign rules, as described<br />
in the “Campaign Rules” section on page 36.<br />
When available, you can use this tab for<br />
assigning equipment that does not cost Character<br />
Points. In general, the Equipment tab is identical<br />
to the Powers tab. However, when you purchase<br />
items on the Equipment tab, the point cost of those<br />
items is not included in the character’s totals and<br />
you have the ability to specify equipment-specific<br />
information about each, such as price and weight.<br />
Superheroic characters who must pay points for<br />
their equipment purchase it on the Powers tab.<br />
SEPARATINg TABS FROM MAIN WINDOW<br />
At times, you may find it useful to be able to<br />
view more than one <strong>Hero</strong> <strong>Designer</strong> tab at a time.<br />
You can do this by tearing off (that is, separating)<br />
tabs from the main window.<br />
To separate a tab, first select desired tab and then<br />
select Tear Off Selected Tab from the Tools menu.<br />
The selected tab is removed from the main <strong>Hero</strong><br />
<strong>Designer</strong> window and appears as a separate window<br />
that can be moved and resized on its own. To return<br />
the tab to the main <strong>Hero</strong> <strong>Designer</strong> window, simply<br />
close the window containing the separated tab.
<strong>Hero</strong> <strong>Designer</strong> <strong>6th</strong> <strong>Edition</strong> Using <strong>Hero</strong> <strong>Designer</strong> ■ 11<br />
ADDINg ABILITIES AND<br />
COMPLICATIONS<br />
At the core of the HERO System is the way you<br />
can add abilities (Skills, Perks, Talents, Martial<br />
Maneuvers, and Powers) to a character and balance<br />
those abilities with Complications. In addition,<br />
you can customize these abilities with Adders and<br />
Modifiers to create specific effects.<br />
For details on adding Lists and Frameworks, see<br />
the “Working With Lists And Frameworks” section<br />
on page 25.<br />
Regardless of the ability or Complication with<br />
which you are working, the basic procedure for<br />
adding, deleting, or moving it is the same.<br />
Adding An Item<br />
To add an item to the character, you should first<br />
set where on the character sheet pane you want<br />
the item to appear. Where the new item appears<br />
depends primarily on whether or not an entry on<br />
that pane is currently highlighted. Clicking once<br />
on an item toggles it between highlighted and not<br />
highlighted.<br />
If an item on the character sheet pane is<br />
highlighted, the new item is inserted either before<br />
or after the highlighted item depending on whether<br />
the Insert button is currently set to Insert Before<br />
or Insert After. Clicking the Insert button toggles it<br />
between the two values.<br />
If no item on the character sheet pane is<br />
highlighted, the new item is inserted either at the<br />
top or end of the character sheet pane depending on<br />
whether the Insert button is currently set to Insert<br />
At Top or Insert At End. Clicking the Insert button<br />
toggles it between the two values.<br />
Then, to add an item, select the item from the<br />
available item list shown in the right pane. You<br />
can do this either by double clicking on the item<br />
or by highlighting the item and clicking Select or<br />
pressing Enter.<br />
The dialog for the selected item appears. Fill<br />
in the dialog as appropriate (see the “Attaching<br />
Adders And Modifiers” section on page 12 as well as<br />
the section on the type of ability or Complication<br />
being added) and click OK. A new item including<br />
all values and options specified in the dialog and<br />
all attached Adders and Modifiers appears on the<br />
character sheet pane in the desired location.<br />
You can also add an item to the character sheet<br />
by right-clicking on the item in the available item<br />
list. When you add an item in this way, no dialog<br />
appears and the item is added at its default value.<br />
When adding an item to the character sheet<br />
pane, a Duplicate Purchase dialog may appear<br />
if you already added that item to the character,<br />
asking if you want to purchase the item again.<br />
Click Yes to add the item again. Click No to not<br />
add the item. The Duplicate Purchase dialog<br />
appears for multiple purchases of virtually all Skills,<br />
Perks, Talents, and Martial Maneuvers. It also<br />
appears for multiple purchases of Powers that are<br />
generally only purchased once for a given character.<br />
It does not appear at all for duplicate purchases<br />
of Complications. Whether or not this warning<br />
appears can be set on the Preferences dialog as<br />
described in the “Application Preferences” section<br />
on page 33.<br />
Deleting An Item<br />
To delete an item from the character sheet pane,<br />
highlight the item and either click the Delete button<br />
or press the Delete key. You can also delete an item<br />
by editing it (see “Editing An Item” below) and<br />
clicking the Delete button on the item’s dialog box.<br />
Finally, you can simply right-click on the item and<br />
select Delete from the pop-up menu that appears.<br />
Whichever method you choose, a prompt<br />
appears asking you to confirm the deletion. Click<br />
Yes to delete the item. Click No to change your<br />
mind and not delete it. You can turn off the need for<br />
confirming deletions on the Preferences dialog as<br />
described in the “Application Preferences” section<br />
on page 33.<br />
Moving An Item<br />
You can rearrange the order of items on the<br />
character sheet pane by moving items up or down.<br />
To move an item, highlight it and click either the<br />
Down-Arrow button or the Up-Arrow button. As<br />
you might expect, the Down-Arrow button moves<br />
the item down the pane and the Up-Arrow button<br />
moves the item up the pane.<br />
As an alternative, you can move an item up or<br />
down the character sheet pane by right-clicking<br />
on the item and selecting either Move Up or Move<br />
Down from the pop-up menu that appears.<br />
You can also rearrange items using the<br />
techniques described in the “Copying, Cutting, and<br />
Pasting” section on page 15 or by sorting as described<br />
on page 16.<br />
Editing An Item<br />
After adding an item to the character sheet pane,<br />
you may decide there is something that you want<br />
to change about it. You can edit such an item by<br />
double clicking on the item’s Cost or END, by rightclicking<br />
on the item and selecting Edit from the<br />
pop-up menu that appears, or by highlighting the<br />
item and clicking Edit or pressing Enter.<br />
The dialog for the item to be edited appears.<br />
Make your changes and click OK. The character<br />
sheet pane is updated to show the edited item.<br />
Naming An Item<br />
Dialogs for all items (except Complications)<br />
include a Name field. This field is the name by<br />
which the fully constructed item is known. For
12 ■ Using <strong>Hero</strong> <strong>Designer</strong> <strong>Hero</strong> <strong>Designer</strong> <strong>6th</strong> <strong>Edition</strong><br />
MODIFIERS AND<br />
TEMPLATES<br />
The actual lists of<br />
Modifiers shown in the<br />
Select Modifiers dialog<br />
depend are limited to the<br />
Modifiers defined in the<br />
current character template.<br />
Not all templates define all<br />
Modifiers. For example,<br />
the STR Minimum<br />
Limitation is not available<br />
in the Superheroic<br />
template because it is<br />
inappropriate for the<br />
superhero genre.<br />
example, if Captain Righteous’ Telekinesis is known<br />
as the “Hand of Righteousness” you would enter<br />
that in the Name field of the Telekinesis dialog.<br />
This name appears in italics at the beginning of the<br />
item’s entry on the character sheet pane.<br />
Changing The Text Of An Item<br />
When you add an item, the descriptive text<br />
for that item appears in the second column of<br />
the character sheet pane. This column is labeled<br />
appropriately with the type of ability displayed<br />
on the tab. For example, it is labeled Power on<br />
the Powers tab and Skill on the Skills tab. This<br />
descriptive text is editable.<br />
To edit an item’s descriptive text, double-click<br />
on that text. You can now edit it. When you are<br />
finished editing, press Enter. The edited text is now<br />
displayed in blue and will not change regardless of<br />
any changes you make to the ability or its Modifiers.<br />
At any point, you can reset the descriptive text to<br />
the item’s normal display by deleting all the edited<br />
descriptive text and pressing Enter.<br />
Attaching Adders And<br />
Modifiers<br />
You can customize any ability by attaching<br />
Adders and Modifiers. There are four types of<br />
Adders and Modifiers: ability-specific Adders,<br />
standard Modifiers (that is, Advantages and<br />
Limitations), Custom Modifiers, and Custom<br />
Adders. Regardless of type, you attach all Adders<br />
and Modifiers using the ability’s dialog. Each<br />
ability’s dialog has a large text area that displays<br />
available ability-specific Adders as well as any other<br />
Adders and Modifiers you have attached.<br />
Some Adders and Modifiers have value selector<br />
boxes or dropdown lists that you can use to set<br />
details of the Adder or Modifier. Also, remember<br />
you can edit the text of an Adder or Modifier to<br />
appear however you would like on the character<br />
sheet pane.<br />
In addition, if an Adder or Modifier has a blue<br />
question mark near their cost, clicking on the<br />
question mark brings up a definition for the Adder<br />
or Modifier.<br />
As you attach, edit, and remove Adders and<br />
Modifiers, <strong>Hero</strong> <strong>Designer</strong> automatically adjusts the<br />
Real and Active Cost displayed for the ability.<br />
Additionally, when you attach a Modifier to an<br />
ability, a Display Active Points checkbox is added<br />
to the ability’s dialog. Checking this box includes<br />
the Active Points in an ability in that’s ability’s<br />
display on the character sheet pane.<br />
For details on using Adders and Modifiers with<br />
Lists and Frameworks, see the “Working With Lists<br />
And Frameworks” section on page 25.<br />
ABILITy-SPECIFIC ADDERS<br />
Several abilities have Adders that are specific to<br />
that ability. Entries for these Adders always appear<br />
on the ability’s dialog. To attach one of these Adders<br />
to the ability, check the box next to it. To remove an<br />
Adder, uncheck its box.<br />
STANDARD MODIFIERS<br />
Standard Modifiers include Advantages and<br />
Limitations that you can attach to almost any<br />
ability. To add a standard Modifier, click the Add<br />
Modifier… button. The Select Modifiers dialog<br />
appears.<br />
This dialog features five selectable lists:<br />
Advantages, Limitations, Recently Selected,<br />
Unavailable Advantages, and Unavailable<br />
Limitations. The Advantages and Limitations<br />
lists display the current available (see the “Modifier<br />
Intelligence” sidebar on page 13) Modifiers of<br />
those types. The Recently Selected list displays,<br />
in alphabetical order, up to the last 40 Modifiers<br />
(including the details you specified for each)<br />
you have assigned to abilities. This makes it easy<br />
to assign exactly the same Modifier to multiple<br />
abilities across multiple characters. The Recently<br />
Selected list is preserved when you exit <strong>Hero</strong><br />
<strong>Designer</strong>. Finally, the Unavailable Advantages<br />
and Unavailable Limitations lists display those<br />
Advantages and Limitations that are currently<br />
unavailable due to Modifier intelligence. While you<br />
cannot add these Modifiers to the current ability,<br />
you can see why a given Modifier is unavailable by<br />
either or double-clicking on it or by highlighting it<br />
and clicking the View Reason button.
<strong>Hero</strong> <strong>Designer</strong> <strong>6th</strong> <strong>Edition</strong> Using <strong>Hero</strong> <strong>Designer</strong> ■ 13<br />
If you have turned off Modifier intelligence<br />
in the Preferences dialog as described in the<br />
“Application Preferences” section on page 33,<br />
the Unavailable Advantages and Unavailable<br />
Limitations lists are renamed Non-Recommended<br />
Advantages and Non-Recommended Limitations<br />
and the Modifiers in these lists are available to<br />
attach to the ability.<br />
To add a Modifier from any list, either double<br />
click on the Modifier or highlight it and click Select.<br />
Once selected, a dialog for the Modifier appears.<br />
A Modifier dialog sometimes includes Adders<br />
and multipliers of its own. These Adders and<br />
multipliers adjust the Modifier’s value. For example,<br />
a +½ Adder adds +½ to the Modifier’s value, while a<br />
x2 multiplier doubles that value.<br />
The Comments field lets you enter text to<br />
appear in parentheses with the Modifier value on<br />
the character sheet. Fill out the dialog and click OK.<br />
The Modifier appears at the bottom of the Modifier<br />
list for the ability with a checked box next to it and<br />
the word Edit in blue near its cost.<br />
After adding a Modifier, you are returned to<br />
the Select Modifiers dialog so you can add more<br />
Modifiers. When you are finished adding Modifiers<br />
to an ability, click Done.<br />
To edit a Modifier, click on the word Edit.<br />
To remove a Modifier, uncheck the box next to<br />
it. The next time you edit the item on the character<br />
sheet pane, the Modifier will not be listed.<br />
CUSTOM MODIFIERS<br />
Custom Modifiers let you add Advantages or<br />
Limitations that are not defined in the current<br />
character template.<br />
To add a Custom Modifier, click the Add<br />
Modifier button and when the Select Modifiers<br />
dialog appears, click the Custom Modifier button.<br />
The Custom Modifier dialog appears.<br />
Edit the text “Custom Modifier” in the Display<br />
field to the name you want the Advantage or<br />
Limitation to have and set the value of the Modifier<br />
using the value selector box<br />
in the Value field.<br />
Negative values are<br />
Limitations; positive<br />
values are Advantages.<br />
Additionally, you can enter<br />
text in the Comments<br />
field. This text will appear<br />
in parentheses with the<br />
Modifier value on the<br />
character sheet pane. Click<br />
OK to add the Modifier to<br />
the current ability and you<br />
are returned to the Select<br />
Modifiers dialog so you can<br />
add more Modifiers.<br />
Custom Modifiers may<br />
be edited and removed<br />
in the same manner as<br />
Standard Modifiers.<br />
You can use Custom Modifiers to add new<br />
Advantages or Limitations from house rules or<br />
newer rules supplements that have not yet been<br />
incorporated into <strong>Hero</strong> <strong>Designer</strong>. They are also<br />
useful for adding versions of standard Modifiers<br />
with non-standard values. Finally, they be used<br />
to add a Modifier that is currently unavailable for<br />
the ability. Often, such Modifiers are unavailable<br />
because they would normally be illegal in<br />
the current circumstance (see the “Modifier<br />
Intelligence” sidebar) but may be needed because of<br />
an unusual ability construct.<br />
CUSTOM ADDERS<br />
Custom Adders adjust an ability’s Active Cost.<br />
They can be positive or negative. Positive Custom<br />
Adders increase the Active Cost, while negative<br />
Custom Adders decrease it. You can use Custom<br />
Adders for a variety of purposes. Possible uses<br />
include Adders specified in house rules, cost<br />
adjustments due to house rules or unusual ability<br />
constructs, or to represent reduced cost abilities<br />
(such as making a Skill into an Everyman Skill).<br />
To add a Custom Adder, click the Custom<br />
Adder button. An entry for the Custom Adder<br />
appears on the ability dialog with a checked box<br />
next to it. Edit the text “Custom Adder” to indicate<br />
what the Custom Adder represents and set the<br />
MODIFIER<br />
INTELLIgENCE<br />
When you try to attach a<br />
Modifier, <strong>Hero</strong> <strong>Designer</strong><br />
lists only those Advantages<br />
and Limitations that<br />
are currently valid to be<br />
attached to the ability.<br />
For example, if the ability<br />
is not ranged, the No<br />
Range Limitation is not<br />
listed. Similarly, if the<br />
ability does not have an<br />
Endurance cost of 0, the<br />
Persistent Advantage is<br />
not available. However,<br />
if you add the Reduced<br />
Endurance Advantage<br />
to lower the END cost<br />
to zero, Persistent then<br />
becomes available.<br />
Modifier intelligence also<br />
prevents Modifiers that<br />
should be attached only<br />
once from being attached<br />
multiple times.<br />
Other aspects of Modifier<br />
intelligence, like mutual<br />
exclusivity, affect abilityspecific<br />
Modifiers and<br />
Adders. Attaching certain<br />
Modifiers and Adders<br />
prohibits attaching others.<br />
Once you attach one, any<br />
mutually exclusive Adders<br />
or Modifiers are grayed<br />
out. Removing that Adder<br />
or Modifier makes the<br />
others available again.<br />
If, due to house rules or<br />
unusual ability constructs,<br />
Modifier intelligence does<br />
not let you add a desired<br />
Modifier or Adder, you<br />
can use a Custom Modifier<br />
or Custom Adder and edit<br />
it appropriately.<br />
You can check to see if all<br />
Modifiers on a character<br />
are valid by selecting<br />
Valid all Modifiers on<br />
Character from the<br />
Current Character<br />
menu. A dialog showing<br />
the offending Modifiers<br />
appears and all abilities<br />
with offending Modifiers<br />
appear in red on the<br />
character sheet pane.<br />
You can turn off Modifier<br />
Intelligence from the<br />
Preferences dialog<br />
as described in the<br />
“Application Preferences”<br />
section on page 33. This<br />
also turns off the ability to<br />
validate all Modifiers.
14 ■ Using <strong>Hero</strong> <strong>Designer</strong> <strong>Hero</strong> <strong>Designer</strong> <strong>6th</strong> <strong>Edition</strong><br />
SPECIAL EFFECTS<br />
The following standard<br />
special effects are available<br />
for all <strong>Hero</strong> <strong>Designer</strong><br />
abilities:<br />
■ Acid<br />
■ Alien<br />
■ Air/Wind<br />
■ Animal Body<br />
■ Control Chi<br />
■ Cosmic Energy<br />
■ Cyberkinesis<br />
■ Darkness<br />
■ Density Alteration<br />
■ Dimensional<br />
Manipulation<br />
■ Earth/Stone<br />
■ Electricity<br />
■ Emotion Control<br />
■ Fire/Heat<br />
■ Force<br />
■ Gravity<br />
■ Ice/Cold<br />
■ Illusion<br />
■ Kinetic Energy<br />
■ Light<br />
■ Luck<br />
■ Magic/Mystic<br />
■ Magnetism<br />
■ Martial Arts<br />
■ Matter Manipulation<br />
■ Mental/Psionic<br />
■ Metamorphic<br />
■ Mutant<br />
■ Precognition<br />
■ Radiation<br />
■ Serum Based<br />
■ Shape Alteration<br />
■ Size Alteration<br />
■ Sleep/Dream<br />
■ Solar/Celestial<br />
■ Sonic<br />
■ Speedster<br />
■ Strength/Toughness<br />
■ Stretching<br />
■ Telekinetic<br />
■ Teleportation<br />
■ Time<br />
■ Vibration<br />
■ Water<br />
■ Weather<br />
■ Wood/Plant<br />
■ Miscellaneous<br />
value of the Adder using the value selector box. To<br />
remove a Custom Adder, uncheck the box next to<br />
it. The next time you edit the item on the character<br />
sheet pane, the Adder will not be listed.<br />
Copying, Cutting, And<br />
Pasting Modifiers<br />
Sometimes an ability has a set of Modifiers that<br />
you would to copy or move to one or more other<br />
abilities or to a List or Framework. You can do this<br />
by right-clicking on the item on the character sheet<br />
pane that has the modifiers you want to copy or<br />
move and selecting the appropriate item from the<br />
pop-up menu that appears.<br />
To copy an ability’s Modifiers but still leave<br />
them attached to the original ability, select Copy<br />
Modifiers from the menu. To remove an ability’s<br />
Modifiers so that they can be moved to another<br />
ability, select Cut Modifiers from the menu.<br />
Once you have cut or copied a set of Modifiers,<br />
right-click on the item (or List or Framework) to<br />
which you want to add those Modifiers, and select<br />
Paste Modifier from the pop-up menu that appears.<br />
Any Modifiers that are valid to be added to the<br />
target item (or List or Framework) are added.<br />
Cost Multipliers<br />
When the Cost Multipliers checkbox of the<br />
Rules tab on the View/Edit Rules dialog (see the<br />
“Campaign Rules” section on page 36) is checked, a<br />
Cost Multiplier button appears on each ability’s<br />
dialog. When you click this button, the Cost<br />
Multiplier dialog appears.<br />
On this dialog, you can specify a value by which<br />
the cost of the ability will be multiplied. If you want<br />
to double the normal cost of the ability, you would<br />
enter “2” in the Cost Multiplier field. Similarly,<br />
if you want the cost to be a third of normal, you<br />
would enter “.333333” in that field.<br />
As noted on the dialog, cost multipliers are not<br />
officially part of the HERO System Fifth <strong>Edition</strong> or<br />
the HERO System Sixth <strong>Edition</strong> rules. However, they<br />
do have their uses in optional rules. At least one<br />
Fantasy <strong>Hero</strong> magic system suggests charging onethird<br />
normal cost for spells. Additionally, individual<br />
GMs may find this feature useful for implementing<br />
their campaigns’ house rules.<br />
Assigning Special Effects<br />
Special effects can play a big part in many HERO<br />
System games and <strong>Hero</strong> <strong>Designer</strong> lets you quickly<br />
and easily assign a special effect to each ability. To<br />
do so, use the Special Effect dropdown list on the<br />
ability’s dialog to select the desired special effect.<br />
See the “Standard Special Effects” sidebar for a list<br />
of the available special effects.<br />
If your desired special effect is not available in<br />
the dropdown list, you can type your special effect<br />
directly into the Special Effect field.<br />
Assigned special effects will not appear on the<br />
character sheet pane and will not normally be<br />
exported unless the Export Format used specifically<br />
exports them.<br />
Attaching Notes<br />
Occasionally, it is handy to add extra notes to<br />
an item’s description. To do so, click the Create<br />
Notes… button on the ability’s dialog when adding<br />
or editing an item. The Notes for… dialog appears.<br />
On this dialog, enter the notes you want to<br />
attach in the text box. If you do not want the notes<br />
to appear on the character sheet pane, and thus, not<br />
on an exported version of the character, uncheck<br />
the Include in Print Out box. Click Close to close<br />
the dialog.<br />
When an item has a note attached, the Create<br />
Notes… button changes to an Edit Notes… button,<br />
which lets you edit the attached notes. If you delete<br />
all the text on the Notes for… dialog, the Edit<br />
Notes… button reverts to a Create Notes… button.<br />
Possible uses for notes includes specifying<br />
additional information about the ability (such as the<br />
Sense Groups that can detect a Power), providing<br />
further details about Modifiers attached to the<br />
ability, and so forth.<br />
Associating Files<br />
Several HERO System abilities (most notably,<br />
the Follower and Vehicles & Bases Perks and the<br />
Duplication, Multiform, and Summon Powers) have<br />
costs which are based on another related HERO<br />
System character. <strong>Hero</strong> <strong>Designer</strong> provides two<br />
methods for dealing with such an ability.<br />
The first method is simply to enter the<br />
appropriate costs for the related character on the<br />
ability’s dialog. However, this means that any time
<strong>Hero</strong> <strong>Designer</strong> <strong>6th</strong> <strong>Edition</strong> Using <strong>Hero</strong> <strong>Designer</strong> ■ 15<br />
you make a change in the related character, you<br />
need to update the costs on the ability’s dialog.<br />
The second method is to directly associate the<br />
related character with the main character’s ability<br />
by clicking the Associate File… button on the<br />
ability’s dialog (see the Summon dialog above).<br />
A standard file selector dialog appears. Select the<br />
<strong>Hero</strong> <strong>Designer</strong> character file you wish to associate<br />
and click Associate Character. The ability’s dialog<br />
is updated with the information from the related<br />
character and the cost of the ability is calculated.<br />
Once you have associated a file with an ability,<br />
any changes you make to the associated file (and<br />
save) will be reflected on the ability’s dialog and in<br />
the ability’s cost.<br />
Also, once a file is associated with an ability, the<br />
Associate File… button is replaced with a Remove<br />
File Association button. Clicking this button<br />
removes the file association but leaves the last<br />
values received from the previously associated file.<br />
viewing An Ability’s<br />
Definition<br />
To view an ability’s definition, click the Define<br />
button on the ability’s dialog when adding or<br />
editing an item. Alternatively, you can right-click<br />
on an item on the character sheet and select Define<br />
from the pop-up menu that appears. In either case,<br />
a pop-up box appears showing the definition. Click<br />
anywhere on the box to dismiss it. Similarly, you<br />
can view the definition of a Modifier by clicking on<br />
the Define button of its dialog.<br />
When the Show Popup definitions in selection<br />
lists checkbox is checked on the Display tab of the<br />
Preferences dialog as described in the “Application<br />
Preferences” section on page 33, you can view an<br />
ability’s definition by simply moving your mouse<br />
over the ability’s name in a selection list.<br />
Copying,<br />
Cutting, And<br />
Pasting<br />
As discussed earlier,<br />
you can reorder items on<br />
the character sheet pane<br />
with the Down-Arrow and<br />
Up-Arrow buttons. These<br />
buttons work great if you<br />
are just moving items up<br />
or down a few positions.<br />
However, if you want to<br />
move an item freely to<br />
any point on the character<br />
sheet pane or even copy or<br />
move an item to another<br />
character, you can use the<br />
Edit menu on the character<br />
sheet menu bar. This menu<br />
has three items: Cut, Copy,<br />
and Paste.<br />
To remove an item from the character sheet pane<br />
and place it on the <strong>Hero</strong> <strong>Designer</strong> clipboard, select<br />
Cut.<br />
To copy an item (without removing it) from the<br />
character sheet and place it on the <strong>Hero</strong> <strong>Designer</strong><br />
clipboard, select Copy.<br />
The Paste entry on the menu is only available if<br />
the current item on the <strong>Hero</strong> <strong>Designer</strong> clipboard<br />
can be added to the current tab. Normally, items<br />
copied or cut from a tab can only be added to that<br />
same tab (on any character). However, items from<br />
the Skills, Perks, Talents, Powers, and Equipment<br />
tabs can be added to the Powers or Equipment<br />
tabs. In addition, Skills, Perks, and Talents<br />
purchased as Powers or Equipment can be added to<br />
the Skills, Perks, and Talents tabs, respectively.<br />
Pasting an item to the character sheet pane of<br />
a tab works in the same way as adding an item. As<br />
described in the “Adding an Item” section on page<br />
11, you must first select where to paste the item on<br />
the character pane. This is based on whether or not<br />
an item on the pane is highlighted and the current<br />
setting of the Insert button. Then, select Paste<br />
from the Edit menu to add the item in the desired<br />
location.<br />
Alternatively, you can access this functionality<br />
by right-clicking on an item and selecting Cut,<br />
Copy, or Paste from the pop-up menu that appears.<br />
Note that once an item is on the <strong>Hero</strong> <strong>Designer</strong><br />
clipboard, it remains there until another cut or<br />
copied item replaces it or you exit <strong>Hero</strong> <strong>Designer</strong>.<br />
Thus, you can cut or copy an item from one<br />
character and paste it on another.<br />
Items placed on the <strong>Hero</strong> <strong>Designer</strong> clipboard<br />
are also placed on the system clipboard and can be<br />
pasted into other applications.
16 ■ Using <strong>Hero</strong> <strong>Designer</strong> <strong>Hero</strong> <strong>Designer</strong> <strong>6th</strong> <strong>Edition</strong><br />
UNUSUAL<br />
EvERyMAN SKILLS<br />
Everyman Skills vary from<br />
campaign to campaign<br />
and not all of them<br />
are the standard free<br />
8- Familiarity that <strong>Hero</strong><br />
<strong>Designer</strong> handles easily.<br />
For example, the sample<br />
Everyman Skill list for<br />
modern campaigns in<br />
the HERO System Sixth<br />
<strong>Edition</strong> rules includes a<br />
Professional Skill at 11and<br />
Transport Familiarity:<br />
Small Motorized Ground<br />
Vehicle. Both are nonstandard,<br />
so you must<br />
use another method to<br />
represent these free Skills.<br />
That method is Custom<br />
Adders. For each of these<br />
Everyman Skills, purchase<br />
the Skill normally<br />
and attach a negative<br />
Custom Adder to bring<br />
the cost down to 0 and<br />
edit “Custom Adder” to<br />
“Everyman”.<br />
When creating several<br />
characters for a campaign<br />
that has unusual Everyman<br />
Skills, you may find useful<br />
to create a Prefab for the<br />
campaign’s Everyman<br />
Skills. Prefabs are<br />
described in the “Prefabs<br />
And Package Deals”<br />
chapter on page 40.<br />
Sorting<br />
In addition to being able to rearrange items on<br />
the character sheet pane by moving items up and<br />
down or by cutting, copying, and pasting, you can<br />
also sort all the items on the character sheet pane of<br />
a given tab.<br />
To sort the items on a tab’s character sheet, use<br />
the Sorting menu from the character sheet menu<br />
bar. First select either Ascending or Descending<br />
to specify whether the items are to be sort in<br />
ascending or descending order. When you select<br />
one these two menu items, you are then presented<br />
with four options for sorting the items on the<br />
character sheet: by Type, by Display, by Real Cost,<br />
and by Active Cost.<br />
If you select by Real Cost or by Active Cost, the<br />
items on the character sheet are sorted in ascending<br />
or descending numerical order based on the chosen<br />
cost. If you select by Display, the items are sorted in<br />
ascending or descending alphabetical order based<br />
on the text displayed for each item. Finally, if you<br />
select by Type, the items are sorted in ascending<br />
or descending alphabetical order based on default<br />
Display field for each item. For example, all Blasts<br />
will be sorted together.<br />
If the character sheet contains any lists or<br />
Power Frameworks, the items within each list or<br />
Framework are also sorted<br />
according to the selected<br />
criteria.<br />
Finally, if the sort being<br />
performed does not affect<br />
an item, it is not moved.<br />
This means, for example, if<br />
you first sort Complications<br />
in descending order by<br />
their Active Costs and then<br />
resort in ascending order<br />
by their type, you get a list<br />
of Complications grouped<br />
by type (in alphabetical<br />
order) with the individual<br />
Complications within each<br />
grouping appearing in<br />
descending order of their<br />
Active Costs.<br />
Because there is no way<br />
to undo a sorting operation,<br />
you should always save a<br />
character before performing<br />
any sort. This allows you<br />
to easily return to the unsorted version if the sort<br />
yields undesired results.<br />
Skills<br />
In general, Skills are added just like any other<br />
ability. One exception to this is those Skills which<br />
do not have any additional options. Normally, such<br />
Skills are added automatically as though you had<br />
right-clicked on the Skill name. This ability can be<br />
disabled from the Preferences dialog as described<br />
in the “Application Preferences” section on page 33.<br />
If you are adding a Skill which features<br />
additional options, or you are editing a Skill, the<br />
dialog for that Skill appears.<br />
As you can see from the Acrobatics dialog<br />
shown below, this dialog may include several fields.<br />
The Display field shows how the Skill is labeled<br />
on the character sheet pane, that is, it is the actual<br />
name of the Skill. This field is completely editable.<br />
For example, in a Star <strong>Hero</strong> campaign, your GM<br />
might have added a separate Zero-G Acrobatics<br />
Skill that works just like Acrobatics but in a zero-G<br />
environment. The easiest way to add such a Skill to<br />
a character using <strong>Hero</strong> <strong>Designer</strong> is to simply add the<br />
Acrobatics Skill and edit the Display field to read<br />
“Zero-G Acrobatics”. When adding new Skills in<br />
this manner, the Power Skill is a good choice to edit<br />
because it allows you to choose which Characteristic<br />
the Skill is based on.<br />
The Characteristic field shows the Characteristic<br />
on which the Skill Roll is based. For Skills that can<br />
be based on one of a variety of Characteristics (for<br />
example, Knowledge Skill, Professional Skill and<br />
Power), this field contains a dropdown list showing<br />
the available Characteristics (as well as possibly<br />
GENERAL). From this list, you can choose the<br />
Characteristic on which to base the Skill Roll. If you<br />
choose GENERAL, the Skill Roll has a base of 11-.
<strong>Hero</strong> <strong>Designer</strong> <strong>6th</strong> <strong>Edition</strong> Using <strong>Hero</strong> <strong>Designer</strong> ■ 17<br />
The Levels field contains a value selector box<br />
that lets you purchase additional +1s to the Skill<br />
Roll. This field starts at 0 to indicate to the base Skill<br />
Roll.<br />
For Skills that can be purchased as a 8-<br />
Familiarity, the Skill dialog contains a checkbox<br />
labeled Familiarity Only. Check this box to<br />
indicate that you only want a Familiarity with the<br />
Skill. When you do so, the Levels field is grayed out<br />
and an additional checkbox may appear, labeled<br />
Everyman Skill. If the Skill is an Everyman Skill in<br />
the character’s campaign (that is, Familiarity with<br />
the Skill is free), check this box.<br />
Similarly, if the Skill can be purchased as a 10-<br />
Proficiency according to the optional Proficiency<br />
rules in HERO System Sixth <strong>Edition</strong>, the Skill dialog<br />
includes a Proficiency checkbox. Check this box to<br />
purchase the Skill as a Proficiency.<br />
If you only want to purchase bonuses with a Skill<br />
(as used in several racial Templates in Fantasy <strong>Hero</strong>,<br />
for example), check the Skill Levels Only checkbox.<br />
When you do so, the Levels field represents the<br />
number of bonus levels with the Skill.<br />
The dialog for some Skills may have additional<br />
fields that are tailored to that Skill. For example,<br />
Knowledge Skill has a Type field with a dropdown<br />
list of Groups, People, Places, and Things that lets<br />
you identify the type of knowledge the Skill covers.<br />
For this Skill, choosing an item from that list<br />
might change the value shown in the Display field.<br />
Choosing People changes the Display field to CuK<br />
(Cultural Knowledge); choosing Places changes<br />
Display to AK (Area Knowledge); choosing Groups<br />
or Things leaves Display as KS. The item chosen<br />
from this list also changes the label for the field<br />
where you enter the field of knowledge to which the<br />
Skill applies.<br />
Some Skills (for example, Gambling, Survival,<br />
and Transport Familiarity) have categories and<br />
possibly subcategories as well. These categories and<br />
subcategories appear as ability-specific Adders in<br />
the Adders section of the dialog and are added and<br />
removed as described in the “Attaching Adders and<br />
Modifiers” section on page 12. Because categories<br />
and subcategories are implemented as Adders, you<br />
can purchase additional unlisted ones as Custom<br />
Adders.<br />
For Skills with subcategories, the cost of<br />
purchasing subcategories maxes out at the cost<br />
of the category under which they are listed.<br />
For example, the Card <strong>Games</strong> category for the<br />
Gambling Skill costs 2 points. It has 5 subcategories<br />
that cost 1 point each. Regardless of how many of<br />
the subcategories of Card <strong>Games</strong> are purchased,<br />
they will never cost more than a total of 2 points<br />
(the cost to purchase the category).<br />
There are also some Skills which do not have<br />
categories or subcategories in the HERO System<br />
Fifth <strong>Edition</strong> and HERO System Sixth <strong>Edition</strong> rules,<br />
but have been expanded in other HERO System<br />
books. For example, Computer Programming<br />
was expanded in Star <strong>Hero</strong> to feature a range of<br />
categories and subcategories. When you purchase<br />
such a Skill without selecting any categories or<br />
subcategories, <strong>Hero</strong> <strong>Designer</strong> uses the cost of the<br />
original version. Otherwise, it uses the costs of the<br />
expanded version.<br />
Finally, the Combat Driving and Combat<br />
Piloting Skills, as described in the HERO System<br />
Fifth <strong>Edition</strong> and HERO System Sixth <strong>Edition</strong><br />
rules, grant a free Transport Familiarity with an<br />
appropriate 1-point subcategory of vehicle. When<br />
you purchase Transport Familiarity with one of<br />
the appropriate subcategories, the total cost of<br />
the Transport Familiarity is reduced by 1 point to<br />
account for this.<br />
If the cost of a Skill as determined by <strong>Hero</strong><br />
<strong>Designer</strong> differs from what you think it should<br />
be because of house rules used in the character’s<br />
campaign, you can use a Custom Adder to adjust<br />
the cost. When you do so, you should edit “Custom<br />
Adder” to something appropriate.<br />
Skill Enhancers can also affect the cost of a Skill.<br />
Because <strong>Hero</strong> <strong>Designer</strong> implements Skill Enhancers<br />
using Lists, they are discussed in the “Skill and Perk<br />
Enhancers” section on page 29.<br />
CUSTOM SKILLS<br />
The previous section showed how you could edit<br />
an existing Skill’s Display field as a way to add a<br />
new Skill. Another method of adding new Skills is<br />
Custom Skills<br />
Custom Skill appears in the available item list on<br />
the right pane of the Skills tab. You can add it to a<br />
character like any other Skill.<br />
On the Custom Skill dialog, edit the Display<br />
field to indicate what you want the Skill to be<br />
called on the character sheet pane. Enter the full<br />
cost of the Skill using the value selector box in<br />
the Cost field and the Skill Roll using the value<br />
selector box in the Roll field. If the Skill does not<br />
LANgUAgE<br />
FAMILIARITy<br />
CHART<br />
<strong>Hero</strong> <strong>Designer</strong>, by default,<br />
does not use the Language<br />
Familiarity Chart from the<br />
HERO System Fifth <strong>Edition</strong><br />
and HERO System <strong>6th</strong><br />
<strong>Edition</strong> rules to calculate<br />
the cost of Languages.<br />
However, you can enable<br />
the use of this chart in<br />
the current campaign<br />
rules as described in the<br />
“Campaign Rules” section<br />
on page 36.<br />
When the Language<br />
Familiarity Chart is<br />
enabled, you must define<br />
a native language. If you<br />
do not do so, you will be<br />
penalized 1 point for not<br />
having at least a 1-point<br />
similarity with the first<br />
Language you purchase.
18 ■ Using <strong>Hero</strong> <strong>Designer</strong> <strong>Hero</strong> <strong>Designer</strong> <strong>6th</strong> <strong>Edition</strong><br />
have a roll, enter 0. If the<br />
Skill uses categories and<br />
subcategories, enter them as<br />
Custom Adders, editing the<br />
name appropriately.<br />
The best use for Custom<br />
Skills is adding new Skills<br />
with an unusual cost<br />
structure. If a new Skill has<br />
the same cost structure as<br />
an existing Skill, it is best to<br />
use the method of editing<br />
the existing Skill’s Display<br />
field.<br />
Perks<br />
When you add a Perk<br />
to a character, the dialog<br />
for that Perk appears. In<br />
general, the dialogs for Perks are very simple and<br />
easy to fill out.<br />
The Display field shows the name of the Perk<br />
and is fully editable. The other fields on Perk dialogs<br />
are very straightforward. They are used for things<br />
such as setting the point value and roll (if any) for<br />
the Perk and providing additional details about the<br />
Perk (for example, the name of a Contact). Some,<br />
such as the Contact dialog, feature Perk-specific<br />
Adders used to provide additional information that<br />
affect the cost of the Perk. In a similar vein, the<br />
Fringe Benefit Perk uses Adders to represent each of<br />
the individual benefits that can be bought as part of<br />
the Perk. To add a benefit not listed, use a Custom<br />
Adder. For example, if the campaign has the Fringe<br />
Benefit “Sanctioned Superhero” that costs 3 points,<br />
you would add a Custom Adder worth 3 points to<br />
the Fringe Benefit dialog and edit “Custom Adder”<br />
to read “Sanctioned Superhero”.<br />
The Well-Connected Skill Enhancer also affects<br />
the cost of Perks. Because Well-Connected only<br />
affects Perks, <strong>Hero</strong> <strong>Designer</strong> actually considers it a<br />
Perk Enhancer. <strong>Hero</strong> <strong>Designer</strong> implements Skill and<br />
Perk Enhancers using Lists. They are discussed in<br />
the “Skill and Perk Enhancers” section on page 29.<br />
CUSTOM PERKS<br />
Custom Perks are similar to Custom Skills in<br />
that you use them to add new Perks. Custom Perk<br />
appears in the available item list on the right pane<br />
of the Perks tab. You can add it to a character like<br />
any other Perk.<br />
On the Custom Perk dialog, edit the Display<br />
field to indicate what you want the Perk to be called<br />
on the character sheet pane. Enter the full cost of<br />
the Perk using the value selector box in the Cost<br />
field and the roll associated with the Perk using the<br />
value selector box in the Roll field. If the Perk does<br />
not have a roll, enter 0.<br />
Talents<br />
In general, Talents are added just like any other<br />
ability. One exception to this is those Talents which<br />
do not have any additional options. Normally, such<br />
Talents are added automatically as though you had<br />
right-clicked on the Talent name. This ability can be<br />
disabled from the Preferences dialog as described<br />
in the “Application Preferences” section on page 33.<br />
If you are adding a Talent which features<br />
additional options, or you are editing a Talent, the<br />
dialog for that Talent appears.<br />
The dialogs for Talents are very similar to those<br />
for Skills and Perks and can range from the simple<br />
to the complex. For example, because the Danger<br />
Sense Talent behaves similarly to other Senses,<br />
its dialog features the full list of Adders that are<br />
normally available to Enhanced Senses.
<strong>Hero</strong> <strong>Designer</strong> <strong>6th</strong> <strong>Edition</strong> Using <strong>Hero</strong> <strong>Designer</strong> ■ 19<br />
Finally, a note should be made about the Combat<br />
Luck Talent. Because Combat Luck provides PD<br />
and ED that you may want to include in your<br />
Defense Talents, its dialog has a Totaling Options<br />
field. This field is described in the “Characteristics<br />
From Powers” section on page 21.<br />
CUSTOM TALENTS<br />
Custom Talents are similar to Custom Skills<br />
and Custom Perks in that you use them to add new<br />
Talents. Custom Talent appears in the available item<br />
list on the right pane of the Talents tab. You can add<br />
it to a character like any other Talent.<br />
On the Custom Talent dialog, edit the Display<br />
field to indicate what you want the Talent to be<br />
called on the character<br />
sheet pane. Enter the full<br />
cost of the Talent using<br />
the value selector box in<br />
the Cost field and the roll<br />
associated with the Talent<br />
using the value selector<br />
box in the Roll field. If the<br />
Talent has no roll, enter 0.<br />
Martial Arts<br />
The available item list<br />
on the Martial Maneuvers<br />
subtab of the Martial Arts<br />
tab contains all the Martial<br />
Maneuvers defined in both<br />
the HERO System Fifth<br />
<strong>Edition</strong> and HERO System<br />
Sixth <strong>Edition</strong> rules as well as<br />
The Ultimate Martial Artist<br />
(for HERO System Fifth<br />
<strong>Edition</strong>) and HERO System<br />
Martial Arts (for HERO<br />
System Sixth <strong>Edition</strong>). It also<br />
includes Weapon Element<br />
and +1 Damage Class(es)<br />
with both hand-to-hand<br />
and ranged Maneuvers.<br />
When you add a Maneuver<br />
from this list to a character, the appropriate dialog<br />
appears. For the hand-to-hand and ranged Martial<br />
Maneuvers, the dialog is similar to the one shown<br />
below for Offensive Strike.<br />
The Display field contains the name of the<br />
Maneuver. This field can be edited if the Maneuver<br />
has a different name in the martial style being<br />
entered. For example, if you were entering the<br />
Boxing style, you would edit “Offensive Strike” to<br />
instead read “Hook”.<br />
The Type field contains a dropdown list that lets<br />
you choose whether the Maneuver is used with an<br />
empty hand or with a weapon.<br />
The Phase, OCV, and DCV fields show how<br />
many phases the Maneuver<br />
takes to perform, its OCV<br />
modifier, and its DCV<br />
modifier.<br />
The Effect field shows<br />
the effect of the Maneuver.<br />
This includes damage and<br />
other effects. Damage and<br />
STR-based effects indicated<br />
in this field include the<br />
base effect of the character’s<br />
STR plus any extra Damage<br />
Classes that apply to the<br />
Maneuver. They do not,<br />
however, include the base<br />
weapon damage, which can<br />
vary widely<br />
The dialog for ranged<br />
Martial Maneuvers
20 ■ Using <strong>Hero</strong> <strong>Designer</strong> <strong>Hero</strong> <strong>Designer</strong> <strong>6th</strong> <strong>Edition</strong><br />
also includes a Range field which indicates the<br />
additional OCV modifier for using the Maneuver<br />
at range.<br />
For +1 HTH Damage Class(es) and +1 Ranged<br />
Damage Class(es), the dialog simply lets you choose<br />
the number of extra damage classes you want<br />
to purchase for that type of maneuver. As noted<br />
earlier, these extra damage classes are automatically<br />
included in the effects for appropriate maneuvers.<br />
The Weapon Element dialog simply lets you<br />
specify which weapons a style applies to.<br />
To purchase an entire Martial Arts style,<br />
separately purchase each<br />
of the Martial Maneuvers<br />
as well as any Weapon<br />
Element that applies to<br />
that style. Any Weapon<br />
Familiarities, Knowledge<br />
Skills, or other Skills that<br />
might be listed as part of<br />
the style are purchased<br />
from the Skills tab.<br />
Lists are a good way to<br />
organize the Maneuvers<br />
and Weapon Elements<br />
of a given style. Lists are<br />
described in the “Working<br />
with Lists and Frameworks”<br />
on page 25.<br />
Also, because Martial<br />
Arts styles are often used<br />
over and over again in<br />
different characters. This<br />
makes them a prime<br />
candidate for placing<br />
in Prefabs. Prefabs are<br />
described in the “Prefabs<br />
And Package Deals” chapter<br />
on page 40.<br />
CUSTOM MANEUvERS<br />
Custom Maneuvers<br />
let you add new Martial<br />
Maneuvers. Custom<br />
Maneuver appears in the<br />
available item list on the<br />
right pane of the Martial<br />
Arts tab. You can add it<br />
to a character like any<br />
other Martial Maneuver.<br />
The Custom<br />
Maneuver dialog features<br />
several fields describing<br />
the new Maneuver. By<br />
default, these fields are<br />
set to the values for the<br />
Basic Strike Maneuver.<br />
The Display field<br />
indicates the name of<br />
the Maneuver. Edit it<br />
from “Basic Strike” to the<br />
name desired.<br />
The Cost field features a value selector box<br />
that lets you set the cost in Character Points for<br />
the Maneuver. You can either pick an appropriate<br />
cost based on the costs of existing Maneuvers or<br />
calculate the cost using the rules for creating new<br />
Maneuvers given in The Ultimate Martial Artist<br />
(for HERO System Fifth <strong>Edition</strong>) and HERO System<br />
Martial Arts (for HERO System Sixth <strong>Edition</strong>) .<br />
The Phase field contains a dropdown list from<br />
which you can select how long it takes to perform<br />
the Maneuver.
<strong>Hero</strong> <strong>Designer</strong> <strong>6th</strong> <strong>Edition</strong><br />
Using <strong>Hero</strong> <strong>Designer</strong> ■ 21<br />
The OCV, DCV, and<br />
Range fields each feature<br />
a value selector box for<br />
setting the OCV modifier,<br />
DCV modifier, and ranged<br />
OCV modifier for the<br />
Maneuver. If the new<br />
Maneuver is not ranged, set<br />
the Range field to -1.<br />
Finally, the Effect field<br />
describes the effects of the<br />
Maneuver. Edit it from<br />
“Strike” to appropriate text<br />
that describes the effect.<br />
If the effect of the new<br />
Maneuver would normally<br />
be affected by extra Damage<br />
Classes, you should include<br />
those Damage Classes in<br />
the text that you enter to<br />
keep it consistent with other<br />
Maneuvers.<br />
Powers<br />
The available item list<br />
on the right pane of the<br />
Powers tab includes all<br />
appropriate Powers described in the HERO System<br />
Fifth <strong>Edition</strong> or HERO System Sixth <strong>Edition</strong> rules.<br />
It also has entries for adding Characteristics, Skills,<br />
Perks, Talents as Powers as well as entries for<br />
Compound Powers, Naked Modifiers, and Custom<br />
Powers.<br />
When you add a Power to a character, the dialog<br />
for that Power appears. Because of the complexity<br />
of Powers, the dialog for each Power is different and<br />
there is no way that this manual can describe all<br />
of them. However, most of the fields on a Power’s<br />
dialog should be easy to figure out if you review<br />
the Power’s description in the appropriate HERO<br />
System rulebook.<br />
The following sections cover some of the areas<br />
that require additional information.<br />
CHARACTERISTICS FROM POWERS<br />
Many Powers (including Characteristics bought<br />
as Powers) add to a character’s Characteristics.<br />
For example, Armor and Force Field in HERO<br />
System Fifth <strong>Edition</strong> and Resistant Protection in<br />
HERO System Sixth <strong>Edition</strong> increase PD and ED,<br />
while Fifth <strong>Edition</strong> Growth adds to STR, BODY,<br />
and STUN and Sixth <strong>Edition</strong> Growth adds to STR,<br />
CON, PRE, PD, ED, BODY, STUN, and Running.<br />
The dialogs for such Powers (like the Resistant<br />
Protection dialog above) have a Totaling Options<br />
field which contains a dropdown list. Normally,<br />
this dropdown has three options: Add to Primary<br />
Value, Add to Secondary Value, and Do Not<br />
Add to Totals. The Add to Primary Value option<br />
adds Characteristics granted by that Power to the<br />
primary values for those Characteristics.<br />
The primary value is either the only value shown<br />
in the Totals column for that Characteristic on<br />
the Characteristics tab, or if a secondary value<br />
also exists, it is the value to the left of the / in that<br />
column. The primary value of a Characteristic is<br />
normally in effect at all times.<br />
The Add to Secondary Value option adds<br />
any Characteristics granted by the Power to the<br />
secondary values for those Characteristics. The<br />
secondary value will be shown to the right of the /<br />
in the Totals column for that Characteristic on the<br />
Characteristics tab. Normally, the secondary value<br />
of a Characteristic represents a value that is only<br />
in effect some of the time. For example, if you have<br />
Characteristics bought with the Only In <strong>Hero</strong>ic<br />
Identity Limitation, you would normally choose to<br />
have them added to the secondary value.<br />
The Do Not Add to Totals option does not add<br />
the Characteristics granted by the Power to any<br />
totals. These Characteristics only appear in the<br />
Power’s description on the character sheet pane.<br />
CHARACTERISTICS AS POWERS<br />
As well as the Totaling Options field discussed<br />
previously, the dialog for a Characteristic bought<br />
as a Power (including Running, Swimming,<br />
and Leaping which <strong>Hero</strong> <strong>Designer</strong> treats as<br />
Characteristics) also contains an Add Modifiers<br />
to Base Characteristics checkbox. If this box is<br />
checked, <strong>Hero</strong> <strong>Designer</strong> includes the value for<br />
the Characteristic from the Value column of the<br />
Characteristics tab when calculating the cost of any<br />
Modifiers attached to the Characteristic.<br />
For example, if a character has 13 INT in the<br />
Value column of the Characteristics tab and<br />
purchases an additional 10 INT as a Power with<br />
BUyINg SPD AS A<br />
POWER<br />
When purchasing SPD as<br />
a Power, it is important to<br />
note that you can only buy<br />
it in full increments of +1<br />
for 10 points. You cannot<br />
buy fractional SPD.<br />
If you are creating a<br />
character using a HERO<br />
System Sixth <strong>Edition</strong><br />
template, this is really not<br />
relevant. However, it does<br />
have some implications<br />
if you are a creating a<br />
character using a HERO<br />
System Fifth <strong>Edition</strong><br />
template.<br />
For example, suppose<br />
a character has a DEX<br />
of 13/25 and you want<br />
the character to have a<br />
SPD of 3/5. The primary<br />
SPD of 3 is bought on<br />
the Characteristics tab<br />
at a cost of 7 Character<br />
Points. This means that the<br />
secondary SPD has a base<br />
value of 4.5 (1 + 2.8 + .7)<br />
which, for all purposes, is<br />
treated as SPD 4. You need<br />
to buy another full point of<br />
SPD as a Power (and add<br />
it to the secondary value)<br />
with an Active Cost of 10<br />
points to get a secondary<br />
SPD of 5.<br />
Some HERO System Fifth<br />
<strong>Edition</strong> campaigns have<br />
a house rule that lets you<br />
buy fractional SPD as a<br />
Power. In such campaigns,<br />
you would only need to<br />
buy .5 SPD as a Power for<br />
an Active Cost of 5 points<br />
to raise the secondary<br />
SPD to 5. To do this in<br />
<strong>Hero</strong> <strong>Designer</strong>, you would<br />
purchase the full 1 point<br />
of SPD and then use a<br />
negative Custom Adder<br />
to reduce the Active Cost<br />
to simulate purchasing<br />
fractional SPD.
22 ■ Using <strong>Hero</strong> <strong>Designer</strong> <strong>Hero</strong> <strong>Designer</strong> <strong>6th</strong> <strong>Edition</strong><br />
TARgETINg AND<br />
NONTARgETINg<br />
SENSES<br />
Sense-Affecting Powers<br />
like Flash and Invisibility<br />
have different costs for<br />
affecting Targeting and<br />
Nontargeting Senses.<br />
The HERO System Fifth<br />
<strong>Edition</strong> and HERO System<br />
Sixth <strong>Edition</strong> templates<br />
designate the following<br />
Senses as Targeting Senses:<br />
■ Active Sonar<br />
■ Infrared Perception<br />
■ Mind Scan<br />
■ Nightvision<br />
■ Normal Sight<br />
■ Radar<br />
■ Spatial Awareness<br />
■ Ultraviolet Perception<br />
Also, HERO System<br />
Fifth <strong>Edition</strong> templates<br />
designate the following as<br />
a Targeting Sense:<br />
■ N-Ray Perception<br />
The Sight Group is the<br />
only Targeting Sense<br />
Group. All other Senses<br />
and Sense Groups are<br />
Nontargeting.<br />
In campaigns with other<br />
Targeting Senses or<br />
Sense Groups, you must<br />
purchase Powers that affect<br />
those Senses or Sense<br />
Groups as affecting one of<br />
the above Targeting Senses<br />
or the Sight Group. You<br />
would then edit the sense<br />
name to reflect the desired<br />
Targeting Sense or Sense<br />
Group.<br />
In campaign where any of<br />
the Targeting Senses above<br />
or the Sight Group are<br />
Nontargeting, you must<br />
purchase Powers that affect<br />
those Senses as affecting<br />
one of the normally<br />
Nontargeting Senses or<br />
Sense Groups. You would<br />
then edit the name of the<br />
Sense or Sense Group<br />
appropriately.<br />
A more complete solution<br />
for changing Targeting<br />
Senses and Sense Groups<br />
is to create a custom<br />
character template. Details<br />
on creating and editing<br />
character templates can be<br />
found in the “Character<br />
Templates” chapter on<br />
page 43.<br />
Add Modifiers to Base Characteristics checked,<br />
any Modifiers that are added to the 13 INT bought<br />
as a Power will have their cost calculated as if<br />
bought on 13 INT (an effective Active Cost of<br />
13 points). The whole cost of such Modifiers is<br />
included in the cost of the Characteristic on the<br />
Powers tab.<br />
This technique can be used to apply Modifiers<br />
to just the base Characteristic value. For example,<br />
suppose a character has a 25 STR in the Value<br />
column of the Characteristics tab and you want to<br />
purchase a +1/2 Reduced Endurance Advantage<br />
to reduce it to an END cost of 0. You can do this<br />
by purchasing 0 STR as a Power, checking Add<br />
Modifiers to Base Characteristics, and attaching<br />
the Reduced Endurance Advantage.<br />
COMPOUND POWERS<br />
Compound Powers are two or more Powers<br />
attached together to form a single Power construct.<br />
Compound Powers can represent partially limited<br />
Powers, linked Powers in a Power Framework,<br />
and a variety of similar<br />
constructs. When you add<br />
a Compound Power, the<br />
Compound Power dialog<br />
appears.<br />
This dialog differs from<br />
most ability dialogs in<br />
that it displays a miniature<br />
version of the character<br />
sheet pane and features a<br />
different set of buttons.<br />
To add a Power to the<br />
Compound Power, click<br />
the Add button. A list of<br />
available Powers appears.<br />
Select the Power that you<br />
want to add from this list.<br />
The dialog for the selected<br />
Power appears. Fill out<br />
this dialog and attach<br />
Adders and Modifiers in<br />
the same way you would<br />
for any other Power. Click<br />
OK when you are done and the Power description<br />
appears on the Compound Power dialog.<br />
You can edit a Power in a Compound Power by<br />
highlighting it and either clicking the Edit button<br />
or pressing Enter.<br />
The Compound Power dialog also features<br />
Up-Arrow, Down-Arrow, and Insert buttons that<br />
work similarly to the corresponding buttons on the<br />
character sheet pane.<br />
Once you have entered all the Powers that are<br />
going to make up the Compound Power, click the<br />
OK button on the Compound Power dialog. The<br />
Compound Power will be added to the character<br />
sheet pane. The description of the Compound<br />
Power is made up of the descriptions of its<br />
component Powers separated by the word “plus”<br />
in bold. This is similar to the format used for such<br />
Power constructs in the HERO System Fifth <strong>Edition</strong><br />
and HERO System Sixth <strong>Edition</strong> rulebooks.<br />
The Active, Real, and END costs for a<br />
Compound Power are the sums of the Active,<br />
Real, and END costs of its<br />
component Powers. Note,<br />
however, that the Real<br />
Cost may be adjusted if the<br />
Compound Power is in a<br />
List or Framework.<br />
NAKED ADvANTAgES<br />
The Naked Advantages<br />
Power lets you enter Naked<br />
Advantages. To create a<br />
Naked Adder as described<br />
in the rulebook, use a<br />
Custom Power.<br />
When you add a Naked<br />
Advantage to a character<br />
from the available item<br />
list, the Naked Advantage<br />
dialog appears.
<strong>Hero</strong> <strong>Designer</strong> <strong>6th</strong> <strong>Edition</strong> Using <strong>Hero</strong> <strong>Designer</strong> ■ 23<br />
Like all Power dialogs, the Naked Advantage<br />
dialog includes a Name field where you can specify<br />
what the Naked Advantage is to be called.<br />
The Display field should be edited to identify<br />
the precise type of Naked Advantage and what<br />
the Advantage modifies. For example, if you were<br />
buying Autofire as a Naked Advantage that can be<br />
used with any firearm (to represent someone who<br />
can shoot any gun quickly), you might edit this field<br />
to read “Naked Advantage for All Firearms”.<br />
The Max. Base Cost field has a value selector<br />
box that specifies the Active Cost of the largest<br />
Power to which the Naked Advantage can apply.<br />
To specify the actual Naked Advantages<br />
that can be applied to another Power, click the<br />
Naked Modifiers… button and select the desired<br />
Advantages. The costs of these Advantages is based<br />
on the value specified in the Max. Base Cost field.<br />
This is the Active Cost of the Naked Advantage.<br />
To offer maximum flexibility, all Advantages are<br />
available as Naked Advantages.<br />
To attach an Advantage or Limitation which<br />
only applies to and affects the cost of the Naked<br />
Modifier, click the Add Modifiers… button and<br />
the add the Modifiers using the same procedure as<br />
adding a Modifier to any other ability.<br />
CUSTOM POWERS<br />
Custom Powers let you add new Powers to<br />
a character that aren’t defined in the current<br />
character template. You can also use them for<br />
Power constructs such as Naked Adders that cannot<br />
be added using other methods. You can attach<br />
Modifiers and Adders to a Custom Power.<br />
Custom Power appears in the available item list<br />
on the right pane of the Powers tab. You can add<br />
it to a character like any other Power. You can also<br />
add Custom Powers to Compound Powers.<br />
When you add a Custom Power, the Custom<br />
Power dialog appears. This dialog features a variety<br />
of options that let you give the details of the Power.<br />
The Display field lets<br />
you identify the Power. For<br />
example, when creating a<br />
character for a campaign<br />
that used, as a house rule,<br />
the HERO System Fourth<br />
<strong>Edition</strong> version of Instant<br />
Change, you would enter<br />
“Instant Change” in the<br />
Display field.<br />
The Base Cost field has<br />
a value selector box used to<br />
specify the Active Cost of<br />
the Custom Power.<br />
The Uses END<br />
checkbox determines<br />
whether or not END is<br />
calculated or specified.<br />
When checked, END is<br />
calculated like any other<br />
Power. When unchecked,<br />
the Define Custom END Column Output<br />
checkbox is available. Checking this box makes<br />
the END Column Output field available. In this<br />
field, you can enter the specific value or text that<br />
will appear in the END column for this Custom
24 ■ Using <strong>Hero</strong> <strong>Designer</strong> <strong>Hero</strong> <strong>Designer</strong> <strong>6th</strong> <strong>Edition</strong><br />
DISADvANTAgES<br />
AND FIFTH EDITION<br />
TEMPLATES<br />
As mentioned in the<br />
section “Ability and<br />
Complications Tabs” on<br />
page 16, HERO System Fifth<br />
<strong>Edition</strong> uses the term<br />
Disadvantage instead of<br />
Complication and thus,<br />
Fifth <strong>Edition</strong> templates<br />
have a Disadvantages<br />
tab instead of a<br />
Complications tab.<br />
When the Normal<br />
Characteristic Maxima<br />
box is checked on the<br />
Characteristics tab (see<br />
the “Characteristics Tab”<br />
section on page 8) of a<br />
Fifth <strong>Edition</strong> template, the<br />
Normal Characteristic<br />
Maxima Disadvantage<br />
automatically appears on<br />
the character sheet pane<br />
of the Disadvantages<br />
tab. Similarly, when an<br />
age restriction is selected,<br />
the Age Disadvantage<br />
also appears on the<br />
Disadvantages tab. These<br />
Disadvantages can be<br />
moved up and down<br />
on the character sheet<br />
pane and sorted but they<br />
cannot be deleted, edited,<br />
cut, or copied. They only<br />
change when the setting<br />
on the Characteristics tab<br />
changes.<br />
Power. If neither the Uses<br />
END or Define Custom<br />
END Column Output<br />
checkboxes are checked, the<br />
Custom Power is displayed<br />
with an END value of 0.<br />
The other checkboxes,<br />
dropdown lists, and 0 point<br />
Adders let you specify<br />
properties of the Custom<br />
Power that are primarily<br />
used to determine the<br />
Modifiers that can be used<br />
with the Power.<br />
Complications<br />
Adding Complications<br />
to a character is very straightforward. When<br />
you add a Complication from those listed in the<br />
available item list, the dialog for that Complication<br />
appears.<br />
All Complication dialogs have a Display field<br />
that contains the name of the Complication. The<br />
other fields are usually either dropdown lists from<br />
which you choose the various factors that affect the<br />
Complication value or blank fields in which you<br />
provide additional details about the Complication.<br />
Occasionally, some Complication dialogs also use<br />
Adders and even Modifiers to specify information.<br />
If, for some reason such as house rules, you<br />
need to adjust the value of a Complication, attach a<br />
Custom Adder.<br />
The Active Points and Real Cost fields on the<br />
dialog indicate the value of the Complication. As<br />
you select options that affect this value, you will see<br />
these fields change to reflect these choices.<br />
When you have finished filling out the dialog,<br />
click the OK button. The Complication appears on<br />
the character sheet pane.<br />
The current campaign rules specify the<br />
maximum number of points in a given type of<br />
Complication you can add to a character. For details<br />
on setting campaign rules, see the “Campaign<br />
Rules” section on page 33.<br />
CUSTOM COMPLICATIONS<br />
Custom Complications let you add new<br />
Complications to a character. You might also use<br />
it for such things as Experience Points needed<br />
to balance a Powerful supervillain and Mystery<br />
Complications.<br />
Custom Complication appears in the available<br />
item list on the right pane of the Complications<br />
tab. You can add it to a character like any other<br />
Complication.<br />
The Display field should be edited to reflect<br />
the name of the new Complication (for example,<br />
Mystery Complication).<br />
The Points field has a value selector box used to<br />
set the value of the Complication.<br />
When using Custom Complication to represent<br />
a new Complication that has a cost based on several<br />
factors, you may want to set the Points field to 0<br />
and use Custom Adders to represent each factor<br />
and how much it is worth. Edit the name of each<br />
Custom Adder to reflect the factor it is representing.<br />
HERO System Fifth <strong>Edition</strong> templates use the<br />
term Custom Disadvantage rather than Custom<br />
Complication but otherwise<br />
the two are identical.<br />
Equipment<br />
Constructing equipment<br />
on the Equipment tab is<br />
similar to constructing<br />
Powers on the Powers tab.<br />
There are two significant<br />
differences.<br />
The first difference<br />
is that points spent on<br />
equipment are not included<br />
in the character’s point<br />
total. The equipment<br />
point total is, however,<br />
displayed above the<br />
character sheet pane.
<strong>Hero</strong> <strong>Designer</strong> <strong>6th</strong> <strong>Edition</strong> Using <strong>Hero</strong> <strong>Designer</strong> ■ 25<br />
The campaign rules, as<br />
described in the “Campaign<br />
Rules” section on page 36,<br />
may specify a maximum<br />
number of equipment<br />
points per character. The<br />
second difference is that<br />
abilities purchased on the<br />
Equipment tab have an<br />
Equipment Info section on<br />
their dialogs. This section<br />
lets you specify information<br />
about that particular piece<br />
of equipment.<br />
The Weight field<br />
specifies the weight<br />
of the item in either<br />
kilograms or pounds as<br />
set on the Preferences<br />
menu as described in the<br />
“Application Preferences”<br />
section on page 33.<br />
The Price field specifies<br />
the price of the item. The<br />
format of the Price field<br />
depends upon the current<br />
campaign rules as described<br />
in the “Campaign Rules”<br />
section on page 36.<br />
Finally, the Carried<br />
checkbox specifies if the<br />
item is carried by the<br />
character. When checked,<br />
the weight of the item is<br />
added to the weight of<br />
all other items carried by<br />
character. If this total is<br />
greater than the amount than the character can<br />
carry (based on the character’s STR), a warning<br />
appears.<br />
WORKINg WITH LISTS AND<br />
FRAMEWORKS<br />
Lists are used to organize abilities into groups on<br />
the character sheet pane. <strong>Hero</strong> <strong>Designer</strong> uses Lists<br />
to implement Frameworks as well as Skill and Perk<br />
Enhancers.<br />
Lists<br />
In their generic form, Lists can contain any item<br />
allowed on the tab. Items in a List are numbered 1),<br />
2), 3) and so on.<br />
Possible uses for Lists include Powers that share<br />
common Modifiers (for example, a powered armor<br />
character might put all the Powers that have the<br />
powered armor as a Focus in a List), Martial Arts<br />
styles, or Skills associated with specific training (for<br />
example, ninja training).<br />
CREATINg A LIST<br />
To create a new list, select New List… from the<br />
List menu on the character sheet menu bar.<br />
The New List dialog appears.<br />
ATTACHINg<br />
MODIFIERS<br />
TO LISTS AND<br />
FRAMEWORKS<br />
Modifiers on Lists and<br />
Frameworks can be<br />
divided into two groups:<br />
Common Modifiers and<br />
Private Modifiers.<br />
Common Modifiers<br />
apply to all items in a<br />
List or Framework as<br />
well as to the reserve of<br />
a Framework. To attach<br />
a Common Modifier,<br />
click the Add Common<br />
Modifier button on<br />
the List or Framework<br />
dialog.<br />
Private Modifiers apply<br />
only to the reserve of a<br />
Multipower or Variable<br />
Power Pool. They don’t<br />
affect slot costs. To<br />
attach a Private Modifier,<br />
click the Add MP-only<br />
Modifier button on a<br />
Multipower dialog or the<br />
Add VPP-only Modifier<br />
button on a Variable<br />
Power Pool dialog.<br />
When you add a<br />
Modifier of the same<br />
type as a Common<br />
Modifier to an item in<br />
a List or Framework,<br />
only the Modifier<br />
attached to the item is<br />
used. For example, if<br />
you have a Multipower<br />
with the Common OIF<br />
Limitation attached and<br />
add an OAF Limitation<br />
to a slot, only the OAF is<br />
applied to the slot’s cost.<br />
The Charges Modifier<br />
is an exception. When<br />
you attach Charges as a<br />
Common Modifier to a<br />
Multipower or Elemental<br />
Control, those Charges<br />
apply to the whole<br />
Framework; however,<br />
the Modifier only affects<br />
the Multipower reserve<br />
or the base cost of the<br />
Elemental Control. It<br />
does not affect slot costs.<br />
You can also attach<br />
Modifiers to a List<br />
or Framework by<br />
pasting them from<br />
another ability, List, or<br />
Framework as discussed<br />
in the “Copying, Cutting,<br />
and Pasting Modifiers”<br />
section on page 14.
26 ■ Using <strong>Hero</strong> <strong>Designer</strong> <strong>Hero</strong> <strong>Designer</strong> <strong>6th</strong> <strong>Edition</strong><br />
ATTACHINg<br />
CUSTOM ADDERS<br />
TO LISTS AND<br />
FRAMEWORKS<br />
Adders on Lists and<br />
Frameworks can be<br />
divided into two groups:<br />
Common Adders and<br />
Private Adders.<br />
Common Adders apply<br />
to all items in a List<br />
or Framework as well<br />
as to the reserve of a<br />
Framework. They do not<br />
apply to the basic cost of a<br />
List. To attach a Common<br />
Adder, click the Common<br />
Adder button on the List<br />
or Framework dialog.<br />
Private Adders, on<br />
the other hand, apply<br />
only to the reserve of a<br />
Framework or to the basic<br />
cost of a List. They do not<br />
affect the cost of the slot<br />
at all, only the cost of the<br />
reserve or the basic List<br />
cost To attach a Private<br />
Adder, click the Private<br />
Adder button on the List<br />
or Framework dialog.<br />
These Adders are useful<br />
for simulating new Skill<br />
or Perk Enhancers. By<br />
placing the items to be<br />
affected by the simulated<br />
Enhancer in a List and<br />
applying a Private Adder<br />
of 3 and a Common Adder<br />
of -1 to that List, you can<br />
achieve the same effect as a<br />
standard Enhancer.<br />
Enter the name you want to give the List in<br />
the List Name field and attach any Modifiers and<br />
Custom Adders that you want to apply to the<br />
List. See the “Attaching Modifiers To Lists And<br />
Frameworks” sidebar and the “Attaching Custom<br />
Adders To Lists And Frameworks” sidebar on page<br />
26 for details on how Modifiers and Adders affect<br />
slots. Click OK and the List name appears on<br />
the character sheet pane along with the attached<br />
Modifiers. The location of the List on the character<br />
sheet pane is determined in the same way as adding<br />
an item to the character sheet described in the<br />
“Adding An Item” section on page 11.<br />
If you attempt to create a List inside another<br />
List or a Framework, a warning appears informing<br />
you that the new List will be placed outside of the<br />
selection. The new List appears after the existing<br />
List or Framework on the character sheet pane.<br />
Once you have created a List, you can edit its<br />
name, Modifiers, Adders, and attached notes by<br />
double-clicking on the END or Cost column next<br />
to the List name on the character sheet pane, by<br />
highlighting the List name and clicking the Edit<br />
button, or by right-clicking on the List name and<br />
selecting Edit from the pop-up menu.<br />
ADDINg ITEMS TO A LIST<br />
Adding items to a List or Framework is really<br />
just a specialized case of adding items to the<br />
character sheet pane described in the “Adding An<br />
Item” section on page 21.<br />
If no item is highlighted on the character sheet<br />
pane, a List is at the bottom of the character sheet<br />
pane, and the Insert button is set to Insert At End,<br />
the item added appears as the last item in the List.<br />
If the List name is highlighted and the Insert<br />
button is set to Insert After, the item added appears<br />
just after the List name as the first item in the List.<br />
If an item in the List is highlighted and the<br />
Insert button is set to either Insert After or Insert<br />
Before, the item being added appears just after or<br />
just before the highlighted item based on the setting<br />
of the Insert button.<br />
You can also move an item into a List from<br />
elsewhere on the character sheet pane by<br />
highlighting the item to be moved and using the<br />
Up-Arrow and Down-Arrow buttons to move the<br />
item into the List.<br />
When you add an item to a List, the List’s<br />
numbering is adjusted to include the new item.<br />
REMOvINg ITEMS FROM A LIST<br />
There are two ways to remove an item from a<br />
List or Framework: deleting it from the character<br />
entirely or by moving it out of the List.<br />
Deleting a List item entirely is just like deleting<br />
any other item on the character sheet pane. This<br />
process is described in the “Deleting An Item”<br />
section on page 11.<br />
To move an item out of a List, highlight the item<br />
and use the Up-Arrow and Down-Arrow buttons<br />
to move it elsewhere on the character sheet pane.<br />
When moving the last item in a List down, the first<br />
move down does not actually change the item’s<br />
position on the screen, it just takes it out of the List<br />
(removing the numbering and List Modifiers).<br />
When an item is removed from a List, the List’s<br />
numbering is automatically adjusted.<br />
DELETINg A LIST<br />
To delete a List or Framework, highlight the List<br />
name and either click the Delete button or press<br />
the Delete key. You can also delete a List by rightclicking<br />
on the List name and selecting Delete from<br />
the pop-up menu that appears or by clicking the<br />
Delete button on the List’s dialog when editing it.<br />
When you attempt to delete a List, a dialog<br />
appears prompting you for confirmation of the<br />
deletion. If you click Yes and there are no items<br />
in the List, the List name is removed from the<br />
character sheet pane. If you click Yes and there<br />
are items in the List, you are then prompted if you<br />
want to delete all items in the List. If you click Yes,<br />
the List name and all items in the List are removed.<br />
If you click No, just the List name is removed and<br />
the numbering from the List items is removed,<br />
making them the same as any item not in a List.<br />
Any Modifiers that were applied to the List items as<br />
a result of them being in the List are also removed<br />
and the cost of the items is recalculated. If you click<br />
Cancel, the deletion of the List is cancelled.<br />
If you have turned off deletion confirmation<br />
on the Preferences dialog as described in the<br />
“Application Preferences” section on page 33, you will<br />
not be prompted as to whether you want to delete<br />
the List, but you will still be prompted as to whether<br />
you want to delete all items in the List.<br />
Separators<br />
To add a blank line as a separator on the<br />
character sheet pane, select New Separator from<br />
the List menu on the character sheet menu bar.<br />
Because separators are handled internally as<br />
blank List names (although they cannot have items<br />
like Lists), the rules for adding a separator are the<br />
same as those for creating a List (see “Creating A<br />
List” on page 25). This means that you cannot add a<br />
separator in a List or Framework.<br />
Elemental Controls<br />
<strong>Hero</strong> <strong>Designer</strong> implements Elemental Controls<br />
in HERO System Fifth <strong>Edition</strong> templates as Lists.
<strong>Hero</strong> <strong>Designer</strong> <strong>6th</strong> <strong>Edition</strong> Using <strong>Hero</strong> <strong>Designer</strong> ■ 27<br />
Since HERO System Sixth <strong>Edition</strong> no longer includes<br />
Elemental Controls, this Framework is not available<br />
when using Sixth <strong>Edition</strong> templates.<br />
Once you have created an Elemental Control,<br />
the process of adding and removing items is exactly<br />
like that described for Lists in the previous section.<br />
To create an Elemental Control select New<br />
Elemental Control… from the Power Frameworks<br />
menu on the character sheet menu bar of the<br />
Powers tab.<br />
The New Elemental Control dialog appears.<br />
Enter the name that you want to assign to the<br />
Elemental Control in the Name field. When you<br />
want to give the Framework a name other than<br />
Elemental Control(for example, “EC”), edit the EC<br />
Name field to reflect this.<br />
The Base Points field has a value selector box<br />
used to set the base points of the Elemental Control.<br />
All Powers added to the Elemental Control must<br />
have an Active Cost of at least double that value.<br />
From this dialog, you can also attach any<br />
Modifiers and Custom Adders that you want to<br />
affect the entire Framework. See the “Attaching<br />
Modifiers To Lists And Frameworks” sidebar on<br />
page 25 and the “Attaching Custom Adders To Lists<br />
And Frameworks” sidebar on page 26.<br />
When you have finished filling out this dialog,<br />
click OK and the Elemental Control along with<br />
the attached Modifiers appears on the character<br />
sheet pane. The location of the Elemental Control<br />
is determined in the same way as adding an item<br />
to the character sheet described in the “Adding An<br />
Item” section on page 11.<br />
If you attempt to create an Elemental Control<br />
inside another Framework or a List, a warning<br />
appears informing you that the new Elemental<br />
Control will be placed outside of the selection. It<br />
appears after the existing Framework or List on the<br />
character sheet pane.<br />
Once an Elemental Control is created, you can<br />
edit its name, base cost, Modifiers, Adders, and<br />
attached notes by double-clicking on the Elemental<br />
Control on the character sheet pane, by highlighting<br />
the Elemental Control and clicking the Edit button,<br />
or by right-clicking on the Elemental Control and<br />
selecting Edit form the pop-up menu that appears.<br />
If you try to add a Power whose Active Cost<br />
is not at least twice the base cost of the Elemental<br />
Control, a warning appears informing you that the<br />
cost of that item will be raised to the minimum<br />
required. Similarly, if you try to add a Special Power<br />
or a Power that does not normally cost END, an<br />
appropriate warning appears informing you that<br />
adding the Power to an Elemental Control is not<br />
normally allowed. However, the Power is still added.<br />
You can set <strong>Hero</strong> <strong>Designer</strong> to allow Special<br />
Powers and Powers that do not normally cost END<br />
without warning or to explicitly forbid such Powers<br />
with campaign rules, as described in the “Campaign<br />
Rules” section on page 36.<br />
Multipowers<br />
Like Elemental Controls, <strong>Hero</strong> <strong>Designer</strong><br />
implements Multipowers as Lists. Once you have<br />
created a Multipower, the process of adding and<br />
removing items is exactly like that described for<br />
Lists in the “Lists” section on page 25.<br />
To create a Multipower, select New<br />
Multipower… from the Power Frameworks menu<br />
on the character sheet menu bar of the Powers tab.<br />
The New Multipower dialog appears.<br />
Enter the name that you want to assign to the<br />
Multipower in the Name field. If, for some reason,
28 ■ Using <strong>Hero</strong> <strong>Designer</strong> <strong>Hero</strong> <strong>Designer</strong> <strong>6th</strong> <strong>Edition</strong><br />
you would like the Framework called something<br />
else on the character sheet pane (for example,<br />
“MP”), edit the Multipower Name field to reflect<br />
this.<br />
The Base Points field has a value selector box<br />
used to set the Multipower’s point reserve. All<br />
Powers added to the Multipower must have an<br />
Active Cost that is equal to or less than this value.<br />
From this dialog, you can also attach any<br />
Modifiers and Adders that you want to affect<br />
either the reserve or the entire Framework. See the<br />
“Attaching Modifiers To Lists And Frameworks”<br />
sidebar on page 25 and the “Attaching Custom Adders<br />
To Lists And Frameworks” sidebar on page 26.<br />
When you have filled out this dialog, click OK<br />
and the Multipower along with attached Modifiers<br />
appears on the character sheet pane. The location<br />
of the Multipower is determined in the same way as<br />
adding an item to the character sheet described in<br />
the “Adding An Item” section on page 11.<br />
If you try to create a Multipower inside another<br />
Framework or a List, a warning informs you that<br />
the new Multipower will be placed outside of the<br />
selection. The Multipower appears after the existing<br />
Framework or List on the character sheet pane.<br />
Once you have created a Multipower, you<br />
can edit its name, base cost, Modifiers, Adders,<br />
and attached notes by double-clicking on the<br />
Multipower on the character sheet pane, by<br />
highlighting the Multipower and clicking the Edit<br />
button, or by right-clicking on the Multipower and<br />
selecting Edit from the pop-up menu that appears.<br />
By default, all items added to a Multipower are<br />
created as fixed (in HERO System Sixth <strong>Edition</strong><br />
templates) or ultra (in HERO System Fifth <strong>Edition</strong><br />
templates) slots. To convert an item from a fixed<br />
slot to a variable (in HERO System Sixth <strong>Edition</strong><br />
templates) or multi (in HERO System Fifth <strong>Edition</strong><br />
templates) slot, edit the item (as described in the<br />
“Editing An Item” section on page 25) and uncheck<br />
the Fixed Slot (Sixth <strong>Edition</strong>) or Ultra Slot (Fifth<br />
<strong>Edition</strong>) box on the item’s dialog.<br />
If you attempt to add an Power whose Active<br />
Cost is greater than the Multipower’s reserve, a<br />
warning appears informing you that the Power<br />
will be added outside the Multipower. The Power<br />
appears on the character sheet pane after the last<br />
slot in the Multipower. Similarly, if you attempt to<br />
add a Special Power, a warning appears informing<br />
you that adding the Power to a Multipower is not<br />
normally allowed. However, the Power is still added.<br />
You can set <strong>Hero</strong> <strong>Designer</strong> to allow Special<br />
Powers or to explicitly forbid such Powers with<br />
campaign rules, as described in the “Campaign<br />
Rules” section on page 36.<br />
variable Power Pools<br />
Like Elemental Controls and Multipowers, <strong>Hero</strong><br />
<strong>Designer</strong> implements Variable Power Pools as Lists.<br />
Once you have created a Variable Power Pool, the<br />
process of adding and removing items is exactly<br />
like that described for Lists in the “Lists” section<br />
on page 25. However, items in a Variable Power Pool<br />
list are actually just sample Powers that can be built<br />
with the Pool and will be shown with a cost of 0,<br />
although the description of the item includes both<br />
the Active and Real Cost of the Power.<br />
To create a Variable Power Pool (VPP), select<br />
New Variable Power Pool… from the Power<br />
Frameworks menu on the character sheet menu bar<br />
of the Powers tab.<br />
The New Variable Power Pool dialog appears.<br />
Enter the name that you want to assign to the<br />
VPP in the Name field. If, for some reason, you<br />
would like the Framework called something else<br />
on the character sheet pane (for example, “VPP”),<br />
edit the VPP Name field to reflect this. The Type<br />
field identifies the type of the VPP. You can select<br />
Gadget Pool, Magic Pool, or Mimic Pool from the<br />
dropdown list or fill in the blank field with another<br />
type.<br />
The Pool Points field has a value selector box<br />
used to set the number of points in the Pool. This<br />
field determines how many Real Points of Powers<br />
the character can use at one time. For HERO System<br />
Fifth <strong>Edition</strong> templates, all sample Powers added to<br />
the VPP must have an Active Cost that is equal to<br />
or less than this value.<br />
The Control Cost field in HERO System Sixth<br />
<strong>Edition</strong> templates has a value selector box used to<br />
set the maximum Active Cost for all Powers in this<br />
VPP.<br />
From this dialog, you can also attach any<br />
Modifiers and Adders that you want to affect
<strong>Hero</strong> <strong>Designer</strong> <strong>6th</strong> <strong>Edition</strong> Using <strong>Hero</strong> <strong>Designer</strong> ■ 29<br />
either the reserve or the entire Framework. See the<br />
“Attaching Modifiers To Lists And Frameworks”<br />
sidebar on page 25 and the “Attaching Custom Adders<br />
To Lists And Frameworks” sidebar on page 26.<br />
When you have filled out this dialog, click OK<br />
and the VPP along with the attached Modifiers<br />
appears on the character sheet pane. The location of<br />
the VPP is determined in the same way as adding<br />
an item to the character sheet described in the<br />
“Adding An Item” section on page 11.<br />
If you attempt to create a VPP inside another<br />
Framework or a List, a warning appears informing<br />
you that the new VPP will be placed outside of<br />
the selection. The VPP appears after the existing<br />
Framework or List on the character sheet pane.<br />
Once you have created a VPP, you can edit its<br />
name, type, pool points, Modifiers, Adders, and<br />
attached notes by either double-clicking on the<br />
VPP on the character sheet pane, by highlighting<br />
the VPP and clicking the Edit button, or by rightclicking<br />
on the VPP and selecting Edit from the<br />
pop-up menu that appears.<br />
If you try to add an Power whose Active Cost<br />
is greater than the value in Pool Points (for HERO<br />
System Fifth <strong>Edition</strong> templates) or in Control<br />
Cost (for HERO System Sixth <strong>Edition</strong> templates),<br />
a warning appears informing you that the Power<br />
will be added outside the VPP. The Power appears<br />
on the character sheet pane after the last slot in<br />
the VPP. Similarly, if you attempt to add a Special<br />
Power, a warning appears informing you that<br />
adding the Power to a VPP is not normally allowed.<br />
However, the Power is still added.<br />
You can set <strong>Hero</strong> <strong>Designer</strong> to allow Special<br />
Powers or to explicitly forbid such Powers with<br />
campaign rules, as described in the “Campaign<br />
Rules” section on page 36.<br />
Skill And Perk Enhancers<br />
While Skill and Perk Enhancers are implemented<br />
as a special form of List, their behavior is quite<br />
different from the other forms.<br />
To add a Skill Enhancer, select the desired<br />
Enhancer from the Skill Enhancer menu on the<br />
character sheet menu bar of the Skills tab.<br />
The chosen Enhancer appears on the character<br />
sheet pane on the appropriate tab. The location of<br />
the Enhancer is determined in the same way as<br />
adding an item to the character sheet described in<br />
the “Adding An Item” section on page 11.<br />
To add a Perk Enhancer, select the desired<br />
Enhancer from the Perk Enhancer menu on the<br />
character sheet menu bar of the Perks tab.<br />
If that character sheet pane contains any<br />
items affected by the Enhancer, those items are<br />
immediately moved into a list beneath the Enhancer<br />
and numbered appropriately. Any new Skills or<br />
Perks added after this point that are affected by the<br />
Enhancer are automatically added to this list.<br />
You can remove an Enhancer by selecting<br />
the Enhancer again from the Skill Enhancer or<br />
Perk Enhancer menu. The Skills or Perks in the<br />
Enhancer list are moved back into the normal list of<br />
Skills or Perks on the character sheet pane.<br />
You can delete both the Enhancer and the items<br />
in its list by highlighting the Enhancer and clicking<br />
the Delete button. You are prompted if you want to<br />
the delete the list. Click Yes. You are then prompted<br />
if you want to delete all items contained by the<br />
Enhancer. Click Yes to delete both the Enhancer<br />
and all items in its list. Click No to delete just the<br />
Enhancer. Click Cancel to cancel the deletion.<br />
If you have turned off the need for confirming<br />
deletions on the Preferences dialog as described<br />
in the “Application Preferences” section on page 33,<br />
you will not be prompted as to whether you want to<br />
delete the Enhancer, but you will still be prompted<br />
as to whether you want to delete all items in the list.<br />
As noted in the sidebar the “Attaching Custom<br />
Adders To Lists And Frameworks” sidebar on page<br />
26, you can use a combination of Lists and Custom<br />
Adders to simulate new Enhancers.<br />
When you select to use Skill Multipliers as<br />
described in the “Campaign Rules” section on page<br />
36, Skill Enhancers is replaced with Skill Multipliers<br />
on the character sheet menu bar of the Skills tab.<br />
The costs of Skills to which the Skill Multiplier<br />
applies are calculated as per the Background Skill<br />
Multiplier rules in the HERO System Fifth <strong>Edition</strong><br />
sourcebook The Ultimate Skill.<br />
WORKINg WITH MULTIPLE<br />
CHARACTERS<br />
<strong>Hero</strong> <strong>Designer</strong> lets you work on multiple<br />
characters at once. The Open Files menu shows the<br />
names of all currently active characters. For each<br />
character, it also lists the associated file name and<br />
a keyboard equivalent. New <strong>Hero</strong> is displayed for<br />
any new characters who do not yet have a name<br />
assigned to them. To change to another character,
30 ■ Using <strong>Hero</strong> <strong>Designer</strong> <strong>Hero</strong> <strong>Designer</strong> <strong>6th</strong> <strong>Edition</strong><br />
select that character from the Open Files menu or<br />
type the character’s keyboard equivalent.<br />
By using the techniques described in the<br />
“Copying, Cutting, and Pasting” section on page 15,<br />
you can move or copy abilities from one character<br />
to another.<br />
When you choose to create a new character with<br />
one or more characters already loaded, the new<br />
character defaults to using the same template as the<br />
last character created or loaded.<br />
COMBAT RECORDS<br />
When you have one or more open characters,<br />
<strong>Hero</strong> <strong>Designer</strong> lets you create a combat record that<br />
summarizes some or all of the open characters.<br />
Combat records are often used to create SPD charts<br />
or single sheet character briefs for use during play.<br />
The exact format and contents of a combat<br />
record are determined by a combat record Export<br />
Format. Full instructions on creating and modifying<br />
combat record Export Formats are available in the<br />
“Export Formats” chapter on page 52.<br />
Exporting A Combat Record<br />
To create and export a combat record, select<br />
Combat Record Export… from the File menu.<br />
The Combat Record Character Selection dialog<br />
appears.<br />
You can also choose how you want these<br />
characters to be sorted. This is a two level sort.<br />
Select the first level sorting method from the<br />
Sort Characters By dropdown list and check the<br />
Ascending checkbox beside that list if you want<br />
the sort to be in ascending order as opposed to the<br />
default descending order. Select the second level<br />
sorting method from the Then By dropdown list<br />
and corresponding checkbox. You can choose to<br />
sort by Name, SPD, DEX, or Character Points.<br />
When you have selected the characters to be<br />
included and specified the sorting methods, click<br />
Done.<br />
The Select Export Template dialog appears<br />
showing a list of available combat record Export<br />
Formats. Click on a format name to choose a format<br />
and see its description. Click Select to assign that<br />
template to the character.<br />
Next, a standard file selector dialog appears.<br />
Choose the directory in which you want to save the<br />
exported file, enter the file name for the exported<br />
file in the File Name field and click Save. If the file<br />
name has no extension, the first extension in the<br />
list of acceptable extensions shown in the Files of<br />
Type field (specified by the combat record Export<br />
Format) is used by default.<br />
To print the exported combat record, load the<br />
exported file into the appropriate program and<br />
follow the instructions in that program for printing.<br />
You can also view, edit, or otherwise manipulate the<br />
combat record as desired.<br />
Previewing A Combat Record<br />
To preview a combat record in your default web<br />
browser (or other program associated with the<br />
extensions specified in the Export Format), select<br />
Preview Combat Record… from the File menu.<br />
Select the characters to be included, the sorting<br />
method to use, and the combat record Export<br />
Format to use.<br />
<strong>Hero</strong> <strong>Designer</strong> then launches your web browser<br />
(or other appropriate program) with your character<br />
loaded. Some Export Formats may not preview<br />
properly.<br />
SAvINg A CHARACTER<br />
To save the current character, select Save from<br />
the Current Character menu . A sub-menu appears<br />
with the following items: Save Character, Save<br />
Character As…, Save As Package Deal…, Save As<br />
Prefab…, and Save As Template…. If the character<br />
has not been previously saved or has not changed<br />
since it was last saved, the Save Character item will<br />
be grayed out.<br />
Selecting Save Character automatically saves the<br />
current character with the same file name and in<br />
the same directory as when it was last saved. Typing<br />
Ctrl-S is the same as selecting Current Character ><br />
Save > Save Character.<br />
Selecting Save Character As displays the Save<br />
Character file selector dialog. Choose the directory<br />
in which you want to save the character, enter the<br />
file name in the File Name field and click Save. The<br />
file is always saved with an .hdc extension. If you<br />
specify any other file extension, it is replaced with<br />
.hdc. Typing Alt-S is the same as selecting Current<br />
Character > Save > Save Character As….<br />
When a character is saved, the current character<br />
template, and the assigned image, if any, are also<br />
saved in the character file.<br />
You can also save all open files by selecting<br />
Save All Files from the File menu. This saves all<br />
currently open files with the same file names and in
<strong>Hero</strong> <strong>Designer</strong> <strong>6th</strong> <strong>Edition</strong> Using <strong>Hero</strong> <strong>Designer</strong> ■ 31<br />
the same directories as when they were last saved.<br />
If any of the currently open files have not been<br />
previously saved, the Save Character file selector<br />
dialog appears allowing you to specify a file name<br />
and directory for saving the character.<br />
For details on Save Character As Prefab…<br />
and Save Character As Package Deal…, see the<br />
“Prefabs And Package Deals” chapter on page 40. For<br />
details on Save Character As Template…, see the<br />
“Character Templates” chapter on page 43.<br />
CLOSINg A CHARACTER<br />
To close the current character, select Close<br />
Character from the Current Character menu<br />
or type Ctrl-W. If no changes have been made<br />
since the character was last saved, the character is<br />
simply closed. If changes have been made or the<br />
character has never been saved, you are prompted<br />
as to whether or not you want to save the character<br />
before closing it. If you select No, all changes made<br />
since the character was last saved are lost. If you<br />
select Yes, the character is saved as described in the<br />
previous section.<br />
You can also close all open files by selecting<br />
Close All Files from the File menu. As with Close<br />
Character, you will be prompted as to whether or<br />
not to save any new or changed characters before<br />
closing.<br />
If you exit <strong>Hero</strong> <strong>Designer</strong> without closing a<br />
character and that character was previously saved,<br />
the saved version of that character is automatically<br />
loaded when you next run the program.<br />
PREvIEWINg, ExPORTINg,<br />
AND PRINTINg A<br />
CHARACTER<br />
Once you have created your character, you can<br />
export it for printing, viewing, or editing with a web<br />
browser, text editor, word processor, or other such<br />
program. You can also preview the character before<br />
exporting it to see what the exported character will<br />
look like.<br />
To export and preview characters, <strong>Hero</strong><br />
<strong>Designer</strong> uses Export Formats as described in the<br />
“Export Formats” section on page 2. Full details<br />
on creating and modifying Export Formats are<br />
available in the “Export Formats” chapter on page 52.<br />
Setting The Export Format<br />
To set or change the Export Format associated<br />
with a character, select Export from the Current<br />
Character menu and then select Set Export<br />
Format… from the sub-menu that appears or type<br />
Ctrl+Alt-E. The Select Export Template dialog<br />
appears showing a list of available Export Formats.<br />
Click on a Export Format name to choose a format<br />
and see its description. Click Select to assign that<br />
Export Format to the character.<br />
Exporting And Printing A<br />
Character<br />
To export a character, select Export from the<br />
Current Character menu and then select Export<br />
to File… from the sub-menu that appears or<br />
type Ctrl-E. If no Export Format is set (either by<br />
explicitly setting an Export Format or by previously<br />
exporting or previewing the character), the Select<br />
Export Template dialog appears as described above<br />
to let you choose one. Next, a standard file selector<br />
dialog appears. Choose the directory in which you<br />
want to save the exported file, enter the file name<br />
for the exported file in the File Name field and click<br />
Save. If the file name has no extension, the first<br />
extension in the list of acceptable extensions shown<br />
in the Files of Type field (specified by the Export<br />
Format) is used by default.<br />
When the character has an image attached, you<br />
are prompted as to whether or not you want to<br />
include the image with the exported character (that<br />
is, save it in the same directory). If you choose to<br />
include the image, a standard file selector dialog<br />
appears. Enter the file name to use for the image in<br />
the File Name field and click Save. <strong>Hero</strong> <strong>Designer</strong><br />
can save the file in either JPG or GIF format based<br />
on the file extension you specify. If you do not<br />
specify a file extension, the image is saved with a<br />
.jpg extension. If you specify an extension other<br />
than .jpg or .gif, the image is saved in JPG format<br />
with that extension, but you will need to change the<br />
extension to .jpg to use the image.
32 ■ Using <strong>Hero</strong> <strong>Designer</strong> <strong>Hero</strong> <strong>Designer</strong> <strong>6th</strong> <strong>Edition</strong><br />
When the character being exported has one or<br />
more abilities that are associated with other <strong>Hero</strong><br />
<strong>Designer</strong> files (as described in the “Associating<br />
Files” section on page 31), you are prompted as<br />
to whether or not you also want to export the<br />
associated files.<br />
To print an exported character, load the<br />
exported file into the appropriate program and<br />
follow the instructions in that program for printing.<br />
You can also view, edit, or otherwise manipulate the<br />
file as desired.<br />
Previewing A Character<br />
To preview a character in your default web<br />
browser (or other program associated with the<br />
extensions specified in the Export Format), select<br />
Export from the Current Character menu and<br />
then select Preview Character… from the submenu<br />
that appears or type Alt-E. If no Export<br />
Format has been set (either by previously exporting<br />
or previewing the character or by setting an Export<br />
Format as described in the “Setting the Export<br />
Format” section on page 31), the Select Export<br />
Template dialog appears as described above to let<br />
you choose one.<br />
<strong>Hero</strong> <strong>Designer</strong> then launches your web browser<br />
(or other appropriate program) with your character<br />
loaded. Some Export Formats, such as the one<br />
designed for use with the <strong>Hero</strong> <strong>Games</strong> discussion<br />
boards, do not preview properly.<br />
Printing To PDF<br />
In addition to printing using an Export Format,<br />
you can also print characters directly to PDF.<br />
To print the current character to a PDF file,<br />
select Print to PDF... from the Current Character<br />
menu. A standard file selector dialog appears. Enter<br />
the file name for the PDF file in the File Name field<br />
and click Save. If you do not specify a file extension,<br />
the file is saved with a .pdf extension. If you specify<br />
an extension other than .pdf, the image is saved in<br />
PDF format with that extension, but you may need<br />
to change the extension to .pdf to display the file. If<br />
the file is saved with a .pdf extension, that PDF file<br />
is displayed once it has been created.<br />
When printing to PDF, Export Formats are<br />
not used instead characters are always printed<br />
on character sheets resembling the blank sheets<br />
included in the HERO System rulebooks. Characters<br />
based on Fifth <strong>Edition</strong> templates are printed on<br />
the sheet from the Fifth <strong>Edition</strong> rulebooks and<br />
characters based on Sixth <strong>Edition</strong> templates<br />
are printed on the sheet from the Sixth <strong>Edition</strong><br />
rulebooks.<br />
You can see a PDF character sheet for a HERO<br />
System Sixth <strong>Edition</strong> character below.
<strong>Hero</strong> <strong>Designer</strong> <strong>6th</strong> <strong>Edition</strong><br />
Configuring <strong>Hero</strong> <strong>Designer</strong> ■ 33<br />
CONFIgURINg<br />
HERO DESIgNER<br />
As briefly described in the “Basic Concepts”<br />
chapter on page 2, there are two ways that<br />
you can tailor <strong>Hero</strong> <strong>Designer</strong> to work the<br />
way you want it to: applications preferences<br />
and campaign rules.<br />
APPLICATION<br />
PREFERENCES<br />
Application preferences let you change the<br />
way <strong>Hero</strong> <strong>Designer</strong> and its interface work. These<br />
changes do not affect the abilities available or the<br />
way that <strong>Hero</strong> <strong>Designer</strong> interprets the HERO System<br />
rules, but they may affect how those abilities are<br />
presented.<br />
To view or edit the current application<br />
preferences, select Preferences from the File menu.<br />
The Preferences dialog appears.<br />
The number of tabs on the Preferences dialog<br />
varies depending upon the current active character<br />
template. If no character template is currently active<br />
(that is, no characters are loaded) or a HERO System<br />
Sixth <strong>Edition</strong> character template is currently active,<br />
the Preferences dialog has five tabs: General,<br />
System, Display, Modifier Intelligence, and<br />
Prefabs. If a HERO System Fifth <strong>Edition</strong> character<br />
template is currently active, the Preferences dialog<br />
also has a Template tab.<br />
general Preferences<br />
The General tab of the Preferences dialog<br />
includes five settings that affect the behavior of<br />
<strong>Hero</strong> <strong>Designer</strong> when it starts. The screenshot below<br />
shows the default settings for this tab.<br />
The Restore window position on startup<br />
checkbox specifies whether or not the size and<br />
position of the main <strong>Hero</strong> <strong>Designer</strong> window are<br />
preserved when you exit the program and restored<br />
when you restart the program.<br />
The Remember dialog position and size<br />
checkbox specifies whether or not <strong>Hero</strong> <strong>Designer</strong><br />
uses the position and size of the previous dialog<br />
when displaying a new dialog.<br />
The Load characters on startup checkbox<br />
specifies whether or not <strong>Hero</strong> <strong>Designer</strong><br />
automatically loads characters that were still open<br />
when you last exited <strong>Hero</strong> <strong>Designer</strong>.<br />
The Load prefabs on startup checkbox specifies<br />
whether or not <strong>Hero</strong> <strong>Designer</strong> automatically loads<br />
prefabs that were still open when you last exited<br />
<strong>Hero</strong> <strong>Designer</strong>.<br />
The Tab Placement dropdown list lets you<br />
select where tabs are displayed for the main <strong>Hero</strong><br />
<strong>Designer</strong> window as well as any dialogs which use<br />
tabs. From this dropdown list, you can select to<br />
display tabs at the Top, Left, Bottom, or Right of<br />
the window or dialog.<br />
Finally, there is a slider which sets the amount of<br />
memory available for use with <strong>Hero</strong> <strong>Designer</strong>. <strong>Hero</strong><br />
<strong>Designer</strong> is optimized to use 64 MB of memory and<br />
while increasing the memory available can allow<br />
more characters and Prefabs to be open at once, it<br />
can also slow down the program. For this reason,<br />
changing the available memory from 64 MB is not<br />
recommended.<br />
System Preferences<br />
The System tab of the Preferences dialog<br />
includes settings which affect the overall operation<br />
of <strong>Hero</strong> <strong>Designer</strong>. The screenshot below displays the<br />
default settings for this tab.<br />
The Confirm deletions checkbox specifies<br />
whether or not <strong>Hero</strong> <strong>Designer</strong> prompts you for<br />
confirmation when you attempt to delete an item<br />
from the character sheet pane. When this box is<br />
unchecked, <strong>Hero</strong> <strong>Designer</strong> still prompts you as to<br />
whether or not you want to delete all items in a list<br />
or Framework.
34 ■ Configuring <strong>Hero</strong> <strong>Designer</strong> <strong>Hero</strong> <strong>Designer</strong> <strong>6th</strong> <strong>Edition</strong><br />
The Warn on duplicate purchases checkbox<br />
specifies whether or not <strong>Hero</strong> <strong>Designer</strong> issues a<br />
warning when you attempt to purchase an ability<br />
that you have already purchased.<br />
The Use “Quick Assign” on abilities checkbox<br />
specifies whether you can add an ability at its base<br />
level without having that ability’s dialog displayed.<br />
When this box is not checked, you can still add<br />
these abilities without displaying their dialogs by<br />
right-clicking on the ability in the available item list.<br />
The Prompt to export image file when<br />
exporting character checkbox specifies whether<br />
or not <strong>Hero</strong> <strong>Designer</strong> prompts you to export an<br />
attached image file when exporting a character.<br />
When this box is not checked, <strong>Hero</strong> <strong>Designer</strong><br />
automatically exports the attached image file.<br />
The Refresh character template from file<br />
during load dropdown list describes how <strong>Hero</strong><br />
<strong>Designer</strong> handles loading a character whose<br />
character template has changed since the character<br />
was saved. There are three possible settings: Always,<br />
Prompt, and Never. When Always is selected, a<br />
changed character template is always refreshed<br />
from the original template file when a character<br />
is loaded. When Prompt is selected, the user is<br />
prompted as to whether or not to refresh a changed<br />
character template. When Never is selected, a<br />
changed character template is never refreshed from<br />
the original file.<br />
The Refresh campaign rules from file during<br />
load dropdown list describes the behavior of <strong>Hero</strong><br />
<strong>Designer</strong> whose attached<br />
campaign rules have<br />
changed since the character<br />
was saved. There are three<br />
possible settings: Always,<br />
Prompt, and Never. When<br />
Always is selected, changed<br />
campaign rules are always<br />
refreshed from the original<br />
campaign rules file when a<br />
character is loaded. When<br />
Prompt is selected, the user<br />
is prompted as to whether<br />
or not to refresh changed<br />
campaign rules. When<br />
Never is selected, a changed<br />
campaign rules are never<br />
refreshed from the original<br />
file.<br />
The Number of decimal<br />
places for rounding field<br />
specifies the number of<br />
digits <strong>Hero</strong> <strong>Designer</strong><br />
calculates to before<br />
rounding.<br />
The Character template<br />
directory, Default<br />
Campaign Rules directory,<br />
and Default Export<br />
Template directory fields<br />
specify the directories<br />
in which <strong>Hero</strong> <strong>Designer</strong><br />
will look for character<br />
templates, campaign rules, and Export Formats,<br />
respectively You can either enter directory names<br />
directly in the text boxes provided or you can use<br />
the Browse buttons to find the desired directories<br />
using a standard file selector.<br />
Finally, there are several fields which specify the<br />
default Export Formats to be used with the specified<br />
built-in character templates.<br />
Display Preferences<br />
The Display tab of the Preferences dialog<br />
includes six settings which affect how abilities are<br />
displayed on the character sheet pane and thus, how<br />
they are exported. The screenshot below shows the<br />
default settings for this tab.
<strong>Hero</strong> <strong>Designer</strong> <strong>6th</strong> <strong>Edition</strong> Configuring <strong>Hero</strong> <strong>Designer</strong> ■ 35<br />
The Use strict Writers’ Guidelines compliance<br />
checkbox specifies whether or not <strong>Hero</strong> <strong>Designer</strong><br />
displays abilities in a format as close to that of<br />
the <strong>Hero</strong> <strong>Games</strong> Writers’ Guidelines as possible.<br />
Normally, <strong>Hero</strong> <strong>Designer</strong> displays additional<br />
information for some abilities and Modifiers.<br />
The Use metric units of measurement for<br />
character height and weight checkbox specifies<br />
whether or not <strong>Hero</strong> <strong>Designer</strong> uses metric<br />
measurements for entering and displaying the<br />
height and weight of a character as well as the<br />
weight of equipment. If this box is unchecked,<br />
English units are used instead.<br />
The Display Active Points on abilities (by<br />
default) checkbox specifies whether or not <strong>Hero</strong><br />
<strong>Designer</strong> defaults to automatically displaying the<br />
Active Points of any ability to which Modifiers have<br />
been attached. The Display Active Points checkbox,<br />
which normally appears on an ability’s dialog when<br />
you attach a Modifier is automatically checked.<br />
It can still be unchecked if you don’t want Active<br />
Points displayed for a particular ability.<br />
The Show Common Limitations in slots on<br />
Lists/Frameworks checkbox specifies whether or<br />
not <strong>Hero</strong> <strong>Designer</strong> displays Limitations which apply<br />
to all slots of a Framework or list on each slot.<br />
The Use Abbreviations (where available)<br />
checkbox specifies whether or not <strong>Hero</strong> <strong>Designer</strong><br />
will display commonly-used abbreviations for<br />
certain abilities or Modifiers. For example, DI<br />
is displayed instead of Density Increase. When<br />
the Use strict Writers’ Guidelines compliance<br />
checkbox is also checked, only those abbreviations<br />
allowed by the Writers’ Guidelines are included.<br />
The Show Popup definitions in selection lists<br />
checkbox specifies whether or not you can view an<br />
ability’s definition by simply moving your mouse<br />
over the ability’s name in a selection list.<br />
Note that changing these settings only affects<br />
those abilities added after the change is made. The<br />
change has no effect on abilities already added.<br />
Modifier Intelligence<br />
Preferences<br />
The Modifier Intelligence tab of the Preferences<br />
dialog has three checkboxes that define how<br />
<strong>Hero</strong> <strong>Designer</strong> handles Modifier intelligence. The<br />
screenshot below shows the default settings for<br />
these checkboxes.<br />
The Use ‘Modifier Intelligence’ checkbox<br />
specifies whether or not <strong>Hero</strong> <strong>Designer</strong> uses<br />
Modifier intelligence when determining what<br />
Modifiers can be attached to abilities. When this<br />
box is unchecked, Modifier intelligence is still used<br />
to separate out non-recommended Modifiers but<br />
these Modifiers are still available to be attached.<br />
Additionally, if this box is unchecked, the other two<br />
settings in this section are grayed out and have no<br />
effect.<br />
The Check Modifiers during ability edit<br />
checkbox specifies whether or not <strong>Hero</strong> <strong>Designer</strong><br />
examines all Modifiers attached to an ability for<br />
validity each time you edit that ability. When this<br />
box is unchecked, <strong>Hero</strong> <strong>Designer</strong> also does not<br />
check Modifiers for validity when a character is<br />
loaded. Additionally, if this box is unchecked, the<br />
Remove Modifiers which fail validity check setting<br />
is grayed out and has no effect.<br />
The Remove Modifiers which fail validity<br />
check checkbox specifies whether or not <strong>Hero</strong><br />
<strong>Designer</strong> automatically removes Modifiers that it<br />
does not consider valid for an ability.<br />
Prefabs Settings<br />
The Prefabs tab of the Preferences dialog<br />
includes two settings that deal with how <strong>Hero</strong><br />
<strong>Designer</strong> handles Prefabs. The screenshot below<br />
displays the default settings for this tab.<br />
The Show Powers Prefabs on the Equipment<br />
Tab checkbox specifies whether or not Powers<br />
stored in Prefabs are displayed on the Equipment<br />
tab as well as the Powers tab.<br />
The Show Equipment Prefabs on the Powers<br />
Tab specifies whether or not equipment stored in<br />
Prefabs is displayed on the Powers tab as well as the<br />
Equipment tab.<br />
Template Preferences<br />
When the currently active character template<br />
is a HERO System Fifth <strong>Edition</strong> template, the<br />
Preferences dialog also includes a Template tab.<br />
This tab displays a list of HERO System Fifth<br />
<strong>Edition</strong> sourcebooks and other sources from which<br />
<strong>Hero</strong> <strong>Designer</strong> Fifth <strong>Edition</strong> character templates<br />
draw the abilities available in various selection lists.<br />
When the checkbox for a source listed on this tab<br />
is checked, <strong>Hero</strong> <strong>Designer</strong> includes the abilities<br />
defined in that source. When the checkbox is<br />
HERO gAMES<br />
WRITERS’<br />
gUIDELINES<br />
The <strong>Hero</strong> <strong>Games</strong> Writers’<br />
Guidelines (available at<br />
www.herogames.com/get/<br />
WritersGuidelines.pdf)<br />
describe the format to be<br />
used when submitting<br />
character sheets and other<br />
write-ups for publication.<br />
When Use strict Writers’<br />
Guidelines compliance<br />
is selected, <strong>Hero</strong> <strong>Designer</strong><br />
displays and exports all<br />
abilities in a format as<br />
close as possible to the<br />
Writers’ Guidelines.<br />
This option works best<br />
with Export Formats that<br />
also follow the Writers’<br />
Guidelines. There are still<br />
a few idiosyncrasies in<br />
the Writers’ Guidelines<br />
that can’t be generated<br />
by <strong>Hero</strong> <strong>Designer</strong>. Thus,<br />
when submitting character<br />
sheets produced by <strong>Hero</strong><br />
<strong>Designer</strong> for publication<br />
by <strong>Hero</strong> <strong>Games</strong>, you<br />
should double check<br />
those sheets to ensure that<br />
they fully meet Writers’<br />
Guidelines requirements<br />
and edit them manually if<br />
they do not.
36 ■ Configuring <strong>Hero</strong> <strong>Designer</strong> <strong>Hero</strong> <strong>Designer</strong> <strong>6th</strong> <strong>Edition</strong><br />
not checked, those abilities are not included. The<br />
screenshot below displays the default settings for<br />
this tab.<br />
When there are no characters loaded or the<br />
currently active character template is a HERO<br />
System Sixth <strong>Edition</strong> template, this tab does not<br />
appear on the Preferences dialog.<br />
CAMPAIgN RULES<br />
Almost every HERO System campaign operates<br />
under slightly different rules. Sometimes the<br />
difference is simply a matter of different point<br />
limits. Sometimes, it’s the use of Active Point limits.<br />
Other times, it’s the use of options listed in a HERO<br />
System rulebook or sourcebook. With all of these<br />
possibilities, it can sometimes be difficult to keep<br />
track of what limits and<br />
options are in use in a given<br />
campaign.<br />
To make this task easier,<br />
<strong>Hero</strong> <strong>Designer</strong> lets you<br />
create sets of campaign<br />
rules that you can assign<br />
to characters to enforce<br />
campaign-related options.<br />
Once you have defined a<br />
set of rules for a campaign,<br />
you can attach those<br />
rules to each individual<br />
character created for that<br />
campaign. If that character<br />
is then moved to another<br />
campaign, you can attach<br />
the campaign rules for<br />
that new campaign to<br />
the character and the old<br />
rules will be replaced. You<br />
can then ensure that the<br />
character is in line with the<br />
new campaign rules.<br />
To view or edit the campaign rules for the<br />
current character, select Campaign Rules from the<br />
Current Character menu and then select View/<br />
Edit Campaign Rules from the sub-menu that<br />
appears. The View/Edit Rules dialog appears.<br />
At the top of this dialog is the Ruleset Name<br />
field. When you are viewing or editing a set of<br />
campaign rules that was previously attached to<br />
the character, the name assigned to those rules is<br />
displayed in this field. When no campaign rules<br />
have been attached to the current character, this<br />
field is blank.<br />
When the current character is based on a HERO<br />
System Fifth <strong>Edition</strong> character template, the View/<br />
Edit Rules dialog has three tabs: Point Limits,<br />
Rules, and Settings. When the current character is<br />
based on a Sixth <strong>Edition</strong> template, the dialog also<br />
has a Characteristic Maxima tab.<br />
Point Limits Tab<br />
The Point Limits tab lets you specify a variety<br />
of point limits for a campaign. These point limits<br />
apply to all characters to which this set of rules is<br />
attached. The screenshot below shows the default<br />
values for this tab.<br />
For each point limit, you can select Ignore,<br />
Warn, or Do not allow from the associated<br />
dropdown list. If you select Ignore, <strong>Hero</strong> <strong>Designer</strong><br />
takes no action when the point limit is exceeded.<br />
If you select Warn, a warning is displayed when<br />
the point limit is displayed. If you select Do not<br />
allow, <strong>Hero</strong> <strong>Designer</strong> does not permit you to add<br />
any ability that would cause the point limit to be<br />
exceeded.<br />
Note that the screenshot is for HERO System<br />
Sixth <strong>Edition</strong> character templates; when the current<br />
character is based on a HERO System Fifth <strong>Edition</strong>
<strong>Hero</strong> <strong>Designer</strong> <strong>6th</strong> <strong>Edition</strong> Configuring <strong>Hero</strong> <strong>Designer</strong> ■ 37<br />
character template, the term “Disadvantage” or<br />
“Disad” is used in place of “Complication”.<br />
Characteristic Maxima Tab<br />
The Characteristic Maxima tab is only available<br />
when the current character is based on a HERO<br />
System Sixth <strong>Edition</strong> character template. This<br />
tab lets you specify the campaign maximum (if<br />
any) for each Characteristic. The maximum for a<br />
Characteristic represents the point where, when<br />
exceeded, the Characteristic begins to cost double.<br />
Rules Tab<br />
The Rules tab lets you implement several<br />
optional rules (such as the Language Familiarity<br />
Chart and cost multipliers) and alter how <strong>Hero</strong><br />
<strong>Designer</strong> interprets other rules. The screenshot<br />
below shows the defaults values for this tab for<br />
HERO System Sixth <strong>Edition</strong> character templates.<br />
Many of the rules on this tab are turned on or<br />
off by checking or unchecking the corresponding<br />
checkbox. For example, if you want to allow the<br />
use of the Standard Effect rule in your campaign,<br />
you would check the Standard Effect allowed<br />
checkbox.<br />
If the campaign uses the optional Skill Maxima<br />
rule, check the Use Normal Skill Maxima Limit<br />
checkbox and set the maximum Skill Roll value.<br />
Beyond this value, increasing a Skill Roll costs<br />
double. Similarly, if the optional Background<br />
Skill Multiplier rule is in use, check the Use Skill<br />
Multiplier check box.<br />
You can also use this tab to change how<br />
Characteristic Rolls and Skill Rolls are calculated<br />
by specifying different values for their bases and<br />
denominator. For example, if you want Skill Rolls<br />
to be calculated as 8+(CHAR/3) instead of as<br />
9+(CHAR/5), you would set the Skill Roll Base<br />
field to 8 and the Skill Roll Denominator field to 3.<br />
For other rules, there is a dropdown list to<br />
determine the action taken by <strong>Hero</strong> <strong>Designer</strong> in<br />
certain situations. These dropdown lists are similar<br />
to the ones described in the “Point Limits Tab”<br />
section on page 36. For example, you can set <strong>Hero</strong>
38 ■ Configuring <strong>Hero</strong> <strong>Designer</strong> <strong>Hero</strong> <strong>Designer</strong> <strong>6th</strong> <strong>Edition</strong><br />
<strong>Designer</strong> not to react to linking different slots of<br />
a Power Framework by selecting Ignore from the<br />
Linking different slots of a Power Framework<br />
dropdown list.<br />
When the current character is based on a HERO<br />
System Fifth <strong>Edition</strong> character template, the Rules<br />
tab contains additional rules options for features<br />
like Elemental Controls and Figured Characteristics<br />
that are not part of the HERO System Sixth <strong>Edition</strong><br />
rules.<br />
Settings Tab<br />
The Settings tab includes a variety of additional<br />
settings that will be applied to characters to which<br />
this set of rules is attached. The screenshot below<br />
shows the defaults values for this tab.<br />
The Active Points per END field specifies<br />
how many Active Points of an endurance-using<br />
ability (except STR) cost 1 END to use. The Active<br />
Points per END (STR) does the same thing for<br />
STR. By default, both these fields are set to 10 for<br />
superheroic templates and to 10 and 5, respectively,<br />
for heroic and normal templates.<br />
When the Equipment Allowed checkbox is<br />
checked, the Equipment tab becomes available for<br />
all characters to which these campaign rules are<br />
attached. Additionally, when this box is checked,<br />
several equipment-related fields become available.<br />
The Monetary Units field lets you specify the<br />
symbol or string that represent monetary units in<br />
your campaign. For example, you might specify “$”<br />
for a modern Champions campaign, “GP” (for gold<br />
pieces) for a Fantasy <strong>Hero</strong> campaign, or “Cr” (for<br />
credits) for a Star <strong>Hero</strong> campaign.<br />
The Prepend unit string to value checkbox<br />
specifies where the symbol or string specified where<br />
the Monetary Units field should appear in relation<br />
to a monetary value. When this box is checked,<br />
the string or symbol appears before the value (for<br />
example, $1.00). When it is unchecked, the string or<br />
symbol appears after the value (for example, 1GP).<br />
The # CU per $1 field specifies the value of 1<br />
current monetary unit in the generic currency units<br />
used by <strong>Hero</strong> <strong>Designer</strong> to track prices. The $1 in<br />
this field’s name is altered based on the value of the<br />
Monetary Units field. For example, if Monetary<br />
Units is set to “GP” and the Prepend unit string to<br />
value checkbox is unchecked, the field name will be<br />
# CU per 1GP.<br />
The purpose of this value is to allow easy<br />
conversions between currency. For example,<br />
suppose an American GM creates a prefab full of<br />
modern day equipment with prices in American<br />
dollars and a # CU per $1 setting of “1” in the<br />
campaign rules. This GM then shares the prefab<br />
with a British GM who likes the prefab but would<br />
prefer the prices to be in British pounds. To<br />
accomplish this, the British GM simply sets the<br />
# CU per ₤1 field in his campaign rules to “1.57”<br />
(the current value of a British pound in American<br />
dollars). Thus, when adding equipment from<br />
the prefab to characters with these campaign<br />
rules attached, the prices<br />
of the equipment will<br />
automatically be displayed<br />
in British pounds.<br />
The decimal places field<br />
specifies how many decimal<br />
places will be displayed<br />
for monetary values. For<br />
example, for American<br />
dollars, you would likely set<br />
this field to “2”, yielding a<br />
display of $1.00, while for<br />
fantasy gold pieces, you<br />
would likely set this field<br />
to “0”, yielding a display of<br />
1GP.<br />
Finally, the Notes Tabs<br />
section allows you to add<br />
up to five additional tabs<br />
to the main <strong>Hero</strong> <strong>Designer</strong><br />
window. Each new tab is<br />
essentially one large text<br />
box in which information<br />
about the character not<br />
included on other tabs<br />
can be entered. To add a<br />
new tab, check the Enable<br />
checkbox for the tab and<br />
enter the desired title for<br />
the new tab in the Tab Title<br />
field. By default, the five
<strong>Hero</strong> <strong>Designer</strong> <strong>6th</strong> <strong>Edition</strong><br />
Configuring <strong>Hero</strong> <strong>Designer</strong> ■ 39<br />
available new tabs are titled Notes 1, Notes 2, …<br />
Notes 5.<br />
It is important to note that information entered<br />
on these additional tabs will not be exported unless<br />
the Export Format selected specifically exports the<br />
information from those tabs.<br />
If the current character is based on a HERO<br />
System Fifth <strong>Edition</strong> character template, this tab<br />
will include two additional checkboxes which let<br />
you specify if NCM (Normal Character Maxima) is<br />
automatically applied to all characters and whether<br />
or not the NCM choice can be changed on a<br />
character by character basis. For more information<br />
on Normal Characteristic Maxima in HERO System<br />
Fifth <strong>Edition</strong>, see “Characteristic Maxima” on page 8.<br />
Saving Campaign Rules<br />
Once you have set up your campaign rules, you<br />
must save them before they have any effect.<br />
If you are modifying an existing set of campaign<br />
rules (other than the default rules), two buttons will<br />
be available on the View/Edit Rules dialog: Save<br />
and Save As….<br />
Clicking the Save button saves the campaign<br />
rules with the same name under which they were<br />
previously saved.<br />
Clicking the Save As… button launches a<br />
standard file selector. Choose the directory in which<br />
you want to save the character, enter the file name<br />
in the File Name field and click Save.<br />
In either case, the campaign rules are saved with<br />
a .hdr extension.<br />
When you are creating a new set of campaign<br />
rules, only the Save As… button is available.<br />
Once you have saved a set of campaign rules,<br />
those rules are automatically applied to the current<br />
active character. The status line at the bottom of<br />
the <strong>Hero</strong> <strong>Designer</strong> window is updated to show the<br />
name of the new campaign rules attached.<br />
To exit the View/Edit Rules dialog without<br />
saving the rules and applying them to the current<br />
active character, either click Cancel or close the<br />
dialog.<br />
Attaching Campaign Rules<br />
To A Character<br />
As mentioned in the previous section, when you<br />
save campaign rules, those rules are then attached<br />
to the current active character.<br />
To attach an existing set of campaign rules to<br />
the current active character, select Load Campaign<br />
Rules… from the Campaign Rules menu. A<br />
standard file selector dialog appears. Select the file<br />
containing the campaign rules you want to load and<br />
click Load Campaign Rules to load that file and<br />
apply the rules. The status line at the bottom of the<br />
<strong>Hero</strong> <strong>Designer</strong> window is updated to show the new<br />
of campaign rules as being attached.<br />
To attach the default HERO System campaign<br />
rules to the current active character, select Set to<br />
<strong>Hero</strong> System Default from the Campaign Rules<br />
menu. The default campaign rules are applied to the<br />
character and the status line is updated.
40 ■ Prefabs And Package Deals <strong>Hero</strong> <strong>Designer</strong> <strong>6th</strong> <strong>Edition</strong><br />
PREFABS AND<br />
PACKAgE DEALS<br />
As briefly described in the “Basic Concepts”<br />
chapter on page 2, a Prefab is a <strong>Hero</strong><br />
<strong>Designer</strong> file that contains lists of abilities<br />
and Disadvantages that you want to make<br />
available for multiple characters to chose items<br />
from.<br />
Similarly, a Package Deal (also briefly described<br />
in the “Basic Concepts” chapter) is a <strong>Hero</strong> <strong>Designer</strong><br />
file containing a set of Characteristic modifications,<br />
abilities, and Complications (or Disadvantages<br />
for characters built on HERO System Fifth <strong>Edition</strong><br />
character templates) that can be added in total (that<br />
is, all items in the Package Deal are added) to any<br />
character.<br />
<strong>Hero</strong> <strong>Designer</strong> Package Deals are most<br />
commonly used for implementing Package Deals<br />
from HERO System Fifth <strong>Edition</strong> and Templates<br />
from HERO System Sixth <strong>Edition</strong>, which are the<br />
same concept with two different names.<br />
PREFABS<br />
Possible uses for Prefabs include Martial Arts<br />
styles, equipment lists, spell lists, lists of Everyman<br />
Skills, lists of common Complications, and so on.<br />
Basically, any time that you have a list of abilities or<br />
Disadvantages that you want to use with more than<br />
one character, you may find it useful to put those<br />
items in a Prefab.<br />
For details on sharing Prefabs and Package Deals<br />
with other users, see the “Sharing <strong>Hero</strong> <strong>Designer</strong><br />
Files” sidebar on page 3.<br />
Creating A Prefab<br />
To create a Prefab, select New Prefab from the<br />
File menu. A blank form similar to a character form<br />
appears. Unlike a character form, this form has no<br />
Background or Characteristics tabs, because the<br />
information on these tabs is not used in Prefabs.<br />
The Basic Info tab has two fields. In the Prefab<br />
Name field, enter the name of the Prefab. In the<br />
Created By field, enter your name, e-mail address,<br />
or other identifying information. The Created By<br />
field lets other users with whom you may share this<br />
Prefab know who created it.<br />
Using this character form, add the abilities and<br />
Complications that you to want to include in the<br />
Prefab. You do this in the same way that you add<br />
abilities and Complications to a character. Any<br />
abilities with costs that normally may depend upon<br />
a character’s point total (for example, the Follower<br />
and Vehicle & Bases Perks) have their costs<br />
calculated based on a point total of 0. When these<br />
abilities are added to a character from the Prefab,<br />
their costs are recalculated based on that character’s<br />
point total.<br />
You may find it handy to organize some of the<br />
items in the Prefab into lists because, as discussed in<br />
the “Using Prefabs” section on page 41, you can add<br />
an entire List or Framework from a Prefab with a<br />
single action.<br />
For example, if you were using Prefabs to store<br />
Martial Arts styles, you could do it in one of two<br />
ways. You could create a separate Prefab for each<br />
style or you could create one Prefab that contained<br />
all the styles. When using the latter method, you<br />
would create a List for each style and put all the<br />
Martial Maneuvers for that style in the List.<br />
As another example, suppose you were creating a<br />
Prefab for a Package Deal that gives you a choice of<br />
one of three particular Skills. In this case, you might<br />
put those Skills in a List named “Choose one of”.<br />
Once you have entered all the items that you<br />
want to include in the Prefab, it is time to save<br />
the Prefab. This is just like saving a character, as<br />
described in the “Saving A Character” section on<br />
page 30, except that the sub-menu of the Save item on<br />
the Current Prefab menu contains Save Prefab and<br />
Save Prefab As instead of Save Character and Save<br />
Character As. By default, the name of the Prefab
<strong>Hero</strong> <strong>Designer</strong> <strong>6th</strong> <strong>Edition</strong> Prefabs And Package Deals ■ 41<br />
file will be the same as the name of the Prefab. The<br />
Prefab file is saved with a .hdp extension.<br />
CREATINg A PREFAB FROM A CHARACTER<br />
As an alternative, you can create a Prefab from a<br />
character. To do so, simply create or load a character<br />
that has the abilities and Complications you want<br />
to include in the Prefab. Note that anything on the<br />
Basic Info, Background, and Characteristics tabs<br />
will not be included in the Prefab.<br />
To turn this character into a Prefab, select Save<br />
from the Current Character menu and then Save<br />
As Prefab… from the sub-menu that appears or<br />
type Alt-P. The Save As Prefab dialog appears<br />
prompting you to enter the name for the Prefab.<br />
This is not the name of the file that is going to<br />
contain the Prefab but rather the name that will<br />
be used to refer to the Prefab in the Prefab menu.<br />
Enter the Prefab name and click OK. A standard<br />
file selector dialog appears. Choose the directory<br />
in which you want to store the Prefab file and enter<br />
the desired name for the file in the File Name field<br />
and click Save. The Prefab file is saved with a .hdp<br />
extension.<br />
Loading And Unloading<br />
Prefabs<br />
To load a Prefab, select Load Prefabs… from<br />
the Prefabs menu or type Ctrl-L. A standard file<br />
selector dialog appears. Select the file containing the<br />
Prefab you want to load and click Load Prefab. The<br />
selected Prefab is loaded and will remain loaded<br />
until it is explicitly unloaded. If you exit <strong>Hero</strong><br />
<strong>Designer</strong> with one or more Prefabs loaded, those<br />
Prefabs will be loaded automatically when you<br />
next restart the program (unless you have specified<br />
otherwise on the Preferences dialog as described in<br />
the “Application Preferences” section on page 33).<br />
To unload a Prefab, go to the Prefabs menu and<br />
move the mouse down to Unload Prefab. A list of<br />
currently loaded Prefabs appears to the right of the<br />
menu. Click on the name of the Prefab you want to<br />
unload and that Prefab is unloaded.<br />
Using Prefabs<br />
Once you have loaded one or more Prefabs, you<br />
can add any of the abilities or Complications in<br />
those Prefabs to any active character.<br />
To see the list of available items in the loaded<br />
Prefabs that you can add to a given tab’s character<br />
sheet, select that tab and then select the Prefabs<br />
subtab on the right pane. If the loaded Prefabs do<br />
not contain any items that can be added on that tab,<br />
the available item list is empty. Otherwise, you will<br />
see the list of items in the Prefab that can be added<br />
on the current tab.<br />
The Prefab item list is shown in tree format with<br />
folders being used to represent both Prefabs and<br />
Lists within the Prefabs. For example, suppose you<br />
had a Prefab named Science Skills that contained a<br />
collection of various science skills. With this Prefab<br />
loaded, the first time you look at the Prefabs subtab<br />
of the Skills tab, you would see the following:<br />
As you can see from the screenshot, it just shows<br />
a folder for the entire Prefab. You can open and<br />
close this or any other folder by clicking on the<br />
symbol to the left of the folder icon. After opening<br />
this folder, the Prefabs subtab looks like this:<br />
You can now add any item from the Prefabs<br />
subtab in the same way as you would add any other<br />
item (see “Adding An Item” on page 11). However,<br />
no dialog appears when you add an item from a<br />
Prefab. Items in Prefabs include any name, options,<br />
Modifiers, Adders, or notes set for the item when it<br />
was originally added to the Prefab.<br />
Editing A Prefab<br />
Occasionally, you will find that you need to<br />
go back and edit a Prefab. Usually, this is either<br />
to correct an error or to add new abilities or<br />
Complications.<br />
To edit a Prefab, select Open Prefab… from the<br />
File menu. A standard file selector dialog appears.<br />
Select the file containing the character you want to<br />
load and click Open Prefab to load that file as well<br />
as the associated character template and campaign<br />
rules.<br />
Make the desired changes to the Prefab’s<br />
contents and save the Prefab as described in the<br />
“Creating A Prefab” section on page 40.
42 ■ Prefabs And Package Deals <strong>Hero</strong> <strong>Designer</strong> <strong>6th</strong> <strong>Edition</strong><br />
PACKAgE DEALS<br />
In some ways, Package Deals are similar to<br />
Prefabs in that they are collections of items that<br />
can be added to any <strong>Hero</strong> <strong>Designer</strong> character.<br />
However, unlike Prefabs, which essentially provide<br />
lists of items for users to choose individual items<br />
from, Package Deals are applied in whole to a<br />
character. Package Deals are particularly useful for<br />
representing things like professions, cultures, and<br />
fantasy or alien races and other groups represented<br />
by Package Deals (in HERO System Fifth <strong>Edition</strong>) or<br />
Templates (in HERO System Sixth <strong>Edition</strong>).<br />
Creating Package Deals<br />
To create a Package Deal, you create a<br />
character with the Characteristics, abilities, and<br />
Disadvantages that a basic character with that<br />
Package Deal would have. Next, load any Prefabs<br />
that you want included as part of the Package Deal.<br />
Prefabs in Package Deals are useful for representing<br />
lists of abilities that can be chosen from.<br />
For example, many HERO System Package Deals<br />
and Templates include lists like “Choose two of the<br />
following skills”. Such lists are best implemented<br />
as Prefabs that will be stored as part of the Package<br />
Deal.<br />
Finally, to save that character as a Package Deal,<br />
select Save from the Current Character menu and<br />
then select Save As Package Deal … from the submenu<br />
that appears. The Enter Package Deal Name<br />
dialog appears prompting you to enter the name<br />
for the Package Deal. This is not necessarily the<br />
name of the file that is going to contain the Package<br />
Deal but rather the name of the deal itself. Enter<br />
the Package Deal name and click OK. A standard<br />
file selector dialog appears. Choose the directory in<br />
which you want to store the Package Deal file and<br />
enter the desired name for the file in the File Name<br />
field and click Save. If you have any Prefabs loaded,<br />
you are prompted as to whether or not you want<br />
those Prefabs saved as part of the Package Deal. The<br />
Package Deal file is saved with a .hpk extension.<br />
It should be noted here that the Characteristics<br />
entered when creating a Package Deal are those of<br />
a basic character that has that deal. That is, the only<br />
differences in Characteristics from the base values<br />
are those that are a result of that deal.<br />
For example, if a Package Deal gives +2 STR,<br />
you should enter 12 in the Value field for STR on<br />
the Characteristics tab When this deal is applied (as<br />
described in the next session) to a character, <strong>Hero</strong><br />
<strong>Designer</strong> adjusts each Characteristic’s Value field by<br />
the difference between that Characteristic’s Value<br />
and Base fields in the Package Deal.<br />
Applying Package Deals<br />
To apply a Package Deal to a character,<br />
select Apply Package Deal… from the Current<br />
Character menu. The Apply Package Deal file<br />
selector appears. Select the Package Deal you want<br />
to apply and click Apply Package Deal.<br />
When a Package Deal is applied, the current<br />
character’s Characteristics are adjusted as<br />
described in the previous section and any abilities<br />
or Complications in the Package Deal are added<br />
to the character. In addition, any Prefabs that<br />
were included in the Package Deal will be loaded,<br />
allowing to select items from those Prefabs to add<br />
to the character.<br />
Editing Package Deals<br />
Currently, <strong>Hero</strong> <strong>Designer</strong> does not provide any<br />
method for editing Package Deals. However, if<br />
you save the “character” you are using as the basis<br />
for your Package Deal as a character (with a .hdc<br />
extension) before you save it as a Package Deal, you<br />
can reload that character , edit it, and then resave it<br />
as both a character and as a Package Deal (using the<br />
same file names as when you first saved them). You<br />
have then effectively edited your Package Deal.
<strong>Hero</strong> <strong>Designer</strong> <strong>6th</strong> <strong>Edition</strong><br />
Character Templates ■ 43<br />
CHARACTER<br />
TEMPLATES<br />
As briefly described in the “Basic Concepts”<br />
chapter on page 2, character templates are<br />
XML (Extensible Markup Language) files<br />
that define various aspects of the rules used<br />
to build HERO System characters. This includes<br />
the points available to build a character as well as<br />
a complete list of Characteristics, abilities (Skills,<br />
Powers, Perks, and so forth), Complications (or<br />
Disadvantages), and Modifiers (Advantages and<br />
Limitations) along with their costs.<br />
Because the character template also defines<br />
exactly what options are available for abilities and<br />
Modifiers as well as the relationships between<br />
different abilities and Modifiers, you can change<br />
how <strong>Hero</strong> <strong>Designer</strong> interprets the HERO System<br />
rules by creating custom versions of the standard<br />
templates. This chapter provides an overview of the<br />
structure and format of character templates so that<br />
you can create your own by either editing a copy of<br />
one of the standard templates or creating your own<br />
template from scratch. See the “Copies Of Standard<br />
Character Templates” sidebar for more information<br />
about copies of the standard templates.<br />
There are two methods for creating a character<br />
template: saving a character as a template and<br />
creating a character template from scratch.<br />
SAvINg A CHARACTER AS<br />
A TEMPLATE<br />
When your template does not involve making<br />
any changes to the standard HERO System rules,<br />
it is easiest to create it by saving a character as a<br />
template. For example, if all the characters in a<br />
given campaign will be created using the same<br />
campaign rules, have the same Everyman Skills, and<br />
have a common set of campaign-specific Perks and<br />
Complications, you may want to use this method to<br />
create a character template that can then be used to<br />
create all characters for that campaign.<br />
To do so, create a new character with the<br />
desired starting Characteristics, abilities, and<br />
Complications.<br />
Next, assign the desired set of campaign rules<br />
(if any) and load any prefabs you want to have<br />
available to all characters built with the template.<br />
Finally, select Save from the Current Character<br />
menu and then select Save Character As<br />
Template... from the sub-menu that appears. The<br />
Enter Template Name dialog appears prompting<br />
you to enter the name for the character template.<br />
This is not necessarily the name of the file that is<br />
going to contain the template but rather the name<br />
of the template itself. Enter the template name and<br />
click OK. A standard file selector dialog appears.<br />
Choose the directory in which you want to store the<br />
character template file and enter the desired name<br />
for the file in the File Name field and click Save.<br />
If you have any prefabs loaded, you are<br />
prompted as to whether or not you want those<br />
prefabs saved as part of the template. The character<br />
template file is saved with a .hdt extension.<br />
You may also want to save the “character” you<br />
used to created the character template as a character<br />
file (with a .hdc extension), so that if you want<br />
to make changes to the template, you can edit<br />
the saved character then resave it as a character<br />
template.<br />
Creating A Template From<br />
Scratch<br />
If you want to create a character template that<br />
requires changes to the standard HERO System<br />
rules, you should consider creating a new custom<br />
character template from scratch.<br />
You can edit or create a character template<br />
using any standard text editor such as the Notepad<br />
application on Windows systems or the VI editor on<br />
Linux and UNIX systems. Once you have finished<br />
editing or creating a template, be sure to save the<br />
template with a .hdt extension. Only files with a .hdt<br />
extension are recognized as character templates.<br />
While the following sections describe the<br />
structure of a character template and define the<br />
containers and attributes used in the template, a<br />
greater understanding can be obtained by viewing<br />
the copies of the standard templates provided, so<br />
you can see how these items are actually used.<br />
COPIES OF<br />
STANDARD<br />
CHARACTER<br />
TEMPLATES<br />
You can get copies of the<br />
standard <strong>Hero</strong> <strong>Designer</strong><br />
character templates by<br />
extracting the .hdt files<br />
from the HDv3.jar file<br />
using WinZip or a similar<br />
program for unzipping<br />
archives. This is best done<br />
in a directory other than<br />
the <strong>Hero</strong> <strong>Designer</strong> install<br />
directory.<br />
As an alternative, you can<br />
send an e-mail message<br />
to support@herodesigner.<br />
com and ask for the latest<br />
version of the templates.
44 ■ Character Templates <strong>Hero</strong> <strong>Designer</strong> <strong>6th</strong> <strong>Edition</strong><br />
CUSTOM<br />
TEMPLATES<br />
FROM PREvIOUS<br />
vERSIONS<br />
Due to the redesign of<br />
how character templates<br />
work, it is strongly<br />
recommended that you not<br />
use any <strong>Hero</strong> <strong>Designer</strong> v1<br />
custom templates. <strong>Hero</strong><br />
<strong>Designer</strong> v2 templates<br />
should work without<br />
problem if they were<br />
created as extensions to<br />
the built-in templates.<br />
Templates for HERO<br />
System Fifth <strong>Edition</strong><br />
characters may need<br />
editing before being used<br />
with HERO System Sixth<br />
<strong>Edition</strong> characters.<br />
The Hierarchical Structure of<br />
Character Templates<br />
<strong>Hero</strong> <strong>Designer</strong> character templates use a<br />
hierarchical structure. That is, one character<br />
template can be defined as an extension of another<br />
template. When a character template is defined<br />
in this way, it need only describe the differences<br />
between it and the other template. Such templates<br />
are called extension templates.<br />
The standard templates are all defined in this<br />
manner. They are extensions of the built-in Main.<br />
hdt template.<br />
It is recommended that you create a custom<br />
template as an extension template based on an<br />
existing built-in template. This ensures not only that<br />
all users of the custom template have the template<br />
on which it is based but that you need only define<br />
the differences from the built-in template. This<br />
latter benefit means not only less work for you but<br />
makes it much easier for another user to understand<br />
what is customized in the template. Finally, if the<br />
built-in template is updated, those changes are<br />
automatically inherited by the extension template.<br />
For more information on creating extension<br />
templates, see the “Creating Extension Templates”<br />
on page 50.<br />
xML Basics<br />
As noted earlier, character templates use XML.<br />
An XML document is comprised of “containers”.<br />
Containers have the form:<br />
<br />
<br />
<br />
<br />
Each container begins with an opening tag (such<br />
as and ) and ends<br />
with a corresponding closing tag (such as <br />
and ). As a shorthand for<br />
containers that do not contain anything, you can<br />
use the following format:<br />
<br />
Note the / before the closing >. That ends the<br />
empty container.<br />
As you can see from the basic format shown<br />
above, containers may contain other containers.<br />
This nesting structure can go as deeply as you want.<br />
Additionally, containers can have attributes. An<br />
attribute is a simple name/value pair. The name of<br />
the attribute must be unique within the tag. The<br />
value of the attribute must be surrounded by double<br />
quotes.<br />
Finally, all names in XML are case-sensitive, so<br />
TAGNAME is a different name from TagName.<br />
Structure Of A Character<br />
Template<br />
The basic structure of a <strong>Hero</strong> <strong>Designer</strong> character<br />
template is as follows:<br />
<br />
<br />
…<br />
<br />
<br />
…<br />
<br />
<br />
…<br />
<br />
<br />
…<br />
<br />
<br />
…<br />
<br />
<br />
…<br />
<br />
<br />
…<br />
<br />
<br />
…<br />
<br />
<br />
…<br />
<br />
<br />
Each of these containers defines a major section<br />
of the template. These sections are discussed later in<br />
this chapter.<br />
COMMON ATTRIBUTES<br />
The following attributes are used throughout<br />
character templates:<br />
XMLID: All items defined in the template<br />
should have this attribute. Its value can be<br />
any string, but the string must be unique<br />
within the item’s context. For example, if<br />
you’re defining a Modifier, the XMLID must<br />
be unique within the context of all Modifiers.<br />
There are cases where you may want to<br />
repeat a given XMLID (that is, have it not<br />
be unique), such as when you want a new<br />
Modifier to replace an existing one.<br />
Items which have unique containers (such<br />
as ACROBATICS or ABSORPTION)<br />
automatically have an XMLID which is the<br />
same as the container name.<br />
DISPLAY: This attribute specifies the initial<br />
display value for the item. Any string value<br />
can be used here. Usually, this is the name of<br />
the item.<br />
BASECOST: The cost or value for the item. For<br />
example, for Powers, this is the base cost to<br />
purchase the Power. For Modifiers, it is the
<strong>Hero</strong> <strong>Designer</strong> <strong>6th</strong> <strong>Edition</strong> Character Templates ■ 45<br />
value of the Modifier. Any decimal value can<br />
be inserted here (positive or negative).<br />
MINCOST: This attribute specifies the<br />
minimum cost or value for the item.<br />
MAXCOST: This attribute specifies the<br />
maximum cost or value for the item.<br />
LVLCOST: This attribute specifies the cost to<br />
increase a level with the item. Any decimal<br />
value can be used here. For example, most<br />
standard Skills have a LVLCOST of 2, that is,<br />
it costs 2 points to add a +1 to the Skill Roll.<br />
LVLVAL: This attribute specifies the value of<br />
increasing a level. For example, in HERO<br />
System Sixth <strong>Edition</strong>, STUN increases (by<br />
default) 2 points for every Character Point.<br />
The template represents this as<br />
LVLCOST=“1” LVLVAL=“2”. Any integer<br />
value can be used here.<br />
LVLPOWER: This attribute is used for “Powerbased”<br />
items. If you want an ability to<br />
increase by 2x for each level, you would use<br />
this tag, setting its value to “2”. Any integer<br />
value can be used here.<br />
LVLMULTIPLIER: This attribute, if present,<br />
causes the levels to be multiplied (once) by<br />
the specified value. Any integer value can be<br />
used here.<br />
LVLSTART: This attribute specifies the default<br />
starting level for an item.<br />
MINVAL: This attribute specifies the minimum<br />
level for the item.<br />
MAXVAL: The attribute specifies the maximum<br />
level for the item.<br />
USESEND: This attribute specifies whether or<br />
not the ability uses END. Valid values are<br />
“Yes” or “No”.<br />
APPEREND: This attribute specifies the Active<br />
Points per point of END for the item. This<br />
value will only be used for STR or items<br />
purchased as Powers. Any integer value can<br />
be used here. If you specify the APPEREND<br />
attribute for STR or a Power in a template, it<br />
overrides any END cost settings specified in<br />
the current campaign rules.<br />
INPUTLABEL: This attributes specifies the label<br />
for a field on the item’s dialog that requires<br />
input from the user. Any string can be<br />
specified here.<br />
OTHERINPUT: This attributes specifies<br />
whether the user can specify their own input<br />
or whether they must use one of the provided<br />
values. Valid values are “Yes” and “No”.<br />
ALLOWSOTHERMODIFIERS: This attribute<br />
specifies whether non-specific Modifiers can<br />
be added to this item. Valid values are “Yes”<br />
and “No”. If it is set to “Yes”, there will be an<br />
Add Modifier… button on the item’s dialog.<br />
ALLOWSOTHERADDERS: This attribute<br />
specifies whether or not non-specific Adders<br />
can be added to this ability. Valid values are<br />
“Yes” and “No”. If it is set to “Yes”, there will<br />
be a Custom Adder button on the item’s<br />
dialog.<br />
EXCLUSIVE: This attribute specifies whether<br />
the item can normally be purchased more<br />
than once within its given context. Valid<br />
values are “Yes” and “No”.<br />
SHOWDIALOG: This attribute specifies<br />
whether or not to display the item’s dialog<br />
when the item is added. Valid values are<br />
“Yes” and “No”. This attribute has no effect<br />
when “Quick Assign” is turned off on the<br />
Preferences dialog as described in the<br />
“Application Preferences” section on page 33. It<br />
can be used in all sections but the POWERS<br />
section.<br />
ABBREVIATION: This attribute specifies the<br />
abbreviation for the item. This value is only<br />
used when abbreviations are enabled on<br />
the Preferences dialog as described in the<br />
“Application Preferences” section on page 33.<br />
WGABBREVIATION: This attribute<br />
specifies the abbreviation to use when<br />
both abbreviations and writers’ guidelines<br />
compliance are enabled on the Preferences<br />
dialog as described in the “Application<br />
Preferences” section on page 33.<br />
WARNSIGN: This attribute specifies whether<br />
a warning sign appears beside the ability’s<br />
name in the available item pane. Valid values<br />
are “Yes” and “No”.<br />
STOPSIGN: This attribute specifies whether a<br />
stop sign appears beside the ability’s name in<br />
the available item pane. Valid values are “Yes”<br />
and “No”.<br />
COMMON SUBCONTAINERS<br />
The following subcontainers are used<br />
throughout character templates:<br />
OPTION: This subcontainer is used to present<br />
the user with a list of options for defining the<br />
Power. Base Cost, Level Cost, and so forth<br />
can all be specified on an option by option<br />
basis.<br />
Each option must have an XMLID attribute<br />
assigned to it which is unique within the<br />
context of the item. Options can contain<br />
Modifiers and Adders which will only appear<br />
when the user selects that option. If an option<br />
has a definition assigned to it, the definition<br />
of the main ability will be swapped out when<br />
the option is selected.<br />
DEFINITION: This subcontainer defines the<br />
definition for the item. Any text can be used<br />
here for the container’s contents.<br />
ADDER: Use this subcontainer to define any<br />
Adders which are available for the ability.<br />
Each ADDER container should specify at<br />
least the XMLID (unique within the context<br />
of the item), DISPLAY, BASECOST, and<br />
EXCLUSIVE attributes. You may also specify<br />
the various level parameters defined above.
46 ■ Character Templates <strong>Hero</strong> <strong>Designer</strong> <strong>6th</strong> <strong>Edition</strong><br />
BASIC INFO FIELDS<br />
The following list shows<br />
the subcontainers that can<br />
be specified to label fields<br />
on the Basic Info tab:<br />
■ NAME1<br />
■ NAME2<br />
■ CAMPAIGN<br />
■ GENRE<br />
■ PLAYER<br />
■ GM<br />
BACKgROUND<br />
FIELDS<br />
The following list shows<br />
the subcontainers that can<br />
be specified to label fields<br />
on the Background tab:<br />
■ EYE_COLOR<br />
■ HAIR_COLOR<br />
■ BACKGROUND<br />
■ PERSONALITY<br />
■ QUOTE<br />
■ TACTICS<br />
■ USE<br />
■ APPEARANCE<br />
An ADDER may contain other ADDER<br />
containers, giving a hierarchical structure<br />
similar to that which is found in abilities like<br />
Transport Familiarity.<br />
Adders can contain EXCLUDES and<br />
REQUIRES containers which define the<br />
XMLIDs of other Adders which are either<br />
excluded or required by this Adder.<br />
Up to six Adders per ability may contain<br />
a REQUIRED attribute. Valid values for<br />
REQUIRED are “Yes” and “No”. When<br />
set to “Yes”, the Adder will be part of the<br />
item’s dialog and will always be selected.<br />
Only Adders with Options should use this<br />
Attribute.<br />
MODIFIER: Use this subcontainer to define<br />
any ability-specific Modifiers which are<br />
available. If you want to replace one of the<br />
standard Modifier definitions, you should<br />
create a Modifier with the same XMLID as<br />
the Modifier you wish to replace. MODIFIER<br />
containers can contain Adders and other<br />
Modifiers.<br />
The MODIFIER subcontainer may use a<br />
MULTIPLIER attribute to specify whether or<br />
not the Modifier is to appear as a multiplier<br />
on the dialog. Valid values for MULTIPLIER<br />
are “Yes” and “No”. For example, when<br />
MULTIPLIER is set to “Yes”, a +1 Modifier is<br />
displayed as a x2 multiplier.<br />
TYPE: This subcontainer defines the type of the<br />
item (for example, ATTACK or DEFENSE).<br />
The type determines what Modifiers should<br />
be made available as well as what Enhancers<br />
will apply to a given Skill or Perk. The<br />
container’s contents should be text. This<br />
container may be repeated multiple times so<br />
that an item may actually have multiple types.<br />
EXAMPLE: If the item’s container has an<br />
INPUTLABEL attribute, this subcontainer<br />
specifies a predefined input example that will<br />
appear in the dropdown list for the field in<br />
the item’s dialog labeled by INPUTLABEL.<br />
Repeat this container for every input example<br />
you want.<br />
TEMPLATE CONTAINER<br />
The main TEMPLATE container contains all the<br />
other containers used in the template. The following<br />
are valid attributes for the TEMPLATE container:<br />
version: This attributes specifies the version of<br />
<strong>Hero</strong> <strong>Designer</strong> character template tags with<br />
which the template was designed to be used.<br />
For example, templates designed for <strong>Hero</strong><br />
<strong>Designer</strong> v2, v3, and <strong>6th</strong> <strong>Edition</strong> would have<br />
this attribute set to “2.0”.<br />
extends: This attribute specifies the template that<br />
this template extends. For example, the builtin<br />
Superheroic template extends the built-in<br />
Main template and thus, has this attribute set<br />
to “builtIn.Main.hdt”.<br />
ABILITy CONTAINERS<br />
Most abilities (Skills, Perks, Talents, and so<br />
forth) defined by the template are defined by a<br />
container that bears the name of the ability (for<br />
example, the Acrobatics Skill is defined in the<br />
ACROBATICS container) or a variation of that<br />
name (for example, the Darkness Power is defined<br />
in the DARKNESS container).<br />
Each ability container features an appropriately<br />
named generic container that allows you to define<br />
new abilities of that type. For example, you can use<br />
the generic SKILL container to define new Skills<br />
within the SKILLS container. Adders, Modifiers,<br />
and Disadvantages are also defined with generic<br />
containers.<br />
When creating new abilities, it is often useful to<br />
copy the definition of a similar ability to use as your<br />
starting point and edit it appropriately. As always,<br />
be sure to assign a unique XMLID when defining<br />
new items.<br />
MAINAPP SECTION<br />
The MAINAPP section of the template is<br />
specified with the MAINAPP container.<br />
This container defines the basic application<br />
level parameters for characters built with the<br />
template. This includes the fields that appear on<br />
the Background tab and, for HERO System Fifth<br />
<strong>Edition</strong> templates, information on how Normal<br />
Characteristic Maxima affect characters built with<br />
the template.<br />
All attributes of the MAINAPP tag are fixed, that<br />
is, you can modify the values, but you cannot create<br />
new attributes. The following are valid attributes for<br />
the MAINAPP container:<br />
HEIGHT: This attribute specifies whether or not<br />
a Height field appears on the Background<br />
tab allowing users to enter the height of a<br />
character. Valid values are “Yes” or “No”.<br />
WEIGHT: This attribute specifies whether<br />
or not a Weight field appears on the<br />
Background tab allowing users to enter the<br />
weight of a character. Valid values are “Yes”<br />
or “No”.<br />
EYECOLOR: This attribute specifies whether<br />
or not an Eye Color field appears on the<br />
Background tab allowing users to enter the<br />
eye color of a character. Valid values are “Yes”<br />
or “No”.<br />
HAIRCOLOR: This attribute specifies whether<br />
or not a Hair Color field appears on the<br />
Background tab allowing users to enter the<br />
hair color of a character. Valid values are<br />
“Yes” or “No”.<br />
BACKGROUND_TAB: This attribute specifies<br />
whether or not the Background tab is<br />
included. Valid values are “Yes” or “No”.<br />
NCM_COST_MULTIPLIER: This attribute<br />
specifies the effect of exceeding the Normal<br />
Characteristic Maxima level on a given<br />
Characteristic, that is, the value indicates by
<strong>Hero</strong> <strong>Designer</strong> <strong>6th</strong> <strong>Edition</strong><br />
Character Templates ■ 47<br />
how much to multiply the cost of increased<br />
levels. The value must be an integer.<br />
This attribute can be omitted if the characters<br />
to be built with the template do not use<br />
Normal Characteristic Maxima. For example,<br />
the standard Vehicle template does not use<br />
this attribute nor do HERO System Sixth<br />
<strong>Edition</strong> characters.<br />
GENERAL_LEVEL: This attribute specifies the<br />
value for the “General” Characteristic. This<br />
is used for Skills such as Knowledge Skills<br />
which are based off of “General” rather than<br />
a Characteristic. The standard templates have<br />
this attribute set to “10”.<br />
The MAINAPP section also defines Normal<br />
Characteristic Maxima with the NCM container.<br />
If you do not want Normal Characteristic Maxima<br />
available for characters built with this template, do<br />
not include the NCM container.<br />
The NCM container has the following attributes:<br />
XMLID: This attribute is described in the<br />
“Common Attributes” section on page 44.<br />
DISPLAY: This attribute specifies what you want<br />
Normal Characteristic Maxima to be called in<br />
this template. This is normally set to “Normal<br />
Characteristic Maxima”.<br />
BASECOST: This attribute specifies the base<br />
value of the Disadvantage associated with<br />
Normal Characteristic Maxima. The value<br />
must be an integer.<br />
For example, standard <strong>Hero</strong>ic templates<br />
have this attribute set to “0”, while standard<br />
Superheroic templates have it set to “20”.<br />
Within the NCM container, you can specify<br />
any number of OPTION containers that define<br />
the various age restrictions available. Each of these<br />
OPTION containers must have a unique XMLID.<br />
Each Characteristic affected by the age restriction<br />
must also have a corresponding attribute (with the<br />
same name as the OPTION’s XMLID attribute)<br />
that specifies the Characteristic maximum for that<br />
age restriction. Examples of this can be seen in the<br />
copies of the standard templates provided.<br />
Each OPTION container used to define an<br />
age restriction also has a DISPLAY attribute that<br />
specifies the name of the restriction (for example,<br />
“40+ Years Old”) and a BASECOST attribute that<br />
specifies the value of the Disadvantage associated<br />
with taking Normal Characteristic Maxima and this<br />
age restriction.<br />
Finally, the MAINAPP section also uses<br />
several subcontainers to specify the labels used<br />
for fields on the Basic Info and Background<br />
tabs. These subcontainers are listed in the “Basic<br />
Info Fields” and “Background Fields” sidebars<br />
on page 46. If any of these subcontainers (except<br />
EYE_COLOR or HAIR_COLOR) are empty (for<br />
example, or<br />
), the field that it labels is removed from<br />
the appropriate tab.<br />
CHARACTERISTICS SECTION<br />
This section defines the Characteristics available<br />
for characters built with this template.<br />
A template can include any of the Characteristics<br />
listed in the “Available Characteristics” sidebar,<br />
as appropriate. For example, in the standard<br />
<strong>Hero</strong> <strong>Designer</strong> templates, the DEF and SIZE<br />
Characteristics are only used in the Vehicle<br />
template, while the BASESIZE Characteristic is<br />
only used in the Base template. There are also 10<br />
custom characteristics (CUSTOM1, CUSTOM2,<br />
… CUSTOM10) that you can use to define new<br />
characteristics.<br />
To include a Characteristic in a template, the<br />
CHARACTERISTICS section should include a<br />
container with the name of the Characteristic. Such<br />
a container can have the following attributes:<br />
BASE: This attribute specifies the base value for<br />
the Characteristic on the Characteristics tab.<br />
Any levels gained from this are free.<br />
POSITION: This attribute specifies position<br />
in the Characteristic list in which the<br />
Characteristic should appear (relative to the<br />
others)<br />
[XXX]INCREASE: This attribute specifies the<br />
amount to increase another Characteristic<br />
(or other aspect of the character) relative to<br />
this one.<br />
[XXX]INCREASELEVELS: This attribute<br />
specifies the number of levels of the<br />
Characteristic before the increase defined<br />
by [XXX]INCREASE takes effect. For<br />
example, the DEX container in HERO<br />
System Fifth <strong>Edition</strong> templates has the<br />
attributes SPDINCREASE=“1” and<br />
SPDINCREASELEVELS=“10”.<br />
Using the [XXX]INCREASE and [XXX]<br />
INCREASELEVELS attributes let you specify which<br />
Characteristics are Figured Characteristics as well<br />
as the formula used to determine their value. Valid<br />
values for [XXX] are STR, DEX, CON, BODY, INT,<br />
EGO, PRE, COM, PD, ED, SPD, REC, END, STUN,<br />
KB, REACH, HEIGHT, WIDTH, DCV, OCV,<br />
PER, ECV, DEF, SIZE, LEAPING, RUNNING,<br />
and SWIMMING as well as CUSTOM1,<br />
CUSTOM2, … CUSTOM10. You should never<br />
have a Characteristic increase itself in this manner<br />
(that is, the STR container should never have<br />
the STRINCREASE or STRINCREASELEVELS<br />
attributes).<br />
The OCVINCREASE, DCVINCREASE,<br />
OCVINCREASELEVELS, and<br />
DCVINCREASELEVELS attributes are only usable<br />
with the calculated OCV and DCV in HERO System<br />
Fifth <strong>Edition</strong> templates, and not with the OCV and<br />
DCV Characteristics in HERO System Sixth <strong>Edition</strong><br />
templates.<br />
In templates that use Normal Characteristic<br />
Maxima (NCM), Characteristic containers also<br />
define the various limits for NCM. These attributes<br />
take the form of NCM=“10” or NCM40=“15”,<br />
and so forth. The name of the attribute (that is,<br />
AvAILABLE<br />
CHARACTERISTICS<br />
There are many built-in<br />
Characteristic containers<br />
that can be specified in a<br />
<strong>Hero</strong> <strong>Designer</strong> character<br />
template. The following are<br />
from HERO System Fifth<br />
<strong>Edition</strong>:<br />
■ STR<br />
■ DEX<br />
■ CON<br />
■ BODY<br />
■ INT<br />
■ EGO<br />
■ PRE<br />
■ COM<br />
■ PD<br />
■ ED<br />
■ SPD<br />
■ REC<br />
■ END<br />
■ STUN<br />
■ DEF<br />
■ SIZE<br />
■ BASESIZE<br />
■ RUNNING<br />
■ SWIMMING<br />
■ LEAPING<br />
In addition, the following<br />
built-in Characteristic<br />
containers from HERO<br />
System Sixth <strong>Edition</strong> are<br />
available:<br />
■ OCV<br />
■ DCV<br />
■ OMCV<br />
■ DMCV<br />
Finally, the following<br />
custom Characteristic<br />
container are available:<br />
■ CUSTOM1<br />
■ CUSTOM2<br />
■ CUSTOM3<br />
■ CUSTOM4<br />
■ CUSTOM5<br />
■ CUSTOM6<br />
■ CUSTOM7<br />
■ CUSTOM8<br />
■ CUSTOM9<br />
■ CUSTOM10
48 ■ Character Templates <strong>Hero</strong> <strong>Designer</strong> <strong>6th</strong> <strong>Edition</strong><br />
NCM or NCM40) should match the XMLID of<br />
the appropriate NCM OPTION specified in the<br />
MAINAPP section. The value is the maximum<br />
value before the Normal Characteristic Maxima<br />
cost multiplier kicks in.<br />
In addition, Characteristic containers can<br />
include Adders and Modifiers, although these will<br />
only be used when the Characteristic is purchased<br />
as a Power.<br />
An example of modifying Characteristic<br />
definitions and adding new Characteristics appears<br />
in the “Creating Extension Templates” section on<br />
page 50.<br />
SKILLS SECTION<br />
The SKILLS section defines the Skills available<br />
for characters built with the template.<br />
In addition to the common subcontainers<br />
listed on page 45, Skills use a subcontainer called<br />
CHARACTERISTIC_CHOICE. This subcontainer<br />
specifies on what Characteristic a Skill is based.<br />
When multiple CHARACTERISTIC_CHOICE<br />
subcontainers are present, users are presented with<br />
a dropdown selection list, letting them choose<br />
on which Characteristic to base the Skill. Each<br />
CHARACTERISTIC_CHOICE subcontainer has a<br />
single subcontainer of its own: ITEM.<br />
ITEM can define the following values:<br />
BASECOST, LVLCOST, LVLVAL, and<br />
CHARACTERISTIC. The CHARACTERISTIC<br />
value should match one of the Characteristics<br />
defined in the template’s CHARACTERISTICS<br />
section. Additionally, you may use the value<br />
GENERAL to refer to the GENERAL_LEVEL<br />
defined in the MAINAPP section.<br />
As a general rule, you should not change<br />
flat-cost Skills (that is, Skills that do not have a<br />
LVLCOST, LVLVAL, and so forth defined) to levelbased<br />
Skills or vice-versa. The safest way to edit<br />
abilities in this section is to just change the values of<br />
attributes that are already specified.<br />
You can add Adders and Modifiers to any Skill.<br />
To create new Skills, use the generic SKILL<br />
container and assign it a unique XMLID.<br />
This container uses the same attributes and<br />
subcontainers as the predefined Skills. An example<br />
of creating a new Skill appears in the “Creating<br />
Extension Templates” section on page 50.<br />
SKILL_ENHANCERS SECTION<br />
All Skill Enhancers (Scholar, Scientist, and so<br />
forth) are defined in this section. The available Skill<br />
Enhancers are fixed, though you can change any<br />
of the attributes and set what types of item each<br />
affects (for example, KNOWLEDGE, CONTACT,<br />
and so forth) by using the TYPE container.<br />
The only attribute unique to Skill Enhancers is<br />
COSTSAVINGS. This attribute should be set to an<br />
integer value and represents the amount to deduct<br />
from the cost of any abilities which match the<br />
Enhancer’s type.<br />
You cannot add new Skill Enhancers. Nor<br />
can you can you remove a Skill Enhancer from<br />
the menu. However, you can use the REMOVE<br />
container described in “Creating Extension<br />
Templates” on page 50 to disable a Skill Enhancer<br />
and prevent it from being selected from the Skill<br />
Enhancer menu. You can also use Custom Adders<br />
to simulate new Skill Enhancers as described<br />
in the “Attaching Custom Adders To Lists And<br />
Frameworks” sidebar on page 26.<br />
MARTIAL_ARTS SECTION<br />
All Martial Maneuvers and related abilities<br />
(extra Damage Classes, Weapon Element, and<br />
so forth) are defined in this section. The related<br />
abilities (extra Damage Classes, Weapon Element,<br />
and so forth) are fixed (that is, you cannot add new<br />
ones), though the attributes can all be edited to<br />
change their structure.<br />
All maneuvers are defined with the generic<br />
MANEUVER container. The valid attributes for the<br />
MANEUVER container are as follows:<br />
DISPLAY: This attribute specifies the default<br />
name of the maneuver.<br />
CATEGORY: This attribute specifies the<br />
category of the Maneuver. By default, there<br />
are two categories: “Hand To Hand” and<br />
“Ranged”. If you define a Maneuver with a<br />
different value for CATEGORY, it will be<br />
placed in a list for that category. Any string<br />
value may be used here.<br />
OCV: This attribute specifies the OCV modifier<br />
for the Maneuver. Any String value may<br />
be used here (so you may specify “--“ for<br />
Maneuvers like Dodge) , though the length of<br />
the string should be limited for formatting.<br />
DCV: This attribute specifies the DCV modifier<br />
for the maneuver. Any String value may be<br />
used here, though the length of the string<br />
should be limited for formatting.<br />
DC: This attribute specifies the number of<br />
additional damage classes of effect this<br />
Maneuver provides. Any integer value may be<br />
used here.<br />
PHASE: This attribute specifies how many<br />
phases it takes to perform the Maneuver. Any<br />
string value may be used here, though for<br />
formatting, you should limit the length to 3<br />
characters or less.<br />
EFFECT: This attribute specifies the text that<br />
should appear in the effect column for this<br />
Maneuver.<br />
WEAPONEFFECT: This attribute specifies the<br />
text that should appear in the effect column<br />
for this Maneuver if the user specifies that it<br />
is used with a weapon. The presence of this<br />
Attribute will create a drop-down list for the<br />
user to select whether they are purchasing the<br />
maneuver for use with a weapon or empty<br />
hand.<br />
The EFFECT and WEAPONEFFECT<br />
attributes specify the damage that a Maneuver
<strong>Hero</strong> <strong>Designer</strong> <strong>6th</strong> <strong>Edition</strong> Character Templates ■ 49<br />
does. To represent the different types of damage<br />
(normal, killing, NND, and so forth), you<br />
can use the following special strings within<br />
the value definitions for these attributes:<br />
[NORMALDC], [WEAPONDC], [FLASHDC],<br />
[NNDDC], [STRDC], [KILLINGDC], and<br />
[WEAPONKILLINGDC]. These special strings<br />
include, where appropriate, all Damage Classes<br />
from both the maneuver itself and the character’s<br />
STR as well as any appropriate extra Damage<br />
Classes purchased.<br />
For example, the EFFECT attribute for the Basic<br />
Strike Maneuver is set to “[NORMALDC] Strike” in<br />
the standard templates resulting in a display of “6d6<br />
Strike” for a STR 15 character who has purchased<br />
+1HTH Damage Class(es).<br />
PERKS SECTION<br />
All Perks are defined in this section. The list of<br />
available Perks is fixed, though the attributes for any<br />
given Perk can be edited to change most aspects of<br />
the Perk itself.<br />
As a general rule, you should not change<br />
flat-cost Perks (that is, Perks that do not have<br />
LVLCOST, LVLVAL, and so forth defined) to<br />
level-based Perks or vice-versa. The safest way to<br />
edit abilities in this section is to change the values<br />
of Attributes that are already specified. Also, you<br />
cannot change a roll-based Perk to a non-roll-based<br />
Perk (or vice versa) as the formatting for display<br />
on the character sheet pane (and thus, exporting as<br />
well) is contained within the application itself.<br />
You can add Adders and/or Modifiers to any of<br />
the Perks.<br />
To create new Perks, use the generic PERK<br />
container and assign it a unique XMLID.<br />
This container uses the same attributes and<br />
subcontainers as the predefined Perks.<br />
TALENTS SECTION<br />
All Talents are defined in this section. The list<br />
of available Talents is fixed, though the attributes<br />
for any given Talent can be edited to change most<br />
aspects of the Talent itself.<br />
In addition to the common subcontainers<br />
listed on page 45, Talents use a subcontainer called<br />
CHARACTERISTIC_CHOICE. This subcontainer<br />
specifies on what Characteristic a Talent is<br />
based. When a Talent container has multiple<br />
CHARACTERISTIC_CHOICE subcontainers,<br />
the users are presented with a dropdown<br />
selection list, letting them choose on which of<br />
these Characteristics to base the Talent. Each<br />
CHARACTERISTIC_CHOICE subcontainer has a<br />
single subcontainer of its own: ITEM.<br />
ITEM can define the following values:<br />
BASECOST, LVLCOST, LVLVAL, and<br />
CHARACTERISTIC. The CHARACTERISTIC<br />
value should match one of the Characteristics<br />
defined in the template’s CHARACTERISTICS<br />
section. Additionally, you may use the value<br />
GENERAL to refer to the GENERAL_LEVEL<br />
defined in the MAINAPP section.<br />
As a general rule, you should not change<br />
flat-cost Talents (i.e. Talents that do not have a<br />
LVLCOST, etc. defined) to level-based Talents or<br />
vice-versa. The safest way to edit abilities in this<br />
section is to change the values of Attributes that<br />
are already specified. Also, you cannot change a<br />
roll-based Talent to a non-roll-based Talent (or vice<br />
versa) as the formatting for display for display on<br />
the character sheet pane (and thus, exporting as<br />
well) is contained within the application itself.<br />
You can add Adders and/or Modifiers to any of<br />
the Talents.<br />
To create new Talents, use the generic TALENT<br />
container and assign it a unique XMLID.<br />
This container uses the same attributes and<br />
subcontainers as the predefined Talents..<br />
POWERS SECTION<br />
All Powers are defined in this section. The list<br />
of available Powers is fixed, though the attributes<br />
for any given Power can be edited to change most<br />
aspects of the Power itself.<br />
In addition to the common attributes listed on<br />
page 44, Power containers can have the following<br />
attributes:<br />
DURATION: This attribute specifies the<br />
duration of the Power. Valid values are<br />
“INSTANT”, “CONSTANT”, “PERSISTENT”,<br />
and “INHERENT”.<br />
TARGET: This attribute specifies how the Power<br />
is targeted. Valid values are “SELFONLY”,<br />
“DCV”, “ECV”, and “HEX”.<br />
The value “HEX” is also used for Powers that<br />
target a 2 meter area in HERO System Sixth<br />
<strong>Edition</strong>.<br />
RANGE: This attributes specifies the range of<br />
the Power. Valid values are “SELF”, “Yes”,<br />
“No”, and “LOS”.<br />
VISIBLE: This attribute specifies whether or not<br />
a Power is visible. Valid values are “Yes” and<br />
“No”.<br />
In addition, Power Containers can also<br />
use the attributes [XXX]INCREASE and<br />
[XXX]INCREASELEVELS as defined in<br />
“CHARACTERISTICS Section” on page 47.<br />
MODIFIERS SECTION<br />
All Modifiers are defined in this section.<br />
Modifiers use the generic MODIFIER container<br />
combined with a unique XMLID. This means you<br />
can create as many new Modifiers as you like. Each<br />
Modifier is defined in a MODIFIER container.<br />
A MODIFIER container may use the<br />
EXCLUDES and REQUIRES attributes. These<br />
attributes hold a simple string which should be<br />
equal to the XMLID of the Modifier that you wish<br />
to make exclusive or required.
50 ■ Character Templates <strong>Hero</strong> <strong>Designer</strong> <strong>6th</strong> <strong>Edition</strong><br />
BUILT-IN TEMPLATE<br />
NAMES<br />
The following are the<br />
names of the built-in<br />
templates to be used with<br />
the extends attribute of the<br />
TEMPLATE container:<br />
■ builtIn.Main6E.hdt<br />
■ builtIn.<strong>Hero</strong>ic6E.hdt<br />
■ builtIn.Superheroic6E.<br />
hdt<br />
■ builtIn.Vehicle6E.hdt<br />
■ builtIn.Base6E.hdt<br />
■ builtIn.Automaton6E.hdt<br />
■ builtIn.Computer6E.hdt<br />
■ builtIn.AI6E.hdt<br />
■ builtIn.Main.hdt<br />
■ builtIn.Normal.hdt<br />
■ builtIn.<strong>Hero</strong>ic.hdt<br />
■ builtIn.Superheroic.hdt<br />
■ builtIn.Vehicle.hdt<br />
■ builtIn.Base.hdt<br />
■ builtIn.Automaton.hdt<br />
■ builtIn.Computer.hdt<br />
■ builtIn.AI.hdt<br />
DISADvANTAgES SECTION<br />
All Complications (or Disadvantages) are<br />
defined in this section. Complications use the<br />
generic DISADVANTAGE container combined<br />
with a unique XMLID. This means you can create as<br />
many new Complications as you like. There are no<br />
special Attributes or Containers for Complications.<br />
Complications in the standard templates make<br />
heavy use of the REQUIRED attribute for many of<br />
their Adders.<br />
Creating Extension<br />
Templates<br />
As mentioned earlier, the recommended way to<br />
create a custom template is to create an extension<br />
template that is based on one of the existing<br />
built-in templates. This section looks at common<br />
considerations when creating an extension template<br />
based on the built-in Main template.<br />
An extension template contains all the sections<br />
of a standard template. So, to begin, it’s best to start<br />
with an empty template that basically inherits all<br />
the features of the Main template. In fact, that is<br />
how the built-in Superheroic template is defined.<br />
<br />
<br />
...<br />
<br />
<br />
...<br />
<br />
<br />
...<br />
<br />
<br />
...<br />
<br />
<br />
...<br />
<br />
<br />
...<br />
<br />
<br />
...<br />
<br />
<br />
...<br />
<br />
<br />
...<br />
<br />
<br />
...<br />
<br />
<br />
Once you have the basic template defined, you<br />
can add the changes you want.<br />
First, you decide you want to add a new Figured<br />
Characteristic named Education (EDU) to a HERO<br />
System Fifth <strong>Edition</strong> template. EDU will have a<br />
base value of INT/2 and can be increased at a cost<br />
of 1 point per +1. As mentioned earlier, you can<br />
implement the addition of a new Characteristic<br />
by using the custom Characteristics, in this<br />
case, CUSTOM1. However, because this new<br />
Characteristic is based on INT, you must redefine<br />
both CUSTOM1 and INT. To do so, include the<br />
following in the CHARACTERISTICS container:<br />
<br />
<strong>Hero</strong> System Fifth <strong>Edition</strong> Rule Book<br />
Sidekick<br />
(<strong>Hero</strong> System Fifth <strong>Edition</strong> Rule Book,<br />
page 23; Revised, page 37) Intelligence represents a<br />
character’s ability to take in and process information<br />
quickly. <br />
<br />
<br />
(Template extension) Education<br />
represents a character’s level of education. <br />
<br />
This positions the new EDU Characteristic<br />
at the bottom of the Characteristic list following<br />
the Movement abilities. To position it somewhere<br />
else in the list, you would need to redefine any<br />
Characteristics which would follow it in the list to<br />
adjust its POSITION attribute.<br />
If you were adding EDU as a Characteristic to a<br />
HERO System Sixth <strong>Edition</strong> template, the approach<br />
would be slightly different. In this case, EDU will<br />
not be based on INT but will simply have a starting<br />
value of 2. As a result, there is no need to redefine<br />
INT; you need only define EDU.<br />
<br />
(Template extension) Education<br />
represents a character’s level of education. <br />
<br />
Next you decide to add a new Skill named<br />
Leadership based on the example from the HERO<br />
System Sixth <strong>Edition</strong> and HERO System Sixth<br />
<strong>Edition</strong> rulebooks. To do so, you would make use of<br />
the generic SKILL container described in “SKILLS
<strong>Hero</strong> <strong>Designer</strong> <strong>6th</strong> <strong>Edition</strong> Character Templates ■ 51<br />
Section” on page 48 and place the following definition<br />
in the SKILLS container of a HERO System Fifth<br />
<strong>Edition</strong> template:<br />
<br />
<br />
<br />
<br />
<strong>Hero</strong> System Fifth <strong>Edition</strong> Rule Book<br />
(<strong>Hero</strong> System Fifth <strong>Edition</strong> Rule Book<br />
sample, page 352; Revised, page 562)Characters<br />
with this Interaction Skill can lead and inspire men<br />
in battle.<br />
<br />
<br />
For a HERO System Sixth <strong>Edition</strong> temple, you<br />
would place the following in the SKILLS container:<br />
<br />
<br />
<br />
<br />
Characters with this Interaction Skill can<br />
lead and inspire men in battle.<br />
<br />
<br />
The easiest way to create this definition is to<br />
copy the definition of a similar Skill (in this case,<br />
Persuasion) and edit it appropriately.<br />
You also decide that you do not want the<br />
Universal Translator Talent in this custom template.<br />
To accomplish this, you would use the REMOVE<br />
container and place the following in the TALENTS<br />
container:<br />
UNIVERSAL_TRANSLATOR<br />
The REMOVE container causes the extension<br />
template not to inherit an item from the template<br />
it is based on. The value placed in the container<br />
identifies the item. For items which have a unique<br />
container such as Universal Translator, it is the<br />
name of that container. For items which have an<br />
XMLID attribute, it is the value of that attribute. For<br />
example, to remove the Indirect Advantage, which<br />
has an XMLID of “INDIRECT”, you would place<br />
the following in the MODIFIERS container:<br />
INDIRECT<br />
As these examples show, you can express the<br />
differences between the extension template and the<br />
base template using three different methods: adding<br />
new items, redefining existing ones, and removing<br />
items.<br />
So far, the examples given have been of a single<br />
extension template extending a single built-in<br />
template. That is, the extension template inherits<br />
features from a single parent template. However,<br />
you can also create an extension template that<br />
inherits features from multiple parent templates. To<br />
do so, instead of specifying a single template name<br />
as the value of the extends attribute, you specify<br />
a comma-separated list of template names as the<br />
value of that attribute.<br />
The order of the parent templates in this list is<br />
very important. The first template in the string gets<br />
precedence over all others, and so on down the<br />
string. For example, if you have a custom template<br />
named C.hdt which has the following extends<br />
attribute:<br />
extends=”A.hdt, B.hdt”><br />
If A.hdt and B.hdt both define the Armor Power,<br />
A’s definition will be used as the base for C.hdt<br />
because A.hdt comes before B.hdt in the list of<br />
parent templates.<br />
Things get a little more confusing when dealing<br />
with REMOVE containers in the parent templates.<br />
Suppose A.hdt removes the STR Characteristic,<br />
but B.hdt does not. C.hdt will contain B.hdt’s<br />
definition of the STR Characteristic. If you don’t<br />
want this, you will need to either remove STR from<br />
C.hdt or redefine it, whichever suits your needs.<br />
The best way to think about this is that C.hdt<br />
inherits the first definition of a given ability in the<br />
list of parent templates. Since A.hdt removes the<br />
definition for STR, it does not have that ability.<br />
B.hdt therefore becomes the first template in the list<br />
to contain the definition.<br />
Another tricky area is the containers found in<br />
the MAINAPP section. In general, the first template<br />
in list of parent templates defines the defaults for<br />
the MAINAPP section. The only exception is NCM.<br />
The first template in the list of parent templates<br />
which contains an NCM container defines both<br />
the NCM object as well as the default value for the<br />
NCM cost multiplier for the extension template.<br />
When you have finished creating your extension<br />
template be sure to save it with a .hdt extension. You<br />
can then assign it to a character by selecting Choose<br />
File… from the Template menu as described in<br />
the “Changing The Character Template” section on<br />
page 6.
52 ■ Export Formats <strong>Hero</strong> <strong>Designer</strong> <strong>6th</strong> <strong>Edition</strong><br />
ExPORT FORMATS<br />
As briefly described in the “Basic Concepts”<br />
chapter on page 2, Export Formats are<br />
files which contain special fields that<br />
get replaced by information from your<br />
character when you export that character.<br />
Because the Export Format determines what<br />
information is exported and where it is placed<br />
in the exported file, this feature lets you create<br />
character sheets with a wide variety of looks.<br />
<strong>Hero</strong> <strong>Designer</strong> provides many Export Formats<br />
including a HTML template based on the standard<br />
HERO System Fifth <strong>Edition</strong> character sheet as well<br />
as a variety of HERO System Sixth <strong>Edition</strong> formats<br />
and many others. These can be found in the Export<br />
Formats section of the <strong>Hero</strong> <strong>Designer</strong> area of the<br />
<strong>Hero</strong> <strong>Games</strong> website (www.herogames.com).<br />
Currently, <strong>Hero</strong> <strong>Designer</strong> only exports text files.<br />
This means that you can only create templates in<br />
text-based formats. This could be HTML (for web<br />
browsers), plain text, or more complex formats such<br />
as RTF (used by many word processors including<br />
Microsoft Word). You cannot create templates in<br />
binary formats.<br />
You can edit or create an Export Format using<br />
any standard text editor such as the Notepad<br />
application on Windows systems or the VI editor on<br />
Linux and UNIX systems. Once you have finished<br />
editing or creating an Export Format, be sure to<br />
save it with a .hde extension. Only files with a .hde<br />
extension are recognized as Export Formats.<br />
While the following sections describe the<br />
structure of an Export Format and define the tags<br />
and containers used, a greater understanding can be<br />
obtained by viewing the Export Formats available,<br />
so you can see how these items are actually used.<br />
You can also often find help with creating Export<br />
Formats in the <strong>Hero</strong> <strong>Designer</strong> discussion board on<br />
the <strong>Hero</strong> <strong>Games</strong> website at www.herogames.com.<br />
CREATINg AN ExPORT<br />
FORMAT<br />
The Export Format structure is based on tags<br />
and containers. The definition of a tag is simply<br />
anything that looks like the following:<br />
<br />
A container has a similar appearance, but (as the<br />
name suggests) it contains other items. It has both a<br />
beginning and an ending tag. Like this:<br />
<br />
…any text here….<br />
<br />
The tag for the end of the container is the<br />
same as the tag for the beginning with a / inserted<br />
before the container name. Note that the “--” at the<br />
beginning and end of tag names is two hyphens.<br />
Tags are single entities. They don’t contain<br />
anything and <strong>Hero</strong> <strong>Designer</strong> simply replaces them<br />
with the appropriate value when it creates an<br />
export file. You can repeat any tag as many times<br />
as you want. Each occurrence is replaced with the<br />
appropriate value.<br />
Containers may contain other tags or even other<br />
containers. There are several containers that entail<br />
certain logical checks be made by the application<br />
before inserting any values. These will be discussed<br />
below.<br />
A list of the available tags and containers appears<br />
in the “Available Tags And Containers” section on<br />
page 54. A similar list can be found in the Export<br />
Formats section of the <strong>Hero</strong> <strong>Designer</strong> area of the<br />
<strong>Hero</strong> <strong>Games</strong> website (www.herogames.com). As<br />
updates to <strong>Hero</strong> <strong>Designer</strong> are released, additional<br />
tags and containers may be made available. If there<br />
is information that you would like to see made<br />
available for export, send an e-mail to support@<br />
herodesigner.com requesting it.<br />
To create an Export Format, you simply write<br />
the template file in whatever mark-up language you<br />
choose (plain text, HTML, RTF, TEX, LaTEX, and<br />
so forth) and insert the tags and containers at the<br />
point where you want text from the character to be<br />
inserted.<br />
Any text that is inside of a container is<br />
preserved. This is useful when dealing with<br />
containers that represent “1 to many” values<br />
(like Powers). These containers loop through<br />
the specified values and insert the text and tags<br />
contained within them once for each value they<br />
encounter. For example, the …<br />
container will loop through each<br />
Power the character has bought and each time,<br />
insert the text between the beginning and ending
<strong>Hero</strong> <strong>Designer</strong> <strong>6th</strong> <strong>Edition</strong> Export Formats ■ 53<br />
tag. If there are any subcontainers or tags, they will<br />
be evaluated for each Power.<br />
Once you have written and saved your Export<br />
Format, you’re ready to test it out. Fire up <strong>Hero</strong><br />
<strong>Designer</strong> and try exporting a character with the<br />
new format.<br />
Describing The Format<br />
<strong>Hero</strong> <strong>Designer</strong> has several containers for<br />
specifying general information about the Export<br />
Format.<br />
To specify the display name of the Export<br />
Format to be used in the list of available formats<br />
presented by <strong>Hero</strong> <strong>Designer</strong>, use the container:<br />
<br />
<br />
The text in this container is used as the display.<br />
Everything from the beginning tag to the ending<br />
tag (inclusive) will be removed from the final export<br />
file. The name should be kept short for display<br />
purposes.<br />
To specify the description of the Export Format<br />
to be displayed in this list, use the container:<br />
<br />
<br />
The text contained between these two tags<br />
will appear as the format’s description in the list<br />
of available Export Formats presented by <strong>Hero</strong><br />
<strong>Designer</strong>. Everything from the beginning tag to the<br />
ending tag (inclusive) will be removed from the<br />
final export file.<br />
To specify the valid file extensions for files<br />
exported using this Export Format, use the<br />
container:<br />
<br />
<br />
This container can be repeated multiple times.<br />
For example:<br />
html<br />
htm<br />
Replacement Containers<br />
Occasionally, when creating a <strong>Hero</strong> <strong>Designer</strong><br />
Export Format, you may find it useful to be able to<br />
replace one string of text in the output with another<br />
each time the first string occurs. You can do this by<br />
using the REPLACE container and its associated<br />
subcontainers. For example:<br />
<br />
abc<br />
xyz<br />
<br />
replaces each occurrence of the string “abc” (as<br />
specified by the DEFSTRING subcontainer) with<br />
the string “xyz” (as specified by the REPSTRING<br />
subcontainer).<br />
For more sophisticated replacements, <strong>Hero</strong><br />
<strong>Designer</strong> provides the REG_REPLACE container<br />
and its subcontainers. This container has the form:<br />
<br />
… <br />
… <br />
<br />
This is similar to the REPLACE container except<br />
that the REGSTRING subcontainer contains a<br />
regular expression. Regular expressions are complex<br />
constructions that specify a pattern of characters<br />
to be matched. They are particularly common in<br />
many UNIX utilities and in languages like Perl.<br />
A discussion of regular expressions is beyond the<br />
scope of this manual; however, the a quick web<br />
search should turn up plenty of information if<br />
you are not already familiar with the concept. The<br />
REPSTRING subcontainer specifies the string that<br />
will replace the strings matched by the regular<br />
expression in the REGSTRING subcontainer.<br />
MATH Container<br />
<strong>Hero</strong> <strong>Designer</strong> also allows you to perform<br />
basic mathematical calculation with the MATH<br />
container. The contents of this container is a<br />
mathematical expression. In the exported file, the<br />
MATH container is replaced with the calculated<br />
value of the expression. For example:<br />
<br />
3 * <br />
<br />
is replaced with the value of 3 times the<br />
character’s STR characteristic.<br />
Mathematical expressions in the MATH<br />
container can use the four basic mathematical<br />
operations (+, -, *, and /) as well as parentheses.<br />
Conditional Containers<br />
<strong>Hero</strong> <strong>Designer</strong> features a variety of conditional<br />
containers. These containers (which normally begin<br />
with IF or IS) only have their contents included in<br />
the exported files if the condition is true.<br />
For example, the following container only has<br />
its contents included if the character has purchased<br />
any Maneuvers:<br />
<br />
<br />
Similarly, the following container only has its<br />
contents included if the current item is in a list or<br />
Framework:<br />
<br />
<br />
Looping Containers<br />
This section describes looping containers and<br />
some of the tags and other containers that can be<br />
used in conjunction with them.
54 ■ Export Formats <strong>Hero</strong> <strong>Designer</strong> <strong>6th</strong> <strong>Edition</strong><br />
As mentioned earlier, containers that represent<br />
general ability categories such as:<br />
<br />
’<br />
automatically loop through all abilities of that type,<br />
one at a time.<br />
<strong>Hero</strong> <strong>Designer</strong> also has several containers which<br />
give you greater control over such loops.<br />
To specify the item which begins the loop, use<br />
the container:<br />
<br />
<br />
For example, the following means “Start with the<br />
10th item in the loop:”:<br />
10<br />
Similarly, the following container specifies which<br />
item ends the loop:<br />
<br />
<br />
For example the following means “Stop with the<br />
20th item in the loop:”:<br />
20<br />
These containers let you create Export Formats<br />
that place sections of an ability list in different<br />
places of the exported file.<br />
COMBAT RECORD ExPORT<br />
FORMATS<br />
Combat record Export Formats are a special case<br />
of Export Format. As the name indicates, they are<br />
used for exporting combat records, as described in<br />
the “Combat Records” section on page 31.<br />
In most ways, combat record Export Formats are<br />
just like regular Export Formats with one exception.<br />
They have a special container:<br />
<br />
<br />
which is a looping container that loops through<br />
each character specified to be included in the<br />
combat record. Within this container, you can place<br />
any appropriate tag or container. The following<br />
containers are particularly appropriate for including<br />
a table that shows which characters act in which<br />
phases:<br />
<br />
<br />
<br />
<br />
<br />
<br />
<br />
<br />
Once you have finished editing or creating a<br />
combat record Export Format, be sure to save the<br />
template with a .hcr extension. Only files with a .hcr<br />
extension are recognized as combat record Export<br />
Formats.<br />
AvAILABLE TAgS AND<br />
CONTAINERS<br />
Basic Tags<br />
FORMAT INFORMATION TAgS<br />
<br />
<br />
<br />
<br />
<br />
<br />
<br />
CHARACTER INFORMATION TAgS<br />
<br />
<br />
<br />
<br />
<br />
<br />
<br />
<br />
<br />
<br />
<br />
<br />
<br />
<br />
<br />
<br />
<br />
<br />
<br />
<br />
<br />
<br />
<br />
<br />
<br />
<br />
<br />
<br />
<br />
<br />
<br />
<br />
<br />
<br />
<br />
<br />
<br />
<br />
<br />
<br />
<br />
<strong>Hero</strong> <strong>Designer</strong> <strong>6th</strong> <strong>Edition</strong> Export Formats ■ 55<br />
IMAgE TAgS<br />
<br />
<br />
<br />
<br />
<br />
<br />
<br />
<br />
POINT TOTAL TAgS<br />
<br />
<br />
<br />
<br />
<br />
<br />
<br />
<br />
<br />
<br />
<br />
<br />
<br />
<br />
<br />
<br />
<br />
<br />
<br />
<br />
<br />
<br />
<br />
OCv, DCv, AND ECv TAgS<br />
<br />
<br />
<br />
<br />
<br />
<br />
<br />
<br />
<br />
EqUIPMENT TAgS<br />
<br />
<br />
<br />
REPLACEMENT TAgS<br />
<br />
<br />
<br />
<br />
<br />
<br />
<br />
<br />
<br />
<br />
<br />
<br />
MATH TAgS<br />
<br />
[simple math formulae including the symbols *, /,<br />
+, -, (, )]<br />
<br />
NOTE TAgS<br />
<br />
<br />
<br />
<br />
<br />
<br />
<br />
<br />
<br />
<br />
<br />
<br />
<br />
<br />
<br />
<br />
<br />
<br />
<br />
<br />
<br />
<br />
<br />
<br />
<br />
COMBAT RECORD TAgS<br />
<br />
<br />
<br />
<br />
<br />
<br />
<br />
<br />
RUNNINg TAgS<br />
Movement Tags<br />
<br />
<br />
<br />
<br />
<br />
<br />
<br />
<br />
<br />
<br />
<br />
<br />
SWIMMINg TAgS<br />
<br />
<br />
<br />
<br />
<br />
<br />
56 ■ Export Formats <strong>Hero</strong> <strong>Designer</strong> <strong>6th</strong> <strong>Edition</strong><br />
<br />
<br />
<br />
<br />
<br />
LEAPINg TAgS<br />
<br />
<br />
<br />
<br />
<br />
<br />
<br />
<br />
<br />
<br />
<br />
<br />
FLIgHT TAgS<br />
<br />
<br />
<br />
<br />
<br />
<br />
<br />
<br />
<br />
<br />
<br />
<br />
gLIDINg TAgS<br />
<br />
<br />
<br />
<br />
<br />
<br />
<br />
<br />
<br />
<br />
<br />
<br />
SWINgINg TAgS<br />
<br />
<br />
<br />
<br />
<br />
<br />
<br />
<br />
<br />
<br />
<br />
<br />
TELEPORTATION TAgS<br />
<br />
<br />
<br />
<br />
<br />
<br />
<br />
<br />
<br />
<br />
<br />
<br />
TUNNELINg TAgS<br />
<br />
<br />
<br />
<br />
<br />
<br />
<br />
<br />
<br />
<br />
<br />
<br />
Characteristic Tags<br />
gENERAL CHARACTERISTIC TAgS<br />
<br />
<br />
<br />
<br />
<br />
<br />
<br />
<br />
<br />
<br />
<br />
<br />
SPECIFIC CHARACTERISTIC TAgS<br />
<br />
<br />
<br />
<br />
<br />
<br />
[General Characteristic Tags]<br />
<br />
<br />
<br />
[General Characteristic Tags]<br />
<br />
<br />
[General Characteristic Tags]<br />
<br />
<br />
[General Characteristic Tags]<br />
<br />
<br />
[General Characteristic Tags]<br />
<br />
<strong>Hero</strong> <strong>Designer</strong> <strong>6th</strong> <strong>Edition</strong> Export Formats ■ 57<br />
<br />
[General Characteristic Tags]<br />
<br />
<br />
[General Characteristic Tags]<br />
<br />
<br />
[General Characteristic Tags]<br />
<br />
<br />
[General Characteristic Tags]<br />
<br />
<br />
[General Characteristic Tags]<br />
<br />
<br />
[General Characteristic Tags]<br />
<br />
<br />
<br />
<br />
<br />
<br />
[General Characteristic Tags]<br />
<br />
<br />
<br />
<br />
<br />
<br />
[General Characteristic Tags]<br />
<br />
<br />
[General Characteristic Tags]<br />
<br />
<br />
[General Characteristic Tags]<br />
<br />
<br />
[General Characteristic Tags]<br />
<br />
<br />
[General Characteristic Tags]<br />
<br />
<br />
[General Characteristic Tags]<br />
<br />
<br />
[General Characteristic Tags]<br />
<br />
<br />
[General Characteristic Tags]<br />
<br />
<br />
<br />
[General Characteristic Tags]<br />
<br />
<br />
[General Characteristic Tags]<br />
<br />
<br />
[General Characteristic Tags]<br />
<br />
<br />
[General Characteristic Tags]<br />
<br />
<br />
[General Characteristic Tags]<br />
<br />
<br />
[General Characteristic Tags]<br />
<br />
<br />
[General Characteristic Tags]<br />
<br />
<br />
[General Characteristic Tags]<br />
<br />
<br />
[General Characteristic Tags]<br />
<br />
<br />
[General Characteristic Tags]<br />
<br />
<br />
[General Characteristic Tags]<br />
<br />
<br />
[General Characteristic Tags]<br />
<br />
<br />
<br />
<br />
<br />
<br />
[General Characteristic Tags]<br />
<br />
gENERAL TAgS<br />
<br />
<br />
<br />
<br />
<br />
<br />
<br />
<br />
<br />
<br />
<br />
<br />
Ability Tags
58 ■ Export Formats <strong>Hero</strong> <strong>Designer</strong> <strong>6th</strong> <strong>Edition</strong><br />
<br />
<br />
<br />
<br />
<br />
<br />
<br />
<br />
<br />
<br />
<br />
<br />
<br />
<br />
<br />
<br />
<br />
<br />
<br />
<br />
<br />
<br />
<br />
<br />
<br />
<br />
<br />
<br />
<br />
<br />
<br />
<br />
<br />
<br />
<br />
<br />
<br />
<br />
<br />
<br />
<br />
[General Tags]<br />
<br />
<br />
[General Tags]<br />
<br />
COMBAT LEvEL TAgS<br />
<br />
<br />
<br />
<br />
<br />
[General Tags]<br />
<br />
LIgHTNINg REFLExES<br />
<br />
<br />
<br />
<br />
<br />
[General Tags]<br />
<br />
MARTIAL ART TAgS<br />
<br />
<br />
<br />
<br />
<br />
<br />
<br />
<br />
<br />
[General Tags]<br />
<br />
<br />
<br />
<br />
<br />
<br />
[General Tags]<br />
<br />
<br />
<br />
<br />
<br />
<br />
<br />
<br />
<br />
<br />
<br />
<br />
<br />
<br />
<br />
[General Tags]<br />
<br />
SKILL TAgS<br />
<br />
<br />
<br />
<br />
<br />
<br />
<br />
<br />
<br />
<br />
[General Tags]<br />
<br />
PERK TAgS<br />
<br />
<br />
<br />
<br />
<br />
<br />
<br />
<br />
[General Tags]<br />
<strong>Hero</strong> <strong>Designer</strong> <strong>6th</strong> <strong>Edition</strong> Export Formats ■ 59<br />
TALENT TAgS<br />
<br />
<br />
<br />
<br />
<br />
<br />
[General Tags]<br />
<br />
POWER TAgS<br />
<br />
<br />
<br />
<br />
<br />
<br />
<br />
<br />
<br />
<br />
<br />
<br />
<br />
<br />
<br />
<br />
<br />
<br />
<br />
<br />
<br />
<br />
<br />
<br />
<br />
<br />
<br />
<br />
<br />
<br />
<br />
<br />
<br />
<br />
<br />
<br />
<br />
<br />
<br />
[General Tags]<br />
<br />
<br />
<br />
<br />
[General Tags]<br />
<br />
EqUIPMENT TAgS<br />
<br />
<br />
<br />
<br />
<br />
<br />
<br />
<br />
<br />
<br />
<br />
<br />
<br />
<br />
<br />
<br />
<br />
<br />
<br />
<br />
<br />
<br />
<br />
<br />
<br />
<br />
<br />
<br />
<br />
<br />
<br />
<br />
<br />
<br />
<br />
<br />
<br />
<br />
<br />
<br />
<br />
[General Tags]<br />
<br />
<br />
<br />
<br />
[General Tags]<br />
<br />
COMPLICATION/DISADvANTAgE TAgS<br />
<br />
<br />
<br />
<br />
<br />
[General Tags]<br />