lokring connections
lokring connections
lokring connections

You also want an ePaper? Increase the reach of your titles
YUMPU automatically turns print PDFs into web optimized ePapers that Google loves.
LOKCLIP ASSEMBLY 010 | 011<br />
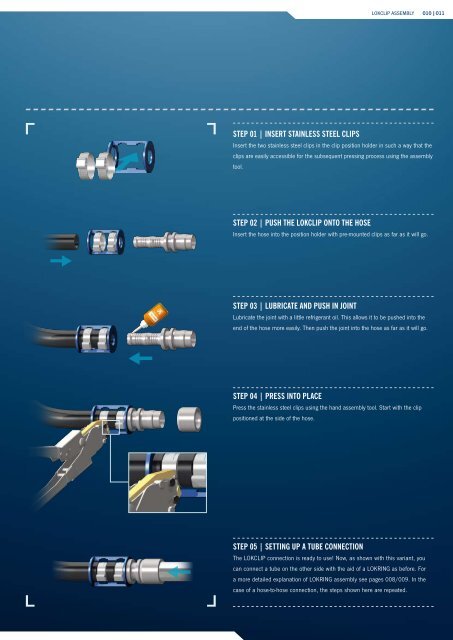
STEP 01 | INSERT STAINLESS STEEL CLIPS<br />
Insert the two stainless steel clips in the clip position holder in such a way that the<br />
clips are easily accessible for the subsequent pressing process using the assembly<br />
tool.<br />
STEP 02 | PUSH THE LOKCLIP ONTO THE HOSE<br />
Insert the hose into the position holder with pre-mounted clips as far as it will go.<br />
STEP 03 | LUBRICATE AND PUSH IN JOINT<br />
Lubricate the joint with a little refrigerant oil. This allows it to be pushed into the<br />
end of the hose more easily. Then push the joint into the hose as far as it will go.<br />
STEP 04 | PRESS INTO PLACE<br />
Press the stainless steel clips using the hand assembly tool. Start with the clip<br />
positioned at the side of the hose.<br />
STEP 05 | SETTING UP A TUBE CONNECTION<br />
The LOKCLIP connection is ready to use! Now, as shown with this variant, you<br />
can connect a tube on the other side with the aid of a LOKRING as before. For<br />
a more detailed explanation of LOKRING assembly see pages 008/009. In the<br />
case of a hose-to-hose connection, the steps shown here are repeated.