lokring connections
lokring connections
lokring connections

You also want an ePaper? Increase the reach of your titles
YUMPU automatically turns print PDFs into web optimized ePapers that Google loves.
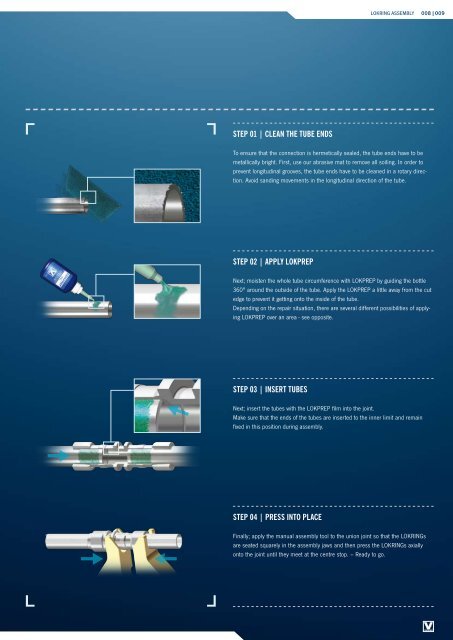
LOKRING ASSEMBLY 0 0 8 | 0 0 9<br />
STEP 01 | CLEAN THE TUBE ENDS<br />
To ensure that the connection is hermetically sealed, the tube ends have to be<br />
metallically bright. First, use our abrasive mat to remove all soiling. In order to<br />
prevent longitudinal grooves, the tube ends have to be cleaned in a rotary direction.<br />
Avoid sanding movements in the longitudinal direction of the tube.<br />
STEP 02 | APPLY LOKPREP<br />
Next; moisten the whole tube circumference with LOKPREP by guiding the bottle<br />
360° around the outside of the tube. Apply the LOKPREP a little away from the cut<br />
edge to prevent it getting onto the inside of the tube.<br />
Depending on the repair situation, there are several different possibilities of applying<br />
LOKPREP over an area - see opposite.<br />
STEP 03 | INSERT TUBES<br />
Next; insert the tubes with the LOKPREP film into the joint.<br />
Make sure that the ends of the tubes are inserted to the inner limit and remain<br />
fixed in this position during assembly.<br />
STEP 04 | PRESS INTO PLACE<br />
Finally; apply the manual assembly tool to the union joint so that the LOKRINGs<br />
are seated squarely in the assembly jaws and then press the LOKRINGs axially<br />
onto the joint until they meet at the centre stop. – Ready to go.