Download - Fuji Xerox Printers
Download - Fuji Xerox Printers
Download - Fuji Xerox Printers

You also want an ePaper? Increase the reach of your titles
YUMPU automatically turns print PDFs into web optimized ePapers that Google loves.
DocuPrint CM205 b<br />
User Guide
Contents<br />
Preface....................................................................................................................... 7<br />
Trademarks and Document Disclaimer...................................................................... 8<br />
Types of Manuals....................................................................................................... 9<br />
Using This Guide...................................................................................................... 10<br />
Organization ................................................................................................ 11<br />
Conventions................................................................................................. 12<br />
Safety Notes............................................................................................................. 13<br />
Electrical Safety........................................................................................... 14<br />
Machine Installation..................................................................................... 16<br />
Operational Safety....................................................................................... 18<br />
Consumable ................................................................................................ 20<br />
Warning and Caution Labels ....................................................................... 21<br />
Environment ............................................................................................................. 22<br />
Regulation ................................................................................................................ 23<br />
Radio Frequency Emissions (Class B) ........................................................ 23<br />
Product Safety Certification (CB)................................................................. 23<br />
Illegal Copies and Printouts...................................................................................... 24<br />
Product Features...................................................................................................... 25<br />
1 Specifications............................................................................. 27<br />
Copy Function ............................................................................................. 28<br />
Print Function .............................................................................................. 30<br />
Scan Function.............................................................................................. 31<br />
2 Basic Operation ......................................................................... 33<br />
Main Components ....................................................................................... 34<br />
Front View....................................................................................... 35<br />
Rear View ....................................................................................... 36<br />
Operator Panel ............................................................................... 37<br />
Turning On the Printer ................................................................................. 39<br />
Setting Initial Settings on the Operator Panel.............................................. 40<br />
Printing a Panel Settings Page.................................................................... 41<br />
The Operator Panel ........................................................................ 42<br />
The Printer Setting Utility ................................................................ 43<br />
Power Saver Mode...................................................................................... 44<br />
Exiting the Power Saver Mode ....................................................... 45<br />
3 Printer Management Software ................................................... 47<br />
Print and Scan Drivers................................................................................. 48<br />
Printer Setting Utility (Windows Only).......................................................... 49<br />
SimpleMonitor (Windows Only) ................................................................... 50<br />
1
Launcher (Windows Only) ........................................................................... 51<br />
Express Scan Manager ............................................................................... 52<br />
4 Installing the Print Driver............................................................ 53<br />
Connecting Your Printer .............................................................................. 54<br />
Connecting Printer to Computer ..................................................... 55<br />
Installing Print Driver on Computers Running Windows.............................. 57<br />
Inserting the Software Pack CD-ROM ............................................ 58<br />
USB Connection Setup................................................................... 59<br />
Installing Print Driver on Computers Running Mac OS X ............................ 60<br />
Installing the Drivers and Software ................................................. 61<br />
5 Printing Basics ........................................................................... 63<br />
About Print Media........................................................................................ 64<br />
Print Media Usage Guidelines ........................................................ 65<br />
Print Media That Can Damage Your Printer ................................... 66<br />
Print Media Storage Guidelines ...................................................... 67<br />
Supported Print Media................................................................................. 68<br />
Usable Print Media ......................................................................... 69<br />
Loading Print Media..................................................................................... 71<br />
Capacity.......................................................................................... 72<br />
Print Media Dimensions.................................................................. 73<br />
Loading Print Media in the Multipurpose Feeder (MPF) ................. 74<br />
Loading Print Media in the Priority Sheet Inserter (PSI) ................. 81<br />
Manual Duplex Printing (Windows Print Driver Only) ..................... 86<br />
Using the Output Tray Extension.................................................... 90<br />
Setting Paper Sizes and Types ................................................................... 91<br />
Setting Paper Sizes ........................................................................ 92<br />
Setting Paper Types ....................................................................... 93<br />
Printing ........................................................................................................ 94<br />
Sending a Job to Print .................................................................... 95<br />
Canceling a Print Job...................................................................... 96<br />
Direct Print Using the USB Storage Device.................................... 97<br />
Selecting Printing Options .............................................................. 98<br />
Printing Custom Size Paper (Windows Only) ............................... 103<br />
Checking Status of Print Data....................................................... 105<br />
Printing a Report Page ................................................................. 106<br />
Printer Settings ............................................................................. 107<br />
6 Copying.................................................................................... 111<br />
Loading Paper for Copying........................................................................ 112<br />
Preparing a Document............................................................................... 113<br />
Making Copies From the Document Glass................................................ 114<br />
Setting Copy Options................................................................................. 116<br />
Number of Copies......................................................................... 117<br />
2
Color ............................................................................................. 118<br />
Collated......................................................................................... 119<br />
Reduce/Enlarge ............................................................................ 120<br />
Document Size ............................................................................. 122<br />
Original Type ................................................................................ 123<br />
Lighten/Darken ............................................................................. 124<br />
Sharpness..................................................................................... 125<br />
Auto Exposure .............................................................................. 126<br />
Color Balance R............................................................................ 127<br />
Color Balance G ........................................................................... 128<br />
Color Balance B............................................................................ 129<br />
Gray Balance ................................................................................ 130<br />
N-Up ............................................................................................. 131<br />
Margin Top/Bottom ....................................................................... 133<br />
Margin Left/Right .......................................................................... 134<br />
Margin Middle ............................................................................... 135<br />
Changing the Default Settings................................................................... 136<br />
7 Scanning.................................................................................. 137<br />
Scanning Overview.................................................................................... 138<br />
Scanning to a Computer............................................................................ 139<br />
Scanning From the Operator Panel .............................................. 140<br />
Scanning Using the TWAIN Driver ............................................... 141<br />
Scanning Using the WIA Driver .................................................... 143<br />
Scanning to USB Storage Device.............................................................. 144<br />
Adjusting Scanning Options ...................................................................... 145<br />
Adjusting the Default Scan Settings ............................................. 146<br />
Changing the Scan Settings for an Individual Job ........................ 148<br />
8 Using the Operator Panel Menus and Keypad ........................ 149<br />
Understanding the Printer Menus.............................................................. 150<br />
Report / List .................................................................................. 151<br />
Meter Readings ............................................................................ 152<br />
Admin Menu.................................................................................. 153<br />
Defaults Settings........................................................................... 162<br />
Tray Settings................................................................................. 170<br />
Panel Language............................................................................ 172<br />
Panel Lock Function .................................................................................. 173<br />
Enabling the Panel Lock ............................................................... 174<br />
Disabling the Panel Lock .............................................................. 175<br />
Limiting Access to Copy, Scan and Print From USB Memory Operations 176<br />
Setting the Power Saving Timer Option .................................................... 177<br />
Resetting to Factory Defaults .................................................................... 178<br />
Using the Numeric Keypad........................................................................ 179<br />
Changing Numbers....................................................................... 180<br />
3
9 Troubleshooting ....................................................................... 181<br />
Clearing Jams............................................................................................ 182<br />
Avoiding Jams .............................................................................. 183<br />
Identifying the Location of Paper Jams......................................... 184<br />
Clearing Paper Jams From the Front of the Printer...................... 185<br />
Clearing Paper Jams From the Back of the Printer ...................... 186<br />
Clearing Paper Jams From the Center Output Tray ..................... 188<br />
Jam Problems............................................................................... 191<br />
Basic Printer Problems .............................................................................. 192<br />
Display Problems....................................................................................... 193<br />
Printing Problems ...................................................................................... 194<br />
Print Quality Problems............................................................................... 195<br />
The Output Is Too Light ................................................................ 196<br />
Toner Smears or Print Comes Off/Stain on Back Side................. 197<br />
Random Spots/Blurred Images..................................................... 198<br />
The Entire Output Is Blank............................................................ 199<br />
Streaks Appear on the Output ...................................................... 200<br />
Pitched Color Dots........................................................................ 201<br />
Vertical Blanks .............................................................................. 202<br />
Mottle ............................................................................................ 203<br />
Ghosting ....................................................................................... 204<br />
Fog................................................................................................ 205<br />
Bead-Carry-Out (BCO) ................................................................. 206<br />
Auger Mark ................................................................................... 207<br />
Wrinkled/Stained Paper ................................................................ 208<br />
The Top Margin Is Incorrect.......................................................... 209<br />
Color Registration Is out of Alignment .......................................... 210<br />
Protrudent/Bumpy Paper .............................................................. 211<br />
Copy Quality Problems.............................................................................. 212<br />
Adjusting Color Registration...................................................................... 213<br />
Performing Auto Correct ............................................................... 214<br />
Printing the Color Registration Chart ............................................ 215<br />
Determining Values ...................................................................... 216<br />
Entering Values ............................................................................ 217<br />
Scanning Problems ................................................................................... 218<br />
Scan Driver/Printer Utility Problems .......................................................... 219<br />
Other Problems ......................................................................................... 220<br />
Understanding Printer Messages .............................................................. 221<br />
Contacting Service .................................................................................... 225<br />
Getting Help............................................................................................... 226<br />
LCD Panel Messages ................................................................... 227<br />
SimpleMonitor Alerts..................................................................... 228<br />
Obtaining the Product Information ................................................ 229<br />
Non-Genuine Mode ................................................................................... 230<br />
The Operator Panel ...................................................................... 231<br />
The Printer Setting Utility .............................................................. 232<br />
4
10 Maintenance ............................................................................ 233<br />
Cleaning the Printer................................................................................... 234<br />
Cleaning the Scanner ................................................................... 235<br />
Cleaning Inside the Printer ........................................................... 237<br />
Cleaning the Color Toner Density (CTD) Sensor ......................... 240<br />
Replacing Toner Cartridges....................................................................... 241<br />
Overview....................................................................................... 242<br />
Removing the Toner Cartridges.................................................... 243<br />
Installing a Toner Cartridge .......................................................... 244<br />
Ordering Supplies...................................................................................... 246<br />
Consumables................................................................................ 247<br />
When to Order Toner Cartridges .................................................. 248<br />
Recycling Supplies ....................................................................... 249<br />
Storing Consumables ................................................................................ 250<br />
Managing the Printer ................................................................................. 251<br />
Checking Printer Status with SimpleMonitor (Windows Only) ...... 252<br />
Conserving Supplies.................................................................................. 253<br />
Checking Page Counts.............................................................................. 254<br />
Moving the Printer ..................................................................................... 255<br />
Contacting <strong>Fuji</strong> <strong>Xerox</strong> ......................................................................... 259<br />
Technical Support...................................................................................... 260<br />
Online Services ......................................................................................... 261<br />
5
Preface<br />
Thank you for purchasing the DocuPrint CM205 b.<br />
This guide is intended for users who use the printer for the first time, and provides all the necessary<br />
operating information about the printer, copier, and scanner functions.<br />
Please read this guide to achieve the best performance from this printer.<br />
This guide assumes you are familiar with computers.<br />
After reading this guide, keep it safe and handy for future reference.<br />
DocuPrint CM205 b User Guide Help<br />
Copyright© 2010 by <strong>Fuji</strong> <strong>Xerox</strong> Co., Ltd.<br />
<strong>Fuji</strong> <strong>Xerox</strong> Co., Ltd.<br />
November 2010 (Edition 1)<br />
No. ME5051E2-1<br />
7 Preface
Trademarks and Document Disclaimer<br />
Apple ® , Bonjour ® , ColorSync ® , Macintosh ® , and Mac OS ® are trademarks of Apple Inc. in the United<br />
States and/or other countries.<br />
Microsoft ® , Windows Vista ® , Windows ® , and Windows Server ® are trademarks of<br />
Microsoft Corporation in the United States and/or other countries.<br />
All product/brand names are trademarks or registered trademarks of the respective holders.<br />
In this manual, safety instructions are preceded by the symbol<br />
before performing the required procedures.<br />
. Always read and follow the instructions<br />
IMPORTANT:<br />
1. This manual is copyrighted with all rights reserved. Under the copyright laws, this manual may not be copied<br />
or modified in whole or part, without the written consent of the publisher.<br />
2. Parts of this manual are subject to change without prior notice.<br />
3. We welcome any comments on ambiguities, errors, omissions, or missing pages.<br />
4. Never attempt any procedure on the machine that is not specifically described in this manual. Unauthorized<br />
operation can cause faults or accidents. <strong>Fuji</strong> <strong>Xerox</strong> is not liable for any problems resulting from unauthorized<br />
operation of the equipment.<br />
5. Decompiling this manual is prohibited.<br />
An export of this product is strictly controlled in accordance with Laws concerning Foreign Exchange and<br />
Foreign Trade of Japan and/or the export control regulations of the United States.<br />
XEROX, the sphere of connectivity design, and DocuPrint are trademarks or registered trademarks of<br />
<strong>Xerox</strong> Corporation in the U.S. or <strong>Fuji</strong> <strong>Xerox</strong> Co., Ltd.<br />
DocuWorks is a trademark of <strong>Fuji</strong> <strong>Xerox</strong> Co., Ltd.<br />
All <strong>Xerox</strong> and <strong>Fuji</strong> <strong>Xerox</strong> product names are either registered trademarks or trademarks of <strong>Xerox</strong><br />
Corporation or <strong>Fuji</strong> <strong>Xerox</strong> Co., Ltd.<br />
Trademarks and Document Disclaimer 8
Types of Manuals<br />
Safety Guide<br />
Setup Guide<br />
User Guide (HTML files)<br />
(this guide)<br />
Operator Panel Guide<br />
Lifting Your Printer<br />
Describes the information you need to know before using the printer<br />
and to operate the printer safely.<br />
Provides step-by-step instructions on how to set up your printer<br />
including the initial settings of the Scan function.<br />
Describes how to get ready to print and set various features. It also<br />
covers the operator panel menus, troubleshooting tips, and<br />
maintenance information.<br />
This guide is on the Software Pack CD-ROM.<br />
Describes the icons assigned to the buttons or indicators on the<br />
operator panel.<br />
Describes how to lift and hold your printer.<br />
9 Types of Manuals
Using This Guide<br />
This section includes:<br />
• "Organization" on page 11<br />
• "Conventions" on page 12<br />
Using This Guide 10
• Organization<br />
This guide is organized into the following chapters. The summary of each chapter is as follows:<br />
1 Specifications Describes the printer specifications.<br />
2 Basic Operation Describes the main components of the printer, the power saver mode,<br />
and how to turn on the printer.<br />
3 Printer Management Software Describes the software available for the printer.<br />
4 Installing the Print Driver Describes the basic information about how to connect the printer to<br />
your computer and how to install the print driver.<br />
5 Printing Basics Describes the supported paper, how to load paper, and how to print<br />
data using various print features.<br />
6 Copying Describes how to copy documents and the adjustment features.<br />
7 Scanning Describes how to set and use the Scan features.<br />
8 Using the Operator Panel<br />
Menus and Keypad<br />
Describes the setting items available on the operator panel, their<br />
setup procedures, and how to use the numeric keypad.<br />
9 Troubleshooting Describes the troubleshooting tips for printer problems such as paper<br />
jams.<br />
10Maintenance<br />
Describes how to clean the printer, how to replace toner cartridges,<br />
and how to see the printer status.<br />
11 Contacting <strong>Fuji</strong> <strong>Xerox</strong> Describes support information.<br />
11 Using This Guide
• Conventions<br />
1 In this guide, personal computers and workstations are collectively called “computers”.<br />
2 The following terms are used throughout this guide:<br />
IMPORTANT:<br />
• Important information that must be read and followed.<br />
NOTE:<br />
• Additional information that merits emphasis.<br />
See also:<br />
• References within this guide.<br />
3 Orientation of documents or paper is described in this guide as follows:<br />
, , Long Edge Feed (LEF): Loading the document or paper in portrait orientation.<br />
, , Short Edge Feed (SEF): Loading the document or paper in landscape orientation.<br />
LEF Orientation<br />
SEF Orientation<br />
Paper feed direction<br />
Paper feed direction<br />
Using This Guide 12
Safety Notes<br />
Before using this product, read “Safety Notes” carefully for safety use.<br />
This product and recommended supplies have been tested and found to comply with strict safety<br />
requirements including safety agency approvals and compliance with environmental standards. Follow<br />
the following instructions for safety use.<br />
WARNING:<br />
• Any unauthorized alteration including an addition of new functions or connection to external devices<br />
may not be covered by the product warranty. Contact your local <strong>Fuji</strong> <strong>Xerox</strong> representative for more<br />
information.<br />
Follow all warning instructions marked on this product. The warning marks stand for the followings:<br />
Used for item that if not followed strictly, can lead death or severe or<br />
fatal injuries and the possibility to do it is comparatively high.<br />
Used for items that if not followed strictly, can lead to severe or fatal<br />
injuries.<br />
Used for items that if not followed strictly, can cause injuries to user or<br />
damages to machine.<br />
: A symbol for items to pay attention to when handling machine.<br />
Follow instructions carefully to use machine safely.<br />
Caution Flammable Explodable Electric<br />
shock<br />
Heated<br />
surface<br />
Moving<br />
object<br />
Pinched<br />
fingers<br />
: A symbol for prohibited items. Follow instructions carefully to avoid<br />
any dangerous acts.<br />
Prohibited No fire Do not touch Do not use in<br />
bathroom<br />
Do not tear<br />
down<br />
Keep away<br />
from wet<br />
Never touch<br />
with wet hand<br />
: A symbol for items that must be performed. Follow instructions<br />
carefully to carry out these essential tasks.<br />
Instructions Unplug Ground/<br />
Earth<br />
13 Safety Notes
• Electrical Safety<br />
WARNING<br />
This product shall be operated by the power source as indicated on the product's data plate. Consult<br />
your local power company to check if your power source meets the requirements.<br />
WARNING:<br />
• Connect this product to a protective earth circuit.<br />
This product is supplied with a plug that has a protective earth pin. The plug fits only into an<br />
earthed electrical outlet. This is a safety feature. If the plug doesn't fit to the outlet, contact an<br />
electrician to replace the outlet to avoid risk of electric shock. Never use an earthed adapter<br />
plug to connect the product to the electrical outlet that has no earth connection terminal.<br />
Improper connection of a grounding conductor may cause electric shock.<br />
Plug the power cord directly into a grounded electrical outlet. To prevent overheat and a fire<br />
accident, do not use an extension cord, a multi-plug adaptor or a multiple connector. Consult<br />
your local <strong>Fuji</strong> <strong>Xerox</strong> representative to check if an outlet is grounded.<br />
Connect this product to a branch circuit or an outlet that has larger capacity than the rated<br />
ampere and voltage of this product. See the data plate on the rear panel of this product for its<br />
rated ampere and voltage.<br />
Never touch the power cord with wet hands. It may cause electric shock.<br />
Do not place an object on the power cord.<br />
CAUTION<br />
Always keep the plug connection free of dust. The dusty and damp environment may bring<br />
about minute electric current in a connector. It may generate heat and eventually cause a fire<br />
accident.<br />
To avoid the risk of electric shock and a fire accident, only use the power cord supplied with this<br />
product or the ones designated by <strong>Fuji</strong> <strong>Xerox</strong>.<br />
The power cord is exclusive use for this product. Do not use it for any other product.<br />
Do not damage or alter the power cord. Damage and alteration may generate heat and<br />
eventually cause electric shock or a fire accident.<br />
If the power cord is damaged or insulated wires are exposed, contact your local <strong>Fuji</strong> <strong>Xerox</strong><br />
representative for its replacement. Do not use a damaged or uninsulated cord to avoid the risk<br />
of electric shock and a fire accident.<br />
When cleaning this product, always switch off and unplug it. Access to a live machine interior<br />
may cause electric shock.<br />
Do not unplug or re-plug this product with the switch on. Plugging and unplugging a live<br />
connector may deform the plug and generate heat, and eventually cause a fire accident.<br />
Hold the plug not the cord when unplugging this product, or it may damage the cord and cause<br />
electric shock or a fire accident.<br />
Safety Notes 14
Always switch off and unplug the machine when it is not used over weekends or long holidays.<br />
It may cause deterioration of insulations and eventually electric shock or a fire accident.<br />
Once a month, switch off this product and check if<br />
• the power cord is plugged firmly into an electrical outlet;<br />
• the plug is not excessively heated, rusted or bent;<br />
• the plug and electrical outlet are free of dust; and<br />
• the power cord is not cracked or worn down.<br />
Once you notice any unusual condition, switch off and unplug this product first and contact your<br />
local <strong>Fuji</strong> <strong>Xerox</strong> representative.<br />
15 Safety Notes
• Machine Installation<br />
WARNING<br />
Do not locate this product where people might step on or trip over the power cord. Friction or<br />
excessive pressure may generate heat and eventually cause electric shock or a fire accident.<br />
CAUTION<br />
Never locate this product in the following places:<br />
• Near radiators or any other heat sources<br />
• Near volatile flammable materials such as curtains<br />
• In the hot, humid, dusty or poorly ventilated environment<br />
• In the place receiving direct sunlight<br />
• Near cookers or humidifiers<br />
Locate this product on a level and sturdy surface that can withstand a weight of 15 Kg.<br />
Otherwise, if tilted, the product may fall over and cause injuries.<br />
Locate this product in a well-ventilated area. Do not obstruct ventilation openings of the<br />
product.<br />
Keep the minimum clearance as follows for ventilation and an access to the power plug.<br />
Unplug the product if an abnormal condition is noted.<br />
100 mm<br />
848 mm<br />
200 mm<br />
114 mm<br />
936.5 mm<br />
100 mm<br />
100 mm<br />
690.5 mm<br />
200 mm<br />
114 mm<br />
Safety Notes 16
Do not incline the product at more than 10 degree angle. Otherwise, it may fall over and cause<br />
injuries.<br />
Left<br />
Right<br />
Left<br />
Right<br />
10° 10°<br />
Front<br />
Back<br />
Front<br />
Back<br />
10° 10°<br />
To bundle wires and cables, always use the cable ties and spiral tubes that <strong>Fuji</strong> <strong>Xerox</strong> supplies.<br />
Otherwise, it may cause some defects.<br />
Others<br />
To keep this product in a good performance and condition, always use it in the following<br />
environment:<br />
• Temperature: 10 – 32 °C<br />
• Humidity: 10 – 85%<br />
When the product is left in a chilly room and the room is rapidly warmed up by heater, dew<br />
condensation may form inside the product and cause a partial deletion on printing.<br />
17 Safety Notes
• Operational Safety<br />
WARNING<br />
The operator's product maintenance procedures are described in the customer documentation<br />
supplied with this product. Do not carry out any other maintenance procedures not described in<br />
the documentation.<br />
This product features safety design not to allow operators access to hazard areas. The hazard<br />
areas are isolated from operators by covers or protectors which require a tool to remove. To<br />
prevent electric shock and injuries, never remove those covers and protectors.<br />
To avoid the risk of electric shock and a fire accident, switch off and unplug the product<br />
promptly in the following conditions, then contact your local <strong>Fuji</strong> <strong>Xerox</strong> representative.<br />
• The product emits smoke or its surface is unusually hot.<br />
• The product emits unusual noise or odor.<br />
• The power cord is cracked or worn down.<br />
• A circuit breaker, fuse or any other safety device is activated.<br />
• Any liquid is spilled into the product.<br />
• The product is soaked in water.<br />
• Any part of the product is damaged.<br />
Do not insert any object into slots or openings of this product.<br />
Do not place any of the followings on the product:<br />
• Liquid container such as flower vases or coffee cups<br />
• Metal parts such as staples or clips<br />
• Heavy objects<br />
If liquid is spilled over or metal parts are slipped into the product, it may cause electric shock or<br />
a fire accident.<br />
Do not use conductive paper such as origami paper, carbonic paper or conductively-coated<br />
paper. When paper jam occurs, it may cause short-circuit and eventually a fire accident.<br />
When cleaning this product, use the designated cleaning materials exclusive to it. Other<br />
cleaning materials may result in poor performance of the product. Never use aerosol cleaners,<br />
or it may catch fire and cause explosion.<br />
Never play the CD-ROM supplied with the product on an audio player. Always use a CD-ROM<br />
player. Otherwise, large sound may damage audio players or your ears.<br />
CAUTION<br />
Always follow all warning instructions marked on or supplied with this product.<br />
To avoid the risk of burn injuries and electric shock, never touch the area with the “High<br />
Temperature” or “High Voltage” marks on.<br />
Keep electrical and mechanical safety interlocks active. Keep the safety interlocks away from<br />
magnetic materials. Magnetic materials may accidentally activate the product and cause<br />
injuries or electric shock.<br />
Do not attempt to remove a paper jammed deeply inside the product, particularly a paper<br />
wrapped around a Fusing Unit or a heat roller. Otherwise, it may cause injuries or burns.<br />
Switch off the product promptly and contact your local <strong>Fuji</strong> <strong>Xerox</strong> representative.<br />
Safety Notes 18
Do not apply excessive force to hold thick document on the document glass. It may break the<br />
glass and cause injuries.<br />
Ventilate well during extended operation or mass copying. It may affect the office air<br />
environment due to odor such as ozone in a poorly ventilated room.<br />
Provide proper ventilation to ensure the comfortable and safe environment.<br />
19 Safety Notes
• Consumable<br />
WARNING<br />
Store all consumables in accordance with the instructions given on its package or container.<br />
CAUTION<br />
Use a broom or a wet cloth to wipe off spilled toner. Never use a vacuum cleaner for the spills.<br />
It may catch fire by electric sparks inside the vacuum cleaner and cause explosion. If you spill<br />
a large volume of toner, contact your local <strong>Fuji</strong> <strong>Xerox</strong> representative.<br />
Never throw a toner cartridge into an open flame. Remaining toner in the cartridge may catch<br />
fire and cause burn injuries or explosion.<br />
If you have a used toner cartridge no longer needed, contact your local <strong>Fuji</strong> <strong>Xerox</strong><br />
representative for its disposal.<br />
Keep toner cartridges out of the reach of children. If a child accidentally swallows toner, spit it<br />
out, rinse mouth with water, drink water and consult a physician immediately.<br />
When replacing toner cartridges, be careful not to spill the toner. In case of any toner spills,<br />
avoid contact with clothes, skin, eyes and mouth as well as inhalation.<br />
If toner spills onto your skin or clothing, wash it off with soap and water.<br />
If you get toner particles in your eyes, wash it out with plenty of water for at least 15 minutes<br />
until irritation is gone. Consult a physician if necessary.<br />
If you inhale toner particles, move to a fresh air location and rinse your mouth with water.<br />
If you swallow toner, spit it out, rinse your mouth with water, drink plenty of water and consult a<br />
physician immediately.<br />
Safety Notes 20
• Warning and Caution Labels<br />
Always follow all warning instructions marked on or supplied with this product.<br />
To avoid the risk of burn injuries and electric shock, never touch the area with the "High Temperature"<br />
or "High Voltage" marks on.<br />
21 Safety Notes
Environment<br />
• For environmental protection and efficient use of resources, <strong>Fuji</strong> <strong>Xerox</strong> reuses returned toner<br />
cartridges to make recycle parts, recycle materials or energy recovery.<br />
• Proper disposal is required for toner cartridges no longer needed. Do not open toner cartridges<br />
containers. Return them to your local <strong>Fuji</strong> <strong>Xerox</strong> representative.<br />
Environment 22
Regulation<br />
• Radio Frequency Emissions (Class B)<br />
This product has been tested and found to comply with the limits for a Class B digital device,<br />
pursuant to the International Standard for Electromagnetic Interference (CISPR Publ. 22) and<br />
Radiocommunications Act 1992 in Australia/New Zealand. These limits are designed to<br />
provide reasonable protection against harmful interference in a residential installation. This<br />
product generates, uses and can radiate radio frequency energy and, if not installed and used<br />
in accordance with the instructions, may cause harmful interference to radio communications.<br />
However, there is no guarantee that interference will not occur in a particular installation. If this<br />
product does cause harmful interference to radio or television reception, which can be<br />
determined by turning this product off and on, the user is encouraged to try to correct the<br />
interference by one or more of the following measures:<br />
• Reorient or relocate the receiving antenna.<br />
• Increase the separation between this product and the receiver.<br />
• Connect this product into an outlet on a circuit different from that to which the receiver is<br />
connected.<br />
• Consult the dealer or an experienced radio/TV technician for help.<br />
Changes and modifications to this product not specifically approved by <strong>Fuji</strong> <strong>Xerox</strong> may void the<br />
user’s authority to operate this product.<br />
• Product Safety Certification (CB)<br />
This product is certified by the following agency using the safety standards listed.<br />
Agency<br />
Standard<br />
TUV-Rh IEC60950-1:ed. 2<br />
23 Regulation
Illegal Copies and Printouts<br />
Copying or printing certain documents may be illegal in your country. Penalties of fines or<br />
imprisonment may be imposed on those found guilty. The following are examples of items that may be<br />
illegal to copy or print in your country.<br />
• Currency<br />
• Banknotes and checks<br />
• Bank and government bonds and securities<br />
• Passports and identification cards<br />
• Copyright material or trademarks without the consent of the owner<br />
• Postage stamps and other negotiable instruments<br />
This list is not inclusive and no liability is assumed for either its completeness or accuracy. In case of<br />
doubt, contact your legal counsel.<br />
Illegal Copies and Printouts 24
Product Features<br />
This chapter describes the product features and indicates their links.<br />
Manual Duplex Print<br />
N-Up (2-in-1 Copy)<br />
Duplex print is to print two or more pages on the<br />
front and back sides of a single sheet of paper<br />
manually. This feature allows you to reduce the<br />
paper consumption.<br />
For more information, see "Manual Duplex<br />
Printing (Windows Print Driver Only)" on<br />
page 86.<br />
Printing From a USB Storage Device (USB<br />
Direct Print)<br />
N-Up copy enables you to print multiple pages<br />
on a single sheet of paper. This feature allows<br />
you to reduce the paper consumption.<br />
For more information, see "N-Up" on page 131.<br />
Scanning to a USB Storage Device<br />
Print From USB Memory feature allows you to<br />
print directly from your USB storage device<br />
without starting your computer. Without<br />
requiring you to start your computer and an<br />
application, this feature allows quick printing<br />
with simple procedures.<br />
For more information, see "Direct Print Using<br />
the USB Storage Device" on page 97.<br />
You do not need a computer to connect your<br />
USB storage device to save the scanned data.<br />
Insert your USB storage device in the port on<br />
the printer, and save the scanned data directly<br />
to your USB storage device.<br />
For more information, see "Scanning to USB<br />
Storage Device" on page 144.<br />
25 Product Features
Priority Sheet Inserter (PSI)<br />
Print media loaded on the PSI is given<br />
precedence over those loaded on the<br />
multipurpose feeder (MPF). Using the PSI<br />
allows you to use other types or sizes of print<br />
media preferentially over the regular print media<br />
loaded on the MPF.<br />
For more information, see "Loading Print Media<br />
in the Priority Sheet Inserter (PSI)" on page 89.<br />
Product Features 26
1<br />
Specifications<br />
This chapter lists the main specifications of the printer. Note that the specifications of the product may<br />
change without prior notice.<br />
This chapter includes:<br />
• "Copy Function" on page 28<br />
• "Print Function" on page 30<br />
• "Scan Function" on page 31<br />
27 Specifications
Copy Function<br />
Type<br />
Console<br />
Memory<br />
128 MB<br />
HDD —<br />
Color Capability<br />
Full color<br />
Scanning Resolution<br />
Document glass: 600 600 dpi<br />
Printing Resolution<br />
Output resolution: 1200 2400 dpi<br />
Data processing resolution: 600 600 dpi<br />
Halftone/Printable Colors 256 color gradation for each color (16,700,000 colors)<br />
Warm-up Time<br />
36 seconds or less*<br />
*: The values are based on a room temperature of 22 °C and on the factory<br />
default setting.<br />
Original Paper Size<br />
Output Paper Size<br />
Output Paper Weight<br />
IMPORTANT:<br />
• It may take longer due to the image quality adjustment.<br />
Document glass: The maximum size is 215.9 297 mm for both<br />
sheets and books.<br />
Multipurpose feeder:<br />
Maximum: Legal (8.5 14"), 215.9 355.6 mm<br />
Minimum: 76.2 127 mm (3 5")<br />
Priority sheet inserter:<br />
Maximum: Legal (8.5 14"), 215.9 355.6 mm<br />
Minimum: 76.2 190.5 mm (3 7.5")<br />
Image loss width: Top edge, 4 mm or less; bottom edge, 4 mm or<br />
less; left and right edges, 4 mm or less<br />
Multipurpose feeder/Priority sheet inserter:<br />
60 – 163 gsm<br />
IMPORTANT:<br />
• Use paper recommended by <strong>Fuji</strong> <strong>Xerox</strong>. Copying may not be<br />
performed correctly depending on the conditions.<br />
First Copy Output Time Monochrome: 24 seconds (for A4 /monochrome priority mode)<br />
Color: 40 seconds (for A4 /color priority mode)<br />
Reduction/Enlargement Size-for-Size: 1:1 ± 1.3%<br />
Preset %: 1:0.500, 1:0.707, 1:0.816, 1:1.225, 1:1.414, 1:2.000<br />
Variable %: 1:0.25 – 1:4.00 (1% increments)<br />
Continuous Copy Speed Monochrome:<br />
A4: 15 sheets/minute<br />
Color:<br />
A4: 12 sheets/minute<br />
IMPORTANT:<br />
• The speed may be reduced due to image quality adjustment.<br />
• The performance may be reduced depending on the paper type or<br />
paper tray.<br />
Specifications 28
Paper Tray Capacity<br />
Continuous Copy<br />
Standard:<br />
150 sheets (Multipurpose feeder) + 10 sheets (Priority sheet<br />
inserter)<br />
Maximum paper capacity:<br />
160 sheets (standard)<br />
IMPORTANT:<br />
• When using <strong>Fuji</strong> <strong>Xerox</strong> P paper (64 gsm)<br />
99 images<br />
NOTE:<br />
• The machine may pause temporarily to perform image<br />
stabilization.<br />
Output Tray Capacity Approximately 100 sheets (A4 )<br />
IMPORTANT:<br />
• When using <strong>Fuji</strong> <strong>Xerox</strong> P paper (64 gsm)<br />
Power Supply AC 220 – 240 V ± 10%/100 – 127 V ± 10%, 4/8 A for both 50/60 Hz ±<br />
3 Hz<br />
Power Consumption<br />
Maximum power consumption:<br />
950 W<br />
Low Power mode:<br />
16 W or less<br />
Sleep mode:<br />
7 W or less<br />
Standby mode:<br />
65 W or less<br />
Dimensions<br />
Width 410 Depth 389 * Height 318 mm<br />
*: When the front cover is closed.<br />
Machine Weight<br />
15 kg<br />
Space Requirement<br />
IMPORTANT:<br />
• The weight of paper is not included.<br />
• The weight of the toner cartridges are included.<br />
Width 848 Depth 936.5 * mm<br />
*: When the front cover and rear cover are open.<br />
29 Specifications
Print Function<br />
Type<br />
Continuous Print Speed<br />
Print Resolution<br />
PDL<br />
Operating System<br />
Built-in<br />
Same as the Copy Function<br />
Output resolution: 1200 2400 dpi<br />
Data processing resolution: 600 600 dpi<br />
— (Host-based)<br />
Standard: GDI driver<br />
Microsoft ® Windows ® XP,<br />
Microsoft ® Windows Server ® 2003,<br />
Microsoft ® Windows Server ® 2008,<br />
Microsoft ® Windows Vista ® ,<br />
Microsoft ® Windows ® 7,<br />
Microsoft ® Windows ® XP x64,<br />
Microsoft ® Windows Server ® 2003 x64,<br />
Microsoft ® Windows Server ® 2008 x64,<br />
Microsoft ® Windows Vista ® x64,<br />
Microsoft ® Windows Server ® 2008 R2 x64,<br />
Microsoft ® Windows ® 7 x64,<br />
Mac OS ® X 10.4/10.5/10.6<br />
IMPORTANT:<br />
• For information about the latest supported OS, contact our<br />
Customer Support Center.<br />
Connectivity Standard: USB 1.1/2.0*<br />
*: USB 2.0 is supported by the following:<br />
Windows ® XP, Windows Server ® 2003, Windows Vista ® , Windows<br />
Server ® 2008, Windows ® 7, Windows ® XP x64, Windows Server ® 2003<br />
x64, Windows Vista ® x64, Windows Server ® 2008 x64, Windows Server ®<br />
2008 R2 x64, Windows ® 7 x64, and Mac OS ® X 10.4/10.5/10.6.<br />
Specifications 30
Scan Function<br />
Type<br />
Original Paper Size<br />
Scanning Resolution<br />
Scanning Halftone<br />
Color scanner<br />
Same as the Copy Function<br />
1200 1200 dpi, 600 600 dpi, 300 300 dpi, 200 200 dpi<br />
Monochrome : 8 bit<br />
Color : 24 bit<br />
Connectivity Standard: USB 1.1/2.0*<br />
*: USB 2.0 is supported by the following:<br />
Windows ® XP, Windows Server ® 2003, Windows Vista ® , Windows<br />
Server ® 2008, Windows ® 7, Windows ® XP x64, Windows Server ® 2003<br />
x64, Windows Vista ® x64, Windows Server ® 2008 x64, Windows Server ®<br />
2008 R2 x64, Windows ® 7 x64, and Mac OS ® X 10.4/10.5/10.6.<br />
Scan to PC<br />
Operating System:<br />
Microsoft ® Windows ® XP,<br />
Microsoft ® Windows Vista ® ,<br />
Microsoft ® Windows Server ® 2003,<br />
Microsoft ® Windows Server ® 2008,<br />
Microsoft ® Windows ® 7,<br />
Microsoft ® Windows XP x64,<br />
Microsoft ® Windows Vista ® x64,<br />
Microsoft ® Windows Server ® 2003 x64,<br />
Microsoft ® Windows Server ® 2008 x64,<br />
Microsoft ® Windows Server ® 2008 R2 x64,<br />
Microsoft ® Windows ® 7 x64,<br />
Mac OS ® X 10.4/10.5/10.6<br />
IMPORTANT:<br />
• For information about the latest supported OS, refer to the <strong>Fuji</strong><br />
<strong>Xerox</strong> Web site.<br />
File Format:<br />
TIFF (MMR, JPEG)<br />
JPEG<br />
PDF (v 1.3)<br />
31 Specifications
Specifications 32
2<br />
Basic Operation<br />
This chapter includes:<br />
• "Main Components" on page 34<br />
• "Turning On the Printer" on page 39<br />
• "Setting Initial Settings on the Operator Panel" on page 40<br />
• "Printing a Panel Settings Page" on page 41<br />
• "Power Saver Mode" on page 44<br />
33 Basic Operation
Main Components<br />
This section provides an overview of your DocuPrint CM205 b.<br />
This section includes:<br />
• "Front View" on page 35<br />
• "Rear View" on page 36<br />
• "Operator Panel" on page 37<br />
Basic Operation 34
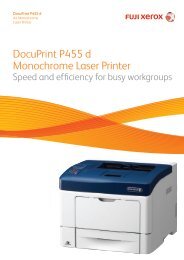
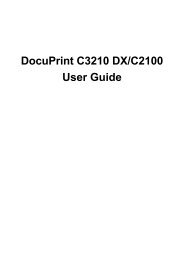
• Front View<br />
10<br />
12<br />
3 4 5<br />
6<br />
15 1413 12 11 10 9 8<br />
7<br />
1 Output Tray Extension 2 Center Output Tray<br />
3 Operator Panel 4 Document Cover<br />
5 Toner Access Cover 6 Document Glass<br />
7 Cleaning Rod 8 Power Switch<br />
9 Front Cover 10 Paper Width Guides<br />
11 Slide Bar 12 Length Guide<br />
13 Multipurpose feeder (MPF) 14 USB Drive<br />
15 Priority Sheet Inserter (PSI)<br />
35 Basic Operation
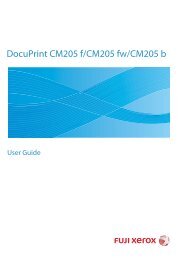
• Rear View<br />
9<br />
8<br />
7<br />
6<br />
5<br />
1<br />
4 3<br />
2<br />
1 USB Port 2 Rear Cover Handle<br />
3 Power Connector 4 Rear Cover<br />
5 Transfer Roller 6 Paper Chute<br />
7 Paper Feed Roller 8 Transfer Belt<br />
9 Levers<br />
Basic Operation 36
• Operator Panel<br />
The operator panel has a 4-line by 28-character liquid crystal display (LCD), light-emitting diodes<br />
(LED), control buttons, and numeric keypad, which allow you to control the printer.<br />
1 2<br />
3 4 5 6 7 8<br />
OK<br />
7<br />
ABC<br />
1 2 3<br />
4 5 6<br />
8<br />
DEF<br />
GHI JKL MNO<br />
PQRS TUV WXYZ<br />
9<br />
CA<br />
0<br />
C<br />
19 18 17 16<br />
15<br />
14<br />
13<br />
12<br />
11<br />
10<br />
9<br />
1 (Copy) button/LED<br />
• Moves to the top level of the Copy menu.<br />
2 (Scan) button/LED<br />
• Moves to the top level of the Scan menu.<br />
3 buttons<br />
• Moves a cursor or highlight up or down.<br />
4 buttons<br />
• Moves a cursor or highlight right or left.<br />
5 (System) button/LED<br />
• Moves to the top level of the System menu.<br />
6 Numeric keypad<br />
• Enters numbers.<br />
7 CA (Clear All) button<br />
• Resets the current setting, and returns to the top level of each service menu.<br />
8 (Energy Saver) button/LED<br />
• Lights up in the Sleep mode. Press this button to exit the Sleep mode.<br />
9 (Stop) button<br />
• Cancels the current processing or pending job.<br />
10 (Start) button<br />
• Starts a job.<br />
11 (Error) LED<br />
• Lights up when the printer has an error.<br />
12 (Data) LED<br />
• Lights up for incoming, outgoing, or pending jobs.<br />
37 Basic Operation
13 C (Clear) button<br />
• Deletes numbers.<br />
14 button<br />
• Confirms the entry of values.<br />
15 (Back) button<br />
• Returns to the previous screen.<br />
16 LCD Panel<br />
• Displays various settings, instructions, and error messages.<br />
17 (Print) button/LED<br />
• Moves to the top level of the Print menu.<br />
18 Color Mode button<br />
• Switches the color mode.<br />
19 B&W/Color LED<br />
• Lights up to indicate which color mode is selected.<br />
NOTE:<br />
• Moving to a different menu or returning to a previous screen cancels the current entry or setting. Make sure to<br />
press the button to save the current entry or setting.<br />
Basic Operation 38
Turning On the Printer<br />
IMPORTANT:<br />
• Do not use extension cords or power strips.<br />
• The printer should not be connected to an uninterruptible power supply (UPS) system.<br />
1 Connect the power cord to the power connector on the rear of your printer (see "Rear View" on<br />
page 36).<br />
2 Connect the other end of the cord to the power source.<br />
3 Turn on the printer.<br />
NOTE:<br />
• When you turn on the printer for the first time, follow the on-screen instructions on the LCD panel to<br />
configure the initial settings of your printer.<br />
See also:<br />
• "Setting Initial Settings on the Operator Panel" on page 40<br />
39 Basic Operation
Setting Initial Settings on the Operator Panel<br />
You need to set the printer language when you turn on the printer for the first time.<br />
When you turn on the printer, a wizard appears on the LCD panel. Follow the step below to set the<br />
initial settings.<br />
NOTE:<br />
• If you do not start configuring the initial settings, Select Function appears on the LCD panel in three<br />
minutes. After that, you can set the following initial setup by enabling Power On Wizard on the operator<br />
panel if needed.<br />
For more information about the operator panel, see "Understanding the Printer Menus" on page 150.<br />
1 Select the language you want to use on the operator panel, and then press the button.<br />
Basic Operation 40
Printing a Panel Settings Page<br />
The Panel Settings page shows current settings for the operator panel menus.<br />
This section includes:<br />
• "The Operator Panel" on page 42<br />
• "The Printer Setting Utility" on page 43<br />
41 Basic Operation
• The Operator Panel<br />
1 Press the (System) button.<br />
2 Select Report / List, and then press the button.<br />
3 Select Panel Settings, and then press the button.<br />
The Panel Settings page is printed.<br />
Basic Operation 42
• The Printer Setting Utility<br />
The following procedure uses Microsoft ® Windows ® XP as an example.<br />
1 Click start All Programs <strong>Fuji</strong> <strong>Xerox</strong> <strong>Fuji</strong> <strong>Xerox</strong> Printer Software for Asia-Pacific <br />
DocuPrint CM205 b Printer Setting Utility.<br />
NOTE:<br />
• The window to select a printer appears in this step, when multiple print drivers are installed on your<br />
computer. In this case, click the name of the desired printer listed in Printer Name.<br />
The Printer Setting Utility appears.<br />
2 Click the Printer Settings Report tab.<br />
3 Select Reports from the list at the left side of the page.<br />
The Reports page is displayed.<br />
4 Click the Panel Settings button.<br />
The Panel Settings page is printed.<br />
43 Basic Operation
Power Saver Mode<br />
The printer has a power saving feature which reduces power consumption during periods of inactivity.<br />
This feature operates in two modes: Low Power mode and Sleep mode. As delivered, the printer<br />
switches to the Low Power mode five minutes after the last print job is printed. The printer then<br />
switches to the Sleep mode after another six minutes of inactivity. When the printer is in the Low<br />
Power mode, the LCD backlight turns off. In the Sleep mode, the (Energy Saver) button lights up.<br />
The display goes blank and displays nothing.<br />
The factory default settings of five minutes (Low Power mode) and six minutes (Sleep mode) are<br />
changeable within the range of 5 to 30 minutes (Low Power mode) and 1 to 6 minutes (Sleep mode).<br />
The printer returns to the ready-to-print state in about 25 seconds when re-activated.<br />
See also:<br />
• "Setting the Power Saving Timer Option" on page 177<br />
Basic Operation 44
• Exiting the Power Saver Mode<br />
The printer automatically exits the Power Saver mode when it receives a job from a computer. To<br />
manually exit the Low Power mode, press any button on the operator panel. To exit the Sleep mode,<br />
press the (Energy Saver) button.<br />
NOTE:<br />
• When the printer is in the Sleep mode, all buttons on the operator panel except for the (Energy Saver)<br />
button do not function. To use the buttons on the operator panel, press the (Energy Saver) button to exit<br />
the Power Saver mode.<br />
See also:<br />
• "Setting the Power Saving Timer Option" on page 177<br />
45 Basic Operation
Basic Operation 46
3<br />
Printer Management Software<br />
Use the Software Pack CD-ROM that is shipped with your printer to install a combination of software<br />
programs, depending on your operating system.<br />
This chapter includes:<br />
• "Print and Scan Drivers" on page 48<br />
• "Printer Setting Utility (Windows Only)" on page 49<br />
• "SimpleMonitor (Windows Only)" on page 50<br />
• "Launcher (Windows Only)" on page 51<br />
• "Express Scan Manager" on page 52<br />
47 Printer Management Software
Print and Scan Drivers<br />
To access all of your printer’s features, install the print and scan drivers from the Software Pack<br />
CD-ROM.<br />
• The print driver enables your computer and printer to communicate and provides access to your<br />
printer features.<br />
• The scan driver enables you to scan images directly to your personal computer and place<br />
scanned images directly into an application via USB.<br />
The scan driver is installed with your <strong>Fuji</strong> <strong>Xerox</strong> print driver. It is available for Microsoft ® Windows ®<br />
and Mac OS ® X.<br />
See also:<br />
• "Installing Print Driver on Computers Running Windows" on page 57<br />
• "Installing Print Driver on Computers Running Mac OS X" on page 60<br />
Printer Management Software 48
Printer Setting Utility (Windows Only)<br />
The Printer Setting Utility allows you to view or specify the system settings. You can also diagnose the<br />
system settings by using the Printer Setting Utility.<br />
The Printer Setting Utility consists of the Printer Settings Report, Printer Maintenance, and<br />
Diagnosis tabs.<br />
The Printer Setting Utility is installed with your <strong>Fuji</strong> <strong>Xerox</strong> print driver.<br />
NOTE:<br />
• The Password dialog box appears the first time you try to change settings on Printer Setting Utility when<br />
Panel Lock is set on the printer. In this case, enter the password you specified, and click OK to apply the<br />
settings.<br />
49 Printer Management Software
SimpleMonitor (Windows Only)<br />
You can check the printer status with SimpleMonitor. Double-click the SimpleMonitor printer icon on<br />
the taskbar at the bottom right of the screen. The Printer Selection window appears, which displays<br />
the printer name, printer connection port, printer status, and model name. Check the column Status to<br />
know the current status of your printer.<br />
Settings button: Displays the Settings screen and allows you to modify the SimpleMonitor settings.<br />
Click the name of the desired printer listed on the Printer Selection window. The Printer Status<br />
window appears.<br />
The Printer Status window alerts you when there is a warning or when an error occurs, for example,<br />
when a paper jam occurs or toner is running low.<br />
By default, the Printer Status window launches automatically when an error occurs. You can specify<br />
the conditions for starting the Printer Status window in Printer Status Window Properties.<br />
To change the pop-up settings for the Printer Status window:<br />
1 Right-click the SimpleMonitor printer icon on the taskbar at the bottom right of the screen.<br />
2 Select Printer Status Window Properties.<br />
The Printer Status Window Properties window appears.<br />
3 Select the type of the pop-up and then click OK.<br />
You can also check the toner level of your printer and the job information on the Printer Status<br />
window.<br />
The SimpleMonitor is installed with your <strong>Fuji</strong> <strong>Xerox</strong> print driver.<br />
Printer Management Software 50
Launcher (Windows Only)<br />
Using the Launcher-Btype window, you can open the Status Window, Printer Setting Utility,<br />
Troubleshooting, and Express Scan Manager.<br />
The following procedure uses Windows XP as an example.<br />
To open the Launcher-Btype window:<br />
1 Click start All Programs <strong>Fuji</strong> <strong>Xerox</strong> <strong>Fuji</strong> <strong>Xerox</strong> Printer Software for Asia-Pacific <br />
DocuPrint CM205 b Launcher.<br />
The Launcher-Btype window appears.<br />
2 The Launcher-Btype window provides four buttons; Status Window, Printer Setting Utility,<br />
Troubleshooting, and Express Scan Manager.<br />
To exit, click the X button at the top-right of the window.<br />
For details, click the Help button/icon of each application.<br />
Status Window<br />
Printer Setting Utility<br />
Troubleshooting<br />
Express Scan Manager<br />
Click to open the Printer Status window.<br />
See also:<br />
• "SimpleMonitor (Windows Only)" on page 50<br />
Click to open the Printer Setting Utility.<br />
See also:<br />
• "Printer Setting Utility (Windows Only)" on page 49<br />
Click to open the Troubleshooting guide, which allows you to resolve<br />
issues by yourself.<br />
Click to open the Express Scan Manager.<br />
See also:<br />
• "Express Scan Manager" on page 52<br />
The Launcher is installed with your <strong>Fuji</strong> <strong>Xerox</strong> print driver.<br />
51 Printer Management Software
Express Scan Manager<br />
The Express Scan Manager handles scan jobs sent from the printer to your computer via USB. When<br />
a scan jobs is sent from the printer to the computer, Express Scan Manager automatically manages<br />
the scan job.<br />
Before scanning to your computer, start Express Scan Manager and configure the output destination<br />
of the scanned image files.<br />
Click Open the image file to display scanned files saved in the specified destination after scanning.<br />
The Express Scan Manager is installed with your <strong>Fuji</strong> <strong>Xerox</strong> print driver. It is available for Windows<br />
and Mac OS X.<br />
See also:<br />
• "Scanning From the Operator Panel" on page 140<br />
Printer Management Software 52
4<br />
Installing the Print Driver<br />
This chapter includes:<br />
• "Connecting Your Printer" on page 54<br />
• "Installing Print Driver on Computers Running Windows" on page 57<br />
• "Installing Print Driver on Computers Running Mac OS X" on page 60<br />
53 Installing the Print Driver
Connecting Your Printer<br />
Your DocuPrint CM205 b interconnection cable must meet the following requirement:<br />
Connection Type<br />
USB<br />
Connection Specification<br />
USB 1.1/2.0 compatible<br />
1<br />
1 USB Port<br />
Installing the Print Driver 54
• Connecting Printer to Computer<br />
Connect the printer via USB. A USB connection is a direct connection and is not used for networking.<br />
The available features are shown in the following table.<br />
Connection Type<br />
USB<br />
Available Features<br />
You can:<br />
• Instruct print jobs from a computer.<br />
• Scan and print an image into an application.<br />
• Scan and print an image to a folder on the computer.<br />
55 Installing the Print Driver
USB Connection<br />
A local printer is a printer which is directly attached to your computer using the USB cable.<br />
The following operating systems support USB connection:<br />
• Microsoft ® Windows ® XP<br />
• Windows XP 64-bit Edition<br />
• Windows Server ® 2003<br />
• Windows Server 2003 x64 Edition<br />
• Windows Server 2008<br />
• Windows Server 2008 64-bit Edition<br />
• Windows Server 2008 R2<br />
• Windows Vista ®<br />
• Windows Vista 64-bit Edition<br />
• Windows 7<br />
• Windows 7 64-bit Edition<br />
• Mac OS ® X 10.4/10.5/10.6<br />
To attach the printer to a computer:<br />
1 Ensure that the printer, computer, and any other attached devices are turned off and unplugged<br />
from the power source/outlet.<br />
NOTE:<br />
• If the USB storage device is inserted into the USB drive of the printer, remove it.<br />
2 Connect the smaller USB connector into the USB port at the back of the printer and the other end<br />
of the cable into a USB port of the computer.<br />
USB port<br />
NOTE:<br />
• Do not connect the printer USB cable to the USB connector available on the keyboard.<br />
Installing the Print Driver 56
Installing Print Driver on Computers Running<br />
Windows<br />
This section includes:<br />
• "Inserting the Software Pack CD-ROM" on page 58<br />
• "USB Connection Setup" on page 59<br />
57 Installing the Print Driver
• Inserting the Software Pack CD-ROM<br />
1 Insert the Software Pack CD-ROM into your computer’s CD-ROM drive to start Easy Install<br />
Navi.<br />
NOTE:<br />
• If the CD does not automatically launch, click Start (start for Windows XP) All Programs (for<br />
Windows Vista and Windows 7) Accessories (for Windows Vista and Windows 7) Run, and then<br />
enter D:\setup_assist.exe (where D is the drive letter of your CD), and then click OK.<br />
Installing the Print Driver 58
• USB Connection Setup<br />
The following procedure uses Windows XP as an example.<br />
1 Connect the computer and the printer with the USB cable.<br />
2 Turn on the printer.<br />
NOTE:<br />
• If Found New Hardware Wizard appears, click Cancel at this time.<br />
3 Click Installing Drivers and Software.<br />
4 Select Personal Installation, and then click Next.<br />
5 Click Install.<br />
6 Select Typical Installation(recommended) to perform the standard installation, and then click<br />
Install.<br />
For the custom installation, select Custom Installation, and then click Next. Select the items that<br />
you want to install, and then click Install.<br />
7 Click Finish to exit the wizard. If necessary, click Print Test Page to print a test page.<br />
59 Installing the Print Driver
Installing Print Driver on Computers Running Mac<br />
OS X<br />
This section includes:<br />
• "Installing the Drivers and Software" on page 61<br />
Installing the Print Driver 60
• Installing the Drivers and Software<br />
The following procedure uses Mac OS X 10.6 as an example.<br />
1 Run the Software Pack CD-ROM on the Mac OS X.<br />
2 Double-click the FX DocuPrint CM205 b Installer icon.<br />
3 Click Continue on the Introduction screen.<br />
4 Select a language for the Software License Agreement.<br />
5 After reading the Software License Agreement, click Continue.<br />
6 If you agree to the terms of the Software License Agreement, click Agree to continue the<br />
installation process.<br />
7 Click Continue if Select a Destination screen appears.<br />
8 Click Install to perform the standard installation.<br />
9 Enter the administrator's name and password, and then click OK.<br />
10 Click Continue Installation.<br />
11 Click Restart to complete installation.<br />
Adding a Printer on Mac OS X 10.5/10.6<br />
1 Turn off the printer and your computer.<br />
2 Connect the printer and your computer with the USB cable.<br />
3 Turn on the printer and your computer.<br />
4 Display System Preferences, and then click Print & Fax.<br />
5 Confirm your USB printer is added to Print & Fax.<br />
If your USB printer is not displayed, execute the following procedures.<br />
6 Click the plus (+) sign, and then click Default.<br />
7 Select the printer connected via USB from the Printer Name list.<br />
Name, Location, and Print Using are automatically entered.<br />
8 Click Add.<br />
61 Installing the Print Driver
Adding a Printer on Mac OS X 10.4<br />
1 Turn off the printer and your computer.<br />
2 Connect the printer and your computer with the USB cable.<br />
3 Turn on the printer and your computer.<br />
4 Start Printer Setup Utility.<br />
NOTE:<br />
• You can find Printer Setup Utility in the Utilities folder in Applications.<br />
5 Confirm your USB printer is added to Printer List.<br />
If your USB printer is not displayed, execute the following procedures.<br />
6 Click Add.<br />
7 Click Default Browser in the Printer Browser dialog box.<br />
8 Select the printer connected via USB from the Printer Name list.<br />
Name, Location and Print Using are automatically entered.<br />
9 Click Add.<br />
Installing the Print Driver 62
5<br />
Printing Basics<br />
This chapter includes:<br />
• "About Print Media" on page 64<br />
• "Supported Print Media" on page 68<br />
• "Loading Print Media" on page 71<br />
• "Setting Paper Sizes and Types" on page 91<br />
• "Printing" on page 94<br />
63 Printing Basics
About Print Media<br />
This section includes:<br />
• "Print Media Usage Guidelines" on page 65<br />
• "Print Media That Can Damage Your Printer" on page 66<br />
• "Print Media Storage Guidelines" on page 67<br />
Using paper that is not appropriate for the printer can cause paper jams, image quality problems, or<br />
printer failure. To achieve the best performance from your printer, we recommend you to use only the<br />
paper described in this section.<br />
When using paper other than that recommended, contact the <strong>Fuji</strong> <strong>Xerox</strong> local representative office or<br />
an authorised dealer.<br />
Printing Basics 64
• Print Media Usage Guidelines<br />
The printer tray accommodates most sizes and types of paper and other specialty media. Follow these<br />
guidelines when loading paper and media in the tray:<br />
• Envelopes can be printed from the multipurpose feeder (MPF) and priority sheet inserter (PSI).<br />
• Fan paper or other specialty media before loading in the tray.<br />
• Do not print on label stock once a label has been removed from a sheet.<br />
• Use only paper envelopes. Do not use envelopes with windows, metal clasps, or adhesives with<br />
release strips.<br />
• Print all envelopes single-sided only.<br />
• Some wrinkling and embossing may occur when printing envelopes.<br />
• Do not overload the tray. Do not load print media above the fill line on the inside of the paper<br />
width guides.<br />
• Adjust the paper width guides to fit the paper size.<br />
• If excessive jams occur, use paper or other media from a new package.<br />
WARNING:<br />
• Do not use conductive paper such as origami paper, carbonic paper or conductively-coated paper.<br />
When paper jam occurs, it may cause short-circuit and eventually a fire accident.<br />
See also:<br />
• "Loading Print Media in the Multipurpose Feeder (MPF)" on page 74<br />
• "Loading Print Media in the Priority Sheet Inserter (PSI)" on page 81<br />
• "Loading Envelope in the Multipurpose Feeder (MPF)" on page 78<br />
• "Loading Envelope in the Priority Sheet Inserter (PSI)" on page 82<br />
• "Printing on Custom Size Paper" on page 104<br />
65 Printing Basics
• Print Media That Can Damage Your Printer<br />
Your printer is designed to use a variety of media types for print jobs. However, some media can<br />
cause poor output quality, increased paper jams, or damage to your printer.<br />
Unacceptable media includes:<br />
• Rough or porous media<br />
• Plastic media<br />
• Paper that has been folded or wrinkled<br />
• Paper with staples<br />
• Envelopes with windows or metal clasps<br />
• Padded envelopes<br />
• Non-laser glossy or coated paper<br />
• Perforated media<br />
WARNING:<br />
• Do not use conductive paper such as origami paper, carbonic paper or conductively-coated paper.<br />
When paper jam occurs, it may cause short-circuit and eventually a fire accident.<br />
Printing Basics 66
• Print Media Storage Guidelines<br />
Providing good storage conditions for your paper and other media contributes to optimum print quality.<br />
• Store print media in dark, cool, relatively dry locations. Most paper items are susceptible to<br />
damage from ultraviolet (UV) and visible light. UV radiation, which is emitted by the sun and<br />
fluorescent bulbs, is particularly damaging to paper items. The intensity and length of exposure<br />
to visible light on paper items should be reduced as much as possible.<br />
• Maintain constant temperatures and relative humidity.<br />
• Avoid attics, kitchens, garages, and basements for storing print media.<br />
• Store print media flat. Print media should be stored on pallets, cartons, shelves, or in cabinets.<br />
• Avoid having food or drinks in the area where print media is stored or handled.<br />
• Do not open sealed packages of paper until you are ready to load them into the printer. Leave<br />
paper in the original packaging. For most commercial cut-size grades, the ream wrapper<br />
contains an inner lining that protects the paper from moisture loss or gain.<br />
• Leave the media inside the bag until you are ready to use it; reinsert unused media in the bag<br />
and reseal it for protection. Some specialty media is packaged inside resealable plastic bags.<br />
67 Printing Basics
Supported Print Media<br />
Using unsuitable print media may lead to paper jams, poor print quality, breakdown and damage to<br />
your printer. To use the features of this printer effectively, use the suggested print media that is<br />
recommended here.<br />
IMPORTANT:<br />
• The toner may come off the print media, if it gets wet by water, rain, steam and so on. For details, contact the<br />
<strong>Fuji</strong> <strong>Xerox</strong> local representative office or an authorized dealer.<br />
Printing Basics 68
• Usable Print Media<br />
The types of print media that can be used on this printer are as follows:<br />
Paper Size<br />
Paper Type (Weight)<br />
Loading Capacity<br />
A4 SEF (210 297 mm)<br />
B5 SEF (182 257 mm)<br />
A5 SEF (148 210 mm)<br />
Letter SEF (8.5 11 inches)<br />
Legal SEF (8.5 14 inches)<br />
Folio SEF (8.5 13 inches)<br />
Executive SEF (7.25 10.5 inches)<br />
C5 SEF (162 229 mm)<br />
Monarch SEF (3.875 7.5 inches)<br />
Monarch LEF (7.5 3.875 inches) *<br />
Envelope #10 SEF (4.125 9.5 inches)<br />
DL SEF (110 220 mm)<br />
DL LEF (220 110 mm) *<br />
Custom size:<br />
Multipurpose Feeder (MPF):<br />
Width: 76.2–215.9 mm (3–8.5 inches)<br />
Length: 127–355.6 mm (5 –14 inches)<br />
Priority Sheet Inserter (PSI):<br />
Width: 76.2–215.9 mm (3–8.5 inches)<br />
Length: 190.5–355.6 mm (7.5 –14 inches)<br />
Plain<br />
Bond<br />
Lightweight Cardstock<br />
Lightweight Glossy Cardstock<br />
Envelope<br />
Labels<br />
Recycled<br />
Multipurpose Feeder (MPF): 150 sheets of standard paper<br />
Priority Sheet Inserter (PSI): 10 sheets of standard paper<br />
* Monarch and DL envelopes can be supported by LEF with their flap open.<br />
NOTE:<br />
• SEF and LEF indicate the paper feed direction; SEF stands for short-edge feed. LEF stands for longedge<br />
feed.<br />
• Use only laser print media. Do not use ink jet paper in this printer.<br />
See also:<br />
• "Loading Print Media in the Multipurpose Feeder (MPF)" on page 74<br />
• "Loading Print Media in the Priority Sheet Inserter (PSI)" on page 81<br />
• "Loading Envelope in the Multipurpose Feeder (MPF)" on page 78<br />
• "Loading Envelope in the Priority Sheet Inserter (PSI)" on page 82<br />
Printing on print media that differs from the paper size or paper type selected on the print driver may<br />
lead to paper jams. To ensure that printing is correctly done, select the correct paper size and paper<br />
69 Printing Basics
type.<br />
Printing Basics 70
Loading Print Media<br />
Loading print media properly helps prevent jams and ensures trouble-free printing.<br />
Before loading print media, identify the recommended print side of the print media. This information is<br />
usually on the print media package.<br />
NOTE:<br />
• After loading paper in the feeder, specify the same paper type on the operator panel.<br />
71 Printing Basics
• Capacity<br />
Multipurpose feeder (MPF) can hold:<br />
• 150 sheets of standard paper<br />
• 16.2 mm (0.64 inches) of thick paper<br />
• One sheet of coated paper<br />
• 16.2 mm (0.64 inches) of post cards<br />
• Five envelopes<br />
• 16.2 mm (0.64 inches) of labels<br />
Priority sheet inserter (PSI) can hold:<br />
• 10 sheets of standard paper or one sheet of other paper<br />
Printing Basics 72
• Print Media Dimensions<br />
The MPF accepts print media within the following dimensions:<br />
• Width: 76.2 –215.9 mm (3.00–8.50 inches)<br />
• Length: 127–355.6 mm (5.00–14.00 inches)<br />
The PSI accepts print media within the following dimensions:<br />
• Width: 76.2-215.9 mm (3.00–8.50 inches)<br />
• Length: 190.5–355.6 mm (7.50–14.00 inches)<br />
73 Printing Basics
• Loading Print Media in the Multipurpose Feeder (MPF)<br />
NOTE:<br />
• To avoid paper jams, do not remove the priority sheet inserter (PSI) while printing is in progress.<br />
• Use only laser print media. Do not use ink jet paper in this printer.<br />
1 Open the front cover.<br />
NOTE:<br />
• When you use the MPF for the first time, open the front cover by pulling out the instruction sheet.<br />
2 Pull the PSI out.<br />
NOTE:<br />
• When you use the MPF for the first time, remove the instruction sheet attached to the PSI with adhesive<br />
tape.<br />
Printing Basics 74
• Read the instruction sheet before you use the PSI.<br />
3 Pull the slide bar forward until it stops.<br />
4 Pull the length guide forward until it stops.<br />
5 Adjust the paper width guides to their maximum width.<br />
6 Before loading the print media, flex the sheets back and forth, and then fan them. Straighten the<br />
edges of the stack on a level surface.<br />
75 Printing Basics
7 Load print media on the MPF with the top edge first and with the recommended print side facing<br />
up.<br />
8 Adjust the paper width guides until they rest lightly against the edges of the stack of print media.<br />
9 Slide the length guide towards the printer until it touches the print media.<br />
Printing Basics 76
NOTE:<br />
• Depending on the size of print media, first slide the slide bar backward until it stops, and then pinch the<br />
length guide and slide it backward until it touches print media.<br />
10 Insert the PSI into the printer and then align the PSI to the marking on the MPF.<br />
11 Select the paper type from the print driver if the loaded print media is not standard plain paper. If<br />
a user-specified print media is loaded in the MPF, you must specify the paper size setting by<br />
using the print driver.<br />
NOTE:<br />
• For more information about setting the paper size and type on the print driver, refer to the online Help<br />
provided for the print driver.<br />
NOTE:<br />
• For standard-size paper, adjust the guides first and then set paper.<br />
77 Printing Basics
Loading Envelope in the Multipurpose Feeder (MPF)<br />
NOTE:<br />
• When you print on envelopes, be sure to specify the envelope setting on the print driver. If not specified, the<br />
print image will be rotated 180 degrees.<br />
• When Loading Envelope #10, DL, or Monarch<br />
Load envelopes with the side to be printed on facing up, the flap side facing down, and the flap turned<br />
to the right.<br />
To prevent DL and Monarch from being wrinkled, they are recommended to be loaded with the printside<br />
facing up, flap opened, and facing you.<br />
NOTE:<br />
• When you load the envelopes in the long-edge feed (LEF) orientation, be sure to specify the landscape<br />
orientation on the print driver.<br />
Printing Basics 78
• When Loading C5<br />
Load envelopes with the side to be printed on facing up, flap opened, and facing you.<br />
IMPORTANT:<br />
• Never use envelopes with windows, or coated linings. These lead to paper jams and can cause damage to the<br />
printer.<br />
NOTE:<br />
• If you do not load envelopes in the MPF right after they have been removed from the packaging, they may<br />
bulge. To avoid jams, flatten them as shown below when loading them in the MPF.<br />
• If envelopes are still not fed correctly, add some bending to the flap of the envelopes as shown in the following<br />
illustration.<br />
The amount of the bending shall be 5 mm (0.20 inches) or less.<br />
79 Printing Basics
• To confirm the correct orientation of each print media such as envelopes, see the instruction on the<br />
Envelope/Paper Setup Navigator on the print driver.<br />
Printing Basics 80
• Loading Print Media in the Priority Sheet Inserter (PSI)<br />
NOTE:<br />
• To avoid paper jams, do not remove the PSI while printing is in progress.<br />
• Use only laser print media. Do not use ink jet paper in this printer.<br />
1 Open the front cover.<br />
2 Slide the PSI forward, and then align the PSI to the marking on the MPF.<br />
3 Adjust the paper width guides to their maximum width.<br />
4 Before loading the print media, flex the sheets back and forth, and then fan them. Straighten the<br />
edges of the stack on a level surface.<br />
81 Printing Basics
5 Load print media on the PSI with the top edge first and with the recommended print side facing<br />
up.<br />
6 Adjust the paper width guides until they rest lightly against the edges of the stack of print media.<br />
7 Select the paper type from the print driver if the loaded print media is not standard plain paper. If<br />
a user-specified print media is loaded in the PSI, you must specify the paper size setting by using<br />
the print driver.<br />
NOTE:<br />
• For more information about setting the paper size and type on the print driver, refer to the online Help provided<br />
for the print driver.<br />
Loading Envelope in the Priority Sheet Inserter (PSI)<br />
NOTE:<br />
• Be sure to fully insert the envelope until it stops. Otherwise, print media that is loaded on the MPF will be fed.<br />
• When you print on envelopes, be sure to specify the envelope setting on the print driver. If not specified, the<br />
print image will be rotated 180 degrees.<br />
Printing Basics 82
• When Loading Envelope #10, DL, or Monarch<br />
Load the envelope with the side to be printed on facing up, the flap side facing down, and the flap<br />
turned to the right.<br />
To prevent DL and Monarch from being wrinkled, they are recommended to be loaded with the printside<br />
facing up, flap opened, and facing you.<br />
NOTE:<br />
• When you load the envelopes in the long-edge feed (LEF) orientation, be sure to specify the landscape<br />
orientation on the print driver.<br />
83 Printing Basics
• When Loading C5<br />
Load the envelope with the side to be printed on facing up, flap opened, and facing you.<br />
IMPORTANT:<br />
• Never use envelopes with windows, or coated linings. These lead to paper jams and can cause damage to the<br />
printer.<br />
NOTE:<br />
• If you do not load envelopes in the PSI right after they have been removed from the packaging, they may<br />
bulge. To avoid jams, flatten them as shown below when loading them in the PSI.<br />
• If envelopes are still not fed correctly, add some bending to the flap of the envelopes as shown in the following<br />
illustration.<br />
The amount of the bending shall be 5 mm (0.20 inches) or less.<br />
Printing Basics 84
• To confirm the correct orientation of each print media such as envelopes, see the instruction on the<br />
Envelope/Paper Setup Navigator on the print driver.<br />
85 Printing Basics
• Manual Duplex Printing (Windows Print Driver Only)<br />
This section includes:<br />
• "Operations on Your Computer" on page 87<br />
• "Loading Print Media in the Multipurpose Feeder (MPF)" on page 88<br />
• "Loading Print Media in the Priority Sheet Inserter (PSI)" on page 89<br />
NOTE:<br />
• When printing on curled paper, straighten the paper and then insert it into the feeder.<br />
When you start manual duplex printing, the instruction window appears. Note that the window cannot<br />
be reopened once it is closed. Do not close the window until duplex printing is complete.<br />
Manual duplex printing can be done using the multipurpose feeder (MPF) or the priority sheet inserter<br />
(PSI).<br />
Printing Basics 86
Operations on Your Computer<br />
The following procedure uses Microsoft ® Windows ® XP WordPad as an example.<br />
NOTE:<br />
• The way to display the printer Properties/Printing Preferences dialog box differs according to the application<br />
software. Refer to the manual of your respective application software.<br />
1 From the File menu, select Print.<br />
2 Select the printer from the Select Printer list box, and then click Preferences.<br />
3 The Paper/Output tab appears.<br />
From Duplex, select either Flip on Short Edge or Flip on Long Edge to define the way 2-sided<br />
print pages are bound.<br />
3<br />
4<br />
5<br />
4 From Paper Size, select the size of the document to be printed.<br />
5 From Paper Type, select the paper type to be used.<br />
6 Click OK to close the Printing Preferences dialog box.<br />
7 Click Print in the Print dialog box to start printing.<br />
IMPORTANT:<br />
• When you start manual duplex printing, the instruction window appears. Note that the window cannot be<br />
reopened once it is closed. Do not close the window until duplex printing is complete.<br />
87 Printing Basics
Loading Print Media in the Multipurpose Feeder (MPF)<br />
1 First print the even pages (rear sides).<br />
For a six page document, rear sides are printed in the order of page 6, page 4, then page 2.<br />
The (Data) LED blinks and the Insert Output to Tray message appears on the LCD<br />
panel when the even pages finish printing.<br />
2 After the even pages are printed, remove the paper stack from the center output tray.<br />
NOTE:<br />
• Warped or curled prints can cause paper jams. Straighten them before setting them.<br />
3 Stack the prints and set them as they are (with the blank side facing up) into the MPF, and then<br />
press the button.<br />
Pages are printed in the order of page 1 (rear of page 2), page 3 (rear of page 4), and then page<br />
5 (rear of page 6).<br />
NOTE:<br />
• Printing on both sides of the paper is not possible if the document consists of various sizes of paper.<br />
Printing Basics 88
Loading Print Media in the Priority Sheet Inserter (PSI)<br />
1 First print the even pages (rear sides).<br />
For a six page document, even pages are printed in the order page 6, page 4, then page 2.<br />
The (Data) LED blinks and the Insert Output to Tray message appears on the LCD<br />
panel when the even pages finish printing.<br />
2 After the even pages are printed, remove the paper stack from the center output tray.<br />
NOTE:<br />
• Warped or curled prints can cause paper jams. Straighten them before setting them.<br />
3 Stack the prints and set them as they are (with the blank side face up) into the PSI, and then<br />
press the button.<br />
Pages are printed in order of page 1 (rear of page 2), page 3 (rear of page 4), and then page 5<br />
(rear of page 6).<br />
NOTE:<br />
• Printing on both sides of the paper is not possible if the document consists of various sizes of paper.<br />
89 Printing Basics
• Using the Output Tray Extension<br />
The output tray extension is designed to prevent print media from falling from the printer after the print<br />
job is complete.<br />
Before printing a long length document, ensure that the output tray extension is fully extended.<br />
NOTE:<br />
• When you pull out envelopes or small size print media from the center output tray, lift up the scanner.<br />
Printing Basics 90
Setting Paper Sizes and Types<br />
When loading print media, set the paper size and type on the operator panel before printing.<br />
This section describes how to set the paper size and type on the operator panel.<br />
See also:<br />
• "Understanding the Printer Menus" on page 150<br />
This section includes:<br />
• "Setting Paper Sizes" on page 92<br />
• "Setting Paper Types" on page 93<br />
91 Printing Basics
• Setting Paper Sizes<br />
1 Press the (System) button.<br />
2 Select Tray Settings, and then press the button.<br />
3 Select MPF, and then press the button.<br />
4 Select Paper Size, and then press the button.<br />
5 Select the correct paper size for the print media loaded, and then press the button.<br />
Printing Basics 92
• Setting Paper Types<br />
IMPORTANT:<br />
• Paper type settings must match those of the actual print media loaded in the tray. Otherwise, print-quality<br />
problems can occur.<br />
1 Press the (System) button.<br />
2 Select Tray Settings, and then press the button.<br />
3 Select MPF, and then press the button.<br />
4 Select Paper Type, and then press the button.<br />
5 Select the correct paper type for the print media loaded, and then press the button.<br />
93 Printing Basics
Printing<br />
This section covers how to print certain lists of information from your printer and how to cancel a job.<br />
This section includes:<br />
• "Sending a Job to Print" on page 95<br />
• "Canceling a Print Job" on page 96<br />
• "Direct Print Using the USB Storage Device" on page 97<br />
• "Selecting Printing Options" on page 98<br />
• "Printing Custom Size Paper (Windows Only)" on page 103<br />
• "Checking Status of Print Data" on page 105<br />
• "Printing a Report Page" on page 106<br />
• "Printer Settings" on page 107<br />
Printing Basics 94
• Sending a Job to Print<br />
Install the print driver to use all the features of the printer. When you choose Print from a software<br />
program, a window representing the print driver opens. Select the appropriate settings for the specific<br />
job you are sending to print. Print settings selected from the driver have precedence over the default<br />
menu settings selected from the operator panel or Printer Setting Utility.<br />
You may need to click Properties/Preferences from the initial Print dialog box to see all the available<br />
system settings you can change. If you are not familiar with a feature in the print driver window, open<br />
the online Help for more information.<br />
The following procedure uses Windows XP WordPad as an example.<br />
To print a job from an application:<br />
1 Open the file you want to print.<br />
2 From the File menu, select Print.<br />
3 Verify that the correct printer is selected in the dialog box. Modify the system settings as needed<br />
(such as the pages you want to print or the number of copies).<br />
4 To adjust system settings not available from the first screen, such as Paper Size, Paper Type, or<br />
MPF Orientation, click Preferences.<br />
The Printing Preferences dialog box appears.<br />
5 Specify the print settings. For more information, click Help.<br />
6 Click OK to close the Printing Preferences dialog box.<br />
7 Click Print to send the job to the selected printer.<br />
95 Printing Basics
• Canceling a Print Job<br />
There are several methods for canceling a print job.<br />
This section includes:<br />
• "Canceling From the Operator Panel" on page 96<br />
• "Canceling a Job From the Computer Running Windows" on page 96<br />
Canceling From the Operator Panel<br />
To cancel a job after it has started printing:<br />
1 Press the (Stop) button.<br />
NOTE:<br />
• Printing is canceled only for the current job. All the following jobs will continue to print.<br />
Canceling a Job From the Computer Running Windows<br />
• Canceling a Job From the Taskbar<br />
When you send a job to print, a small printer icon appears in the right corner of the taskbar.<br />
1 Double-click the printer icon.<br />
A list of print jobs appears in the printer window.<br />
2 Select the job you want to cancel.<br />
3 Press the Delete key.<br />
4 Click Yes on the <strong>Printers</strong> dialog box to cancel a print job.<br />
• Canceling a Job From the Desktop<br />
1 Minimize all programs to reveal the desktop.<br />
Click start <strong>Printers</strong> and Faxes (for Windows XP).<br />
Click Start <strong>Printers</strong> and Faxes (for Windows Server ® 2003).<br />
Click Start Devices and <strong>Printers</strong> (for Windows 7 and Windows Server 2008 R2).<br />
Click Start Control Panel Hardware and Sound <strong>Printers</strong> (for Windows Vista ® and<br />
Windows Server 2008).<br />
A list of available printers appears.<br />
2 Double-click the printer you selected when you sent the job.<br />
A list of print jobs appears in the printer window.<br />
3 Select the job you want to cancel.<br />
4 Press the Delete key.<br />
5 Click Yes on the <strong>Printers</strong> dialog box to cancel a print job.<br />
Printing Basics 96
• Direct Print Using the USB Storage Device<br />
The Print From USB Memory feature allows you to print files stored in a USB storage device by<br />
operating from the operator panel.<br />
To print a file in a USB storage device:<br />
1 Insert a USB storage device to the USB drive of the printer.<br />
USB Memory appears.<br />
2 Select Print From, and then press the button.<br />
Select Document appears.<br />
3 Select the desired file, and then press the button.<br />
4 Select printing options as required.<br />
5 Press the (Start) button.<br />
NOTE:<br />
• You can print files scanned and stored using the Scan to USB Memory feature. Files saved without using<br />
the feature such as files created by user may not be printed properly.<br />
Supported File Formats<br />
Files in the following file formats can be printed directly from a USB storage device.<br />
• PDF<br />
• TIFF<br />
• JPEG<br />
97 Printing Basics
• Selecting Printing Options<br />
This section includes:<br />
• "Selecting Printing Preferences (Windows)" on page 98<br />
• "Selecting Options for an Individual Job (Windows)" on page 99<br />
• "Selecting Options for an Individual Job (Mac OS X)" on page 101<br />
Selecting Printing Preferences (Windows)<br />
Printer preferences control all of your print jobs, unless you override them specifically for a job. For<br />
example, if you want to use duplex printing for most jobs, set this option in printer settings.<br />
To select printer preferences:<br />
1 Click start <strong>Printers</strong> and Faxes (for Windows XP).<br />
Click Start <strong>Printers</strong> and Faxes (for Windows Server 2003).<br />
Click Start Devices and <strong>Printers</strong> (for Windows 7 and Windows Server 2008 R2).<br />
Click Start Control Panel Hardware and Sound <strong>Printers</strong> (for Windows Vista and<br />
Windows Server 2008).<br />
A list of available printers appears.<br />
2 Right-click the icon for your printer, and then select Printing Preferences.<br />
The FX DocuPrint CM205 b Printing Preferences screen appears.<br />
3 Make selections on the driver tabs, and then click OK to save your selections.<br />
NOTE:<br />
• For more information about Windows print driver options, click Help on the print driver tab to view the online<br />
Help.<br />
Printing Basics 98
Selecting Options for an Individual Job (Windows)<br />
If you want to use special printing options for a particular job, change the driver settings before<br />
sending the job to the printer. For example, if you want to use Photo print-quality mode for a particular<br />
graphic, select this setting in the driver before printing that job.<br />
1 With the desired document or graphic open in your application, access the Print dialog box.<br />
2 Select the DocuPrint CM205 b and click Preferences to open the print driver.<br />
3 Make selections on the driver tabs. See the following table for specific printing options.<br />
NOTE:<br />
• In Windows, you can save current printing options with a distinctive name and apply them to other print<br />
jobs. Make selections on the Paper/Output, Graphics, Layout, or Watermarks/Forms tab, and then<br />
click Save under Favorites on the Paper/Output tab. Click Help for more information.<br />
4 Click OK to save your selections.<br />
5 Print the job.<br />
See the following table for specific printing options:<br />
Printing Options for Windows<br />
99 Printing Basics
Operating System Driver Tab Printing Options<br />
Windows XP, Windows XP<br />
x 64bit, Windows Server<br />
2003, Windows Server<br />
2003 x 64bit, Windows<br />
Vista, Windows Vista x<br />
64bit, Windows Server<br />
2008, Windows Server<br />
2008 x 64bit, Windows<br />
Server 2008 R2, Windows<br />
7, or Windows 7 x 64bit<br />
Windows XP, Windows<br />
Server 2003, Windows<br />
Vista, Windows Server<br />
2008, or Windows 7<br />
Paper/Output tab<br />
Graphics tab<br />
Layout tab<br />
Watermarks/Forms tab<br />
• Favorites<br />
• Duplex<br />
• Output Color<br />
• Copies<br />
• Collated<br />
• Paper Summary<br />
• Paper Size<br />
• Paper Type<br />
• MPF Orientation<br />
• Envelope/Paper Setup Navigator<br />
• Printer Status<br />
• Restore Defaults<br />
• Output Color<br />
• Image Adjustment Mode<br />
• Image Types<br />
• Screen<br />
• Toner Saving Mode<br />
• Image Settings<br />
• Color Balance<br />
• Profile Settings<br />
• Restore Defaults<br />
• Image Orientation<br />
• Multiple Up<br />
• Poster/Mixed Document<br />
• Output Size<br />
• Reduce / Enlarge<br />
• Margin Shift/Margin<br />
• Restore Defaults<br />
• Watermarks<br />
– New Text<br />
– New Bitmap<br />
– Edit<br />
– Delete<br />
– First Page Only<br />
• Forms<br />
– Off<br />
– Create / Resister Forms<br />
– Image Overlay<br />
• Header / Footer Options<br />
• Restore Defaults<br />
Printing Basics 100
Selecting Options for an Individual Job (Mac OS X)<br />
To select print settings for a particular job, change the driver settings before sending the job to the<br />
printer.<br />
1 With the document open in your application, click File, and then click Print.<br />
2 Select the DocuPrint CM205 b from Printer.<br />
3 Select the desired printing options from the menus and drop-down lists that are displayed.<br />
NOTE:<br />
• In Mac OS ® X, click Save As on the Presets menu screen to save the current printer settings. You can<br />
create multiple presets and save each with its own distinctive name and printer settings. To print jobs<br />
using specific printer settings, click the applicable saved preset in the Presets list.<br />
4 Click Print to print the job.<br />
Mac OS X Print Driver Printing Options:<br />
The table shown below uses Mac OS X 10.6 TextEdit as an example.<br />
Printing options for Mac OS X<br />
Item<br />
Layout<br />
Color Matching<br />
Paper Handling<br />
Cover Page<br />
Scheduler<br />
Printing Options<br />
• Copies<br />
• Collated<br />
• Pages<br />
• Paper Size<br />
• Orientation<br />
• Pages per Sheet<br />
• Layout Direction<br />
• Border<br />
• Two-Sided<br />
• Reverse page orientation<br />
• Flip horizontally<br />
• ColorSync<br />
• Vendor Matching<br />
• Pages to Print<br />
• Page Order<br />
• Scale to fit paper size<br />
• Destination Paper Size<br />
• Scale down only<br />
• Print Cover Page<br />
• Cover Page Type<br />
• Billing Info<br />
• Print Document<br />
• Priority<br />
101 Printing Basics
Item<br />
Printer Features<br />
Summary<br />
Printing Options<br />
• 1. Detailed Settings<br />
– Output Color<br />
– Image Rotation (180deg)<br />
– Toner Saving Mode<br />
– Barcode Mode<br />
– Image Enhancement<br />
• 2. Color Balance 1<br />
– Low Density (C)<br />
– Medium Density (C)<br />
– High Density (C)<br />
– Low Density (M)<br />
– Medium Density (M)<br />
– High Density (M)<br />
• 2. Color Balance 2<br />
– Low Density (Y)<br />
– Medium Density (Y)<br />
– High Density (Y)<br />
– Low Density (K)<br />
– Medium Density (K)<br />
– High Density (K)<br />
• 3. Paper Handling<br />
– Paper Type<br />
• 4. Printer Specific Options<br />
– Skip Blank Pages<br />
Printing Basics 102
• Printing Custom Size Paper (Windows Only)<br />
This section explains how to print on custom size paper using the print driver.<br />
Custom size paper can be loaded in the multipurpose feeder (MPF) and priority sheet inserter (PSI).<br />
The way to load custom size paper in the MPF is the same as the one to load standard size paper.<br />
The way to load custom size paper in the PSI is the same as the one to load standard size paper.<br />
See also:<br />
• "Loading Print Media in the Multipurpose Feeder (MPF)" on page 74<br />
• "Loading Print Media in the Priority Sheet Inserter (PSI)" on page 81<br />
• "Setting Paper Sizes and Types" on page 91<br />
Defining Custom Paper Sizes<br />
Before printing, set the custom size on the print driver.<br />
NOTE:<br />
• When setting the paper size on the print driver and the operator panel, be sure to specify the same size as the<br />
actual print media used. Setting the wrong size for printing can cause printer failure. This is especially true if<br />
you configure a bigger size when using a narrow width paper.<br />
On the Windows print driver, set the custom size in the Custom Paper Size dialog box. This section<br />
explains the procedure using Windows XP as an example.<br />
For Windows XP or later, an administrator’s password only allows users with administrator rights to<br />
change the settings. Users without the rights of administrator can only view the contents.<br />
1 Click start <strong>Printers</strong> and Faxes.<br />
2 Right-click the icon for your printer, and then select Properties.<br />
3 Select the Configuration tab.<br />
4 Click Custom Paper Size.<br />
5 Select the custom setup you want to define from Details.<br />
6 Specify the length of the short edge and long edge under Change Setting For. You can specify<br />
the values either by entering them directly or using the up arrow and down arrow buttons. The<br />
length of the short edge cannot be longer than the long edge, even if it is within the specified<br />
range. The length of the long edge cannot be shorter than the short edge, even if it is within the<br />
specified range.<br />
7 To assign a paper name, select the Name the Paper Size check box, and then enter the name in<br />
Paper Name. Up to 14 characters can be used for the paper name.<br />
8 If necessary, repeat steps 5 to 7 to define another custom size.<br />
9 Click OK twice.<br />
103 Printing Basics
Printing on Custom Size Paper<br />
This section explains the procedure using Windows XP WordPad as an example.<br />
NOTE:<br />
• The way to display the printer Properties/Printing Preferences dialog box differs according to the application<br />
software. Refer to the manual of your respective application software.<br />
1 From the File menu, select Print.<br />
2 Select the printer as the printer to be used and click Preferences.<br />
3 Select the Paper/Output tab.<br />
4 Select the size of the original document from Paper Size.<br />
5 Select the appropriate paper type from Paper Type.<br />
6 Click the Layout tab.<br />
7 From Output Size, select the custom size you defined. If you have selected the custom size from<br />
Paper Size in step 4, select Same as Paper Size.<br />
8 Click OK.<br />
9 Click Print in the Print dialog box to start printing.<br />
Printing Basics 104
• Checking Status of Print Data<br />
This section includes:<br />
• "Checking Status (Windows Only)" on page 105<br />
Checking Status (Windows Only)<br />
You can check the printer status with SimpleMonitor. Double-click the SimpleMonitor printer icon on<br />
the taskbar at the bottom right of the screen. The Printer Selection window appears, which displays<br />
the printer name, printer connection port, printer status, and model name. Check the column Status to<br />
know the current status of your printer.<br />
Settings button: Displays the Settings screen and allows you to modify the SimpleMonitor settings.<br />
Click the name of the desired printer listed on the Printer Selection window. The Printer Status<br />
window appears. You can check the printer status and print job status.<br />
For more information about SimpleMonitor, see Help. The following procedure uses Windows XP as<br />
an example:<br />
1 Click start All Programs.<br />
2 Select <strong>Fuji</strong> <strong>Xerox</strong>.<br />
3 Select <strong>Fuji</strong> <strong>Xerox</strong> Printer Software for Asia-Pacific.<br />
4 Select DocuPrint CM205 b.<br />
5 Select Activate SimpleMonitor.<br />
The Printer Selection window appears.<br />
6 Click the name of the desired printer from the list.<br />
The Printer Status window appears.<br />
7 Click Help.<br />
See also:<br />
• "SimpleMonitor (Windows Only)" on page 50<br />
105 Printing Basics
• Printing a Report Page<br />
You can print a variety of settings for your printer including System Settings, Panel Settings, Job<br />
History, Error History, and Demo Page. This section describes two methods of printing a report page.<br />
Printing a System Settings Page<br />
To verify detailed printer settings, print a System Settings page.<br />
See also:<br />
• "Understanding the Printer Menus" on page 150<br />
The Operator Panel<br />
1 Press the (System) button.<br />
2 Select Report / List, and then press the button.<br />
3 Select System Settings, and then press the button.<br />
The System Settings page is printed.<br />
The Printer Setting Utility<br />
The following procedure uses Windows XP as an example.<br />
1 Click start All Programs <strong>Fuji</strong> <strong>Xerox</strong> <strong>Fuji</strong> <strong>Xerox</strong> Printer Software for Asia-Pacific <br />
DocuPrint CM205 b Printer Setting Utility.<br />
NOTE:<br />
• The window to select a printer appears in this step, when multiple print drivers are installed on your<br />
computer. In this case, click the name of the desired printer listed in Printer Name.<br />
The Printer Setting Utility appears.<br />
2 Click the Printer Settings Report tab.<br />
3 Select Reports from the list at the left side of the page.<br />
The Reports page is displayed.<br />
4 Click System Settings.<br />
The System Settings page is printed.<br />
Printing Basics 106
• Printer Settings<br />
This section includes:<br />
• "Using the Operator Panel to Change the Printer Settings" on page 107<br />
• "Using the Printer Setting Utility to Change the Printer Settings" on page 108<br />
• "Adjusting the Language" on page 108<br />
Using the Operator Panel to Change the Printer Settings<br />
You can select menu items and corresponding values from the operator panel.<br />
When you first enter the menus from the operator panel, you see a list of menu items. The value<br />
displayed on the right of each menu item is the factory default menu setting. These settings are the<br />
original printer settings.<br />
NOTE:<br />
• Factory defaults may vary for different countries.<br />
To select a new value as a default menu setting:<br />
1 Press the (System) button.<br />
2 Select the desired menu, and then press the button.<br />
3 Select the desired menu or menu item, and then press the button.<br />
• If the selection is a menu, the menu is opened and the list of menu items appears.<br />
• If the selection is a menu item, the default menu setting for the menu item is displayed with a<br />
highlight.<br />
Each menu item has a list of values for the menu item. A value can be:<br />
• A phrase or word to describe a setting<br />
• A numerical value that can be changed<br />
• An On or Off setting<br />
4 Select the desired value.<br />
5 Press the button to enable the setting value.<br />
The value is displayed on the right of the menu item in the previous screen to identify it as the<br />
current user default menu setting.<br />
6 To continue setting other items, select the desired menu. Press the (Back) or button to<br />
return to the previous menu.<br />
To quit setting new values, press the (System) button, and then press the (Back) or<br />
button to return to the Select Function screen.<br />
These settings are active until new ones are selected or the factory defaults are restored.<br />
Driver settings may have precedence over changes previously made. In such case, change the<br />
defaults of the operator panel.<br />
107 Printing Basics
Using the Printer Setting Utility to Change the Printer Settings<br />
You can select menu items and corresponding values from the Printer Setting Utility.<br />
The following procedure uses Windows XP as an example.<br />
NOTE:<br />
• Factory defaults may vary for different countries.<br />
These settings are active until new ones are selected or the factory defaults are restored.<br />
To select a new value as a setting:<br />
1 Click start All Programs <strong>Fuji</strong> <strong>Xerox</strong> <strong>Fuji</strong> <strong>Xerox</strong> Printer Software for Asia-Pacific <br />
DocuPrint CM205 b Printer Setting Utility.<br />
NOTE:<br />
• The window to select a printer appears in this step, when multiple print drivers are installed on your<br />
computer. In this case, click the name of the desired printer listed in Printer Name.<br />
The Printer Setting Utility appears.<br />
2 Click the Printer Maintenance tab.<br />
3 Select the desired menu item.<br />
Each menu item has a list of values for the menu item. A value can be:<br />
• A phrase or word to describe a setting<br />
• A numerical value that can be changed<br />
• An On or Off setting<br />
4 Select the desired value, and then click the associated button with each menu item.<br />
Driver settings may have precedence over changes previously made and may require you to<br />
change the Printer Setting Utility defaults.<br />
Adjusting the Language<br />
To display a different language on the operator panel:<br />
• The Operator Panel<br />
1 Press the (System) button.<br />
2 Select Panel Language, and then press the button.<br />
3 Select the desired language, and then press the button.<br />
Printing Basics 108
• The Printer Setting Utility<br />
The following procedure uses Windows XP as an example.<br />
1 Click start All Programs <strong>Fuji</strong> <strong>Xerox</strong> <strong>Fuji</strong> <strong>Xerox</strong> Printer Software for Asia-Pacific <br />
DocuPrint CM205 bPrinter Setting Utility.<br />
NOTE:<br />
• The window to select a printer appears in this step, when multiple print drivers are installed on your<br />
computer. In this case, click the name of the desired printer listed in Printer Name.<br />
The Printer Setting Utility appears.<br />
2 Click the Printer Maintenance tab.<br />
3 Select System Settings from the list at the left side of the page.<br />
The System Settings page is displayed.<br />
4 Select the desired language from Panel Language, and then click the Apply New Settings<br />
button.<br />
109 Printing Basics
Printing Basics 110
6<br />
Copying<br />
This chapter includes:<br />
• "Loading Paper for Copying" on page 112<br />
• "Preparing a Document" on page 113<br />
• "Making Copies From the Document Glass" on page 114<br />
• "Setting Copy Options" on page 116<br />
• "Changing the Default Settings" on page 136<br />
111 Copying
Loading Paper for Copying<br />
The instructions for loading print documents are the same whether you are printing or copying.<br />
See also:<br />
• "Usable Print Media" on page 69<br />
• "Loading Print Media" on page 71<br />
Copying 112
Preparing a Document<br />
You can use the document glass to load an original document for copying and scanning. Load one<br />
sheet at a time on the document glass.<br />
113 Copying
Making Copies From the Document Glass<br />
NOTE:<br />
• A computer connection is not required for copying.<br />
• Contaminants on the document glass may cause black spots on the copy printout. For best results, clean the<br />
document glass before use. For more information, see "Cleaning the Scanner" on page 235.<br />
1 Open the document cover.<br />
2 Place the document face down on the document glass and align it with the registration guide on<br />
the top left corner of the document glass.<br />
CAUTION:<br />
• Do not apply excessive force to hold thick document on the document glass. It may break the<br />
glass and cause injuries.<br />
3 Close the document cover.<br />
NOTE:<br />
• Leaving the document cover open while copying may affect the copy quality and increase the toner<br />
consumption.<br />
• If you are copying a page from a book or magazine, lift the document cover until its hinges are caught by<br />
the stopper, and then close the document cover. If the book or magazine is thicker than 20 mm, start<br />
copying with the document cover open.<br />
4 Press the (Copy) button.<br />
5 Customize the copy settings including the number of copies, copy size, and image quality.<br />
Copying 114
See also:<br />
• "Setting Copy Options" on page 116<br />
To clear the settings, use the CA (Clear All) button.<br />
6 Press the (Start) button to begin copying.<br />
NOTE:<br />
• Press the (Stop) button to cancel a copy job at any time while scanning a document.<br />
115 Copying
Setting Copy Options<br />
Set the following options for the current copy job before pressing the<br />
copies.<br />
(Start) button to make<br />
NOTE:<br />
• After a copy job is completed, the copy options would be kept until the screen returns to Select Function<br />
(auto-reset or the (Back) button is pressed), the CA (Clear All) button is pressed, or the (Copy)<br />
button is pressed again.<br />
This section includes:<br />
• "Number of Copies" on page 117<br />
• "Color" on page 118<br />
• "Collated" on page 119<br />
• "Reduce/Enlarge" on page 120<br />
• "Document Size" on page 122<br />
• "Original Type" on page 123<br />
• "Lighten/Darken" on page 124<br />
• "Sharpness" on page 125<br />
• "Auto Exposure" on page 126<br />
• "Color Balance R" on page 127<br />
• "Color Balance G" on page 128<br />
• "Color Balance B" on page 129<br />
• "Gray Balance" on page 130<br />
• "N-Up" on page 131<br />
• "Margin Top/Bottom" on page 133<br />
• "Margin Left/Right" on page 134<br />
• "Margin Middle" on page 135<br />
Copying 116
• Number of Copies<br />
You can specify the number of copies from 1 to 99.<br />
1 Place a single document face down on the document glass, and close the document cover.<br />
See also:<br />
• "Making Copies From the Document Glass" on page 114<br />
2 Press the (Copy) button.<br />
3 Enter the number of copies using the numeric keypad.<br />
4 If necessary, customize the copy settings including the copy size, and image quality.<br />
See also:<br />
• "Setting Copy Options" on page 116<br />
5 Press the (Start) button to begin copying.<br />
117 Copying
• Color<br />
You can select a mode from color or black and white copying.<br />
1 Place a single document face down on the document glass, and close the document cover.<br />
See also:<br />
• "Making Copies From the Document Glass" on page 114<br />
2 Press the (Copy) button.<br />
3 Press the Color Mode button to select the desired color mode.<br />
4 If necessary, customize the copy settings including the number of copies, copy size, and image<br />
quality.<br />
See also:<br />
• "Setting Copy Options" on page 116<br />
5 Press the (Start) button to begin copying.<br />
See also:<br />
• "Color Button Set" on page 166<br />
Copying 118
• Collated<br />
You can sort the copy output. For example, if you make two copies of three page documents, one<br />
complete three page document will print followed by the second complete document.<br />
NOTE:<br />
• Copying documents with a large amount of data may exhaust available memory. If a memory shortage occurs,<br />
cancel the collating by turning Collated to Uncollated on the operator panel.<br />
1 Place a single document face down on the document glass, and close the document cover.<br />
See also:<br />
• "Making Copies From the Document Glass" on page 114<br />
2 Press the (Copy) button.<br />
3 Select Collated, and then press the button.<br />
4 Select the desired setting, and then press the button.<br />
NOTE:<br />
• Values marked by an asterisk (*) are the factory default menu settings.<br />
Uncollated*<br />
Collated<br />
Does not sort the copy job.<br />
Sorts the copy job.<br />
5 If necessary, customize the copy settings including the number of copies, copy size, and image<br />
quality.<br />
See also:<br />
• "Setting Copy Options" on page 116<br />
6 Press the (Start) button to begin copying.<br />
119 Copying
• Reduce/Enlarge<br />
You can reduce or enlarge the size of a copied image, from 25% to 400%.<br />
NOTE:<br />
• When you make a reduced copy, black lines may appear at the bottom of your copy.<br />
• This item is available only when N-Up is set to Off or Manual.<br />
1 Place a single document face down on the document glass, and close the document cover.<br />
See also:<br />
• "Making Copies From the Document Glass" on page 114<br />
2 Press the (Copy) button.<br />
3 Select Reduce/Enlarge, and then press the button.<br />
4 Select the desired settings, and then press the button.<br />
• mm series<br />
NOTE:<br />
• Values marked by an asterisk (*) are the factory default menu settings.<br />
200%<br />
A5A4(141%)<br />
A5B5(122%)<br />
100%*<br />
B5A5(81%)<br />
A4A5(70%)<br />
50%<br />
Copying 120
• inch series<br />
200%<br />
StmtLgl(154%)<br />
StmtLtr(129%)<br />
100%*<br />
LglLtr (78%)<br />
LdgrLtr(64%)<br />
50%<br />
NOTE:<br />
• You can also use the numeric keypad to input the desired zoom ratio from 25% to 400%, or press the<br />
button to enlarge the zoom ratio or press the button to reduce the zoom ratio in 1% intervals. See the<br />
following table for specific zoom ratios.<br />
Copy<br />
A5 B5 A4<br />
Original<br />
A5 100% 122% 141%<br />
B5 81% 100% 115%<br />
A4 70% 86% 100%<br />
The methods to load print media vary depending on the size and orientation of the print media.<br />
For details, refer to "Loading Print Media in the Multipurpose Feeder (MPF)" on page 74 or<br />
"Loading Print Media in the Priority Sheet Inserter (PSI)" on page 81.<br />
For print media that can be loaded, refer to "Usable Print Media" on page 69.<br />
5 If necessary, customize the copy settings including the number of copies, and image quality.<br />
See also:<br />
• "Setting Copy Options" on page 116<br />
6 Press the (Start) button to begin copying.<br />
121 Copying
• Document Size<br />
You can specify the default document size.<br />
1 Place a single document face down on the document glass, and close the document cover.<br />
See also:<br />
• "Making Copies From the Document Glass" on page 114<br />
2 Press the (Copy) button.<br />
3 Select Document Size, and then press the button.<br />
4 Select the desired settings, and then press the button.<br />
NOTE:<br />
• Values marked by an asterisk (*) are the factory default menu settings.<br />
A4 (210 × 297mm)*<br />
A5 (148 × 210mm)<br />
B5 (182 × 257mm)<br />
Letter (8.5 × 11")<br />
Executive (7.25 × 10.5")<br />
5 If necessary, customize the copy settings including the number of copies, copy size, and image<br />
quality.<br />
See also:<br />
• "Setting Copy Options" on page 116<br />
6 Press the (Start) button to begin copying.<br />
Copying 122
• Original Type<br />
You can select the copy image quality.<br />
1 Place a single document face down on the document glass, and close the document cover.<br />
See also:<br />
• "Making Copies From the Document Glass" on page 114<br />
2 Press the (Copy) button.<br />
3 Select Original Type, and then press the button.<br />
4 Select the desired settings, and then press the button.<br />
NOTE:<br />
• Values marked by an asterisk (*) are the factory default menu settings.<br />
Text<br />
Mixed*<br />
Photo<br />
Suitable for documents with text.<br />
Suitable for documents with both text and photos/gray tones.<br />
Suitable for documents with photos.<br />
5 If necessary, customize the copy settings including the number of copies, and copy size.<br />
See also:<br />
• "Setting Copy Options" on page 116<br />
6 Press the (Start) button to begin copying.<br />
123 Copying
• Lighten/Darken<br />
You can adjust the copy density level to make the copy lighter or darker than the original.<br />
1 Place a single document face down on the document glass, and close the document cover.<br />
See also:<br />
• "Making Copies From the Document Glass" on page 114<br />
2 Press the (Copy) button.<br />
3 Select Lighten/Darken, and then press the button.<br />
4 Select the desired settings, and then press the button.<br />
NOTE:<br />
• Values marked by an asterisk (*) are the factory default menu settings.<br />
Lighten2<br />
Lighten1<br />
Normal*<br />
Darken1<br />
Darken2<br />
Makes the copy lighter than the original. Works well with dark print.<br />
Works well with standard type or printed documents.<br />
Makes the copy darker than the original. Works well with light print or<br />
faint pencil markings.<br />
5 If necessary, customize the copy settings including the number of copies, copy size, and image<br />
quality.<br />
See also:<br />
• "Setting Copy Options" on page 116<br />
6 Press the (Start) button to begin copying.<br />
Copying 124
• Sharpness<br />
You can adjust the sharpness to make the copy sharper or softer than the original.<br />
1 Place a single document face down on the document glass, and close the document cover.<br />
See also:<br />
• "Making Copies From the Document Glass" on page 114<br />
2 Press the (Copy) button.<br />
3 Select Sharpness, and then press the button.<br />
4 Select the desired settings, and then press the button.<br />
NOTE:<br />
• Values marked by an asterisk (*) are the factory default menu settings.<br />
Sharpest<br />
Sharper<br />
Normal*<br />
Softer<br />
Softest<br />
Makes the copy sharper than the original.<br />
Does not make the copy sharper or softer than the original.<br />
Makes the copy softer than the original.<br />
5 If necessary, customize the copy settings including the number of copies, copy size, and image<br />
quality.<br />
See also:<br />
• "Setting Copy Options" on page 116<br />
6 Press the (Start) button to begin copying.<br />
125 Copying
• Auto Exposure<br />
You can suppress the background of the original to enhance text on the copy.<br />
1 Place a single document face down on the document glass, and close the document cover.<br />
See also:<br />
• "Making Copies From the Document Glass" on page 114<br />
2 Press the (Copy) button.<br />
3 Select Auto Exposure, and then press the button.<br />
4 Select On, and then press the button.<br />
5 If necessary, customize the copy settings including the number of copies, copy size, and image<br />
quality.<br />
See also:<br />
• "Setting Copy Options" on page 116<br />
6 Press the (Start) button to begin copying.<br />
Copying 126
• Color Balance R<br />
You can specify the default color balance level of red within the range of -2 to +2.<br />
1 Press the (System) button.<br />
2 Select Defaults Settings, and then press the button.<br />
3 Select Copy Defaults, and then press the button.<br />
4 Select Color Balance R, and then press the button.<br />
5 Select the desired value, and then press the button.<br />
127 Copying
• Color Balance G<br />
You can specify the default color balance level of green within the range of -2 to +2.<br />
1 Press the (System) button.<br />
2 Select Defaults Settings, and then press the button.<br />
3 Select Copy Defaults, and then press the button.<br />
4 Select Color Balance G, and then press the button.<br />
5 Select the desired value, and then press the button.<br />
Copying 128
• Color Balance B<br />
You can specify the default color balance level of blue within the range of -2 to +2.<br />
1 Press the (System) button.<br />
2 Select Defaults Settings, and then press the button.<br />
3 Select Copy Defaults, and then press the button.<br />
4 Select Color Balance B, and then press the button.<br />
5 Select the desired value, and then press the button.<br />
129 Copying
• Gray Balance<br />
You can specify the default gray balance level within the range of -2 to +2.<br />
NOTE:<br />
• This option is effective only for black and white copying.<br />
1 Press the (System) button.<br />
2 Select Defaults Settings, and then press the button.<br />
3 Select Copy Defaults, and then press the button.<br />
4 Select Gray Balance, and then press the button.<br />
5 Select the desired value, and then press the button.<br />
Copying 130
• N-Up<br />
You can print two original images to fit onto one sheet of paper.<br />
Auto:<br />
Automatically<br />
reduces the<br />
pages to fit in<br />
one page.<br />
ID Copy:<br />
Always prints two<br />
sides of the ID<br />
card in one page<br />
in the original size<br />
(by 100%).<br />
Manual:<br />
Reduces the pages in<br />
the custom size<br />
depending on the<br />
setting of the<br />
Reduce/Enlarge menu.<br />
1 Place a single document face down on the document glass, and close the document cover.<br />
See also:<br />
• "Making Copies From the Document Glass" on page 114<br />
2 Press the (Copy) button.<br />
3 Select N-Up, and then press the button.<br />
4 Select the desired setting, and then press the button.<br />
NOTE:<br />
• Values marked by an asterisk (*) are the factory default menu settings.<br />
Off*<br />
Auto<br />
ID Copy<br />
Manual<br />
Does not perform N-Up printing.<br />
Automatically reduces the original pages to fit onto one sheet of<br />
paper.<br />
Prints the original pages onto one sheet of paper in the original size.<br />
Prints the original pages onto the one sheet of paper in the size<br />
specified in Reduce/Enlarge.<br />
131 Copying
5 If necessary, customize the copy settings including the number of copies, copy size (only for Off<br />
or Manual), and image quality.<br />
See also:<br />
• "Setting Copy Options" on page 116<br />
6 Press the (Start) button to begin copying.<br />
When N-Up is set to Auto, ID Copy, or Manual, the display prompts you for another page.<br />
Select No or Yes, and then press the button.<br />
If you select Yes, select Continue or Cancel, and then press the button.<br />
Copying 132
• Margin Top/Bottom<br />
You can specify the top and bottom margins of the copy.<br />
1 Place a single document face down on the document glass, and close the document cover.<br />
See also:<br />
• "Making Copies From the Document Glass" on page 114<br />
2 Press the (Copy) button.<br />
3 Select Margin Top/Bottom, and then press the button.<br />
4 Press the or button or enter the desired value using the numeric keypad, and then press<br />
the button.<br />
NOTE:<br />
• Values marked by an asterisk (*) are the factory default menu settings.<br />
4mm*/0.2 inch*<br />
0-50mm/0.0-2.0 inch<br />
Specify the value in increments of 1 mm/0.1 inch.<br />
5 If necessary, customize the copy settings including the number of copies, copy size, and image<br />
quality.<br />
See also:<br />
• "Setting Copy Options" on page 116<br />
6 Press the (Start) button to begin copying.<br />
133 Copying
• Margin Left/Right<br />
You can specify the left and right margins of the copy.<br />
1 Place a single document face down on the document glass, and close the document cover.<br />
See also:<br />
• "Making Copies From the Document Glass" on page 114<br />
2 Press the (Copy) button.<br />
3 Select Margin Left/Right, and then press the button.<br />
4 Press the or button or enter the desired value using the numeric keypad, and then press<br />
the button.<br />
NOTE:<br />
• Values marked by an asterisk (*) are the factory default menu settings.<br />
4mm*/0.2 inch*<br />
0-50mm/0.0-2.0 inch<br />
Specify the value in increments of 1 mm/0.1 inch.<br />
5 If necessary, customize the copy settings including the number of copies, copy size, and image<br />
quality.<br />
See also:<br />
• "Setting Copy Options" on page 116<br />
6 Press the (Start) button to begin copying.<br />
Copying 134
• Margin Middle<br />
You can specify the middle margin of the copy.<br />
1 Place a single document face down on the document glass, and close the document cover.<br />
See also:<br />
• "Making Copies From the Document Glass" on page 114<br />
2 Press the (Copy) button.<br />
3 Select Margin Middle, and then press the button.<br />
4 Press the or button or enter the desired value using the numeric keypad, and then press<br />
the button.<br />
NOTE:<br />
• Values marked by an asterisk (*) are the factory default menu settings.<br />
0mm*/0.0 inch*<br />
0-50mm/0.0-2.0 inch<br />
Specify the value in increments of 1 mm/0.1 inch.<br />
5 If necessary, customize the copy settings including the number of copies, copy size, and image<br />
quality.<br />
See also:<br />
• "Setting Copy Options" on page 116<br />
6 Press the (Start) button to begin copying.<br />
135 Copying
Changing the Default Settings<br />
The COPY menu options, including color mode, and image quality can be set to the most frequently<br />
used modes.<br />
To create your own default settings:<br />
1 Press the (System) button.<br />
2 Select Defaults Settings, and then press the button.<br />
3 Select Copy Defaults, and then press the button.<br />
4 Select the desired menu item, and then press the button.<br />
5 Select the desired setting or enter the value using the numeric keypad, and then press the<br />
button.<br />
6 Repeat steps 4 and 5, as needed.<br />
7 To return to the previous screen, press the (Back) button.<br />
Copying 136
7<br />
Scanning<br />
This chapter includes:<br />
• "Scanning Overview" on page 138<br />
• "Scanning to a Computer" on page 139<br />
• "Scanning to USB Storage Device" on page 144<br />
• "Adjusting Scanning Options" on page 145<br />
137 Scanning
Scanning Overview<br />
You can use your DocuPrint CM205 b to turn pictures and text into editable images on your computer.<br />
The resolution setting to use when you scan an item depends on the item type and how you plan to<br />
use the image or document after you scan it into your computer. For the best results, use these<br />
recommended settings.<br />
Type<br />
Documents<br />
Documents of poor quality or that contain small text<br />
Photographs and pictures<br />
Images for an inkjet printer<br />
Images for a high-resolution printer<br />
Resolution<br />
300 dpi black-and-white or 200 dpi grayscale or<br />
color<br />
400 dpi black-and-white or 300 dpi grayscale<br />
100–200 dpi color or 200 dpi grayscale<br />
150–300 dpi<br />
300–600 dpi<br />
Scanning beyond these recommended resolutions may exceed the capabilities of the application. If<br />
you require a resolution above those recommended in the above table, you should reduce the size of<br />
the image by previewing (or pre-scan) and cropping before scanning the image.<br />
Scanning 138
Scanning to a Computer<br />
This section includes:<br />
• "Scanning From the Operator Panel" on page 140<br />
• "Scanning Using the TWAIN Driver" on page 141<br />
• "Scanning Using the WIA Driver" on page 143<br />
139 Scanning
• Scanning From the Operator Panel<br />
The following procedure uses Microsoft ® Windows ® XP as an example.<br />
NOTE:<br />
• Ensure that the printer is connected to the computer using the USB cable.<br />
• You must use Express Scan Manager on your computer to configure the output destination of the scanned<br />
image files.<br />
1 Place a single document face down on the document glass, and close the document cover.<br />
See also:<br />
• "Making Copies From the Document Glass" on page 114<br />
2 Press the (Scan) button.<br />
3 Select Scan to Application, and then press the button.<br />
4 Configure the scanning settings as necessary.<br />
5 Press the (Start) button.<br />
The scanned image file is generated.<br />
NOTE:<br />
• If the following dialog box appears on your computer, select Express Scan Manager-Btype, and then<br />
click OK. Once you select the Always use this program for this action check box when selecting<br />
Express Scan Manager-Btype, the selected application is automatically used without displaying the<br />
program selection window.<br />
See also:<br />
• "Express Scan Manager" on page 52<br />
Scanning 140
• Scanning Using the TWAIN Driver<br />
Your printer supports the Tool Without An Interesting Name (TWAIN) driver for scanning images.<br />
TWAIN is one of the standard components provided by Windows XP, Windows Server ® 2003,<br />
Windows Server 2008, Windows Server 2008 R2, Windows Vista ® , Windows 7, and Mac OS ® X<br />
10.4/10.5/10.6, and works with various scanners. The following procedure uses Windows XP as an<br />
example.<br />
NOTE:<br />
• Ensure that the printer is connected to the computer using the USB cable.<br />
The following procedure to scan an image uses Microsoft Clip Organizer as an example.<br />
1 Place a single document face down on the document glass, and close the document cover.<br />
See also:<br />
• "Making Copies From the Document Glass" on page 114<br />
2 Click start All Programs Microsoft Office Microsoft Office 2010 Tools Microsoft<br />
Clip Organizer.<br />
3 Click File Add Clips to Organizer From Scanner or Camera.<br />
4 In the Insert Picture from Scanner or Camera dialog box, under Device, select FX DP CM205<br />
b (TWAIN).<br />
5 Click Custom Insert.<br />
6 Select your scanning preferences and click Preview to display the preview image.<br />
NOTE:<br />
• The illustration may vary for different operating systems.<br />
7 Select the desired properties from the Image Quality and Image Options tabs.<br />
141 Scanning
8 Click Scan to start scanning.<br />
The scanned image file is generated.<br />
Scanning 142
• Scanning Using the WIA Driver<br />
Your printer also supports the Windows Image Acquisition (WIA) driver for scanning images. WIA is<br />
one of the standard components provided by Windows XP and later operating systems and works with<br />
digital cameras and scanners. Unlike the TWAIN driver, the WIA driver allows you to scan an image<br />
and easily manipulate those images without using additional software.<br />
The following procedure uses Windows XP as an example.<br />
NOTE:<br />
• Ensure that the printer is connected to the computer using the USB cable.<br />
1 Place a single document face down on the document glass, and close the document cover.<br />
See also:<br />
• "Making Copies From the Document Glass" on page 114<br />
2 Start the drawing software, such as Paint for Windows.<br />
NOTE:<br />
• When you use Windows Vista, use Windows Photo Gallery instead of Paint.<br />
3 Click File From Scanner or Camera (Paint button From scanner or camera for Windows<br />
Server 2008 R2 and Windows 7).<br />
The Scan using FX DP CM205 b (WIA) window appears.<br />
NOTE:<br />
• The illustration may vary for different operating systems.<br />
4 Select your scanning preferences and click Adjust the quality of the scanned picture to<br />
display the Advanced Properties dialog box.<br />
5 Select the desired properties including brightness and contrast, and then click OK.<br />
6 Click Scan to start scanning.<br />
7 Click Save As from the File menu.<br />
8 Enter a picture name, and select a file format and destination to save the picture.<br />
143 Scanning
Scanning to USB Storage Device<br />
The Scan to USB Memory feature allows you to scan documents and save the scanned data to a USB<br />
storage device. To scan documents and save them, follow the steps below:<br />
1 Insert the USB storage device into the USB drive on your printer.<br />
2 Place a single document face down on the document glass, and close the document cover.<br />
See also:<br />
• "Making Copies From the Document Glass" on page 114<br />
3 Press the (Scan) button.<br />
4 Select Scan to USB Memory, and then press the button.<br />
5 Select Save to Root, and then press the button.<br />
6 Select scanning options as required.<br />
7 Press the (Start) button.<br />
When the scan is complete, the display prompts you for another page. Select No or Yes, and<br />
then press the button.<br />
If you select Yes, select Continue or Cancel, and then press the button.<br />
Scanning 144
Adjusting Scanning Options<br />
This section includes:<br />
• "Adjusting the Default Scan Settings" on page 146<br />
• "Changing the Scan Settings for an Individual Job" on page 148<br />
145 Scanning
• Adjusting the Default Scan Settings<br />
This section includes:<br />
• "Setting the Scanned Image File Type" on page 146<br />
• "Setting the Color Mode" on page 146<br />
• "Setting the Scan Resolution" on page 147<br />
• "Setting the Original Size" on page 147<br />
• "Automatically Suppressing Background Variations" on page 147<br />
For a complete list of all of the defaults settings, see "Defaults Settings" on page 162.<br />
Setting the Scanned Image File Type<br />
To specify the file type of the scanned image:<br />
1 Press the (System) button.<br />
2 Select Defaults Settings, and then press the button.<br />
3 Select Scan Defaults, and then press the button.<br />
4 Select File Format, and then press the button.<br />
5 Select the type, and then press the button.<br />
Available types:<br />
• PDF (factory default)<br />
• TIFF<br />
• JPEG<br />
Setting the Color Mode<br />
You can scan an image in color or in black and white. Selecting black and white significantly reduces<br />
the file size of the scanned images. An image scanned in color will have a larger file size than the<br />
same image scanned in black and white.<br />
1 Press the (System) button.<br />
2 Select Defaults Settings, and then press the button.<br />
3 Select Scan Defaults, and then press the button.<br />
4 Select Color, and then press the button.<br />
5 Select one of the following options, and then press the button.<br />
• Black & White: Scans in black and white mode. This is available only when File Format<br />
is set to PDF or TIFF.<br />
• Color: Scans in color mode. (factory default)<br />
Scanning 146
Setting the Scan Resolution<br />
You may want to change the scan resolution depending on the way you plan to use the scanned<br />
image. Scan resolution affects both the size and image quality of the scanned image file. The higher<br />
the scan resolution, the larger the file size.<br />
To select the scan resolution:<br />
1 Press the (System) button.<br />
2 Select Defaults Settings, and then press the button.<br />
3 Select Scan Defaults, and then press the button.<br />
4 Select Resolution, and then press the button.<br />
5 Select one of the following options, and then press the button:<br />
• 200 × 200dpi: Produces the lowest resolution and smallest file size. (factory default)<br />
• 300 × 300dpi: Produces medium resolution and a medium file size.<br />
• 400 × 400dpi: Produces high resolution and a large file size.<br />
• 600 × 600dpi: Produces the highest resolution and largest file size.<br />
Setting the Original Size<br />
To specify the size of the original:<br />
1 Press the (System) button.<br />
2 Select Defaults Settings, and then press the button.<br />
3 Select Scan Defaults, and then press the button.<br />
4 Select Document Size, and then press the button.<br />
5 Select a specific paper size to determine the area to be scanned, and then press the button.<br />
The factory default setting is A4 (210 × 297mm).<br />
Automatically Suppressing Background Variations<br />
When scanning documents with a dark background such as newspapers, the printer automatically can<br />
detect the background and whiten it when outputting the image.<br />
To turn on/off automatic suppression:<br />
1 Press the (System) button.<br />
2 Select Defaults Settings, and then press the button.<br />
3 Select Scan Defaults, and then press the button.<br />
4 Select Auto Exposure, and then press the button.<br />
5 Select either On or Off, and then press the button.<br />
The factory default setting is On.<br />
147 Scanning
• Changing the Scan Settings for an Individual Job<br />
To temporarily change a scan setting when scanning to a computer:<br />
1 Press the (Scan) button.<br />
2 Select Scan to Application, and then press the button.<br />
3 Select the desired menu item, and then press the button.<br />
4 Select the desired setting or enter the value using the numeric keypad, and then press the<br />
button.<br />
5 Repeat steps 3 and 4, as needed.<br />
6 Press the (Start) button to begin the scan.<br />
Scanning 148
8<br />
Using the Operator Panel Menus and<br />
Keypad<br />
This chapter includes:<br />
• "Understanding the Printer Menus" on page 150<br />
• "Panel Lock Function" on page 173<br />
• "Limiting Access to Copy, Scan and Print From USB Memory Operations" on page 176<br />
• "Setting the Power Saving Timer Option" on page 177<br />
• "Resetting to Factory Defaults" on page 178<br />
• "Using the Numeric Keypad" on page 179<br />
149 Using the Operator Panel Menus and Keypad
Understanding the Printer Menus<br />
When you are not an administrator, the access to the Admin Menu menu can be limited. This<br />
prevents unauthorized users from using the operator panel to inadvertently change the default menu<br />
settings that has been set by the administrator. However, you can use settings for individual print jobs<br />
using the print driver. Print settings selected from the print driver have precedence over the default<br />
menu settings selected from the operator panel.<br />
Using the Operator Panel Menus and Keypad 150
• Report / List<br />
Use the Report / List menu to print various types of reports and lists.<br />
NOTE:<br />
• A password is required to enter the Report / List menu when Panel Lock Set is set to Enable. In this<br />
case, enter the password you specified, and press the button.<br />
System Settings<br />
Purpose:<br />
To print a list of the information such as the printer name, serial number, and print volume.<br />
Panel Settings<br />
Purpose:<br />
To print a detailed list of all the settings on the operator panel menus.<br />
Job History<br />
Purpose:<br />
To print a detailed list of the print, copy, or scan jobs that have been processed. This list contains the<br />
last 50 jobs.<br />
Error History<br />
Purpose:<br />
To print a detailed list of paper jams and fatal errors.<br />
Demo Page<br />
Purpose:<br />
To print a test page.<br />
151 Using the Operator Panel Menus and Keypad
• Meter Readings<br />
Use Meter Readings to check the total number of printed pages.<br />
Values:<br />
Meter 1<br />
Displays the total number of color prints.<br />
Meter 2<br />
Displays the total number of monochrome prints.<br />
Meter 3<br />
Displays the total number of large size color prints.<br />
Meter 4 Displays the total number of color and monochrome prints (Meter 1 +<br />
Meter 2).<br />
Using the Operator Panel Menus and Keypad 152
• Admin Menu<br />
Use the Admin Menu menu to configure a variety of printer features.<br />
NOTE:<br />
• A password is required to enter the Admin Menu menu when Panel Lock Set is set to Enable. In this<br />
case, enter the password you specified, and press the button.<br />
System Settings<br />
Use the System Settings menu to configure a variety of printer features.<br />
NOTE:<br />
• Values marked by an asterisk (*) are the factory default menu settings.<br />
• Power Saving Timer<br />
Purpose:<br />
To specify the time for transition to the Power Saver mode.<br />
Values:<br />
Low Power Timer 5min* Specifies the time taken by the printer before it enters the Low<br />
5–30min<br />
Power mode after it finishes a job.<br />
Sleep Timer 6min*<br />
1–6min<br />
Specifies the time taken by the printer before it enters the<br />
Sleep mode after it goes into the Low Power mode.<br />
Enter 5 in Low Power Timer to put the printer in the Low Power mode five minutes after it finishes a<br />
job. This uses less energy, but requires more warm-up time for the printer. Enter 5 if your printer<br />
shares an electrical circuit with room lighting and you notice lights flickering.<br />
Select a high value if your printer is in constant use. In most circumstances, this keeps the printer<br />
ready to operate with minimum warm-up time. Select a value between 5 and 30 minutes for the Low<br />
Power mode if you want a balance between energy consumption and a shorter warm-up period.<br />
The printer automatically returns to the standby mode from the Power Saver mode when it receives<br />
data from the computer. In the Low Power mode, you can also return the printer to the standby mode<br />
by pressing any button on the operator panel. In the Sleep mode, you can return the printer to the<br />
standby mode by pressing the (Energy Saver) button.<br />
• Auto Reset<br />
Purpose:<br />
To automatically reset the settings for copying or scanning to the defaults and return to the standby<br />
mode after you do not specify any settings for the specified time.<br />
Values:<br />
45sec*<br />
1min<br />
2min<br />
3min<br />
4min<br />
153 Using the Operator Panel Menus and Keypad
•Fault Time-Out<br />
Purpose:<br />
To specify the time taken by the printer before it cancels jobs that stop abnormally. The job is<br />
cancelled if it times out.<br />
Values:<br />
Off<br />
Disables the fault time-out.<br />
On 60sec* Specifies the time taken by the printer before it cancels for jobs<br />
3–300sec<br />
that stop abnormally.<br />
• Job Time-Out<br />
Purpose:<br />
To specify the amount of time that the printer waits for data to arrive from the computer. The print job is<br />
cancelled if it times out.<br />
Values:<br />
Off<br />
Disables the job time-out.<br />
On 30sec* Specifies the amount of time that the printer waits for data to<br />
5–300sec<br />
arrive from the computer.<br />
• Clock Settings<br />
Purpose:<br />
To set the date and time, and regional time zone of the printer.<br />
Values:<br />
Set Date<br />
Specifies the current date.<br />
Set Time<br />
Specifies the current time.<br />
Date Format yy / mm / dd Specifies the date format.<br />
mm / dd / yy<br />
dd / mm / yy*<br />
Time Format 12H* Specifies the time format.<br />
24H<br />
Time Zone Specifies the time zone.<br />
• Alert Tone<br />
Purpose:<br />
To configure settings for tones emitted by the printer during operation or when a warning message<br />
appears.<br />
Values:<br />
Panel Select Tone Off* Does not emit a tone when the operator panel input is correct.<br />
Min<br />
Middle<br />
Emits a tone at the specified volume when the operator panel<br />
input is correct.<br />
Max<br />
Using the Operator Panel Menus and Keypad 154
Panel Alert Tone Off* Does not emit a tone when the operator panel input is<br />
incorrect.<br />
Min<br />
Emits a tone at the specified volume when the operator panel<br />
Middle<br />
input is incorrect.<br />
Max<br />
Auto Clear Alert Off* Does not emit a tone before the printer performs auto clear.<br />
Min<br />
Emits a tone at the specified volume five seconds before the<br />
Middle<br />
Max<br />
printer performs auto clear.<br />
Job Tone Off Does not emit a tone when a job is complete.<br />
Min<br />
Emits a tone at the specified volume when a job is complete.<br />
Middle*<br />
Max<br />
Alert Tone Off Does not emit a tone when a problem occurs.<br />
Min<br />
Emits a tone at the specified volume when a problem occurs.<br />
Middle*<br />
Max<br />
Out of Paper Off Does not emit a tone when the printer runs out of paper.<br />
Min<br />
Emits a tone at the specified volume when the printer runs out<br />
Middle*<br />
Max<br />
of paper.<br />
All Tones Off Disables all the alert tones.<br />
Min<br />
Sets the volume of all the alert tones at once.<br />
Middle<br />
Max<br />
• mm / inch<br />
Purpose:<br />
To specify the measurement unit displayed after the numeric value on the operator panel.<br />
Values:<br />
Millimeters (mm)*<br />
Inches (")<br />
Specifies the default measurement unit.<br />
• Low Toner Alert Msg<br />
Purpose:<br />
To specify whether to show the alert message when the toner is low.<br />
Values:<br />
Off<br />
On*<br />
Does not show the alert message when the toner is low.<br />
Shows the alert message when the toner is low.<br />
155 Using the Operator Panel Menus and Keypad
• Power On Wizard<br />
Purpose:<br />
To perform initial settings for the printer.<br />
See also:<br />
• "Setting Initial Settings on the Operator Panel" on page 40<br />
Values:<br />
Yes<br />
No*<br />
Performs the initial settings for the printer.<br />
Does not perform the initial settings for the printer.<br />
Maintenance<br />
Use the Maintenance menu to initialize Non-Volatile Memory (NVM), configure the plain paper<br />
quality adjustment settings, and configure the security settings.<br />
NOTE:<br />
• Values marked by an asterisk (*) are the factory default menu settings.<br />
• F/W Version<br />
Purpose:<br />
To display the version of the controller.<br />
• Adjust Paper Type<br />
Purpose:<br />
To adjust the paper type.<br />
Values:<br />
Plain<br />
Labels<br />
Lightweight<br />
Heavyweight*<br />
Lightweight<br />
Heavyweight*<br />
•Adjust BTR<br />
Purpose:<br />
To specify the optimum voltage settings for printing for the transfer roller (BTR). To lower the voltage,<br />
set negative values. To increase, set positive values.<br />
The default settings may not give the best output on all paper types. If you see mottles on the print<br />
output, try to increase the voltage. If you see white spots on the print output, try to decrease the<br />
voltage.<br />
NOTE:<br />
• The print quality changes depending on the values you select for this item.<br />
Values:<br />
Plain 0*<br />
-3 – +3<br />
Using the Operator Panel Menus and Keypad 156
• Adjust Fuser<br />
Purpose:<br />
To specify the optimum temperature settings for printing for the fusing unit. To lower the temperature,<br />
set negative values. To increase, set positive values.<br />
The default settings may not give the best output on all paper types. When the printed paper has<br />
curled, try to lower the temperature. When the toner does not fuse on the paper properly, try to<br />
increase the temperature.<br />
NOTE:<br />
• The print quality changes depending on the values you select for this item.<br />
Values:<br />
Bond 0*<br />
-3 – +3<br />
Light Card 0*<br />
-3 – +3<br />
LW Gloss Card 0*<br />
-3 – +3<br />
Labels 0*<br />
-3 – +3<br />
Recycled 0*<br />
-3 – +3<br />
Envelope 0*<br />
-3 – +3<br />
Plain 0*<br />
-3 – +3<br />
Bond 0*<br />
-3 – +3<br />
Light Card 0*<br />
-3 – +3<br />
LW Gloss Card 0*<br />
-3 – +3<br />
Labels 0*<br />
-3 – +3<br />
Recycled 0*<br />
-3 – +3<br />
Envelope 0*<br />
-3 – +3<br />
157 Using the Operator Panel Menus and Keypad
• Auto Regi Adjust<br />
Purpose:<br />
To specify whether to automatically adjust color registration.<br />
Values:<br />
Off<br />
On*<br />
Does not automatically adjust color registration.<br />
Automatically adjusts color registration.<br />
•Adjust ColorRegi<br />
Purpose:<br />
To automatically adjust color registration.<br />
Color registration adjustment need to be made during the initial setup of the printer or when the printer<br />
is moved to a different location.<br />
Values:<br />
Auto Adjust Yes Automatically corrects color registration.<br />
No* Does not correct color registration automatically.<br />
• Clean Developer<br />
Purpose:<br />
To rotate the developer motor and stir the toner in the toner cartridge.<br />
Values:<br />
Yes<br />
No*<br />
Stirs the toner in a new toner cartridge.<br />
Does not stir the toner in a new toner cartridge.<br />
• Toner Refresh<br />
Purpose:<br />
To use up a toner cartridge when you need to replace it before the end of its life, or to stir the toner in<br />
a new toner cartridge.<br />
Values:<br />
Yellow Yes Cleans the toner in the yellow toner cartridge.<br />
No*<br />
Does not clean the toner in the yellow toner cartridge.<br />
Magenta Yes Cleans the toner in the magenta toner cartridge.<br />
No*<br />
Does not clean the toner in the magenta toner cartridge.<br />
Cyan Yes Cleans the toner in the cyan toner cartridge.<br />
No*<br />
Does not clean the toner in the cyan toner cartridge.<br />
Black Yes Cleans the toner in the black toner cartridge.<br />
No*<br />
Does not clean the toner in the black toner cartridge.<br />
Using the Operator Panel Menus and Keypad 158
• BTR Refresh<br />
Purpose:<br />
Specify whether to execute counter measures for curling/separating discharge of the paper.<br />
Values:<br />
Off*<br />
On<br />
Does not automatically execute counter measures for<br />
curling/separating discharge of the paper.<br />
Automatically executes counter measures for curling/separating<br />
discharge of the paper.<br />
• Initialize NVM<br />
Purpose:<br />
To initialize NVM for system parameters. After executing this function and rebooting the printer, the<br />
menu parameters or data are reset to their factory default values.<br />
See also:<br />
• "Resetting to Factory Defaults" on page 178<br />
Values:<br />
• Non-Genuine Mode<br />
Purpose:<br />
To use toner cartridge of another manufacturer.<br />
NOTE:<br />
• Using non-genuine toner cartridges may make some printer features unusable, reduce print quality and<br />
decrease the reliability of your printer. <strong>Fuji</strong> <strong>Xerox</strong> recommends only new <strong>Fuji</strong> <strong>Xerox</strong> brand toner cartridges for<br />
your printer. <strong>Fuji</strong> <strong>Xerox</strong> does not provide warranty coverage for problems caused by using accessories, parts,<br />
or components not supplied by <strong>Fuji</strong> <strong>Xerox</strong>.<br />
• Before you use toner cartridge of another manufacturer, be sure to restart the printer.<br />
Values:<br />
System Section Yes Initializes the system parameters.<br />
No*<br />
Does not initialize the system parameters.<br />
Off*<br />
On<br />
Does not use toner cartridge of another manufacturer.<br />
Uses toner cartridge of another manufacturer.<br />
159 Using the Operator Panel Menus and Keypad
• Adjust Altitude<br />
Purpose:<br />
To specify the altitude of the location where the printer is installed.<br />
The discharge phenomenon for charging the photo conductor varies with barometric pressure.<br />
Adjustments are performed by specifying the altitude of the location where the printer is being used.<br />
NOTE:<br />
• An incorrect altitude adjustment setting leads to poor printing quality, incorrect indication of remaining toner.<br />
Values:<br />
0m* Specifies the altitude of the location where the printer is installed.<br />
1000m<br />
2000m<br />
3000m<br />
Secure Settings<br />
Use the Secure Settings menu to set a password to limit access to the menus. This prevents<br />
items from being changed accidentally.<br />
NOTE:<br />
• Values marked by an asterisk (*) are the factory default menu settings.<br />
• Panel Lock<br />
Purpose:<br />
To restrict access to Admin Menu and Report / List with a password.<br />
See also:<br />
• "Panel Lock Function" on page 173<br />
NOTE:<br />
• You can select Disable for Panel Lock Set when all items under Service Lock are set to Unlocked.<br />
Values:<br />
Panel Lock Set Disable* Does not restrict access to Admin Menu and Report /<br />
List with a password.<br />
Change<br />
Password<br />
Enable<br />
Restricts access to Admin Menu and Report / List with a<br />
password.<br />
0000*–9999 Sets or changes the password required to access Admin<br />
Menu and Report / List.<br />
Using the Operator Panel Menus and Keypad 160
• Service Lock<br />
Purpose:<br />
To specify whether to enable each of the printer services or to require a password to use the services,<br />
and to set or change the password.<br />
See also:<br />
• "Limiting Access to Copy, Scan and Print From USB Memory Operations" on page 176<br />
NOTE:<br />
• You can access to the items under Service Lock only when Panel Lock Set is set to Enable.<br />
Values:<br />
COPY Unlocked* Enables the COPY service.<br />
Locked<br />
Disables the COPY service.<br />
Password Locked Enables the COPY service with a black and white mode, but<br />
requires a password.<br />
Color Pass.<br />
Locked<br />
Enables the COPY service with a color mode, but requires a<br />
password.<br />
SCAN Unlocked* Enables the SCAN service.<br />
Locked<br />
Disables the SCAN service.<br />
Password Locked Enables the SCAN service, but requires a password.<br />
Print from USB Unlocked* Enables the Print From USB Memory service.<br />
Locked<br />
Disables the Print From USB Memory service.<br />
Password Locked Enables the Print From USB Memory service with a black and<br />
white mode, but requires a password.<br />
Change<br />
Password<br />
Color Pass.<br />
Locked<br />
Enables the Print From USB Memory service with a color<br />
mode, but requires a password.<br />
0000*–9999 Sets or changes the password required to use the COPY,<br />
SCAN, and Print From USB Memory services.<br />
USB Settings<br />
Use the USB Settings menu to change printer settings affecting a USB port.<br />
NOTE:<br />
• Values marked by an asterisk (*) are the factory default menu settings.<br />
•Port Status<br />
Purpose:<br />
To enable or disable the USB interface. The change becomes effective after the printer is turned off<br />
and then on.<br />
Values:<br />
Disable<br />
Enable*<br />
Disables the USB interface.<br />
Enables the USB interface.<br />
161 Using the Operator Panel Menus and Keypad
• Defaults Settings<br />
Use the Defaults Settings menu to configure the default copy, scan, and Print From USB<br />
Memory settings of the printer.<br />
Copy Defaults<br />
Use the Copy Defaults menus to configure a variety of copy features.<br />
NOTE:<br />
• Values marked by an asterisk (*) are the factory default menu settings.<br />
•Color<br />
Purpose:<br />
To set whether to make copies in color or in black and white.<br />
Values:<br />
Black & White<br />
Color*<br />
Prints in black and white mode.<br />
Prints in color mode.<br />
•Collated<br />
Purpose:<br />
To sort the copy job.<br />
Values:<br />
Uncollated*<br />
Collated<br />
Does not sort the copy job.<br />
Sorts the copy job.<br />
Using the Operator Panel Menus and Keypad 162
• Reduce/Enlarge<br />
Purpose:<br />
To set the default copy reduction/enlargement ratio.<br />
Values:<br />
mm series<br />
200%<br />
A5A4(141%)<br />
A5B5(122%)<br />
100%*<br />
B5A5(81%)<br />
A4A5(70%)<br />
50%<br />
inch series<br />
NOTE:<br />
200%<br />
StmtLgl(154%)<br />
StmtLtr(129%)<br />
100%*<br />
LglLtr (78%)<br />
LdgrLtr(64%)<br />
50%<br />
• You can also use the numeric keypad to input the desired zoom ratio from 25% to 400%, or press the<br />
button to enlarge the zoom ratio or press the button to reduce the zoom ratio in 1% intervals.<br />
• This item is available only when N-Up is set to Off or Manual.<br />
• Document Size<br />
Purpose:<br />
To specify the default document size.<br />
Values:<br />
A4 (210 × 297mm)*<br />
A5 (148 × 210mm)<br />
B5 (182 × 257mm)<br />
Letter (8.5 × 11")<br />
Executive (7.25 × 10.5")<br />
163 Using the Operator Panel Menus and Keypad
• Original Type<br />
Purpose:<br />
To select the copy image quality.<br />
Values:<br />
Text<br />
Mixed*<br />
Photo<br />
Suitable for documents with text.<br />
Suitable for documents with both text and photos/gray tones.<br />
Suitable for documents with photos.<br />
• Lighten/Darken<br />
Purpose:<br />
To set the default copy density level.<br />
Values:<br />
Lighten2<br />
Lighten1<br />
Normal*<br />
Darken1<br />
Darken2<br />
Makes the copy lighter than the original. Works well with dark print.<br />
Works well with standard type or printed documents.<br />
Makes the copy darker than the original. Works well with light print or<br />
faint pencil markings.<br />
• Sharpness<br />
Purpose:<br />
To set the default sharpness level.<br />
Values:<br />
Sharpest<br />
Sharper<br />
Normal*<br />
Softer<br />
Softest<br />
Makes the copy sharper than the original.<br />
Does not make the copy sharper or softer than the original.<br />
Makes the copy softer than the original.<br />
• Auto Exposure<br />
Purpose:<br />
To suppress the background of the original to enhance text on the copy.<br />
Values:<br />
Off<br />
On*<br />
Does not suppress the background.<br />
Suppresses the background of the original to enhance text on the<br />
copy.<br />
• Color Balance R<br />
Purpose:<br />
To specify the default color balance level of red within the range of -2 to +2. The factory default menu<br />
setting is 0.<br />
Using the Operator Panel Menus and Keypad 164
• Color Balance G<br />
Purpose:<br />
To specify the default color balance level of green within the range of -2 to +2. The factory default<br />
menu setting is 0.<br />
• Color Balance B<br />
Purpose:<br />
To specify the default color balance level of blue within the range of -2 to +2. The factory default menu<br />
setting is 0.<br />
• Gray Balance<br />
Purpose:<br />
To specify the default gray balance level within the range of -2 to +2. The factory default menu setting<br />
is 0.<br />
NOTE:<br />
• This option is effective only for black and white copying.<br />
•N-Up<br />
Purpose:<br />
To print two original pages to fit onto one sheet of paper.<br />
Values:<br />
Off*<br />
Auto<br />
ID Copy<br />
Manual<br />
Does not perform N-Up printing.<br />
Automatically reduces the original pages to fit onto one sheet of<br />
paper.<br />
Prints the original pages onto one sheet of paper in the original size.<br />
Prints the original pages onto the one sheet of paper in the size<br />
specified in Reduce/Enlarge.<br />
• Margin Top/Bottom<br />
Purpose:<br />
To specify the value of the top and bottom margins.<br />
Values:<br />
4mm*/0.2 inch*<br />
0-50mm/0.0-2.0 inch<br />
Specify the value in increments of 1 mm/0.1 inch.<br />
• Margin Left/Right<br />
Purpose:<br />
To specify the value of the left and right margins.<br />
Values:<br />
4mm*/0.2 inch*<br />
0-50mm/0.0-2.0 inch<br />
Specify the value in increments of 1 mm/0.1 inch.<br />
165 Using the Operator Panel Menus and Keypad
• Margin Middle<br />
Purpose:<br />
To specify the value of the middle margin.<br />
Values:<br />
0mm*/0.0 inch*<br />
0-50mm/0.0-2.0 inch<br />
Specify the value in increments of 1 mm/0.1 inch.<br />
Scan Defaults<br />
Use the Scan Defaults menus to configure a variety of scanner features.<br />
NOTE:<br />
• Values marked by an asterisk (*) are the factory default menu settings.<br />
• File Format<br />
Purpose:<br />
To specify the file format to save the scanned image.<br />
Values:<br />
PDF*<br />
TIFF<br />
JPEG<br />
•Color<br />
Purpose:<br />
To set the color mode.<br />
Values:<br />
Black & White<br />
Color*<br />
Scans in black and white mode. This is available only when File<br />
Format is set to PDF or TIFF.<br />
Scans in color mode.<br />
• Color Button Set<br />
Purpose:<br />
To assign color mode to the Color Mode button.<br />
Values:<br />
B&W Button Black & White* Scans in black and white when Black & White is selected<br />
for a color mode.<br />
Grayscale Scans in gray scale when Black & White is selected for a<br />
color mode.<br />
Color Button Color* Scans in color when Color is selected for a color mode.<br />
Color(Photo) Scans in color (photo) when Color is selected for a color<br />
mode. This is suitable for photographic images.<br />
Using the Operator Panel Menus and Keypad 166
• Resolution<br />
Purpose:<br />
To specify the default scan resolution.<br />
Values:<br />
200 × 200dpi*<br />
300 × 300dpi<br />
400 × 400dpi<br />
600 × 600dpi<br />
• Document Size<br />
Purpose:<br />
To specify the default document size.<br />
Values:<br />
A4 (210 × 297mm)*<br />
A5 (148 × 210mm)<br />
B5 (182 × 257mm)<br />
Letter (8.5 × 11")<br />
Executive (7.25 × 10.5")<br />
• Lighten/Darken<br />
Purpose:<br />
To set the default scan density level.<br />
Values:<br />
Lighten2<br />
Lighten1<br />
Normal*<br />
Darken1<br />
Darken2<br />
Makes the scanned image lighter than the original. Works well with<br />
dark print.<br />
Works well with standard type or printed documents.<br />
Makes the scanned image darker than the original. Works well with<br />
light print or faint pencil markings.<br />
• Sharpness<br />
Purpose:<br />
To set the default sharpness level.<br />
Values:<br />
Sharpest<br />
Sharper<br />
Normal*<br />
Softer<br />
Softest<br />
Makes the scanned image sharper than the original.<br />
Does not make the scanned image sharper or softer than the original.<br />
Makes the scanned image softer than the original.<br />
167 Using the Operator Panel Menus and Keypad
• Auto Exposure<br />
Purpose:<br />
To suppress the background of the original to enhance text on the scanned image.<br />
Values:<br />
Off<br />
On*<br />
Does not suppress the background.<br />
Suppresses the background of the original to enhance text on the<br />
scanned image.<br />
• Margin Top/Bottom<br />
Purpose:<br />
To specify the value of the top and bottom margins.<br />
Values:<br />
2mm*/0.1 inch*<br />
0-50mm/0.0-2.0 inch<br />
Specify the value in increments of 1 mm/0.1 inch.<br />
• Margin Left/Right<br />
Purpose:<br />
To specify the value of the left and right margins.<br />
Values:<br />
2mm*/0.1 inch*<br />
0-50mm/0.0-2.0 inch<br />
Specify the value in increments of 1 mm/0.1 inch.<br />
• Margin Middle<br />
Purpose:<br />
To specify the value of the middle margin.<br />
Values:<br />
0mm*/0.0 inch*<br />
0-50mm/0.0-2.0 inch<br />
Specify the value in increments of 1 mm/0.1 inch.<br />
• TIFF File Format<br />
Purpose:<br />
To specify the TIFF file format.<br />
Values:<br />
TIFF V6*<br />
TTN2<br />
Using the Operator Panel Menus and Keypad 168
• Image Compression<br />
Purpose:<br />
To specify the image compression level.<br />
Values:<br />
High<br />
Medium*<br />
Low<br />
Sets the image compression level to High.<br />
Sets the image compression level to Medium.<br />
Sets the image compression level to Low.<br />
Print from USB Defaults<br />
NOTE:<br />
• Values marked by an asterisk (*) are the factory default menu settings.<br />
• Layout<br />
Purpose:<br />
To automatically enlarge print documents when you print directly from a USB storage device.<br />
Values:<br />
Auto*<br />
Off<br />
Automatically enlarges print documents to fit on the paper.<br />
Does not enlarge print documents.<br />
169 Using the Operator Panel Menus and Keypad
• Tray Settings<br />
Use the Tray Settings menu to set the paper size and type of paper loaded in the multipurpose<br />
feeder (MPF).<br />
Using the Operator Panel Menus and Keypad 170
MPF<br />
NOTE:<br />
• Values marked by an asterisk (*) are the factory default menu settings.<br />
Purpose:<br />
To specify the paper loaded in the MPF.<br />
Values:<br />
NOTE:<br />
Paper Size<br />
A4 (210 × 297mm)*<br />
A5 (148 × 210mm)<br />
B5 (182 × 257mm)<br />
Letter (8.5 × 11")<br />
Folio (8.5 × 13")<br />
Legal (8.5 × 14")<br />
Executive (7.25 × 10.5")<br />
Envelope #10 (4.1×9.5")<br />
Monarch Env. (3.9×7.5")<br />
Monarch Env. L (7.5×3.9")<br />
DL Env. (110×220mm)<br />
DL Env. L (220×110mm)<br />
C5 Envelope (162 × 229mm)<br />
Custom Size Portrait(Y) 297mm*/11.7inch* Specifies the<br />
127 - 355mm/5.0-<br />
14.0inch<br />
• For more information on supported paper sizes, see "Usable Print Media" on page 69.<br />
length of the<br />
custom size paper.<br />
Landscape(X) 210mm*/8.3inch* Specifies the width<br />
77 - 215mm/3.0-<br />
of the custom size<br />
8.5inch<br />
paper.<br />
Paper Type Plain*<br />
Bond<br />
Light Card<br />
LW Gloss Card<br />
Labels<br />
Recycled<br />
Envelope<br />
Plain S2<br />
Bond S2<br />
Light Card S2<br />
LW Gloss Card S2<br />
Recycled S2<br />
Display Screen Off Does not display a screen.<br />
On*<br />
Displays a screen that prompts the user to set Paper Size<br />
and Paper Type when the paper is loaded in the MPF.<br />
171 Using the Operator Panel Menus and Keypad
• Panel Language<br />
NOTE:<br />
• Values marked by an asterisk (*) are the factory default menu settings.<br />
Purpose:<br />
To specify the language to be used on the operator panel.<br />
See also:<br />
• "Adjusting the Language" on page 108<br />
Values:<br />
English*<br />
Simplified Chinese<br />
Traditional Chinese<br />
Korean<br />
Using the Operator Panel Menus and Keypad 172
Panel Lock Function<br />
This feature prevents unauthorized users from changing settings made by the administrator. However,<br />
you can select settings for individual print jobs using the print driver.<br />
This section includes:<br />
• "Enabling the Panel Lock" on page 174<br />
• "Disabling the Panel Lock" on page 175<br />
173 Using the Operator Panel Menus and Keypad
• Enabling the Panel Lock<br />
1 Press the (System) button.<br />
2 Select Admin Menu, and then press the button.<br />
3 Select Secure Settings, and then press the button.<br />
4 Select Panel Lock, and then press the button.<br />
5 Select Panel Lock Set, and then press the button.<br />
6 Select Enable, and then press the button.<br />
7 As necessary, select Change Password, and change the password using the numeric keypad.<br />
Then, press the button.<br />
NOTE:<br />
NOTE:<br />
• The factory-default panel password is 0000.<br />
• The procedure described below allows you to reset the password.<br />
1 Turn off the printer. Then, while holding the (System) button, turn on the printer.<br />
• If you change the password while Panel Lock Set is Enable, perform steps 1 to 2. Enter the current<br />
password, and then press the button. Perform steps 3 to 4. Select Change Password, and then press<br />
the button. Enter the new password, and then press the button. This will change the password.<br />
Using the Operator Panel Menus and Keypad 174
• Disabling the Panel Lock<br />
NOTE:<br />
• You can select Disable for Panel Lock Set when all items under Service Lock are set to Unlocked.<br />
1 Press the (System) button.<br />
2 Select Admin Menu, and then press the button.<br />
3 Enter the password, and then press the button.<br />
4 Select Secure Settings, and then press the button.<br />
5 Select Panel Lock, and then press the button.<br />
6 Select Panel Lock Set, and then press the button.<br />
7 Select Disable, and then press the button.<br />
175 Using the Operator Panel Menus and Keypad
Limiting Access to Copy, Scan and Print From USB<br />
Memory Operations<br />
Enabling the COPY Lock, SCAN Lock, and Print from USB Lock options limits access to copy, scan,<br />
and Print From USB Memory operations by requiring a password to be entered before copying,<br />
scanning, or printing.<br />
Taking COPY Lock as an example, the following procedure explains how to enable or disable the<br />
option. Use the same procedure to enable or disable SCAN Lock or Print from USB Lock.<br />
1 Press the (System) button.<br />
2 Select Admin Menu, and then press the button.<br />
3 Select Secure Settings, and then press the button.<br />
4 Select Panel Lock, and then press the button.<br />
5 Select Panel Lock Set, and then press the button.<br />
6 Select Enable, and then press the button.<br />
7 As necessary, select Change Password, and change the password using the numeric keypad.<br />
Then, press the button.<br />
NOTE:<br />
• The default password is 0000.<br />
8 Press the (Back) button.<br />
9 Select Service Lock, and then press the button.<br />
10 Select COPY, and then press the button.<br />
11 Select one of the following option, and then press the button.<br />
• Unlocked<br />
• Locked<br />
• Password Locked<br />
• Color Pass. Locked (available only for COPY Lock and Print from USB Lock)<br />
Using the Operator Panel Menus and Keypad 176
Setting the Power Saving Timer Option<br />
You can set the power saving timer for the printer. The printer switches to the Power Saver mode after<br />
the specified time.<br />
1 Press the (System) button.<br />
2 Select Admin Menu, and then press the button.<br />
3 Select System Settings, and then press the button.<br />
4 Select Power Saving Timer, and then press the button.<br />
5 Select Low Power Timer or Sleep Timer, and then press the button.<br />
6 Press the or button or enter the desired value using the numeric keypad, and then press<br />
the button.<br />
You can select from 5–30 minutes for Low Power Timer or 1–6 minutes for Sleep Timer.<br />
7 To return to the previous screen, press the (Back) button.<br />
177 Using the Operator Panel Menus and Keypad
Resetting to Factory Defaults<br />
After executing Initialize NVM and rebooting the printer, the menu parameters or data are reset to<br />
their factory default values.<br />
1 Press the (System) button.<br />
2 Select Admin Menu, and then press the button.<br />
3 Select Maintenance, and then press the button.<br />
4 Select Initialize NVM, and then press the button.<br />
5 Select System Section, and then press the button.<br />
6 Select Yes, and then press the button.<br />
The printer restarts automatically to apply the settings.<br />
Using the Operator Panel Menus and Keypad 178
Using the Numeric Keypad<br />
As you perform various tasks, you may need to enter numbers. For example, when you enter the<br />
password, you enter four-digit number.<br />
OK<br />
ABC<br />
DEF<br />
1 2 3<br />
GHI JKL MNO<br />
4 5 6<br />
PQRS TUV WXYZ<br />
7 8 9<br />
CA<br />
0<br />
C<br />
179 Using the Operator Panel Menus and Keypad
• Changing Numbers<br />
If an incorrect number is entered, press the C (Clear) button to clear the number. Then enter the<br />
correct number.<br />
Using the Operator Panel Menus and Keypad 180
9<br />
Troubleshooting<br />
This chapter includes:<br />
• "Clearing Jams" on page 182<br />
• "Basic Printer Problems" on page 192<br />
• "Display Problems" on page 193<br />
• "Printing Problems" on page 194<br />
• "Print Quality Problems" on page 195<br />
• "Copy Quality Problems" on page 212<br />
• "Adjusting Color Registration" on page 213<br />
• "Scanning Problems" on page 218<br />
• "Scan Driver/Printer Utility Problems" on page 219<br />
• "Other Problems" on page 220<br />
• "Understanding Printer Messages" on page 221<br />
• "Contacting Service" on page 225<br />
• "Getting Help" on page 226<br />
• "Non-Genuine Mode" on page 230<br />
181 Troubleshooting
Clearing Jams<br />
This section includes:<br />
• "Avoiding Jams" on page 183<br />
• "Identifying the Location of Paper Jams" on page 184<br />
• "Clearing Paper Jams From the Front of the Printer" on page 185<br />
• "Clearing Paper Jams From the Back of the Printer" on page 186<br />
• "Clearing Paper Jams From the Center Output Tray" on page 188<br />
• "Jam Problems" on page 191<br />
Careful selection of appropriate print media and proper loading allow you to avoid most jams.<br />
See also:<br />
• "About Print Media" on page 64<br />
• "Supported Print Media" on page 68<br />
NOTE:<br />
• Before buying large quantities of any print media, it is recommended that you try a sample first.<br />
Troubleshooting 182
• Avoiding Jams<br />
• Use only recommended print media.<br />
• See "Loading Print Media in the Multipurpose Feeder (MPF)" on page 74 and "Loading Print<br />
Media in the Priority Sheet Inserter (PSI)" on page 81 to load print media properly.<br />
• Do not overload the print media sources. Ensure that the stacked print media does not exceed<br />
the maximum height indicated on the paper width guides.<br />
• Do not load wrinkled, creased, damp, or curled print media.<br />
• Flex, fan, and straighten print media before you load it. If a jam occurs with print media, try<br />
feeding one sheet at a time through the MPF or the PSI.<br />
• Do not use print media that you have cut or trimmed.<br />
• Do not mix print media sizes, weights, or types in the same print media source.<br />
• Ensure that the recommended print side is face up when you insert the print media.<br />
• Keep print media stored in an acceptable environment.<br />
• Do not remove the PSI during a print job.<br />
• Ensure that all cables that connect to the printer are correctly attached.<br />
• Overtightening the guides may cause jams.<br />
See also:<br />
• "About Print Media" on page 64<br />
• "Supported Print Media" on page 68<br />
• "Print Media Storage Guidelines" on page 67<br />
183 Troubleshooting
• Identifying the Location of Paper Jams<br />
CAUTION:<br />
• Do not attempt to remove a paper jammed deeply inside the product, particularly a paper wrapped<br />
around a Fusing Unit or a heat roller. Otherwise, it may cause injuries or burns. Switch off the<br />
product promptly and contact your local <strong>Fuji</strong> <strong>Xerox</strong> representative.<br />
IMPORTANT:<br />
• Do not attempt to clear any jams using tools or instruments. This may permanently damage the printer.<br />
The following illustration shows where paper jams may occur along the print media path.<br />
1 2<br />
3<br />
4<br />
7<br />
6<br />
5<br />
1 Center Output Tray<br />
2 Transfer Belt<br />
3 Levers<br />
4 Rear Cover<br />
5 Front Cover<br />
6 Multipurpose feeder (MPF)<br />
7 Priority Sheet Inserter (PSI)<br />
Troubleshooting 184
• Clearing Paper Jams From the Front of the Printer<br />
NOTE:<br />
• To resolve the error displayed on the LCD panel, you must clear all print media from the print media path.<br />
1 Pull the PSI out.<br />
2 Remove any paper jammed from the front of the printer.<br />
3 Replace the PSI in the printer.<br />
IMPORTANT:<br />
• Do not use excessive force on the PSI. Doing so could damage it or the inside of the printer.<br />
185 Troubleshooting
• Clearing Paper Jams From the Back of the Printer<br />
IMPORTANT:<br />
• To prevent electric shock, always turn off the printer and disconnect the power cord from the grounded outlet<br />
before performing maintenance.<br />
• To avoid burns, do not clear paper jams immediately after printing. The fusing unit becomes extremely hot<br />
during use.<br />
NOTE:<br />
• To resolve the error displayed on the LCD panel, you must clear all print media from the print media path.<br />
1 Push the rear cover handle and open the rear cover.<br />
2 Lift up the levers.<br />
3 Remove any paper jammed from the back of the printer.<br />
Troubleshooting 186
4 Lower the levers to their original position.<br />
5 Close the rear cover.<br />
187 Troubleshooting
• Clearing Paper Jams From the Center Output Tray<br />
IMPORTANT:<br />
• To prevent electric shock, always turn off the printer and disconnect the power cord from the grounded outlet<br />
before performing maintenance.<br />
• To avoid burns, do not clear paper jams immediately after printing. The fusing unit becomes extremely hot<br />
during use.<br />
NOTE:<br />
• To resolve the error displayed on the LCD panel, you must clear all print media from the print media path.<br />
1 Push the rear cover handle and open the rear cover.<br />
2 Lift up the levers.<br />
3 Remove any paper jammed from the back of the printer. If no paper is found in the paper path,<br />
face the front of the printer and check the center output tray.<br />
Troubleshooting 188
4 Lift and open the scanner.<br />
5 Remove any paper jammed out of the center output tray.<br />
6 Lower and close the scanner.<br />
7 Lower the levers to their original position.<br />
189 Troubleshooting
8 Close the rear cover.<br />
Troubleshooting 190
• Jam Problems<br />
This section includes:<br />
• "Misfeed jam" on page 191<br />
• "Multi-feed jam" on page 191<br />
Misfeed jam<br />
Problem<br />
Print media misfeeds occur.<br />
Action<br />
Remove the paper from the PSI, and then ensure that the paper is<br />
properly inserted in the MPF.<br />
Depending on the print media you use, take any of the following<br />
actions:<br />
• For thick paper, use the one that is 216 gsm or less.<br />
• For thin paper, use the one that is 60 gsm or more.<br />
• For the envelope, ensure that it is properly loaded in the MPF or<br />
the PSI as instructed in "Loading Envelope in the Multipurpose<br />
Feeder (MPF)" on page 78 or in "Loading Envelope in the Priority<br />
Sheet Inserter (PSI)" on page 82.<br />
NOTE:<br />
• If the problem continues even though you have taken suggested actions described above, contact the <strong>Fuji</strong><br />
<strong>Xerox</strong> local representative office or an authorised dealer.<br />
Multi-feed jam<br />
If the envelope is deformed, correct it or use another envelope.<br />
If performing manual duplex printing, ensure that the print media is<br />
not curled.<br />
Fan the print media.<br />
If the print media is damp, turn over the print media.<br />
If the problem continues, use print media that is not damp.<br />
Problem<br />
Print media multiple feeds occur.<br />
Action<br />
Remove the paper from the PSI, and then ensure that the paper is<br />
inserted properly in the MPF.<br />
If the print media is damp, use print media that is not damp.<br />
Fan the print media.<br />
NOTE:<br />
• If the problem continues even though you have taken suggested actions described above, contact the <strong>Fuji</strong><br />
<strong>Xerox</strong> local representative office or an authorised dealer.<br />
191 Troubleshooting
Basic Printer Problems<br />
Some printer problems can be easy to resolve. If a problem occurs with your printer, check each of the<br />
following:<br />
• The power cord is connected to the printer, and to a properly grounded electrical outlet.<br />
• The printer is turned on.<br />
• The electrical outlet is not turned off at any switch or breaker.<br />
• Other electrical equipment plugged into the outlet is working.<br />
If you have checked all of the above and still have a problem, turn off the printer, wait for 10 seconds,<br />
and then turn on the printer. This often fixes the problem.<br />
Troubleshooting 192
Display Problems<br />
Problem<br />
After the printer is turned on, the<br />
display on the LCD panel is<br />
blank, keeps showing the <strong>Fuji</strong><br />
<strong>Xerox</strong> logo, or the back light is not<br />
lit.<br />
Menu settings changed from the<br />
operator panel have no effect.<br />
Action<br />
Turn off the printer, wait for 10 seconds, and turn on the printer. Self<br />
Test Message appears on the LCD panel. When the test is<br />
completed, the Select Function screen is displayed.<br />
Settings in the software program, the print driver, or the printer utilities<br />
have precedence over the settings made on the operator panel.<br />
Change the menu settings from the print driver, the printer utilities, or<br />
the software program instead of the operator panel.<br />
193 Troubleshooting
Printing Problems<br />
Problem<br />
Job did not print or incorrect<br />
characters printed.<br />
Print media misfeeds or multiple<br />
feeds occur.<br />
Action<br />
Ensure that the Select Function screen appears on the LCD<br />
panel before you send a job to print.<br />
Ensure that print media is loaded in the printer.<br />
Verify that you are using the correct print driver.<br />
Ensure that you are using the correct USB cable and that it is<br />
securely connected to the printer.<br />
Verify that the correct print media size is selected.<br />
If you are using a print spooler, verify that the spooler has not stalled.<br />
Ensure that the print media you are using meets the specifications for<br />
your printer.<br />
See also:<br />
• "Usable Print Media" on page 69<br />
Fan the print media before loading it.<br />
Ensure that the print media is loaded correctly.<br />
Ensure that the paper width guides and length guide are adjusted<br />
correctly.<br />
Ensure that the PSI is securely inserted.<br />
Do not overfill the print media sources.<br />
Do not force print media into the PSI or the MPF when you load it.<br />
Otherwise, it may skew or buckle.<br />
Ensure that the print media is not curled.<br />
Load the recommended print side correctly for the type of print media<br />
you are using.<br />
The envelope is creased after<br />
printing.<br />
See also:<br />
• "Loading Print Media" on page 71<br />
Turn the print media over or around and try printing again to see if<br />
feeding improves.<br />
Do not mix print media types.<br />
Do not mix reams of print media.<br />
Remove the top and bottom curled sheets of a ream before loading<br />
the print media.<br />
Load a print media source only when it is empty.<br />
Ensure that the envelope is loaded as instructed in "Loading<br />
Envelope in the Multipurpose Feeder (MPF)" on page 78 or "Loading<br />
Envelope in the Priority Sheet Inserter (PSI)" on page 82.<br />
Page breaks in unexpected<br />
places.<br />
Print media does not stack neatly<br />
in the center output tray.<br />
Printer does not duplex pages.<br />
Increase the value for Job Time-Out in the System Settings menu,<br />
that is on the Printer Maintenance tab in the Printer Setting Utility.<br />
Turn the print media stack over in the PSI and MPF.<br />
Select Flip on Short Edge or Flip on Long Edge from the Duplex<br />
menu on the Paper/Output tab in the print driver.<br />
Troubleshooting 194
Print Quality Problems<br />
This section includes:<br />
• "The Output Is Too Light" on page 196<br />
• "Toner Smears or Print Comes Off/Stain on Back Side" on page 197<br />
• "Random Spots/Blurred Images" on page 198<br />
• "The Entire Output Is Blank" on page 199<br />
• "Streaks Appear on the Output" on page 200<br />
• "Pitched Color Dots" on page 201<br />
• "Vertical Blanks" on page 202<br />
• "Mottle" on page 203<br />
• "Ghosting" on page 204<br />
• "Fog" on page 205<br />
• "Bead-Carry-Out (BCO)" on page 206<br />
• "Auger Mark" on page 207<br />
• "Wrinkled/Stained Paper" on page 208<br />
• "The Top Margin Is Incorrect" on page 209<br />
• "Color Registration Is out of Alignment" on page 210<br />
• "Protrudent/Bumpy Paper" on page 211<br />
NOTE:<br />
• In this section, some procedures use the Printer Setting Utility or SimpleMonitor. Some procedures that use<br />
the Printer Setting Utility can also be performed using the operator panel.<br />
See also:<br />
• "Understanding the Printer Menus" on page 150<br />
• "Printer Setting Utility (Windows Only)" on page 49<br />
• "SimpleMonitor (Windows Only)" on page 50<br />
195 Troubleshooting
• The Output Is Too Light<br />
Problem<br />
The output is too light.<br />
Action<br />
The toner cartridges may be low or need to be replaced. Confirm the<br />
amount of toner in each toner cartridge.<br />
1 Check the toner level in the Status tab in the Printer Status<br />
window.<br />
2 Replace the toner cartridges as necessary.<br />
Verify that the print media is dry and the correct print media is used.<br />
If not, use the print media recommended for the printer.<br />
See also:<br />
• "Usable Print Media" on page 69<br />
Try changing the Paper Type setting in the print driver.<br />
1 On the Paper/Output tab in Printing Preferences of the print<br />
driver, change the Paper Type setting.<br />
Disable Toner Saving Mode in the print driver.<br />
1 On the Graphics tab in Printing Preferences of the print driver,<br />
ensure that the Toner Saving Mode check box is not selected.<br />
NOTE:<br />
• If the problem continues even though you have taken suggested actions described above, contact the <strong>Fuji</strong><br />
<strong>Xerox</strong> local representative office or an authorised dealer.<br />
Troubleshooting 196
• Toner Smears or Print Comes Off/Stain on Back Side<br />
Problem<br />
Toner smears or print comes off.<br />
The output has stain on the back<br />
side.<br />
Action<br />
The print media surface may be uneven. Try changing the Paper<br />
Type setting in the print driver. For example, change Plain to<br />
Lightweight Cardstock.<br />
1 On the Paper/Output tab in Printing Preferences of the print<br />
driver, change the Paper Type setting.<br />
NOTE:<br />
Verify that the correct print media is being used.<br />
If not, use the print media recommended for the printer.<br />
See also:<br />
• "Usable Print Media" on page 69<br />
Adjust the temperature of the fusing unit.<br />
1 Launch the Printer Setting Utility, and click Adjust Fuser on the<br />
Printer Maintenance tab.<br />
2 Adjust the fixing temperature by turning up the value for your<br />
printing media.<br />
3 Click the Apply New Settings button.<br />
• If the problem continues even though you have taken suggested actions described above, contact the <strong>Fuji</strong><br />
<strong>Xerox</strong> local representative office or an authorised dealer.<br />
197 Troubleshooting
• Random Spots/Blurred Images<br />
Problem<br />
The printed result has random<br />
spots or is blurred.<br />
Action<br />
Ensure that the toner cartridges are installed correctly.<br />
See also:<br />
• "Installing a Toner Cartridge" on page 244<br />
If you use non-genuine brand toner cartridges, install genuine brand<br />
toner cartridges.<br />
Clean up the fusing unit.<br />
1 Load one sheet of paper on the MPF, and then print a solid image<br />
all over paper.<br />
2 Load the printed sheet with the side to be printed on facing down,<br />
and then print a blank sheet of paper.<br />
NOTE:<br />
• If the problem continues even though you have taken suggested actions described above, contact the <strong>Fuji</strong><br />
<strong>Xerox</strong> local representative office or an authorised dealer.<br />
Troubleshooting 198
• The Entire Output Is Blank<br />
If this trouble happens, contact the <strong>Fuji</strong> <strong>Xerox</strong> local representative office or an authorised dealer.<br />
199 Troubleshooting
• Streaks Appear on the Output<br />
If this trouble happens, contact the <strong>Fuji</strong> <strong>Xerox</strong> local representative office or an authorised dealer.<br />
Troubleshooting 200
• Pitched Color Dots<br />
If this trouble happens, contact the <strong>Fuji</strong> <strong>Xerox</strong> local representative office or an authorised dealer.<br />
201 Troubleshooting
• Vertical Blanks<br />
Problem<br />
The printed result has vertical<br />
blanks.<br />
Action<br />
Clean inside the printer and perform test print.<br />
1 Clean inside the printer by using the cleaning rod.<br />
2 Click Print Test Page in the Properties window of the print driver.<br />
NOTE:<br />
See also:<br />
• "Cleaning Inside the Printer" on page 237<br />
• If the problem continues even though you have taken suggested actions described above, contact the <strong>Fuji</strong><br />
<strong>Xerox</strong> local representative office or an authorised dealer.<br />
Troubleshooting 202
• Mottle<br />
Problem<br />
The printed result has mottled<br />
appearance.<br />
Action<br />
Adjust the transfer bias.<br />
1 Launch the Printer Setting Utility, click Adjust BTR on the Printer<br />
Maintenance tab.<br />
2 Adjust the setting for the type of print media being used.<br />
3 Click the Apply New Settings button.<br />
If you use non-recommended print media, use the print media<br />
recommended for the printer.<br />
NOTE:<br />
• If the problem continues even though you have taken suggested actions described above, contact the <strong>Fuji</strong><br />
<strong>Xerox</strong> local representative office or an authorised dealer.<br />
203 Troubleshooting
• Ghosting<br />
Problem<br />
The printed result has ghosting.<br />
Action<br />
Adjust the transfer bias.<br />
1 Launch the Printer Setting Utility, and click Chart Print on the<br />
Diagnosis tab.<br />
2 Click the Ghost Configuration Chart button.<br />
The Ghost Configuration Chart is printed.<br />
3 Click BTR Refresh Mode on the Printer Maintenance tab.<br />
4 Select the check box next to On, and then click the Apply New<br />
Settings button.<br />
5 Click Chart Print on the Diagnosis tab.<br />
6 Click the Ghost Configuration Chart button.<br />
The Ghost Configuration Chart is printed.<br />
The print media surface may be uneven. Try changing the Paper<br />
Type setting in the print driver. For example, change Plain to<br />
Lightweight Cardstock.<br />
1 On the Paper/Output tab in Printing Preferences of the print<br />
driver, change the Paper Type setting.<br />
NOTE:<br />
Adjust the temperature of the fusing unit.<br />
1 Launch the Printer Setting Utility, and click Adjust Fuser on the<br />
Printer Maintenance tab.<br />
2 Adjust the fixing temperature by turning up the value for your<br />
printing media.<br />
3 Click the Apply New Settings button.<br />
If you use non-recommended print media, use the print media<br />
recommended for the printer.<br />
• If the problem continues even though you have taken suggested actions described above, contact the <strong>Fuji</strong><br />
<strong>Xerox</strong> local representative office or an authorised dealer.<br />
Troubleshooting 204
• Fog<br />
Problem<br />
The printed result is foggy.<br />
Action<br />
When the whole is printed light, contact the <strong>Fuji</strong> <strong>Xerox</strong> local<br />
representative office or an authorised dealer.<br />
When the printed page is partly light, start Clean Developer.<br />
1 Launch the Printer Setting Utility, and click Clean Developer on<br />
the Diagnosis tab.<br />
2 Click the Start button.<br />
NOTE:<br />
• If the problem continues even though you have taken suggested actions described above, contact the <strong>Fuji</strong><br />
<strong>Xerox</strong> local representative office or an authorised dealer.<br />
205 Troubleshooting
• Bead-Carry-Out (BCO)<br />
Problem<br />
Bead-Carry-Out (BCO) is<br />
happening.<br />
Action<br />
If the printer is installed in a high altitude location, set the altitude of<br />
the location.<br />
1 Launch the Printer Setting Utility, and click Adjust Altitude on the<br />
Printer Maintenance tab.<br />
2 Select the value close to the altitude of the location where the<br />
printer is installed.<br />
3 Click the Apply New Settings button.<br />
NOTE:<br />
• If the problem continues even though you have taken suggested actions described above, contact the <strong>Fuji</strong><br />
<strong>Xerox</strong> local representative office or an authorised dealer.<br />
Troubleshooting 206
• Auger Mark<br />
Problem<br />
The printed result has auger<br />
mark.<br />
Action<br />
The toner cartridges may be low or need to be replaced. Confirm the<br />
amount of toner in each toner cartridge.<br />
1 Check the toner level in the Status tab in the Printer Status<br />
window.<br />
2 Replace the toner cartridges as necessary.<br />
Start Clean Developer.<br />
1 Launch the Printer Setting Utility, and click Clean Developer on<br />
the Diagnosis tab.<br />
2 Click the Start button.<br />
NOTE:<br />
• If the problem continues even though you have taken suggested actions described above, contact the <strong>Fuji</strong><br />
<strong>Xerox</strong> local representative office or an authorised dealer.<br />
207 Troubleshooting
• Wrinkled/Stained Paper<br />
Problem<br />
The output is wrinkled.<br />
The output is stained.<br />
Action<br />
Verify that the correct print media is being used.<br />
If not, use the print media recommended for the printer.<br />
See also:<br />
• "Usable Print Media" on page 69<br />
• "About Print Media" on page 64<br />
If you use the envelope, check whether the crease is within 30 mm of<br />
the four edges of the envelope.<br />
If the crease is within 30 mm of the four edges of the envelope, this is<br />
considered normal. Your printer is not at fault.<br />
If not, take the following actions:<br />
• If the envelope is Envelope #10, which is 220 mm or longer and<br />
has a flap on the long edge, use a different size envelope.<br />
• If the envelope is C5, which is 220 mm or longer and has a flap on<br />
the short edge, load it in the MPF with the flap open and facing up.<br />
• If the envelope is Monarch or DL, which is shorter than 220 mm,<br />
load it long edge feed in the MPF with the flap open and facing up.<br />
If the problem continues, use a different size envelope.<br />
NOTE:<br />
• If the problem continues even though you have taken suggested actions described above, contact the <strong>Fuji</strong><br />
<strong>Xerox</strong> local representative office or an authorised dealer.<br />
Troubleshooting 208
• The Top Margin Is Incorrect<br />
Problem<br />
The top margin is incorrect.<br />
Action<br />
Ensure that the margins are set correctly on the application being<br />
used.<br />
NOTE:<br />
• If the problem continues even though you have taken suggested actions described above, contact the <strong>Fuji</strong><br />
<strong>Xerox</strong> local representative office or an authorised dealer.<br />
209 Troubleshooting
• Color Registration Is out of Alignment<br />
Problem<br />
Color registration is out of<br />
alignment.<br />
Action<br />
Execute auto color registration adjustment.<br />
1 Launch the Printer Setting Utility, and click Registration<br />
Adjustment on the Printer Maintenance tab.<br />
2 Deselect the check box next to On.<br />
3 Click the Start button next to Auto Correct.<br />
Clean the CTD sensor.<br />
1 Clean the CTD sensor.<br />
2 Launch the Printer Setting Utility, and click Registration<br />
Adjustment on the Printer Maintenance tab.<br />
3 Deselect the check box next to On.<br />
4 Click the Start button next to Auto Correct.<br />
See also:<br />
• "Cleaning the Color Toner Density (CTD) Sensor" on page 240<br />
Print the color registration chart and manually correct the color<br />
registration.<br />
1 Launch the Printer Setting Utility, and click Registration<br />
Adjustment on the Printer Maintenance tab.<br />
2 Deselect the check box next to On.<br />
3 Click the Start button next to Print Color Regi Chart.<br />
The color registration chart is printed.<br />
4 Check the values with the straight lines on the chart.<br />
5 Select the value for each color on the Printer Setting Utility.<br />
6 Click the Apply New Settings button.<br />
7 Click the Start button next to Print Color Regi Chart to print the<br />
color registration chart again.<br />
8 Adjust till all straight lines are at the value of 0.<br />
See also:<br />
• "Adjusting Color Registration" on page 213<br />
NOTE:<br />
• If the problem continues even though you have taken suggested actions described above, contact the <strong>Fuji</strong><br />
<strong>Xerox</strong> local representative office or an authorised dealer.<br />
Troubleshooting 210
• Protrudent/Bumpy Paper<br />
Problem<br />
Printed surface got<br />
protrudent/bumpy.<br />
Action<br />
Clean up the fusing unit.<br />
1 Load one sheet of paper on the MPF, and then print a solid image<br />
all over paper.<br />
2 Load the printed sheet with the side to be printed on facing down,<br />
and then print a blank sheet of paper.<br />
NOTE:<br />
• If the problem continues even though you have taken suggested actions described above, contact the <strong>Fuji</strong><br />
<strong>Xerox</strong> local representative office or an authorised dealer.<br />
211 Troubleshooting
Copy Quality Problems<br />
Problem<br />
There are spots in copies taken<br />
from the document glass.<br />
The reverse side of the original is<br />
showing on the copy.<br />
Light colors are washed out or<br />
white on the copy.<br />
Image is too light or dark.<br />
Action<br />
There is debris on the document glass. When scanning, the debris<br />
creates a spot on the image.<br />
Clean the document glass with a lint free cloth.<br />
See also:<br />
• "Cleaning the Scanner" on page 235<br />
On the Copy menu, enable Auto Exposure.<br />
For information on turning Auto Exposure on and off, see "Auto<br />
Exposure" on page 126.<br />
On the Copy menu, disable Auto Exposure.<br />
For information on turning Auto Exposure on and off, see "Auto<br />
Exposure" on page 126.<br />
Use the Lighten/Darken option on the Copy menu.<br />
For information on making the image lighter or darker, see<br />
"Lighten/Darken" on page 124.<br />
NOTE:<br />
• If the problem continues even though you have taken suggested actions described above, contact the <strong>Fuji</strong><br />
<strong>Xerox</strong> local representative office or an authorised dealer.<br />
Troubleshooting 212
Adjusting Color Registration<br />
This section describes how to adjust the color registration when you first install the printer or after<br />
moving it to a new location.<br />
This section includes:<br />
• "Performing Auto Correct" on page 214<br />
• "Printing the Color Registration Chart" on page 215<br />
• "Determining Values" on page 216<br />
• "Entering Values" on page 217<br />
213 Troubleshooting
• Performing Auto Correct<br />
Auto Correct allows you to correct the color registration automatically.<br />
The Operator Panel<br />
1 Press the (System) button.<br />
2 Select Admin Menu, and then press the button.<br />
3 Select Maintenance, and then press the button.<br />
4 Select Adjust ColorRegi, and then press the button.<br />
5 Select Auto Adjust, and then press the button.<br />
6 Select Yes, and then press the button.<br />
Auto Correct is performed.<br />
The Printer Setting Utility<br />
The following procedure uses Windows XP as an example.<br />
1 Click start All Programs <strong>Fuji</strong> <strong>Xerox</strong> <strong>Fuji</strong> <strong>Xerox</strong> Printer Software for Asia-Pacific <br />
DocuPrint CM205 b Printer Setting Utility.<br />
NOTE:<br />
• The window to select a printer appears in this step, when multiple print drivers are installed on your<br />
computer. In this case, click the name of the desired printer listed in Printer Name.<br />
The Printer Setting Utility opens.<br />
2 Click the Printer Maintenance tab.<br />
3 Select Registration Adjustment from the list at the left side of the page.<br />
The Registration Adjustment page is displayed.<br />
4 Deselect the check box next to On.<br />
5 Click the Start button next to Auto Correct.<br />
The color registration is corrected automatically.<br />
Troubleshooting 214
• Printing the Color Registration Chart<br />
The Printer Setting Utility<br />
The following procedure uses Windows XP as an example.<br />
1 Click start All Programs <strong>Fuji</strong> <strong>Xerox</strong> <strong>Fuji</strong> <strong>Xerox</strong> Printer Software for Asia-Pacific <br />
DocuPrint CM205 b Printer Setting Utility.<br />
NOTE:<br />
• The window to select a printer appears in this step, when multiple print drivers are installed on your<br />
computer. In this case, click the name of the desired printer listed in Printer Name.<br />
The Printer Setting Utility opens.<br />
2 Click the Printer Maintenance tab.<br />
3 Select Registration Adjustment from the list at the left side of the page.<br />
The Registration Adjustment page is displayed.<br />
4 Deselect the check box next to On.<br />
5 Click the Start button next to Print Color Regi Chart.<br />
The color registration chart is printed.<br />
215 Troubleshooting
• Determining Values<br />
On the color registration chart printed, find the straightest lines where the two black lines and the<br />
colored line are most closely aligned for each color (Y, M, and C).<br />
If you find the straightest line, make a note of the value (-5 – +5) indicated by the straightest line for<br />
each color.<br />
When the value is 0 for each color, you do not need to adjust the color registration.<br />
When the value is not 0, enter the value according to the procedure in "Entering Values" on page 217.<br />
Troubleshooting 216
• Entering Values<br />
The Printer Setting Utility<br />
Using the Printer Setting Utility, enter the values that you found in the color registration chart to make<br />
adjustments.<br />
The following procedure uses Windows XP as an example.<br />
1 Click start All Programs <strong>Fuji</strong> <strong>Xerox</strong> <strong>Fuji</strong> <strong>Xerox</strong> Printer Software for Asia-Pacific <br />
DocuPrint CM205 b Printer Setting Utility.<br />
NOTE:<br />
• The window to select a printer appears in this step, when multiple print drivers are installed on your<br />
computer. In this case, click the name of the desired printer listed in Printer Name.<br />
The Printer Setting Utility opens.<br />
2 Click the Printer Maintenance tab.<br />
3 Select Registration Adjustment from the list at the left side of the page.<br />
The Registration Adjustment page is displayed.<br />
4 Deselect the check box next to On.<br />
5 Select the value you checked in the color registration chart, and then click the Apply New<br />
Settings button.<br />
6 Click the Start button next to Print Color Regi Chart.<br />
The color registration chart is printed with the new values.<br />
7 Adjust until all straight lines are at the value of 0. Show image of before and after adjustment will<br />
help.<br />
IMPORTANT:<br />
• After printing the color registration chart, do not turn off the printer until the printer motor has stopped running.<br />
• If 0 is not next to the straightest lines, determine the values and adjust the printer again.<br />
217 Troubleshooting
Scanning Problems<br />
Problem<br />
The scanner does not work.<br />
The printer scans very slowly.<br />
A smear appears at the same<br />
location on the output when<br />
scanned using the document<br />
glass.<br />
Images are skewed.<br />
Cannot scan using WIA on a<br />
Windows Server ® 2003<br />
computer.<br />
Cannot scan using TWAIN or<br />
WIA on a Windows Server 2008<br />
or Windows Server 2008 R2<br />
computer.<br />
Action<br />
Ensure that you place the document to be scanned face down on the<br />
document glass.<br />
There may not be enough available memory to hold the document<br />
you want to scan. Try the Preview function to see if that works. Try<br />
lowering the scan resolution rate.<br />
Check that the USB cable is connected properly.<br />
Ensure that the USB cable is not defective. Switch the cable with a<br />
known good cable. If necessary, replace the cable.<br />
Check that the scanner is configured correctly. Check the application<br />
you want to use to make certain that the scanner job is being sent to<br />
the correct port.<br />
Communication speed becomes slow in scan mode because of the<br />
large amount of memory required to analyze and reproduce the<br />
scanned image.<br />
Scanning images at a high resolution takes more time than scanning<br />
at a low resolution.<br />
Clean the document glass.<br />
See also:<br />
• "Cleaning the Scanner" on page 235<br />
Ensure that the document is placed straight on the document glass.<br />
Enable WIA on the computer.<br />
To enable WIA:<br />
1 Click Start, point to Administrative Tools, and then click<br />
Services.<br />
2 Right-click Windows Image Acquisition (WIA), and then click<br />
Properties to ensure that Startup type is set to Manual or<br />
Automatic.<br />
3 Click OK.<br />
4 Right-click Windows Image Acquisition (WIA), and then click<br />
Start.<br />
Install the Desktop Experience feature on the computer.<br />
To install Desktop Experience:<br />
1 Click Start, point to Administrative Tools, and then click Server<br />
Manager.<br />
2 Under Features Summary, click Add Features.<br />
3 Select the Desktop Experience check box.<br />
4 If a window appears, follow the on-screen instructions.<br />
5 Click Next, and then click Install.<br />
6 Restart the computer.<br />
Troubleshooting 218
Scan Driver/Printer Utility Problems<br />
Problem<br />
The TWAIN driver cannot<br />
connect to the printer.<br />
The scan driver has not been<br />
registered on your computer and<br />
cannot be accessed from the<br />
Express Scan Manager.<br />
Failed to scan your document on<br />
the printer via the Express Scan<br />
Manager.<br />
Failed to create an image file via<br />
the Express Scan Manager.<br />
Failed to initialize the Express<br />
Scan Manager.<br />
Failed to execute the Express<br />
Scan Manager.<br />
An unexpected error occurred on<br />
the Express Scan Manager.<br />
Action<br />
Ensure that your computer and the printer is properly connected with<br />
the USB cable.<br />
Check whether the printer is turned on. If the printer is turned on,<br />
reboot it by turning the power switch off and then on again.<br />
If a scan application is running, close the application once, restart the<br />
application, and then try scanning again.<br />
Install the scan driver. If the driver is installed, uninstall it and then<br />
reinstall it.<br />
Ensure that your computer and the printer is properly connected with<br />
the USB cable.<br />
Check whether the printer is turned on. If the printer is turned on,<br />
reboot it by turning the power switch off and then on again.<br />
If a scan application is running, close the application once, restart the<br />
application, and then try scanning again.<br />
Ensure that there is sufficient space in your hard disk.<br />
Uninstall the Express Scan Manager on your computer and then<br />
reinstall it.<br />
Uninstall the Express Scan Manager on your computer and then<br />
reinstall it.<br />
Uninstall the Express Scan Manager on your computer and then<br />
reinstall it.<br />
Uninstall the Express Scan Manager on your computer and then<br />
reinstall it.<br />
219 Troubleshooting
Other Problems<br />
Problem<br />
Condensation has occurred<br />
inside the printer.<br />
No file is displayed on the LCD<br />
panel when you are selecting a<br />
file for Print From USB Memory<br />
feature.<br />
Action<br />
This usually occurs within several hours after you heat the room in<br />
winter. This also occurs when the printer is operating in a location<br />
where relative humidity reaches 85% or more. Adjust the humidity or<br />
relocate the printer to an appropriate environment.<br />
Confirm that there are files with the supported file formats (PDF, TIFF,<br />
or JPEG) in the USB storage device.<br />
If the target file is in a deep hierarchy in the USB storage device,<br />
move the file to the root directory in the USB storage device with your<br />
computer.<br />
Shorten the target file name in the USB storage device with your<br />
computer, and try printing again.<br />
Troubleshooting 220
Understanding Printer Messages<br />
The printer LCD panel displays messages describing the current state of the printer and indicates<br />
possible printer problems you must resolve. This section describes messages, their meanings, and<br />
how to clear the messages.<br />
IMPORTANT:<br />
• When an error code is displayed, the print data remaining on the printer and the information accumulated in<br />
the memory of the printer are not secured.<br />
Error-Code What You Can Do<br />
009-950 Replace the specified toner cartridge.<br />
009-951<br />
See also:<br />
009-952<br />
009-953<br />
• "Replacing Toner Cartridges" on page 241<br />
010-397 Turn off the printer, and then on. If this does not solve the problem, contact the <strong>Fuji</strong><br />
016-315<br />
016-317<br />
<strong>Xerox</strong> local representative office or an authorised dealer.<br />
See also:<br />
016-501<br />
016-502<br />
• "Online Services" on page 261<br />
016-718 Press the button to clear the message. Retry when the printer does not process any<br />
job.<br />
016-719 Press the button to cancel the current job. Retry when the printer does not process<br />
016-720<br />
any job.<br />
016-744 Press the button. Contact the <strong>Fuji</strong> <strong>Xerox</strong> local representative office or an authorised<br />
016-745 dealer if this message appears repeatedly.<br />
See also:<br />
• "Online Services" on page 261<br />
016-749 Press the button to cancel the current job. Retry when the printer does not process<br />
any job.<br />
016-791 Insert the USB memory device and press the button to clear the message.<br />
016-795 Press the button. Check if the file format of the data is the supported one.<br />
016-797 Press the button to clear the message. Check if the selected file is valid.<br />
016-930 Remove the device from the USB port and press the button to clear the message.<br />
016-931<br />
016-981 Press the button to cancel the current job. Try copying fewer documents.<br />
017-970 Press the button. Delete the data stored in the memory. Retry scanning by lowering<br />
the resolution setting or reducing the number of pages.<br />
017-988 Press the button to clear the message. Check if the interface cable is securely<br />
connected or your computer does not have any problem.<br />
024-340<br />
024-360<br />
024-371<br />
Turn off the printer, and then on. If this does not solve the problem, contact the <strong>Fuji</strong><br />
<strong>Xerox</strong> local representative office or an authorised dealer.<br />
See also:<br />
• "Online Services" on page 261<br />
221 Troubleshooting
Error-Code<br />
024-958 Load the specified paper and press the button to clear the message.<br />
See also:<br />
• "Loading Print Media in the Multipurpose Feeder (MPF)" on page 74<br />
• "Loading Print Media in the Priority Sheet Inserter (PSI)" on page 81<br />
024-963 Press the button to clear the message and load the specified paper. Follow the onscreen<br />
instruction if one appears.<br />
See also:<br />
• "Loading Print Media in the Multipurpose Feeder (MPF)" on page 74<br />
• "Loading Print Media in the Priority Sheet Inserter (PSI)" on page 81<br />
026-720 Press the button to clear the message. Check if the USB memory device has<br />
enough memory.<br />
026-721 Press the button to clear the message. Check if the USB memory device can store<br />
026-722<br />
data.<br />
026-723 Press the button to clear the message. Check if the path and file name to save the<br />
data is too long.<br />
026-750 Press the button to clear the message. Check if the interface cable is securely<br />
connected, or restart the application you use.<br />
026-751 Press the button to clear the message. Check if the interface cable is securely<br />
026-752<br />
connected.<br />
041-340 Turn off the printer, and then on. If this does not solve the problem, contact the <strong>Fuji</strong><br />
042-358<br />
042-372<br />
<strong>Xerox</strong> local representative office or an authorised dealer.<br />
See also:<br />
061-370<br />
062-321<br />
062-360<br />
• "Online Services" on page 261<br />
062-790 Press the button to clear the message.<br />
075-100 Check and clear the paper path, load the paper, and then press the button.<br />
See also:<br />
• "Clearing Paper Jams From the Front of the Printer" on page 185<br />
075-921 Load paper for the second side (odd) pages, and press the button.<br />
See also:<br />
• "Manual Duplex Printing (Windows Print Driver Only)" on page 86<br />
077-100 Check and clear the paper path.<br />
077-104<br />
See also:<br />
077-106<br />
077-108<br />
077-109<br />
• "Clearing Paper Jams From the Back of the Printer" on page 186<br />
077-304 Close the rear cover.<br />
077-900 Check and clear the paper path.<br />
077-901<br />
What You Can Do<br />
See also:<br />
• "Clearing Paper Jams From the Back of the Printer" on page 186<br />
Troubleshooting 222
Error-Code<br />
092-310 Clean the CTD sensor.<br />
See also:<br />
• "Cleaning the Color Toner Density (CTD) Sensor" on page 240<br />
092-651 Turn off the printer, and then on. If this does not solve the problem, contact the <strong>Fuji</strong><br />
092-661<br />
<strong>Xerox</strong> local representative office or an authorised dealer.<br />
See also:<br />
• "Online Services" on page 261<br />
092-910 Clean the CTD sensor.<br />
See also:<br />
• "Cleaning the Color Toner Density (CTD) Sensor" on page 240<br />
093-423 Replace the specified toner cartridge soon.<br />
093-424<br />
See also:<br />
093-425<br />
093-426<br />
• "Replacing Toner Cartridges" on page 241<br />
093-919 Re-install or replace the specified toner cartridge.<br />
093-920<br />
See also:<br />
093-921<br />
093-922<br />
• "Replacing Toner Cartridges" on page 241<br />
093-930 Remove the specified toner cartridge and install a new one. If you do not replace the<br />
093-931<br />
093-932<br />
toner cartridge, print quality problems may occur.<br />
See also:<br />
093-933 • "Replacing Toner Cartridges" on page 241<br />
093-926 Replace the specified toner cartridge with the supported one.<br />
093-960<br />
See also:<br />
093-961<br />
093-962<br />
• "Replacing Toner Cartridges" on page 241<br />
093-970 Re-install the specified toner cartridge.<br />
093-971<br />
093-972<br />
093-973<br />
What You Can Do<br />
See also:<br />
• "Installing a Toner Cartridge" on page 244<br />
223 Troubleshooting
Error-Code<br />
What You Can Do<br />
116-210 Turn off the printer, and then on. If this does not solve the problem, contact the <strong>Fuji</strong><br />
116-325<br />
116-326<br />
<strong>Xerox</strong> local representative office or an authorised dealer.<br />
See also:<br />
116-395<br />
117-331<br />
117-332<br />
117-333<br />
117-334<br />
117-340<br />
117-342<br />
117-343<br />
117-344<br />
117-349<br />
117-350<br />
117-351<br />
117-366<br />
124-333<br />
191-310<br />
• "Online Services" on page 261<br />
193-700 This message indicates the printer is in the Non-Genuine Mode.<br />
Troubleshooting 224
Contacting Service<br />
When you call for printer service, be prepared to describe the problem you are experiencing or the<br />
error message on the LCD panel.<br />
You need to know the model of your printer and serial number. See the label on the rear cover of your<br />
printer.<br />
225 Troubleshooting
Getting Help<br />
This section includes:<br />
• "LCD Panel Messages" on page 227<br />
• "SimpleMonitor Alerts" on page 228<br />
• "Obtaining the Product Information" on page 229<br />
<strong>Fuji</strong> <strong>Xerox</strong> provides several automatic diagnostic tools to help you produce and maintain print quality.<br />
Troubleshooting 226
• LCD Panel Messages<br />
The LCD panel provides you with information and troubleshooting help. When an error or warning<br />
condition occurs, the LCD panel displays a message informing you of the problem.<br />
See also:<br />
• "Understanding Printer Messages" on page 221<br />
227 Troubleshooting
• SimpleMonitor Alerts<br />
The SimpleMonitor is a tool that is included on the Software Pack CD-ROM. It automatically checks<br />
the printer status when you send a print job. If the printer is unable to print your job, the SimpleMonitor<br />
automatically displays an alert on your computer screen to let you know that the printer needs<br />
attention.<br />
Troubleshooting 228
• Obtaining the Product Information<br />
Obtaining the Latest Print Driver<br />
The latest print driver can be obtained by downloading it from our web site.<br />
NOTE:<br />
• The communication fee shall be borne by users.<br />
1 In your print driver's Properties dialog box, click the Configuration tab and then click About.<br />
2 Click <strong>Fuji</strong> <strong>Xerox</strong> Printer Homepage.<br />
Your web browser launches and our web site is displayed.<br />
3 Follow the instructions on the web site and download an appropriate print driver.<br />
NOTE:<br />
• The URL of the driver download service page is as follows: http://www.fujixeroxprinters.com/<br />
• For the latest information about the print driver features, refer to the online Help provided for the print driver.<br />
Updating the Printer's Firmware<br />
Our web site also provides a tool that allows you to update the printer's firmware (software embedded<br />
within the printer) from your computer.<br />
The latest firmware and updating tool can be downloaded from the following URL.<br />
Follow the instructions on the web site and download the correct firmware update.<br />
http://www.fujixeroxprinters.com/<br />
NOTE:<br />
• The communication fee shall be borne by users.<br />
229 Troubleshooting
Non-Genuine Mode<br />
When toner within a toner cartridge is empty, the XXXX Cartridge is Close to Life or<br />
Replace XXXX Cartridge (XXXX: Yellow, Magenta, Cyan, or Black) message appears.<br />
When you want to use the printer in the Non-Genuine Mode, enable the Non-Genuine Mode and<br />
replace the toner cartridge.<br />
IMPORTANT:<br />
• If you use the printer in the Non-Genuine Mode, the performance of the printer may not be at its optimum. And<br />
any problems that may arise from the use of the Non-Genuine Mode are not covered by our quality guarantee.<br />
The continuous use of the Non-Genuine Mode can also cause the printer to break down, and any repair<br />
charges for such break down will be incurred by users.<br />
NOTE:<br />
• To disable the Non-Genuine Mode, select Off for Non-Genuine Mode on the operator panel or deselect the<br />
check box next to On on the Non-Genuine Mode page on the Printer Maintenance tab in the Printer Setting<br />
Utility.<br />
This section includes:<br />
• "The Operator Panel" on page 231<br />
• "The Printer Setting Utility" on page 232<br />
Troubleshooting 230
• The Operator Panel<br />
NOTE:<br />
• Before starting the operation described below, confirm that the Select Function screen is displayed on the<br />
LCD panel.<br />
1 Press the (System) button.<br />
2 Select Admin Menu and then press the button.<br />
3 Select Maintenance and then press the button.<br />
4 Select Non-Genuine Mode and then press the button.<br />
5 Select On and then press the button.<br />
6 Press the button until the top page is displayed.<br />
The printer switches to the Non-Genuine Mode.<br />
231 Troubleshooting
• The Printer Setting Utility<br />
The following procedure uses Windows XP as an example.<br />
1 Click start All Programs <strong>Fuji</strong> <strong>Xerox</strong> <strong>Fuji</strong> <strong>Xerox</strong> Printer Software for Asia-Pacific <br />
DocuPrint CM205 b Printer Setting Utility.<br />
NOTE:<br />
• The window to select a printer appears in this step, when multiple print drivers are installed on your<br />
computer. In this case, click the name of the desired printer listed in Printer Name.<br />
The Printer Setting Utility opens.<br />
2 Click the Printer Maintenance tab.<br />
3 Select Non-Genuine Mode from the list at the left side of the page.<br />
The Non-Genuine Mode page is displayed.<br />
4 Select the check box next to On, and then click the Apply New Settings button.<br />
Troubleshooting 232
10<br />
Maintenance<br />
This chapter includes:<br />
• "Cleaning the Printer" on page 234<br />
• "Replacing Toner Cartridges" on page 241<br />
• "Ordering Supplies" on page 246<br />
• "Storing Consumables" on page 250<br />
• "Managing the Printer" on page 251<br />
• "Conserving Supplies" on page 253<br />
• "Checking Page Counts" on page 254<br />
• "Moving the Printer" on page 255<br />
233 Maintenance
Cleaning the Printer<br />
This section describes how to clean the printer in order to maintain it in good condition and print clean<br />
printouts all the time.<br />
WARNING:<br />
• When cleaning this product, use the designated cleaning materials exclusive to it. Other cleaning<br />
materials may result in poor performance of the product. Never use aerosol cleaners, or it may catch<br />
fire and cause explosion.<br />
CAUTION:<br />
• When cleaning this product, always switch off and unplug it. Access to a live machine interior may<br />
cause electric shock.<br />
This section includes:<br />
• "Cleaning the Scanner" on page 235<br />
• "Cleaning Inside the Printer" on page 237<br />
• "Cleaning the Color Toner Density (CTD) Sensor" on page 240<br />
Maintenance 234
• Cleaning the Scanner<br />
Keep the scanner clean to ensure the best possible copies. Clean the scanner at the start of each day<br />
and during the day, as needed.<br />
1 Slightly dampen a soft lint-free cloth or paper towel with water.<br />
2 Open the document cover.<br />
3 Wipe the surface of the document glass until it is clean and dry.<br />
1<br />
2<br />
1 White Document Cover<br />
2 Document Glass<br />
4 Wipe the underside of the white document cover until it is clean and dry.<br />
5 Close the document cover.<br />
235 Maintenance
Maintenance 236
• Cleaning Inside the Printer<br />
1 Turn off the printer.<br />
2 Open the toner access cover.<br />
3 Pinch the toner cartridge firmly as shown in the illustration.<br />
4 Pull the toner cartridge out.<br />
IMPORTANT:<br />
• Always pull the toner cartridge out slowly so you do not spill any toner.<br />
5 Pull the other three toner cartridges out as well.<br />
6 Pull the cleaning rod out.<br />
237 Maintenance
7 Insert the cleaning rod fully into the hole beside the arrow on the printer until its tip reaches the<br />
interior of the printer as illustrated below, and then pull it out.<br />
8 Repeat the same procedure for the other three holes.<br />
9 Return the cleaning rod to its original location.<br />
10 Replace the black toner cartridge by adjusting it to the associated cartridge holder, and then<br />
insert it firmly by pressing near the center of the label until the toner cartridge clicks.<br />
Maintenance 238
11 Replace the other three toner cartridges as well.<br />
12 Close the toner access cover.<br />
239 Maintenance
• Cleaning the Color Toner Density (CTD) Sensor<br />
Clean the CTD sensor only when an alert for the CTD sensor is shown on the Printer Status window<br />
or operator panel.<br />
1 Ensure that the printer is turned off.<br />
2 Push the rear cover handle and open the rear cover.<br />
3 Clean the CTD sensor inside the printer with a clean dry cotton swab.<br />
4 Close the rear cover.<br />
Maintenance 240
Replacing Toner Cartridges<br />
<strong>Fuji</strong> <strong>Xerox</strong> toner cartridges are available only through <strong>Fuji</strong> <strong>Xerox</strong>.<br />
It is recommended that you use <strong>Fuji</strong> <strong>Xerox</strong> toner cartridges for your printer. <strong>Fuji</strong> <strong>Xerox</strong> does not<br />
provide warranty coverage for problems caused by using accessories, parts, or components not<br />
supplied by <strong>Fuji</strong> <strong>Xerox</strong>.<br />
WARNING:<br />
• Use a broom or a wet cloth to wipe off spilled toner. Never use a vacuum cleaner for the spills.<br />
It may catch fire by electric sparks inside the vacuum cleaner and cause explosion. If you spill a large<br />
volume of toner, contact your local <strong>Fuji</strong> <strong>Xerox</strong> representative.<br />
• Never throw a toner cartridge into an open flame. Remaining toner in the cartridge may catch fire and<br />
cause burn injuries or explosion.<br />
If you have a used toner cartridge no longer needed, contact your local <strong>Fuji</strong> <strong>Xerox</strong> representative for<br />
its disposal.<br />
CAUTION:<br />
• Keep toner cartridges out of the reach of children. If a child accidentally swallows toner, spit it out,<br />
rinse mouth with water, drink water and consult a physician immediately.<br />
• When replacing toner cartridges, be careful not to spill the toner. In case of any toner spills, avoid<br />
contact with clothes, skin, eyes and mouth as well as inhalation.<br />
• If toner spills onto your skin or clothing, wash it off with soap and water.<br />
If you get toner particles in your eyes, wash it out with plenty of water for at least 15 minutes until<br />
irritation is gone. Consult a physician if necessary.<br />
If you inhale toner particles, move to a fresh air location and rinse your mouth with water.<br />
If you swallow toner, spit it out, rinse your mouth with water, drink plenty of water and consult a<br />
physician immediately.<br />
IMPORTANT:<br />
• Do not shake the used toner cartridge to avoid spilling of the toner.<br />
• Be sure to use the starter toner cartridge shipped with the printer until it gets empty, and then replace it with a<br />
purchased one.<br />
This section includes:<br />
• "Overview" on page 242<br />
• "Removing the Toner Cartridges" on page 243<br />
• "Installing a Toner Cartridge" on page 244<br />
241 Maintenance
• Overview<br />
The printer has toner cartridges of four colors: black (K), yellow (Y), magenta (M), and cyan (C).<br />
When a toner cartridge reaches its usable life-span, the following messages appear on the LCD panel.<br />
Message (Example)<br />
093-426 Printer<br />
Black Cartridge<br />
is Close to Life*<br />
Replace Cart.<br />
093-933 Printer<br />
Replace<br />
Black Cartridge<br />
Action<br />
The specified toner cartridge has become low. Prepare a new one.<br />
The error code differs depending on the color of the toner cartridge.<br />
• 093-426: Black<br />
• 093-425: Cyan<br />
• 093-424: Magenta<br />
• 093-423: Yellow<br />
The specified toner cartridge has become empty. Replace the old toner<br />
cartridge with a new one.<br />
The error code differs depending on the color of the toner cartridge.<br />
• 093-933: Black<br />
• 093-932: Cyan<br />
• 093-931: Magenta<br />
• 093-930: Yellow<br />
* This warning appears only when <strong>Fuji</strong> <strong>Xerox</strong> toner cartridges are used (Non-Genuine Mode is set to<br />
Off.)<br />
IMPORTANT:<br />
• When placing a used toner cartridge on the floor or on a table, place a few sheets of paper under the toner<br />
cartridge to catch any toner that may spill.<br />
• Do not reuse old toner cartridges once you remove them from the printer. Doing so can impair print quality.<br />
• Do not shake or pound the used toner cartridges. The remaining toner may spill.<br />
• We recommend you to use up the toner cartridges within one year after removing them from the packaging.<br />
Maintenance 242
• Removing the Toner Cartridges<br />
1 Turn off the printer.<br />
2 Open the toner access cover.<br />
3 Spread a few sheets of paper on the floor or table where the removed toner cartridge is placed.<br />
4 Pinch the toner cartridge firmly as shown in the illustration.<br />
5 Pull the toner cartridge out.<br />
IMPORTANT:<br />
• Always pull the toner cartridge out slowly so you do not spill any toner.<br />
6 Place the toner cartridge slowly on the sheets of paper spread in step 3.<br />
243 Maintenance
• Installing a Toner Cartridge<br />
1 Unpack a new toner cartridge of the desired color and shake it five to six times to distribute the<br />
toner evenly.<br />
NOTE:<br />
• Ensure that the color of the new toner cartridge matches that on the handle before replacing it.<br />
• Handle the toner cartridge carefully to avoid spilling of the toner.<br />
2 Remove the tape from the toner cartridge.<br />
3 Adjust the toner cartridge to the associated cartridge holder, and then insert it firmly by pressing<br />
near the center of the label until the toner cartridge clicks.<br />
4 Close the toner access cover.<br />
Maintenance 244
5 Pack the removed toner cartridge in the box in which the installed toner cartridge was packed up.<br />
6 Take care not to contact with the spilled toner and remove the sheets of paper spread under the<br />
removed toner cartridge.<br />
245 Maintenance
Ordering Supplies<br />
This section includes:<br />
• "Consumables" on page 247<br />
• "When to Order Toner Cartridges" on page 248<br />
• "Recycling Supplies" on page 249<br />
The toner cartridges need to be ordered occasionally. Each toner cartridge includes installation<br />
instructions on the box.<br />
Maintenance 246
• Consumables<br />
IMPORTANT:<br />
• Use of consumables not recommended by <strong>Fuji</strong> <strong>Xerox</strong> can impair machine quality and performance. Use only<br />
consumables recommended by <strong>Fuji</strong> <strong>Xerox</strong>.<br />
Product Name Product Code Printable number of pages<br />
Toner Cartridge [Black] CT201591 Approx. 2000 pages<br />
Toner Cartridge [Yellow] CT201594 Approx. 1400 pages<br />
Toner Cartridge [Magenta] CT201593 Approx. 1400 pages<br />
Toner Cartridge [Cyan] CT201592 Approx. 1400 pages<br />
IMPORTANT:<br />
• The printable number of pages are applicable when A4 paper SEF ( ) is used and printing is done<br />
continuously at a density such that each toner covers 5% of the page. These values are estimates and vary<br />
depending on conditions such as the content being printed, paper size, paper type, the machine’s operating<br />
environment, initializing process done when you turn on or off the printer, and adjustments to maintain print<br />
quality.<br />
NOTE:<br />
• The printable number of pages for the starter toner cartridges shipped with the printer are approximately 1000<br />
pages for black toner cartridge and 700 pages for yellow, magenta, and cyan toner cartridges.<br />
• Each toner cartridge includes installation instructions on the box.<br />
247 Maintenance
• When to Order Toner Cartridges<br />
The LCD panel displays a warning when the toner cartridge nears its replacement time. Verify that you<br />
have replacements on hand. It is important to order a toner cartridge when the messages first appear<br />
to avoid interruptions to your printing. The LCD panel displays an error message when the toner<br />
cartridge must be replaced.<br />
To order toner cartridges, contact the <strong>Fuji</strong> <strong>Xerox</strong> local representative office or an authorized dealer.<br />
IMPORTANT:<br />
• This printer is designed to provide the most stable performance and print quality when used with the<br />
recommended toner cartridges. Not using toner cartridges recommended for this machine degrades the<br />
performance and printing quality of the printer. You could also incur charges if the machine breaks down. To<br />
receive customer support and achieve the optimum performance of the printer, be sure to use recommended<br />
toner cartridges.<br />
Maintenance 248
• Recycling Supplies<br />
• For environmental protection and efficient use of resources, <strong>Fuji</strong> <strong>Xerox</strong> reuses returned toner<br />
cartridges to make recycle parts, recycle materials or energy recovery.<br />
• Proper disposal is required for toner cartridges no longer needed. Do not open toner cartridges<br />
containers. Return them to your local <strong>Fuji</strong> <strong>Xerox</strong> representative.<br />
• To recover scarce resources, rechargeable batteries used in the returned machines are recycled<br />
as materials or reused for energy generation.<br />
249 Maintenance
Storing Consumables<br />
Store consumables in their original packaging until you need to use them. Do not store consumables<br />
in:<br />
• Temperatures greater than 40 °C (140 °F).<br />
• An environment with extreme changes in humidity or temperature.<br />
• Direct sunlight.<br />
• Dusty places.<br />
• A car for a long period of time.<br />
• An environment where corrosive gases are present.<br />
• An environment with salty air.<br />
Maintenance 250
Managing the Printer<br />
This section includes:<br />
• "Checking Printer Status with SimpleMonitor (Windows Only)" on page 252<br />
251 Maintenance
• Checking Printer Status with SimpleMonitor (Windows<br />
Only)<br />
SimpleMonitor is a tool that is installed with your <strong>Fuji</strong> <strong>Xerox</strong> print driver. It automatically checks the<br />
printer status when you send a print job. SimpleMonitor can also check the status of the tray and<br />
remaining amount of toner cartridges.<br />
Starting SimpleMonitor<br />
Double-click the SimpleMonitor icon on the taskbar or right-click the icon and select Printer<br />
Selection.<br />
If the SimpleMonitor icon is not displayed on the taskbar, open SimpleMonitor from the start menu.<br />
The following procedure uses Microsoft ® Windows ® XP as an example.<br />
1 Click start All Programs <strong>Fuji</strong> <strong>Xerox</strong> <strong>Fuji</strong> <strong>Xerox</strong> Printer Software for Asia-Pacific<br />
DocuPrint CM205 b Activate SimpleMonitor.<br />
The Printer Selection window appears.<br />
2 Click the name of the desired printer from the list.<br />
The Printer Status Window appears.<br />
For details about the functions of SimpleMonitor, refer to the online Help.<br />
See also:<br />
• "SimpleMonitor (Windows Only)" on page 50<br />
Maintenance 252
Conserving Supplies<br />
You can change several settings in your print driver to conserve toner cartridge and paper.<br />
Supply Setting Function<br />
Toner cartridge Toner Saving Mode in<br />
the Graphics tab of the<br />
print driver<br />
This check box allows the users to select a print mode<br />
that uses less toner. When this feature is used, the<br />
image quality will be lower than when it is not used.<br />
Print media<br />
Multiple Up in the Layout<br />
tab of the print driver<br />
The printer prints two or more pages on one side of a<br />
sheet. The available numbers that each print driver can<br />
print one sheet of paper are as follows:<br />
• Microsoft Windows Print Driver: 2, 4, 8, or 16 pages<br />
• Mac OS ® X Print Driver: 2, 4, 6, 9, or 16 pages<br />
Combined with the duplex setting, Multiple Up allows<br />
you to print up to 32 pages on one sheet of paper. (16<br />
images on the front and 16 on the back)<br />
253 Maintenance
Checking Page Counts<br />
The total number of printed pages can be checked at the operator panel. Four meters are available:<br />
Meter 1 (color prints), Meter 2 (monochrome prints), Meter 3 (large size color prints), and Meter<br />
4 (Meter 1 + Meter 2).<br />
The Meter Readings counts the number of pages printed properly. Single side print (including<br />
Multiple Up) is counted as one job, and 2-sided print (including Multiple Up) is counted as two. During<br />
2-sided printing, if an error occurs after one side is printed properly, it is counted as one.<br />
When printing color data, which has been converted by using ICC profile on an application, with the<br />
Color setting, the data is printed by color even if it seems to be black and white data on the monitor. In<br />
that case, Meter 1 and Meter 4 are increased.<br />
When doing 2-sided printing, a blank page may be inserted automatically depending on the settings of<br />
the application. In this case, the blank page is counted as one page. However, when doing 2-sided<br />
printing for odd number of pages, the blank page inserted to the rear side of the last odd page is not<br />
counted.<br />
See also:<br />
• "Meter Readings" on page 152<br />
Use the following procedure to check a meter:<br />
1 Press the (System) button.<br />
2 Select Meter Readings, and then press the button.<br />
3 Check the values for each meter.<br />
Maintenance 254
Moving the Printer<br />
NOTE:<br />
• The front side of this printer is heavier than the rear. Take note of this difference in weight when moving the<br />
printer.<br />
1 Turn off the printer.<br />
2 Disconnect the power cord and USB cable.<br />
3 Remove any paper in the center output tray if there is. Close the output tray extension if it is<br />
extended.<br />
4 Remove any paper in the priority sheet inserter (PSI) or multipurpose feeder (MPF). Keep the<br />
paper wrapped and away from humidity and dirt.<br />
255 Maintenance
5 Push the PSI in.<br />
6 Slide the slide bar backward until it stops.<br />
7 Close the front cover.<br />
Maintenance 256
8 Lift the printer and move it gently.<br />
NOTE:<br />
• If the printer is to be moved over a long distance, the toner cartridges should be removed to prevent toner<br />
from spilling and the printer should be packed inside a box.<br />
9 Adjust the color registration before using your printer.<br />
See also:<br />
• "Adjusting Color Registration" on page 213<br />
257 Maintenance
Maintenance 258
11<br />
Contacting <strong>Fuji</strong> <strong>Xerox</strong><br />
This chapter includes:<br />
• "Technical Support" on page 260<br />
• "Online Services" on page 261<br />
259 Contacting <strong>Fuji</strong> <strong>Xerox</strong>
Technical Support<br />
<strong>Fuji</strong> <strong>Xerox</strong> recommends the Customer first utilize support materials shipped with the product, product<br />
diagnostics, information contained on the Web, and email support. If unsuccessful, to obtain service<br />
under product warranty the Customer must notify <strong>Fuji</strong> <strong>Xerox</strong> Telephone Support or its authorized<br />
service representative of the defect before the expiration of the warranty period. Customer will provide<br />
appropriate assistance to Telephone Support personnel to resolve issues, such as restoration of the<br />
operating system, software program and drivers to their default configuration and settings, verification<br />
of functionality of <strong>Fuji</strong> <strong>Xerox</strong> supplied products, replacement of customer replaceable units, clearing<br />
paper misfeeds and cleaning the unit and other prescribed routine and preventative maintenance.<br />
If the Customer’s product contains features that enable <strong>Fuji</strong> <strong>Xerox</strong> or its authorized service<br />
representative to diagnose and repair problems with the product remotely, <strong>Fuji</strong> <strong>Xerox</strong> may request that<br />
the Customer allow such remote access to the product.<br />
Contacting <strong>Fuji</strong> <strong>Xerox</strong> 260
Online Services<br />
You can find detail Product and Consumable warranty information and activate your warranty by<br />
registering your details on our website at http://www.fujixerox.com/support/docuprint/<br />
<strong>Fuji</strong> <strong>Xerox</strong> Online Support Assistant provides instructions and troubleshooting guides to resolve your<br />
printer problems. It is an easy-to-use, searchable online help. To find out more, please visit our online<br />
support at http://www.fujixerox.com/support/docuprint/<br />
261 Contacting <strong>Fuji</strong> <strong>Xerox</strong>
Contacting <strong>Fuji</strong> <strong>Xerox</strong> 262
Index<br />
A<br />
Adjust Altitude 160<br />
Adjust BTR 156<br />
Adjust ColorRegi 158<br />
Adjust Fuser 157<br />
Adjust Paper Type 156<br />
Adjusting color registration 213<br />
Admin Menu 153<br />
Alert Tone 154<br />
Auto Exposure 126, 164, 168<br />
Auto Regi Adjust 158<br />
Auto Reset 153<br />
Avoiding jam 183<br />
B<br />
B&W/Color LED 38<br />
Back button 38<br />
Basic Printer Problems 192<br />
Black-and-white<br />
Selecting for scanning 146<br />
Bond 157<br />
BTR Refresh 159<br />
C<br />
C (Clear) button 38<br />
CA (Clear All) button 37<br />
Canceling a job 96<br />
Canceling print job<br />
From computer 96<br />
From operator panel 96<br />
Center Output Tray 35, 184<br />
Clean Developer 158<br />
Cleaning Rod 35<br />
Clearing jam 182<br />
Clearing paper jam<br />
From back of the printer 186<br />
From center output tray 188<br />
From front of the printer 185<br />
Clock Settings 154<br />
Collated 119, 162<br />
Color 118, 162, 166<br />
Selecting for scanning 146<br />
Color Balance 164<br />
Color Balance B 129<br />
Color Balance G 128<br />
Color Balance R 127<br />
Color Button Set 166<br />
Color Capability 28<br />
Color Mode button 38<br />
Color Registration Chart 215<br />
Connecting printer 54<br />
Connection specification 54<br />
Connection type 54<br />
Connectivity 30, 31<br />
Conserving supplies 253<br />
Consumables 247<br />
Contacting Service 225<br />
Continuous Copy 29<br />
Continuous Copy Speed 28<br />
Continuous Print Speed 30<br />
Copy<br />
Limiting access to 176<br />
Copy button/LED 37<br />
Copy Quality<br />
Problems 212<br />
CTD Sensor 240<br />
D<br />
Data LED 37<br />
Demo Page 151<br />
Determining values 216<br />
Dimensions 29<br />
Display Problems 193<br />
Document Cover 35<br />
Document Glass 35, 235<br />
Document Size 122, 163, 167<br />
E<br />
Electrical Safety 14<br />
Energy Saver button/LED 37<br />
Entering values 217<br />
Envelope 157<br />
Error and Warning Messages 228<br />
Error History 151<br />
Error LED 37<br />
Express Scan Manager 52<br />
F<br />
F/W Version 156<br />
Fault Time-Out 154<br />
File Format 166<br />
First Copy Output Time 28<br />
Front Cover 35, 184<br />
Getting help 226<br />
G<br />
263
SimpleMonitor Alerts 228<br />
Gray Balance 130<br />
H<br />
Halftone/Printable Colors 28<br />
HDD 28<br />
I<br />
Image Compression 169<br />
Images<br />
Setting color mode 146<br />
Initialize NVM 159<br />
Installing a toner cartridge 244<br />
Jam 191<br />
Job History 151<br />
Job Time-Out 154<br />
L<br />
Labels 157<br />
Launcher 51<br />
Layout 169<br />
LCD 37<br />
LCD panel 38<br />
LCD Panel Messages 227<br />
Length Guide 35<br />
Levers 36, 184<br />
Light Card 157<br />
Lighten/Darken 124, 164, 167<br />
Liquid Crystal Display 37<br />
Loading envelope<br />
MPF 78<br />
PSI 82<br />
Loading print media 71<br />
MPF 74<br />
PSI 81<br />
Low Toner Alert Msg 155<br />
LW Gloss Card 157<br />
M<br />
Machine Weight 29<br />
Main components 34<br />
Managing<br />
Printer 251<br />
Manual Duplex Printing 86<br />
Margin Left/Right 134, 165, 168<br />
Margin Middle 135, 166, 168<br />
Margin Top/Bottom 133, 165, 168<br />
Memory 28<br />
Messages<br />
J<br />
SimpleMonitor 228<br />
Meter Readings 152<br />
Total Printed Pages 254<br />
Meters<br />
Total Page Counts 254<br />
mm / inch 155<br />
Mottle 203<br />
Moving<br />
Printer 255<br />
Multiple Up 253<br />
Multipurpose feeder (MPF) 35, 184<br />
N<br />
Non-Genuine Mode 159<br />
Number of copies 117<br />
Numeric keypad 37<br />
N-Up 131, 165<br />
O<br />
OK button 38<br />
Operating System 30<br />
Operator Panel 35<br />
Ordering supplies 248<br />
Original Paper Size 28, 31<br />
Original size<br />
Setting for scanning 147<br />
Original Type 123, 164<br />
Output Paper Size 28<br />
Output Paper Weight 28<br />
Output Tray Capacity 29<br />
Output Tray Extension 35, 90<br />
P<br />
Panel Language 172<br />
Panel Lock 160, 173<br />
Panel Settings 151<br />
Panel Settings Page 41<br />
Paper Chute 36<br />
Paper Feed Roller 36<br />
Paper Jam Location 184<br />
Paper Tray Capacity 29<br />
Paper Width Guides 35, 76<br />
Parts name 34<br />
PDL 30<br />
Plain 156, 157<br />
Power Connector 36<br />
Power Consumption 29<br />
Power On Wizard 156<br />
Power Saving Timer 153, 177<br />
Power Supply 29<br />
Power Switch 35<br />
Print button/LED 38<br />
Print driver (Mac OS X) installing<br />
264
Installing print driver (Mac OS X) 60<br />
Print driver (Windows) installing<br />
Installing print driver (Windows) 57<br />
Print From USB Memory<br />
Limiting access to 176<br />
Print Media 253<br />
Dimensions 73<br />
Print Quality Problems 195<br />
Print Resolution 30<br />
Printer<br />
Managing 251<br />
Moving 255<br />
Printer Setting Utility 49<br />
Printer software 47<br />
Printing 94<br />
Custom Paper 103<br />
Printing Basics 63<br />
Printing Problems 194<br />
Printing Resolution 28<br />
Priority Sheet Inserter (PSI) 35, 184<br />
Product Features 25<br />
R<br />
Rear Cover 36, 184<br />
Rear Cover Handle 36<br />
Recycled 157<br />
Recycling supplies 249<br />
Reduce/Enlarge 120, 163<br />
Reduction/Enlargement 28<br />
Removing the toner cartridges 243<br />
Report Page 106<br />
Resetting to factory defaults 178<br />
Resolution 167<br />
Setting for scanning 147<br />
S<br />
Safety<br />
Electrical 14<br />
Operational 18<br />
Scan<br />
Limiting access to 176<br />
Scan button/LED 37<br />
Scan to PC 31<br />
Scanner Driver/Printer Utility Problems 219<br />
Scanning<br />
Black-and-white images 146<br />
Color images 146<br />
Scan resolution 147<br />
Setting color mode 146<br />
Setting image file type 146<br />
Specifying original size 147<br />
Suppress background color 147<br />
Scanning Halftone 31<br />
Scanning Problems 218<br />
Scanning Resolution 28, 31<br />
Secure Settings 160<br />
Sending print job 95<br />
Service Lock 161<br />
Setting copy options 116<br />
Sharpness 125, 164, 167<br />
SimpleMonitor 50<br />
SimpleMonitor Alerts 228<br />
Slide Bar 35<br />
Space Requirement 29<br />
Specification 27<br />
Start button 37<br />
Stop button 37<br />
Storing consumables 250<br />
System button/LED 37<br />
System Settings 151<br />
T<br />
TIFF File Format 168<br />
Toner Access Cover 35<br />
Toner Cartridges<br />
Conserving 253<br />
When to order 248<br />
Toner Refresh 158<br />
Tool Without An Interesting Name (TWAIN) 141<br />
Transfer Belt 36, 184<br />
Transfer Roller 36<br />
Tray Settings 170<br />
U<br />
USB Drive 35<br />
USB Port 36, 54<br />
USB Settings<br />
Port Status 161<br />
USB storage device 144<br />
W<br />
Warm-up Time 28<br />
Warning and Error Messages 228<br />
White Document Cover 235<br />
Windows Image Acquisition (WIA) 143<br />
265