Stainless Steel Swivel Repair Manual - Instech Laboratories, Inc.
Stainless Steel Swivel Repair Manual - Instech Laboratories, Inc.
Stainless Steel Swivel Repair Manual - Instech Laboratories, Inc.

You also want an ePaper? Increase the reach of your titles
YUMPU automatically turns print PDFs into web optimized ePapers that Google loves.
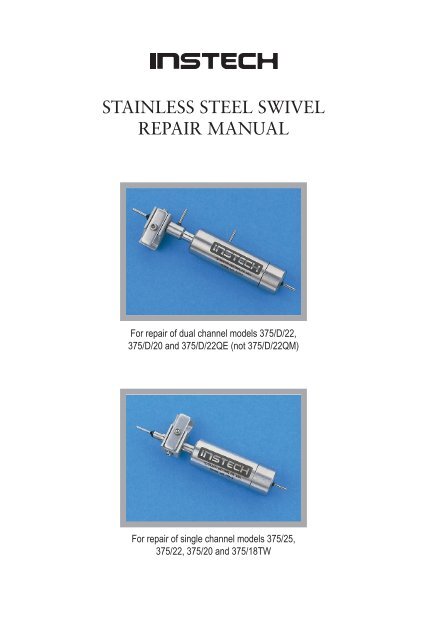
STAINLESS STEEL SWIVEL<br />
REPAIR MANUAL<br />
For repair of dual channel models 375/D/22,<br />
375/D/20 and 375/D/22QE (not 375/D/22QM)<br />
For repair of single channel models 375/25,<br />
375/22, 375/20 and 375/18TW
INTRODUCTION<br />
This manual provides instructions on repairing <strong>Instech</strong> dual or<br />
single channel stainless steel fluid swivels.<br />
Dual Channel <strong>Swivel</strong> <strong>Repair</strong>................................Page 2<br />
Single Channel <strong>Swivel</strong> <strong>Repair</strong> ..............................Page 9<br />
These instructions assume you have purchased the special tools<br />
and parts necessary for the repairs.<br />
Part No. Description Tools Parts<br />
375R/D/xx<br />
Tools and parts to repair<br />
one dual channel swivel<br />
(xx=gauge)<br />
tweezers, 8ga tube,<br />
12ga tube, bearing removal<br />
base, polishing<br />
paper<br />
1 center channel seal, 1<br />
sideseal body, 2 bearings,<br />
3x 1/4in and 3x<br />
1/8in clip rings<br />
375R/xx<br />
Tools and parts to repair<br />
five single channel<br />
swivels (xx=gauge)<br />
8ga tube, polishing<br />
paper<br />
5 center channel seals,<br />
10 bearings, 15x 1/8in<br />
clip rings<br />
375R/D/TK<br />
Tools to refurbish dual<br />
channel swivels<br />
tweezers, 8ga tube,<br />
12ga tube, bearing removal<br />
base, polishing<br />
paper<br />
375R/CSxx<br />
Parts to repair center<br />
channel on five dual or<br />
single channel swivels<br />
(xx=gauge)<br />
polishing paper<br />
5 center channel seals<br />
375R/D/SSxx<br />
Parts to repair sideseals<br />
on five dual channel<br />
swivels (xx=gauge)<br />
polishing paper<br />
5 sideseal bodies, 10x<br />
1/4in clip rings, 15x 1/8in<br />
clip rings<br />
375R/BR<br />
Parts to repair bearings<br />
on five single or dual<br />
channel swivels<br />
polishing paper<br />
10 bearings, 15x 1/8in<br />
clip rings<br />
1
1. DUAL CHANNEL SWIVEL REPAIR<br />
SIDE SEAL ASSEMBLY. The side channel seal assembly can be<br />
damaged by poor handling or excessive fluid pressure and is the<br />
area where most leaks occur. The side seal assembly floats<br />
within the swivel body and leaks will occur if excessive upward<br />
or downward force is applied to the side outlet tube. Seals can<br />
be deformed by excessive pressure or bending of the side outlet<br />
seal assembly when attaching tubing to the swivel. The side seals<br />
can also be damaged by excessive fluid pressure, although we<br />
subject the seal to 60 psi as part of our final inspection. Seals<br />
can be damaged when very high pressures are used to flush or<br />
preload the fluid lines. You can generate 400 psi of pressure<br />
with a 1 ml syringe if a line is blocked. It is safest to pull the<br />
flushing solution back through a swivel because you can never<br />
exceed 1 atmosphere using this technique. The side seals are delicate<br />
and consist of two miniature spring loaded seals mounted<br />
in a stainless steel holder. The seals are designed to reseal themselves<br />
but due to size limitations we must use a much smaller<br />
spring than we use on our more rugged center seal.<br />
CENTER CHANNEL SEAL ASSEMBLY. The center channel<br />
seal assembly usually does not leak because it is spring loaded<br />
and will continue to tighten itself over time. If a leak does occur,<br />
it is usually due to autoclaving a disassembled center seal or improper<br />
seal reassembly. We have developed a seal tightening procedure<br />
since Teflon can cold flow when not installed in the<br />
swivel. This procedure will resize your center channel seal and<br />
must be used when you get new seals from the factory. The procedure<br />
is outlined in these instructions and will usually remedy<br />
problems unless the seal has been gouged or internally scraped<br />
during reassembly.<br />
If you are reading this document you have probably experienced<br />
a leak. If the leak is detected early, the swivel can be ultrasonically<br />
cleaned and the bearings may not need to be replaced.<br />
They should be blown dry and reoiled with a light machine oil if<br />
2
eused. While the bearings are stainless steel, they can corrode<br />
making them very difficult to remove. We strongly recommend<br />
that you follow the bearing removal instructions and use the<br />
tools supplied by <strong>Instech</strong> to remove frozen bearings. If you are<br />
totally disassembling the swivel it is prudent to replace all seals.<br />
Take a few minutes to familiarize yourself with the internal parts<br />
of a dual channel swivel.<br />
side seal<br />
seal spring body spacer bearings<br />
outlet tube<br />
cap<br />
seal cup washer<br />
body<br />
circlip<br />
retaining ring<br />
fig.1<br />
1.1 Disassembly and Cleaning<br />
Start disassembly by unscrewing the cap. Then gently push the<br />
outlet tube towards the cap end as far as it will allow. This will<br />
expose the center Teflon seal inside the seal cup.<br />
Remove the spring and slide the Teflon seal and seal cup assembly<br />
out of the cap. The Teflon seal can then be removed from the<br />
seal cup. This is the center channel seal.<br />
It is not necessary to remove the central outlet tube seal assembly<br />
and bearings from the body for a leaking center seal<br />
and if the bearings do not need to be lubricated or replaced.<br />
If you remove the side seal assembly we strongly recommend<br />
you replace it.<br />
If only the center channel seal has leaked and bearings freely<br />
move, skip to 1.5 Center Seal Tightening.<br />
3
1.2 Total Disassembly<br />
Grasp the tube extending from the side seal body and slide it off<br />
of the outlet tube out of the open end of the swivel (see fig 1<br />
above). Save the washer and spacer. Note the recessed side of the<br />
spacer and remember its orientation. The washer has no special<br />
orientation.<br />
Use the tweezers provided in the tool kit to remove the retaining<br />
ring located just inside the unslotted end of the body. If the clip<br />
and bearings are corroded you may not be able to get the tweezers<br />
into the hole to remove the clip and it may require forcibly<br />
driving the components apart using the tools provided (1.3<br />
Frozen Bearings).<br />
If the retaining ring comes out easily and the bearings are not<br />
frozen, remove the outlet tube and bearings by sliding them out<br />
of the swivel body, over the ring grove. Skip to 1.4 Cleaning<br />
<strong>Swivel</strong> Parts if bearings are not frozen.<br />
1.3 Frozen Bearings<br />
To remove frozen bearings, use the set of removal tools and<br />
tweezers provided.<br />
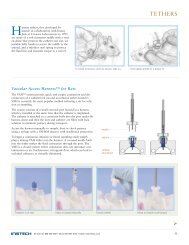
Step A: Place the swivel body, slot side down, into the aluminum<br />
bearing removal tool as shown in fig 2A. Using the larger stainless<br />
steel tube, gently tap the bearings down about an 1/8 of an<br />
inch. (If you go too far you will shear off the outlet tube.) This<br />
provides space so that you can use the tweezers to grasp the<br />
holes in the retaining ring. Remove the retaining ring.<br />
Step B: Next, turn the swivel over and reinsert into the bearing<br />
removal tool, slot side up as shown in fig 2B. Again, using the<br />
larger tube, gently tap the outlet assembly out of the swivel<br />
body.<br />
Step C: Use the tweezers to push off the circlip (fig 2C).<br />
4
Do not apply any pressure or scratch the small diameter<br />
side seal area with the holes in it. Bending or scratching this<br />
area will cause irreparable damage to the swivel.<br />
Step D: Reposition the bearing removal tool with the unslotted<br />
side up as shown in fig 2D. Using the small tube, gently tap the<br />
outlet tube though the two bearings.<br />
tap<br />
tap<br />
tap<br />
large<br />
tube<br />
small<br />
tube<br />
bearing<br />
removal<br />
tool<br />
do not<br />
scratch<br />
seal area<br />
fig.2A 2B 2C 2D<br />
1.4 Cleaning <strong>Swivel</strong> Parts<br />
Ultrasonically clean all parts. Flush all parts to check for blockages<br />
and clear tubes with air. A small diameter wire may be used<br />
to unblock clogged tubes (except the quartz-lined center channel<br />
of model 375/D/22QE).<br />
Make sure that no hard residue remains on the side seal area. If<br />
necessary, polish with the very fine paper provided and reclean<br />
5
to remove any dirt or particles generated by this process. Make<br />
sure slot area is free of any burrs or loose material.<br />
1.5 Center Seal Tightening<br />
Place the seal into the retaining cup and genlly slide the cup into<br />
the cap (exposed seal toward cap).<br />
Do not force the seal onto the tube since it is easily gouged.<br />
Also, be careful not to over compress the seal. Making the<br />
seal too tight will increase the torque required to rotate the<br />
swivel and make it difficult to assemble.<br />
Holding the cap, firmly press downward against<br />
fig.3<br />
the seal cup. This pressure will force the seal<br />
against the inner conical surface of the seal cup<br />
thus reducing the diameter of the hole in the<br />
open end of the seal. Check for a snug fit by inserting<br />
the tubing on the outlet assembly into<br />
the open end of the seal. Reverse the seal in the<br />
cap and repeat this procedure to tighten the<br />
other end of the seal.<br />
<strong>Repair</strong> kit seals have not been presized at the factory so this<br />
must be done for all new seals.<br />
1.6 Reassembly<br />
Slide the bearings onto outlet tube, up against the shoulder. New<br />
bearings do not require oiling. Install the circlip into the groove<br />
to retain the bearings. Place the bearings on a flat surface and<br />
use needlenose pliers or the tweezers to push the clip on.<br />
Push the retaining ring over the outlet tube (see fig 2). Place the<br />
outlet tube/bearing assembly into the swivel body. Use the<br />
tweezers to install the retaining ring located just inside the unslotted<br />
end of the body.<br />
6
Slip the stainless steel spacer, with recess end facing the bearings,<br />
onto the outlet tube assembly inside of the swivel body.<br />
USE EXTREME CARE IN THE FOLLOWING STEPS!<br />
Take the side seal assembly with the seals installed, and with<br />
very light pressure, carefully slide the seal assembly onto the<br />
outlet tube assembly. It will come to rest at the joint between the<br />
small central tube and the slotted outer tube. Do not push it on<br />
yet.<br />
Now put the stainless steel washer onto the outlet tube assembly<br />
and slide it up against the side seal assembly.<br />
Place the entire assembly back into the aluminum tool as in Fig<br />
2B, with the bearings resting on the internal retaining ring.<br />
Using the larger stainless tube gently press the side seal assembly<br />
straight down until it seats.<br />
To reassemble the cap, place the spring onto the stepped end of<br />
the seal cup. Insert the white Teflon center seal, which you have<br />
tightened (section 1.5), into the seal cup. Slide this assembly into<br />
the cap. The spring end of the cup will protrude from the cap.<br />
Remove the swivel from the tool and slide the outlet tube assembly<br />
toward the open end until the side outlet tube touches the<br />
body. Take the cap group and insert the center channel tube<br />
through the spring and start it into the Teflon seal. Push the entire<br />
cap assembly back into the body and tighten the cap one<br />
thread. Check that the outlet tube assembly has not jammed into<br />
the seal, then finish tightening the cap.<br />
If any resistance is felt, do not force the swivel together. Unscrew<br />
the cap and determine the source of resistance.<br />
Look through the slot in the side of the swivel to ensure that all<br />
parts have seated properly and no gaps exist between any components<br />
below the spring.<br />
7
1.7 Leak Checking<br />
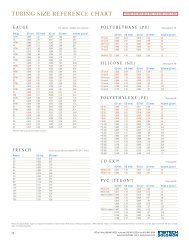
Connect catheter tubing to a syringe and attach it to the outlet<br />
lube of the swivel channel you wish to check (e.g. PE50 for 22ga<br />
or PE90 for 20ga). Attach another piece of tubing to the inlet<br />
side of the swivel channel and place the end of the tube in a<br />
beaker of alcohol or water.<br />
Suck fluid back through the channel to be checked, clearing all<br />
or bubbles.<br />
Sucking liquid back through the swivel can only generate a<br />
maximum of 15 psi or one atmosphere of pressure. If you<br />
push fluid through the swivel with a syringe you can generate<br />
significantly higher pressures which can damage the<br />
swivel.<br />
To check for a leaking channel, block the inlet tube and pull<br />
back on the syringe. A continuing stream of bubbles in the syringe<br />
indicates that a leak is present.<br />
Perform this check on both side and center channels.<br />
8
2. SINGLE CHANNEL SWIVELS<br />
2.1 Care and Sterilization<br />
Immediately after each use, the swivel should be flushed out<br />
thoroughly by pulling water through it with a syringe, follwed<br />
by air to dry the channel. In most cases it will not be necessary<br />
to totally disassemble the swivel but all salts should be flushed<br />
out.<br />
Sterilizing solutions can be passed though the swivel or it can be<br />
steam sterilized (autoclaved) or EtO gas sterilized.<br />
2.2 Disassembly and Cleaning<br />
Unscrew the swivel cap from the body section and gently separate<br />
the two sections.<br />
seal spring bearings body<br />
cap seal cup spacer outlet tube fig.4<br />
Holding the swivel body, push the outlet tube and bearing assembly<br />
out through the threaded end. Be careful not to push material<br />
into or damage the center tube.<br />
All parts may be individually removed for cleaning. The bearings<br />
should be left in place and cleaned as an assembly.<br />
Clean parts with hot water and detergent or place them in an ultrasonic<br />
bath for a few minutes.<br />
Rinse and dry all parts prior to assembly. The bearings, if<br />
washed, should be rinsed, blown dry and oiled with a light machine<br />
oil (such as 3-in-1®) and again blown out.<br />
9
At all times, take care not to scratch or deform the internal surface<br />
of the small white Teflon seal.<br />
2.3 Reassembly<br />
Check the Teflon seal by sliding each end of it over the tubing<br />
protruding from the bearing side of the outlet tube. This should<br />
be a gentle slide fit. If it is too loose, see section 1.5 Center Seal<br />
Tightening. If it is too tight, place it completely on the outlet<br />
tube and let it stand 24 hours. If it does not respond order a new<br />
seal.<br />
Place the white Teflon seal into the seal cup and slide this assembly<br />
into the cap taking care not to damage the seal as it engages<br />
the tube inside of the cap. DO NOT FORCE this assembly as<br />
you will damage the seal and it will leak.<br />
With the cap end down, slide the spring over the reduced diameter<br />
side of the seal cup.<br />
Next place the spring spacer with the shouldered side to the<br />
spring over the spring. This leaves the tapered side up to mate<br />
with the outlet tube.<br />
Carefully insert the tubing extending from the bearing end of the<br />
outlet tube, through the spacer, spring, retaining cup and gently<br />
into the Teflon seal.<br />
Drop the body over this entire assembly and<br />
fig.5<br />
tighten the body onto the cap about 1 turn. Test<br />
the assembly by sliding the outlet tube in and out<br />
of the seal (see fig 5). If it moves in and out freely,<br />
tighten the cap to tighten both ends of the seal<br />
onto the tubing. If after final assembly the swivel<br />
rotational torque is too high or the swivel leaks,<br />
repeat the assembly sequence.<br />
10
2.4 Center Seal Tightening<br />
Follow the procedure outlined in the dual channel swivel repair<br />
section of this manual (1.5) to tighten the center seal of a single<br />
channel swivel. Teflon can undergo cold flow with time, and it<br />
may be necessary to tighten the Teflon seal if the swivel starts to<br />
leak.<br />
2.5 <strong>Swivel</strong> Testing<br />
Using a syringe, suck water back through the swivel. Block off<br />
inlet tube and draw a vacuum with the syringe. If bubbles are<br />
noted, either retighten or replace Teflon seal.<br />
7700-05-0118 rev0 090713<br />
11
<strong>Instech</strong> <strong>Laboratories</strong>, <strong>Inc</strong>.<br />
5209 Militia Hill Road<br />
Plymouth Meeting PA 19462 USA<br />
TL (800) 443-4227<br />
TL 1-610-941-0132<br />
FX 1-610-941-0134<br />
www.instechlabs.com<br />
7700-05-0118