Model 11 Plus Syringe Pump Manual - Instech Laboratories, Inc.
Model 11 Plus Syringe Pump Manual - Instech Laboratories, Inc.
Model 11 Plus Syringe Pump Manual - Instech Laboratories, Inc.

Create successful ePaper yourself
Turn your PDF publications into a flip-book with our unique Google optimized e-Paper software.
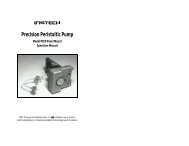
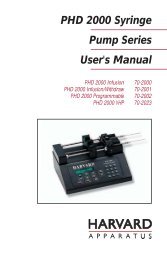
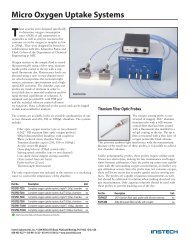
<strong>Model</strong> ‘<strong>11</strong>’ <strong>Plus</strong><br />
<strong>Syringe</strong> <strong>Pump</strong><br />
User’s <strong>Manual</strong><br />
Single <strong>Syringe</strong> <strong>Pump</strong> 70-2208<br />
Dual <strong>Syringe</strong> <strong>Pump</strong> 70-2209<br />
Single <strong>Syringe</strong> <strong>Pump</strong> with Serial Communication 70-22<strong>11</strong><br />
Dual <strong>Syringe</strong> <strong>Pump</strong> with Serial Communication 70-2212
1<br />
Table of Contents<br />
H a r v a r d A p p a r a t u s P u m p '<strong>11</strong>' P l u s S y r i n g e P u m p<br />
SUBJECT<br />
PAGE NO.<br />
Table of Contents ......................................................................................1<br />
General Information - Warranty and Repairs ..........................................2<br />
General Safety Summary ......................................................................3-4<br />
Introduction ..........................................................................................5-6<br />
Theory of Operation............................................................................5<br />
Features ..............................................................................................5<br />
<strong>Pump</strong> <strong>11</strong> <strong>Plus</strong>, Front and Rear Views ................................................6<br />
Installation ................................................................................................7<br />
Initial Setup & Location Requirements..............................................7<br />
Loading the <strong>Syringe</strong> ............................................................................7<br />
Limit Switch Calibration ....................................................................7<br />
Operation ..................................................................................................8<br />
Getting Started ....................................................................................8<br />
Turn <strong>Pump</strong> ON ............................................................................8<br />
Function Keys and Run Indicator ..............................................8<br />
Entering <strong>Syringe</strong> Size ..................................................................9<br />
Entering Flow Rate Range ..........................................................9<br />
Entering Flow Rate......................................................................9<br />
Press Run ....................................................................................9<br />
Check <strong>Syringe</strong> ..............................................................................9<br />
Advanced Features ............................................................................10<br />
Volume Mode ............................................................................10<br />
Power Failure ............................................................................10<br />
Display Intensity ........................................................................<strong>11</strong><br />
Changing Rates ..........................................................................<strong>11</strong><br />
Infuse/Withdraw Switch ............................................................<strong>11</strong><br />
Maintenance ..............................................................................<strong>11</strong><br />
Protecting Small, Fragile <strong>Syringe</strong>s ..........................................12<br />
Remote Communication ..........................................................12<br />
Appendices ..................................................................................................<br />
A. Specifications ............................................................................13<br />
B. Table of Popular <strong>Syringe</strong> Diameters..........................................14<br />
C. Table of Minimum and Maximum Flow Rates ........................15<br />
D. Serial Communications; Commands, Queries<br />
and Responses ......................................................................16,17<br />
E: Serial Port Connections: Dual RS-232......................................18<br />
Daisy-Chain................................................................................18
2<br />
General Information<br />
H a r v a r d A p p a r a t u s P u m p '<strong>11</strong>' P l u s S y r i n g e P u m p<br />
Serial Number<br />
All inquires concerning our product should refer to the serial number of the unit.<br />
Serial numbers are located on the rear of the chassis.<br />
Calibration<br />
All syringe pumps are designed and manufactured to meet their performance specifications<br />
at all rated voltages and frequencies. A calibration certificate is available<br />
upon request. Contact customer service for details and pricing.<br />
Warranty<br />
Harvard Apparatus warranties this instrument for a period of one year from date of<br />
purchase. At its option, Harvard Apparatus will repair or replace the unit if it is<br />
found to be defective as to workmanship or material.<br />
This warranty does not extend to damage resulting from misuse, neglect or abuse,<br />
normal wear and tear, or accident.<br />
This warranty extends only to the original customer purchaser.<br />
IN NO EVENT SHALL HARVARD APPARATUS BE LIABLE FOR INCI-<br />
DENTAL OR CONSEQUENTIAL DAMAGES. Some states do not allow exclusion<br />
or limitation of incidental or consequential damages so the above limitation or<br />
exclusion may not apply to you. THERE ARE NO IMPLIED WARRANTIES<br />
OF MERCHANTABILITY, OR FITNESS FOR A PARTICULAR USE, OR<br />
OF ANY OTHER NATURE. Some states do not allow this limitation on an<br />
implied warranty, so the above limitation may not apply to you.<br />
If a defect arises within the one-year warranty period, promptly contact your local<br />
distributor or Harvard Apparatus, <strong>Inc</strong>. 84 October Hill Road Holliston,<br />
Massachusetts 01746-1388 using our toll free number 1-800-272-2775 (valid<br />
only in the U.S., outside U.S. call 508-893-8999). Goods will not be accepted for<br />
return unless an RMA (returned materials authorization) number has been issued<br />
by our customer service department. The customer is responsible for shipping<br />
charges. Please allow a reasonable period of time for completion of repairs, replacement<br />
and return. If the unit is replaced, the replacement unit is covered only for the<br />
remainder of the original warranty period dating from the purchase of the original<br />
device.<br />
This warranty gives you specific rights, and you may also have other rights which<br />
vary from state to state.<br />
Repair Facilities and Parts<br />
Harvard Apparatus stocks replacement and repair parts. When ordering, please<br />
describe parts as completely as possible, preferably using our part numbers. If practical,<br />
enclose a sample or drawing. We offer a complete reconditioning service.<br />
CAUTION<br />
This pump is not registered with the FDA and is<br />
not for clinical use on human or veterinary<br />
patients. It is intended for research use only.
3<br />
General Safety Summary<br />
H a r v a r d A p p a r a t u s P u m p '<strong>11</strong>' P l u s S y r i n g e P u m p<br />
Please read the following safety precautions to ensure proper use of your syringe<br />
pump. To avoid potential hazards and product damage, use this product only as<br />
instructed in this manual. If the equipment is used in a manner not specified by the<br />
manufacturer, the protection provided by the equipment may be impaired.<br />
To Prevent Hazard or Injury:<br />
Use Proper Power Supply<br />
The pump is supplied with an approved power supply and line cord. To maintain<br />
the safety integrity of the device, use only one of the following power supplies:<br />
Ault <strong>Inc</strong>.<br />
<strong>Model</strong>: PW<strong>11</strong>8<br />
Output: 12 Vdc, 1.5 A,<br />
Input: 100-250 Vac, 50-60 Hz, .5A<br />
Cui <strong>Inc</strong>.<br />
<strong>Model</strong>: SA06N12-V<br />
Ouptut: 12 Vdc, 2.0 A<br />
Input: 100-240 Vac, 50-60 Hz, .8A<br />
Globtek <strong>Inc</strong><br />
<strong>Model</strong>.: GT-4201D-12<br />
Output: 12 Vdc, 1.66 A<br />
Input: 100-240 Vac, 50-60 Hz, 0.6A<br />
Use Proper Line Cord<br />
Use only the line cord shipped with the product and make sure line cord is certified<br />
for country of use.<br />
Ground the Product<br />
This product is grounded through the return path of the DC power supply.To avoid<br />
electric shock, use only approved power supply and line cord with the product.<br />
Make Proper Connections<br />
Make sure all connections are made properly and securely.<br />
Observe all Terminal Ratings<br />
Review the operating manual to learn the ratings on all connections.
4<br />
General Safety Summary<br />
H a r v a r d A p p a r a t u s P u m p '<strong>11</strong>' P l u s S y r i n g e P u m p<br />
Avoid Exposed Circuitry<br />
Do not touch any electronic circuitry inside of the product.<br />
Do Not Operate with Suspected Failures<br />
If damage is suspected on or to the product do not operate the product. Contact qualified<br />
service personnel to perform inspection.<br />
Observe all Warning Labels on Product<br />
Read all labels on product to ensure proper usage.<br />
CAUTION<br />
Refer to <strong>Manual</strong><br />
Functional Ground<br />
Terminal<br />
Enviromental Conditions<br />
Indoor use only<br />
Temperature 4˚C to 40˚C (40˚F to 104˚F)<br />
Humidity 20% to 80% RH<br />
Well Ventilated Room<br />
Altitude up to 2000 m<br />
Mains Voltage Fluctuation not to Exceed +/- 10% of Nominal<br />
Transient Overvoltage, Category II<br />
<strong>Pump</strong> is Rated Pollution Degree 2 in Accordance with IEC 664
5<br />
Introduction<br />
H a r v a r d A p p a r a t u s P u m p '<strong>11</strong>' P l u s S y r i n g e P u m p<br />
Theory of Operation:<br />
The <strong>Pump</strong> '<strong>11</strong>' <strong>Plus</strong> is designed as a low cost, single or dual syringe infusion pump<br />
capable of low to moderate back pressures. The <strong>Pump</strong> ‘<strong>11</strong>’ <strong>Plus</strong> is standard with an<br />
infuse limit switch and anti-siphon brackets. Both the single and dual syringe versions<br />
are available with our serial communication option package that includes dual<br />
RS232, reversing switch, and a withdraw limit switch.<br />
The pump can hold syringes of any make from 0.5 µl to 50/60ml for the single<br />
sringe version and from 0.5 µl to 10ml for the dual syringe version. The diameter<br />
of the syringes is entered via the keypad and the internal microprocessor drives a<br />
precision stepper motor to produce accurate fluid flow.<br />
Nonvolatile memory stores the last syringe diameter and flow rate along with other<br />
configuration data.<br />
The “Power Failure Mode” can be set to either turn the pump off in the event of<br />
power failure or to resume pumping when power resumes.<br />
Features:<br />
Bright Display and Easy-To-Use Interface<br />
A two-line 16 character vacuum fluorescent display along with six membrane keys<br />
make this a most attractive but powerful, easy-to-use syringe pump. Only two<br />
entries required to start pumping; syringe Inside Diameter (mm) and pumping flow<br />
rates. The Flow rate can be changed while the <strong>Pump</strong> is running.<br />
Two Modes of Operation, Constant Flow Rate and Volume<br />
Dispense<br />
The <strong>Pump</strong> '<strong>11</strong>' <strong>Plus</strong> will operate continuously in RATE mode or accurately<br />
dispense a specific amount of fluid in VOLUME mode.<br />
Smooth Flow<br />
Enhanced micro-stepping pump profiles deliver very smooth and consistent flow,<br />
that is virtually pulse free.<br />
Nonvolatile Memory<br />
The pump remembers its last syringe size, flow rate used and configuration settings.<br />
Power Fail Mode<br />
In a power failure the <strong>Pump</strong> can either RESUME or STOP pumping when power<br />
is returned.<br />
CE Mark Approved<br />
The <strong>Pump</strong> '<strong>11</strong>' <strong>Plus</strong> meets all relevant European EMC and Safety requirements for<br />
laboratory equipment.
6<br />
<strong>Pump</strong> '<strong>11</strong>' <strong>Plus</strong> Front and Rear Views<br />
H a r v a r d A p p a r a t u s P u m p '<strong>11</strong>' P l u s S y r i n g e P u m p<br />
Shaft Collar (8)<br />
Pusher Block (4)<br />
Dual RS-232<br />
Connections (Option)<br />
<strong>Syringe</strong> block<br />
bracket (6)<br />
Pusher Block<br />
bracket (2)<br />
<strong>Syringe</strong> Retainer (1)<br />
<strong>Syringe</strong> Block<br />
(5)<br />
LED Light<br />
Keypad<br />
Bronze Button (3)<br />
Guide Rods<br />
On/Off<br />
Switch<br />
Power Input jack<br />
Infuse Limit<br />
switch adjuster (7)<br />
Infuse/Withdraw<br />
Switch (Standard only<br />
with RS232 option)
7<br />
Installation<br />
H a r v a r d A p p a r a t u s P u m p '<strong>11</strong>' P l u s S y r i n g e P u m p<br />
Initial Setup<br />
1. Read the manual to become familiar with all features and functions of the <strong>Pump</strong><br />
'<strong>11</strong>' <strong>Plus</strong>.<br />
2. Connect the external DC Power Supply and line cord to the pump and main<br />
supply.<br />
3. Turn on main power switch located on the rear panel. The display will now<br />
illuminate indicating that the power connections are correct. The display will<br />
indicate POWER FAIL. (this is normal as the pump indicates on the display if<br />
power was disrupted since last use.)<br />
Location Requirements for the <strong>Syringe</strong> <strong>Pump</strong><br />
• A sturdy, level, clean and dry surface<br />
• Minimum of one inch (2cm) clearance around the pump<br />
• Appropriate environmental conditions<br />
• A well ventilated room<br />
Loading the <strong>Syringe</strong> & Limit Switch Calibration<br />
1. Release the <strong>Syringe</strong> pusher block (4) by pressing the bronze button (3) on the side<br />
of the pusher.<br />
2. While holding the bronze button ‘in’, slide the pusher to the right.<br />
3. Raise the spring loaded syringe retainer (1) and swing it out of the way.<br />
4. Lay the loaded syringe in the ‘V’ shaped syringe block (5).<br />
5. Swing the syringe retainer (1) so it holds the syringe in place.<br />
6. Move the pusher so it makes contact with the syringe plunger.<br />
7. Adjust pusher block Thumbscrews & bracket (2) until the syringe plunger is<br />
completely captured.<br />
8. Tighten down thumbscrews on syringe block bracket (6) so that it captures<br />
flanges on syringe barrel.<br />
9. The Infuse limit switch can be easily adjusted by loosening the thumbscrew (7)<br />
on the pusher block and sliding the dowel pin in or out to the desired position.<br />
Tighten thumbscrew into place when switch is set.<br />
10. For units with RS232 option, the Withdraw limit switch is adjusted via the shaft<br />
collar (8). Slide the collar to the desired position, and use the hex key provided to<br />
lock it into place.
8<br />
Operation: Getting Started<br />
H a r v a r d A p p a r a t u s P u m p '<strong>11</strong>' P l u s S y r i n g e P u m p<br />
Getting started<br />
1. Turn <strong>Pump</strong> ‘ON’<br />
Turn on power using the switch on rear of the pump, the display will light,<br />
and indicate POWER FAIL. (this is normal as the pump indicates on the display<br />
if power was disrupted since last use.)<br />
2. Function Keys and Run Indicator<br />
Refer to the colored keypad at the front of the pump to identify the following<br />
functions starting from the right.<br />
RUN/STOP – This turns the pump motor on and off.<br />
ENTER – This key enters the data that is on the display into the memory of<br />
the pump. Also used to query the flow rate.<br />
DIAM – Used to enter or query the syringe diameter.<br />
SET – This key is used to select which digit of the display is to be changed, to<br />
move the decimal point and to move between modes. Each time the set key is<br />
pressed the underline cursor below the digit or character on the display moves<br />
one step to the right. It is used in conjunction with the ascending and descending<br />
keys. When it the display shows the desired the correct value the set key<br />
will advance right to the next digit.<br />
▲▼ – The ascending and descending keys are used to change the numbers<br />
on the display. ▲ Up key makes numbers increase, ▼ Down Key makes<br />
numbers decrease. When the underline cursor is placed below the decimal<br />
point, the ▲▼ keys shift the decimal one place up or down.<br />
Run Indicator – When the pump is running, the highly visible, green LED<br />
above the RUN/STOP key will illuminate.
9<br />
Operation: Getting Started<br />
H a r v a r d A p p a r a t u s P u m p '<strong>11</strong>' P l u s S y r i n g e P u m p<br />
3. Enter <strong>Syringe</strong> Size<br />
Enter the inside diameter (ID) of the syringe you wish to use. Units are in millimeters<br />
(mm).<br />
If you do not know your syringe diameter, refer to appendix B for nominal inside<br />
diameters of most popular syringes. For the greatest accuracy or if your syringe<br />
is not listed in appendix B, measure the inside diameter with a vernier caliper or<br />
other precision measuring tool. Record this value for future use.<br />
Press SET followed by the DIAM key. The previously used diameter will appear<br />
on the display. The underline cursor will appear under the left-most digit or decimal<br />
point. The ▲ and ▼ keys are used to scroll to the desired number and the<br />
SET key moves the underline cursor one place to the right. Once the desired<br />
diameter is displayed, press the ENTER key to place this value into memory.<br />
4. Enter Flow Rate Range<br />
Choose your flow rate units; either microliters or milliliters, per minute or per hour.<br />
From the initial RATE VOL CONFIG menu, using the ▲ or ▼ key, move the<br />
underline cursor under the CONFIG mode menu prompt. Press the SET key to<br />
enter the CONFIG mode. Press the SET key again to move the underline cursor<br />
to the flow rate choices. Choose your flow rate units while in the SET:UNITS<br />
mode by pressing the ▲ or ▼ keys to scroll the four flow rate choices; ml/min,<br />
µl/min, ml/hr, µl/hr. Once the desired flow rate units are displayed, press the<br />
ENTER key to return to the main SET:CONFIG mode. Press SET or ENTER<br />
again to put your desired flow rate units into memory and return to the RATE<br />
VOL CONFIG menu. These units will be the same for infuse and withdraw.<br />
5. Enter Flow Rate<br />
From the initial RATE VOL CONFIG menu, press the SET key to enter the<br />
SET:RATE mode. Each time you change the syringe diameter, the previously<br />
used flow rate is erased. If the syringe diameter is unchanged, the previously used<br />
flow rate will appear on the display. The underline cursor will appear under the<br />
left-most digit or decimal point. The ▲ and ▼ keys are used to scroll to the<br />
desired number and the SET key moves the underline cursor one place to the<br />
right. Once the desired rate is displayed, press the ENTER key to place this value<br />
into memory. This value will be the same for infuse and withdraw.<br />
6. Press RUN<br />
Press the RUN/STOP key to start pump and begin pumping. The Run Indicator<br />
(Green LED above the RUN/STOP key) will light when the pump is on and<br />
pumping.<br />
7. Check <strong>Syringe</strong> Often<br />
The <strong>Pump</strong> <strong>11</strong> <strong>Plus</strong> will shut itself off via the limit switches. It will not shut off if<br />
the switches are set incorrectly, and the syringe is empty or otherwise overloaded.<br />
Although this presents no hazard to the user or the pump, it is prudent to check<br />
the syringe from time to time.
10<br />
Operation: Advanced Features<br />
H a r v a r d A p p a r a t u s P u m p '<strong>11</strong>' P l u s S y r i n g e P u m p<br />
1. Volume Mode<br />
The <strong>Pump</strong> <strong>11</strong> <strong>Plus</strong> can be set to dispense a precise volume and then stop. To<br />
activate the volume dispense mode a target volume must be set.<br />
To set a target volume, at the RATE VOL CONFIG display, move the underline<br />
cursor, using the ▲ or ▼ key, to VOL. Press the SET key to enter the<br />
VOL set mode. Use the ▲ or ▼ key and the SET key to display a target volume<br />
from 00.01 to 99.99. Volume units are either ml (milliliters) or µl<br />
(microliters). Target volume units are established in the CONFIG<br />
SET:UNITS mode; example: if your pumping units are ml/ min or ml/ hr,<br />
then the volume dispense units will be ml’s. Press the ENTER key to select<br />
the desired target volume. Exit the VOL mode by pressing the ENTER key.<br />
Once you press the RUN key, the pump will run until the target volume is<br />
delivered. The display will show the actual volume dispensed along with the<br />
target volume. Press the RUN key each time you want to repeat the volume<br />
dispense. If you press the STOP key during a volume dispense, you can restart<br />
the pump at the place you stopped by pressing the RUN key again.<br />
To exit the volume dispense mode, set the target volume to 00.00 or turn off<br />
and on the pump via the main power switch. NOTE: In the event of a power<br />
failure, the actual dispensed volume and the target volume are not retained in<br />
memory. This means that while in volume dispense mode, if a power failure<br />
occurred, the pump would not resume volume dispense pumping even if the<br />
POWER ON mode was set to run. This mode will function for both infuse<br />
and withdraw.<br />
2. Power Failure<br />
In the event of a momentary or prolonged power failure, the <strong>Pump</strong> <strong>11</strong> <strong>Plus</strong><br />
can be set to either;<br />
a) Resume pumping when power is returned, with “POWER FAIL” on the<br />
display.<br />
b) Not start pumping when power is returned, with “POWER FAIL” on the<br />
display.<br />
To set the power fail mode, at the RATE VOL CONFIG display, move the<br />
underline cursor, using the ▲ or ▼ key, to CONFIG. Press the SET key to<br />
enter the CONFIG mode options. Use the ▲ or ▼ key to scroll the CON-<br />
FIG options until you reach the SET:POWER ON: display. Press the SET<br />
key again moving the underline cursor to the right. Use the ▲ or ▼ key to<br />
scroll the POWER:ON choices; ‘stop’ or ‘run’. Press the ENTER key to select<br />
either mode. Exit the CONFIG mode by pressing the ENTER key again and<br />
save the POWER:ON setting in memory.
<strong>11</strong><br />
Operation: Advanced Features<br />
H a r v a r d A p p a r a t u s P u m p '<strong>11</strong>' P l u s S y r i n g e P u m p<br />
3. Display Intensity<br />
For varying light conditions, four levels of intensity can be set on the vacuum<br />
fluorescent display<br />
To set the desired display intensity, at the RATE VOL CONFIG display, move<br />
the underline cursor, using the ▲ or ▼ key, to CONFIG. Press the SET key<br />
to enter the CONFIG mode options. Use the ▲ or ▼ key to scroll the CON-<br />
FIG options until you reach the SET:INTENSITY:. Press the SET key again<br />
moving the underline cursor to the right. Use the ▲ or ▼ key to scroll the<br />
SET : INTENSITY choices; "1", "2", "3", "4" ( 4 is highest intensity, 1 is the<br />
lowest intensity). Press the ENTER key to select the desired display intensity.<br />
Exit the CONFIG mode by pressing the ENTER key again and save the<br />
INTENSITY setting in memory.<br />
4. Changing Rates<br />
If the pump is running at an existing rate it will continue to do so until a new<br />
rate is entered. Except for volume mode, the flow rate can be changed while<br />
the pump is running. As soon as the ENTER key is pressed the pump will<br />
change to the new flow rate. To change rates from the keypad, while in volume<br />
mode, the pump must be stopped first.<br />
5. Infuse/Withdraw Switch Operation<br />
(standard with RS232 option)<br />
For customer convenience, a two position rocker switch is included in the<br />
<strong>Pump</strong> '<strong>11</strong>' <strong>Plus</strong> Advanced for changing from infuse to withdraw on the fly.<br />
When the pump is infusing, and the switch is toggled, the pump will now be<br />
in the withdraw mode. Switch the toggle again, it puts it back into infuse<br />
mode. The physical position of the switch does not matter. The pump always<br />
powers up in infuse mode.<br />
6. Maintenance<br />
Keep the pump clean and dry. Avoid liquid spills that may find their way into<br />
the electronics.<br />
A small container of grease is provided for periodic lubrication of the lead<br />
screw and guide rods. It is important to keep these guide rods clean and lubricated.<br />
To clean the exterior surfaces, use a lint-free cloth to remove loose dust. Use<br />
care to avoid scratching the display window. For more efficient cleaning, use a<br />
soft cloth dampened with water or an aqueous solution of 75% isopropyl alcohol.<br />
If the pump does not work properly, contact Harvard Apparatus for appropriate<br />
instructions.
12<br />
Operation: Advanced Features<br />
H a r v a r d A p p a r a t u s P u m p '<strong>11</strong>' P l u s S y r i n g e P u m p<br />
7. Protecting Small, Fragile <strong>Syringe</strong>s<br />
The <strong>Pump</strong> <strong>11</strong> <strong>Plus</strong> will hold microliter size syringes down to 10µl size. These<br />
small syringes have fine wire plungers that may be damaged if allowed to bottom<br />
out. The pump is equipped with limit switches to help in avoiding this<br />
problem. (See page 7 for instructions on use.)<br />
8. Remote Communication<br />
The <strong>Pump</strong> <strong>11</strong> <strong>Plus</strong> with RS232 option is equipped at the factory for remote<br />
serial communications. The baud rate and address are set in the CONFIG<br />
mode options.<br />
a. <strong>Pump</strong> Address<br />
To set the pump address, at the RATE VOL CONFIG display, move the<br />
underline cursor, using the ▲ or ▼ key, to CONFIG. Press the SET key<br />
to enter the CONFIG mode options. Use the ▲ or ▼ key to scroll the<br />
CONFIG options until you reach the SET:ADDRESS. Press the SET key<br />
again moving the underline cursor to the right. Use the ▲ or ▼ key to<br />
scroll the two digit number fields. Use the ▲ or ▼ key and the SET key<br />
to display a unique pump address from 00 to 99. Press the ENTER key to<br />
select the desired pump address. Exit the CONFIG mode by pressing the<br />
ENTER key again and save the ADDRESS setting in memory.<br />
b. Baud Rate<br />
To set the pump Baud Rate, at the RATE VOL CONFIG display, move the<br />
underline cursor, using the ▲ or ▼ key, to CONFIG. Press the SET key<br />
to enter the CONFIG mode options. Use the ▲ or ▼ key to scroll the<br />
CONFIG options until you reach the SET:BAUD. Press the SET key<br />
again moving the underline cursor to the right. Use the ▲ or ▼ key to<br />
scroll the SET:BAUD choices; ‘300’, ‘1200’, .‘2400’ or ‘9600’. Press the<br />
ENTER key to select the desired baud rate. Exit the CONFIG mode by<br />
pressing the ENTER key again and save the BAUD setting in memory.
13<br />
Appendix A<br />
H a r v a r d A p p a r a t u s P u m p '<strong>11</strong>' P l u s S y r i n g e P u m p<br />
<strong>Pump</strong> ‘<strong>11</strong>’ <strong>Plus</strong> Specifications<br />
Type<br />
Microprocessor single or dual syringe<br />
<strong>Syringe</strong>/Size for <strong>Pump</strong> ‘<strong>11</strong>’<br />
with Holder For: Plastic or glass<br />
1 <strong>Syringe</strong> From 0.5 µl to 50/60 ml<br />
2 <strong>Syringe</strong> From 0.5 µl to 10 ml<br />
Flow Rate Range:<br />
Minimum / Maximum 0.0014 µl/hr with 0.5 µl syringe / 26.55 ml/min<br />
with 50/60 ml syringe<br />
Flow Rate Accuracy + 0.5%<br />
Calibration<br />
Automatic, enter syringe size up to 35 mm<br />
Inside Diameter<br />
Display<br />
2 line, 16 character vacuum, fluorescent display<br />
and green run led<br />
Nonvolatile Memory Stores diameter, rate and configuration settings<br />
Maximum Force<br />
8 kg (17 lb.)<br />
Maximum Pressure 8 p.s.i. with 50/60 cc syringe; 100 p.s.i.<br />
with 1 ml syringe<br />
Drive Motor<br />
0.9° step angle motor<br />
Step Rate:<br />
Minimum / Maximum 1 pulse in 27.6 sec / 200 steps/sec<br />
Pusher Advance/Step 0.8 µm pusher advance per motor step<br />
Pusher Travel Rate:<br />
Minimum / Maximum 0.7 µm/min / 15 mm/min<br />
Dynamic Range 1 to 16,384<br />
Leakage to Ground Typically < 150 µA<br />
Ground Resistance Typically < 0.05 ohms<br />
Input Power<br />
12 VDC 1.5Amps<br />
Input Power Connection 2.5mm ID x 5.5mm OD male plug<br />
Power Supply<br />
100/250 VAC, 50/60 Hz, 18 Watts Universal Power<br />
Supply, Use Only a Harvard Apparatus Approved<br />
Power Supply and Line Cord<br />
Size, H x W x D<br />
<strong>11</strong>.4 x 22.9 x <strong>11</strong>.4 cm (4-1/2 x 9 x 4-1/2 in)<br />
Weight<br />
2.2 kg (4.8 lb)
14<br />
Appendix B: <strong>Syringe</strong> Inside Diameter<br />
H a r v a r d A p p a r a t u s P u m p '<strong>11</strong>' P l u s S y r i n g e P u m p<br />
–––––––––––––––––––<br />
Terumo<br />
Size Diameter<br />
3 cc 8.95 mm<br />
5 13.00<br />
10 15.80<br />
20 20.15<br />
30 23.10<br />
60 29.10<br />
–––––––––––––––––––<br />
Sherwood Monoject<br />
Plastic<br />
Size Diameter<br />
1 cc 4.65 mm<br />
3 8.94<br />
6 12.70<br />
12 15.90<br />
20 20.40<br />
35 23.80<br />
60 26.60<br />
140 38.40<br />
–––––––––––––––––––<br />
Popper & Sons, <strong>Inc</strong>.<br />
“Perfektum” Glass<br />
Size Diameter<br />
0.25 cc3.45 mm<br />
0.5 3.45<br />
1 4.50<br />
2 8.92<br />
3 8.99<br />
5 <strong>11</strong>.70<br />
10 14.70<br />
20 19.58<br />
30 22.70<br />
50 29.00<br />
100 35.70<br />
–––––––––––––––––––<br />
Stainless Steel<br />
Size Diameter<br />
8 cc 9.525 mm<br />
20 cc 19.130<br />
50 cc 28.600<br />
100 cc 34.900<br />
–––––––––––––––––––<br />
Becton Dickinson<br />
Plastic “Plasticpak”<br />
Size Diameter<br />
1 cc 4.78 mm<br />
3 8.66<br />
5 12.06<br />
10 14.50<br />
20 19.13<br />
30 21.70<br />
50/60 26.70<br />
–––––––––––––––––––<br />
Air Tite “All Plastic”<br />
Size Diameter<br />
2.5 cc 9.60 mm<br />
5.0 12.45<br />
10 15.90<br />
20 20.05<br />
30 22.50<br />
50 29.00<br />
–––––––––––––––––––<br />
Unimetrics<br />
Series 4000 & 5000<br />
Size Diameter<br />
10 µl 0.460 mm<br />
25 0.729<br />
50 1.031<br />
100 1.460<br />
250 2.300<br />
500 3.260<br />
1000 4.610<br />
–––––––––––––––––––<br />
SGE<br />
Scientific Glass<br />
Engineering<br />
Size Diameter<br />
25 µl 0.73 mm<br />
50 1.03<br />
100 1.46<br />
250 2.30<br />
500 3.26<br />
1.0 ml 4.61 mm<br />
2.5 7.28<br />
5 10.30<br />
10 14.57<br />
–––––––––––––––––––<br />
Hamilton Microliter<br />
Series Gastight<br />
Size Diameter<br />
.5 µl 0.103 mm<br />
1 0.1457<br />
2 0.206<br />
5 0.3257<br />
10 0.460<br />
25 0.729<br />
50 1.031<br />
100 1.46<br />
250 2.3<br />
500 3.26<br />
1.0 ml 4.61 mm<br />
2.5 7.28<br />
5 10.3<br />
10 14.57<br />
25 23.0<br />
50 32.6
15<br />
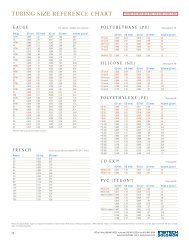
Appendix C: Flow Rates<br />
H a r v a r d A p p a r a t u s P u m p '<strong>11</strong>' P l u s S y r i n g e P u m p<br />
nominal<br />
syringe<br />
size<br />
µl/min ml/hr ml/min<br />
nominal<br />
µl/hr<br />
diameter<br />
(mm) min max min max min max min max<br />
Min 0.10 0.0014 22.35 0.0001 0.3725 0.0001 0.0223 0.0001 0.0003<br />
1 µl 0.15 0.0031 50.29 0.0001 0.8383 0.0001 0.0502 0.0001 0.0008<br />
2 µl 0.21 0.0061 98.58 0.0002 1.6430 0.0001 0.0985 0.0001 0.0016<br />
5 µl 0.33 0.0149 243.4 0.0003 4.057 0.0001 0.2434 0.0001 0.0040<br />
10 µl 0.46 0.0289 473.0 0.0005 7.883 0.0001 0.4730 0.0001 0.0078<br />
25 µl 0.73 0.0728 1,191 0.0013 19.85 0.0001 1.191 0.0001 0.0198<br />
50 µl 1.03 0.1448 2,371 0.0025 39.52 0.0002 2.371 0.0001 0.0395<br />
100 µl 1.46 0.2909 4,765 0.0049 79.41 0.0003 4.765 0.0001 0.0794<br />
250 µl 2.30 0.7218 9,999 0.0121 197.0 0.0008 <strong>11</strong>.82 0.0001 0.1970<br />
1,000 µl 3.26 1.451 9,999 0.0242 395.7 0.0015 23.75 0.0001 0.3959<br />
1 ml 4.61 2.900 9,999 0.0484 791.8 0.0029 47.50 0.0001 0.7918<br />
2.5 ml 7.28 7.232 9,999 0.1206 1,974 0.0073 <strong>11</strong>8.4 0.0002 1.974<br />
3 ml 8.66 10.24 9,999 0.1706 2,794 0.0103 167.6 0.0002 2.794<br />
5 ml 10.30 14.50 9,999 0.2413 3,952 0.0145 237.1 0.0003 3.952<br />
10 ml 14.57 28.97 9,999 0.4828 7,909 0.0290 474.5 0.0005 7.909<br />
20 ml 20.05 54.86 9,999 0.9142 9,999 0.0549 898.6 0.0010 14.97<br />
30 ml 23.10 72.81 9,999 1.214 9,999 0.0729 1,192 0.0013 19.88<br />
50 ml 26.70 97.27 9,999 1.622 9,999 0.0973 1,576 0.0017 26.56<br />
Max 35.00 167.2 9,999 2.786 9,999 0.1672 2,738 0.0028 45.64
16<br />
Appendix D: Serial Communication<br />
H a r v a r d A p p a r a t u s P u m p '<strong>11</strong>' P l u s S y r i n g e P u m p<br />
Commands, Queries and Responses<br />
After each transmission to the pump terminating with a CR character (ASCII 13),<br />
the pump enters remote mode and responds with the three character sequence:<br />
CR LF prompt<br />
The prompt character indicates the status of the pump as follows:<br />
prompt meaning ASCII code<br />
: When stopped (ASCII 58 decimal)<br />
> When running forward (ASCII 62 decimal)<br />
* When stalled (ASCII 42 decimal)<br />
<strong>Pump</strong> <strong>11</strong> does not include stall<br />
detection<br />
Serial commands and their meanings:<br />
Commands:<br />
KEY<br />
RUN<br />
STP<br />
CLV<br />
CLT<br />
REV<br />
Return to keyboard control. Exit remote mode<br />
Start infuse (forward direction)<br />
Stop motor<br />
Commands with numbers:<br />
Clears volume accumulator to zero<br />
Clears target volume to zero, dispense disabled<br />
Start (Reverse Direction)<br />
MMD number Set syringe diameter, units are mm.<br />
Rate is set to zero after MMD command.<br />
ULM number Set flow rate and range, units are microliters per minute<br />
MLM number Set flow rate and range, units are milliliters per minute<br />
ULH number Set flow rate and range, units are microliters per hour<br />
MLH number Set flow rate and range, units are milliliters per hour<br />
MLT number Set target infusion volume, units are ml or µl depending<br />
on range<br />
Numbers can be between 0 and 1999.<br />
Leading zeros and trailing decimal point are optional. Any number of digits<br />
to the right of the decimal point may be transmitted. The number will be<br />
rounded.
17<br />
Appendix D: Serial Communication<br />
H a r v a r d A p p a r a t u s P u m p '<strong>11</strong>' P l u s S y r i n g e P u m p<br />
Queries:<br />
DIA Returns diameter value units in mm<br />
RAT Returns rate value set in current range units<br />
VOL Returns current accumulated infused volume, units in ml or µl<br />
depending on range<br />
VER Returns model and version number of firmware<br />
TAR Returns target volume, units in ml or µl depending on range<br />
value format: nnnn.nnn<br />
The returned value is an 8 character string with leading zeros converted to SP<br />
characters (ACSII 32 decimal). The fifth character is a decimal point (ASCII<br />
46 decimal)<br />
Queries with string response:<br />
RNG Returns range message (character string either: ML/H ML/M<br />
UL/H UL/M)<br />
Error responses:<br />
CR LF ? CR LF prompt<br />
CR LF OOR CR LF prompt<br />
Unrecognized command<br />
Entered value in out of range
18<br />
Appendix E: Dual RS-232<br />
H a r v a r d A p p a r a t u s P u m p '<strong>11</strong>' P l u s S y r i n g e P u m p<br />
Daisy-Chain Connector & Cables<br />
Part No.<br />
Description<br />
70-2022 RS232 serial cable, 6 ft long, 9 pin d-sub on one end, and RJ<strong>11</strong> on the<br />
other end<br />
72-2478 Daisy Chain Cable, 6 ft<br />
55-7760 Daisy Chain Cable, 2 ft
Harvard Apparatus pumps are distributed<br />
on a non-exclusive basis by:<br />
<strong>Instech</strong> <strong>Laboratories</strong>, <strong>Inc</strong>.<br />
Headquarters:<br />
5209 Militia Hill Road<br />
Plymouth Meeting, PA 19462<br />
TL (800) 443-4227<br />
TL (610) 941-0132<br />
FX (610) 941-0134<br />
European sales office:<br />
P.O. Box 2<br />
9950 AA Winsum<br />
The Netherlands<br />
TL 0031-(0)594-696123<br />
www.instechlabs.com/<strong>Pump</strong>s/syringe/