Download Project PDF - Bernina
Download Project PDF - Bernina
Download Project PDF - Bernina

Create successful ePaper yourself
Turn your PDF publications into a flip-book with our unique Google optimized e-Paper software.
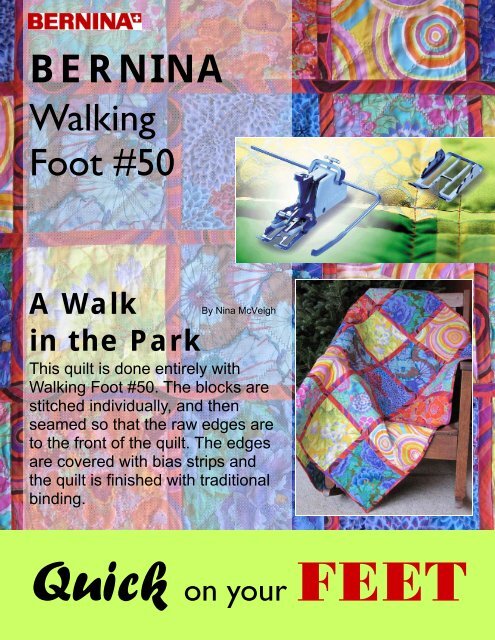
BERNINA<br />
Walking<br />
Foot #50<br />
A Walk<br />
By Nina McVeigh<br />
in the Park<br />
This quilt is done entirely with<br />
Walking Foot #50. The blocks are<br />
stitched individually, and then<br />
seamed so that the raw edges are<br />
to the front of the quilt. The edges<br />
are covered with bias strips and<br />
the quilt is finished with traditional<br />
binding.<br />
Quick on your FEET
Walking Foot #50 is a very helpful aid for working<br />
with layers of fabric. It can be used with almost any<br />
decorative stitch, making grid quilting much more<br />
interesting! The ability to move the needle to any<br />
position makes precision piecing a breeze. This quilt<br />
is done entirely with Walking Foot #50. The blocks<br />
are stitched individually, and then they are seam so<br />
that the raw edges are to the front of the quilt. The<br />
raw edges are covered with bias strips and the quilt<br />
is finished with traditional binding.<br />
Supplies<br />
• ⅔ yard of seven different fabrics<br />
• 1¼ yards fabric for binding & strips between blocks<br />
• 2¼ yards loft batting (or twin size batt)<br />
• Isacord thread in eight colors to coordinate with<br />
quilt fabrics (can use fewer colors if desired)<br />
• Embroidery needle, size 90/14<br />
• Denim needle, size 90/14<br />
• Walking Foot #50 with Guides<br />
• 1” Bias Tape Maker<br />
• Water-soluble glue stick<br />
• Spray starch<br />
• Rotary cutting equipment<br />
• 12½” square quilting ruler<br />
• BERNINA Sewing Machine<br />
Cutting Instructions<br />
Using a rotary cutter, mat and ruler cut the 7 pieces<br />
of fabric into 10¾” squares (8 from each piece).<br />
Draw diagonal lines<br />
connecting the corners of<br />
each block.<br />
Cut the batting into twenty-five 10¾” squares.<br />
Preparation<br />
Make 25 quilt sandwiches using the fabric and batting<br />
squares, layering the same print on the top and<br />
bottom of each batting square.<br />
Construction<br />
Attach the open-toe sole to Walking Foot #50;<br />
this sole provides extra visibility. Attach Walking<br />
Foot #50 to the sewing machine.<br />
Insert a new #90/14<br />
Embroidery needle into the<br />
machine. Select an Isacord<br />
thread color to complement<br />
each of the 7 block fabrics.<br />
Thread needle and bobbin<br />
with the same thread color.<br />
You will have six extra fabric squares left over.<br />
Select a decorative stitch<br />
and quilt the block along<br />
the diagonals. Choose open<br />
stitches, avoiding satinbased<br />
stitches.
Repeat until you have stitched 25 blocks.<br />
When all blocks are stitched, trim to 10” squares.<br />
Arrange the blocks as desired in a 5 x 5 grid.<br />
With wrong sides<br />
(backs) together, sew<br />
five blocks together in<br />
a row. Guide the edges<br />
with the ¼” seam mark<br />
on the walking foot.<br />
Make 5 rows.<br />
Press seam allowances<br />
open—they will be on<br />
the right side of the quilt.<br />
With wrong sides<br />
(backs) together, stitch<br />
the rows together to<br />
make a square.<br />
Press seam allowances<br />
open.<br />
Attach the right hand<br />
guide to Walking Foot<br />
#50 and set it at 3”<br />
from the needle.<br />
Tighten the screw<br />
to hold it in place.<br />
Place the guide on<br />
the previously stitched<br />
line and sew the same<br />
decorative stitch on<br />
each side of the two<br />
diagonal lines.<br />
Select a zigzag stitch<br />
with length = 2mm,<br />
width = 5mm. Zigzag<br />
the seams open using<br />
a thread that is complementary<br />
to all the blocks,<br />
as it will show on the<br />
back of the quilt.<br />
Stitch all blocks of<br />
the same fabric with<br />
the same thread,<br />
choosing a different<br />
decorative stitch for<br />
each block. Choose<br />
open decorative<br />
stitches, avoiding the<br />
satin-based stitches.<br />
Spray starch the binding fabric. To avoid seaming,<br />
fold the fabric at a diagonal so that when you cut the<br />
bias strips in the next step you will be cutting strips<br />
as long as possible.<br />
Cut eight 1¾”-wide bias strips that are at least 52”<br />
long (seaming if necessary). Set aside the rest of the<br />
fabric.
Load the bias tape<br />
maker with a binding<br />
strip. Pull the fabric<br />
through the bias tape<br />
maker and press as<br />
the folded strip exits<br />
the other end. (I found<br />
that my strips were<br />
more even and consistent when I pressed from the<br />
top side of the fabric.)<br />
Measure the width of<br />
the pressed strip and<br />
divide the measurement<br />
in half. Measure<br />
this distance out from<br />
the seam and draw a<br />
placement line for the<br />
edge of the bias strip.<br />
Position a folded bias strip over the seam, aligning<br />
the edge with the marked line. Use a glue stick to<br />
hold the strip in place.<br />
Remove the guide from Walking Foot #50. Remove<br />
the open-toe sole from the foot and attach the<br />
standard sole. Since you will be stitching through<br />
more layers of fabric you may want to change to a<br />
#90/14 Denim needle.<br />
Select a straight stitch<br />
and move the needle<br />
position 2 steps to the<br />
right of center. Place<br />
the quilt under the foot<br />
with the edge of the<br />
bias strip just inside<br />
the right toe of the<br />
foot. Stitch down the<br />
side of the strip.<br />
Repeat for the second<br />
side of the strip.<br />
Lay four strips in one<br />
direction, then lay the<br />
remaining four strips<br />
in the other direction.<br />
From the fabric left over from cutting the bias strips,<br />
cut enough 2½”-wide bias strips to go around the<br />
outer edge of the quilt—about 220”. Seam the bias<br />
strips together. Press the long strip in half lengthwise,<br />
wrong sides together.<br />
Place the folded bias<br />
strip on the right side<br />
of the quilt with the<br />
raw edges even. Sew<br />
the folded bias strip<br />
to the quilt using a ⅜”<br />
seam allowance. To<br />
accomplish this, move<br />
the needle position all<br />
the way to the right and guide the raw edge of the<br />
fabric along the outside edge of the foot.<br />
When all of the binding is sewn to the front of the<br />
quilt, press it out away from the quilt. Pull the binding<br />
around to the back of the quilt and stitch along the<br />
inner folded edge to hold the binding in place.<br />
For additional information on Dual Sole<br />
Walking Foot with Guides #50 and other<br />
BERNINA presser feet, attachments, and<br />
accessories, see Feetures, volumes 1-3.<br />
Visit<br />
bernina.com<br />
for additional projects and information.