Monitor Removal and Installation - Megatouch
Monitor Removal and Installation - Megatouch
Monitor Removal and Installation - Megatouch

You also want an ePaper? Increase the reach of your titles
YUMPU automatically turns print PDFs into web optimized ePapers that Google loves.
COPYRIGHT © 2004 MERIT INDUSTRIES, INC.<br />
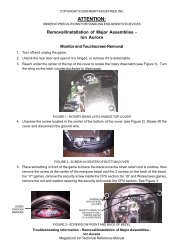
ATTENTION:<br />
OBSERVE PRECAUTIONS FOR HANDLING ELECTROSTATIC DEVICES<br />
1. Turn off <strong>and</strong> unplug the game.<br />
<strong>Removal</strong>/<strong>Installation</strong> of <strong>Monitor</strong> -<br />
FORCE Classic Countertop<br />
<strong>Monitor</strong> <strong>Removal</strong><br />
2. Unlock <strong>and</strong> remove the coin box or coin box/bill acceptor assembly.<br />
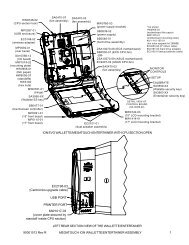
3. Unlock <strong>and</strong> remove the lid by first disconnecting the fan power connector, then the clear drainage<br />
tubing (from lid end) <strong>and</strong> ground strap. Also remove the monitor control board attached<br />
with velcro to the inside of the game. Then press up on the spring-loaded levers (located on<br />
each side of the lid), push the levers forward, <strong>and</strong> lift <strong>and</strong> remove the lid. Also remove the front<br />
bezel. See Figures 1 <strong>and</strong> 2.<br />
4. Disconnect the ground wire (with the ring lug) that is attached to the metalwork next to the<br />
touchscreen controller. Then disconnect the cable from the back of the controller <strong>and</strong> disconnect<br />
the Molex connector connecting the orange <strong>and</strong> gray wires (from the touchscreen controller<br />
cable) to the main harness.<br />
5. Disconnect the monitor power connector (black <strong>and</strong> white wires running from the monitor<br />
board to the right angle connector plugged into the power supply).<br />
6. Disconnect the monitor signal cable from the motherboard.<br />
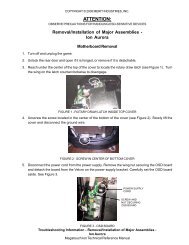
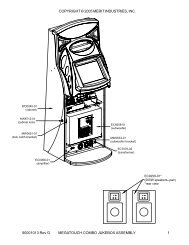
7. Remove the 4 nuts securing the monitor chassis to the main chassis. Two nuts are located on<br />
each side of the monitor board. See Figure 3 for locations. NOTE: BE CAREFUL TO AVOID<br />
THE FLYBACK TRANSFORMER AND HIGH VOLTAGE WIRE RUNNING TO THE MONI-<br />
TOR.<br />
8. Pick up the monitor assembly <strong>and</strong> remove it from the cabinet.<br />
<strong>Monitor</strong> <strong>Installation</strong><br />
1. Place the new monitor assembly in the cabinet.<br />
2. Fasten the monitor chassis to the main chassis with the 4 nuts, 2 on each side of the monitor<br />
board. NOTE: BE CAREFUL TO AVOID THE FLYBACK TRANSFORMER AND HIGH<br />
VOLTAGE WIRE RUNNING TO THE MONITOR.<br />
3. Connect the monitor signal cable to the motherboard.<br />
4. Reconnect the monitor power connector to the monitor board.<br />
5. Reconnect the touchscreen cable in the back of the controller, then reconnect the Molex<br />
connector to the main harness.<br />
6. After replacing the front bezel, install the hood on the chassis, connecting the fan power<br />
connector, monitor control board, ground strap, <strong>and</strong> plastic drain tube. Then pull the lid towards<br />
you until the spring-loaded levers lock into place. See Figures 1 <strong>and</strong> 2 for locations.<br />
7. Close <strong>and</strong> lock the lid.<br />
8. Replace <strong>and</strong> lock the coin box or coin box/bill acceptor assembly.<br />
9. Plug in <strong>and</strong> turn on the game.<br />
Troubleshooting Information - <strong>Removal</strong>/<strong>Installation</strong> of <strong>Monitor</strong> -<br />
FORCE Classic Countertop<br />
<strong>Megatouch</strong> FORCE Technical Reference Manual
COPYRIGHT © 2004 MERIT INDUSTRIES, INC.<br />
FAN POWER<br />
CONNECTOR<br />
CLEAR<br />
DRAINAGE<br />
TUBING<br />
GROUND<br />
STRAP<br />
SPRING-LOADED<br />
LEVER<br />
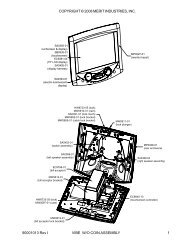
FIGURE 1 - FORCE CLASSIC - HOOD ASSEMBLY<br />
FRONT<br />
BEZEL<br />
FIGURE 2 - FORCE CLASSIC - MONITOR ASSEMBLY<br />
Troubleshooting Information - <strong>Removal</strong>/<strong>Installation</strong> of <strong>Monitor</strong> -<br />
FORCE Classic Countertop<br />
<strong>Megatouch</strong> FORCE Technical Reference Manual
COPYRIGHT © 2004 MERIT INDUSTRIES, INC.<br />
HIGH VOLTAGE<br />
WIRE<br />
HEATSINK<br />
MONITOR POWER<br />
CONNECTOR<br />
NUTS<br />
(TYP. 4 PLACES)<br />
FIGURE 3 - MONITOR REMOVAL<br />
Troubleshooting Information - <strong>Removal</strong>/<strong>Installation</strong> of <strong>Monitor</strong> -<br />
FORCE Classic Countertop<br />
<strong>Megatouch</strong> FORCE Technical Reference Manual