Megatouch FORCE Touchscreen Replacement
Megatouch FORCE Touchscreen Replacement
Megatouch FORCE Touchscreen Replacement
- No tags were found...

You also want an ePaper? Increase the reach of your titles
YUMPU automatically turns print PDFs into web optimized ePapers that Google loves.
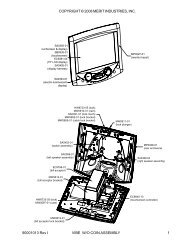
COPYRIGHT © 2004 MERIT INDUSTRIES, INC.SCREWS SECURING REARBEZEL (5 PLACES)SCREWSECURINGFRONT BEZEL(BOTH SIDES)SCREWSECURINGREAR BEZEL(BOTH SIDES)FIGURE 2 - <strong>FORCE</strong> RADION/FUN ZONE JR. - FRONT AND REAR BEZELSREPLACEMENTTOUCHSCREENSCREWS SECURINGFRONT BEZEL(2 PLACES)TOUCHSCREENCONTROLLERPICTURETUBEFIGURE 3 - <strong>FORCE</strong> RADION/FUN ZONE JR. - MONITOR ASSEMBLY3 MEGATOUCH <strong>FORCE</strong> TOUCHSCREEN REPLACEMENT PM0331-04
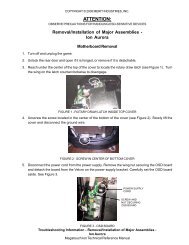
COPYRIGHT © 2004 MERIT INDUSTRIES, INC.completely remove the touchscreen.12. Remove any remaining adhesive residuewith denatured alcohol, then wipethe surface of the picture tube with thesupplied alcohol wipe.<strong>Touchscreen</strong> Installation13. Clean the reverse side of the replacementtouchscreen with the supplied alcoholwipe.14. Peel the backing from the 8 pieces offoam tape already adhered to the reverseside of the touchscreen. Thencut 8 pieces of equal size from the suppliedroll of 3/8” double-sided foam tape(the thinner of the two supplied 3/8”rolls) and place them (backing side facingout) on the tape already on thetouchscreen before peeling off thebacking. The double-thickness of thefoam tape will allow enough distancebetween the touchscreen and the picturetube once the new screen is inplace.15. Replace the new touchscreen over thepicture tube (with the cable on the leftif you are facing the game), making surethe screen is properly and evenlyaligned over the picture tube. Thenclean the front of the screen with thesupplied alcohol wipe.16. Connect the new touchscreen controllercable in the back of the controllerand secure the controller on the mountingscrews in the game with the existinghardware. Also connect the Molexconnector (orange and gray wires) tothe main power harness.17. Remembering the manner in which thetape was placed around the touchscreenyou removed, place and cut alength of the supplied black poly tapeevenly over an entire edge of the touchscreenand repeat until all 4 edges arecovered.18. Place and cut a longer length of blackpoly tape around all 4 edges of thescreen.NOTE: Use the additional 3/8” foamtape (the thicker of the two supplied3/8” rolls) if you need to replace thegasket on the inside of the front bezel.Be sure to remove all of the existingfoam tape and adhesive first.19. Replace the front bezel and the 4screws (2 at the bottom, 2 at the top)holding the bezel to the game. See Figures2 and 3.20. Replace the rear bezel and the 7screws (5 along the top edge, 2 at thebottom rear) holding the bezel to thegame. See Figure 2.21. Replace the screw securing the strainrelief cord to the rear door, then replacethe monitor board.22. Replace the cash box.23. Plug in and turn on the game.24. When the game is finished booting, calibratethe touchscreen.25. Close and lock the rear door, then replaceand lock both side doors.<strong>FORCE</strong> CLASSIC GAMES<strong>Touchscreen</strong> Removal1. Turn off and unplug the game.2. Unlock and remove the coin box or coinbox/bill acceptor assembly.3. Unlock and open the rear door. To removethe lid, first disconnect the fanPM0331-04 MEGATOUCH <strong>FORCE</strong> TOUCHSCREEN REPLACEMENT 4
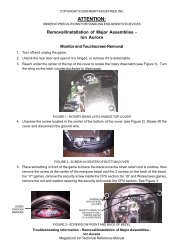
COPYRIGHT © 2004 MERIT INDUSTRIES, INC.power connector, then the clear drainagetubing (from lid end) and groundstrap. Also remove the monitor controlboard attached with velcro to the insideof the game. Then press up onthe spring-loaded levers (located oneach side of the lid), push the leversforward, and lift and remove the lid.Also remove the front bezel. See Figures4 and 5.4. Remove the two nuts and washerssecuring the touchscreen controller tothe game and remove the controllerfrom the mounting screws. Then disconnectthe touchscreen controllercable from the back of the controllerand disconnect the Molex connector(orange and gray wires) running fromthe touchscreen controller cable to themain power harness.5. Remove the black poly tape from aroundthe edges of the old touchscreen. Rememberhow the tape was placed inorder to tape the new touchscreen.6. Use dental floss to carefully cut thefoam tape holding the touchscreen tothe picture tube until you are able tocompletely remove the touchscreen.7. Remove any remaining adhesive residuewith denatured alcohol, then wipethe surface of the picture tube with thesupplied alcohol wipe.<strong>Touchscreen</strong> Installation8. Clean the reverse side of the replacementtouchscreen with the suppliedalcohol wipe.9. If there is no tape already on the screen,cut pieces of the supplied 1/2” doublesidedfoam tape long enough to covereach edge of the screen without over-FAN POWERCONNECTORCLEAR DRAINAGETUBINGSPRING-LOADEDLEVERGROUNDSTRAPFIGURE 4 - <strong>FORCE</strong> CLASSIC - HOOD ASSEMBLY5 MEGATOUCH <strong>FORCE</strong> TOUCHSCREEN REPLACEMENT PM0331-04
COPYRIGHT © 2004 MERIT INDUSTRIES, INC.FRONTBEZELFIGURE 5 - <strong>FORCE</strong> CLASSIC - MONITOR ASSEMBLYlapping. After the tape is in place onthe screen, peel off the backing.10. Replace the new touchscreen over thepicture tube (with the cable on the rightif you are facing the game), making surethe screen is properly and evenlyaligned over the picture tube. Thenclean the front of the screen with thesupplied alcohol wipe.11. Remembering the manner in which thetape was placed around the touchscreenyou removed, place and cut alength of the supplied black poly tapeevenly over an entire edge of the touchscreenand repeat until all 4 edges arecovered.12. Place and cut a longer length of blackpoly tape around all 4 edges of thescreen.13. Route the new touchscreen controllercable under the picture tube and awayfrom the flyback transformer. Then reconnectthe cable in the back of thecontroller and secure the controller onthe mounting screws in the game withthe existing hardware. Also connectthe Molex connector (orange and graywires) to the main power harness.NOTE: Use the supplied roll of 3/8”foam tape (the thicker of the two 3/8”rolls) if you need to replace the gasketon the inside of the front bezel. Be sureto remove all of the existing foam tapeand adhesive first.14. After replacing the front bezel, installthe hood on the chassis, connectingthe fan power connector, monitor controlboard, ground strap, and plasticdrain tube. See Figure 4 for locations.Pull the hood towards you until thespring-loaded levers lock into place.15. Close and lock the hood.16. Plug in and turn on the game.17. When the game is finished booting, cali-PM0331-04 MEGATOUCH <strong>FORCE</strong> TOUCHSCREEN REPLACEMENT 6
COPYRIGHT © 2004 MERIT INDUSTRIES, INC.brate the touchscreen.18. Replace and lock the coin box or coinbox/bill acceptor assembly.<strong>FORCE</strong> ELITE GAMES<strong>Touchscreen</strong> Removal1. Turn off and unplug the game.2. Unlock and open the rear door.3. Disconnect the monitor power connection(black and yellow wires) runningto the power supply.4. Disconnect the monitor signal cablefrom the motherboard and remove itfrom the cable clamps.5. Inside the game, access the latchesfor each side panel and remove bothpanels (see Figure 6).6. Remove the two nuts and washerssecuring the touchscreen controller tothe game and remove the controllerfrom the mounting screws. Then disconnectthe cable from the back of thecontroller and disconnect the Molexconnector (orange and gray wires)running from the touchscreen controllercable to the main power harness.7. Remove the 3 screws at the top of eachside piece fastening the top cover tothe game (see Figure 7) and removethe top cover.8. Loosen the 5/16” nuts securing the 2LCD clips (one on each side piece).See Figure 7.9. Lift the bezel and monitor assembly fromthe game.10. Remove the 3 screws on top of thefront bezel (see Figure 7) and separatethe bezel from the monitor.11. Use dental floss to carefully cut thefoam tape holding the touchscreen tothe monitor until you are able to completelyremove the touchscreen.12. Remove any remaining adhesive residuewith denatured alcohol, then cleanthe monitor glass with the supplied alcoholwipe.<strong>Touchscreen</strong> Installation13. Clean the reverse side of the replacementtouchscreen with the supplied alcoholwipe.14. Cut pieces of the supplied 1/2” doublesidedfoam tape long enough to covereach edge of the screen without overlapping.After the tape is in place onthe screen, peel off the backing.15. Replace the new touchscreen over themonitor (with the cable on the left ifyou are facing the game), making surethe screen is properly and evenlyaligned over the monitor glass. Thenclean the front of the screen with thesupplied alcohol wipe.16. Reattach the front bezel to the monitorwith the 3 screws removed earlier. SeeFigure 7.17. Replace the monitor assembly, aligningit with the support brackets inside thegame and making sure the LCD clips fitproperly into the slots at the top of eachside.18. Tighten the nuts securing the 2 LCDclips. See Figure 7.19. Replace the top cover.20. Replace the 3 screws at the top of eachside piece. The shorter screw will go7 MEGATOUCH <strong>FORCE</strong> TOUCHSCREEN REPLACEMENT PM0331-04
COPYRIGHT © 2004 MERIT INDUSTRIES, INC.SIDE PANELLATCHESLATCH DETAILFIGURE 6 - <strong>FORCE</strong> ELITE - SIDE PANEL LATCH ACCESSSCREWS SECURINGBEZEL (3 PLACES)SCREWS SECURINGTOP COVER(BOTH SIDES)NUTS FASTENINGLCD CLIPS(BOTH SIDES)FIGURE 7 - <strong>FORCE</strong> ELITE - FRONT BEZEL REMOVALPM0331-04 MEGATOUCH <strong>FORCE</strong> TOUCHSCREEN REPLACEMENT 8
COPYRIGHT © 2004 MERIT INDUSTRIES, INC.in the screw hole closest to the rear ofthe game. See Figure 7.21. Connect the new touchscreen controllercable in the back of the controllerand secure the controller on the mountingscrews in the game with the existinghardware. Also connect the Molexconnector (orange and gray wires) tothe main power harness.22. Replace both side panels.23. Reconnect the monitor power connectorto the power supply.24. Route the monitor signal connectorthrough the cable clamps and reconnectit to the motherboard.25. Plug in and turn on the game.26. When the game is finished booting, calibratethe touchscreen.27. Close and lock the rear door.<strong>FORCE</strong> VIBE GAMES<strong>Touchscreen</strong> Removal1. Turn off and unplug the game.2. Unlock and open the CPU section.3. Games with bill acceptors only:Remove the clamp fastening the bill acceptorsensor cable to the VGA monitorcable. Then disconnect the 12-pinpower connector from the side of thebill acceptor and remove the 4 screwsand washers securing the bill acceptorto the CPU. You will then be able toremove the bill acceptor.4. Disconnect the VGA monitor cable connectorand the screw fastening thecable to the monitor mounting plate, andalso disconnect the ground screw.Then disconnect the monitor powerconnector. See Figure 8.5. Remove the 2 thumbnuts securing thetouchscreen controller to the game andSCREWSFASTENINGMONITOR TOBEZEL(10 PLACES)VGAMONITORCONNECTORMONITORPOWERCONNECTORGROUNDSCREWTOUCHSCREENCONTROLLERTOUCHSCREENPOWERCONNECTORFIGURE 8 - <strong>FORCE</strong> VIBE - MONITOR REMOVAL9 MEGATOUCH <strong>FORCE</strong> TOUCHSCREEN REPLACEMENT PM0331-04
COPYRIGHT © 2004 MERIT INDUSTRIES, INC.remove the controller from the mountingscrews. Then disconnect the cablefrom the back of the controller and disconnectthe Molex connector (orangeand gray wires) running from thetouchscreen controller cable to the mainpower harness. Also disconnect theground screw. See Figure 8.6. Using Figure 8, remove the 10 screwsfastening the monitor to the bezel (2screws also fasten strain relief cordson either side of the CPU) and carefullypull the monitor assembly away fromthe bezel until you’re able to accessthe touchscreen.NOTE: Keep track of all hardwareremoved in the touchscreen replacementprocess.7. Note the orientation of the touchscreencable before removing the screen.Then use dental floss to carefully cutthe foam tape holding the touchscreento the monitor until you are able to completelyremove the screen. Note themanner in which the 2 layers of foamtape are placed on the front edge ofthe screen.8. Remove any remaining adhesive residuewith denatured alcohol, then cleanthe monitor glass with the supplied alcoholwipe.<strong>Touchscreen</strong> Installation9. Clean the reverse side of the replacementtouchscreen with the supplied alcoholwipe.10. If there is no tape already on the touchscreen,cut pieces of the supplied 1/2”double-sided foam tape long enough tocover each edge of the screen withoutoverlapping. After the tape is inplace on the screen, peel off the backing.11. Replace the new touchscreen over themonitor in the same manner as the oldscreen, making sure the screen is properlyand evenly aligned over the monitorglass. Then clean the front of thescreen with the supplied alcohol wipe.12. Using the original touchscreen for reference,cut pieces of the supplied 1/2”single-sided foam tape long enough tocover each edge of the front of thescreen without overlapping, then placethe tape on the screen. After the tapeis in place, repeat this step so thereare two layers of tape on the screen.13. Connect the new touchscreen controllercable in the back of the controllerand secure the controller on the mountingscrews in the game with the existinghardware. Also connect the Molexconnector (orange and gray wires) tothe main power harness.14. Replace the monitor assembly in thebezel, lining up the screw holes in themonitor with the holes in the bezel, thenreplace the 10 screws. See Figure 8.15. Reconnect the VGA monitor cable connectorand the screw fastening thecable to the monitor mounting plate, andalso reconnect the ground screw. Thenreconnect the monitor power connector.See Figure 8.16. Games with bill acceptors only:Replace the bill acceptor in the CPUsection (make sure the touchscreencontroller cables do not interfere) andfasten it with the 4 screws and washers.Then reconnect the 12-pin bill acceptorpower connector. It is also recommendedyou use a cable clamp torefasten the bill acceptor sensor andVGA monitor cables.PM0331-04 MEGATOUCH <strong>FORCE</strong> TOUCHSCREEN REPLACEMENT 10
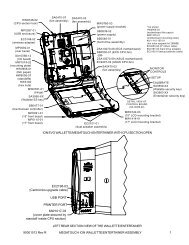
COPYRIGHT © 2004 MERIT INDUSTRIES, INC.16. Plug in and turn on the game.17. When the game is finshed booting, calibratethe touchscreen.18. Close and lock the CPU section.<strong>FORCE</strong> FUSION/FUN ZONE GAMESUse Figures 9 and 10 to determine yourtype of game, then follow the appropriateinstructions to remove and install thetouchscreen.Fusion with electronics box/Fun Zone<strong>Touchscreen</strong> Removal1. Turn off and unplug the game.2. Unlock and open the bezel.3. Remove the 6 thumbnuts fastening thebezel to the game (see Figure 11) andremove the bezel.4. Remove the cable clamps securing thetouchscreen cable and the touchscreenpower harness, then removethe screws fastening the touchscreenELECTRONICSBOXELECTRONICSMOUNTEDDIRECTLYTO GAMEFIGURE 9 - FUSION WITHELECTRONICS BOX/FUN ZONEFIGURE 10 - FUSION WITHOUTELECTRONICS BOX11 MEGATOUCH <strong>FORCE</strong> TOUCHSCREEN REPLACEMENT PM0331-04
COPYRIGHT © 2004 MERIT INDUSTRIES, INC.THUMBNUTSSECURINGBEZEL(6 PLACES)TOUCHSCREENCONTROLLERFIGURE 11 - UNDERSIDE OF BEZELcontroller (see Figure 11) to the gameand disconnect the cable from theback of the controller. Locate anddisconnect the Molex connector(orange and gray wires) running fromthe touchscreen controller cable to themain power harness, and alsodisconnect the ground screw.5. Use dental floss to carefully cut thefoam tape holding the touchscreen tothe monitor until you are able tocompletely remove the screen. Oncethe touchscreen is completely freefrom the monitor, remove any residualfoam tape from the monitor withdenatured alcohol.<strong>Touchscreen</strong> Installation6. Clean the glass on the reverse side ofthe new touchscreen with the suppliedalcohol wipe, then cut pieces ofthe supplied 1/2” foam tape longenough to cover each edge of themonitor without overlapping. After thetape is in place on the monitor, peel offthe backing. Carefully place thetouchscreen over the monitor in thesame manner it was attached to theold monitor, making sure the screen isproperly and evenly aligned over theglass. Clean the front of the touchscreenwith the supplied alcohol wipeonce it is in place.7. Connect the touchscreen cable in thePM0331-04 MEGATOUCH <strong>FORCE</strong> TOUCHSCREEN REPLACEMENT 12
COPYRIGHT © 2004 MERIT INDUSTRIES, INC.back of the controller (see Figure 11)and secure the controller with the existinghardware. Also connect theMolex connector (orange and graywires) to the main power harness (afterrouting the wires through the cableclamps) and attach the ground screw.8. Reinstall the bezel on the game andfasten it with the 6 thumbnuts.9. Plug in and turn on the game.10. When the game is finished booting,press the CALIBRATE button.11. Close and lock the bezel, then calibratethe touchscreen.Fusion without electronics box<strong>Touchscreen</strong> Removal1. Turn off and unplug the game.2. Unlock and open the bezel.3. Disconnect the VGA monitor connectorand ground screw, the monitor controlboard connector, and the monitorpower connector and also remove thecables from the 2 clamps attached tothe monitor. See Figure 12.4. Remove the screws fastening thetouchscreen controller to the game anddisconnect the cable from the back ofthe controller. Then locate anddisconnect the Molex connector(orange and gray wires) running fromthe touchscreen controller cable to themain power harness. After disconnectingthe ground screw, pull thecables out of the clamps. See Figures12 and 13.5. Remove the 10 screws securing theplastic bezel to the wooden frame (seeFigure 12) and carefully remove thebezel from the game. Be careful notto damage the bezel with the coin cupduring removal.NOTE: Keep track of all hardwareremoved in the touchscreen replacementprocess.6. Place the bezel assembly upsidedownon a flat surface and removethe 10 screws fastening the LCDmonitor to the bezel (remember which2 screws also fasten cable clamps),then remove the monitor from thebezel. See Figure 14.NOTE: Be sure the glass is notscratched when setting the monitoraside.7. Note the orientation of the touchscreencable before removing the screen.Then use dental floss to carefully cutthe foam tape holding the touchscreento the monitor until you are able to completelyremove the screen. Once thetouchscreen is completely free fromthe monitor, remove any residual foamtape from the monitor with denaturedalcohol.<strong>Touchscreen</strong> Installation7. Clean the glass on the reverse side ofthe new touchscreen with the suppliedalcohol wipe, then cut pieces ofthe supplied 1/2” foam tape longenough to cover each edge of themonitor without overlapping. After thetape is in place on the monitor, peel offthe backing.8. Carefully place the touchscreen overthe monitor in the same manner as theold screen, making sure the screen isproperly and evenly aligned over theglass. Then clean the front of thescreen with the supplied alcohol wipe.13 MEGATOUCH <strong>FORCE</strong> TOUCHSCREEN REPLACEMENT PM0331-04
COPYRIGHT © 2004 MERIT INDUSTRIES, INC.CABLECLAMPS(2 PLACES)SCREWSSECURINGBEZEL TOWOODENFRAME(10 PLACES)GROUNDSCREWMONITORPOWERCONNECTORMONITORCONTROLBOARDCONNECTORVGAMONITORCONNECTORTOUCHSCREENCONTROLLERFIGURE 12 - <strong>FORCE</strong> FUSION - UNDERSIDE OF BEZELMOLEXCONNECTORGROUNDSCREWFIGURE 13 - <strong>FORCE</strong> FUSION - CLOSEUP OF CPU SECTIONPM0331-04 MEGATOUCH <strong>FORCE</strong> TOUCHSCREEN REPLACEMENT 14
COPYRIGHT © 2004 MERIT INDUSTRIES, INC.CABLECLAMPSSCREWSFASTENINGLCD MONITORTO BEZEL(10 PLACES)FIGURE 14 - <strong>FORCE</strong> FUSION - UNDER SIDE OF MONITOR9. Place the new LCD monitor in the bezel(make sure it is not upside-down), liningup the screw holes on the face of themounting frame with the larger, drilledholes on the plastic mounting pieces(see Figure 15), and fasten it with the10 screws. Also replace the cableclamps in the appropriate screw holes(See Figure 14).10. Carefully replace the plastic bezelassembly in the game, making sure thecoin cup protrudes into the lowercutout and no wires are pinched, thensecure it to the wooden frame withthe 10 screws (see Figure 12).11. Connect the touchscreen controllercable in the back of the controller andsecure the controller in the game withthe existing hardware. Then connectthe Molex connector (orange and graywires) to the main power harness andattach the ground screw. Replace thecables in the clamps as before. SeeFigure 13.12. Reconnect the VGA monitor connectorand ground screw (do not overtighten),the monitor control boardconnector, and the monitor powerconnector (see Figure 12) and replacethe cables in the 2 clamps attached tothe monitor.13. Plug in and turn on the game.14. When the game is finished booting,press the CALIBRATE button.15. Close and lock the bezel, then calibratethe touchscreen.<strong>FORCE</strong> UPRIGHT (NON-FUSION)GAMES<strong>Touchscreen</strong> Removal1. Turn off and unplug the game.2. Upright with coin door: Remove thebezel by removing the 2 wing nuts in-15 MEGATOUCH <strong>FORCE</strong> TOUCHSCREEN REPLACEMENT PM0331-04
COPYRIGHT © 2004 MERIT INDUSTRIES, INC.DRILLEDHOLES(5 PER SIDE)FIGURE 15 - <strong>FORCE</strong> FUSION - PLASTIC MOUNTING PIECES ON BEZELside the CPU door along the bottom ofthe bezel and the 3 wing nuts insidethe game along the top piece (after removingthe rear door). Then disconnectthe 2 speaker connectors insidethe game on either side of the marqueebefore lifting the bezel from the game.Upright without coin door: Unlockand open the front bezel (see Figure16).3. Remove the black poly tape (see Figure16) from around the edges of theold touchscreen, keeping the mannerin which the tape was placed aroundthe screen in mind.4. Remove the two nuts and washers securingthe touchscreen controller to thegame and remove the controller fromthe mounting screws. Then disconnectthe cable from the back of thecontroller and disconnect the Molexconnector (orange and gray wires)running from the touchscreen controllercable to the main power harness.5. Use dental floss to carefully cut thefoam tape holding the touchscreen tothe picture tube until you are able tocompletely remove the touchscreen.6. Remove any remaining adhesive residuewith denatured alcohol, then wipethe surface of the picture tube with thesupplied alcohol wipe.<strong>Touchscreen</strong> Installation7. Clean the reverse side of the replacementtouchscreen with the supplied alcoholwipe.8. Peel the backing from the 8 pieces ofdouble-sided foam tape already adheredto the reverse side of thetouchscreen.9. Replace the new touchscreen over thepicture tube (with the cable on the rightPM0331-04 MEGATOUCH <strong>FORCE</strong> TOUCHSCREEN REPLACEMENT 16
COPYRIGHT © 2004 MERIT INDUSTRIES, INC.BLACK POLY TAPEFIGURE 16 - <strong>FORCE</strong> UPRIGHT (NON-FUSION) TOUCHSCREEN ACCESS17 MEGATOUCH <strong>FORCE</strong> TOUCHSCREEN REPLACEMENT PM0331-04
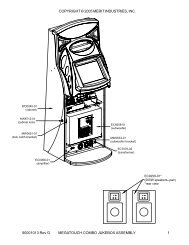
COPYRIGHT © 2004 MERIT INDUSTRIES, INC.if you are facing the game), making surethe screen is properly and evenlyaligned over the picture tube. Thenclean the front of the screen with thesupplied alcohol wipe.10. Connect the new touchscreen controllercable in the back of the controllerand secure the controller on the mountingscrews in the game with the existinghardware. Also connect the Molexconnector (orange and gray wires) tothe main power harness.11. Remembering the manner in which thetape was placed around the touchscreenyou removed, place and cut alength of the supplied black poly tapeevenly over an entire edge of the touchscreenand repeat until all 4 edges arecovered.12. Place and cut a longer length of blackpoly tape around all 4 edges of thescreen.13. Plug in and turn on the game.14. When the game is finshed booting, calibratethe touchscreen.15. Close and lock the front bezel. Forupright games with coin doors, replacethe bezel and secure it with the 5 wingnuts removed earlier. Also reconnectthe 2 speaker connectors, then replacethe rear door.MEGATOUCH COMBO JUKEBOX<strong>Touchscreen</strong> Removal1. Turn off and unplug the game.2. Unlock and remove the rear door andturn off the internal power switch (locatedabove the cooling fan on the leftside).3. Using Figures 17 and 18, remove the 6bolts and wing nuts (3 per side) fasteningthe front bezel to the cabinet andremove the bezel.4. Using Figure 19, locate the touchscreencontroller mounted inside thecabinet on the right side (if you are facingthe rear of the game) and removethe two screws fastening the controllerto the cabinet. Then disconnect theMolex connector (orange and graywires) running from the touchscreencontroller cable to the main power harness.5. Remove the black poly tape from aroundthe edges of the old touchscreen (seeFigure 20). Remember how the tapewas placed in order to tape the newtouchscreen.6. Use dental floss to carefully cut thefoam tape holding the touchscreen tothe picture tube until you are able tocompletely remove the touchscreen.7. Remove any remaining adhesive residuewith denatured alcohol, then wipethe surface of the picture tube with thesupplied alcohol wipe.<strong>Touchscreen</strong> <strong>Replacement</strong>8. Clean the reverse side of the replacementtouchscreen with the supplied alcoholwipe.9. If there is no tape already on the touchscreen,cut pieces of the supplied 1/2”foam tape long enough to cover eachedge of the screen without overlapping.After the tape is in place on thescreen, peel off the backing.10. Replace the new touchscreen over thePM0331-04 MEGATOUCH <strong>FORCE</strong> TOUCHSCREEN REPLACEMENT 18
COPYRIGHT © 2004 MERIT INDUSTRIES, INC.monitor (with the cable on the left ifyou are facing the game), making surethe screen is properly and evenlyaligned over the picture tube. Thenclean the front of the screen with thesupplied alcohol wipe.11. Remembering the manner in which thetape was placed around the touchscreenyou removed, place and cut alength of the supplied black poly tapeevenly over an entire edge of the touchscreenand repeat until all 4 edges arecovered.12. Place and cut a longer length of blackpoly tape around all 4 edges of thescreen.13. Connect the new touchscreen controllercable in the back of the controllerand secure the controller with the existinghardware. Also connect theMolex connector (orange and graywires) to the main power harness.14. Carefully replace the front bezel, liningup the holes in the bezel with the screwholes on the game. Then replace the 6bolts and wing nuts (3 per side) fasteningthe bezel to the game. Refer tofigures 17 and 18.15. Plug in and turn on the game.16. Calibrate the touchscreen.17. Replace and lock the rear door.BOLTS ANDWING NUTSFASTENINGFRONTBEZEL TOCABINET(BOTHSIDES)FIGURE 17 - MEGATOUCH COMBO JUKEBOX - INSIDE REAR OF CABINET19 MEGATOUCH <strong>FORCE</strong> TOUCHSCREEN REPLACEMENT PM0331-04
COPYRIGHT © 2004 MERIT INDUSTRIES, INC.BOLTS ANDWING NUTSFASTENINGFRONTBEZEL TOCABINET(BOTHSIDES)DUAL FANASSEBMLYFIGURE 18 - MEGATOUCH COMBO JUKEBOX - INSIDE REAR OF CABINETTOUCHSCREENCONTROLLERETHERNETHUBFIGURE 19 - MEGATOUCH COMBO JUKEBOX - INSIDE REAR OF CABINETBLACKPOLYTAPEFIGURE 20 - MEGATOUCH COMBO JUKEBOX - MONITOR AND TOUCHSCREENPM0331-04 MEGATOUCH <strong>FORCE</strong> TOUCHSCREEN REPLACEMENT 20
COPYRIGHT © 2004 MERIT INDUSTRIES, INC.MR. VIPS GAMES<strong>Touchscreen</strong> Removal1. Turn off and unplug the game.2. Unlock and remove the upper rear door.3. To remove the large prize assembly,first remove the 2 nuts and bolts fasteningthe cap and unplug the fluorescentlight assembly, then remove theremaining 8 nuts and bolts fasteningthe prize assembly to the game. Thecap and prize assembly can be removedtogether. See Figure 21.4. To proceed with touchscreen removal,first determine the type of hardwaresecuring the shroud to your game. SeeFigures 22 and 23.Games with screws securing frontof shroud:• To remove the front bezel fromthe shroud, remove the 4 screwson the underside of the bezel(see Figure 22), then remove the4 screws (2 per side) on eitherside of the front bezel (see Figure24). The bezel can then beremoved.Games with bolts securing frontof shroud:• Remove the cable clamp fasteningthe small prize assembly light wiringto the monitor frame. See Figure25.• From inside the game, access andremove the 4 screws (2 per side)fastening the sides of the shroudto the game. See Figure 26.• Remove the bolts and nuts (theremay be as many as 6) securingthemonitor to the game (see Figures27-29 for possible locations).Then carefully pull the monitor towardsyou until you have enoughroom to access the 4 nuts securingthe bolts holding the front of theshroud to the game. Remove the nutsand bolts, then carefully remove theshroud and small prize assemblyfrom the game.5. Remove the black poly tape (see Figure30) from around the edges of theold touchscreen, keeping the mannerin which the tape was placed aroundthe screen in mind.6. Remove the two nuts and washers securingthe touchscreen controller to theinside of the monitor (see Figure 31)and remove the controller from themounting screws. Then disconnect thecable from the back of the controllerand disconnect the Molex connector(orange and gray wires) running fromthe touchscreen controller cable to themain power harness.7. Use dental floss to carefully cut thefoam tape holding the touchscreen tothe picture tube until you are able tocompletely remove the touchscreen.8. Remove any remaining adhesive residuewith denatured alcohol, then wipethe surface of the picture tube with thesupplied alcohol wipe.<strong>Touchscreen</strong> Installation1. Clean the reverse side of the replacementtouchscreen with the supplied alcoholwipe.2. Peel the backing from the 8 pieces ofdouble-sided foam tape already adheredto the reverse side of thetouchscreen.21 MEGATOUCH <strong>FORCE</strong> TOUCHSCREEN REPLACEMENT PM0331-04
COPYRIGHT © 2004 MERIT INDUSTRIES, INC.3. Replace the new touchscreen over thepicture tube (with the cable on the rightif you are facing the game), making surethe screen is properly and evenlyaligned over the picture tube. Thenclean the front of the screen with thesupplied alcohol wipe.4. Connect the new touchscreen controllercable in the back of the controllerand secure the controller on the mountingscrews in the game with the existinghardware (see Figure 31). Alsoconnect the Molex connector (orangeand gray wires) to the main powerharness.5. Remembering the manner in which thetape was placed around the touchscreenyou removed, place and cut alength of the supplied black poly tapeevenly over an entire edge of the touchscreenand repeat until all 4 edges arecovered.6. Place and cut a longer length of blackpoly tape around all 4 edges of thescreen.7. Games with screws securing frontof shroud:Games with bolts securing frontof shroud:• Replace the shroud and small prizeassembly, then secure the front ofthe shroud with the 4 nuts and boltsremoved earlier.• Slide the monitor back into positionand secure it with the hardwareremoved earlier (see Figures 27-29 for hardware locations).• Replace the 4 screws (2 per side)fastening the sides of the shroudto the game. See Figure 23.• Replace the cable clamp fasteningthe small prize assembly light wiringto the monitor frame. See Figure25.8. Replace the cap and large prize assembly,then replace the 8 nuts andbolts fastening the prize assembly tothe game. Then replace the 2 nuts andbolts fastening the cap to the game andplug in the fluorescent light. See Figure21.9. Replace and lock the upper rear door.10. Plug in and turn on the game.• Replace the bezel in the shroudand secure it with the 8 screws.See Figures 22 and 24.PM0331-04 MEGATOUCH <strong>FORCE</strong> TOUCHSCREEN REPLACEMENT 22
COPYRIGHT © 2004 MERIT INDUSTRIES, INC.NUTS/BOLTSSECURINGCAP TOGAMELARGE PRIZEASSEMBLYNUTS/BOLTSSECURING SIDEOF LARGEPRIZEASSEMBLY(3 PER SIDE)SHROUDNUTS/BOLTSSECURINGBOTTOM OFLARGE PRIZEASSEMBLYTO GAMEFIGURE 21 - SIDE/REAR VIEW OF GAMEFIGURE 22 - FRONT OF SHROUD FASTENED WITH SCREWSFIGURE 23 - FRONT OF SHROUD FASTENED WITH BOLTS23 MEGATOUCH <strong>FORCE</strong> TOUCHSCREEN REPLACEMENT PM0331-04
COPYRIGHT © 2004 MERIT INDUSTRIES, INC.SCREWSFASTENINGFRONTBEZEL TOSHROUD(2 PER SIDE)FRONTBEZELSHROUDFIGURE 24 - SIDE/FRONT OF GAMECABLECLAMPSMALL PRIZEASSEMBLYLIGHTWIRING(2 WIRES)NECKBOARDFIGURE 25 - REAR OF MONITORSHROUDSCREWSFASTENINGSIDES OFSHROUDTO GAME(2 PER SIDE)MONITORBASEFIGURE 26 - INSIDE OF SHROUDPM0331-04 MEGATOUCH <strong>FORCE</strong> TOUCHSCREEN REPLACEMENT 24
COPYRIGHT © 2004 MERIT INDUSTRIES, INC.FIGURE 27 - POSSIBLE HARDWARE LOCATION FOR MOUNTING MONITORNECKBOARDFIGURE 28 - POSSIBLE HARDWARE LOCATION FOR MOUNTING MONITORFIGURE 29 - POSSIBLE HARDWARE LOCATION FOR MOUNTING MONITOR25 MEGATOUCH <strong>FORCE</strong> TOUCHSCREEN REPLACEMENT PM0331-04
COPYRIGHT © 2004 MERIT INDUSTRIES, INC.BLACKPOLY TAPEFIGURE 30 - MONITOR AND TOUCHSCREENTHUMBNUTSSECURINGTOUCHSCREENCONTROLLERFIGURE 31 - TOUCHSCREEN CONTROLLERPM0331-04 MEGATOUCH <strong>FORCE</strong> TOUCHSCREEN REPLACEMENT 26
NOTES:______________________________________________________________________________________________________________________________________________________________________________________________________________________________________________________________________________________________________________________________________________________________________________________________________________________________________________________________________________________________________________________________________________________________________________________________________________________________________________________________________________________________________________________________________________________________________________________________________________________________________________________________________________________________________________________________________________________________________________________________________________________________________________________________________________________________________________________________________________________________________________________________________________________________________________________________________________________________________________________________________________________________________________________________________________________________________________________________________________________________
MEGATOUCH <strong>FORCE</strong> TOUCHSCREEN REPLACEMENTPM0331-04