Megatouch FORCE Touchscreen Replacement
Megatouch FORCE Touchscreen Replacement
Megatouch FORCE Touchscreen Replacement
- No tags were found...

Create successful ePaper yourself
Turn your PDF publications into a flip-book with our unique Google optimized e-Paper software.
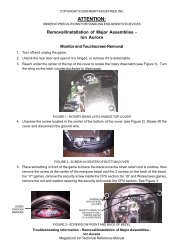
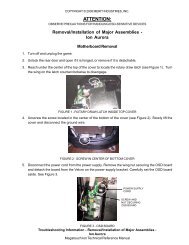
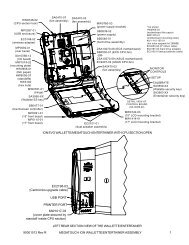
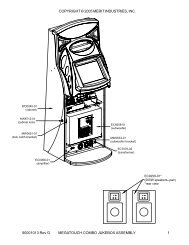
COPYRIGHT © 2004 MERIT INDUSTRIES, INC.MR. VIPS GAMES<strong>Touchscreen</strong> Removal1. Turn off and unplug the game.2. Unlock and remove the upper rear door.3. To remove the large prize assembly,first remove the 2 nuts and bolts fasteningthe cap and unplug the fluorescentlight assembly, then remove theremaining 8 nuts and bolts fasteningthe prize assembly to the game. Thecap and prize assembly can be removedtogether. See Figure 21.4. To proceed with touchscreen removal,first determine the type of hardwaresecuring the shroud to your game. SeeFigures 22 and 23.Games with screws securing frontof shroud:• To remove the front bezel fromthe shroud, remove the 4 screwson the underside of the bezel(see Figure 22), then remove the4 screws (2 per side) on eitherside of the front bezel (see Figure24). The bezel can then beremoved.Games with bolts securing frontof shroud:• Remove the cable clamp fasteningthe small prize assembly light wiringto the monitor frame. See Figure25.• From inside the game, access andremove the 4 screws (2 per side)fastening the sides of the shroudto the game. See Figure 26.• Remove the bolts and nuts (theremay be as many as 6) securingthemonitor to the game (see Figures27-29 for possible locations).Then carefully pull the monitor towardsyou until you have enoughroom to access the 4 nuts securingthe bolts holding the front of theshroud to the game. Remove the nutsand bolts, then carefully remove theshroud and small prize assemblyfrom the game.5. Remove the black poly tape (see Figure30) from around the edges of theold touchscreen, keeping the mannerin which the tape was placed aroundthe screen in mind.6. Remove the two nuts and washers securingthe touchscreen controller to theinside of the monitor (see Figure 31)and remove the controller from themounting screws. Then disconnect thecable from the back of the controllerand disconnect the Molex connector(orange and gray wires) running fromthe touchscreen controller cable to themain power harness.7. Use dental floss to carefully cut thefoam tape holding the touchscreen tothe picture tube until you are able tocompletely remove the touchscreen.8. Remove any remaining adhesive residuewith denatured alcohol, then wipethe surface of the picture tube with thesupplied alcohol wipe.<strong>Touchscreen</strong> Installation1. Clean the reverse side of the replacementtouchscreen with the supplied alcoholwipe.2. Peel the backing from the 8 pieces ofdouble-sided foam tape already adheredto the reverse side of thetouchscreen.21 MEGATOUCH <strong>FORCE</strong> TOUCHSCREEN REPLACEMENT PM0331-04