Megatouch FORCE Touchscreen Replacement
Megatouch FORCE Touchscreen Replacement
Megatouch FORCE Touchscreen Replacement
- No tags were found...

Create successful ePaper yourself
Turn your PDF publications into a flip-book with our unique Google optimized e-Paper software.
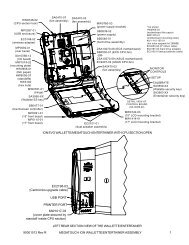
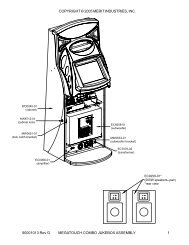
COPYRIGHT © 2004 MERIT INDUSTRIES, INC.3. Replace the new touchscreen over thepicture tube (with the cable on the rightif you are facing the game), making surethe screen is properly and evenlyaligned over the picture tube. Thenclean the front of the screen with thesupplied alcohol wipe.4. Connect the new touchscreen controllercable in the back of the controllerand secure the controller on the mountingscrews in the game with the existinghardware (see Figure 31). Alsoconnect the Molex connector (orangeand gray wires) to the main powerharness.5. Remembering the manner in which thetape was placed around the touchscreenyou removed, place and cut alength of the supplied black poly tapeevenly over an entire edge of the touchscreenand repeat until all 4 edges arecovered.6. Place and cut a longer length of blackpoly tape around all 4 edges of thescreen.7. Games with screws securing frontof shroud:Games with bolts securing frontof shroud:• Replace the shroud and small prizeassembly, then secure the front ofthe shroud with the 4 nuts and boltsremoved earlier.• Slide the monitor back into positionand secure it with the hardwareremoved earlier (see Figures 27-29 for hardware locations).• Replace the 4 screws (2 per side)fastening the sides of the shroudto the game. See Figure 23.• Replace the cable clamp fasteningthe small prize assembly light wiringto the monitor frame. See Figure25.8. Replace the cap and large prize assembly,then replace the 8 nuts andbolts fastening the prize assembly tothe game. Then replace the 2 nuts andbolts fastening the cap to the game andplug in the fluorescent light. See Figure21.9. Replace and lock the upper rear door.10. Plug in and turn on the game.• Replace the bezel in the shroudand secure it with the 8 screws.See Figures 22 and 24.PM0331-04 MEGATOUCH <strong>FORCE</strong> TOUCHSCREEN REPLACEMENT 22