Megatouch FORCE Touchscreen Replacement
Megatouch FORCE Touchscreen Replacement
Megatouch FORCE Touchscreen Replacement
- No tags were found...

You also want an ePaper? Increase the reach of your titles
YUMPU automatically turns print PDFs into web optimized ePapers that Google loves.
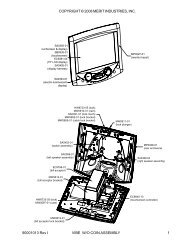
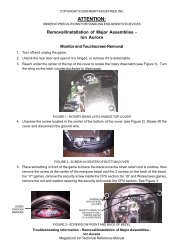
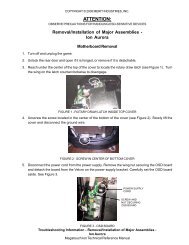
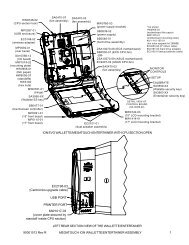
COPYRIGHT © 2004 MERIT INDUSTRIES, INC.remove the controller from the mountingscrews. Then disconnect the cablefrom the back of the controller and disconnectthe Molex connector (orangeand gray wires) running from thetouchscreen controller cable to the mainpower harness. Also disconnect theground screw. See Figure 8.6. Using Figure 8, remove the 10 screwsfastening the monitor to the bezel (2screws also fasten strain relief cordson either side of the CPU) and carefullypull the monitor assembly away fromthe bezel until you’re able to accessthe touchscreen.NOTE: Keep track of all hardwareremoved in the touchscreen replacementprocess.7. Note the orientation of the touchscreencable before removing the screen.Then use dental floss to carefully cutthe foam tape holding the touchscreento the monitor until you are able to completelyremove the screen. Note themanner in which the 2 layers of foamtape are placed on the front edge ofthe screen.8. Remove any remaining adhesive residuewith denatured alcohol, then cleanthe monitor glass with the supplied alcoholwipe.<strong>Touchscreen</strong> Installation9. Clean the reverse side of the replacementtouchscreen with the supplied alcoholwipe.10. If there is no tape already on the touchscreen,cut pieces of the supplied 1/2”double-sided foam tape long enough tocover each edge of the screen withoutoverlapping. After the tape is inplace on the screen, peel off the backing.11. Replace the new touchscreen over themonitor in the same manner as the oldscreen, making sure the screen is properlyand evenly aligned over the monitorglass. Then clean the front of thescreen with the supplied alcohol wipe.12. Using the original touchscreen for reference,cut pieces of the supplied 1/2”single-sided foam tape long enough tocover each edge of the front of thescreen without overlapping, then placethe tape on the screen. After the tapeis in place, repeat this step so thereare two layers of tape on the screen.13. Connect the new touchscreen controllercable in the back of the controllerand secure the controller on the mountingscrews in the game with the existinghardware. Also connect the Molexconnector (orange and gray wires) tothe main power harness.14. Replace the monitor assembly in thebezel, lining up the screw holes in themonitor with the holes in the bezel, thenreplace the 10 screws. See Figure 8.15. Reconnect the VGA monitor cable connectorand the screw fastening thecable to the monitor mounting plate, andalso reconnect the ground screw. Thenreconnect the monitor power connector.See Figure 8.16. Games with bill acceptors only:Replace the bill acceptor in the CPUsection (make sure the touchscreencontroller cables do not interfere) andfasten it with the 4 screws and washers.Then reconnect the 12-pin bill acceptorpower connector. It is also recommendedyou use a cable clamp torefasten the bill acceptor sensor andVGA monitor cables.PM0331-04 MEGATOUCH <strong>FORCE</strong> TOUCHSCREEN REPLACEMENT 10