EMS-2 Operating Instructions - CONTA-CLIP
EMS-2 Operating Instructions - CONTA-CLIP
EMS-2 Operating Instructions - CONTA-CLIP

You also want an ePaper? Increase the reach of your titles
YUMPU automatically turns print PDFs into web optimized ePapers that Google loves.
5. Operation<br />
Once you have installed the <strong>EMS</strong>-2 and connected the power supply and data cable,<br />
you can switch the plotter on.<br />
Important:<br />
Before switching the device on please ensure that there are no objects on the<br />
writing/plotting area which might prevent the writing arm from moving freely.<br />
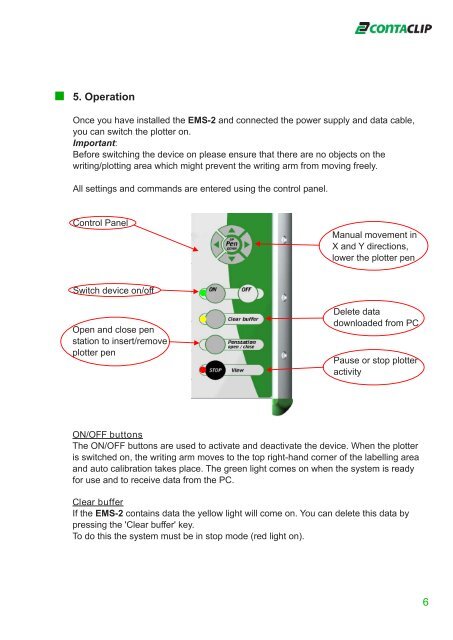
All settings and commands are entered using the control panel.<br />
Control Panel<br />
Manual movement in<br />
X and Y directions,<br />
lower the plotter pen<br />
Switch device on/off<br />
Open and close pen<br />
station to insert/remove<br />
plotter pen<br />
Delete data<br />
downloaded from PC<br />
Pause or stop plotter<br />
activity<br />
ON/OFF buttons<br />
The ON/OFF buttons are used to activate and deactivate the device. When the plotter<br />
is switched on, the writing arm moves to the top right-hand corner of the labelling area<br />
and auto calibration takes place. The green light comes on when the system is ready<br />
for use and to receive data from the PC.<br />
Clear buffer<br />
If the <strong>EMS</strong>-2 contains data the yellow light will come on. You can delete this data by<br />
pressing the 'Clear buffer' key.<br />
To do this the system must be in stop mode (red light on).<br />
6