User, Installation And Servicing Instructions - Heatingspares247.com
User, Installation And Servicing Instructions - Heatingspares247.com
User, Installation And Servicing Instructions - Heatingspares247.com

Create successful ePaper yourself
Turn your PDF publications into a flip-book with our unique Google optimized e-Paper software.
WD388/0/2004<br />
The Keston C36 Combi & C36P Combi Boilers<br />
C36 Combi<br />
Modulating Condensing Combination<br />
Gas Fired Boiler<br />
<strong>User</strong>, <strong>Installation</strong> <strong>And</strong> <strong>Servicing</strong><br />
<strong>Instructions</strong><br />
CE/PI No : 87BQ006<br />
C36 Combi - GC No : 47 930 01<br />
C36P Combi - GC No : 47 930 02<br />
These instructions must be left either with<br />
the user or next to the site gas meter.<br />
34 West Common Road<br />
Hayes, Bromley, Kent BR2 7BX<br />
Tel. +44 (0)20 8462 0262 Fax. +44 (0)20 8462 4459<br />
email : info@keston.co.uk web : www.keston.co.uk<br />
COMPLIANT WITH BUILDING REGULATION PART L1 & L2<br />
SEDBUK A RATED
WD388/0/2004<br />
The Keston C36 Combi & C36P Combi Boilers<br />
CONTENTS<br />
NB : These instructions are an integral part of the appliance. This document must be handed over to<br />
the user on completion of the installation to ensure compliance with the Gas Safety (<strong>Installation</strong><br />
& Use) Regulations<br />
Section<br />
Description<br />
0 HANDLING INSTRUCTIONS<br />
0.1 List of contents<br />
0.2 Recommended handling procedure<br />
1 USER INSTRUCTIONS<br />
1.1 Introduction<br />
1.2 Maintenance<br />
1.3 Boiler Setup and Operation<br />
1.4 Safety Information<br />
2 GENERAL INSTRUCTION<br />
2.1 Description<br />
2.2 Boiler Schematic<br />
2.3 Related Documents<br />
2.4 Physical Data<br />
2.5 Optional Accessories<br />
2.6 Performance Data C36 Combi and C36P Combi<br />
3 BOILER LOCATION<br />
3.1 Dimensions & Minimum Clearances<br />
3.2 Service Connections<br />
3.3 Position<br />
3.4 Electrical<br />
3.5 Boiler Size Selection<br />
3.6 Gas Supply<br />
3.7 CH & DHW Water Systems<br />
3.8 Flue System<br />
3.9 Air Supply<br />
3.10 Compartment <strong>Installation</strong><br />
3.11 Condensate Drainage<br />
4 INSTALLATION OF THE BOILER<br />
4.1 Wall Mounting Bracket<br />
4.2 Mounting The Boiler<br />
4.3 Assembly Practice<br />
4.4 Installing Flue <strong>And</strong> Air Pipes<br />
4.5 Condensate Drainage<br />
4.6 Water System<br />
4.7 Gas Supply<br />
4.8 Electrical Supply<br />
4.9 Exchanging A Boiler<br />
5 COMMISSIONING OF THE BOILER<br />
5.1 Initial Flushing<br />
5.2 Gas Supply<br />
5.3 Electrical <strong>Installation</strong><br />
5.4 LP Gas<br />
5.5 Initial Firing<br />
Page : i
WD388/0/2004<br />
5.6 Hot Flushing<br />
5.7 Combustion Testing<br />
5.8 Checking The Gas Pressure<br />
5.9 Timing The Gas Meter<br />
5.10 Handing Over To The <strong>User</strong><br />
6 FAULT FINDING<br />
6.1 Electrical Control Sequence<br />
6.2 Normal Operation<br />
6.3 Fault Modes<br />
6.4 Functional Flow Wiring Diagram<br />
6.5 Electrical Wiring Diagram<br />
6.6 Illustrated Wiring Diagram<br />
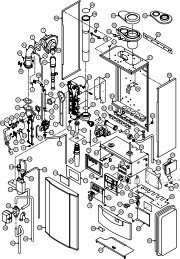
6.7 Exploded Assembly Diagrams<br />
7 SERVICING<br />
7.1 Pre Service Checks<br />
7.2 Recommended Routine Service<br />
8 REPLACEMENT OF PARTS<br />
8.0 General<br />
8.1 Precautions<br />
8.2 Access<br />
8.3 Replacement Procedure<br />
8.4 Electrical Components<br />
8.5 Spark Ignition/Flame Detection Electrode<br />
8.6 Burner<br />
8.7 Heat Exchanger<br />
8.8 Condensate Trap<br />
8.9 Pump<br />
8.10 DHW Heat Exchanger<br />
8.11 Expansion Vessel<br />
9 SPARE PARTS LISTINGS<br />
The Keston C36 Combi & C36P Combi Boilers<br />
Page : ii
WD388/0/2004<br />
The Keston C36 Combi & C36P Combi Boilers<br />
0. HANDLING INSTRUCTIONS<br />
0.1 LIST OF CONTENTS<br />
The Keston C36 Combi and C36P Combi are supplied almost totally pre-assembled. The<br />
units use standard 50 mm muPVC (BS5255) pipe for the flue and air intake systems. The<br />
boiler is packed in a single box without additional flue kit. All additional components are<br />
packed inside the boiler cabinet itself. The following is a list of components and their location<br />
in the boiler cabinet<br />
Equipment List<br />
Item Quantity Location<br />
Wall Bracket Rawl Plugs 6 Inside accessories bag<br />
Wall Bracket Wall Fixing Screws 6 Inside accessories bag<br />
Wall Mounting Bracket 1 Secured to inside right<br />
hand side of boiler case<br />
Pre-<strong>Installation</strong> Jig Locator Cross 1 Secured to inside right<br />
hand side of boiler case<br />
Wall Mounting Bracket Nuts 1 Inside accessories bag.<br />
Wall Mounting Bracket Washers 1+1 Inside accessories bag<br />
50 mm muPVC Air/Flue Terminals 2 Inside accessories bag<br />
Air Inlet Spigot (50 mm) 1 Inside accessories bag<br />
Flue Outlet Spigot (50 mm) 1 Inside accessories bag<br />
Air Inlet Spigot Gasket 1 Inside accessories bag<br />
Air Inlet Spigot + Flue Outlet Spigot M6 Screws 4+2<br />
Inside accessories bag<br />
Cabinet Cable Entry Clamps 1 Inside accessories bag<br />
Gas Isolating Cock with PTN 1 Inside accessories bag<br />
Filling Loop Kit 1 Inside accessories bag<br />
Document List<br />
Item Quantity Location<br />
Registration of Purchase 1 In A4 envelope<br />
<strong>Installation</strong> Template 1 In document bag<br />
Benchmark Record Log Book 1 In document bag<br />
Remove the cabinet shell by removing the two retaining screws in the top of the cabinet and<br />
the two retaining screws in the bottom of the cabinet.<br />
0.2 RECOMMENDED HANDLING PROCEDURE<br />
NB : The following lift operation exceeds the recommended weight for a one-man lift as<br />
specified in the Manual Handling Operations 1992 Regulations.<br />
For the carriage of carton it is recommended at least two people perform any lift. Clear the<br />
carriage route of the carton from point of delivery to point of installation. Take care to avoid<br />
trip hazards, slippery or wet surfaces and when climbing steps and stairs. Always use<br />
assistance if required. If a sack truck is used it is recommended the carton is strapped to the<br />
truck.<br />
For the unpacking of the appliance from the carton, it is recommended at least two people<br />
perform any lift. It is recommended to cut the base end of carton and open the carton flaps.<br />
Ensure the protective packing over the boiler tappings at the base of the boiler is kept in<br />
place, then tilt the boiler forwards from its back onto its base and remove carton by sliding up<br />
over the boiler. When lifting this appliance the back should be kept straight at all times. Avoid<br />
twisting at the waist - reposition the feet instead. Avoid upper body bending when holding the<br />
appliance and keep the boiler as close to the body as possible.<br />
Page : iii
WD388/0/2004<br />
The Keston C36 Combi & C36P Combi Boilers<br />
Before hanging the appliance on the wall it is best to store the appliance laid on its back with<br />
the casing on. When ready to hang the boiler on the wall remove the casing and place to one<br />
side. At this stage it is assumed that the wall bracket is correctly positioned and secured on<br />
the wall face.<br />
a) Have the wall bracket nut and washer to hand so that they can be accessed whilst<br />
holding the boiler in position on its mounting bracket. If the optional pre-installation jig is<br />
not being used discard the Pre-<strong>Installation</strong> Jig Locator Cross.<br />
b) The boiler has a dry weight of 45 kg (99 lbs) and will therefore require at least two people<br />
to lift without the use of lifting aids - ensure co-ordinated movements durring lift. Always<br />
use assistance if required.<br />
c) Lift the boiler by gripping at the four corners of the boiler back plate. When lifting this<br />
appliance the back should be kept straight at all times. Avoid twisting at the waist -<br />
reposition the feet instead. Avoid upper body bending when holding the appliance and<br />
keep the boiler as close to the body as possible.<br />
d) Lift the boiler and locate onto the stud and the two pegs of the wall mounting bracket.<br />
e) Place the wall mounting bracket washers over the bracket stud protruding through the<br />
back plate of the boiler.<br />
f) Secure the boiler onto the wall bracket by fixing the wall mounting bracket nut onto the<br />
wall bracket stud. This must be tightened well.<br />
Safety footwear and gloves are recommended PPE when lifting this appliance - to protect<br />
against sharp edges and ensure good grip.<br />
The C36 Combi and C36P Combi boilers can be fitted in compartments with very small<br />
clearances required around the appliance (refer to Section 3.1). Due consideration should<br />
therefore be given to access within the compartment for lifting and positioning.<br />
A pre-installation jig plate (part no C.10C.0.11.00.0) with heating flow, heating return and cold<br />
supply isolation is available as an optional accessory. This jig enables the installation of the<br />
pipework to be carried out and pressure tested before hanging the boiler. Further instructions<br />
for this procedure are included with the jig plate kit.<br />
Page : iv
WD388/0/2004 Chapter 1 : <strong>User</strong> <strong>Instructions</strong> The Keston C36 Combi & C36P Combi Boilers<br />
B il<br />
1. USER INSTRUCTIONS<br />
1.1 INTRODUCTION<br />
Thank you for chosing this Keston C36 Combi for your household heating and hot water<br />
needs. The boiler is designed to be very straightforward to operate and has no user<br />
serviceable parts inside the cabinet. The following instructions are to provide you with<br />
information on the operation and maintenance of your C36 Combi and what to do in the<br />
unlikely event of a fault.<br />
These user instructions should be read carefully to ensure safe and economical use of your<br />
C36 Combi. The C36 Combi model is for use with natural gas only, the C36P Combi model<br />
is for use with LPG only.<br />
1.2 MAINTENANCE<br />
<strong>Servicing</strong><br />
To ensure continual safe and efficient operation and to maintain product warranties it is a<br />
requirement that the appliance is checked and serviced at least once per year. It is the law<br />
that any servicing must be carried out by a competent person. Removal of the appliance<br />
cabinet by anyone other than a competent person will automatically invalidate the<br />
appliance warranty.<br />
Clearances<br />
If fixtures are to be positioned close to the boiler, the following minimum clearances must be<br />
observed: Top 150mm, Left 5mm, Right 5mm, Base 100mm, Front 305mm. Extended<br />
clearance is required to the front for servicing.<br />
Cleaning<br />
Normal case cleaning only requires dusting with a dry cloth. To remove more stubborn marks<br />
wipe with a damp cloth and finish with a dry cloth.<br />
1.3 BOILER SETUP & OPERATION<br />
Check that the gas supply from the gas meter is turned on. Switch on the electrical supply to<br />
the boiler. The display will now run through a self check procedure. Set any controls to call for<br />
heat.<br />
To light the boiler<br />
The C36 Combi features separate adjustment of central heating and domestic hot water<br />
temperature. To set these press the “+” or “-” buttons associated with the heating or hot water<br />
temperature and set the required temperature. After a few seconds the display stop flashing<br />
and will change back to show the actual boiler temperature.<br />
If the actual temperature is less than the desired temperature the boiler will fire and, after a<br />
few seconds, a “.” will appear in the lower right hand corner of the display to show that the<br />
boiler is alight.<br />
In summer you can switch the boiler to hot water only by pressing the “Summer” button to<br />
that the green lamp above it is illuminated. In this mode the boiler will not respond to any<br />
demand for central heating. Press the “Summer” button again to extinguish the green light<br />
above and resume normal central heating operation.<br />
Normal Operation<br />
During normal operation the digital display will dhow the current boiler temperature and will<br />
show a “.” In the lower right corner of the display when the burner is alight. If the green lamp<br />
near the CH or DHW+ - keys is illuminated the boiler is receiving a demand for that function.<br />
If the green lamp is flashing the boiler is either up to temperature or shutting down following<br />
removal of the CH or DHW demand.<br />
<strong>Installation</strong> & <strong>Servicing</strong> <strong>Instructions</strong> Page : 1
WD388/0/2004 Chapter 1 : <strong>User</strong> <strong>Instructions</strong> The Keston C36 Combi & C36P Combi Boilers<br />
B il<br />
Fault Modes<br />
In the event that the boiler detects a situation which it considers to be a fault the display will<br />
change to show a flashing fault code starting with an “E” and then a two digit number. The<br />
table below explains these codes and the action you should take.<br />
Display Description of fault<br />
E01 Ignition failure - the boiler has attempted to light five times and not succeeded - check<br />
the gas supply is on.<br />
E02 False flame - There is possibly a problem with the power supply.<br />
E03 Boiler overheat - Check that any valves to the heating circuit have not been shut down,<br />
that there is no air in the system and that the water pressure is correct..<br />
E24 Water pressure losses - You have topped up the water pressure more than 4 times in<br />
24 hours. You may have a leak on the system..<br />
E26 Flame drop out - Check for obstruction of the flue and/or air terminals,<br />
blockage/freezing of the drain pipe or a low gas supply (LPG).<br />
E34 Mains supply voltage < 180V - There may be a problem with your power supply<br />
E35 Mains supply frequency incorrect - There may be a problem with your power supply.<br />
E37 Water pressure error - You must top up the water pressure for your system<br />
E40 Water pressure too high - You have put too much water pressure in your system<br />
The above is an abbreviate list of possible error codes. If the code is not in the list above<br />
consult a CORGI registered engineer. A full list of codes can be found in Chapter 6 of this<br />
manual. If a code appears and you feel the original cause has been rectified, press the<br />
“Reset” button to resume boiler operation. If the code persists consult a CORGI registered<br />
engineer.<br />
When topping up the water pressure you can observe the actual pressure by pressing the<br />
“Installer” button repeatedly until the number “5” appears. After a few seconds the display<br />
with then change to show the system water pressure in bar. Set the water pressure to<br />
between 1.0 and 2.0 bar.<br />
Precautions<br />
Care must be taken at all times to ensure that no blockage or obstruction is present in the<br />
condensate drainage line. In addition, the air intake and flue exhaust terminals must be free<br />
from obstruction at all times.<br />
Frost Protection<br />
The C36 Combi has an integral frost protection function. However, care should also be taken<br />
that any exposed pipework is adequately insulated to prevent freezing.<br />
1.4 SAFETY INFORMATION<br />
IF YOU SUSPECT A GAS LEAK TURN OFF THE APPLIANCE IMMEDIATELY, TURN OFF<br />
THE GAS TAP TO THE APPLIANCE (LOCATED UNDERNEATH) AND CONTACT YOUR<br />
LOCAL GAS REGION WITHOUT DELAY.<br />
Benchmark Initiative<br />
As part of the industry wide “Benchmark” initiative all C36 Combi<br />
boilers now include a Benchmark <strong>Installation</strong>, Commissioning and Service Record Log Book.<br />
This log book should be completed by your installer at the end of the installation and<br />
commissioning process. The details of the Log Book will be required in the event of any<br />
warranty work being required. There is also a section to be completed after each annual<br />
service visit.<br />
This log book should be kept in a safe place for the life of the boiler.<br />
The boiler should be installed and serviced only by CORGI registered operatives. All CORGI<br />
registered Installers carry a CORGI ID card and have a registration number. Both should be<br />
recorded in your Benchmark Log Book. You can check your installer by calling CORGI<br />
direct on 01256 372300.<br />
<strong>Installation</strong> & <strong>Servicing</strong> <strong>Instructions</strong> Page : 2
WD388/0/2004<br />
Chapter 2 : General Instruction The Keston C36 Combi & C36P Combi Boilers<br />
2. GENERAL INSTRUCTION<br />
2.1 DESCRIPTION<br />
The KESTON C36 Combi and C36P Combi combination boilers utilise the latest in<br />
condensing technology to produce a high efficiency boilers that deliver an exceptional hot<br />
water flow rate with SEDBUK A rated efficiency.<br />
The C36 Combi and C36P Combi are unique in concept and design. They comprise a<br />
high efficiency stainless steel heat exchanger coupled with a low emissions burner to<br />
deliver ultra high efficiency condensing mode operation and a plate-to-plate heat<br />
exchanger for domestic hot water production all within a compact wall hung cabinet. The<br />
unit automatically adjusts gas and air rate according to demand to give a heating output<br />
in the range of 7.4kW to 28.0kW [condensing]. The integral pump assembly is<br />
automatically speed controlled to best match water flow rate to heat output & further<br />
increase appliance efficiency. The efficient plate-to-plate heat exchanger provides<br />
superior levels of performance: its has an outstanding hot water performance of 14.5<br />
L/min (at 35C temperature rise) and 17.0 L/min (at 30C temperature rise - EN625)<br />
In addition, the boilers feature a connection for an optional outside sensor to enable the<br />
boilers inbuilt weather compensation option which delivers enhanced user comfort levels<br />
with peak operating efficiency due to the lower flow temperatures involved. The boiler<br />
also features an “Opentherm” connection point for the Keston Room Control module<br />
which provides further advanced user control for room temperature compensation and<br />
optimum start. The boiler fascia provides separate user controls for central heating and<br />
domestic hot water temperatures. The advanced hot water flow monitoring ensures<br />
exceptionally stable hot water temperatures are provided. The boilers have the added<br />
advantage of very high efficiency, and small diameter muPVC plastic flue which can be<br />
extended up to 20 metres horizontally or vertically.<br />
The Keston C36 Combi uses a variable speed combustion blower to deliver a premix of<br />
gas and air to a downward firing burner in a high efficiency, single pass heat exchanger.<br />
The flue system is room sealed and fan powered. The ignition is direct spark and fully<br />
automatic. The boiler housing is not waterproof and should be installed in a position<br />
where it will always be dry. Combustion air is drawn from the cabinet which is connected<br />
to outside atmosphere via a small diameter plastic intake pipe. The cabinet therefore<br />
remains under negative pressure at all times the boiler is operating.<br />
These boilers are designed for use as part of a sealed water central heating system with<br />
fully pumped circulation. The pump, an 8l expansion vessel and associated safety<br />
devices are all fitted within the boiler.<br />
The boiler heat exchanger is made from highly corrosion resistant stainless steel in<br />
corrugated pipe form which provides massive surface area within a compact dimension.<br />
The hot combustion gases from the down firing burner pass around the stainless steel<br />
pipes imparting heat into the system water. The integral variable speed pump within the<br />
appliance cabinet ensures the heat exchanger receives correct water flow when firing.<br />
The C36 Combi is not a high water content boiler and does not contain the metal mass,<br />
or water volume, of a cast iron or steel boiler. This boiler is of low mass and low water<br />
content and therefore responds faster when there is a call for heat. The C36 Combi<br />
features full user diagnostics, integral frost protection function, automatic pump and fan<br />
exercise in periods of inactivity, anti cycle control and dry fire protection.<br />
2.2 BOILER SCHEMATIC<br />
Air is drawn into the boiler through a 50 mm muPVC (BS5255) plastic pipe or,<br />
alternatively, via a 75mm Keston composite plastic pipe. Gas is mixed with combustion<br />
air at the inlet to the fan. The gas flow is automatically regulated by the gas valve<br />
according to the air flow generated by the fan. The gas and air are thoroughly mixed in<br />
the blower and fed into the burner located at the top end of the heat exchanger module.<br />
The gas and air mixture is ignited by a direct spark ignition control system and burns with<br />
<strong>Installation</strong> & <strong>Servicing</strong> <strong>Instructions</strong> Page : 3
WD388/0/2004 Chapter 2 : General Instruction The Keston C36 Combi & C36P Combi Boilers<br />
a blue flame just off<br />
the surface of the<br />
burner. As the hot<br />
products<br />
of<br />
combustion pass<br />
downwards, they are<br />
cooled by exchanging<br />
heat with the<br />
circulating water<br />
which enters the heat<br />
exchanger at the<br />
bottom of the heat<br />
exchanger. The<br />
optimum heat input is<br />
detected<br />
by<br />
monitoring flow and<br />
return temperatures<br />
and is adjusted by<br />
controlling the speed<br />
of the fan. The<br />
optimum pump speed<br />
is also detected and<br />
automatically selected<br />
by the boiler.<br />
When the return water temperature is below 55 o C, part of the water vapour in the<br />
combustion products will condense inside the heat exchanger, thus increasing the boiler<br />
efficiency further by releasing<br />
the latent heat of<br />
condensation.<br />
This<br />
condensate falls to the<br />
bottom of the heat exchanger<br />
where it is separated from the<br />
flue gases and exits from the<br />
boiler through the<br />
condensate drain. Any<br />
condensate formed in the flue<br />
runs back down the flueway<br />
and is drained at the base of<br />
the flue connection to the<br />
heat exchanger or drain<br />
points within the flue.<br />
The condensate is very<br />
slightly acidic (about the<br />
same acidity as vinegar) and<br />
should be piped in a plastic<br />
pipe. It is not harmful to the<br />
waste disposal system and<br />
may be disposed of as<br />
normal waste water.<br />
The flue gases are piped in a<br />
50 mm muPVC (BS5255)<br />
plastic or, alternatively,<br />
75mm Keston composite<br />
plastic pipe to outside. The<br />
temperature of the flue gases<br />
are usually around 5 o C to<br />
<strong>Installation</strong> & <strong>Servicing</strong> <strong>Instructions</strong> Page : 4
WD388/0/2004<br />
Chapter 2 : General Instruction The Keston C36 Combi & C36P Combi Boilers<br />
10 o C above the temperature of the return water. The flue pipe should be terminated<br />
outside the building from where they cannot re-enter the building or any other adjacent<br />
building.<br />
The heating level may be controlled by room thermostats, programmer time clocks and<br />
compatible energy management systems. An optional Keston room controller can be<br />
connected which will provide enhanced controls such as room compensation to further<br />
increase efficiency and comfort levels. Once the controls are set the boiler operates<br />
automatically. Further, a Keston outside sensor can be connected to the boiler which will<br />
automatically invoke weather compensated heating which further boosts user comfort<br />
and boiler efficiency.<br />
In the event of the boiler overheating the safety devices will cause a safety shutdown. A<br />
safety discharge valve and discharge pipe is fitted to the boiler.<br />
The C36 Combi features an integral frost protection function which will operate the pump,<br />
regardless of the external controls, should the boiler temperature fall below 10 o C. In the<br />
event the boiler temperature falls below 5 o C the boiler will also fire. This is to avoid<br />
damage to the boiler through freezing of boiler water. The boiler will turn off when the flow<br />
temperature exceeds 15 o C.<br />
The C36 Combi features an integral pump exercise function which will run the pump,<br />
without firing the boiler, for 10 seconds in the event the boiler is on standby for in excess<br />
of 24 hours without firing. This is to help prevent seizing of the pump due to long periods<br />
of inactivity.<br />
2.3 RELATED DOCUMENTS<br />
The Keston C36 Combi and C36P Combi Combination Condensing Boiler must be<br />
installed in accordance with the current issue of the Gas Safety (<strong>Installation</strong> and Use)<br />
Regulations 1996, current IEE Wiring Regulations, Building Regulations, Building<br />
Standards (Scotland) Consolidation, and the Bye Laws of the local Water Undertaking. It<br />
is the law that ALL gas appliances are installed by a competent person in accordance<br />
with the above regulations.<br />
In addition, due account must be taken to the following Codes Of Practice:<br />
BS 6891 : Gas Supplies<br />
BS 6798 : <strong>Installation</strong> Central Heating Boilers<br />
BS 5449 : <strong>Installation</strong> Pumped Central Heating<br />
BS 5546 : <strong>Installation</strong> Domestic Hot Water<br />
BS 5440.1 : Flues<br />
BS 5440.2 : Air Supply<br />
BS 5482.1 : Domestic Propane and Butane Burning<br />
<strong>Installation</strong>s<br />
BS 7074.1 : Expansion Vessels<br />
BS 7593 : Treatment of Water in Hot Water Central Heating<br />
Systems<br />
BS 7671 : Requirements for Electrical <strong>Installation</strong>s. IEE<br />
Wiring Regulations 16th Edition.<br />
For Timber Framed Buildings, British Gas Publications DM2. Also British Gas<br />
Publications 'Guidance Notes For The <strong>Installation</strong> Of Domestic Gas Condensing<br />
Boilers' and 'Specification For Domestic Wet Central Heating Systems'.<br />
In IE, the installation must be carried out by a competent person and installed in<br />
accordance with the current edition of IS813 “Domestic Gas <strong>Installation</strong>s”, the current<br />
Building Regulation and reference should be made to the current ETC1 rules for electrical<br />
installations.<br />
No alterations should be made to the boiler without written permission from Keston<br />
Boilers Ltd. Any unauthorised modification will invalidate the warranty and may affect the<br />
safe and efficient operation of the boiler.<br />
<strong>Installation</strong> & <strong>Servicing</strong> <strong>Instructions</strong> Page : 5
WD388/0/2004 Chapter 2 : General Instruction The Keston C36 Combi & C36P Combi Boilers<br />
2.4 PHYSICAL DATA - C36 COMBI & C36P COMBI<br />
Cabinet Height mm 840<br />
Cabinet Width mm 450<br />
Cabinet Depth mm 300<br />
Top Clearance mm 150<br />
Side Clearance mm 5<br />
Base Clearance mm 100<br />
Front Clearance (for servicing) mm 300<br />
Weight - Full kg / (lbs) 50/(110)<br />
Weight - Empty kg / (lbs) 45/(99)<br />
Flow and Return Connection (using pre-installation jig)<br />
22mm<br />
Compression<br />
DHW and CWS Connection (using pre-installation jig)<br />
15mm Compression<br />
Gas Connection<br />
15mm Compression<br />
Condensate Connection overflow<br />
22mm plastic<br />
Safety Valve Connection discharge<br />
15mm copper<br />
IP Rating<br />
IP20 (IPX0)<br />
Flue and Air Intake Material<br />
50mm muPVC (BS5255)<br />
Flue Pipe Size (nominal bore) mm / (in) 50 / (2)<br />
Air Intake Pipe Size (nominal bore) mm / (in) 50 / (2)<br />
Max. Air Intake Length m 39<br />
Max. Flue Outlet Length m 20*<br />
Max. Total Flue Outlet and Air Intake Length m 40<br />
* Flue lengths between 16 and 20m will create a 1% reduction in DHW output.<br />
Flue and Air Intake Material<br />
75mm Keston Composite<br />
Flue Pipe Size (nominal bore) mm / (in) 75 / (3)<br />
Air Intake Pipe Size (nominal bore) mm / (in) 75 / (3)<br />
Max. Air Intake Length m 117<br />
Max. Flue Outlet Length m 60**<br />
Max. Total Flue Outlet and Air Intake Length m 120<br />
** Flue lengths between 48 and 60m will create a 1% reduction in DHW output<br />
2.5 OPTIONAL ACCESSORIES<br />
A range of accessories are available from Keston Boilers Ltd to compliment an installation.<br />
Terminal wall sealing collars are available to make good the external all face whilst working from<br />
the inside of the building using 50mm muPVC pipe. Stand-off frames are available to leave a<br />
50mm gap behind the boiler to allow routing of pipes behind the boiler.<br />
Description<br />
Pre-<strong>Installation</strong> Jig Plate<br />
Flue Terminal Wall Sealing Collar (50mm)<br />
Air Terminal Wall Sealing Collar (50mm)<br />
50/75mm Flue Adapter<br />
Flue Outlet Terminal (75mm)<br />
Air Inlet Terminal (75mm)<br />
Stand Off Back Plate<br />
Outside Temperature Sensor<br />
Keston Chronotherm Room Controller<br />
Part Number<br />
C.10C.0.11.00.0<br />
C.08.0.00.07.0<br />
C.08.0.00.07.0<br />
C.17.2.00.60.0<br />
C.17.2.26.00.0<br />
C.17.2.26.00.0<br />
C.10C.0.01.00.0<br />
C.10C.0.09.00.0<br />
C.17.4.21.00.0<br />
<strong>Installation</strong> & <strong>Servicing</strong> <strong>Instructions</strong> Page : 6
WD388/0/2004<br />
Chapter 2 : General Instruction The Keston C36 Combi & C36P Combi Boilers<br />
2.6 PERFORMANCE DATA - C36 COMBI & C36P COMBI<br />
C36 COMBI C36P COMBI<br />
Nat. Gas (G20) LPG (G31)<br />
Min. Input (Gross CV) kW/(Btu/h) 8.3/(28,300) 8.1/(27,600)<br />
Max. CH Input (Gross CV) kW/(Btu/h) 28.3/(96,500) 27.7/(94,500)<br />
Max. DHW Input (Gross CV) kW (Btu/h) 40.0/(136,500) 39.0/(133,000)<br />
Max. DHW Output to Water kW/(Btu/h) 36.0/((122,800) 36.0/(122,800)<br />
Max. CH Output To Water<br />
(80/60 o C Flow/Return) kW/(Btu/h) 25.2/(86,000) 25.2/(86,000)<br />
(50/30 o C Flow/Return) kW/(Btu/h) 28.0/(95,500) 27.7/(94,500)<br />
Min. CH Output To Water<br />
(80/60 o C Flow/Return) kW/(Btu/h) 7.4/(25,250) 7.4(25,250)<br />
(50/30 o C Flow/Return) kW/(Btu/h) 8.2/(28,000) 8.1/(27,600)<br />
Max. Domestic Hot Water Flow Rate litre/min 14.5 14.5<br />
(at 35 O C Rise)<br />
Specific DHW Rate (30 O C Rise) litre/min 17.0 17.0<br />
Min. Domestic Hot Water Flow Rate litre/min 0.35 0.35<br />
Max. Domestic Hot Water Flow Temp. O<br />
C 65 65<br />
Max. Burner Press.-Hot (Factory Preset) mbar/(in w.g) 0/(0) 0/(0)<br />
Max. Gas Cons. After 10 mins (DHW) l/s / (Ft 3 /hr) 1.03/(131) 0.48/(61)<br />
Max. Operating Flow Temp. o<br />
C 82 82<br />
Max. Press. (Sealed System) bar 2.70 2.70<br />
Inlet Gas Pressure mbar/(in w.g) 20.0 / (8.0) 37.0/(14.8)<br />
Recommended Temp Diff. o<br />
C 8 to 20 8 to 20<br />
Electrical Supply 230V 50Hz 230V 50Hz<br />
Power Consumption (Max) W 180 180<br />
Power Consumption (Standby) W 6 6<br />
Type of Gas<br />
G20 Natural Gas G31 LPG<br />
Optimum Flue Gas CO 2 Level (at max CH rate, case on) 9.3 10.6<br />
Expected CO/CO2 Ratio (at max CH rate, case on) 0.0006 0.001<br />
Destination Countries GB/IE GB/IE<br />
SEDBUK Efficiency 90.7 92.8<br />
NOx Class 5 5<br />
Safety Valve bar / (lbf/sq in) 3 / (43.5) 3 / (43.5)<br />
Expansion Vessel Capacity litre 8 8<br />
[NB: For larger systems an additional expansion vessel may be required]<br />
Expansion Vessel Charge Pressure bar / (lbf/sq in) 1.0 / (14.5)<br />
Heating System Minimum Pressure bar / (lbf/sq in) 0.5 / (7.25)<br />
DHW Max. Working Pressure bar / (lbf/sq in) 8/ (116)<br />
Min. Working Pressure for Max. Domestic Flow Rate bar / (lbf/sq in) 2<br />
Maximum CWS Inlet Temperature o<br />
C 50 50<br />
Seasonal Efficiency (SEDBUK) =90.7 (C36 Combi) & 92.8 (C36P Combi)<br />
This value is used in the UK Government's Standard Assessment Procedure (SAP) for<br />
energy rating of dwellings. The test data from which it has been calculated have been<br />
certified by Advantica Technologies Ltd<br />
Keston Boilers Ltd declare that there are no substances harmful to health within the<br />
appliance or used during the production of the appliance.<br />
The C36 Combi is intended for domestic and commercial EMC environments and on a<br />
governed G20 meter supply.<br />
<strong>Installation</strong> & <strong>Servicing</strong> <strong>Instructions</strong> Page : 7
WD388/0/2004 Chapter 2 : General Instruction The Keston C36 Combi & C36P Combi Boilers<br />
The C36P Combi is intended for domestic and commercial EMC environments and on a<br />
governed G31 supply.<br />
This boiler meets the requirements of SI 3083 The Boiler (Efficiency) Regulations and is therefore<br />
deemed to meet the requirements of Directive 92/42/EEC. The CE mark on the appliance shows<br />
compliance with Directives 90/396/EEC, 73/23/EEC and 89/336/EEC.<br />
IMPORTANT<br />
This product contains ceramic fibre boards, which although not regarded as a risk, contain<br />
ceramic fibre which may cause temporary irritation to eyes, skin and respiratory tract. The<br />
fibres are held in place by inorganic binders. Therefore as long as the boards are not<br />
disturbed they will not be released. Since the boards are non-servicable parts there should<br />
be no risk. Under no circumstances should the user interfere with any sealed parts.<br />
However, in the event these boards are removed care must be taken when handling to<br />
ensure the release of dust or fibres is kept to a minimum. Protective clothing is not<br />
required but it is recommended that gloves are worn and that hands are washed before<br />
eating or drinking after handling the boards. To keep the release of dust or fibres to a<br />
minimum it is recommended that a HEPA filtered vacuum is used<br />
to remove any debris from within the appliance. It is recommended<br />
that any replaced boards are sealed within heavy duty plastic bags<br />
and labeled “RCF Waste”. This may be disposed of at a tipping site<br />
licensed for the disposal of industrial waste.<br />
BENCHMARK INITIATIVE<br />
As part of the industry wide “Benchmark” Initiative all C36 Combi boilers now include a<br />
Benchmark <strong>Installation</strong>, Commissioning and Service Record Log Book. Please read this carefully<br />
and complete all sections relevant to the appliance installation. The details of the Log Book will be<br />
required in the event of and warranty work being required. There is also a section to be<br />
completed after each regular service visit. The completed Log Book should be left with the<br />
customer.<br />
CORGI CONTACT INFORMATION<br />
The boiler should be installed and serviced only by CORGI registered operatives. All CORGI<br />
registered Installers carry a CORGI ID card, and have a registration number. Both should be<br />
recorded in the Benchmark Log Book. You can call CORGI direct on 01256 372300.<br />
IN THE EVENT OF A GAS LEAK<br />
Turn off the gas isolation valve to the property immediately. Extinguish<br />
all naked flames or other sources of ignition. Do not operate electrical<br />
switches on or off. Open all doors and windows to ventilate the area.<br />
<strong>Installation</strong> & <strong>Servicing</strong> <strong>Instructions</strong> Page : 8
WD388/0/2004 Chapter 3 - Boiler Location The Keston C36 Combi & C36P Combi Boilers<br />
3. BOILER LOCATION<br />
All dimensions in mm.<br />
150<br />
3.1 DIMENSIONS AND MINIMUM<br />
CLEARANCES<br />
The boiler must be installed in minimum<br />
clearances shown to allow subsequent<br />
servicing, and safe operation. However, larger<br />
clearances may be required during<br />
installation.<br />
3.2 SERVICE CONNECTIONS<br />
Without Optional Pre-<strong>Installation</strong> Jig:<br />
Gas, water, air and flue pipe, condensation,<br />
and electrical connections are as shown. Gas<br />
: 15mm compression. Flow/Return 0.75BSPM<br />
compression. DHW/CWS 0.5BSPM<br />
compression.<br />
With Optional Pre-<strong>Installation</strong> Jig:<br />
Gas, water, air and flue pipe, condensation,<br />
and electrical connections are as shown.<br />
Gas : 15mm compression. Flow/Return<br />
22mm compression. DHW/CWS 15mm<br />
compression.<br />
An optional stand-off frame is also available<br />
which mounts behind the boiler to leave a<br />
50mm deep space behind the boiler. This is<br />
to permit pipe routing behind the boiler if<br />
required. See Section 2.5 - Optional<br />
Accessories.<br />
5<br />
Figure 3.1.2<br />
Dimensions<br />
Flue<br />
Air Intake<br />
300 When servicing appliance<br />
10 When appliance is operating<br />
100<br />
5<br />
Figure 3.1.1<br />
Minimum Clearances<br />
All dimension<br />
m<br />
840<br />
3.3 POSITION<br />
The C36 Combi and C36P Combi are not<br />
suitable for external installation. The boiler<br />
may be installed in any room or internal<br />
space, although particular attention is drawn<br />
to the requirements of the current IEE Wiring<br />
Regulations and, in Scotland, the electrical<br />
provisions of the Building Regulations<br />
450<br />
300<br />
<strong>Installation</strong> & <strong>Servicing</strong> <strong>Instructions</strong> Page : 9
WD388/0/2004 Chapter 3 - Boiler Location The Keston C36 & C36P Combi Boilers<br />
applicable in Scotland, with respect to the installation of the boiler in a room or internal<br />
space containing a bath or shower.<br />
Where a room-sealed appliance is installed in a room containing a bath or shower, any<br />
electrical switch or appliance control, utilising mains electricity, should be so situated that<br />
it cannot be touched by a person using the bath or shower. The C36 Combi and C36P<br />
Combi are classified as IP20 (IPX0) and are therefore suitable for installation in Zone 3<br />
areas, unless subject to hose down.<br />
Compartment installation is permitted - such compartments must be constructed in<br />
accordance with BS 6798.<br />
The wall on which the boiler is mounted must be of suitable load bearing capacity and<br />
must be non-combustible.<br />
The Keston C36 Combi can be located virtually anywhere desired provided that all<br />
Chimneys not used for<br />
venting any other<br />
appliance may be used.<br />
Secure air & flue pipes at<br />
chimney outlet.<br />
[NB: Refer to<br />
Section 3.8.3]<br />
Figure 3.3<br />
regulations are complied with. Because of the boiler's compact size and venting flexibility,<br />
the installation is not limited to a boiler room setting. Before locating the boiler near a<br />
living space consider whether the sounds generated by the boiler will be objectionable.<br />
The boiler may be located within a cupboard enclosure to reduce noise levels if located<br />
within a living space. LPG boilers must not be installed in a cellar.<br />
3.4 ELECTRICAL<br />
3.4.1 Electrical Connections<br />
The boiler must be connected to a permanent 230V ~ 50Hz supply, fused at 3A.<br />
The boiler has provision to receive a 230VAC switched live signal from a<br />
room thermostat/time clock. Alternatively, a Keston Room Controller can be<br />
connected directly, via two core low voltage cable, to the terminals marked<br />
“OT”. The Keston Room Controller will then provide fully room<br />
compensated control to ensure the boiler output is matched to the rooms<br />
requirements at optimum boiler efficiency. DHW demand will always take<br />
priority over heating demand. Wiring external to the boiler must be in<br />
accordance with current I.E.E wiring regulations and local regulations.<br />
<strong>Installation</strong> & <strong>Servicing</strong> <strong>Instructions</strong> Page : 10
WD388/0/2004 Chapter 3 - Boiler Location The Keston C36 Combi & C36P Combi Boilers<br />
The method of connection to the mains electricity supply must facilitate complete<br />
electrical isolation of the boiler, preferably by the use of a fused, unswitched<br />
three pin plug and a shuttered socket-outlet, both complying with the<br />
requirements of BS 1363. There must be only one common method of isolation<br />
for the boiler and its control system.<br />
The appliance must be connected to the 3A supply via a fused double-pole<br />
switch having at least 3 mm (1/8 inch) contact separation in both poles, serving<br />
only the boiler and the system controls.<br />
The connection point to the mains supply should be readily accessible and<br />
adjacent to the boiler, except for rooms containing a bath or a shower. Refer to<br />
section 3.3 Position.<br />
3.4.2 External Wiring & Controls<br />
1. The boiler is designed so that all control wiring is external to the boiler.<br />
2. Heating control signal inputs must the 230VAC "switched live" type<br />
unless using a Keston Room Controller (see below)<br />
3.4.2.1 Enhanced Control Options<br />
Room Compensation (Opentherm)<br />
A Keston Room Controller may be used to provide room compensated<br />
control to ensure the boiler output is matched to the rooms requirements<br />
at optimum boiler efficiency<br />
Mains Supply<br />
Fused @ 3A<br />
230V<br />
3.4.2 Wiring Example<br />
Live<br />
Neutral<br />
Earth<br />
L<br />
N<br />
E<br />
SL<br />
OTC<br />
OTC<br />
OT<br />
OT<br />
KESTON<br />
C36 Combi<br />
1<br />
2<br />
3<br />
Room Thermostat<br />
T6360B1028<br />
To Keston<br />
Ext. Sensor<br />
[Optional]<br />
To Keston<br />
Room Controller<br />
[Optional - instead of room thermostat]<br />
Weather Compensation<br />
A Keston outside temperature sensor may be connected as an option.<br />
The boiler will automatically detect this connection and will operate on a<br />
"weather compensation" basis when receiving a heating demand signal<br />
from the SL terminal or from a Keston Room Controller. Screened cable<br />
(80% density) must be used to connect the outside temperature sensor.<br />
3.5 BOILER SIZE SELECTION<br />
The C36 Combi will automatically adjust heat output and pump speed to match the<br />
system requirements at any given time. Efficiency and combustion levels are maintained<br />
at optimum levels throughout the possible output range. The C36 Combi is therefore<br />
suitable for all systems with a total heat load within the maximum range of the boiler.<br />
3.6 GAS SUPPLY<br />
A gas meter should be connected to the service pipe by the local gas region or their<br />
contractor. An existing meter should be checked preferably by the gas region to ensure<br />
that the meter is adequate to deal with the rate of gas supply required. <strong>Installation</strong> pipes<br />
should be fitted in accordance with BS 6891.<br />
Minimum/Maximum Gas Pressure:<br />
Natural gas pressure before the gas valve must be maintained at between 18 mbar (7.2<br />
in WG) and 22 mbar (8.8 in) while the boiler is running.<br />
<strong>Installation</strong> & <strong>Servicing</strong> <strong>Instructions</strong> Page : 11
WD388/0/2004 Chapter 3 - Boiler Location The Keston C36 & C36P Combi Boilers<br />
LPG pressure must be maintained between 31.5 mbar (12.4 in w.g) and 37.6 mbar (14.8<br />
in w.g) while the boiler is running.<br />
Gas pressures above or below these levels will lead to problems associated with the gas<br />
valve's internal pressure regulator.<br />
Supply pipes to the boiler must not be sized less than the boiler inlet connection<br />
(15 mm). Due consideration must be given to the supply pressure to other gas<br />
appliances in the premises. Reduction in dynamic gas supply pressure will result<br />
in intermittent ignition failures. Ensure gas supply pipe work is adequately sized<br />
for the length of run from the meter to the boiler at a supply rate of 40kW (i.e. a<br />
natural gas supply should be considered to be a minimum of 22mm diameter, reducing to<br />
15mm at the boiler. If gas runs greater than 12m, including the allowance for bends, are<br />
involved the pipe size should be increased further).<br />
3.7 CH & DHW WATER SYSTEMS<br />
All piping must be installed in accordance with all applicable local and Water Supply<br />
Bylaws for forced hot water heating systems.<br />
Consideration must be given to pipe capabilities and pressure drop through the piping<br />
when selecting pipe sizes. The primary pipe connections to the boiler must be sized<br />
according to the system load, not dictated by the boiler connection sizes.<br />
Water treatment must be carried out to BS 7593 : Treatment of Water in Hot Water<br />
Central Heating Systems.<br />
In IE the requirements given in the current edition of IS813 and the current Building<br />
Regulations must be followed.<br />
a The Keston C36 Combi is designed for installation on sealed water systems only.<br />
With fully pumped water circulation. The pump, an 8l expansion vessel and<br />
associated safety devices are fitted within the boiler.<br />
b Any system must be thoroughly flushed clean of grease, dirt and debris, prior to<br />
connection with the boiler. A trap may be installed in the flow line to collect any<br />
solder, or other debris, from the installation.<br />
c All water systems must be constructed to comply with requirements of the Local<br />
Water Authority.<br />
d Always use a system complying with the requirements of BS 5449 and BS 6798.<br />
e System design must ensure an open circuit is always available to ensure<br />
circulation when the pump overrun function is operating after boiler shutdown.<br />
f Isolation valves must be fitted on the cold mains supply, the heating flow and the<br />
heating return to enable isolation when maintaining the boiler. Such isolation<br />
valves are included in the optional pre-installation jig (C.10C.0.11.00.0)<br />
g Copper tubing to BS 2871 Part 1 or barrier plastic pipe suitable to 110 o C, such<br />
as Unipipe, is recommended.<br />
h Jointing should be either with capillary, threaded or compression fittings. Pipes<br />
should have a gradient to ensure air is passed easily to vent points and water<br />
flows readily to drain points.<br />
i Draining taps must be located in accessible positions which permit the draining of<br />
the boiler. Draining taps should be at least 22 mm in nominal size and be in<br />
accordance with BS 2879. A drain tap is incorporated into the optional<br />
pre-installation jig (C.10C.0.11.00.0)<br />
AIR VENT POINTS<br />
j These must be fitted at all high points where air will naturally collect and must be<br />
sited to allow complete draining of the system.<br />
Table 3.7 Additional Expansion Vessel Selection<br />
Safety Valve Setting<br />
3.0 bar<br />
Vessel charge & initial system<br />
1.0 bar<br />
pressure.<br />
Total Water Content of system in Vessel<br />
excess of 125 litres<br />
Volume<br />
25 litres<br />
2.7<br />
50 litres<br />
5.4<br />
75 litres<br />
8.2<br />
<strong>Installation</strong> & <strong>Servicing</strong> <strong>Instructions</strong> Page : 12
WD388/0/2004 Chapter 3 - Boiler Location The Keston C36 Combi & C36P Combi Boilers<br />
100 litres<br />
125 litres<br />
10.9<br />
13.6<br />
k. The boiler is supplied with an integral expansion vessel of 8l capacity. This is<br />
suitable for systems of up to 125 Litres system volume. Table 3.7 Expansion<br />
Vessel Selection provides guidance for the correct additional expansion vessel<br />
size to use for systems with a water content larger than 125 Litres. Any additional<br />
vessel must be fitted on the boiler primary return.<br />
l<br />
A filling point must be fitted, in accordance with local water authority<br />
requirements. An approved filling loop is supplied loose with the boiler installation<br />
jig. There must be no permanent connection to the mains water supply. The filling<br />
loop must therefore be left isolated at both ends and disconnected after the<br />
system is filled.<br />
m The installation must be designed to work with flow temperatures of up to 110 o C.<br />
All components of the system must be suitable for a working pressure of 3 bar<br />
and a temperature of 110 o C. Care should be taken in making all connections that<br />
the risk of leakage is minimised.<br />
n<br />
The pipe from the safety discharge valve must not discharge above an entrance,<br />
window or any type of public access area. The boiler safety discharge valve pipe<br />
must be extended using not less than 15mm pipe to discharge, in a visible<br />
position, outside the building, facing downwards, preferably over a drain. The<br />
pipe must have a continuos fall and be routed to a position so that any discharge<br />
of water, possibly boiling, or steam cannot create any danger to persons,<br />
damage to property or external electrical components or wiring. To ease future<br />
DOMESTIC HOT WATER<br />
DOMESTIC WATER<br />
COLD WATER SUPPLY<br />
KESTON<br />
COMBI<br />
Drain<br />
Cock<br />
By-pass<br />
(if required)<br />
Expansion<br />
Vessel<br />
(if required)<br />
RETURN<br />
HEATING CIRCUIT<br />
FLOW<br />
Isolating Valve<br />
Flex Hose<br />
(disconnected<br />
after filling)<br />
Isolating & Dbl Chekc Valve<br />
Figure 3.7 : CH & DHW Sealed Systems Diagram<br />
servicing it is advisable to use a compression type fitting to extend the safety<br />
discharge valve pipe.<br />
3.7.1 Boiler By-pass Piping<br />
Boiler water flows are critical to the operation of the boiler. If flow cannot be maintained<br />
through the system piping to meet the minimums required by the boiler, insufficient water<br />
flows through the boiler will cause the boiler to "kettle" or even produce steam which can<br />
damage the heat exchanger and will invalidate the heat exchanger warranty. In addition,<br />
an open circuit is required after boiler shutdown to permit circulation during the boilers 2<br />
minute pump overrun sequence.<br />
It is advisable to incorporate a boiler by-pass in the system, especially if thermostatic<br />
radiator valves are used. The flow/return differential should be 10 o C to 20 o C. To comply<br />
with the Building Regulations Part L1 the bypass must of the automatic type.<br />
3.7.2 Air Elimination<br />
<strong>Installation</strong> & <strong>Servicing</strong> <strong>Instructions</strong> Page : 13
WD388/0/2004 Chapter 3 - Boiler Location The Keston C36 & C36P Combi Boilers<br />
In the initial charge of water to<br />
the boiler system and in all<br />
subsequent additions of water<br />
to the system some air will be<br />
dissolved in the water. As the<br />
water is heated the air is driven<br />
out of the solution and will<br />
collect in high spots in the<br />
system. These air bubbles can<br />
interfere with pumping and<br />
heat transfer and must be<br />
eliminated.<br />
<strong>Installation</strong> of air bleed valves at<br />
the high spot(s) in the system<br />
will allow for air elimination<br />
when filling the system and will<br />
allow re-venting in a day or so<br />
after all air has been driven out<br />
of solution.<br />
Pump Head (m)<br />
7<br />
6<br />
5<br />
4<br />
3<br />
2<br />
1<br />
C36 Combi Available pump head<br />
3.7.3 System Pump<br />
Selection (if required)<br />
The C36 Combi features an<br />
integral circulating pump which<br />
has sufficient excess head to<br />
drive most domestic systems.<br />
The available head is<br />
shown in the graph<br />
below. If the system<br />
index circuit resistance<br />
is in excess of the<br />
available head from the<br />
integral pump an<br />
additional system pump<br />
will be required.<br />
DOMESTIC HOT WATER<br />
The schematic below<br />
illustrates<br />
a<br />
recommended approach<br />
to using an additional<br />
system pump. The<br />
additional system pump<br />
should be sized to<br />
overcome the index<br />
circuit resistance only as<br />
the boilers integral pump<br />
will overcome boiler resistance.<br />
DOMESTIC WATER<br />
COLD WATER SUPPLY<br />
0<br />
Drain<br />
Cock<br />
0 5 10 15 20 25 30 35 40<br />
KESTON<br />
COMBI<br />
Permanently<br />
Open 28mm<br />
By-pass<br />
Flow Rate (lpm)<br />
Expansion<br />
Vessel<br />
(if required)<br />
Additional System<br />
Pump<br />
(if required)<br />
RETURN<br />
HEATING CIRCUIT<br />
FLOW<br />
If an additional pump is required the selected pump must comply with BS 1394. Provision<br />
must be made in the system design for control of the additional pump.<br />
3.7.4 Filling The System<br />
The boiler is supplied with an approved filling loop device. This filling device is designed<br />
to enable initial fill and topping up of system pressure. The system should be set to a<br />
pressure of between 1.0 and 1.5 bar. To display the system water pressure press the<br />
“Installer” button, on the boiler fascia, repeatedly until the number 5 appears on the<br />
display. After a few seconds the display will change to show the water pressure, in bars.<br />
Using the filling loop set the pressure to 1.0 to 1.5 bar,<br />
<strong>Installation</strong> & <strong>Servicing</strong> <strong>Instructions</strong> Page : 14
WD388/0/2004 Chapter 3 - Boiler Location The Keston C36 Combi & C36P Combi Boilers<br />
3.8 FLUE SYSTEM<br />
NB: When installing a replacement boiler a new flue system must be used. Do<br />
not re-use the existing boiler flue installation.<br />
3.8.1 Design<br />
Individual air supply and flue outlet pipes are used. The material used for flue outlet &/or<br />
air inlet must be muPVC to BS 5255 an of an internal diameter of 51 mm. (i.e. nominal 50<br />
mm diameter muPVC solvent weld waste pipe)<br />
Alternatively, where flue or air intake lengths of up to 60m are require, Keston Composite<br />
75mm flue and air pipe can be used (contact your Keston stockist for details). Keston<br />
Composite 75mm pipe MUST be painted where exposed to UV light.<br />
Both 50mm flue outlet terminal and 50mm air inlet terminal are supplied and are<br />
illustrated in Figure 3.8.1. Both terminals are identical. If 75mm terminals are required<br />
these can be obtained from your Keston Boilers stockist. Request part numbers<br />
C.17.2.26.00.0 (terminals) and C.17.2.00.60.0 (50 to 75 adapters).<br />
3.8.2 Maximum Lengths<br />
The maximum lengths of both air inlet pipe and flue outlet pipe, when no bends are used,<br />
are as detailed below.<br />
However, each bend used has an equivalent length that must be deducted from the<br />
maximum straight length stated above. Knuckle bends must not be used.<br />
A 92.5 o sweep elbow is equivalent to 1.0m straight length. A 45 o bend is equivalent to<br />
0.5m straight length<br />
50mm 75mm<br />
Maximum Air Inlet Length : 39.0m 117.0m<br />
Maximum Flue Outlet Length: 20.0m* 60m**<br />
Maximum Total Flue and Air Intake Length : 40.0m 120.0m<br />
* A flue length of between 16 and 20m in<br />
50mm pipe will reduce the DHW output by<br />
1%<br />
FLUE<br />
** A flue length of between 48 and 60m in<br />
AIR<br />
75mm pipe will reduce the DHW output by<br />
1%<br />
d<br />
b<br />
Example (assuming 50mm muPVC flue<br />
and air pipework)<br />
Air inlet uses two one 92.5 o sweep elbows.<br />
Hence, maximum length permissible<br />
(i.e. a+b in figure 2.8.2) = 39.0m - 1.0m -<br />
1.0m = 37.0m<br />
c<br />
KESTON COMBI<br />
(COMBI P)<br />
a<br />
Flue outlet uses one 92.5 o sweep elbow.<br />
Hence, maximum length permissible (i.e.<br />
c+d in figure 2.8.2 = 20.0m - 1.0 m = 19.0m<br />
Figure 3.8.2 : Flue Air Maximum Length Example<br />
3.8.3 Slope<br />
‘Horizontal' flue outlet pipework MUST slope at least 2 degrees (32 mm per metre run)<br />
downwards towards the boiler. Pipework can be vertical. Only swept elbows can be used.<br />
Air inlet pipework can be truly horizontal or vertical, or sloping in a downward direction<br />
towards the boiler but in this case rain, etc., must be prevented from entering the pipe.<br />
There must be no troughs in any of the pipework, whether it be air inlet or flue<br />
outlet.<br />
<strong>Installation</strong> & <strong>Servicing</strong> <strong>Instructions</strong> Page : 15
WD388/0/2004 Chapter 3 - Boiler Location The Keston C36 & C36P Combi Boilers<br />
Due the low temperature of the flue gases further<br />
condensate will form within the flue system. Drain<br />
points, with suitable traps, must therefore be<br />
incorporated within the flue system at the base of<br />
vertical flue sections in excess of 6m, for 50mm<br />
muPVC pipe flue systems. These additional<br />
condensate drains must be run to discharge as<br />
detailed in section 3.11. Such drain points can be<br />
formed using standard muPVC fittings. Refer to<br />
the example in Figure 3.8.3.<br />
To Boiler<br />
To Terminal<br />
Figure 2.8.3 :<br />
Flue Condensate Drain<br />
Point Example<br />
Tee Fitting<br />
3.8.4 Terminations<br />
Air inlet terminals must be facing horizontally or<br />
downwards to prevent entry of rain into the<br />
6 in min.<br />
terminal and positioned to ensure only fresh air is<br />
drawn into the boiler. The air terminal must be<br />
located outside of the building.<br />
Drawing of combustion air directly from a<br />
ventilated boiler room invalidates the heat<br />
exchanger warranty.<br />
The flue outlet terminal is designed to face<br />
outwards but can, if desired, be adapted to face in<br />
any direction BUT must not be directed in the<br />
region of the air inlet. The flue terminal and air inlet<br />
terminal can be located on different, but not<br />
opposing wall faces.<br />
The two terminals are subject to the requirements<br />
Flue Outlet/Air Inlet Terminals<br />
of BS 5440 Pt 1 for clearances from features of the<br />
Figure 2.8.1 : Terminals<br />
building although some can be decreased to the<br />
values indicated.<br />
The Keston C36 Combi and C36P Combi, as<br />
with any condensing boiler, will generate a condensate “plume” from the flue<br />
terminal in all weather conditions. Consideration must therefore be given to the<br />
effect of this “plume” when selecting a location for the flue terminal. It is the<br />
responsibility of the installer to ensure the selected terminal location does not<br />
cause nuisance.<br />
A<br />
B<br />
C Below eaves.<br />
E<br />
F<br />
G Above ground or balcony or roof.<br />
H From surface facing a terminal *<br />
I<br />
J<br />
K<br />
L<br />
Dimensions (mm)<br />
Below or beside openable window, air brick,<br />
etc.<br />
Below gutters, soil pipes, drain pipes.<br />
D Below balconies or car port roof.<br />
From vertical drain or soil pipes.<br />
From internal or external corner.<br />
From terminal facing a terminal.<br />
From opening in a car port.(not recommended)<br />
Vertically from terminal on same wall.<br />
Flue<br />
Terminal<br />
1,200<br />
1,200<br />
1,500<br />
1,200<br />
1,500<br />
Horizontally from terminal on same wall.<br />
300 300<br />
*The dimensions given in the table above may need to be increased to avoid wall<br />
staining and nuisance depending on site conditions.<br />
300<br />
75<br />
200<br />
200<br />
75<br />
200<br />
200<br />
600<br />
Air<br />
Inlet<br />
<strong>Installation</strong> & <strong>Servicing</strong> <strong>Instructions</strong> Page : 16<br />
50<br />
75<br />
50<br />
50<br />
50<br />
50<br />
100<br />
100<br />
100
WD388/0/2004 Chapter 3 - Boiler Location The Keston C36 Combi & C36P Combi Boilers<br />
It is advisable for horizontal flue terminals to place a 45 o elbow at the end of the<br />
flue to direct the condensate plume up and away from the property. If the air<br />
intake is within 500mm of the flue outlet the air must not terminal at a level above<br />
that of the flue<br />
If either the air inlet or flue outlet terminate at a height of less than 2.1m above<br />
ground level, the terminal must be protected by a suitable guard. The K4 terminal<br />
guard (with plastic coating), manufactured by Tower Flue Components Ltd is<br />
suitable for this purpose<br />
3.8.5 Clearances From Wall<br />
Flue outlet and air inlet terminations must be at least 40 mm from the wall face.<br />
3.8.6 Distance Between Flue Outlet & Air Inlet<br />
There is no maximum - the terminations must not be on opposite sides of the<br />
dwelling but can be in areas of unequal pressure..<br />
A minimum clearance of at least 200 mm must be left between the terminations.<br />
3.8.7 General <strong>Installation</strong>s<br />
All parts of the system must be constructed in accordance with BS 5440 Part 1,<br />
except where specifically mentioned in these instructions.<br />
All pipe work must be adequately supported.<br />
All joints other than push-on or plastic compression connectors must be made<br />
and sealed with solvent cement suitable for muPVC pipes and conforming to BS<br />
6209: 1982.<br />
External wall faces and any internal faces of cavity walls must be made good.<br />
Rubber collars are available for flue and air terminals to finish the external wall<br />
face around the terminals (Part No C.08.0.00.07.0)<br />
3.9 AIR SUPPLY<br />
The KESTON C36 Combi and C36P Combi are room sealed appliances and therefore do<br />
not require purpose provided ventilation to the boiler room for combustion air.<br />
3.10 COMPARTMENT INSTALLATION<br />
Due to the low casing temperatures generated by the boiler, no compartment ventilation<br />
is required. However, the cupboard or compartment must not be used for storage.<br />
3.11 CONDENSATE DRAINAGE<br />
Being a condensing boiler, the C36 Combi and C36P Combi are fitted with a condensate<br />
trap at the base of the heat exchanger and flue assembly, with facility to connect to a<br />
drain point underneath the appliance.<br />
Use only plastic piping and do not reduce below 15 mm internal diameter within the<br />
dwelling. Condensate should preferably be drained into the sanitary waste system or,<br />
alternatively, the rainwater system of the property in most cases. Ensure in all cases that<br />
the disposal of the condensate is in accordance with any local regulations in force.<br />
Termination of the pipe must be either at a branch or stack internal to the house, or<br />
externally at an open gully. Alternatively, discharge into a purpose made condensate<br />
soakaway can be considered. Existing or purpose built drains must use suitable corrosion<br />
resistant material as condensate is mildly acidic.<br />
The connection to the condensate drain of the boiler, and the condensate drain pipework<br />
itself, should be properly sealed to ensure there is no possibility of leakage into the<br />
dwelling.<br />
A minimum slope downwards towards the drain of 1 in 20 is essential. Freezing of the<br />
termination and pipework must be prevented. Any drainage pipes outside the property<br />
must be at least 32 mm inside diameter.<br />
<strong>Installation</strong> & <strong>Servicing</strong> <strong>Instructions</strong> Page : 17
WD388/0/2004 Chapter 4 : <strong>Installation</strong> The Keston C36 Combi & C36P Combi Boilers<br />
4. INSTALLATION OF THE BOILER<br />
Read Chapter 3 - Boiler Location and decide upon the position of the boiler.<br />
<strong>Installation</strong> of the boiler is straightforward but consideration must be given to access to allow flue<br />
and air pipes to be pushed through walls and ceilings. The order in which the components are<br />
installed will depend upon particular site conditions, but in general it will be easiest and most<br />
accurate to install the boiler and then build up the flue outlet and air inlet pipes to the terminal -<br />
this is the sequence described.<br />
4.1 WALL MOUNTING BRACKET<br />
a Place the bracket on the<br />
wall horizontally with the<br />
pre-drilled holes at the<br />
All dimensions in mm.<br />
bottom and position as<br />
dictated by the template 173<br />
supplied within the boiler<br />
packaging.<br />
b Drill through the centre<br />
hole of the bracket, plug<br />
the hole and fix in position.<br />
c Using a spirit level make<br />
sure the bracket is<br />
completely level and mark<br />
915<br />
the position of the other<br />
screw holes.<br />
d Remove the bracket and<br />
drill the holes in the<br />
positions marked. Plug<br />
these holes.<br />
e Screw the bracket to the<br />
wall using screws of an<br />
appropriate size for the<br />
wall type (No. 12 x 2 inch<br />
wood screws normally<br />
Fixing Jig<br />
Figure 4.1 Wall Mounting Fixing Locations<br />
suffice).<br />
f Fix the cross spacer to the wall bracket locating pegs and mark the resulting location for<br />
the pre-installation jig dictated by the lower ends of the cross spacer.<br />
g Drill and plug the holes for the pre-installation jig.<br />
h Screw the pre-installation jig to the wall using screws of an appropriate size for the wall<br />
type.<br />
If you have purchase the optional pre-installation jig you are now able to connect system<br />
pipework to the pre-installation jig, isolate using the valves supplied as part of the jig and<br />
pressure test the system pipework prior to mounting of the boiler. System flushing and<br />
cleaning should also be carried out at this stage prior to boiler mounting.<br />
4.2 MOUNTING THE BOILER (after system cleaning and testing)<br />
a Lift and locate the boiler onto the stud and the two locating pegs protruding from<br />
the wall bracket. (lift the boiler via the back frame only)<br />
b Lower the boiler for hanging on the two pegs.<br />
c Fix the boiler on the bracket stud using the nut and the washers supplied.<br />
d Make the gas, DHW, CWS, flow and return connections to the system or, if a<br />
pre-installation jig is being used, the pre-installation jig valves using the swivel nut<br />
connections supplied. Ensure the compound gasket inserts are in place inside the<br />
swivel nut face before tightening. Check all joints for soundness.<br />
4.3 ASSEMBLY PRACTICE<br />
Remove all plastic debris and burrs when installing air intake piping. Plastic filings caused<br />
by cutting muPVC pipe must not be allowed to be drawn into the combustion air blower.<br />
<strong>Installation</strong> & <strong>Servicing</strong> <strong>Instructions</strong> Page : 18
WD388/0/2004 Chapter 4 : <strong>Installation</strong> The Keston C36 Combi & C36P Combi Boilers<br />
Prevent dust entering the air intake when cutting on building sites. Blower failure which is<br />
determined to be caused by plastic filings or other debris will not be covered by<br />
guarantee.<br />
4.4 INSTALLING FLUE AND AIR PIPES<br />
IMPORTANT - When installing the boiler on an existing system a new flue and air<br />
intake system MUST also be installed. You must NOT re-use existing flue or air<br />
pipework components.<br />
NB: When installing the boiler, consider:<br />
Flue Spigot Assembly<br />
The flue spigot (50mm muPVC) is inside the accessory bag.<br />
Put the flue spigot assembled with the test plug on the cabinet frame and secure<br />
it by fastening the two M6 screws. Couple the spigot to the internal flue pipe<br />
using the flexible couple and fastening clips. Ensure the clips are properly<br />
secured and no leakage can occur.<br />
Remember the flue pipe must slope downwards back towards the boiler and this<br />
is best achieved using 92.5 o bends.<br />
a<br />
or<br />
b<br />
c<br />
Using the template supplied within the boiler packaging mark the<br />
positions of the two holes for the flue and air pipes on the wall(s)<br />
ceiling.<br />
Drill the two holes in the wall/ceiling, preferably using a core drill.<br />
Measure, cut and check the air and flue pipes to pass to the exit from the<br />
wall(s) or ceiling.<br />
Always thoroughly deburr all pipes and, most important, remove shavings from<br />
within the pipe.<br />
Note:<br />
d Mount the boiler on the wall bracket and fix the air spigot (packed loose<br />
with the boiler and with appropriate gasket) to the boiler air inlet<br />
connection tightly to ensure there is no leakage. Assemble, using<br />
adhesive, the pipework from the boiler connections to the exit from the<br />
first wall/ceiling (remount the boiler if removed). When pushing pipe<br />
through walls, ensure grit and dust is not allowed to enter the pipe.<br />
Ensure pipes are fully engaged into sockets and solvent welded with no<br />
leaks.<br />
e Using the same methods drill any further holes (always covering existing<br />
pipework), cut and assemble the pipework.<br />
f From outside, complete the two terminations - See Section 3.8 Flue<br />
System and make good all holes. (wall sealing collars are available to<br />
make good hole areas on the wall face (part number C.08.0.00.07.0)<br />
g Support any pipes whose route could be displaced either of its own<br />
accord or by accident. Any horizontal run over 1m or vertical runs of any<br />
length must always be supported. Brackets should be placed at intervals<br />
of approximately 1m.<br />
h Check all connections for security and re-seal any joints using solvent<br />
cement where soundness may be in doubt.<br />
It is equally important to seal the air inlet with solvent cement as the flue outlet<br />
pipe joints.<br />
4.5 CONDENSATE DRAINAGE<br />
NB: When installing the boiler, consider:<br />
Condensate Trap Assembly<br />
The condensate trap is fitted loose inside the cabinet.<br />
i) remove the nut from the condensate trap spigot;<br />
ii) fit the condensate trap through the two holes in the bottom of the<br />
frame;<br />
iii) replace the nut from the frame bottom<br />
<strong>Installation</strong> & <strong>Servicing</strong> <strong>Instructions</strong> Page : 19
WD388/0/2004 Chapter 4 : <strong>Installation</strong> The Keston C36 Combi & C36P Combi Boilers<br />
Connect the condensate drainage system to the boiler. It is advisable to use a detachable<br />
fitting at connection to the boiler to enable easy removal for servicing.<br />
Fill the condensate trap by pouring water into the boiler flue until water is seen to flow<br />
freely from the condensate drainage system. Make the final connection of flue pipe to the<br />
boiler.<br />
Details are provided in Chapter 3 - Section 3.11 Condensate Drainage<br />
Connection : 22 mm plastic pipe.<br />
4.6 WATER SYSTEM<br />
<strong>Installation</strong> Without Optional Pre-<strong>Installation</strong> Jig:<br />
Connect the flow and return HEATING CIRCUIT system pipework to the boiler. Details of<br />
system requirements are given in Chapter 3 - Section 3.7 Water Systems.<br />
Connections : 0.75 BSPM<br />
Connect the flow and return DOMESTIC WATER pipework to the boiler. Details of<br />
system requirements are given in Chapter 3 - Section 3.7 Water Systems.<br />
Connections : 0.5 BSPM<br />
<strong>Installation</strong> With Optional Pre-<strong>Installation</strong> Jig:<br />
Connect the flow and return HEATING CIRCUIT system pipework to the boiler jig valves.<br />
Details of system requirements are given in Chapter 3 - Section 3.7 Water Systems.<br />
Connections : 22mm compression<br />
Connect the flow and return DOMESTIC WATER pipework to the boiler jig valves. Details<br />
of system requirements are given in Chapter 3 - Section 3.7 Water Systems.<br />
Connections : 15mm compression<br />
For optimum performance after installation, this boiler and its associated central heating<br />
system must be flushed in accordance with the guidelines given in BS7592:1992,<br />
"Treatment of water in domestic hot water central heating systems".<br />
This must involve the use of a proprietary cleaner, such as Fernox Superfloc, or<br />
BetzDearborn's Sentinel X300 or X400. Full instructions are supplied with the products,<br />
but for immediate information, please contact Fernox on 01799 550811 or BetzDearborn<br />
on 0151 420 9563.<br />
For long term protection against corrosion and scale, after flushing, it is recommended<br />
that an inhibitor such a Fernox MB1 or BetzDearborn's Sentinel X100 is dosed in<br />
accordance with the guidelines given in BS7593:1992.<br />
4.7 GAS SUPPLY<br />
Connect the gas supply to the appliance. Details of gas supply requirements are given in<br />
Chapter 3 - Section 3.6 Gas Supply. Supply of adequate gas pressure (with the boiler<br />
running) is critical to ensure reliable operation of the boiler.<br />
Connections : 15mm compression<br />
4.8 ELECTRICAL SUPPLY<br />
The entry point(s) for the electrical supply cable(s) is in the base of the appliance (see<br />
Section 3.2 Service Connections fig. 3.1.2) via a cordgrip bush. Feed the cable through<br />
the bush and route inside the cabinet to the connection strip located to the front bottom<br />
right area of the cabinet.<br />
1. The electrical supply must be as specified in Chapter 3 - Section 3.4 Electrical<br />
Supply.<br />
WARNING : THIS APPLIANCE MUST BE EARTHED.<br />
2. All external controls and wiring must be suitable for mains voltage. Supply wiring<br />
should be in PVC insulated cable not less than 0.75mm 2 (8.0mm dia) to BS 6500<br />
Table 16 (material code H05VV-F).<br />
3. The permanent live supply connection may be via a 3 amp fused double pole<br />
switch, serving only the boiler. (Refer to Chapter 3 - Section 3.4 Electrical<br />
Supply). The system controls for the boiler must also be supplied via this isolator.<br />
4. Securely tighten the terminal screws and route the cable(s) through the<br />
re-openable cable clips. Ensure all cables are secured and that the cord grip<br />
<strong>Installation</strong> & <strong>Servicing</strong> <strong>Instructions</strong> Page : 20
WD388/0/2004 Chapter 4 : <strong>Installation</strong> The Keston C36 Combi & C36P Combi Boilers<br />
bush is tightened to securely grip the main cable at entry to the cabinet. Remove<br />
the factory fitted link wire between the room thermostat terminals on the boiler.<br />
The supply cable(s) must be connected to the main terminals as follows:-<br />
N - Blue wire (Neutral) for 3A permanent<br />
L - Brown wire (Live) 3A permanent supply<br />
- Yellow/Green Wire (Earth)<br />
SL - 230V Switched Live - i.e. Room Thermostat<br />
OTC - Optional outside temperature sensor for weather<br />
compensation. (Sensor part no C.10C.0.09.00.0)<br />
OT - Optional Keston Chronotherm room compensating<br />
programmable room thermostat. (Part no<br />
C.17.4.21.00.0)<br />
Ensure connection is made such that if the cable slips in its anchorage the<br />
current carrying conductors become taut before the earthing conductor.<br />
4.9 EXCHANGING A BOILER<br />
Before removing an existing boiler add Fernox Supafloc , or equivalent cleaning agent, in<br />
accordance with the manufacturers instructions. Open all radiator valves and fire the<br />
boiler. When the system is fully heated, shut off the gas supply and drain down the<br />
central heating system.<br />
Important<br />
The C36 Combi and C36P Combi combination condensing boilers contain components<br />
which could be damaged or blocked by grease, dirt or solder etc. It is essential that<br />
sludge or scale is removed from an existing system before fitting the boiler.<br />
The guarantee provided with the Keston C36 Combi and C36P Combi does not cover<br />
damage caused by system debris or sludge.<br />
Connect the new boiler as instructed in this manual and fit in accordance with Sections<br />
4.1 to 4.8<br />
Fill to a pressure of about 2.7 bar. Check the complete system for water soundness. If<br />
leaks need to be rectified using flux or solder the system must be flushed cold again<br />
before proceeding.<br />
Reduce the pressure to the Initial System Design Pressure. Vent the system.<br />
Gas Supply<br />
The complete gas installation up to the boiler gas control valve must be checked for<br />
soundness. BS 6891.<br />
Electrical <strong>Installation</strong><br />
Carry out preliminary electrical safety checks, i.e. Earth continuity, Polarity, Resistance to<br />
Earth, Short Circuit and earth loop impedance using a suitable test meter.<br />
Initial Firing<br />
The gas pressure setting is factory adjusted to within the required range and does<br />
not need readjustment. If the reading is incorrect then check such factors as soundness<br />
of the air and flue pipe joints, pressure sensible joints and the gas inlet pressure<br />
(minimum 18 mbar required for Natural Gas and 31 mbar required for LP gas). If all joints<br />
are sound and the gas inlet pressure is satisfactory set the gas pressure check the gas<br />
input. Full details of this procedure are given in Section 5.9 Timing The Gas Meter.<br />
Combustion Testing<br />
It is advisable on all installations that the combustion quality is checked by measuring the<br />
carbon dioxide (CO 2), or oxygen (O 2), level. This procedure is detailed in Section 5.7<br />
Combustion Testing. Badly tuned combustion will lead to reduce the life of the boiler and<br />
invalidate the warranty.<br />
<strong>Installation</strong> & <strong>Servicing</strong> <strong>Instructions</strong> Page : 21
WD388/0/2004<br />
Chapter 5 : Commissioning The Keston C36 Combi & C36P Combi Boilers<br />
5. COMMISSIONING OF THE BOILER<br />
Important:<br />
This condensing combination boiler contains components which could be damaged or blocked by<br />
grease, dirt, solder etc., from the water system. The following commissioning procedures must be<br />
followed precisely.<br />
5.1 INITIAL FLUSHING<br />
All waterways within the Keston C36 Combi and C36P Combi are either copper or high<br />
alloy stainless steel. As a result water treatment chemicals for central heating boilers<br />
such as Fernox MB1, Sentinel X100 or equivalent, are suitable. In any event reference<br />
must be made to BS 7593 : Treatment Of Water In Hot Water Central Heating Systems.<br />
a. Disconnect the boiler from the system at the flow and return connections and<br />
temporarily link the flow and return pipes on the system.<br />
b. Flush the entire system until clean water is discharged, free from dirt, flux, solder<br />
etc. The use of a flushing chemical is recommended, e.g. Fernox Supafloc, or<br />
equivalent.<br />
Sludge and scale must be removed from an existing system. Boiler failure due to<br />
system debris or sludge shall invalidate the guarantee.<br />
c. Connect the system to the boiler and fill in accordance with Section 2.7 - Water<br />
Systems. At this stage fill to a pressure of about 2.7 bar.<br />
d. Check the complete system for water soundness. If leaks need to be rectified<br />
using flux and solder, the system must be flushed cold again before proceeding.<br />
e. Reduce the pressure to the Initial System Design Pressure. Vent the system<br />
5.2 GAS SUPPLY<br />
The complete gas installation up to the boiler service cock must be checked for<br />
soundness. BS 6891.<br />
5.3 ELECTRICAL INSTALLATION<br />
Carry out preliminary electrical safety checks, i.e. Earth continuity, Polarity, Resistance to<br />
Earth, Short Circuit using a suitable test meter.<br />
5.4 LP GAS<br />
The Keston C36 Combi and C36P Combi are supplied preset for the gas designated on<br />
the boiler packing. No field conversion is possible. LPG installations must use C36P<br />
Combi models only.<br />
5.5 INITIAL FIRING<br />
Important<br />
Checking the gas pressure to the pre-mix burner requires a special procedure, outlined<br />
below, which must be carried out.<br />
a. Purge the gas supply in accordance with BS 6891.<br />
b. Vent the water system.<br />
Important:<br />
The heat exchanger consists of corrugated tubes which can trap an air pocket.<br />
Great care must be taken to ensure that water flow has been established through<br />
the heat exchanger and thus ensuring no air pockets remain in the heat<br />
exchanger and pipe work. Firing the boiler while an air pocket exists in the heat<br />
exchanger could damage it.<br />
c. Turn the gas service cock to ON.<br />
d. Turn on the electrical supply, setting any external controls to call for heat.<br />
e. Using the “+” button on the left hand side of the control panel, set the CH<br />
temperature to 80C. After a few seconds the display will revert to show the actual<br />
flow temperature of the boiler. Also press the “Summer” button until the green<br />
light above this button is extinguished.<br />
Once a heating demand is received the fan will start and the boiler will enter the<br />
pre-purge phase. During this phase the boiler pump will also start to run. After 5<br />
<strong>Installation</strong> & <strong>Servicing</strong> <strong>Instructions</strong> Page : 22
WD388/0/2004<br />
Chapter 5 : Commissioning The Keston C36 Combi & C36P Combi Boilers<br />
Seconds the boiler will start to spark and will energise the gas valve. When<br />
ignition is achieved a dot will appear in the lower right corner of the digital display<br />
to show the boiler is alight.<br />
If an air lock or other blockage is present the unit may go to overheat or water<br />
pressure lockout. This will be indicated by the display flashing error code “E03” or<br />
“E37”. If this occurs clear the blockage and/or purge the air from the system, and<br />
press the “Reset” button to restart the ignition sequence.<br />
If ignition does not occur, the boiler, at approximately 20 second intervals, will<br />
make four further attempts to light the burner.<br />
If after five automatic attempts the boiler still fails to ignite, the display will show<br />
the code “E 01” indicating no ignition.<br />
If, after five manual attempts (to allow for purging of any air in the gas line), the<br />
boiler still fails to ignite (indicated by the red (lockout) lamp) refer to Section 5.3 -<br />
Fault Modes.<br />
f. Check for gas soundness between the gas service cock and connection to<br />
the burner manifold.<br />
5.6 HOT FLUSHING<br />
a. Allow the system to heat up, checking for water soundness.<br />
b. Follow instructions provided with the cleaning agent, i.e. Fernox Supafloc, or<br />
equivalent. Turn off the boiler and flush the water system while still hot.<br />
Thoroughly flush the system with clear water.<br />
c. Refill the system using a quality water treatment such as Fernox MB1 or Sentinel<br />
X100. For sealed systems, fill to the required Initial Design Pressure.<br />
5.7 COMBUSTION TESTING<br />
Although the gas pressure is preset at the factory it is advisable to check proper<br />
combustion by measuring gas input and the level of carbon dioxide, or oxygen, in the flue<br />
outlet from the boiler. Overfiring or underfiring the burner will reduce the longevity of the<br />
appliance.<br />
Carbon dioxide is a colourless, odourless gas produced by all combustion processes.<br />
When the Keston condensing boiler is operating properly carbon dioxide (CO 2) levels will<br />
be between 8.5 to 8.7% (low rate) and 9.2 to 9.4% (high rate) CO 2 for natural gas and<br />
between 9.6 to 9.8% (low rate) and 10.4 to 10.6% (high rate) CO 2 for LP gas.<br />
To measure CO 2 levels in the Keston boiler remove the 1/8" plug from the flue outlet pipe<br />
spigot (Figure 6.7.4 item 7). Insert the probe of a combustion analysis meter and sample<br />
the gases as instructed in the test equipment's instructions.<br />
The C36 Combi is factory set for combustion and should need no adjustment. However,<br />
in the event adjustment is required, i.e. when fitting a replacement gas valve or other part<br />
of the combustion circuit, the following procedure must be followed.<br />
1) Set any controls to call for heat.<br />
2) Press and hold the “Summer” button until the display changes to “t99” then<br />
release the “Summer” button.<br />
3) Measure the CO 2 reading in the flue gases and adjust, if necessary, the<br />
adjustment screw (pos 4) to produce a CO 2 reading of 9.3% for natural gas and<br />
10.6% for LPG.<br />
4) Using the “-” button for CH temperature control, adjust the display to “t27”<br />
5) Measure the CO 2 reading in the flue gases and adjust, if necessary, the gas<br />
valve ratio adjustment screws (pos 6) found under the star socket dust cover, to<br />
provide a CO 2 reading of 8.6% for natural gas and 9.7% for LPG (CAUTION: This<br />
adjuster is VERY sensitive)<br />
6) Using the “+” button for CH temperature control, adjust the display back to “t99”<br />
and check the CO 2 level is within +/- 0.1 of the setting made in step 3.<br />
5.8 CHECKING THE GAS PRESSURE<br />
With the boiler running measure the burner pressure at the burner pressure test nipple.<br />
(pos. 5).<br />
<strong>Installation</strong> & <strong>Servicing</strong> <strong>Instructions</strong> Page : 23
WD388/0/2004<br />
Chapter 5 : Commissioning The Keston C36 Combi & C36P Combi Boilers<br />
NB:<br />
It is advisable to carry out this test with the<br />
user control knob turned to maximum<br />
and the system water cold to ensure<br />
the boiler is running at maximum rate.<br />
The gas setting is factory adjusted to within<br />
the required range and should not need<br />
adjustment. If the reading is incorrect then<br />
check such factors as soundness of the air<br />
and flue pipe joints and the gas inlet pressure<br />
(pos. 3) (minimum 18 mbar required for<br />
natural gas, minimum 31 mbar required for<br />
LP gas). If all joints are sound and the gas<br />
inlet pressure is satisfactory check the gas<br />
input by timing the gas meter as detail in<br />
Section 5.9 Timing The Gas Meter.<br />
5.9 TIMING THE GAS METER<br />
Set the boiler DHW temperature to 65C and open two hot taps in the property fully. With<br />
no other appliances using gas, time the gas meter to be certain that the unit is running at<br />
the proper gas input. Determine the cubic feet of gas passing through the meter and<br />
determine the input in Btu per hour. Input must be within plus or minus 5% of the rated<br />
input.<br />
Time, in seconds, the time taken to pass 2 cubic feet of gas through the meter (i.e. one<br />
revolution of a 2 cu ft dial) or 0.1 cubic metres if the meter is of the new metric digital type.<br />
Model Time for 2 cu ft Time for 0.1 cu m<br />
C36 Combi (natural gas) 54 96<br />
C36P Combi (LPG) 118 210<br />
If the meter timing is found to be incorrect when the boiler is firing at maximum rate<br />
contact Keston Boilers Ltd for further guidance.<br />
5.10 HANDING OVER TO THE USER<br />
It is important to fully explain the following:<br />
a. Procedure to light and turn off the boiler, including isolation of the electrical<br />
supply if necessary.<br />
b. The function of the lockout feature must be explained :<br />
If the display shows “E 01” this means that the boiler has failed to light. Press the<br />
“Reset” button and wait.<br />
i) If lockout recurs immediately then the gas supply should be checked as<br />
ON, otherwise consult a Service Engineer.<br />
ii)<br />
If it is not possible to relight, the boiler must be isolated and a Service<br />
Engineer called in to rectify the fault.<br />
c. Advise that a reduction in the water pressure reading on the system pressure<br />
gauge, for sealed systems, indicates a leak which should be rectified before<br />
further use.<br />
d. Advise that the appliance should be serviced by a competent person at least<br />
once a year.<br />
e. Advise on the frost protection and pump/fan exercise feature.<br />
f. Hand over <strong>User</strong> <strong>Instructions</strong>.<br />
Carefully read and complete all sections of the “Benchmark” <strong>Installation</strong>, Commissioning<br />
and Service Record Log Book that are relevant to the appliance installation. The details of<br />
the log book will be required in the event of any warranty work. The Log Book must be<br />
handed to the user for safe keeping and each subsequent regular service visit recorded.<br />
g. Hand over Benchmark Log Book<br />
h. Advise the user that a plume of water vapour (steam) from the flue terminal is<br />
normal and that there is no need for concern.<br />
<strong>Installation</strong> & <strong>Servicing</strong> <strong>Instructions</strong> Page : 24
WD388/0/2004 Chapter 6 : Fault Finding The Keston C36 & C36P Combi Boilers<br />
6. FAULT FINDING<br />
6.1 ELECTRICAL CONTROL SEQUENCE<br />
6.1.1 HEATING DEMAND<br />
When the external control(s) are calling for heat, power will be fed to the boiler<br />
connection strip at terminal SL (Switched Live) and N (Neutral) and the CH green light will<br />
illuminate. If the user control setting of the CH temperature is to a temperature above the<br />
actual boiler flow temperature and provided all safety sensors are confirmed as OK the<br />
control PCB will initiate the following sequence.<br />
(1) The fan will start.<br />
(2) When the fan reaches running speed, the control PCB will start the ignition<br />
sequence.<br />
(3) After a pre-purge period of about 5 seconds, the gas valve will open to allow gas<br />
to mix with the air at the suction side of the fan and the ignition spark will occur at<br />
the main burner.<br />
(4) When the burner ignites, the flame is detected by the control PCB through the<br />
combined flame sensor/ignitor and the ignition spark is stopped. A dot is<br />
illuminate in the lower right corner of the temperature display. The boiler is now in<br />
its normal run condition.<br />
(5) The boiler will automatically and continuously adjust its power output and pump<br />
speed to best match the demands of the system at any time.<br />
(6) The burner will continue to operate until the gas valve interrupts the gas supply.<br />
The gas valve will be closed by the control PCB if power is interrupted to the<br />
boiler by any external control or the boiler exceeds the requested temperature. If<br />
an interruption to the gas supply causes loss of the flame, the control box will<br />
pause for approximately 10 seconds and then attempt to re-ignite the unit. If this<br />
attempt fails, i.e. due to continued lack of gas supply, the boiler will make four<br />
further attempts to ignite at intervals of approximately 10 seconds and will then<br />
go to a lockout state (the display shows “E01”). Once the gas supply has been<br />
resumed the boiler can be reset by pressing the “Reset” button.<br />
(7) The boiler can also be shut down by the cabinet temperature sensor, water<br />
pressure sensor or flue overheat sensor.<br />
6.1.2 HOT WATER DEMAND<br />
When a hot tap is opened to allow flow of more than 2.5 litres per minute the DHW green<br />
light will illuminate. If the user control setting of the DHW temperature is to a temperature<br />
above the actual DHW temperature, and provided all safety sensors are confirmed as OK<br />
the control PCB will make the following sequence.<br />
(1) The fan will start (if not already running for a CH demand)<br />
(2) The diverter valve, integral to the boiler pump, will move to the DHW plate heat<br />
exchanger position.<br />
(3) As steps (2) to (7) above.<br />
Any failure of the boiler to sequence in the above manner should be investigated using<br />
the following trouble shooting flow diagram.<br />
Before attempting any electrical fault finding, always carry out preliminary electrical<br />
system checks. On completion of any service/fault finding task which has required the<br />
breaking and remaking of electrical connections, the checks, earth continuity, polarity,<br />
short circuit, resistance to earth must be repeated.<br />
<strong>Installation</strong> & <strong>Servicing</strong> <strong>Instructions</strong> Page : 25
WD388/0/2004 Chapter 6 : Fault Finding The Keston C36 & C36P Combi Boilers<br />
QUICK REFERENCE<br />
6.2 NORMAL OPERATION<br />
The C36 Combi and C36P Combi boilers feature<br />
a user display which shows actual flow<br />
temperature at all times when not serving a<br />
DHW demand. If a DHW demand is detected the<br />
boiler display changes to show the actual DHW<br />
temperature. However, the display can also be<br />
used to show other information about the<br />
operation of the boiler. By pressing the “Installer”<br />
button once the display changes to show the<br />
number 1. Each time the “Installer” button is<br />
pressed the number increases up to a maximum<br />
of 7. Having select the required number in this<br />
way the display, if not touched for a further 5 seconds the display changes again to show the<br />
value relative to that number. The table below shows the values associated with each number<br />
INSTALLER INFORMATION NUMBERS<br />
Display Meaning<br />
1 The flame current (in micro amps) detected from the burner (should be 5 when burner on. Low flame current readings suggest poor combustion<br />
and may lead to flame lockouts. Check gas supply, air supply and combustion<br />
setting.)<br />
2 Actual CH flow temperature (maximum 84C)<br />
3 Actual CH return temperature (maximum 72C) (NB Flow temperatures more than<br />
20C above return temperature may lead to overheat and noise problems. Check<br />
the pump performance and the system for blockages)<br />
4 Actual DHW temperature (maximum 69C)<br />
5 System water pressure, in bar. (Maximum 2.7 bar, minimum 0.5 bar. The boiler will<br />
shut down if the water pressure drops below 0.4 bar)<br />
6 Software version of boiler (not relevant to normal fault diagnosis)<br />
7 Actual flue temperature (of the flue temperature reaches 80C the boiler will drop to<br />
minimum rate until the flue temperature drops to 70C. If the flue temperature<br />
reaches 90C the boiler will shutdown.)<br />
8 DHW Flow rate. Divide this number by 6 to read the actual DHW flow rate through<br />
the boiler in litres per minute.<br />
You can return to the normal display mode at any time by pressing the “Reset” button once.<br />
During normal operation the green lamps beside the CH +/- buttons and DHW +/- buttons indicate<br />
the mode of operation. If the lamp is not lit then no demand for that function (ie CH or DHW) is<br />
present. In CH mode a demand is received by a 230V signal to SL or via the Keston Room<br />
Control unit. In DHW mode a demand is received by drawing >2.5 litres per second from a hot<br />
tap.<br />
If the lamp is lit the boiler is on, or is starting up, to serve the demand for that function. If the lamp<br />
is flashing the demand is still present but the burner is off because the unit exceeded the desired<br />
temperature and the forced anti-cycle (in CH mode) delay has not elapsed.<br />
6.3 FAULT MODES<br />
If a situation is detected which the boiler considers may cause damage to the appliance the boiler<br />
will enter a lockout mode and stop functioning. After clearing the problem the user must also<br />
press the “Reset” button once to resume boiler operation. TURNING THE POWER ON THEN<br />
OFF WILL NOT CLEAR A LOCKOUT SITUATION<br />
<strong>Installation</strong> & <strong>Servicing</strong> <strong>Instructions</strong> Page : 26
WD388/0/2004 Chapter 6 : Fault Finding The Keston C36 & C36P Combi Boilers<br />
ERROR CODES<br />
Display Description of fault<br />
E01 Ignition failure - the boiler has attempted to light five times and not succeeded -<br />
check gas supply, air supply, flue, ignitor condition and spark gap.<br />
E02 False flame - the unit is detecting a flame BEFORE ignition. Check gas valve<br />
closure, power supply polarity and voltage and earth connection.<br />
E03 Boiler overheat - check system for blockage, by-pass provision and pump<br />
operation<br />
E04 Fan failure - boiler cannot detect fan rotation. Check fan operation and BOTH<br />
connectors onto fan.<br />
E07 Flue overheat - check combustion and flue temperature vs. return temperature<br />
(Installer numbers 7 and 3 above). The flue temperature should be no more<br />
than 10C above return temperature. Possible heat exchanger fault<br />
E08 Flame circuit error - possible control box fault..<br />
E09 Valve drive error - possible gas valve or control box fault.<br />
E10 Control box errors - possible faulty control box.<br />
E11 The automatic test for calibration of flow and return sensors has failed. Check<br />
both flow and return sensors are located on the correct pipes and are producing<br />
the correct readings.<br />
E12 to E22 Control box errors - possible faulty control box.<br />
E23 Water filling error - check water pressure sensor.<br />
E24 Water pressure lost 4 times in 24 hours - possible leak, check system and<br />
boiler.<br />
E25 Control box errors - possible faulty control box.<br />
E26 Flame signal lost 5 times in 4 minutes - The flame is unstable, check<br />
combustion, gas supply, air supply and flue.<br />
E30 Flow sensor short circuit - check connections to flow sensor<br />
E31 Flow sensor open circuit - check connections to flow sensor are in place<br />
E32 DHW sensor short circuit - check connections to DHW sensor<br />
E33 DHW sensor open circuit - check connections to DHW sensor are in place<br />
E34 Mains supply voltage < 180V - Check mains voltage system in dwelling<br />
E35 Mains supply frequency incorrect - Check mains voltage system in dwelling<br />
E37 Water pressure error - check system pressure and pressure sensor<br />
E38 Reset key fault - replace fascia PCB<br />
E40 Water pressure too high - check expansion vessel charge and operation<br />
E41 Communication error between fascia and control box - check cables<br />
E43 Return sensor short circuit - check connections to return sensor<br />
E44 Return sensor open circuit - check connections to return sensor are in place<br />
E45 Flue sensor short circuit - check connections to flue sensor<br />
E46 Flue sensor open circuit - check connections to flue sensor are in place<br />
E99 As E41<br />
<strong>Installation</strong> & <strong>Servicing</strong> <strong>Instructions</strong> Page : 27
WD388/0/2004 Chapter 6 : Fault Finding The Keston C36 & C36P Combi Boilers<br />
6.4 FUNCTIONAL FLOW WIRING DIAGRAM<br />
<strong>Installation</strong> & <strong>Servicing</strong> <strong>Instructions</strong> Page : 28
WD388/0/2004 Chapter 6 : Fault Finding The Keston C36 & C36P Combi Boilers<br />
6.5 ELECTRICAL WIRING DIAGRAM<br />
<strong>Installation</strong> & <strong>Servicing</strong> <strong>Instructions</strong> Page : 29
WD388/0/2004 Chapter 6 : Fault Finding The Keston C36 & C36P Combi Boilers<br />
6.6 ILLUSTRATED WIRING DIAGRAM<br />
<strong>Installation</strong> & <strong>Servicing</strong> <strong>Instructions</strong> Page : 30
WD388/0/2004 Chapter 6 : Fault Finding The Keston C36 & C36P Combi Boilers<br />
6.7 Exploded Assembly Diagrams<br />
6.7.1 Boiler Controls Assembly<br />
<strong>Installation</strong> & <strong>Servicing</strong> <strong>Instructions</strong> Page : 31
WD388/0/2004 Chapter 6 : Fault Finding The Keston C36 & C36P Combi Boilers<br />
6.7.2 Waterway, Condensate & Flue Assembly<br />
58<br />
58<br />
56<br />
39<br />
57<br />
57-1<br />
57-4<br />
57-2<br />
57-3<br />
56<br />
<strong>Installation</strong> & <strong>Servicing</strong> <strong>Instructions</strong> Page : 32
WD388/0/2004 Chapter 6 : Fault Finding The Keston C36 & C36P Combi Boilers<br />
39<br />
57-1<br />
56<br />
57-4<br />
39<br />
56<br />
56<br />
57-3<br />
56<br />
57-2<br />
<strong>Installation</strong> & <strong>Servicing</strong> <strong>Instructions</strong> Page : 33
WD388/0/2004 Chapter 6 : Fault Finding The Keston C36 & C36P Combi Boilers<br />
6.7.3 Air - Gas Assembly<br />
<strong>Installation</strong> & <strong>Servicing</strong> <strong>Instructions</strong> Page : 34
WD388/0/2004 Chapter 6 : Fault Finding The Keston C36 & C36P Combi Boilers<br />
6.7.4 Casing Assembly<br />
<strong>Installation</strong> & <strong>Servicing</strong> <strong>Instructions</strong> Page : 35
WD388/0/2004 Chapter 6 : Fault Finding The Keston C36 & C36P Combi Boilers<br />
6.7.5 Exploded Diagrams Parts Reference List<br />
Boiler Controls Assembly (Fig. 6.7.1)<br />
GC Number Code Description<br />
135 Main Control Box (C.10C.4.01.00.0)<br />
138 Control Panel (C.10C.4.04.00.0)<br />
146 Terminal Block (B.34.4.00.07.0)<br />
E72-401 153 Thermal Fuse (C.08.4.21.00.0)<br />
136 Ignitor Cable (C.10C.4.02.00.0)<br />
Waterway, Condensate & Flue Assembly (Fig. 6.7.2)<br />
GC Number Code Description<br />
39 Heat Exchanger (C.10C.2.01.00.0)<br />
57 DHW Heat Exchanger (C.10C.2.09.00.0)<br />
58 Expansion Vessel (C.08.0.08.00.0)<br />
46 Burner (C.10C.2.04.00.0)<br />
161 Burner Head Gasket (C.10C.2.00.45.0)<br />
49 Ignitor Gasket (C.10C.2.00.52.0)<br />
48 Spark Electrode (C.10C.2.06.00.0)<br />
51 Condensate Trap (C.10C.2.07.00.0)<br />
67 Flow/Return Sensor (C.10C.2.23.00.0)<br />
68 Flue Sensor (C.10C.2.11.00.0)<br />
108 DHW Sensor (C.10C.2.16.00.0)<br />
112 Pressure Sensor (C.10C.2.17.00.0)<br />
94 Flow Sensor (C.10C.2.33.00.0)<br />
56 Hydroblock (C.10C.2.08.00.0)<br />
Air - Gas Assembly (Fig. 6.7.3)<br />
GC Number Code Description<br />
119 Combustion Blower (C.10C.3.01.00.1)<br />
126 Gas Valve (C.10C.3.03.00.0)<br />
124 Mixing Venturi (C.10C.3.02.00.0)<br />
Casing Assembly (Fig. 6.7.4)<br />
GC Number Code Description<br />
2 Cabinet Cover (C.10C.1.02.00.0)<br />
19 Databadge - NG (C.10C.1.00.06.0)<br />
19 Databadge - LPG (C.10C.1.00.06.1)<br />
E73-355 10 Combustion Test Plug (B.04.2.00.49.1)<br />
<strong>Installation</strong> & <strong>Servicing</strong> <strong>Instructions</strong> Page : 36
WD388/0/2004 Chapter 7 : <strong>Servicing</strong> The Keston C36 Combi & C36P Combi Boilers<br />
7. ROUTINE (ANNUAL) SERVICING<br />
To ensure the continued safe and efficient operation of the boiler it is necessary to carry out<br />
routine servicing at regular intervals. <strong>Servicing</strong> must be carried out at least once per year. The<br />
frequency of the servicing will depend upon the particular operating conditions.<br />
It is the law that any service work must be carried out by competent qualified persons.<br />
NB:<br />
When servicing ensure that the gas and electrical supplies to the boiler are isolated<br />
before any work starts.<br />
Hazardous materials are not used in the construction of the C36 and C36P Combi. However, due<br />
care should be taken when handling boiler components.<br />
All joints should be checked for soundness after servicing and before firing the appliance.<br />
After servicing complete the relevant section of the Benchmark <strong>Installation</strong>, Commissioning and<br />
Service Record Log Book. This should be in the possession of the <strong>User</strong> and should be left with<br />
the <strong>User</strong> afterwards.<br />
7.1 Pre-Service Checks<br />
It is recommended that an inspection should be carried out prior to shutting down the unit<br />
for servicing. Remove the front cover by removing the screws retaining the top and<br />
bottom. The following items should be observed:<br />
a. Smooth starting and running of the blower.<br />
b. Smooth lighting of the burner.<br />
c. Check for leakage of gas, gas/air or combustion products.<br />
d. Check for condensate leaks.<br />
e. Check for water soundness.<br />
f. Inspect the flue vent and air intake pipework. Joints must be sound and all<br />
pipework well bracketed.<br />
g. Check that there is a steady fall back to the boiler from the flue pipe to allow<br />
condensate to run back into the boiler.<br />
h. With the boiler operating at a low return temperature (i.e. less than 50 o C) check<br />
that the condensate flows freely from the condensate line.<br />
7.2 Recommended Routine Service<br />
a. Remove the outer case by first removing the securing screws at the top and<br />
bottom of the appliance.<br />
b. Remove the burner head (Section 8.6) and inspect the burner appearance. Black<br />
markings or other discoloration's on the gauze indicate too much gas or a lack of<br />
air possibly due to a blocked air inlet. Any breakage's or damage to the burner<br />
mesh indicate the burner must be replaced.<br />
c. If necessary clean the burner with a mild household detergent and rinse under a<br />
hot running tap.<br />
d. If necessary, from visual inspection, clean the heat exchanger using a suitable<br />
stiff plastic bristle brush, vacuum out any large particles and flush the heat<br />
exchanger with fresh water until the water flowing from the condensate drain is<br />
clear.<br />
e. Remove the condensate trap (Section 8.8) and clean by flushing through with<br />
clean running water.<br />
f. Check the electrode assembly mounted on the heat exchanger. If the point is<br />
damaged or burnt replace it.<br />
Check that the spark gap measures 4 mm.<br />
g. Replace the burner head, renewing the gasket, and reconnect the gas/air supply.<br />
Ensure the flanged gas/air supply joint is air tight.<br />
<strong>Installation</strong> & <strong>Servicing</strong> <strong>Instructions</strong> Page : 37
WD388/0/2004 Chapter 7 : <strong>Installation</strong> The Keston C36 Combi & C36P Combi Boilers<br />
h. Turn on the electrical supply to the boiler and allow the boiler to reach operating<br />
temperature levels.<br />
i. Remove the combustion test point plug from the flue pipe. This is situated on the<br />
flue spigot out of the cabinet.<br />
j. Using an approved combustion tester sample the flue products via the<br />
combustion test point. CO 2 levels of between 9.1% and 9.3%, for natural gas and<br />
between 10.2% and 10.4% for LP gas, should be observed. If such levels are not<br />
observed tune the combustion as described in Chapter 5 - Commissioning. Also<br />
check the gas flow as detailed in Sections 5.8 and 5.9<br />
k. Replace the combustion test point plug.<br />
l. Recheck the burner pressure by following the procedure detailed in Section 4.7.<br />
m. Check all joints for soundness up to the gas burner.<br />
n. Complete relevant box on back of Benchmark Log Book.<br />
<strong>Installation</strong> & <strong>Servicing</strong> <strong>Instructions</strong> Page : 38
WD388/0/2004 Chapter 8 : Replacement Of Parts The Keston C36 Combi & C36P Combi<br />
B il B il<br />
8. REPLACEMENT OF PARTS<br />
CONTENTS<br />
8.0 GENERAL<br />
8.1 PRECAUTIONS<br />
8.2 ACCESS<br />
8.3 REPLACEMENT PROCEDURE<br />
8.4 ELECTRICAL COMPONENTS<br />
8.4.1 CONTROL PANEL<br />
8.4.2 BOILER FLOW & RETURN THERMISTORS<br />
8.4.3 CABINET TEMPERATURE SENSOR<br />
8.4.4 FLUE THERMISTOR<br />
8.4.5 PRESSURE SENSOR<br />
8.4.6 MAIN CONTROL BOX<br />
8.4.7 COMBUSTION BLOWER<br />
8.4.8 GAS CONTROL VALVE<br />
8.4.9 GAS INJECTOR<br />
8.4.10 DHW THERMISTOR<br />
8.4.11 FLOW SENSOR<br />
8.5 SPARK IGNITION/FLAME DETECTION ELECTRODE<br />
8.6 BURNER<br />
8.7 HEAT EXCHANGER<br />
8.8 CONDENSATE TRAP<br />
8.9 HYDROBLOCK<br />
8.10 DHW HEAT EXCHANGER<br />
8.11 EXPANSION VESSEL<br />
8.0 GENERAL<br />
The following must always be carried out by a competent/qualified person.<br />
8.1 PRECAUTIONS<br />
i) Always switch off the mains electricity supply and disconnect the plug at the isolating<br />
switch and socket. (If a switch only is used then remove the fuse.)<br />
ii) Gain access to the appliance (Section 8.2) and turn off the gas supply at the<br />
appliance service cock.<br />
WARNING :<br />
Parts of the boiler internal wiring will remain live even after setting the<br />
<strong>User</strong> Controls to Standby. Shut off the power supply at the isolating<br />
switch before working on the appliance.<br />
8.2 ACCESS<br />
i) Remove the cabinet by removing the screws to the top and bottom of the cabinet.<br />
8.3 REPLACEMENT PROCEDURE<br />
i) Always replace in the reverse order unless otherwise stated.<br />
ii) Electrical connections must be remade in accordance with the Electrical Wiring<br />
Diagram (Section 6.5).<br />
iii) Test the soundness of any gas carrying or water carrying joint broken during the<br />
service procedures.<br />
8.4 ELECTRICAL COMPONENTS<br />
8.4.1 Control Panel (Fig. 6.7.1 item 138)<br />
i) Isolate the appliance (Section 8.1)<br />
ii) Gain access (Section 8.2)<br />
iii) Remove the user control cover by removing the four retaining screws (Fig<br />
6.7.1, item 99 and item 145).<br />
iv) Disconnect the Control Panel by unplugging the cable connectors.<br />
v) Reassemble (Section 8.3)<br />
vi) Check for correct operation of the Control Panel.<br />
<strong>Installation</strong> & <strong>Servicing</strong> <strong>Instructions</strong> Page : 39
WD388/0/2004 Chapter 8 : Replacement Of Parts The Keston C36 Combi & C36P Combi<br />
B il B il<br />
8.4.2 Boiler Flow and Return Thermistors (Fig. 6.7.2 - 2/3 item 67)<br />
i) Isolate the appliance (Section 8.1)<br />
ii) Gain access (Section 8.2)<br />
iii) Remove the push on connectors from the thermistor taking note of the<br />
correct positions.<br />
iv) Unclip the thermistor from the pipe.<br />
v) Reassemble (Section 8.3)<br />
NB:<br />
When fitting the new thermistor it is an advantage to smear a thin film<br />
of heat sink compound between the thermistor and pipe. This,<br />
combined with fitting the new thermistor tightly to the pipe, ensures a<br />
good contact.<br />
8.4.3 Cabinet Temperature Sensor (Fig 6.7.1 item 153)<br />
i) Isolate the appliance (Section 8.1)<br />
ii) Gain access (Section 8.2)<br />
iii)<br />
Remove the cabinet temperature sensor from the connector block by<br />
slackening the retaining screws.<br />
iv) Reassemble (Section 8.3)<br />
8.4.4 Flue Thermistor (Fig. 6.7.2 - 1/3 item 68)<br />
i) Isolate the appliance (Section 8.1)<br />
ii) Gain access (Section 8.2)<br />
iii) Remove the push on connectors from the thermistor taking note of the<br />
correct positions.<br />
iv) Unscrew the retaining nut, and remove the thermistor.<br />
v) Reassemble (Section 8.3)<br />
NB: When fitting the new thermistor it is an advantage to smear a thin film<br />
of heat sink compound between the thermistor and plate. This,<br />
combined with fitting the new thermistor tightly to the plate, ensures a<br />
good contact.<br />
8.4.5 Pressure Sensor (Fig. 6.7.2 - 2/3 item 112)<br />
i) Isolate the appliance (Section 8.1)<br />
ii) Shut off the water supply to the appliance.<br />
iii) Gain access (Section 8.2)<br />
iv)<br />
Drain the system to below the level of the appliance using the drain off tap<br />
(fig. 6.7.4 - 2/2 item 180) at the base of the return pipe from the heat<br />
exchanger.<br />
v) Remove the push on connectors from the pressure sensor taking note of the<br />
correct positions.<br />
vi) Unscrew the pressure sensor.<br />
vii) Reassemble (Section 8.3).<br />
NB: Use a little jointing compound or PTFE tape on the thread.<br />
viii) Refill the system (See Section 5 - Commissioning).<br />
8.4.6 Main Control Box (Fig. 6.7.1 item 135)<br />
i) Isolate the appliance (Section 8.1)<br />
ii) Gain access (Section 8.2)<br />
iii)<br />
iv)<br />
Pull off the multi-pin connectors and HT lead away from the board.<br />
Remove the retaining screw (fig. 6.7.1 item 152) securing the control block to<br />
the gas valve (fig. 6.7.3 item 126).<br />
v) Remove the control box.<br />
vi) Reassemble (Section 8.3)<br />
8.4.7 Combustion Blower (Fig. 6.7.3 item 119)<br />
i) Isolate the appliance (Section 8.1)<br />
ii) Gain access (Section 8.2)<br />
iii)<br />
iv)<br />
Disconnect the two connector blocks from the combustion blower.<br />
Unscrew the bolts securing the venturi (fig 6.7.3 item 125) to the inlet port of<br />
the combustion blower.<br />
v) Remove the four nuts securing the combustion blower (fig. 6.7.3 item 121)<br />
outlet flange to the burner and remove the combustion blower.<br />
vi) Reassemble (Section 8.3)<br />
<strong>Installation</strong> & <strong>Servicing</strong> <strong>Instructions</strong> Page : 40
WD388/0/2004 Chapter 8 : Replacement Of Parts The Keston C36 Combi & C36P Combi<br />
B il B il<br />
NB: When reassembling inspect any gaskets for damage and replace if<br />
necessary.<br />
8.4.8 Gas Control Valve (Fig. 6.7.3 item 126)<br />
i) Isolate the appliance (Section 8.1)<br />
ii) Gain access (Section 8.2)<br />
iii) Remove the push on connector block to the gas valve.<br />
iv) Undo the union fitting (Fig 6.7.3 item 104) securing the gas inlet pipe to the<br />
gas control valve.<br />
v) Undo the three bolts fixing the mixing venturi (fig 6.7.3 item 132) to the gas<br />
valve.<br />
vi) Remove the gas valve.<br />
vii) Unscrewing the union fitting from the gas valve.<br />
viii) Reassemble (Section 8.3)<br />
ix) Check the gas rate and combustion(See Section 5 - Commissioning)<br />
8.4.9 Gas Injector - C36P Combi only (Fig. 6.7.3 item 130)<br />
i) Isolate the appliance (Section 8.1)<br />
ii) Gain access (Section 8.2)<br />
iii)<br />
Undo the three bolts fixing the mixing venturi (fig 6.7.3 item 132) to the gas<br />
valve.<br />
iv) Remove the injector from the outlet port of the gas valve (fig 6.7.3 item 126)<br />
v) Insert the new injector<br />
vi) Reassemble (Section 8.3)<br />
vii)<br />
8.4.10 DHW Thermistor (Fig. 6.7.2 - 2/3 item 108)<br />
i) Isolate the appliance (Section 8.1)<br />
ii) Gain access (Section 8.2)<br />
Check the gas rate and combustion (See Section 5 - Commissioning)<br />
iii) Remove the push on connectors from the thermistor taking note of the<br />
correct positions.<br />
iv) Unclip the thermistor from the pipe.<br />
v) Reassemble (Section 8.3)<br />
NB: When fitting the new thermistor it is an advantage to smear a thin film<br />
of heat sink compound between the thermistor and pipe. This,<br />
combined with fitting the new thermistor tightly to the pipe, ensures a<br />
good contact.<br />
8.4.11 Flow Sensor (Fig. 6.7.2 - 3/3 item 94)<br />
i) Isolate the appliance (Section 8.1)<br />
ii) Gain access (Section 8.2)<br />
iii) Shut off the water supply (CWS) to the DHW heat exchanger (Fig. 6.7.2 -<br />
1/3 item 57).<br />
iv)<br />
Remove the push on connector from the sensor taking note of the correct<br />
position.<br />
v) Disconnect the union nuts (Fig. 6.7.2 - 3/3 item 100 and Fig. 6.7.4 - 2/2 item<br />
177) and the fixing nut (Fig. 6.7.2 - 3/3 item 203) from the sensor.<br />
vi) Reassemble (Section 8.3)<br />
NB:<br />
When reassembling inspect the gaskets for damage and replace<br />
if necessary.<br />
8.5 SPARK IGNITION/FLAME DETECTION ELECTRODE (Fig. 6.7.2 - 1/3 item 48)<br />
i) Isolate the appliance (Section 8.1)<br />
ii) Gain access (Section 8.2)<br />
iii)<br />
iv)<br />
Remove the pull off HT lead to the spark ignition electrode.<br />
Undo the screws to the spark ignition electrode flange located on the heat<br />
exchanger top panel and withdraw the spark ignition electrode.<br />
v) Reassemble (Section 8.3)<br />
NB:<br />
When reassembling inspect the gasket for damage and replace if necessary.<br />
With the new spark ignition electrode in place it is essential to ensure the gap<br />
between the tip of the electrode and the burner surface is 4 mm. Distances<br />
<strong>Installation</strong> & <strong>Servicing</strong> <strong>Instructions</strong> Page : 41
WD388/0/2004 Chapter 8 : Replacement Of Parts The Keston C36 Combi & C36P Combi<br />
B il B il<br />
above or below 4 mm will affect ignition performance. If necessary gently<br />
bend the electrode taking care not to damage the ceramic insulator.<br />
8.6 BURNER (Fig. 6.7.2 - 1/3 items 46)<br />
i) Isolate the appliance (Section 8.1)<br />
ii) Gain access (Section 8.2)<br />
iii) Remove the combustion blower (Section 8.4.7)<br />
iv) Remove the 4 nuts fixing the burner to the top of the heat exchanger.<br />
v) Withdraw the burner from the top of the heat exchanger.<br />
vi) Reassemble (Section 8.3)<br />
NB:<br />
When reassembling inspect any gaskets for damage and replace if<br />
necessary.<br />
8.7 HEAT EXCHANGER (Fig. 6.7.2 - 1/3 item 39)<br />
i) Isolate the appliance (Section 8.1)<br />
ii) Gain access (Section 8.2)<br />
iii) Shut off the water supply to the appliance.<br />
iv) Remove the burner (Section 8.6)<br />
v) Drain the system to below the level of the appliance using the drain off tap (Fig.<br />
6.7.4 - 2/2 item 180) at the base of the boiler return pipe.<br />
vi) Remove the flue thermistor (Section 8.4.4)<br />
vii) Remove the spark ignition/flame detection electrode (Section 8.5)<br />
viii) Remove the flue connection by slackening the retaining strap and pulling the flue off<br />
the heat exchanger spigot.<br />
ix) Remove the condensate trap hose (Fig 6.7.2 - 1/3 item 54) by releasing the retaining<br />
clamp and pulling the hose away from the spigot at the base of the heat exchanger.<br />
x) Disconnect the flow and return pipe union nuts (Fig 6.7.2 - 2/3 & Fig. 6.7.2 - 3/3 item<br />
60) from the heat exchanger.<br />
xi) Remove the two screws (Fig. 6.7.2 - 1/3 item 41) fixing the heat exchanger to the top<br />
and the screw (Fig. 6.7.2 - 1/3 item 42) fixing the heat exchanger to the bottom.<br />
xii) Remove the heat exchanger<br />
xiii) Reassemble (Section 8.3)<br />
xiv) Recommission (Section 5 - Commissioning)<br />
8.8 CONDENSATE TRAP (Fig. 6.7.2 - 1/3 item 51)<br />
i) Isolate the appliance (Section 8.1)<br />
ii) Gain access (Section 8.2)<br />
iii) Disconnect the condensate line from the base of the heat exchanger.<br />
iv) Disconnect the condense line from the projection of the condensate trap from the<br />
base of the cabinet.<br />
v) Withdraw the condensate trap.<br />
vi) Mop up any spilled condensate.<br />
vii) Reassemble (Section 8.3)<br />
NB:<br />
When re-fitting the condensate trap pour water onto the condensate hose<br />
from the base of the heat exchanger until nearly full. Then reconnect the<br />
condensate hose to the base of the heat exchanger.<br />
8.9 HYDROBLOCK PUMP (Fig. 6.7.2 - 1/3 item 56)<br />
i) Isolate the appliance (Section 8.1)<br />
ii) Gain Access (section 8.2)<br />
iii) Isolate the waterways to the boiler using the system isolation valves.<br />
iv) Drain the system to below the level of the appliance using the drain off tap (Fig.<br />
6.7.4 - 2/2 item 180) at the base of the boiler return pipe.<br />
v) Undo the screw (Fig. 6.7.1 item 145) to the panel support (Fig. 6.7.4 - 1/2 item 35)<br />
and rotate it on the right.<br />
vi) Disconnect the pump electrical cable from the connections box of the pump head<br />
taking note of the correct position.<br />
vii) Remove the four allen bolts securing the pump head to the hydroblock back body.<br />
viii) Remove the pump head.<br />
<strong>Installation</strong> & <strong>Servicing</strong> <strong>Instructions</strong> Page : 42
WD388/0/2004 Chapter 8 : Replacement Of Parts The Keston C36 Combi & C36P Combi<br />
B il B il<br />
ix) Reassemble (Section 8.3)<br />
8.10 DHW HEAT EXCHANGER (Fig. 6.7.2 - 1/3 item 57)<br />
i) Isolate the appliance (Section 8.1)<br />
ii) Gain Access (section 8.2)<br />
iii) Shut off the water supply (CWS) to the DHW heat exchanger.<br />
iv) Isolate the waterways to the pump using the system isolation valves.<br />
v) Drain the system to below the level of the appliance using the drain off tap (Fig.<br />
6.7.4 - 2/2 item 180) at the base of the boiler return pipe.<br />
vi) Disconnect the two union nuts from the DHW heat exchanger (Fig. 6.7.2 - 3/3<br />
item 86 & 100 and Fig. 6.7.2 - 2/3 item 86).<br />
vii) Remove the DHW heat exchanger.<br />
viii) Reassemble (Section 8.3)<br />
NB:<br />
When reassembling inspect the gaskets for damage and replace if<br />
necessary.<br />
8.11 EXPANSION VESSEL (Fig. 6.7.2 - 1/3 item 58)<br />
i) Isolate the appliance (Section 8.1)<br />
ii) Gain Access (section 8.2)<br />
iii) Isolate the waterways to the pump using the system isolation valves.<br />
iv) Drain the system to below the level of the appliance using the drain off tap (Fig.<br />
6.7.4 - 2/2 item 180) at the base of the boiler return pipe.<br />
v) Disconnect the flexible hose (Fig. 6.7.2 - 1/3 item 116) from the expansion vessel.<br />
vi) Undo the two screws (Fig. 6.7.4 - 1/2 item 4) from the cabinet frame.<br />
vii) Remove the expansion vessel.<br />
viii) Reassemble (Section 8.3)<br />
NB: When reassembling inspect the gasket for damage and replace if necessary.<br />
<strong>Installation</strong> & <strong>Servicing</strong> <strong>Instructions</strong> Page : 43
WD388/0/2004 Chapter 9 : Spare Parts Listings The Keston C36 & C36P Combi Boilers<br />
9. SHORT SPARE PARTS LIST<br />
Item GC No Part Denomination Item GC No PartDenomination<br />
46 Burner 161 Burner Gasket<br />
49 Ignitor Gasket 48 Ignitor/Sensor Probe<br />
67 Flow/Return 68 Flue Thermistor<br />
Thermistors<br />
108 DHW Thermistor<br />
94 Flow Sensor 112 Pressure Sensor<br />
<strong>Installation</strong> & <strong>Servicing</strong> <strong>Instructions</strong> Page : 44
WD388/0/2004 Chapter 9 : Spare Parts Listings The Keston C36 & C36P Combi Boilers<br />
126 Gas Valve 119 Fan<br />
124 Air-Gas Mixer 138 Fascia Panel<br />
135 Control Box 57 DHW Heat<br />
Exchanger<br />
56 Pump block 58 Expansion Vessel<br />
<strong>Installation</strong> & <strong>Servicing</strong> <strong>Instructions</strong> Page : 45
WD388/0/2004 Chapter 9 : Spare Parts Listings The Keston C36 & C36P Combi Boilers<br />
SHORT SPARE PARTS LIST FOR THE KESTON<br />
CONDENSING BOILER RANGE<br />
Item GC No Part Denomination<br />
46 Burner<br />
161 Burner Gasket<br />
48 Ignitor<br />
49 Ignitor Gasket<br />
108 DHW Thermistor<br />
67 Flow/Return Thermistor<br />
68 Flue Thermistor<br />
94 Flow Sensor<br />
112 Pressure Sensor<br />
119 Fan<br />
126 Gas Valve<br />
124 Air-Gas Mixer<br />
138 Control Panel<br />
135 Control Block<br />
57 DHW Heat Exchanger<br />
56 Hydroblock<br />
58 Expansion Vessel<br />
<strong>Installation</strong> & <strong>Servicing</strong> <strong>Instructions</strong> Page : 46
KESTON CONDENSING BOILERS<br />
IMPORTANT<br />
C36 and C36P Combi<br />
INSTALLATION KEY POINTS<br />
† Read <strong>Installation</strong> Manual Carefully<br />
† Ensure that ALL dust particles, filings , plastic chips etc. are<br />
removed from the inlet pipe.<br />
† If the installation is a replacement the system must be flushed<br />
clean. System should be drained hot, then refilled, then drained<br />
again until the water is clean.<br />
† Ensure that there is a proper electrical supply i.e. 230V fused at<br />
3A for the permanent live.<br />
† Take great care with pipe connections to ensure that no damage<br />
is done to the internal pipework.<br />
† Ensure that the 22mm condensate pipe is not exposed to<br />
freezing conditions.<br />
† Make sure that the exhaust pipe terminates away from windows<br />
or vents and is out of reach.<br />
† Make sure that the air inlet and exhaust pipe outlets are at least<br />
200mm apart.<br />
† Check tightness of all connections in the boiler before firing.<br />
† Ensure that the terminals supplied are fitted to both the exhaust<br />
and air inlet pipes.<br />
† The system must be free from air before firing.<br />
† If TRV's are installed on radiators ensure that a bypass is<br />
installed to maintain required flow.<br />
† Complete the appropriate sections of the Benchmark<br />
<strong>Installation</strong>, Commissioning and Service Record Log Book.<br />
Hand over log book to customer.<br />
WD400/0/2004