Chrysanthemum Pillow - Bernina
Chrysanthemum Pillow - Bernina
Chrysanthemum Pillow - Bernina

You also want an ePaper? Increase the reach of your titles
YUMPU automatically turns print PDFs into web optimized ePapers that Google loves.
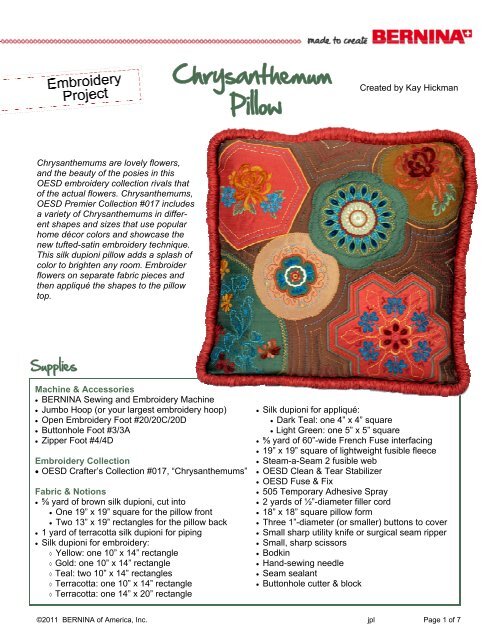
<strong>Chrysanthemum</strong><br />
<strong>Pillow</strong><br />
Created by Kay Hickman<br />
<strong>Chrysanthemum</strong>s are lovely flowers,<br />
and the beauty of the posies in this<br />
OESD embroidery collection rivals that<br />
of the actual flowers. <strong>Chrysanthemum</strong>s,<br />
OESD Premier Collection #017 includes<br />
a variety of <strong>Chrysanthemum</strong>s in different<br />
shapes and sizes that use popular<br />
home décor colors and showcase the<br />
new tufted-satin embroidery technique.<br />
This silk dupioni pillow adds a splash of<br />
color to brighten any room. Embroider<br />
flowers on separate fabric pieces and<br />
then appliqué the shapes to the pillow<br />
top.<br />
Supplies<br />
Machine & Accessories<br />
BERNINA Sewing and Embroidery Machine<br />
Jumbo Hoop (or your largest embroidery hoop)<br />
Open Embroidery Foot #20/20C/20D<br />
Buttonhole Foot #3/3A<br />
Zipper Foot #4/4D<br />
Embroidery Collection<br />
OESD Crafter’s Collection #017, “<strong>Chrysanthemum</strong>s”<br />
Fabric & Notions<br />
⅝ yard of brown silk dupioni, cut into<br />
One 19” x 19” square for the pillow front<br />
Two 13” x 19” rectangles for the pillow back<br />
1 yard of terracotta silk dupioni for piping<br />
Silk dupioni for embroidery:<br />
Yellow: one 10” x 14” rectangle<br />
Gold: one 10” x 14” rectangle<br />
Teal: two 10” x 14” rectangles<br />
Terracotta: one 10” x 14” rectangle<br />
Terracotta: one 14” x 20” rectangle<br />
Silk dupioni for appliqué:<br />
Dark Teal: one 4” x 4” square<br />
Light Green: one 5” x 5” square<br />
⅝ yard of 60”-wide French Fuse interfacing<br />
19” x 19” square of lightweight fusible fleece<br />
Steam-a-Seam 2 fusible web<br />
OESD Clean & Tear Stabilizer<br />
OESD Fuse & Fix<br />
505 Temporary Adhesive Spray<br />
2 yards of ½”-diameter filler cord<br />
18” x 18” square pillow form<br />
Three 1”-diameter (or smaller) buttons to cover<br />
Small sharp utility knife or surgical seam ripper<br />
Small, sharp scissors<br />
Bodkin<br />
Hand-sewing needle<br />
Seam sealant<br />
Buttonhole cutter & block<br />
©2011 BERNINA of America, Inc. jpl Page 1 of 7
General Embroidery Instructions<br />
Note The specific designs and fabric colors, as<br />
well as any changes made to the designs, are<br />
listed after the general embroidery instructions.<br />
Cut two pieces of Ultra Clean & Tear large<br />
enough to be hooped in the embroidery hoop.<br />
Bond them together using 505 Temporary<br />
Adhesive Spray.<br />
Spray the top of the stabilizer layers with additional<br />
505 and adhere them to the wrong side<br />
of the fabric to be embroidered. Hoop the three<br />
layers as one unit.<br />
Attach the hoop to the machine and embroider<br />
the design.<br />
If the design has an appliqué element<br />
A placement<br />
line<br />
will be<br />
stitched.<br />
Prepare the<br />
appliqué<br />
fabric by<br />
adhering<br />
OESD Fuse<br />
& Fix to the<br />
wrong side of the fabric.<br />
Print the appliqué pattern piece provided on<br />
the printed thread chart (also found in PDF<br />
format on the design collection CD or USB<br />
stick) for the chosen design.<br />
Place the pattern right side up over the right<br />
side of the fabric; cut out the shape.<br />
Tip: Mark the<br />
top edge of<br />
the design<br />
with a pin or<br />
a mark of<br />
some kind.<br />
Remove the<br />
paper backing<br />
to expose<br />
the adhesive<br />
surface.<br />
Carefully<br />
position the<br />
appliqué<br />
shape inside<br />
the stitched<br />
placement<br />
line.<br />
Stitch the<br />
next color,<br />
the tack<br />
down stitch.<br />
Continue stitching until the design is complete.<br />
Remove the hoop from the machine and the<br />
fabric from the hoop. Gently tear away the excess<br />
stabilizer from the back of the embroidery, one<br />
layer at a time.<br />
Place the fabric over a fluffy towel, wrong side<br />
up, and press with steam. Allow the fabric to cool<br />
before moving it.<br />
Cut a piece of fusible web larger than the shape<br />
to be cut (refer to the instructions below for specific<br />
shape sizes) and adhere it to the back of the<br />
embroidered design following the manufacturer’s<br />
recommendations.<br />
Cut the fabric into the chosen shape. See pages<br />
3-5 for the exact shapes to cut for the pillow<br />
shown in the photos.<br />
©2011 BERNINA of America, Inc. jpl Page 2 of 7
Cut Satin Technique Instructions<br />
Locate the cut satin guide sheet at the end of<br />
the printed thread chart which accompanies the<br />
embroidery collection. This can also be found as<br />
a PDF file on the embroidery CD or USB stick.<br />
Find the design<br />
that you are<br />
working with<br />
and note that<br />
some areas are<br />
shown in black.<br />
These — and<br />
only these —<br />
are the areas<br />
to be cut.<br />
Place the<br />
design on a<br />
flat surface and<br />
very carefully<br />
cut down the<br />
middle of the<br />
satin stitches<br />
shown in black<br />
using a sharp<br />
utility knife or<br />
surgical seam ripper. It is best to make shallow<br />
cuts and gradually deepen the cut. Take care to<br />
cut only the threads, not the fabric.<br />
Fluff the cut stitches with your fingernail. To<br />
increase the fluffiness, spray your finger with<br />
water and fluff the stitches.<br />
Specific Embroidery and<br />
Cutting Instructions<br />
Before beginning, assemble the pillow front—<br />
fabric, interfacing, and fleece—following the instructions<br />
on page 5.<br />
After adhering the fusible web to the wrong side<br />
of the embroidered fabric pieces, you will cut<br />
the embroidered fabrics into shapes to be fused<br />
to the pillow top. Use the templates that are provided<br />
with the collection to help ensure cutting accuracy.<br />
Select the desired design from the printed template.<br />
You may wish to make a copy of the template<br />
and preserve the original for future use.<br />
Draw the desired<br />
shape around<br />
the design.<br />
Use a very small<br />
pair of scissors<br />
or a small sharp<br />
utility knife to<br />
carefully cut<br />
out a key area<br />
of the design.<br />
Place the printout<br />
over the<br />
fabric and cut<br />
out the shape<br />
following the<br />
marked line.<br />
©2011 BERNINA of America, Inc. jpl Page 3 of 7
BO01727 (lower middle)<br />
Embroider the<br />
design on the<br />
10” x 14”<br />
rectangle of<br />
yellow silk,<br />
using a 4” x 4”<br />
square of teal<br />
dupioni for the<br />
appliqué.<br />
When the embroidery is complete, center and<br />
fuse a 7½” square of fusible web to the back of<br />
the embroidered piece.<br />
Centering the stitched design, cut a 5½”-<br />
diameter circle from the fabric piece.<br />
Appliqué the<br />
circle to the<br />
pillow front<br />
using a blanket<br />
stitch and<br />
Open Embroidery<br />
Foot<br />
#20/20C/20D.<br />
BO01727 (upper right)<br />
Mirror-image the design and embroider it on the<br />
10” x 14” rectangle of gold silk.<br />
When the embroidery is complete, center and<br />
fuse a 9” square of fusible web to the back of<br />
the embroidered piece.<br />
Centering the stitched design, cut a 7”-diameter<br />
circle from the fabric piece.<br />
Appliqué the<br />
circle to the<br />
pillow front<br />
(upper right)<br />
using a fancy<br />
cross-stitch<br />
(artista #308)<br />
and Open<br />
Embroidery Foot<br />
#20/20C/20D.<br />
BO01725 (upper middle)<br />
Embroider the design on the 10” x 14” rectangle<br />
of teal silk, using a 5” x 5” square of light green<br />
dupioni for the appliqué.<br />
When the embroidery is complete, center and<br />
fuse a 8½” square of fusible web to the back of<br />
the embroidered piece.<br />
Centering the<br />
stitched design,<br />
cut out a 6½”-<br />
diameter circle,<br />
then create six<br />
scallops with a<br />
depth of ½”.<br />
Tip: Use a circular ruler,<br />
such as the Brooklyn<br />
Revolver, to divide the<br />
circle into six equal<br />
wedges (60° each),<br />
drawing lines to mark<br />
each section. Place a<br />
mark ½” from the end of<br />
each line, and mark the<br />
center of each wedge’s<br />
outer edge. Use these marks as guides for cutting<br />
the scallops.<br />
Appliqué the circle to the pillow front (upper middle)<br />
using a blanket stitch and Open Embroidery<br />
Foot #20/20C/20D.<br />
Visit<br />
www.berninausa.com<br />
Projects<br />
Webinars<br />
Promotions<br />
Echo-satin-stitch ¼” away from the outer edge<br />
of the cross-stitching.<br />
©2011 BERNINA of America, Inc. jpl Page 4 of 7
BO01704 (upper left)<br />
Embroider the design on the 10” x 14” rectangle<br />
of terracotta silk, changing color #1921 to<br />
#4111, and color #2022 to #4116.<br />
When the embroidery is complete, center and<br />
fuse a 9½” square of fusible web to the back of<br />
the embroidered piece.<br />
Centering the stitched design, cut out a 7½”-<br />
diameter seven-sided polygon.<br />
Tip: Draw a 7½”-diameter circle, then use a circle<br />
ruler, such as the Brooklyn Revolver, to divide it<br />
into seven sections. If you do not have a circular<br />
ruler, divide the circle into seven 51.5° wedges<br />
using a protractor.<br />
Appliqué the<br />
circle to the<br />
pillow front<br />
(upper left)<br />
using a satin<br />
stitch and<br />
Open Embroidery<br />
Foot<br />
#20/20C/20D.<br />
Echo-stitch two lines of triple straight stitch ¼”<br />
inside the satin stitching.<br />
BO01731 (lower right)<br />
Embroider the design on the 14” x 20” rectangle<br />
of terracotta silk. Note: This 8” x 7¾” design and<br />
requires use of the BERNINA 830’s Jumbo<br />
Hoop. If you do not have a Jumbo Hoop, reduce<br />
the size of the design to fit into your largest<br />
hoop, or split the design using the multi-hooping<br />
feature of BERNINA Embroidery Software 6.<br />
When the embroidery is complete, center and<br />
fuse a 10” square of fusible web to the back.<br />
Trim fabric ¼”<br />
away from the<br />
outermost line<br />
of embroidered<br />
satin stitch.<br />
Use a satin<br />
stitch to attach<br />
the fabric to<br />
the pillow top.<br />
BO01729, 1708, & 1707 (lower left, set of three)<br />
Using the onscreen editing<br />
features of your embroidery<br />
machine, or<br />
BERNINA Embroidery<br />
Software 6, position the<br />
three flowers and group<br />
them together.<br />
BC017729—<br />
no change<br />
BC01708—rotate 90°<br />
clockwise and move<br />
to the lower right<br />
CBC01707—move<br />
down<br />
The combined design will be about 5½” x 8½”.<br />
Embroider the flower group on the 10” x 14”<br />
rectangle of teal silk.<br />
When the embroidery is complete, center and<br />
fuse a 8” x 12” rectangle of fusible web on the<br />
back of the embroidered piece.<br />
Using a circular ruler,<br />
cut a pleasing shape<br />
at the top and upper<br />
right of the design.<br />
Do not cut the left or<br />
lower edges at this<br />
time. Trim them after<br />
this piece has been<br />
appliquéd to the pillow<br />
top.<br />
Appliqué the circle<br />
to the pillow front with<br />
a blanket stitch and<br />
Open Embroidery<br />
Foot #20/20C/20D.<br />
Triple straight stitch<br />
along the inner edge<br />
of the blanket stitch.<br />
Sew a triple zigzag<br />
stitch along the edge<br />
of the triple straight<br />
stitch.<br />
©2011 BERNINA of America, Inc. jpl Page 5 of 7
<strong>Pillow</strong> Front Construction Directions<br />
<strong>Pillow</strong> Top<br />
Adhere French Fuse interfacing to the back of the<br />
pillow front following the manufacturer’s recommendations.<br />
Adhere lightweight fusible fleece to the back of<br />
the French Fuse.<br />
Embroider the fabrics as directed on pages 2-5.<br />
Position the cut out shapes on the pillow and appliqué<br />
the edges to the pillow using the stitches<br />
noted with the embroidery instructions.<br />
Echo-stitch<br />
between and<br />
around the<br />
shapes using<br />
a triple zigzag<br />
stitch or triple<br />
straight stitch,<br />
spacing rows<br />
approximately<br />
¼” apart.<br />
Cording<br />
Cut the 1 yard piece of terracotta silk dupioni into<br />
3¼”-wide strips until there are enough to make an<br />
8 yard strip. Stitch the short ends of the strips together<br />
with diagonal seams to form one long continuous<br />
strip. Press the seam allowances open.<br />
Fold the strip in half lengthwise, wrong sides together,<br />
and stitch ½” from the raw edges.<br />
Insert the 2 yard<br />
length of cording<br />
into the tube<br />
using a bodkin.<br />
Evenly distribute<br />
gathers along<br />
the cording.<br />
Pull the gathers back from each end of the<br />
cording and pin the fabric strip to the cording.<br />
Align the raw edges<br />
of the cording fabric<br />
with the raw edges<br />
of the pillow. Pin<br />
them together,<br />
starting in the middle<br />
of the bottom edge<br />
of the pillow. As<br />
you approach the<br />
corners, curve the<br />
cording and<br />
“scrunch” a bit of<br />
extra piping into<br />
the curve.<br />
When you reach<br />
the beginning,<br />
pull the gathers<br />
back and cut the<br />
cord (if needed)<br />
so that it abuts<br />
the beginning<br />
end. Handwhipstitch<br />
the<br />
ends of the<br />
cording together.<br />
Tuck the cut<br />
edges of the<br />
short ends of<br />
the fabric to the<br />
wrong side and<br />
slide them along<br />
the cording so<br />
the ends meet.<br />
Hand-stitch the<br />
ends together if<br />
desired.<br />
Attach the<br />
zipper foot to<br />
the machine<br />
and stitch the<br />
piping to the<br />
pillow with a ½”<br />
seam allowance.<br />
Flatten the<br />
gathers in front<br />
of the presser<br />
foot as you stitch.<br />
©2011 BERNINA of America, Inc. jpl Page 6 of 7
Trim away the<br />
pillow top fabric<br />
at the corners to<br />
match the curve<br />
of the cording.<br />
Press the seam<br />
allowances flat.<br />
<strong>Pillow</strong> Back<br />
Cover three 1”-diameter covered buttons with<br />
scraps of the terracotta silk dupioni.<br />
Adhere French Fuse<br />
interfacing to the<br />
wrong side of the two<br />
13” x 19” pillow back<br />
rectangles following<br />
the manufacturer’s<br />
recommendations.<br />
On each rectangle,<br />
turn one 19” edge to<br />
the wrong side ¼”<br />
and edgestitch.<br />
Fold each edge<br />
again, this time 1½”<br />
to the wrong side,<br />
and press.<br />
On one back piece,<br />
stitch three buttonholes<br />
¾” from and<br />
parallel to the folded<br />
edge. Adjust the<br />
length to accommodate<br />
the covered<br />
buttons. Position<br />
one in the middle<br />
and the others 2”<br />
from the cut edges.<br />
Run a bead of seam sealant inside the buttonhole<br />
slit; allow the fabric to dry. Cut the buttonhole<br />
open with a buttonhole cutter and block.<br />
Final Steps<br />
With right sides together, pin the back piece with<br />
the buttonholes to the upper edge of the pillow<br />
front, aligning the raw edges of the pillow top with<br />
the 19” raw edge of the pillow back. The fold will<br />
be toward the<br />
center of the pillow.<br />
Temporarily<br />
pin in place,<br />
placing the pins<br />
perpendicular to<br />
the pillow edges<br />
for easy removal<br />
(the pillow will<br />
be stitched with<br />
the pillow top<br />
on top).<br />
Align the 19”<br />
cut edge of the<br />
other back piece<br />
to the lower half<br />
of the pillow top<br />
and temporarily<br />
pin in place.<br />
Flip the pillow<br />
over and stitch<br />
just slightly to<br />
the inside of the<br />
previous stitching<br />
on all four<br />
sides of the<br />
pillow.<br />
Trim the seam allowances and notch the curves<br />
on the corners to reduce bulk.<br />
Turn the pillow<br />
cover right side<br />
out through the<br />
back opening.<br />
Sew a button in<br />
place for each<br />
buttonhole.<br />
Insert the pillow<br />
form into the<br />
pillow cover.<br />
©2011 BERNINA of America, Inc. jpl Page 7 of 7